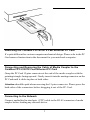
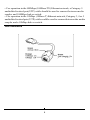
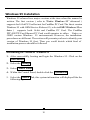
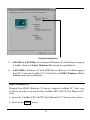
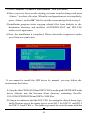
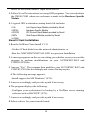
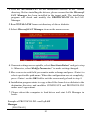
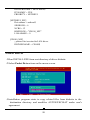
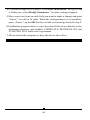
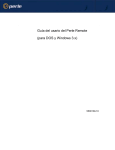
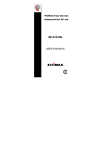
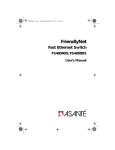
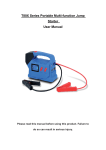
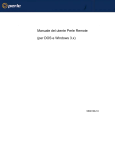
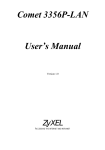
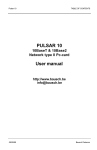
1
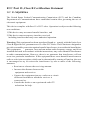
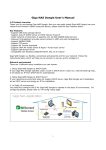
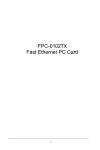
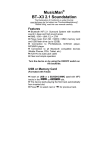
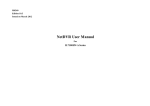
FPC-0103TX
Fast Ethernet PC Card
CONTENTS
CONTENTS...................................................................................................1
INTRODUCTION TO CARDBUS.............................................................4
HARDWARE INSTALLATION ................................................................6
SOFTWARE INSTALLATION .................................................................9
Windows 95 Installation ...........................................................................10
Windows NT 4.0 Installation....................................................................15
Windows NT 3.5x Installation..................................................................16
DOS Mode Installation .............................................................................17
Novell Netware.............................................................................................. 17
MS LAN Manager......................................................................................... 20
Packet Driver ................................................................................................. 22
Windows for Workgroups 3.11 .................................................................... 23
Artisoft Lantastic 6.0 Installation.................................................................. 23
QUESTIONS & ANSWERS.....................................................................25
SPECIFICATIONS.....................................................................................27
1
About This Manual
This manual will explain how to install and use your CardBus FPC-0103TX Fast
Ethernet PC Card. The following guideline will help you through the installation
process.
Chatper 1 presents you the basic information about the CardBus technology. It
also provide some methods to ensure your notebook are CardBus equipped and
correctly configured.
After you already make sure your mobile computer is ready to run the CardBus
FPC-0103TX Fast Ethernet PC Card. You can go on the Chapter 2 to know how to
install the PC Card and Connect it to network.
The CardBus FPC-0103TX Fast Ethernet PC Card provides wide range of drivers
software to meet your need. You can pick up the section within Chapter 3 to
install and configure the network driver.
The Questions and Answers listed in the Chapter 4 give you some solutions
when you encouter problem during installation the network drivrers.
Finally you can find the detail specification of this innovative product in the
Appendix A.
System Requirement
•
•
•
•
An IBM compatible notebook computer with 486 or faster processor with
CardBus supported socket.
Drivers and utilities provided with this product
PCMCIA PC Card compliant Card Services and Socket Services
100Base-TX Fast Ethernet or 10BaseT Ethernet connectivity to your local
area network.
Operating Environments
•
•
Windows 95, Windows 95 OSR2, Windows 98
Novell Netware 3.x, 4.x
2
•
•
•
•
•
•
Microsoft Windows NT 3.51, NT 4.0
Microsoft LAN Manager
Packet Driver Applications
Microsoft Windows for Workgroups 3.11
Microsoft Windows 3.1
Lantastic 6.0
Contents in the Package
•
•
•
•
•
FPC-0103TX Fast Ethernet PC Card
Media coupler with single RJ-45 connector for 10BASE-T and 100BASE-TX
network.
3.5” driver diskette
User’s Manual
Plastic protection case for base PC Card
3
INTRODUCTION TO CARDBUS
Cardbus is the next generation 32-bit version issued by PCMCIA PC Card
standard.In addition to support a wider bus (32 bits instead of 16 bits), CardBus
also supports bus mastering and operation speeds up to 33 MHz. The
132MBytes bus tranfer rate ( compares with legacy 16-bit I/0 PC Card ,20MByte)
provides the mobil user to enjoy the high-bandwith network connection.
A mobil computer which equipped with CardBus and properly configured is the
fundamental require-ment to use the CardBus FPC-0103TX Fast Ethernet
PC Card. to make sure about this point, please follow the guideline listed below:
?
Cardbus is designed to support both 16-bit and Cardbus Card. But the legacy
16-bit PC Card slot couldn't accept the CardBus FPC-0103TX Fast
Ethernet PC Card. In oder to prevent the wrong operation, CardBus is
devoloped with particular machanical consideration to prevent it fit into the
legacy 16-bit PC Card Slot. If you can't insert the CardBus FPC-0103TX Fast
Ethernet PC Card into the slot firmly reaching the bottom, your notebook
probably hasn’t the capability to support CardBus techno-logy. Please check
your notebook manual for detail information.
4
?
Due to variant design of notebook computers , some models implement a
setting in the Computer ‘s BIOS to switch between Cardbus and 16-bit PC
Card modes. You could consult the User’s Guide of your notebook and
properly set on the CardBus or Auto_Detect mode.
5
HARDWARE INSTALLATION
This chapter describes how to install the CardBus FPC-0103TX Fast Ethernet PC
Card in your notebook computer and connect it to network. It’s referred to “the
PC Card” in this manual.
The PC Card could be connected to either 100Mbps Fast Ethernet or 10Mbps
Ethernet over unshielded twisted pair (UTP) calbe. The PC Card have the ability
of automatic sensing and operating on either speed without manual
recofiguration.
After finishing the installation of PC Card into your Notebook, please refer to
Chapter.3 Software Installation on how to install network drivers using menu
driven installation utility.
Inserting the CardBus Dual-Speed PC Card
1.Hold the CardBus FPC-0103TX Fast Ethernet PC Card with wide connector
toward the slot and the brand lable facing upward.
2.Insert the CardBus FPC-0103TX Fast Ethernet PC Card and push it firmly into
the bottom.
( Please see the figuer on the next page for reference)
6
Removing the CardBus FPC-0103TX Fast Ethernet PC Card
It’s quite different for various computer mechanical design. Please refer to the PC
Card removal instruction in the document for your notebook computer.
Connecting and Removing the Cable of Media Coupler to the
CardBus FPC-0103TX Fast Ethernet PC Card
Grasp the PC Card 15-pins connector at the end of the media coupler with the
pointing triangle facing upward. Gently insert it into the mating connector on the
PC Card until it clicks in place at both sides.
Attention should be paid when removing the 15-pins connector. Please press the
both sides of the connectors before dragging it out of the PC Card.
Connecting to the Network
Connect unshielded twisted pair (UTP) cable to the RJ-45 connector of media
coupler before loading any network driver.
7
For operation in the100Mbps (100Base-TX) Ethernet network, a Category 5
unshielded twisted pair(UTP) cable should be used to connect between media
coupler and 100Mbps hub or switch.
l For operation in the 10Mbps (10Base-T) Ethernet network, Category 3, 4 or 5
unshielded twisted pair (UTP) cable could be used to connect between the media
coupler and a 10Mbps hub or switch.
l
LED Indicators
8
SOFTWARE INSTALLATION
Extensive software drivers have been developped for CardBus 10/100Mbps
Fast Ethernet PC Card including DOS-Mode, Microsoft Windows 3.x,
Windows 95, Windows NT. Some of the Operating Systems and PC
Card/Socket Services haven’t been well implemented to support new
CardBus technology at the present time. Our unique drivers and utility enable
the CardBus FPC-0103TX Fast Ethernet PC Card to run almost all the major
environments.
This Chapter consists four main parts: Windows 95, Windows NT 4.0,
Windows NT 3.5x and various configuration in DOS-mode. The user could
refer to specific section for installation.
9
Windows 95 Installation
Windows 95 released two major versions at the time when this manual is
written. The first version ( refer to “Native Windows 95” afterward )
supports for 16-bit PC Card but not for CardBus PC Card. The latest version
Windows 95 with OEM Service Release #2 ( refer to OSR2 Windows 95 or
later ) supports both 16-bit and CardBus PC Card. The CardBus
FPC-0103TX Fast Ethernet PC Card could operates in either Native or
OSR2 version Windows 95 environments. However, the installation
procedures are different. The section will presents you how to identify your
version of Windows 95 first. Then you could decide which kind of
installation process should be followed:
Determining the Version of Windows 95
1. After successfully booting and login the Windows 95. Click on the
Start Button.
2. Select the Settings.
3. Select Control Panel.
4. Within the Control Panel, double-click the System icon.
5. Select the General Tab, this system information will displayed like the
following figure.
10
Version Information here!
Ø
4.00.950 or 4.00.950a is first released Windows 95 which don’t support
CardBus. Refer to Native Windows 95 section for installation.
Ø
4.00.950B is Windows 95 with OEM Service Release #2 which support
both PC Card and CardBus PC Card. Refer to OSR2 Windows 95 or
Later section for installation.
Native Windows 95
Though Non-OSR2 Windows 95 doesn’t support CardBus PC Card, you
could use our driver to run the the CardBus FPC-0103TX Fast Ethernet PC
Card.
1. Insert the CardBus FPC-0103TX Fast Ethernet PC Card into the socket.
2. Click on the Start button.
11
3. Select Setting
4. Select Control Panel.
And the Control Panel show up.
5. Double-click the Network icon.
And the Network Menu prompt up.
6. Click the Add button.
And Select Network Components Type
Menu shows.
7. Double-click the Adapter.
The Select Network Adapters Menu opens.
8. Click the Have Disk button.
The Install From Disk Menu shows.
9. Insert the Drive Disk.
10. Give A:\ in the input box. Click OK.
( Or type the path name whereever you place
the driver programs)
11. Select the “CardBus Fast Ethernet 10/100 Adapter manual load”
12
12. Click OK
A dialog box will appear to adjust the driver's settings. The resources
assignment to adapter should be uniqe in the system.
13. The Newwork window reopens.
14. Click OK
15. Insert your original Windows 95 CD or disk set. Input the drive which
contain the source. Click OK
16. After the copy file process is complete, the system will promt you to
restart the Computer.
17. For the first time installation, you need to go to the Network in the
Control Panel to setup the protocols, clients and services properly
according to your need.
Note: If you start the computer without the CardBus FPC-0103TX Fast
Ethernet PC Card installed in the socket, the native Windows 95 system
will prompt you the warning message “Your Network Adapter
CardBus Fast Ethernet 10/100 Adapter manual load”[0001] is not
working properly. You may need to set it up again. For more
information see the network troubleshutter in the windows Help”.
If you don’t need to use the CardBus FPC-0103TX Fast Ethernet PC Card
at this time, you can just ignore the message. Otherwise, you need to
insert the CardBus FPC-0103TX Fast Ethernet PC Card into the CardBus
socket and just restart the native Windows 95 again to make the Card
working functionally.
OSR2 Windows 95 and Later
Windows 95 OSR2 and later versions support both CardBus and 16-bit PC
Card. That is, you could run the 16-bit PC Card and CardBus 10/100M
Ethernet PC Card simultaneously with the plug-n-play support. In addition
to the plug n-play support of both types of PC Card, the user also could
13
perform the Hot Swap function provided by the Card and Socket Service
built in the OSR2 Windows 95 or later.
1.After the Windows 95 OSR2 have successfully boot, insert the CardBus
FPC-0103TX Fast Ethernet PC Card with media coupler attached into the
CardBus Socket.
2.Click Next on Update Device Drivers
Winzard
3.Click The Others Locations button
4.Insert driver diskette into the floopy disk.
5.Type A:\ .The driver will be installed and you may be asked for the original
Windows 95 CD/disks.
6.For the first time installation, please click Network icon in Control Panel
to add Protocols, Client and Service if you needed
7.Reboot the machine and the card will be fully functional.
14
Windows NT 4.0 Installation
Assumed that the Network Services already installed in the NT 4.0 system.
1.Insert the CardBus FPC-0103TX Fast Ethernet PC Card into any one of PC
Card Slots in system.
2.Power up Windows NT 4.0
3.Open My Computer
4.Open Control Panel icon
5.Double-click the Network icon
6.Select Adapters tab.
7.Press Add to add network adapter
8.Press Have Disk button
9.Insert the driver disk into floppy drive
10.Specify the path to ” A:\ and press OK
( Or type the path name whereever you place the driver programs)
11.A dialog box will appear to adjust the driver's settings. The resources
assignment to the adapter must be unique in the system.
12.Press OK when all setting are completed.
13.Press Close to complete network setting
15
Windows NT 3.5x Installation
1.In Main Group of NT 3.5x, open Control Panel and click on Network
icon.
2.In Network Settings dialog box, push Add Adapter... button. The Add
Network Adapter dialog box will appear.
3.Choose <Other> requires disk from manufacturer” from the network
adapter card list and press Continue.
4.When Windows NT prompts for manufacturer disk, insert driver diskette
and press OK until the Network Setting Change dialog box appears.
5.Restart now to have the card take effect.
16
DOS Mode Installation
The pure DOS mode , not the DOS prompt under the Windows 95 or
Windows NT, doesn’t support any PC Card device. Many BIOS vendors
develop the Card services and Socket Sevices for DOS. Because the CardBus
technology is new to market, all the current shipping versions of Card and
Socket Services don’t support CardBus PC Card. We implements the DOS
driver sets with this acknowledge in mind. All our DOS modes drivers were
built to include the Direct Enabler in them to fulfill the essential of DOS mode
Card Service and Socket Service program.
Besides, We provide a menu driven installation utility to help you install the
various driver in the DOS mode. Just plug the driver diskette into the floppy
drive and set the current drive to the floppy drive. Then run INSTALL to
install the real mode drivers such as ODI or NDIS 2.x or Packet Drivers into the
target disk.
Novell Netware
There are two methods to install the Netware client ODI driver, the menu
installation and Netware 3.12 or 4.x Client installation.
Menu Installation
1.Run INSTALL.EXE from the root directory of driver diskette.
17
2.Select Netware 3.x and 4.x Workstation” item from menu.
4.Move cursor to focus on the setting you want to make change and press
<Enter>” to select a fit value. When the configurations are set completely,
press <Enter> on the OK” field to exit the screen and go back to step 3.
5.Installation program starts copying related files from diskette to the
destination directory and modifies AUTOEXEC.BAT and NET.CFG
under user’s agreement
6.Now, the installation is completed. Please reboot the computer to make
your Netware connection.
If you wanted to install the ODI driver by manual, you may follow the
instructions list below.
1.Copy the files CB100.COM and NET.CFG from the path\NETWARE in the
driver diskette into the Netware client directory containing Novell's
LSL.COM, IPXODI.COM and NETx.COM files.
2.Using a text editor to edit the NET.CFG for setting the default frame type.
In the Netware server the frame type is set to 802.3 for NW3.11 and 802.2
for NW3.12 and NW4.x . The frame type must be set to the same with the
18
server or the client couldn’t login to the server.
3.Follow Novell's instructions on using ODI programs. You can substitute
the CB100.COM whenever a reference is made to the Hardware Specific
Module.
4.A typical ODI workstation startup batch file includes:
>LSL
>CB100
>IPXODI
>NETx
>LOGIN
;Link Support Layer Module provided by Novell
;Hardware Specific Module
;IPX Protocol Stack Module provided by Novell
;Shell Support Module provided by Novell
Novell Client Installation
1.Run the NetWare Client Install V1.21
-Get the 4 Client disks from the network administrator, or
-Run the \NWCLIENT\INSTALL.EXE in a previous Installation
2.A message appears on the screen asking you whether or not you want the
program to perform modifications on your AUTOEXEC.BAT and
CONFIG.SYS files.
3.Answer "Yes". The program then modifies your AUTOEXEC.BAT and
CONFIG.SYS files accordingly and creates backup copies.
4.The following message appears:
-Install support for MS Windows? (Y/N):
5.Answer accordingly and provide a path if necessary.
6.The program displays the following:
-Configure your workstation for backup by a NetWare server running
software such as BACKUP? (Y/N):
7.Answer accordingly and provide a path if necessary.
8.Select a driver for your network board.
19
9.From the driver list, select Other Drivers.
10.Go to the Insert the Driver Disk dialog box and specify the path where the
ODI driver and INS files reside. For example: C:\ODI.DOS.
11.Press Enter and select the target ODI driver.
12.Specify the driver's optional settings.
13.Press F10 to save to new configuration.
14.Highlight "Install press here" and press <Enter> to install.
The program copies the necessary files for NetWare Client. Continue the
installation procedure to completion. Upon completion, a new NET.CFG file
will be created in your DOS directory. Typically, this file contains the
following lines:
Link Driver CB100
#FRAME Ethernet_802.3
FRAME Ethernet_802.2
:
16. An STARTNET.BAT for the ODI workstation performs as the following
SET NWLANGUAGE=ENGLISH
--Set NetWare 4.X to English
language
LSL
--Link Support Layer Module
provided by Novell
CB100
--Hardware Specific Module
IPXODI
--IPX Protocol Stack Module provided by Novell
VLM
--DOS Support Module provided by Novell
F:
--Change to connected device
LOGIN xxx --Login to file server as user xxx
17.Run
network.
STARTNET
to
MS LAN Manager
20
access
the
Novell
1.View the README.TXT on the installation diskette in the \NDIS2
directory. Before installing the drivers, please ensure that the Microsoft
LAN Manager has been installed in the target path. The installation
program will check and modify the PROTOCOL.INI file for LAN
Manager.
2.Run INSTALL.EXE from root directory of driver diskette.
3.Select Microsoft LAN Manager item on the menu screen.
4.If current settings are acceptable, select Start Installation” and go to step
6. Otherwise, select Modify Parameters” to make setting changed.
5.Move cursor to each field you want to make a change and press <Enter> to
select a preferable path name. When the configuration are set completely,
press <Enter> on the OK field to exit the screen and go back to step 4.
6.Installation program starts to copy related files from driver diskette to the
destination directory and modifies CONFIG.SYS and PROTOCOL.INI
under user’s agreement.
7. Please reboot the computer to load driver and start LAN Manager in
batch.
Example of PROTOCOL.INI: used by LAN
Manager
[PROTMAN]
21
DRIVERNAME = PROTMAN$
DYNAMIC = YES
PRIORITY = NETBEUI
[NETBEUI_XIF]
Drivername = netbeui$
SESSIONS = 6
NCBS = 12
BINDINGS = "CB100_NIF"
LANABASE = 0
[CB100_NIF]
; protocol.ini session for LAN driver.
DRIVERNAME = CB100$
Packet Driver
1.Run INSTALL.EXE from root directory of driver diskette.
2.Select Packet Driver item on the menu screen.
3.Installation program starts to copy related files from diskette to the
destination directory and modifies AUTOEXEC.BAT under user’s
agreement.
22
4.Please reboot the computer to load the driver.
Windows for Workgroups 3.11
NDIS2 Driver for Workgroups
1.Run Windows for Workgroups and click Network Setup icon in
Network” group.
2.In Network Settings dialog box, click Networks... button to select the
network operating system.
3.In Networks dialog box, check the radio button before Install Microsoft
Windows Network and No Additional Network”. Press OK to go back
the Network Settings” screen.
4.Click Drivers...” button to select network driver.
5.In Network Drivers dialog box, press Add Adapter...” button to enter Add
Network Adapter dialog box. Select Unlisted or Updated Network
Adapter and press OK“.
6.Windows will prompt a Install Driver dialog box. In this time, put the driver
diskette into floppy drive and press OK”.
7.Select the CardBus Fast Ethernet 10/100 PC Card string and press OK.
8.Follow Windows instructions to complete the installation and exit
Windows.
Artisoft Lantastic 6.0 Installation
1.Install LANTASTIC 6.0 first.
2.Run INSTALL.EXE from root directory of driver diskette.
3.Select LANTASTIC 6.0 in Network Operating System screen.
23
4.If current settings are acceptable, select Start Installation” and go to step
6. Otherwise, select Modify Parameters” to make settings changed.
5.Move cursor to focus on each field you want to make a change and press
<Enter>” to select a fit value. When the configuration is set completely,
press <Enter>” on the OK field to exit the screen and go back the step 4.
6.Installation program starts to copy the related files from diskette to the
destination directory and modifies CONFIG.SYS, PROTOCOL.INI, and
STARTNET.BAT under user’s agreement.
7. Please reboot the computer to have the driver take effect.
24
QUESTIONS & ANSWERS
This chapter provides a number of examples of Questions (Q:), Causes (C:),
and Answers (A:). If your LAN is not functioning properly, look up the
problem here, or ask your dealer for technical assistance.
Q:When I run the DOS real mode driver , it reports that “CardBus PC
Card are not present”, but I did install the CardBus PC Card in the
slot?
A:Currently, there are no PC Card/Socket Service which supports CardBus
socket in the DOS mode. We already built the direct enabler into each DOS
mode drivers to active the CardBus PC Card. Following check list could
help you identify the problem.
1. If you install some other DOS mode Card/Socket Service from AMI,
Award, Phoenix or SystemSoft…etc, please disable them by comment
out these drivers in the CONFIG.SYS file.
2. If memory management software e.g. EMM386 has been installed, you
have to reserve some area in upper memory (C000:0 -- EFFF:F) for
attribute memory of PCMCIA card during enabling the card. Example:
Device=C:\DOS\EMM386.EXE RAM X=D000-D3FF. Reserve D000 D3FF for attribute memory.
Q: When I run the DOS real mode driver , it reports that
“PCI-to-CardBus bridge are not present”,but my notebook is equipped
with the CardBus socket?
A: Some notebook computer, for example Toshiba , need to enable the
System’s BIOS setting to support CardBus environment. Pleae check
your user manual to find the detail information.
Q:How come I see the message “UnKnown PCI-to-CardBus bridge” when
I try to load the driver in DOS mode?
25
A:The CardBus controller are rolling out from time to time. The driver set of
CardBus 10/100M Ethernet PC Card support all the CardBus controllers on
the current market. We will continue to revise our driver to support any
new CardBus controller come to the market. If you encounter this message,
please contact your local dealer to get the newest driver set. If you still
have problem with it, please contact us to further support.
Q:The ODI driver is run successfully but fail to login to the Netware
server
C:Frame type imcompatiable with server or Interrupt miss match.
A:The default frame type for Netware 3.11 and before is 802.3 but it is changed
to 802.2 in Netware 4.x and 3.12. You may check the content of NET.CFG to
see if the frame type is acceptable by the server. If the frame type cannot
accept by server, please edit NET.CFG to change the frame type at client
site or add the frame type can be accepted at sever site driver.
26
Specifications
SPECIFICATIONS
Network Interface Specifications
u10Mbps
Ethernet: IEEE 802.3 standard 10BaseT baseband CSMA/CD local area
network.
u100Mbps Ethernet: IEEE 802.3u standard 100Base-TX baseband CSMA/CD local
area network.
u20/200Mbps full duplex support
Autonegotiation between all four operation modes.
u
Host Interface and Physical Specifications
uCardbus
PC Card Standard compliant.
II PC Card form factor
u3.37” x 2.128” x 0.197” (86mm x 54mm x 5.0mm)
u40gw in weight
uType
Operating Environments
Novell Netware 3.x, 4.x
Microsoft LAN Manager
Packet Driver Applications
Microsoft Windows for Workgroups 3.11, Windows 3.1
Microsoft Windows NT 3.5x, NT 4.0
Windows 95, 98
Lantastic 6.0
27
Specifications
Power Requirements:
uNormal
uSleep
Operation: +3.3V DC, 380mA max
Mode
: +3.3V DC, 80mA max
General Specification
LEDs: Link , Activity, 10/100Mbps
Enviroments Ranges:
Operating:
32°F to 140°F (0°C to 60°C)
Storage:
-4°F to 158°F (0°C to 70°C)
Humidity:
10% - 90% , noncondensing
Certifications: FCC, Part 15, Class B
CE Mark (EN55022,ClassB, EN50082-1)
28
FCC Part 15 ,Class B Certification Statement
FCC ID: MQ4FE2KA
The United States Federal Communication Commission (FCC) and the Canadian
Department of Communications have established certain rules governing the use of
electronic equipment.
This device complies with Part 15 of FCC rules. Operation is subject to the following
two conditions:
1)This device may not cause harmful interface, and
2)This device must accept any interface received,
including interface that may cause undesired operation.
Warning:This equipment has been tested and found to comply with the limits for a
Class B digital device, pursuant to art 15 of the FCC Rules. These limits are designed to
provide reasonable protection against harmful interference in a residential installation.
This equipment
generates, uses and can radiate radio frequency energy, and if not
installed and used in accordance with the instructions, may cause harmful interference
to radio communications. However, there is no guarantee that interference will not
occur in a particular installation. If this equipment does cause harmful interference to
radio or television reception, which can be determined by turning off and on, the user
is encouraged to try to correct the interference by one or more of the following
measures:
?
Reorient or relocate the receiving antenna.
?
Increase the distance between the
equipment and receiver.
?
Connect the equipment into an outlet on a circuit
different from that to which the receiver is
connected to.
Consult the dealer or an experienced radio/TV
technician for help.
?