1
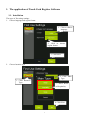
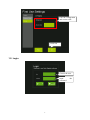
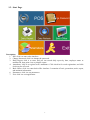
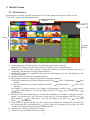
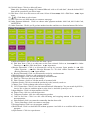
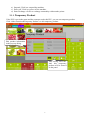
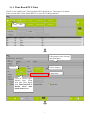
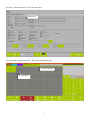
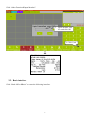
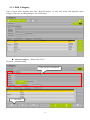
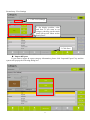
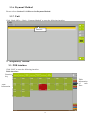
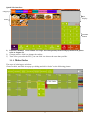
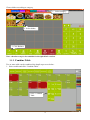
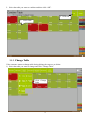
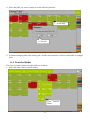
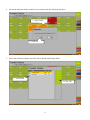
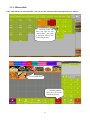
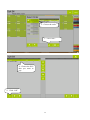
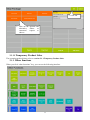
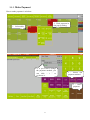
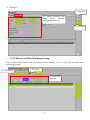
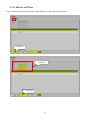
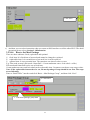
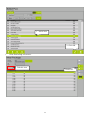
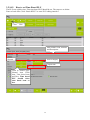
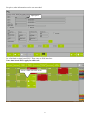
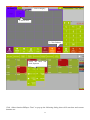
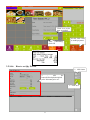
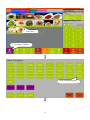
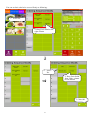
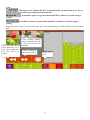
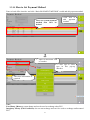
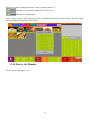
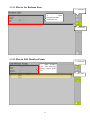
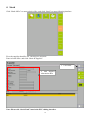
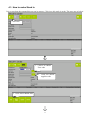
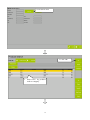
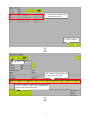
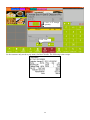
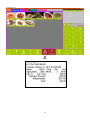
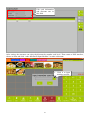
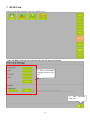
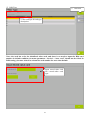
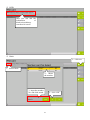
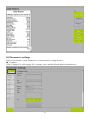
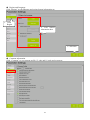
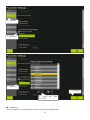
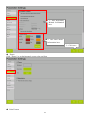
Touch Cash Register Software User Manual Pinnacle Technology Corp. Address: North 4th Floor, Guangxia Building, Torch High-Tech Zone, Xiamen, Fujian, China Service line: 0592-5710087 Website: www.aclas.tw Email: [email protected] This specification is to change without prior notice, the latest version please contact our company directly. CONTENT 1. THE APPLICATION OF TOUCH CASH REGISTER SOFTWARE ...........................................1 1.1. 1.2. 1.3. 2. Installation .....................................................................................................................................1 Login ..............................................................................................................................................2 Start Page .......................................................................................................................................3 RETAIL VERSION .............................................................................................................................4 2.1. POS Interface .................................................................................................................................4 2.1.1. Temporary Product ................................................................................................................6 2.1.2. Time Based PLU Sales ..........................................................................................................7 2.2. Basic interface ...............................................................................................................................9 2.2.1. Edit Category .......................................................................................................................10 2.2.2. Category Group ...................................................................................................................12 2.2.3. Edit PLU ..............................................................................................................................13 2.2.4. Member ................................................................................................................................15 2.2.5. Edit Item Group ...................................................................................................................15 2.2.6. Payment Method ..................................................................................................................16 2.2.7. Unit ......................................................................................................................................16 3. HOSPITALITY VERSION ...............................................................................................................16 3.1. POS Interface ...............................................................................................................................16 3.1.1. Make Order ..........................................................................................................................17 3.1.2. Combine Table .....................................................................................................................18 3.1.3. Change Table .......................................................................................................................19 3.1.4. Transfer Dishes ....................................................................................................................20 3.1.5. Share table ...........................................................................................................................22 3.1.6. Spilt Bill ...............................................................................................................................23 3.1.7. Void Item..............................................................................................................................25 3.1.8. Taste .....................................................................................................................................27 3.1.9. Instruction ............................................................................................................................27 3.1.10. Set Meal Sales......................................................................................................................28 3.1.11. Temporary Product Sales .....................................................................................................29 3.1.2. Other functions ....................................................................................................................29 3.1.3. Make Payment .....................................................................................................................31 3.2. Basic Data Settings ......................................................................................................................32 3.2.1. How to set Category and Category Group ...........................................................................32 3.2.2. How to set Category Group .................................................................................................32 3.2.3. How to set Item Group ........................................................................................................32 3.2.4. How to set Tax .....................................................................................................................33 3.2.5. How to set Taste ...................................................................................................................33 3.2.6. How to set Payment Method and Unit .................................................................................34 3.2.7. How to set Void Reason .......................................................................................................34 3.2.8. How to set Customer Type...................................................................................................34 3.2.9. How to set User Group ........................................................................................................35 3.2.10. How to set User ...................................................................................................................36 3.2.11. How to set supplier ..............................................................................................................36 3.2.12. How to set Meal Package Group .........................................................................................37 3.2.13. How to set Place ..................................................................................................................38 3.2.14. How to set PLU ...................................................................................................................40 3.2.15. How to set Printer ................................................................................................................55 3.2.16. How to set Ordering sequence .............................................................................................58 3.2.17. 3.2.18. 3.2.19. 3.2.20. 3.2.21. 3.2.22. 4. How to setVirtual Category .................................................................................................62 How to set Sub Menu Link Operation .................................................................................65 How to Set Payment Method ...............................................................................................67 How to Set Member .............................................................................................................68 How to Set Redeem Item .....................................................................................................69 How to Edit Member Points ................................................................................................69 STOCK ...............................................................................................................................................70 4.1. How to make Stock In .................................................................................................................71 4.2. How to make Stock Refund .........................................................................................................75 4.3. How to make Shrinkage...............................................................................................................80 4.4. How to makeStock Taking ...........................................................................................................84 4.5. How to make Payment Bill ..........................................................................................................89 4.5.1. Set plu Property as “Stock Link” .........................................................................................89 4.5.2. Set Supplier information ......................................................................................................89 4.5.3. Add Stock-In Order .............................................................................................................90 4.5.4. Add Full Pay Bill .................................................................................................................93 4.5.5. Add Part Pay Bill .................................................................................................................95 4.5.6. Payment Bill Report ............................................................................................................97 5. REPORT .............................................................................................................................................98 6. PROMOTION ..................................................................................................................................100 6.1. 6.2. 6.3. 6.4. 6.5. 6.6. How to set Buy One Get One Free ............................................................................................100 How to set Happy Hour .............................................................................................................105 How to set Qty Favour ...............................................................................................................108 How to set PLU Member Discount ...........................................................................................108 How to set Category Discount ................................................................................................... 111 How to setCard Level Discount ................................................................................................. 112 7. RFID CARD ..................................................................................................................................... 114 8. MAINTAIN....................................................................................................................................... 119 9. DAILY REPORT .............................................................................................................................120 10. PARAMETERS SETTINGS .......................................................................................................121 1. The application of Touch Cash Register Software 1.1. Installation The steps of first using settings: 1. Choose language and region format 1. Click to choose language 2. Click to region format choose 3. Click Next 2. Choose busniess type 2. Click Main Type 1. Click Business Type 3. Choose Retail or Hospitality 4. Click Next 1 Edit the background and accent color Click OK 1.2. Login Choose the user Input password 2 the 1.3. Start Page Description: 1. P0S: click it to enter sales interface. 2. Change Password: click it to change the password. 3. Daily Report: click it to enter, and you can search daily report by date, employee name or machine ID, then print view or print the report. 4. Attendance: click it to register staff’s attendance. Click clock-in for work registration, and click clock-out for off-work. 5. Back Office: click it to enter back office interface. It contains of basic, promotion, stock, report, and maintain information. 6. Parameters: click it to set parameters. 7. Exit: click it to exit application. 3 2. Retail Version 2.1. POS Interface POS interface is used for sale and collecting money. It is the main interface of the system as well. Click “POS” to enter the following interface Category Bill display Menu Number button 1) Commodity items: Click the pictures of commodity that customers will pay. Note: the PLUs showed on the touch panel are frequently-used or without barcode. 2) Number buttons: Click number buttons to change the number of selected commodity, the price of commodity, item discount, receipt discount and tip etc. 3) Hold/Recall: Click to save unpaid bill first, when you click again ,you can see this bill agin so that you can pay the bill. 4) Void Item: Click to delete the commodity that you 5) Edit Quantity: Click it to change the quantity of selected commodity. a. Select the commodity you want to change in the PLU list click < Edit Quantity > input number b. Select the commodity you want to change in the PLU list Input number click < Edit Quantity > For example, a customer wants to buy 3 apples: click the apple in the PLU list input number 3 click <Edit Quantity>. Or click the apple in the PLU list click <Edit Quantity> input number 3 6) Edit Price: Click it to change the price of selected commodity. For example, a customer selected a mango,its original cost is $1.5, but now it only costs $1: click the mango in the PLU list input number1 click <Edit Price>. Or click the mango in the PLU list click <Edit Price> input number1 7) Cash: Click it to pay the bill by cash. For example, the commodity a customer has selected costs $25, and he pays $50: click number 50 click <Cash> (if he pays the bill by credit card, click <Credit Card> instead), then the printer will print the bill. 8) Open Drawer: Click it to open the cash drawer. 9) Void Item: Click it to delete selected row item. 4 10) Void All Items: Click it to delete all items. Note: tick “Parameter Settings CommonRecord void or all void data”, then the deleted PLU data will be recorded if you delete items. 11) Edit Note: Click it to edit notes to all items. Select all items click <Edit Note> input notes. 12) : Click them to select items. 13) Exit: click it to exit POS interface to return to start page. 14) Other Payment Methods:Click it to choose other payment methods: 000 Cash, 001 Credit Card, 002EFTPOS. 15) Other Functions: Click it you’ll get into another interface and there are function buttons like below: a) Item Discounts$: Click it to decrease one item’s price. b) Edit Item Note: Click it to edit notes to the item selected. Select an item click <Other Function> click <Edit Item Note> input notes. c) Receipt Discount%: Click it to discount the receipt by percents. Input number 8 click <Other Function> click <Receipt Discount %>. Or click <Other Function> click <Receipt Discount %> input number. d) Receipt Discount$: Click it to discount the receipt by certain amount. e) Edit Surcharge%: Click it to edit surcharge by percents. f) Edit Surcharge$: Click it to edit surcharge by certain amount. g) Edit Tip: Click it to edit tip to the receipt. h) Edit Customer: click it to edit the amout of customer hold. i) Product Search: Click it to search the product by code, barcode, stock etc. j) Change User: Click to change other users to login in. k) View Transaction: Click to view the transaction detail information. You can search by bill No., invoice No. or date etc, and then print or print view it. And click [cancel] to exit. l) Input Member: Click it to input member card No.. m) Elapse Time: click it to search elapse time. n) Temporary Product: click it to edit temporary product. o) Cash In and Out:Click it to edit cash incoming and outgoing amount at the moment of non-transaction. p) Sales Refund: click it to return the commodity that has been sold. q) Exit to Start Page: click it to return to start page. r) Exit Application: click it to exit program window. s) Hold/ Recall: Click it to hold the bill without payment. And click it to recall the bill to make a payment. t) Open Drawer: Click it to open drawer. 5 u) Suspend: Click it to suspend the machine. v) Power off: Click it to power off the machine. w) Point Exchange: click it to exchange commodity with member points. 2.1.1. Temporary Product If the PLU is not in the menu and the customer needs this PLU, you can set temporary product. Click “Other FunctionTemporary Product” to edit temporary product: Edit product information in this pop-up dialog. After setting, click OK. And this temporary product will be showed on the panel 6 2.1.2. Time Based PLU Sales The PLUs are sold by time. First time based PLU should be set. The steps are as below: Enter to back office, click “BasicPLU” to enter PLU editing interface: Click New Edit product code, barcode and description. Set unit Select category Input time Click to choose type: Normal item, Fresh item and Time based item. Time based PLU should select time based item or box. 7 Set price, other information can be set as needed. Input price So it finished set time based PLU. Then come to POS interface: 1.Select Category 2.Select PLU 8 Click “Other FunctionInput Member”: 1. Input member card No. and click OK 2. Click Cash 2.2. Basic interface Click “Back OfficeBasic” to enter the following interface. 9 2.2.1. Edit Category Enter to back office interface and click “BasicCategory” to add, edit, delete and import& export category. The steps of adding category are as following: Add new category,Please click “New”. First step: Common setting 2. Edit category information 1. Click New 10 Second step: View Settings 1. Click View Settings 2. Set display position, color and font. If you want to set category showing on the touch panel, please tick “Show on the touch panel”. 3. Click Save Import &Export If you want to import & export category information, please click “Import& Export” key and the system will pop up the following dialog box: 11 Then after choosing the file you want to import or export, please click “OK” to confirm as the following picture shows: 2. Click “OK” 1. Choose file 2.2.2. Category Group Click “Back Office---Basic---Category group” to add, edit and delete category group as the following picture shows: Edit category group information The editing method is the same as adding new category. After editing, please click “Save” and 12 then click “Exit” to drop out. 2.2.3. Edit PLU Enter to “Back Office” interface and click “Basic---PLU” to add and edit PLU data: Add new PLU,click “New” to edit the new PLU data. It contains of common information, price_stock and view settings. 1. Set common information Edit product code, barcode and name etc Click to choose category Set as required 13 2. Price_Stock Click Price_Stock Edit price Edit stock 3. View settings Click View Set PLU display position, tick “show on the touch panel” as required Set font and color Upload picture After setting, please click “Save” 14 2.2.4. Member Click “Back Office---Basic---Member” to enter member editing interface. The users can add, edit or delete member data: New. Click “New” to edit new member information, which includes Message (1), Message (2) and Message (3). After editing, please click “Save” and click “Exit” to drop out. Message (1):Set member No., member card level and use’s information etc. Message (2):Set the information of insurance agent. Message (3):Edit member consume date and account balance etc. Edit. Click it to edit member message. Delete. Click it to delete the selected member. 2.2.5. Edit Item Group Click “Back Office--- Basic---Item Group” to enter the following interface. Edit item group information here 15 2.2.6. Payment Method Please refer to Section 3.2.11 How to Set Payment Method. 2.2.7. Unit Click “Back Office--- Basic---Payment Method” to enter the following interface: Edit unit 3. Hospitality Version 3.1. POS Interface Click “POS” to enter the following interface: Table interface: Function key Table information of each floor Table Information 16 Quick Sale interface: category Bill display menu Number button 1) Function \member \void item\PLU\receipt discount\quantity\hold/recall\payments\cash please refer to chapter 2.1 2) Change cashier: click it to change the cashier. 3) Taste: after you order the PLU, you can click it to choose the taste that you like. 3.1.1. Make Order The steps of ordering are as below: Choose a table, and click it to pop up a dialog and click “Order” as the following picture Click Order 17 Choose dishes according to category. 1. Select category 2. Select dishes 3. Click Balance Note : the above step is also suitable for the Quick Sale version. 3.1.2. Combine Table Two or more table can be combined; the detail steps are as below: 1. Select a table and click “Combine Table”. Click Combine Table 18 2. Select the table you want to combine and then click “OK”. 2. Click OK 1. Select table 3.1.3. Change Table If the customer wants to change table during dining, the steps are as below: 1) Select the table you want to change and click “Change Table”. Click Change Table 19 2) Select the table you want to change to in the following interface. 1. Select table 2. Click OK 3) It finished changing table after clicking OK. And the main interface will show which table is changed from. 3.1.4. Transfer Dishes The steps to transfer dishes to another table are as below: 1. Select the table wants to transfer dishes. Click Transfer Dishes 20 2. choose the table the dishes wanted to be transferred in the following interface: 1. Select Table 2. Click OK 3. Select the transferred dishes and click OK to finish transferring dishes. 1. Select dish 2. Click OK 21 3.1.5. Share table Note: only when you order the PLU can you use this function, the detail operations as follows: 1、Click the table and then you can see the “share table”, just click it and you will see the following picture. 2、Choose the PLU 3、Click the balance, then you will see the following picture. 22 4 、 As you can see ,the share table is finished. 3.1.6. Spilt Bill Note: only when you order the PLU can you use this function, the detail operations as follows: 1、Click the table and then you can see the “spilt bill”, just click it and you will see the following picture. 23 2、Choose the order . 3、Click “OK”. 4、Choose the PLU that you want to pay. 5、Click “OK”. 24 6、Choose the payment method, then Click “payment”. The system will print the bill automatically. 3.1.7. Void Item This function could be adopted, when waiter orders wrong dishes or the customers want to cancel dishes. The operating steps are as following picture shows: 25 ※ Function1:before you order the PLU, this key can be used for cancel the PLU that you ordered before. 3、the order be chose here will be cancelled. 1、Choose the PLU 2、Click “Void Item” ※ Function2: After you order the PLU, this key can be used for void the orders. If you have set the printer before, the void item will be printed and sent to the kitchen. 1. Select dish 3. Choose void reason in the pop-up dialog 2. Click Void Item 26 3.1.8. Taste The customers can choose the taste type of dish as their favor. 1. Select dish 3. Choose taste in the pop-up dialog 4. Click OK 2. Click Taste 3.1.9. Instruction Some dishes have different cooking methods as customers’ favor. 1. Select dish 27 2. Select instruction 2.可根据实际情况 3. 点 击 编辑价格和数量 “确定” 1. Click OK 3.1.10. Set Meal Sales The steps to sell set meal as below: Select set meal 28 2. Click OK 1. Here are the optional and alternative dishes as customers’ request to choose. 3.1.11. Temporary Product Sales The operating method please refers to section 2.1.1 Temporary Product Sales. 3.1.2. Other functions When you click “other functions” key, you can see the following interface. 29 ※ Item Disc$: this key is used to give some item discount.(for money) Operation steps: click Item Disc$:→input number→click “OK” ※ Item Disc%:this key is used to give some item discount.(for percent) ※ Receipt Discount(%):this key is used to give the receipt discount (for percent) Operation steps: click Receipt Discount%→input number→click “OK” ※ Receipt:this key is used to give the receipt discount(for money) Operation steps: click Receipt Off$: →input number→click “OK” ※ Item original price: this key is used to recover the item original price. Operation steps: click Receipt Off$:→input number→click “OK” ※ All Original Price: this key is used to recover all items original price. Operation steps: click All Original Price→input number→click “OK” ※ Tip: this key is used to give the extra money to the seller. Operation steps: click tip→input tip number →click “OK” ※ Surcharge(%):this key is used to pay for the surcharge(for percent) Operation steps: click Surcharge(%)→input number→click “OK” ※ Other Charge: this key is used to pay for other charge. Operation steps: click Other Charge→input number→click “OK” ※ Note: this key is used to add some receipt note. Operation steps: click Note→input receipt note→ click enter ※ Void All Items: this key is used to void all items. Operation steps: click Void All Items→click “OK”. ※ Dinner Mode: this key is used to change the dinner mode. Operation steps: click Dinner Mode→ choose the suitable dinner mode(delivery\take away\dine in) ※ Time Based PLU: this key is used to search the members’ transaction on Time based PLU. For example: member A borrowed the bicycle ,click Time Based PLU ,input the member number and click OK, the interface will show you the record, if you return it back on time, click “return” or click “revert to sale”. ※ Temporary Product: this key is used to add the new PLU to sell. ※ Ordering Sequence Modify: this key is used to modify the ordering sequence. ※ Pre-Print Receipt: this key is used to pre-print the receipt. ※ Duplicate Kitchen List: this key is used to duplicate the kitchen list. ※ Last Receipt: click this key to reprint the last receipt. ※ Sales Refund: click this key to refund the item. Before use this function ,you should go to back office →plu→default value→tick “allow sales refund” or this function cannot be used. Then you can go back POS interface to choose the number of the refund item or input the date and item number on the right of the interface by hand ,click ok ,then choose the refund item and the suitable payment method to finish the refund. ※ Point Exchange: click this to exchange the commodity according to the points. ※ View Transaction: click this to search the detail transactions. ※ Cash In And Out: click this to edit the information of the cash in and out. ※ Open Drawer: click this to open the connected drawer. ※ Rfid Manage: click this to manage the Rfid card. ※ Screen Capture: insert in the USB and then click this to capture the screen. ※ Power Off: click this to close the device. ※ Suspend: click this to come into standby mode, press the power on/off again ,the device come to work again. ※ Exit Application: click this to exit the application, the interface will return to the desktop. ※ Exit To Start Page: click this to return to the start page. ※ Exit: click this to return to the POS interface. 30 3.1.3. Make Payment How to make payment is as below: 2. Click payment in the pop-up dialog 1. Select table 2、if you want to change the payment method, you can click “ × ” to re-choose it. 1 、 choose the payment method 3 、 click payment 31 3.2. Basic Data Settings Click “Back officeBasic” to enter basic interface. 3.2.1. How to set Category and Category Group Please refer to Section 2.2.1 Edit Category. 3.2.2. How to set Category Group Enter to back office interface and click “BasicCategory Group” to add, edit and delete category group. The steps of adding category group are as following: 1. 2. Edit category group data Click New 3. Click Save 3.2.3. How to set Item Group Please refer to the charter 2.2.5. 32 3.2.4. How to set Tax 1、click new 2 、 edit tax id\tax name\tax rate\amount etc. 3、click save 3.2.5. How to set Taste Enter to back office interface and click “BasicTaste” to add, edit and delete taste. 1. Click New 3. Click Save 2. Edit taste 33 3.2.6. How to set Payment Method and Unit The editing methods please refer to Section 2.26 Payment Method and Section 2.27 Unit. 3.2.7. How to set Void Reason 2 、 edit code\void reason\abbreviation 1、click new 3、click save. 3.2.8. How to set Customer Type 1、click new 2、edit type id\ type name 3、click save 34 3.2.9. How to set User Group setting 1、click new 2、choose setting, and input code\group name\discount limit\rounding 3、click save. authoritory 1、click new. 3、click save. 2、choose authority and tick one function on the left and the sub-function will pop-up on the right. 35 3.2.10. How to set User 1、click new 2 、 edit the staff ID/staff name/password/comfirm/user group/max discount etc. 1、click save 3.2.11. How to set supplier Message1: 1、click new 2、choose the message1 And input supplier code /full name/fax/e-mail etc. 36 3、click save Message2: 1、click new 2 、 choose message2 and input latest tran/start date/end date/status etc. 3、click save 3.2.12. How to set Meal Package Group Enter to back office interface and click “Basic Meal Package Group” to add, edit and delete meal package group data. 1. Click New 3. Click Save 2. Edit meal package 37 3.2.13. How to set Place Enter to back office interface and click “BasicTaste” to add, edit and delete place. Click New 1. Edit place 2. Click Save 38 The steps to edit table information are as below: Click New 2. Edit table data 1. Select place 3. Click Save 39 3.2.14. How to set PLU Enter to back office interface and click “BasicPLU” to add and edit PLU data. 3.2.14.1. How to Add New PLU In plu interface,Click New to edit new PLU data. First step: set Common information. Edit common information here 40 Second step: set price and stock. Edit price Edit stock Third step: set hospitality Edit related information here 41 Fourth step: set view Set PLU display position, tick “show on the touch panel” as required Set font and color Upload picture After setting, please click “Save” 3.2.14.2. How to Batch Modify In the PLU interface, select Category firstly to select the PLUS you want to batch modify and click Batch Edit as followings. But if you want to batch modify all PLUs, just click Batch Edit. 6. Click Batch Edit 1. Tick it 3. Select category in the pop-up interface 2. Click it to select category in the pop-up interface 5. Click Search 4. Click OK 42 1. Edit related information as required 2. Click Batch Edit 3.2.14.3. How to set Instruction Plu Instruction, that is cooking method. For example, PLU A has many cooking method, such as steam, braise, and poach. The customers can choose different cooking method as their favor. Instruction settings description: a) Cooking methods should be set as PLU firstly (cooking method cannot be set to show on the touch panel). For example, set cooking method E: Enter to PLU interface and click New to add PLU E. Edit PLU E 43 Instruction Item should be ticked in the hospitality tab as below: Click Hospitality Tick this item b) And then select the PLU in the PLU list, and click Set Instruction to edit. 2. Click Set Instruction 1. Select PLU Click Insert 44 2. Click here 1. Click Kind to select instruction kind 1. Choose cooking method 2.Click OK 45 Click Save c) And then you can select instruction when you return to POS interface to sell the edited PLU. The detail operations please refer to Section 3.1.8Instruction. 3.2.14.4. How to Set Meal Package There are three subitems: fixed, replaceable and optional. 1) fixed item: It is fixed item of set meal and cannot be changed or replaced. 2) replaceable item: It is essential item of set meal, but it can be replaced. 3) optional item: It is not essential item. The customers can choose to have or not. E.g. Filet steak set meal (filet steak+ Oinne Roll + Cream mushroom sauce+ fruit salad + coffee) Filet steak and Oinne Roll can be set as fixed item. Cream mushroom sauce and fruit salad can be replaceable item. Customers can choose corn soup or other. Note: If the replaceable item need to be set, the meal package Group should be set first. The steps are as following: Enter to “Back Office” interface and click “Basic---Meal Package Group”, and then click “New”: 2. Click Save 1. Edit meal package group data 46 Set meal setting method is as below: Enter to “Back Office” interface and click “Basic---PLU”: 2. Click Set Meal Package 1. Select PLU Click Insert 47 1. Select PLU 2. Click OK i. fixed item setting is as below: Tick this item Click Save 48 ii. Replaceable item setting is as below: Note: Meal Package should be set first. 1. Click Item Group 3. Click Save 2. Select Meal Package Group in the pop-up dialog Repeat the above steps to set more replaceable PLUs. iii. Optional item setting is as below: 2. Click Save 1. Edit quantity and price as request. 49 3.2.14.5. How to set Time Based PLU The PLUs are sold by time. First time based PLU should be set. The steps are as below: Enter to back office, click “BasicPLU” to enter PLU editing interface: Click New Edit product code, barcode and description. Set unit Select category Input time Click to choose type: Normal item, Fresh item, Time based item and Box. Time based PLU should select time based item or box. 50 Set price, other information can be set as needed. Input price So it finished set time based PLU. Then come to POS interface: Note: time based PLUs apply for table sale. Select a table and click order 51 1. Select category 2. Select PLU 3. Click Balance Select the table and click Payment Click “Other functionElapse Time” to pop-up the following dialog shows bill start date and current datetime etc: 52 Click it to revise time as needed After confirming, click OK At last, click Cash to make payment. 3.2.14.6. How to set Qty Favour 1、click insert 2 、 edit the barcode\description\original price\ discount price etc. 3、click save 53 3.2.14.7. How to set Package 1、click “insert” 2 、 click here, the system will pop-up the following picture 3、after finishing editing, click save . 1、tick the item group or category to search the item 2、tick it to modify time 3 、 after finishing editing, click save . 54 3.2.14.8. How to set Layout 2、here you can put the item to any place you like. 1 、 You can choose rearrange category or rearrange plu 3 、 click save after finishing it. 3.2.15. How to set Printer Enter to “Back Office” interface, and click “Basic---printer” to add, edit and delete printer. In general, three printers need to be connected. One printer is for kitchen, one is for food hatch and another is for printing bills to customer. a) Add new printer: Click “New” input printer No.,e.g. No.1, No.2, No.3 input printer name select printer function select printer interface, COM or Network input printer baudrate or printer address select place. 55 1. Click New 2. Edit printer data here b) How to set Job List printer Click “New” input printer No.,e.g. No.1, No.2, No.3 input printer name select printer function:Job List select printer interface: COM or Network input printer baudrate or printer address select place. Auto Split: tick it, and then bill will be split automatically, that is, one PLU will be printed on one bill. Auto cut: tick it, and then it will cut bill automatically after printing. c) How to set Table bill Click “New” input printer No.,e.g. No.1, No.2, No.3 input printer name select printer function:Table bill select printer interface: COM or Network input printer baudrate or printer address select place(if the place is selected, table bills of this place will be printed by this printer, unless all table bills will be printed by this printer.). d) How to set Master Printer Click “New” input printer No.,e.g. No.1, No.2, No.3 input printer name select printer function:Master Bill select printer interface: COM or Network input printer baudrate or printer address。 e) How to set other prints First,Click “New” input printer No.,e.g. No.1, No.2, No.3 input printer name select printer function:Other Prints select printer interface: COM or Network input printer baudrate or printer address。 Second,select a standby printer such as A, and click Editclick Standby Print 1to select printer function, and then click Save. f) Click Type, it will enter to following interface to choose printer type: 56 Select printer type. Note: Aclas-EM is inbuilt printer, if you select Aclas-EM, interface, baudrate and address need not to be set, click “Save” to save directly. g) Set WinCE IP: Click<Start> Click<Settings> Click <Network and Dial-up Connection> Double click “EMAC1” select <Specify an IP address> input IP(note: IP should in the same network segment with kitchen printer. E.g. kitchen printer IP is 192.168.1.3,so the IP you input should be 192.168.1.X) Note: Tick <Auto split>, when you edit kitchen printer. In this way, various dishes customer order will be shared to different cooks. But when you edit ordering sequence, <Auto split> should not be ticked. 57 3.2.16. How to set Ordering sequence Kitchen receipt sample: Before setting ordering sequence: After setting ordering sequence: Remark The steps to set ordering sequence are as following: i. Set printer. The detailed steps please refer to section 3.2.8 How to set Printer. (Note: Auto Split should not be ticked) ii. To select printer when you edit PLU. The detailed steps please refer to section 3.2.7.1 How to Add New PLU. iii. Enter to “Back Office” interface, and click “Basic---Ordering sequence” to set up ordering sequence as the following picture: Input remarks here if required Category Ordering Sequence 58 And then drag category away from right column to left column as needed such as the following picture: 1. Select No. 2. Drag the category to left column. 3. Click Exit to save Repeat the above steps to edit more ordering sequence information. And after setting, come back to POS interface to sell PLU, the system will auto-identify the ordering sequence you have set. And the kitchen printer will print order as the setting ordering sequence, which is convenient for cook to arrange dishes in sequence. And you can adjust ordering sequence during you place order, the method is as follow: Before adjusting sequence: After adjusting sequence: 59 1. Select PLU 2. Click Other Function Click Ordering sequence 60 You can set fruit salad to be severed firstly as following: 1. Select No. 2. Drag Fruit Salad to the right column 1. Select No. 2. Drag Fruit Salad from right column to left column 3. Click OK 61 3.2.17. How to set Virtual Category Before set virtual category, category should be set first. Enter to back office interface and click “Basic Category”: Input code and description This item should be ticked. Click Save Enter to back office interface and click “BasicVirtual Category” to edit virtual category data. Click it to choose category 62 1. Select category 2. Click OK 1. Select category 2. Select PLU 3. Click Add or Add All 63 2. Tick this item 1. Select PLU to set as default Plu 3. After setting ,click save You can click “Edit” to set more information. 64 3.2.18. How to set Sub Menu Link Operation This is an ordering mode that has higher requirement of ordering process sequence. This function is suitable for western-style meal. First, you should set PLU of sub menu link. The operating steps are as below: 1. Set virtual category. Please refer to section 3.2.10 How to setup Virtual Category. 2. Enter to back office, and click “Basic-->PLU” to select PLU you want to set sub menu link: 2. Click edit 1. Select PLU 1. Click Hospitality 4. Set min qty for sell and max qty for sell 2. Click virtual to pop-up select virtual category dialog to select virtual category 3. Click OK 65 Note: This item is to set whether this PLU is included in this sub menu link or not. If you tick this item, then it will not be included in this menu link. It should be equal to or greater than default PLU quantity of virtual category setting. It should be equal to or greater than default PLU quantity of virtual category setting. Repeat the above steps to set more sub menu link. After setting, return to POS interface to sell sub menu link: Click it to return to the Prior hierarchy. Or if you order wrong dish, you can click it to cancel If the ordering quantity comes to max qty for sell, it will skip to the next hierarchy Click it to skip to the next hierarchy Click it to Click it to exit 66 3.2.19. How to Set Payment Method Enter to back office interface and click “BasicPAYMENT METHOD” to add and edit payment method. These are system payment method that can’t be deleted Click New to add payment method 1. Input ID and name such as voucher 2. Click Type to select type in this pop-up interface Edit other information as required Note: Fact Money (Money): return change and can be used to exchange other PLU Imaginary Money (Gift Certificate): do not return change and can’t be used to exchange undiscounted PLU. 67 Free: do not return change and can be used to exchange other PLU. : Whether to activate this method. Tick it to activate. : Whether to round numbers. After setting, return to POS interface, the new payment method will be showed when you click Other Payment button as following picture shows: 3.2.20. How to Set Member Please refer to the chapter 2.2.4. 68 3.2.21. How to Set Redeem Item 1、click new 2 、 input barcode/product code/notes etc. 3、click save 3.2.22. How to Edit Member Points 1、click edit 2 、 input member No./ first name/last name/ current point etc. 3、click save 69 4. Stock Click “Back Office” to enter to back office, and click “Stock” to enter following interface: First, the supplier should be set. The steps are as below: Enter to back office, and click “Basic Supplier”: 1. Click New 2. Edit supplier information here Note: Please tick “Stock Link” item in the PLU editing interface. 70 4.1. How to make Stock In It is set up when the commodities are put in storage. Click it to edit stock-in order. The steps are as below: Click New 1. Click it to choose User code 2. Click it to choose supplier code 2. Click Add or Batch Add 71 Click Select PLU 2. Click OK 1. Select PLU by product code or category 72 1. Input unit, purchase Qty and purchase price 2. Click Confirm Click Save The editing information will be showed in this field. If you want to edit more information, please click Add to edit again. 73 1. Click Check Click Exit to drop out 2. Click OK After editing, you can search total quantity of the editing PLU. Return to back office, click “Basic Plu”: 2. Click Stock 1. Select PLU 74 The total quantity stock 4.2. How to make Stock Refund It is set up when the commodities are returned to the supplier. And the inventory will be reduced accordingly. Click “Stock Refund” to edit refund order, the steps are as below: Click New 75 1. Click it to choose User Code 2. Click it to choose Supplier Code 3. Click Add or Batch Add Click Select Plu 76 2. Click OK 1. Select PLU by product code or category 1. Input return quantity and purchase price 2. Click Confirm 77 Click Save 1. Click Check 2. Click OK After editing, the stock quantity will be reduced accordingly. Return to back office, click “Basic Plu”: 78 2. Click Stock 2. Select PLU The stock quantity is reduced accordingly 79 4.3. How to make Shrinkage It records the quantity of damaged commodity and the reasons. And the inventory will be reduced accordingly. Click “Shrinkage” to edit shrinkage list, the steps are as below: Click New 1. Click it to choose user code 2. Click Add Batch Add or 80 Click Select PLU 2. Click OK 1. Select PLU by product code or category 81 1. Input quantity 2. Click Confirm Click Save 82 1. Click Check 2. Click OK After editing, the stock quantity will be reduced accordingly. Return to back office, click “Basic Plu”: 2. Click Stock 3. Select PLU 83 Stock quantity is reduced accordingly 4.4. How to makeStock Taking Make an inventory of the commodities to check the actual loss during the specific period. And the inventory will be changed into actual counted quantity. Click “Shrinkage” to edit shrinkage list, the steps are as below: Click New 84 1. Click it to choose user name 2. Click Add or Batch Add Click Select PLU 85 2. Click OK 2. Select PLU by product code or category 1. Input stock taking quantity 2. Click Confirm 86 Click Save 1. Click Check 2. Click OK After editing, the inventory will be changed into actual counted quantity. Return to back office, click “Basic Plu”: 87 2. Click Stock 1. Select PLU Stock quantity is changed into actual counted quantity, 88 4.5. How to make Payment Bill 4.5.1. Set plu Property as “Stock Link” Enter into BackOffice->Basic->Plu, select a plu, and double click into plu edit interface, switch to Price & Stock interface, click the option of “Stock Link”,then click “Save”. click “Stock Link” click “Save” 4.5.2. Set Supplier information Enter into Back Office->Basic->Supplier, click “New” to add the supplier information as the follow, after edit, click “Save” . Edit the supplier information 89 Edit the supplier information 4.5.3. Add Stock-In Order Enter into Back Office->Stock->Stock In, Step 1:click “New” 90 Step 2: operator supplier select and the the Step 3: click “Add”, enter into the plu to set interface Step4: choose the plu you want to stock, click “OK.” 91 Step 5: Input Purchase Qty, Purchase Price Step 6:click “Confirm” Step 7: click “Add” to add the more, also you can click the button of “Batch Add” to select several plu, after edited, click “Save”, then click “Check”, the Stock-In Order is finished, as follow: 92 4.5.4. Add Full Pay Bill Enter into Back Office->Stock->Payment Bill Manage, as follow: Step 1:click “New” Step 1: Click “New”, select the supplier. Step 2: Click “Add” into the “select Bill No” interface, it will list all the checked Stock-In Order which belong to the selected supplier in step 1 , as follow: 93 Step 1:select supplier Step 2:click “Add” to select the Stock-In order Step 3:select the Stock-In order Step 3: Select the Stock-In order which you want to pay, then click “OK” Step 4: Input the pay amount,if you want to pay the all, you must input the number which equal to the Fact Amount, as follow,input “4320”. Step 4:input the pay amount Step 5: Click “Save”, then click “Check”, and the Pay Amount will show the number you input in step 4, and because have pay all the money , so the Payment status value is “Yes”, as follow: 94 It means you have pay all the money 4.5.5. Add Part Pay Bill Step 1: Click “New”, and select the Stock-In Order you want to Pay. click “OK”. Step 2: For example , the Fact Amount is 7200, and you only want to pay 5000 now, then you can input “5000” in the text of Pay Amount, as follow: 95 Step 3: click “Save”, then click “Check”, It shows that the Fact Amount is 7200 and the Pay Amount is 5000, they are not equal, and the Payment Status is “No”, It means you haven’t pay all the money, as follow: Step 4: Repeat the step 1,and choose the same supplier and the same Stock-In Order,it shows the Fact Amount is 2200, as follow, then you can make the Payment again. 96 4.5.6. Payment Bill Report Enter into Back Office->Report->Payment Bill Manage, click “Search”, it will list all the pay bill, which contain the already payment and non-payment and Part-Payment bill, as follow: Already payment bill Non-Payment bill Part-Payment bill 97 5. Report Enter to back office interface, and click “Report”: Category Group Sales Item Group Sales Category Sales Sales Statistic Clerk Sales Detail Hourly Sales Customer Type Tax Promo Statistic Gross Profit All Void Item Void Loyalty Point Attendance Cash Float In Out Statistic Sales Refund Stock Plu Inventory Sales Reps Commission Cashier Commission Order Taker Commission Payment Bill Take Sales Statistic as an example; click “Sales Statistic” to enter the following interface: 98 1. Input the queried information 2. Click Search 2. Click Print View 1. Select PLU 99 Click Print to print report: 6. Promotion There are five promotion methods, which are buy one get one free, happy hour, Plu Member Discount, Category Discount and Card Level Discount. The discount strength of buy one get one free is the highest. However card level discount is the lowest. If both buy one get one free and happy hour are set for PLU A, then customer buy it by buy one get one free. 6.1. How to set Buy One Get One Free Click “Back Office”Promo Buy One Get One Free to enter the following interface: Click “New” 100 Click “Add Items” 1. Select PLU such as Beef Noodle 2. Click “OK” 101 Click “Add Items” 1. Select another PLU such as Lettuce Wrap 2. Click “OK” 102 You can set the starting date and time and ending date and time Choose time mode Set week plan After setting, please click “Save” Note: : Time means a certain period of time. If the setting time is 8:00 to 22:00 from August 26th, 2013 to August 31st, 2013, the promotion time is only from 8:00 to 22:00 during the period of August 26th, 2013 to August 31st. Time length: certain length of time. If the setting time is from 8:00 August 26th, 2013 to 22:00 August 31st, 2013, the promotion start time is 8:00 August 26th, 2013and the end time is 22:00 August 31st, 2013. Week plan: Tick All: promotion held every day. Monday, Tuesday, Thursday, Friday, Saturday, Sunday: ticking one or a few days means promotion held only in these days. Then come POS interface to sell Beef Noodle after setting, the customer will get Lettuce Wrap free. As the following picture shows: 103 Click it to change quantity Click “OK” So the customer only needs to pay money for Beef Noodle. The following is the receipt: 104 6.2. How to set Happy Hour Click “Back Office”Promo Happy Hour to enter the following interface: Click “New” 1. Select PLU 2. Click “OK” 105 Input discount value Choose Promotion mode You can set discount starting time sand ending time here After setting, please click “Save’ Note: : Time means a certain period of time. If the setting time is 8:00 to 22:00 from August 26th, 2013 to August 31st, 2013, the promotion time is only from 8:00 to 22:00 during the period of August 26th, 2013 to August 31st. Time length: certain length of time. If the setting time is from 8:00 August 26th, 2013 to 22:00 August 31st, 2013, the promotion start time is 8:00 August 26th, 2013and the end time is 22:00 August 31st, 2013. Promotion Mode: : There are 3 modes can be chosen. All Discount: all customers can enjoy the discount NonMember Discount: only nonmember can enjoy the discount Member Discount: only member can enjoy the discount. When you settle amount, you need to input member or swipe member card Week plan: Tick All: promotion held every day. Monday, Tuesday, Thursday, Friday, Saturday, Sunday: ticking one or a few days means promotion held only in these days. :if you click this button, all PLU discount information will be the same as the first PLU you set. Then return to POS interface after setting. Choose the PLU, and then the customer will enjoy the discount 106 you have set. 107 6.3. How to set Qty Favour 1、click new 2、input barcode/disc type/qty/original price/discount price etc. 6.4. How to set PLU Member Discount Click “Back OfficeBasic PLU” to enter the following interface: 2. Edit Click 1. Select PLU such as Chicken with Cashiew Nuts 108 3、click save Do not click this item 1. Click Price_Stock 2. Input discount value like 20 3. Click “Save” 109 Return to POS interface and click Chicken With Cashiew Nuts and click “Other function Input Member”, then the customer can enjoy 20 percent off : 1. Input card NO. and click “OK” 2. Click “Cash” 110 6.5. How to set Category Discount Click “Back OfficeBasic Category to enter the following interface: 2. Click Edit 1. Select a category Click to select discount type Input discount rate 111 Note: Discount all: all customers can enjoy the discount. Member Discount: only member can enjoy the discount. When you settle amount, you need to input member or swipe member card. No discount: all customers can not enjoy the discount. Then return to POS interface, seafood will be twenty percent off. 6.6. How to setCard Level Discount Note: If you want to set discount for member card level, both PLU member discount and category discount should not be set. Click “Back OfficeCard Level to enter the following interface: 112 Edit card information and discount rate in this field After setting, the customer can enjoy the discount by member card level. Then return to POS interface, choose an item and click “other function Input Member” to make a discount: 1. Click it to input member card No. 2. Click “OK” 113 7. RFID Card Enter to back office interface, and click “RFID Card”: ※ Rfid Card Manage Note: the Rfid Card can only authorize once for the same card reader. 1、Here you can make manage card/user card init 2 、 after finishing, click exit. 114 ※ Rfid Type 1、click new 2、edit card type id/card type description ※ Rfid Issue Note: the card has to be the initialized Aclas card, and there is no need to input the Rfid card number in default condition (it means parameter—device1—“issue card” should not be ticked in Rfid setting.), because Aclas has written the card number for user when default. Input stored-value card No.\ stored-value card type 115 ※ RFID Here you can edit the information of black\reissue\history search\serial search ※ Black 2、click new 1、choose black 4 、 choose the member 3、input the member No. and click search 5、click “OK” 116 if you want to delete the black, click here After finishing, click exit. ※ Reissue 1、choose reissue 2、click reissue 3、edit black card\member name\points\balance 4、click save after finishing. 4、click exit. ※ History search 117 1、choose history search 3、click search 2、Input Member Card No.\Bill No\Card Type\Operation Type etc. 4、you can see the search result here. ※ serial search 1、Choose Serial Search 2、Input Member Card No.\Bill No.\Card Type Etc. 118 3、click save 8. Maintain Enter to back office interface, and click “Report”: Click Maintain Description: Erase Date: Erase the basic file data and sales data of program. Software Version: Check the software version. Data Backup & Recovery: Data backup and recovery. Reset System: Reset the system to original. Image Resource: add and edit picture. Software Update: update software. Software Upload The steps of software update are as below: Enter to back office interface, choose “Maintain” “Software Update” to pop up the following dialog: Click Select 119 Choose the path of installation package, the type should be ZIP: Click “OK” Click Upload When it finishes updating, the system will be restart automatically. 9. Daily Report Enter to start interface, and click “Daily Report”: Click Report Daily According to date print or print view daily report: 120 10. Parameters settings Enter to start interface, click “Parameters” to enter parameter setting interface: Company Click “Company” to edit company No., company, store, machine ID and address information etc. 121 Region and Language Click “Region” to edit language and region format information etc. 1. Click Region 2. Edit related information here 3. Click Save Common information Click “Common” to set common profile, 13 code and 18 code and system etc. 122 1. Click here 2. Click here 1. Click here 3. Click Save 2. Select Click OK one, then Hospitality Click “Hospitality” to set hospitality related information and table status. 123 1、Edit Hospitality Related Information here. 2、Edit Table Status Information here. 3、Click save. Theme Click “Theme” to set background, accent color and font. Print Format 124 Set print format, daily report print format and receipt related information as request. Device 1 Set print, cash drawer, Pole display and Tvout second display information etc. Server 125 E-Invoice Set invoice configuration information etc. System 126 Set system date and time. Backup Set whether to use data backup set or not. 127 Second Display 1 、 edit second display information here 2、click save 128