1
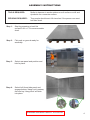
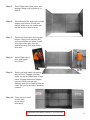
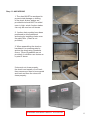
USER MANUAL
AND
ASSEMBLY INSTRUCTIONS
COLLAPSIBLE SHEDS
Moving On 2014 Pty Ltd t/a Collapsible Sheds
PO Box 7859 Bundall 4217, Queensland
ABN 86 120 237 318
Australian Innovation Patent No 2015100130
TABLE OF CONTENTS
Safety Precautions ................................................... Page 1
Full Size Shed: Component List ............................... Page 2
: Materials and Dimensions............... Page 2
: Shipping Dimensions and Weight ... Page 2
: Engineers Certification .................... Page 2
Half Size Shed: Component List .............................. Page 3
: Materials and Dimensions .............. Page 3
: Shipping Dimensions and Weight ... Page 3
: Engineers Certification .................... Page 3
Assembly Instructions .............................................. Page 4
Anchoring ................................................................. Page 6
Disassembly Instructions ......................................... Page 7
Australian Innovation Patent No 2015100130
SAFETY PRECAUTIONS
PERSONS
REQUIRED :
Two people should assemble and disassemble the shed.
LEVEL SITE :
It is most important when constructing the shed to PREPARE A LEVEL SITE.
WIND :
Beware of windy conditions. DO NOT assemble the shed in strong wind
conditions. Shed panels can act as a “sail” when erecting the shed and can
be whipped around causing injury or damage. Make sure you can safely
assemble / disassemble the shed in the prevailing conditions. Secure doors
against wind.
SHARP EDGES :
Care must be taken when handling various pieces because sheet metal has
sharp edges. Please wear suitable work gloves and eye protection.
HOT WEATHER : Care must be taken during hot weather conditions. The shed panels can
become very hot. Please wear suitable work gloves to prevent burns to
hands.
DOORS :
Please secure doors in open or closed position to prevent wind from swinging
the doors which can cause injury or damage.
ANCHORING :
1. The shed MUST be anchored to prevent wind damage or shifting of the
shed. Anchor stakes are provided but should NOT be relied upon in high
winds. Anchor stakes can only be used on soft terrain.
2. Anchor chain eyelets have been positioned to allow additional anchoring
by installing chains over the pallet floor. (Chain is not provided)
3. When assembling shed on hardstand it is recommended to anchor the
shed using Dynabolts 6mm x 75mm (Dynabolts are not provided). In addition
use chains as in point 2 above.
Collaspible Sheds will not accept any responsibility or liability for any
shed used in cyclone regions or regions of exposed high winds.
COLLAPSIBLE SHEDS CANNOT BE HELD RESPONSIBLE FOR ANY
CONSEQUENCES DUE TO THE SHED NOT BEING ERECTED AS PER
INSTRUCTIONS OR DAMAGE DUE TO WEATHER CONDITIONS OR
ACTS OF GOD. PARTS MAY CONTAIN SHARP EDGES AND CORNERS
AND CARE MUST BE TAKEN WHEN HANDLING VARIOUS PIECES
TO AVOID AN ACCIDENT. FOR SAFETY SAKE, PLEASE USE A PAIR
OF WORK GLOVES AND EYE PROTECTION WHEN ASSEMBLING,
DISASSEMBLING OR PERFORMING ANY MAINTENANCE ON THE
SHED.
Australian Innovation Patent No 2015100130
1
DATA SHEET
FULL SIZE SHED
COMPONENT LIST
ITEM NUMBER
DESCRIPTION
WEIGHT Kg
901
Rear Panel Full Size
33.58
902
LH Side Panel
20.09
903
RH Side Panel
20.09
904
Roof Panel Full Size
27.30
905
LH Door
18.4
906
RH Door
17.87
907
Bottom Bar Full Size
4.15
908
Anchor Stakes (4)
1.3
924
Wood Pallet 2.4m. x 1.1m.
20.0
910
Full Size Shed Complete
190
MATERIALS AND DIMENSIONS
Full Size Shed: 2 doors wide 2.5m wide x 1.4 m Deep x 1.9m High
Zinc Plated Sheet 0.55m on 20x20mm square tube width TIG Welds
No Screws
SHIPPING DIMENSIONS AND WEIGHT
Full Size Shed: 2.5m x 1.4m x 0.2m
190 kgs.
ENGINEERS CERTIFICATION
TESTED AND CERTIFIED TO AUSTRALIAN STANDARDS AS1170(2011) and AS4100(1998)
DGM Consulting Pty Ltd : Engineers Report Number MO-101
Australian Innovation Patent No 2015100130
2
DATA SHEET
HALF SIZE SHED
COMPONENT LIST
ITEM NUMBER
902
DESCRIPTION
WEIGHT Kg
LH Side Panel
20.09
LH Side Half Size
20.09
903
RH Side Panel
20.09
906
RH Door
17.87
908
Anchor Stakes (4)
1.3
921
Rear Panel Half Size
16.0
922
Roof Panel Half Size
14.0
923
Bottom Bar Half Size
2.2
924
Wood Pallet 2.4m. x 1.1m.
20.0
915
Half Size Shed Complete
150
902-H
MATERIALS AND DIMENSIONS
Half Size Shed: 1 door wide 1.25m wide x 1.4 m Deep x 1.9m High
Zinc Plated Sheet 0.55m on 20x20mm square tube width TIG Welds
No Screws
SHIPPING DIMENSIONS AND WEIGHT
Half Size Shed: 1.2m x 1.4m x 0.2m
150 kg
ENGINEERS CERTIFICATION
TESTED AND CERTIFIED TO AUSTRALIAN STANDARDS AS1170(2011) and AS4100(1998)
DGM Consulting Pty Ltd : Engineers Report Number MO-101
Australian Innovation Patent No 2015100130
3
ASSEMBLY INSTRUCTIONS
TOOLS REQUIRED:
Mallet to hammer in anchor stakes on soft surface or drill and
dynabolts for a concrete surface.
PERSONS REQUIRED: Two people should erect full size shed. One person can erect half size shed.
Step 1: Start by preparing a level flat
surface 2.6m x 1.5 to accommodate
shed.
Step 2: Flat pack on ground ready for assembly.
Step 3:
Select rear panel and position and
hold in place.
Step 4:
Select Left Hand side panel and
engage bottom ‘Hang-Lock’ partway
first and top ‘Hang-Lock’ will slide
into place.
Australian Innovation Patent No 2015100130
4
Step 5:
Select Right Hand side panel and
engage ‘Hang-Lock’ system as in
Step 4.
Step 6:
Select Bottom Bar and insert upright
spigots into bottom of both side
panels. Make sure all corners are
square and the shed is level.
Step 7:
Select Left Hand door and engage
bottom ‘Hang-Lock’ partway first
and top will slide into place. Install
and leave door open, secure
against blowing shut with sliding
drop bolt.
Step 8:
Select Right Hand
door and repeat
as in Step 7.
Step 9: Select roof and install with spring
bolts at front. Engage rear tabs
under top square framework of rear
panel. Engage downward spigots
into top of both side panels.
Release and lock the spring bolts at
front. Test roof is secure by pushing
upward.
Step 10: Place pallet in shed
as floor and
reuse when
relocating.
Australian Innovation Patent No 2015100130
5
Step 11: ANCHORING
1. The shed MUST be anchored to
prevent wind damage or shifting
of the shed. Anchor stakes are
provided but should NOT be relied
upon in high winds. Anchor stakes
can only be used on soft terrain.
2. Anchor chain eyelets have been
positioned to allow additional
anchoring by installing chains over
the pallet floor. (Chain is not
provided)
3. When assembling the shed on
hardstand it is recommended to
anchor the shed using Dynabolts 6mm x 75mm (Dynabolts are not
provided). In addition use chains as
in point 2 above.
If doors do not close properly
the shed is not square or not level;
then manoeuvre shed to be squared
and level and then the doors will
close properly.
Australian Innovation Patent No 2015100130
6
DISASSEMBLY INSTRUCTIONS
REMEMBER TO RETRIEVE BOTTOM BAR
Step 1: Remove floor/transport pallet and place in convenient position at front of shed.
Step 2: Remove roof and place on pallet with spigots pointing down.
Step 3: Remove doors and place on pallet so that locks will not protrude through roof and
damage during transport.
Step 4: Remove sides and place on pallet. Support rear panel so that it does not fall on you.
Step 5: Place rear panel on top.
Step 6: RETRIEVE BOTTOM BAR
Step 7: Strap or tie down to pallet
Step 8: If hand loading directly onto vehicle, take care to place panels so that spigots and
protrusions will not cause damage during transport. Strap and securely tie down to
vehicle.
REMEMBER TO RETRIEVE BOTTOM BAR
Australian Innovation Patent No 2015100130
7