1
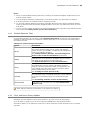
WorkExpo 9.0 User Manual | 1
WorkExpo 9.0 User Manual
WorkExpo
Managing
work
experience
programs
VE R S I O N 9 . 0 - U S E R M A N U A L
WorkExpo 9.0 User Manual | 2
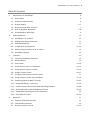
Table Of Contents
1.
Introduction to WorkExpo
1.1. Demo Mode
6
1.2. Delete Sample Records
6
1.3. School Details
1.4. Single Or Multi User Licence?
1.5. How to Register WorkExpo
1.6. Understanding WorkExpo
2.
Getting Started
7
7-8
9
10
10
2.2. Adding New Student Records
11
2.3. Add New Employer
11
11-12
2.5. Setting fonts and font sizes in letters
12
2.6. WorkExpo Options
12
Tutorials
13
3.1. Learning WorkExpo Overview
13
3.2. Default Dates
13
3.3. Post Codes
13-14
3.4. Using School Logo in Certificates
14-15
3.5. Using School Logos in Letters
15-16
3.6. Assign Teacher Visits
16-17
3.7. Creating and Saving Custom Letters
17
3.8. Using Custom Colors with WorkExpo
17-18
3.9. Importing Records Walk-Through
18-21
3.10. Using Mail Merge - Overview
21-22
3.11. Create Custom Documents with Mail Merge Wizard
22-28
3.12. Printing Double-sided Arrangement Forms
28-29
3.13. Swap Data files between Two Computers
3.14. User Defined Fields
4.
6-7
2.1. WorkExpo in a nutshell
2.4. Create New Arrangement
3.
6
Students
29
29-30
31
4.1. Importing Student Records
31
4.2. Find Student Records
31
4.3. Sorting student records
31-32
WorkExpo 9.0 User Manual | 3
4.4. Optional Tabs
4.5. Setting Defaults
4.6. Student Detail (Background) Information
4.7. Student Medical And Emergency Information
4.8. Delete All Student Records
34
35-36
4.14. Custom Student Groups
Employers
36
36-37
37
37-38
39
5.1. Find Employer By Business Name
39
5.2. Search Employers By Work Type
39
5.3. Search Employers By Key Word
5.4. Searching Using Wildcards
39-40
40
5.5. Delete Employer Records
40-41
5.6. Defaults - Employer Background Detail
41-42
5.7. Industry Sectors
42
5.8. User Defined Fields
42-43
Arranging Placements
44
6.1. Arrangements Datasheet View
Multiple Users
44
45
7.1. Multiple Users Overview
45
7.2. Add/Edit Users
45
7.3. Delete Users
45-46
7.4. Phone Fax Mobile Numbers
46
7.5. Passwords
46
7.5.1. Overview
8.
33-34
4.10. Tracking Students
4.13. Find Students Using the Find Tool
7.
33
34-35
4.12. Form And Home Group Update
6.
32-33
4.9. Exit Students
4.11. Student Optional Tabs
5.
32
46
7.5.2. User Passwords
46-47
7.5.3. Effective Passwords
47-48
Multiple Schools
8.1. Multi-School Edition In Brief
50
50
8.2. Working with Multiple Schools - Overview
50-51
8.3. Add a New School
51-52
WorkExpo 9.0 User Manual | 4
8.4. Edit School Details
52
8.5. Delete a School
52
8.6. Delete Students By School
52-53
8.7. Import Data Files - Overview
53-54
8.8. Import School Data File
8.9. Import School Data Files -Detailed Information
54
54-55
8.10. Assign Students to a School
55
8.11. Non WorkExpo Schools
55
9.
Printing
9.1. Print Work Experience Arrangement form(s)
56
56
9.2. Sample Documents
56-58
9.3. Letter Sample
58-59
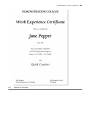
9.4. Certificate (Student)
59-60
9.5. Statistics Sample
60-61
9.6. Letter Setup and Margins
61
9.7. Troubleshoot - Printer Prints Blank Page
61-62
9.8. Print Wizard
62-63
9.9. Employer Evaluation Form
10.
Import and Export
63
64
10.1. Troubleshoot importing records
64-65
10.2. Import Employer records
65-66
10.3. Update Import
66-67
10.4. Import signature images
10.5. Exporting
11.
67
67-68
Backup and Restore
69
11.1. About The Data File
69
11.2. Automatic Multiple Backups
69
11.3. Backup Data File
69-70
11.4. Backing up to a CD
70-71
12.
Archiving
12.1. Archiving Records And End Of Year Rollover
72
72
12.2. Archiving Records
72-73
12.3. Archive Or Delete
73
12.4. Auto Archive
73
12.5. Archive Data Sheet View
74
WorkExpo 9.0 User Manual | 5
12.6. Browse Archives
74
12.7. Print Archived Arrangement
74
12.8. Restore Archived Arrangement
75
13.
Reference
76
13.1. Getting Help
76
13.2. Keyboard Shortcuts
76
13.3. Mouse Shortcuts
13.4. Using Multiple WorkExpo Data Files
76-77
77
13.5. What Teachers Say About WorkExpo
77-78
13.6. What's New In Version 9.0
78-80
14.
Technical & Support
81
14.1. Troubleshooting
81
14.1.1. Trouble Shooting FAQ
81
14.1.2. Phone and Fax Issues
81-82
14.1.3. Certificate Printing On Two Pages
14.2. System Requirements
82
82
14.3. Support Options
82-83
14.4. Licence and Copyright
83-85
14.5. Networking WorkExpo
85-87
14.6. Networking WorkExpo - Overview
87
14.7. Networking WorkExpo - Step by step
87-89
14.8. Data File Overview
89-90
14.9. Data File Corruption
90
WorkExpo 9.0 User Manual | 6
1
Introduction to WorkExpo
1.1
Demo Mode
When WorkExpo is installed on a new computer it always starts in DEMO mode. You need to enter your
WorkExpo registration number to unlock the demo to a full working copy. You will find the registration
number on the WorkExpo CD Cover. If you have a WorkExpo registration number enter it on the system
to unlock the demo. If you can't find your number contact Info Plan Software on (03) 9531 1091
HOW TO TURN THE WORKEXPO DEMO INTO A FULL WORKING COPY:
1.
Start WorkExpo and go to the Main Menu screen.
2.
Click the large OPTIONS button and select the SCHOOL tab.
3.
Make sure that your school name is entered correctly and click the REGISTER button.
4.
Enter your registration number and click OK
If the registration number fails check that your school name is entered correctly. The registration
code is very sensitive to the name of the school.
LIMITS OF THE DEMO VERSION:
Note that the demo has limits - it is record and time limited. WorkExpo demo will warn you when you
are nearing the limits. These limits are in the WorkExpo demo program, not in the data. As a result, you
may add new data to the demo and then continue to use the same data file when you purchase the full
program. The demo includes an on-line help system. You can turn the demo into a full working version
without the need to re-install software. Simply telephone the number below with your school's order
number and a registration number to unlock the demo will be supplied.
There are several tutorial files available on the CD. Check the Tutorial and Lessons folders. The audiovisual demos can be viewed directly on your computer from the CD Rom. We hope that you will enjoy
looking at WorkExpo.
If you require further details about the product, please telephone (03) 9531 1091 during business hours.
1.2
Delete Sample Records
You can delete the sample records in WorkExpo while at the same time not deleting any of your own
records which you may have added:
1. Make sure that you have a good backup of your data file.
2. From the Main Menu - menu bar at the top of screen
3. Choose Tools / Utilities /Delete sample records...
This removes the sample student and employer records but does not delete any of your own records.
1.3
School Details
On the School Details page you can enter the school details for your school or college. Enter the address
details for the school, indicate what the public liability is and Principal name and Title. These details will
appear on letters generated by WorkExpo.
Add/Edit/Delete WorkExpo Users:
In previous versions of WorkExpo the school phone numbers were stored with the school details. With the
introduction of multiple-users in WorkExpo these details are now stored on a user-by-user basis.
To add/edit or delete school phone, fax and email details:
1.
From the WorkExpo main menu click the large Options button.
2.
In the school details section choose Add/Edit/Delete WorkExpo users
3.
Add or edit the details for each WorkExpo user.
WorkExpo 9.0 User Manual | 7
The phone, fax, mobile phone and email for the logged-in user will appear in all documents and letters.
How to add a password for a particular user:
1.
Log into WorkExpo as the user you wish to set a password for.
Note that you can Log Off and change users without having to close WorkExpo. To do this choose Log
Off from the File Menu.
2.
From the WorkExpo main menu click the large Options button.
3.
In the Options dialog click the Password tab.
4.
Add or edit the password for the logged-in WorkExpo user.
Next time WorkExpo starts you will be prompted for a password.
You can add up to 5 users if you have a network licence.
1.4
Single Or Multi User Licence?
The licencing structure for WorkExpo has changed in Version 9.0. Prices for the stand-alone products
have not altered but multi-user licences have been introduced as more schools share WorkExpo among
work education teachers, VCAL and VET co-ordinators, MIPS officers and a range of other admin
staff who have a need to share the WorkExpo student/employer database in schools, often across a
network.
You should have a single-user licence if:
l
You are the only person in your entire school, college or multi-campus college who uses WorkExpo
AND
l
You are using WorkExpo on a stand-alone PC.
A single-user licence entitles you to install WorkExpo on one desktop PC and you may also install a copy
of WorkExpo on your notebook PC. You may move the data file to a network drive for security reasons
but you are not able to share the data file across the network with other users.
You should have a multi-user licence if:
l
There is another staff member(s) who wishes to have access to or use WorkExpo on their own PC OR
l
You need to install WorkExpo on more than one desktop PC for use across a network OR
l
You are job sharing with another staff member and you both will be using WorkExpo. A multi-user
licence is required if WorkExpo is installed on a single machine but two (or more) people use it.
A multi-user licence allows for up to 5 (five) users. Each user may install a copy of WorkExpo on
their desktop PC and another copy on their notebook PC. A single-user licence entitles the user to
install a copy on their desktop machine and a laptop for their own use.
1.5
How to Register WorkExpo
If you have already installed the WorkExpo demo there is no need to install any further software.
You can turn the demo into a full working version. Follow these steps:
1.
Start WorkExpo and click the OPTIONS button on the main menu.
2.
In the SCHOOL DETAILS tab, make sure that your school name is correctly entered.
3.
Click the REGISTER button.
4.
Enter the WorkExpo registration code. This can be found on the front of the WorkExpo CD cover.
Ensure that the school name is entered correctly before attempting to register using the registration
code. The code itself is linked to the name of the school and internally converts the name of the school to
a number which must match the registration code.
If you have already registered and are trying to change the name of the school this is not possible.
WorkExpo 9.0 User Manual | 8
You need to contact Info Plan Software on (03) 9531 1091 if you need to change the name of the
school after it has previously been registered.
WorkExpo 9.0 User Manual | 9
1.6
Understanding WorkExpo
Notes about the DATA.MDB file
All the information that you enter into WorkExpo is stored in a single data file. This file’s default name is
DATA.mdb (although you can name it anything you like) and it normally resides in the C: \Program
Files\WorkExpo folder. This file contains all your important WorkExpo information and should be carefully
backed-up regularly. Always back-up the data file after each session.
Back-up strategies
WorkExpo will create a backup copy of your data file when you exit the program. To ensure this select
OPTIONS, then Backup maintenance.
It's a good idea to have two copies of your data file in case one is lost or unusable.
You should have a backup copy of your data file on floppy as well as a separate backup copy on the hard
drive or preferably on the network.
You can open data files directly in WorkExpo. Follow these instructions to do so:
1.
In WorkExpo select OPEN from the FILE menu.
2.
Navigate to the data file you wish to use.
3.
The default file DATA.MDB normally resides in C:\Program Files\WorkExpo or wherever you store the
WorkExpo data file.
How to copy a WorkExpo data file from one computer to another
1.
Make sure WorkExpo is closed.
2.
Use Windows Explorer to copy the file DATA.MDB to a floppy disk.
3.
Place the floppy disk in the drive of the second computer.
4.
Use Windows Explorer to copy the file DATA.MDB to C:\Program Files\WorkExpo or wherever you
store the WorkExpo data file
The path to the data file you're using can be displayed in the title bar. Select OPTIONS/Settings to set
this.
WorkExpo 9.0 User Manual | 10
2
Getting Started
2.1
WorkExpo in a nutshell
In simple terms there are three basics steps to creating a new student arrangement record within
WorkExpo.
Add a new student record in the Students window:
Add a new record for an Employer.
Finally, create the Arrangement between the student and employer
Some things to be aware of when adding records in WorkExpo
Records are saved automatically but you can explicitly save a record by pressing the save button on
the toolbar.
l
These three windows are the central work areas in WorkExpo and where you spend most time in
WorkExpo.
l
It's important to understand that deleting an arrangement record DOES NOT delete the related
student or employer records.
l
l
A student may have more than one arrangement.
WorkExpo 9.0 User Manual | 11
l
2.2
An employer may have more than one student undertaking work experience at the same time.
Adding New Student Records
To add a new student record manually:
1.
In the Students window.
2.
Select "EDIT" then "Add new student" from the menu or click the STAR button on the WorkExpo
ToolBar.
3.
Once you have added the details, the new record is saved automatically or you can click the save
record button on the toolbar.
To delete a student record:
1.
In the Students window.
2.
Select "Delete student record" from the EDIT menu.
3.
The currently displayed student record will be deleted.
4.
The student record is deleted.
When you delete a student or employer record all arrangements and other details associated with
that student or employer are also deleted. WorkExpo will always warn you of this before deleting
any records.
2.3
Add New Employer
To add a new employer record manually:
1.
In the employer window.
2.
Select "EDIT" then "Add new employer" from the menu or click the STAR button on the WorkExpo
ToolBar.
3.
Once you have added the details, the new record is saved automatically or you can click the save
record button on the toolbar.
To delete a employer record:
1.
In the employer window.
2.
Select "Delete employer record" from the EDIT menu.
3.
The currently displayed employer record will be deleted.
4.
The employer record is deleted.
Notes:
You can import employer records into WorkExpo from many external sources.
You can delete sample employer records easily. See Delete Sample Records (Section 1.2)
You can delete multiple employers with just a few clicks. See Deleting Employer records (Section
5.5).
2.4
Create New Arrangement
The student and employer must already exist in WorkExpo before an arrangement can be created.
In the student or employer does not current exist then they will need to be added via the student or
employer screens.
To create a new arrangement in WorkExpo:
1.
From the WorkExpo main menu click the Arrangements button.
2.
In the Arrangements window click the large NEW button at the top left of screen.
WorkExpo 9.0 User Manual | 12
3.
A new (empty) arrangement record is created and ready for input.
4.
Place the cursor in the Student field and type the first few letters of the student's last name.
5.
WorkExpo finds the student and populates the field.
6.
Press the tab key on the keyboard. WorkExpo moves to the Employer field.
7.
Enter the first few letters of the employer name and press tab.
8.
Continue to complete the fields in the Arrangements window in this way.
9.
Once the record has been entered click the Save button on the toolbar or move off the record to
another record.
The minimum fields are student, employer, start date, end date and work type.
2.5
Setting fonts and font sizes in letters
When setting up letters in WorkExpo you are able to choose fonts and/or font sizes. Certificates, reports.
pro-formas and lists continue to use WorkExpo font defaults.
Follow these instructions to set up fonts and font sizes for all letters.
1.
From the WorkExpo Main Menu click the large Options button
2.
Click the Print Settings tab
3.
Click the Set Fonts For Letters blue hyperlink
4.
Select the Font and font size as necessary.
The selected font will be used in all letters in WorkExpo.
Notes:
2.6
l
Certificates have built in fonts and can't be changed.
l
Lists and other internal documents have built in fonts and can't be changed.
l
The default font for WorkExpo letters is Times New Roman size 12.
WorkExpo Options
WorkExpo is very customizable and offers many options and settings so that you can spend the minimum
time with data entry and the maximum time with analysis and outputs.
The following is a list of items or features which offer customization within the program including:
l
Setting the date which appears on letters
l
Setting up your own user-defined fields
l
Maintining Work Type pick lists
l
Setting passwords for multiple users
l
Configuring warnings while you are working
l
Using an ink-jet printer
l
Show or Hide the School Details information in letters
l
Set up your own custom letters
l
Using signature images in letters
l
Warning you of various errors or possible conflicts while you work.
See the OPTIONS chapter in the WorkExpo Help File.
WorkExpo 9.0 User Manual | 13
3
Tutorials
3.1
Learning WorkExpo Overview
There are several ways to learn how to use WorkExpo. Choose one of the options below for more details.
Displaying a list of audio/visual tutorials
In WorkExpo click the Help menu, then Tutorials. A list of several audio/visual tutorials will be available
to view on-screen.
- or 1.
Go to the InfoPlan website (http://www.infoplan.com.au/workexpo) and click On-line
Tutorials.
2.
The list of tutorials will be displayed, allowing you to easily choose which tutorial to watch.
3.
Audio-visual tutorials on the WorkExpo CD in the Tutorials folder.
4.
Viewlets (short video demos) on the Info Plan web site.
Click here to view a sample Viewlet
(http://www.infoplan.com.au/workexpo/viewlet/overview.viewlet/overview_viewlet_swf.html)
3.2
Default Dates
In the Arrangements window you can set a default start date and a default end date so that each newly
created arrangement record has the start date and end date filled in with your current block dates. You
can also have a list of alternative dates to choose from in the start and end date drop down boxes.
To set a default start date and a default end date:
1.
In the Arrangements window click the OPTIONS tab in the upper right of screen.
2.
In the section "Defaults for each new Arrangement" enter the start and end date you'd like each new
arrangement to default to.
3.
You can double-click these date fields to pop-up a calendar. Choose a date from the calendar and
click it and the selected date will appear back in the Arrangements window's default date box.
To edit the dates which appear in the start and end date drop down boxes perform the following:
1.
In the Arrangements window, click the large DATES button at the lower left of screen.
2.
This pops up the dates edit dialog box where you can add, edit or delete a series of start and end
dates. Demo here ('Block Dates' in the on-line documentation)
It is recommended that you enter all possible start and end dates which may occur during the year
so that you can easily select a particular start date or end date from the drop down boxes. For
example, if you have a two week block for work experience you should enter BOTH Monday dates
as possible start dates and BOTH Friday dates as possible end dates. This will mean that when you
are entering arrangement records for students undertaking one-week placements you will have the
start end end dates readily available from the drop down boxes.
(Data File Corruption.html)
3.3
Post Codes
WorkExpo is designed primarily for Australian schools. In both the student and employer windows there's
an automatic postcode lookup feature. This feature allows you to type a suburb name and WorkExpo
finds the postcode and populates the postcode field automatically. You can specify which state to use by
double-clicking in the Suburb field. When you do this a postcode selection dialog box is displayed. You
can choose any combination of Australia postcodes or choose to disable the automatic postcode lookup
WorkExpo 9.0 User Manual | 14
feature altogether. WorkExpo will remember your settings for future.
How to set specific state postcode lookup:
1.
In the students or employers window double-click the Suburb field.
2.
The postcode lookup dialog box is displayed.
3.
Click to include or exclude any combination of States/Territories.
4.
Optionally, you can select "Don't use Auto Postcode" and the feature is disabled.
The postcode list cannot be edited. It is updated with each new version of WorkExpo.
You can choose multiple states and the postcode lookup will shows all state postcodes selected.
3.4
Using School Logo in Certificates
You can use your school logo in certificates and letters in WorkExpo. The logo must be an image file
(.bmp, gif, jpg or png).
Prepare the image file before adding it to WorkExpo and note the location of the file. Try to keep the file
size as small as possible.
To add a logo to a certificate, first bring the certificate up in print preview.
To display a certificate in print preview mode:
1.
From the WorkExpo main menu click the Print button to start the Print wizard.
2.
Choose Students / Individual Student then click Next.
3.
Select any student with a placement from the list and click Next.
4.
Place a tick in the Student Certificate box.
5.
Make sure that Print Preview is selected in options for print.
The certificate is displayed in print preview mode.
To include a school logo with the certificate:
1.
Click the School Logo button on the Print Preview toolbar.
2.
This displays the School Logo settings dialog box.
3.
Here is where you set properties for the logo.
Each Certificate can have its own logo. This means that you need to add the logo to each certificate.
Property settings for formatting school logo:
Page' in the on-line documentation)
- See also Setting Up Logo ('Setting Up Logo On
Property
Description
Logo visible
Make the logo visible or invisible
Logo file path
Path to the logo bitmap image file. Click to browse.
Logo align
Align logo left, centre or right of page.
Logo top
Logo distance from the top margin in centimeters.
Logo mode
Image mode - defaults to Best Fit.
WorkExpo 9.0 User Manual | 15
Text top
Text distance from the top margin in centimeters.
Show school
Include the school name in certificate.
Show border
Include a border around the certificate.
Teacher name
Include the current logged-in user's name.
Teacher title
Include the current logged-in user's title.
Teacher sig
Include the current logged-in user's signature.
Principal name
Include the school principal's name.
Principal title
Include the school principal's title.
Principal sig
Include the school principal's signature.
Extra Page Depth
Makes the page longer but can create a second page.
Notes:
l
WorkExpo will remember your logo settings from session to session.
l
Each Certificate can have its own logo. This means that you need to add the logo to each certificate.
l
You can set the margins for the certificate by choosing File / Page Setup when in print preview.
l
You have can different settings and/or different logos for the student certificate, employer certificate
and letters.
l
Image formats supported are .bmp, .gif, jpg and .png
l
You can turn logos on globally from Options / Print Settings but the settings you make in print
preview override these.
l
Be careful using the Extra Page Depth setting as it can create too much space at the bottom of the
page an extra blank page may be created.
Teacher and Principal signatures are added in Main Menu /Options / Signatures
3.5
Using School Logos in Letters
You can use your school logo in certificates and letters in WorkExpo. The logo must be an image file
(.bmp, .gif, .jpg or .png).
Prepare the image file before adding it to WorkExpo and note the location of the file. Try to keep the file
size as small as possible.
To add a logo to a letter, first display the document in print preview.
To display a letter in print preview mode:
1.
From the WorkExpo main menu click the Print button to start the Print wizard.
2.
Choose Students / Individual Student then click Next.
3.
Select any student with a placement from the list and click Next.
4.
Place a tick in one of the letter options e.g. Letter to Employer .
5.
Make sure that Print Preview is selected in options for print.
The letter is displayed in print preview mode.
To include a school logo with the letter:
1.
Click the School Logo button on the Print Preview toolbar.
2.
This displays the School Logo settings dialog box.
3.
Here is where you set properties for the logo.
Property settings for formatting school logo:
- See also Setting Up Logo ('Setting Up Logo On
WorkExpo 9.0 User Manual | 16
Page' in the on-line documentation)
Property
Description
Logo visible
Make the logo visible or invisible
Logo file path
Path to the logo bitmap image file. Click to browse.
Logo align
Align logo left, centre or right of page.
Logo top
Logo distance from the top margin in centimeters.
Logo mode
Image mode - defaults to Best Fit.
Text top
Text distance from the top margin in centimeters.
Show school
Include the school name and address at the top.
Teacher name
Include the current logged-in user's name.
Teacher title
Include the current logged-in user's title.
Teacher sig
Include the current logged-in user's signature.
Principal name
Include the school principal's name.
Principal title
Include the school principal's title.
Principal sig
Include the school principal's signature.
Extra Page Depth
Makes the page longer but can create a second page.
Notes:
l
WorkExpo will remember your logo settings from session to session.
l
Each letter can have its own separate logo. This means that you need to add the logo separately to
each letter.
l
You can set the margins for the letter by choosing File / Page Setup when in print preview.
l
You have can different settings and/or different logos for the student certificate, employer certificate
and letters.
l
Image formats supported are .bmp, .gif, jpg and .png
l
You can set logos on globally from Options / Print Settings but settings you make in print preview
override these.
l
Be careful using the Extra Page Depth setting as it can create too much space at the bottom of the
page an extra blank page may be created.
l
Each letter can have its own separate logo. This means that you need to add the logo separately to
each letter.
Teacher and Principal signatures are added in Main Menu /Options / Signatures
3.6
Assign Teacher Visits
You can assign teachers to visit students on Work placement. You can do this at the time of creating the
arrangement or add this information later.
Follow these instructions to assign teacher visits.
1.
Go to the Arrangements window.
2.
Choose VISITS from the VIEW menu
3.
Select the visiting teacher from a drop down list.
4.
Click the PRINT button on the bottom right to view a hard copy document.
WorkExpo 9.0 User Manual | 17
3.7
Creating and Saving Custom Letters
WorkExpo allows you to write a custom letter to a selected employer and save the custom letter to be reused later. You can choose to create new custom letters or edit your own existing custom letters. You can
also print custom letters you have written and saved. Custom letters are designed to allow you to create
and saved "one-off" letters e.g. a Cancellation letter which you might use occasionally. Custom letters
can only be sent to employers and they can't be merged or bulk generated. They are designed to be sent
to a single employer at a time.
1.
With the WORKEXPO main menu on your screen click on the PRINT button.
2.
The Print Wizard dialog box will appear. Select “Custom letters to employers” and click NEXT
3.
Follow the steps that WorkExpo walks you through.
4.
Each letter that you write must be given a name which you enter in the Letter Type box while the
text is entered in the Letter Text area.
5.
When writing a new letter include only the body text of the letter Do not include
l
Recipient
l
Address
l
Date
WorkExpo will take care of these parts of the letter.
l
l
To delete a custom letter press DELETE. The currently displayed letter will be permanently deleted.
Custom letters are designed to be sent to a single employer at a time. You can't add, edit or delete
WorkExpo's in-built letters and documents.
3.8
Using Custom Colors with WorkExpo
In WorkExpo you can set up the main windows so that the color of the Header area changes depending
on the placement status of the current student or employer. This is useful as the change in color gives a
visual clue as to the current state of the placement, When you turn on this color setting you can choose
to accept the pre-defined WorkExpo colors or set your own colors.
Follow these instructions to activate color settings in WorkExpo.
1.
Go to the Arrangements window.
2.
Choose the OPTIONS tab on the right of the screen.
3.
Click the “set colors” link.
4.
The Add/Edit Placement Type.
WorkExpo 9.0 User Manual | 18
3.9
5.
Add a new Placement Type called VCAL, for example (Victorian Certificate of Applied Learning).
6.
Set colors as preferred using the Windows Color Picker dialog.
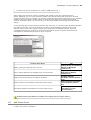
Importing Records Walk-Through
Importing records into WorkExpo is a two step process. First export the records from your school's
central database then import the records into WorkExpo. Follow these instructions.
What to do
Notes
1. Export the student
records from
CASES/CASES21 or any
other school computer
system as a comma
delimited (separated) text
file.
All school database systems are able to export data as text files.
However, if they can export directly to Excel then this saves time.
2. It’s important that the
fields WorkExpo needs are
exported. See the required
list to the right:
Note that these fields are the
MINIMUM fields required for
import.
You can add additional fields
if required. The order of
these fields is not important
but their names are.
3. Name the exported text
file and save it to memory
stick or a shared network
location
4. Text file can be opened
using Windows Notepad and
should look similar to this.
l
FirstName
l
LastName
l
DateOfBirth
l
Form
l
Homegroup
l
Street
l
Suburb
l
PostalCode
l
Phone
l
ParentName
l
ParentPhone
l
Note
Exported file can be named anything but should have a .txt (TEXT) file
extension.
e.g. Year9_2006.txt
WorkExpo 9.0 User Manual | 19
5. Start Microsoft Excel
6. Open the file
WorkExpo.xls
in the WorkExpo folder.
This file contains macros to help you set up the text file for import into
WorkExpo. If Excel asks you to open with macros you should say YES.
Note: This file is available for download from our website.
http://www.infoplan.com.au/workexpo/document/workexpo.xls
7. Next, open the TEXT file
you saved earlier.
You must select TEXT FILES
from the files of type.
8. Excel will automatically
start the TEXT IMPORT
WIZARD.
Under the Original Date Type
section make sure that you
choose DELIMITED
9. In STEP 2 of the wizard
make sure under Delimiters
you have selected COMMA
WorkExpo 9.0 User Manual | 20
10. Make sure that the
columns in WorkExpo are in
the correct order.
Use the WorkExpo toolbar to
move columns to the left or
right.
COLUMN ORDER (Include all columns)
l
FirstName
l
LastName
l
DateOfBirth
l
Form
l
Homegroup
Street
Note that these fields are the
MINIMUM fields required for l Suburb
import.
l PostalCode
l
You can add additional fields l Phone
if required. The order of
l ParentName
these fields is not important
l ParentPhone
but their names are.
l Note
11. Use the WorkExpo
toolbar to help you set up
the spreadsheet. Although
some setting up needs to be
done manually.
Note: This file is available for download from our website.
http://www.infoplan.com.au/workexpo/document/workexpo.xls
12. Use the ARROWS to
move Excel columns to the
left or right.
Select the column to move by placing the
cursor in the selected column, then click
move left or right on the toolbar
WorkExpo 9.0 User Manual | 21
13. The PARENT NAME
needs to be in single column
but the spreadsheet may
contain two columns i.e.
parent’ first name and
parent last name.
You can get the parent names into a single column by placing the cursor
into the parent first name column and clicking the toolbar button above
6. When all is ready click
the SETUP icon on the
WorkExpo toolbar to finish
the job.
The sheet is now ready to be
saved.
Clicking this button will add column headers, change text case to proper
case and format the spreadsheet correctly, ready for import.
7. Finally the spreadsheet is
now ready to be saved. It must
be saved as an Excel file. i.e. it
must have an .xls file
extension.
e.g. YEAR9_2006.xls
The spreadsheet is now ready
to be imported into WorkExpo.
8. Close Excel and start
WorkExpo. Start the
WorkExpo import wizard
again and import the newly
saved Excel spreadsheet.
To view an audio visual demonstration how to import records: In WorkExpo choose Help / Video
Tutorials / Importing student data.
3.10
Using Mail Merge - Overview
MailMail merge - What to do.
Use Microsoft Word's Mail Merge Wizard to create form letters, mailing labels, lists and envelopes for
distribution.
WorkExpo 9.0 User Manual | 22
1.
Data source with recipient information, such as student or employer information
2.
Main document with merge fields that are placeholders for WorkExpo information
3.
Resulting merged document
Word’s wizard guides you through all of these steps. If you prefer to work outside the wizard, you can
use the Mail Merge toolbar. Either way, the end result is that each row (or record) in the data source
produces an individual form letter, mailing label, envelope, or directory item.
Notes
To complete the basic process, you:
3.11
l
Open or create a main document.
l
Open or create a data source with individual recipient information.
l
Add or customize merge fields in the main document.
l
Merge data from the data source into the main document to create a new, merged document.
l
You can use Word’s mail merge to create any type of document that maps fields to data, not just
mailings or lists.
Create Custom Documents with Mail Merge Wizard
What to do
Notes
1. Start Microsoft Word.
We will create a custom Student Certificate using a school logo.
2. Open a blank document if Choose File/New Document
one is not already open
3. From the Tools menu,
select Mail Merge…
WorkExpo 9.0 User Manual | 23
4. The Mail Merge Helper
(Wizard) appears.
5. The Mail Merge Helper
has 3 steps
6.
Click CREATE
Step 1 is CREATE new document
WorkExpo 9.0 User Manual | 24
7.
Select Form Letters
8. Next the wizard asks if
you’d like to use the Active
Window
9. Click the GET DATA
button. This is the second
step in the wizard.
In this step you can create a
new data source or open an
existing data source.
Our WorkExpo data file is our
data source so choose OPEN
DATA SOURCE…
Form Letters are a way to create a page for every record in our data
source. This means a page for each student record, for example.
Click Active Window
WorkExpo 9.0 User Manual | 25
10. Navigate to the
WorkExpo folder.
By default this folder is
C:\PROGRAM
FILES\WORKEXPO
IMPORTANT NOTE!
In the Files of type drop
down box make sure that MS
Access databases is selected!
11. Word now creates a link
to the Microsoft Access
database file and displays its
contents.
Click the Tables tab, then
choose under Tables in
data.mdb:
Arrangements for Mail
Merge
WorkExpo 9.0 User Manual | 26
12. Because the main
Click EDIT MAIN DOCUMENT
document is a new document
Word displays this message.
13. The wizard disappears and
we are returned to the main
document
The Mail Merge Toolbar appears
14. Now the mail merge toolbar We use this toolbar to perform the merge process. Run your mouse over
has appeared.
the toolbar buttons to get acquainted with them.
15. Click the INSERT MERGE
FIELD button at the left of the
toolbar.
WorkExpo 9.0 User Manual | 27
The fields from WORKEXPO are displayed in a list. Because there are many fields in WorkExpo this list is
very long. Click on Student_First_Name. Word inserts that field into the Word main document.
16. The field is shown enclosed
in double brackets called
CHEVRONS
17. Press the space bar to
create a space after the inserted
field
18. Click the INSERT MERGE
FIELD button at the left of the
toolbar again.
19. This time insert the
student’s last name.
Click on the field called Student_Last_Name
20. To VIEW the data that the
fields represent you click the
ABC button as shown below
This allows you to check that the data in WorkExpo is successfully being merged. You should see a
student’s first and last name instead of the field names. To switch back to the field click the “View
Merged Data ” button again.
WorkExpo 9.0 User Manual | 28
21. Click the NEXT RECORD
(See above) button to view the
name of the next student.
Similar to the Student and Employer navigation controls in WorkExpo.
22. You have now set up your
main document. The next step is
to create the merge itself.
23. Finally the merge itself
occurs. Click the
Merge To New Document
button
(see below)
This creates the third and final file in the merge process.
24. Word now displays the
results of the merge in a new
document.
This file can be saved or printed. Alternatively, you can simply click the
“Merge to printer” button to produce the output of the merge directly to
the printer.
25. Save the main document
for later re-use.
This saves all merge information so that next time you won’t need to
use the merge wizard.
26. Check out some of the
Or under the My Documents folder.
merge samples on the CD under
the TRAIN folder.
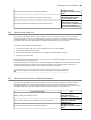
3.12
Printing Double-sided Arrangement Forms
Double sided arrangement forms are causing some difficulty and paper wastage in some schools.
Teachers have requested that they be able to print the first page only of the work experience
arrangement form so that they can photocopy a single blank Page 2 and print all of page 1 information
directly from WorkExpo. Thus producing a single document for each student.
WorkExpo allows you to print the FIRST PAGE ONLY if required.
Follow these steps to print a single double sided form for each student:
1.
Photocopy page 2 of your master copy of the Arrangement form.
WorkExpo 9.0 User Manual | 29
2.
Feed this photocopy, blank side up, into your printer.
3.
Ensure that “First Page Only” is checked, as shown above.
4.
All arrangement forms printed from WorkExpo will now only ever print the first page.
WorkExpo can print both sides of work experience arrangement form if you are using a duplex
printer.
3.13
Swap Data files between Two Computers
You can transfer the WorkExpo data between two computers.
1.
••
3.
4.
3.14
User Defined Fields
User-defined fields provide a way where you can store information which you determine. You can specify
the name of the field and you can choose whether the field is a text box or a drop down box. If you
choose a drop-down box you can specify default values for the drop-down box. For example, if you added
a user-defined field called "Sport" you could include a drop down box which may contain items such as
"Football", "Hockey", "Cricket" etc as possible choices. You can add up to ten user-defined fields to the
Students window and five user-defined fields for employers.
1.
2.
3.
1.
2.
WorkExpo 9.0 User Manual | 30
3.
4.
1.
To display field names back on the main student window enter the field names you wish to use here
on the left here.
2.
On the REPORT tab you can enter the Name of the Report and a report description.
3.
WorkExpo 9.0 User Manual | 31
4
Students
4.1
Importing Student Records
You can import records into WorkExpo from any external electronic record keeping system. You must,
however, do this as a 2 step process.
Export the required records from your school's database system to an Excel file. Import this file into
WorkExpo, using the Import wizard (File menu)
Select Import Student (or Employer) records. Follow the Import Wizard's instructions on screen.
How to import student records:
1.
In WorkExpo, start the import wizard from the File / Import menu.
2.
Print the list of fields required in Step 2 of the Import wizard. Then cancel the wizard.
3.
Contact your school's central database administrator.
4.
Give the field list to the database administrator and request an export file of all Year x records.
5.
Request that all fields set out in the field list are included.
6.
Open the export file using Microsoft Excel.
7.
Format the file as set out in the field list instructions.
8.
Once the Excel file has been saved with an .xls extension, re-start the WorkExpo import wizard and
follow the instructions.
You can import student records in a special update import to update records reather than replace
them.
4.2
Find Student Records
You can find student records by Last Name or by First Name . You can enter the first few characters of
the name and WorkExpo will try to find a match. For example type in "SAR" and WorkExpo will locate, for
example, "SARAH" or "SARA". WorkExpo sorts the records into Last Name order if you search by last
name and first name order if you search by first name. This means that if the first record found is not the
one you're looking for you can page through the records using the PAGE DOWN key.
1.
In the Students window, select the MAIN tab.
2.
Choose to search by Last Name or by First Name by selecting the appropriate check box.
3.
Enter the Name of the Student and press enter.
4.
WorkExpo finds the student and shows the student record.
5.
Press the PAGE DOWN key to see the next closest match.
You can also Find Students by using the FIND tool (Section 4.13) e.g. Find students where
the post code = "1234".
4.3
Sorting student records
WorkExpo 9.0 User Manual | 32
Sort student records by FIRST
NAME and filter student records
for Year 10A students only.
Then remove filtering and sorting
by choosing remove filter/sort
from RECORDS menu.
Right click for shortcut menu
4.4
Optional Tabs
In the students and employers window you can show or hide additional information for
students/employers. This information is available on tabs which either are displayed or hidden depending
on your choices in the Options tab. In this way WorkExpo allows you to hide any information which is not
essential to the running of your program.
Settings for optional student information:
Option
Description
DETAIL
Provides a DETAIL tab which shows detailed information for
the current student. Fields such as gender and language
spoken at home are available. To make this tab visible place
a tick in the DETAIL check box.
See Setting Defaults ('Defaults - Student Background
Detail' in the on-line documentation) for students.
PREFER
Displays a tab PREFER where students can indicate a
preference for work experience. WorkExpo will try to match
individual student preferences with employers.
See Student Preferences (on-line documentation)
TRACK
Displays TWO tabs called TRACK. On the left side of screen
the TRACK tab is used to capture information relating to
tracking a student's progress towards work placement. The
other TRACK tab on the right of screen provides a matrix
where tracking outcomes are visible.
See Tracking Overview (Section 4.10).
COUNSEL
Provides a tab where you can capture counselling information
about students. Each counselling interaction can be captured
to provide a counselling history on a student-by student
basis.
See Counselling students (on-line documentation)
USER DEFINED
A tab where you can enter your own user defined fields
(Section 3.14).
When tabs are hidden the information is not deleted only hidden.
4.5
Setting Defaults
You can set defaults in WorkExpo so that when new records are added certain fields you nominate are
automatically populated with default values. i.e. the gender field is automatically populated as "female".
WorkExpo 9.0 User Manual | 33
To set defaults for student records in WorkExpo:
1.
From the WorkExpo main menu press the large Students button.
2.
In the Students window click the "Background Details" tab.
3.
Click the "Set Defaults..." blue link at the bottom of the tab.
4.
In the "Set Defaults" dialog box, select the defaults you'd like to set and press OK.
5.
Now, when new students records are added these defaults will be added to the new records.
To update existing student records with defaults:
1.
From the WorkExpo main menu press the large Students button.
2.
In the Students window click the "Background Details" tab
3.
Click the "Set Defaults..." blue link at the bottom of the tab.
4.
In the "Set Defaults" dialog box, select the defaults you'd like to set.
5.
In the "Apply Defaults for.." section choose "All Students".
6.
In the "Overwrite?" section choose Yes or NO as necessary.
Note: If you choose "Overwrite YES" then any existing values for all students will be overwritten
with the new defaults. If you choose "Overwrite NO" then only student records which have empty
values for the default fields will be populated.
4.6
Student Detail (Background) Information
WorkExpo allows you to capture additional details about students. The Detail tab allows you to add
additional detailed information about students. You can include details such as gender, your school’s
student ID number (School ID) and many other aspects of a student's background details.
Detailed information for students may be useful if providing statistical information about your work
experience program.
For example, you can provide statistics on:
l
students by placement by gender or
l
students by country of birth
This information is also included in each student’s detailed individual report.
(In the Students window choose File / Print / Full Details)
4.7
Student Medical And Emergency Information
1.
2.
NOTES:
WorkExpo 9.0 User Manual | 34
4.8
l
Medical information is private not published.
l
There's an option in the Arrangements window to remind you when placing a student with a medical
issue. See the Options tab in the Arrangements window. WorkExpo will remind you when you are
creating a placement for the student but will allow you to continue.
Delete All Student Records
To delete ALL student records:
1.
In the Students window.
2.
From the Tools / Utilities menu.
3.
Select Delete ALL student records.
4.
WorkExpo will ask you to confirm your choice to delete ALL student records.
5.
If you proceed, all student records (and all related arrangement records) will be deleted.
NOTE that you cannot undo this operation. So it's wise to ensure that you have a good backup before you
proceed.
When you choose to delete all student records then all arrangements will also be deleted.
WorkExpo will always warn you of this before deleting any records.
4.9
Exit Students
WorkExpo allows you to capture information in relation to students who have left or are leaving the
school.
These "Exit" students can be followed up at a later date in relation to student destination post-school and
exit patterns can be established.
To capture information about Exit students:
1.
In the Students window click the Options tab at top right of screen.
2.
Make sure there's a tick next to "EXIT - Capture details of school leaving...".
3.
This displays an EXIT tab in the student details area.
4.
Add information regarding the Exit student here.
To print information about Exit Students:
1.
Click the PRINT button on the Main Menu.
2.
Choose Other Lists / EXIT Students lists.
To see statistics about EXIT students:
1.
Click the PRINT button on the Main Menu.
2.
Choose Miscellaneous / Program Statistics.
3.
In the Program Statistics dialog choose EXIT Students.
4.
Select the statistic you like figures for from the drop down list.
To view a list on screen about Exit Students:
1.
In the Students window choose the VIEW menu option.
2.
Next choose View Exit Students...
3.
In the View Exit Students grid choose options as necessary.
WorkExpo 9.0 User Manual | 35
Note: A student is an Exit student when they have an Exit Date assigned to them.
4.10
Tracking Students
You can track a student's progress towards or through work experience using a 'checklist' style approach.
This may be useful if you'd like to keep track of how students are progressing with their arrangements for
placement.
A student may have more than one placement and WorkExpo allows you to track each of these
separately.
To customize the tracking feature:
1.
In the Students window, click the Track tab.
2.
Click the Customize button.
3.
Select the number of items you'd like to keep track of from the drop-down list.
4.
Edit the text of each of the items to track. You can include any text you wish. Tell me more.
5.
Select OK to save your changes or Cancel to undo.
6.
You can change the number of items or the text of these items at any time.
To link tracking with an arrangement:
1.
In the Students window, click the Track tab.
2.
Click the "Link to Arrangement" blue link.
3.
A drop down box appear at the top of the tracking list. Any arrangements the student has will appear
here.
4.
Select the arrangement from the drop down box you'd like to associate with this tracking record - if
more than one.
5.
This tracking record is now linked to this arrangement.
To UNlink tracking with an arrangement:
1.
In the Students window, click the Track tab.
2.
Select the student with a tracking record linked to an arrangement.
3.
Click the delete hyperlink (blue) to delete the tracking record.
4.
A new empty, unlinked record replaces the previously linked record.
5.
This tracking record is now UNlinked to any arrangement.
To add a new tracking record for a student:
1.
In the Students window, click the Track tab.
2.
Click the "New" button (looks like a star) on the navigation set of buttons at the bottom of the
tracking items.
3.
A new tracking record is now created for the active student.
4.
You can assign this new tracking record with a placement (see above).
To delete a tracking record for a student:
1.
In the Students window, click the Track tab.
2.
Select the tracking record you wish to delete by using the tracking navigation buttons at the bottom
of the tracking record.
3.
Click the "Delete" blue link.
4.
The current tracking record is now deleted.
WorkExpo 9.0 User Manual | 36
Notes:
4.11
l
When you add multiple tracking records for a student, the student will appear multiple times in the
tracking matrix window.
l
You can assign a placement (arrangement) to a tracking record if you wish but this is optional.
l
A student may have an unlimited number of tracking records.
l
Try to avoid confusion between the tracking navigation buttons and the student navigation buttons
which are identical. Note the student navigation buttons are at the very bottom left corner of screen
at all times.
l
You can view the outputs for tracking by using the track tab on the right side of the students window.
This is called the tracking matrix (on-line documentation).
Student Optional Tabs
In the students window you can show or hide additional information for students. This information is
available on tabs which either are displayed or hidden depending on your choices in the Options tab in
the students window.
Settings for optional student information:
Option
Description
DETAIL
Provides a DETAIL tab which shows detailed information for
the current student. Fields such as gender and language
spoken at home are available. To make this tab visible place
a tick in the DETAIL check box.
See Setting Defaults ('Defaults - Student Background
Detail' in the on-line documentation) for students.
PREFER
Displays a tab PREFER where students can indicate a
preference for work experience. WorkExpo will try to match
individual student preferences with employers.
See Student Preferences (on-line documentation)
TRACK
Displays TWO tabs called TRACK. On the left side of screen
the TRACK tab is used to capture information relating to
tracking a student's progress towards work placement. The
other TRACK tab on the right of screen provides a matrix
where tracking outcomes are visible.
See Tracking Overview (Section 4.10).
COUNSEL
Provides a tab where you can capture counselling information
about students. Each counselling interaction can be captured
to provide a counselling history on a student-by student
basis.
See Counselling students (on-line documentation)
USER DEFINED
A tab where you can enter your own user defined fields
(Section 3.14).
When tabs are hidden the information is not deleted only hidden.
4.12
Form And Home Group Update
WorkExpo uses two different ways to group students - By Year Level or by Homegroup.
If you do want to change it you can do so using the UPDATE tab in the Students window.
This feature allows you to update the Year Level or Home Group for several students at once in a batch
operation.
WorkExpo 9.0 User Manual | 37
1.
From the Main Menu choose Students.
2.
On the top right click the 'Update' tab.
3.
In the section "What do you want to update?" select either Year or Homegroup.
(Note that you can't update both Year and Homegroup at the same time, but you can update each
sequentially).
4.
In the section "Which student records are affected?" you have a choice to include Students in a
specific Year/HG only or ALL students across the entire Year Level or Homegroup.
5.
Finally, in the Update section, choose which Year Level or Homegroup you wish to update.
6.
In the 'Update To' box enter the new value to replace the one in "Find all Students in".
7.
Click 'Update Now' and WorkExpo will perform the batch operation updating all relevant student
records.
When WorkExpo was originally developed the Year Level was the only way to sort and group
students. In a later version the Home Group field was added. This mean that the Year Level field is
best to use if you only require one way to group students and it was part of the original database
design since its inception.
4.13
Find Students Using the Find Tool
You can find a student record by searching for any part of the student name or any search on any
other field in the Student Window. For example, you could find student records where the Suburb =
"SPRINGFIELD".
1.
In the Students window, choose FIND from the EDIT menu.
2.
Enter the characters you'd like to find and click the FIND button.
3.
WorkExpo finds the first match and displays the found student record.
4.
If this is not the record you were looking for click the FIND NEXT button.
You can use the asterisk wildcard in your search. For example, SAR* will find SARA and SARAH.
4.14
Custom Student Groups
You can create a custom student group and use this group of students for printing and grouping
purposes.
For instance, say that there are half a dozen students going out on work experience during an odd week.
You could create a custom student group and print reports just for these few students even though they
may be all in different year levels and/or homegroups.
To create a custom student group:
WorkExpo 9.0 User Manual | 38
1.
From the WorkExpo main menu click the Options button.
2.
In the General tab click Flag or Group Students for Printing.
3.
In the Custom Student Group dialog you can add or remove students from the group.
Click the custom student button to choose to print or group students by custom group when printing.
Only students with arrangements can be members of a custom group.
WorkExpo 9.0 User Manual | 39
5
Employers
5.1
Find Employer By Business Name
You can find an Employer by Name or by *PART* of the employer or business name. You can enter the
first few characters and WorkExpo will try to find a match. For example type in "COMM" and WorkExpo
will locate, for example, "Commonwealth Bank".
1.
In the Employers window, select the GENERAL tab.
2.
Enter the Name of the Employer and press enter.
3.
WorkExpo finds the employer and shows the employer record in the list.
OTHER WAYS TO FIND EMPLOYERS:
5.2
l
You can also Search Employers by Work Type (Section 5.2) to find a list of employers who offer a
particular type of work.
l
You can also Search Employers by Key Word (Section 5.3) e.g. BANK to find all employers with
"Bank" in the business name.
l
You can also Find Employers by using the FIND tool ('Find Employer Using the Find Tool' in
the on-line documentation) e.g. Find employers where the contact first name is "Robert".
Search Employers By Work Type
You can find an employer by Work Type. Searching this way allows you to view a listing of all employers
who offer a particular type of work, say, photography.
1.
In the Employers window, select the LIST tab.
2.
Select the work type from the drop down list.
3.
WorkExpo finds matching employers who offer this work and displays a list of employer names.
4.
Click on any name to view the employer detail record.
OTHER WAYS TO FIND EMPLOYERS:
5.3
l
You can find an employer by Name (Section 5.1) to find an employer by business name or the first
part of the business name.
l
You can also Search Employers by Key Word (Section 5.3) e.g. BANK to find all employers with
"Bank" in the business name.
l
You can also Find Employers by using the FIND tool ('Find Employer Using the Find Tool' in
the on-line documentation) e.g. Find employers where the contact first name is "Robert".
Search Employers By Key Word
You can find an employer by Key Word. Searching this way allows you to view a filtered sub-set of your
employer records which contain a <specified> key word in the employer name.
1.
In the Employers window, place the cursor in the Business Name field.
2.
Right-click the mouse button to show the shortcut menu.
3.
In the shortcut menu choose the "Filter For:" option.
4.
Enter your keyword surrounded by asterisks. e.g. *bank*
5.
WorkExpo will filter the list of employers to show only those which have the specified keyword in the
WorkExpo 9.0 User Manual | 40
business name.
6.
To remove the filter, choose "Remove Filter/Sort" from the records menu.
OTHER WAYS TO FIND EMPLOYERS:
5.4
l
You can find an employer by Name (Section 5.1) to find an employer by business name or the first
part of the business name.
l
You can also Search Employers by Work Type (Section 5.2) to find a list of employers who offer a
particular type of work.
l
You can also Find Employers by using the FIND tool ('Find Employer Using the Find Tool' in
the on-line documentation) e.g. Find employers where the contact first name is "Robert".
Searching Using Wildcards
About using wildcard characters to search for partial or matching values
You use wildcard characters as placeholders for other characters when you are specifying a value you
want to find and you:
l
Know only part of the value.
l
Want to find values that start with a specific letter or match a certain pattern.
You can use the following characters in the Find and Replace dialog boxes, or in queries, commands, and
expressions, to find such things as field values, records, or file names.
Character Usage Examples:
5.5
Character
Usage
Example
*
Matches any number of characters. It can be used as the
first or last character in the character string.
wh* finds what, white, and why
?
Matches any single alphabetic character.
B?ll finds ball, bell, and bill
[]
Matches any single character within the brackets.
B[ae]ll finds ball and bell but not
bill
!
Matches any character not in the brackets.
b[!ae]ll finds bill and bull but not
bell
-
Matches any one of a range of characters. You must
specify the range in ascending order (A to Z, not Z to A).
b[a -c]d finds bad, bbd, and bcd
#
Matches any single numeric character.
1#3 finds 103, 113, 123
l
Wildcard characters are meant to be used with text data types, although you can sometimes use
them successfully with other data types, such as dates, if you don't change the Regional Settings
properties for these data types.
l
When using wildcard characters to search for an asterisk (*), question mark (?), number sign (#),
opening bracket ([), or hyphen (-), you must enclose the item you're searching for in brackets. For
example, to search for a question mark, type [?] in the Find dialog box. If you're searching for a
hyphen and other characters simultaneously, place the hyphen before or after all the other characters
inside the brackets. (However, if you have an exclamation point (!) after the opening bracket, place
the hyphen after the exclamation point.) If you're searching for an exclamation point (!) or closing
bracket (]), you don't need to enclose it in brackets.
l
You can't search for the opening and closing brackets ([ ]) together because Microsoft Access
interprets this combination as a zero-length string.
If you're searching for values in a table other than a Microsoft Access table, such as a Microsoft SQL
Server table, you may need to use different wildcard characters.
Delete Employer Records
WorkExpo 9.0 User Manual | 41
There are different methods you can use to delete employer records.
Method 1: Delete a single employer record.
In the employers window navigate to the employer record you wish to delete.
1.
From the Edit menu choose Delete employer.
2.
This will delete the employer record and any associated arrangement records.
Method 2: Delete several employer records in a single step.
In the employers window:
1.
From the Edit / Delete menu option choose Delete employer records...
2.
In the Delete Employers wizard select the employers you wish to delete.
3.
You can select multiple employer records for deletion then single-click delete.
4.
Follow the directions in the wizard.
5.
Then click the Delete button.
Method 3: Delete all employer records in a single step.
In the employers window:
1.
From the Edit /Delete menu option choose Delete ALL employers records.
2.
Then click the Delete button. This will delete all employers.
3.
All employer records and all arrangement records will be deleted.
All associated details e.g. arrangements for deleted employers are also deleted.
5.6
Defaults - Employer Background Detail
You can apply default values to each new employer record in order to save data entry.
Setting Defaults:
You can set defaults for background detail information in the employer window. This saves having to
update individual records if there is likely to be little difference in the values stored for many of your
employers.
If you wish to apply defaults that you have set you have three choices:
Apply defaults for the current employer.
Apply defaults for all employers.
Apply defaults only to new records.
Make your selection in the Defaults dialog.
You can set defaults in WorkExpo so that when new records are added certain fields you nominate are
automatically populated with default values.
To set defaults for employer records in WorkExpo:
1.
From the WorkExpo main menu press the large Employers button.
2.
In the Employers window click the Details tab.
3.
Click the "Set Defaults..." blue link at the bottom of the tab.
4.
In the "Set Defaults" dialog box, select the defaults you'd like to set and press OK.
5.
Now, when new employer records are added these defaults will be added to the new records.
To update existing employer records with defaults:
WorkExpo 9.0 User Manual | 42
5.7
1.
From the WorkExpo main menu press the large Employers button.
2.
In the Employers window click the Details tab
3.
Click the "Set Defaults..." blue link at the bottom of the tab.
4.
In the "Set Defaults" dialog box, select the defaults you'd like to set.
5.
In the "Apply Defaults for.." section choose "All Employers".
6.
In the "Overwrite?" section choose Yes or NO as necessary.
Industry Sectors
You can add, edit or delete the industry sector descriptions in WorkExpo. Industry sector descriptions are
broad over -arching descriptions of industries and the world of work.
Difference between Work Types and Industry Sector:
Work Types describe the general duties a student might undertake while on work placement e.g.
l
Receptionist
l
Teacher Aide
l
Aircraft Mechanic
l
Food Area worker
...whereas Industry Sector descriptions are the agreed general broad Industry categories such as:
l
Manufacturing
l
Transport & Storage
l
Finance and Insurance
l
Hospitality and Tourism
l
etc.
Both listings within WorkExpo can be edited. Double-click the text box to edit the drop-down list.
To add Industry Sector descriptions to Employers:
1.
At the Main Menu click the EMPLOYERS button.
2.
In the EMPLOYERS window click the DETAILS (Background Details) tab.
3.
You will see that there's an INDUSTRY SECTOR field, drop down the list to view the possible items.
4.
To add/edit or delete items in this list - double-click the INDUSTRY SECTOR field.
5.
To ADD a new item click into the last row and type the item e.g. 'Automotive'.
6.
To DELETE an item select the item by clicking the little grey box at the left of the item.
7.
To EDIT an item simply click into the item and edit. Changes are saved automatically.
You can print arrangement lists by grouped by Work Type or grouped by Industry Sector.
Select Arrangement Lists in the Print Wizard.
5.8
User Defined Fields
Is it possible to change the field names in WorkExpo?
Yes and No. The field names in WorkExpo are generally *not* customizable. However, the field names in
the "User" tab (in Student and Employer windows) are entirely customizable. These tabs contain userdefined fields. You can not only enter your own field names but you can also decide whether the field is a
text box or a drop-down box. If you select a drop down box then you also have control over the items
that appear in the drop-down box.
To see what you can do with student user-defined fields try this:
WorkExpo 9.0 User Manual | 43
1.
In the Students Window click the Options tab at the top right of screen.
2.
In the Options tab you have control of various optional parameters within the student window.
3.
Place a tick in the User-defined - create your own fields check box.
4.
You will notice that a tab User-defined or you may see a MIPS (Managed Individual Pathways
Students) tab.
(MIPS is the way I have defined the tab for example purposes only but you can change this).
5.
On this tab, click the Customize hyperlink. This displays the customize user-defined fields dialog.
6.
Here you can edit the field names used in the section and/or the tab name itself as necessary.
7.
You can also place a tick in the Use as drop down check box.
8.
If you do this then click the click to set... hyperlink. Another dialog appears. Here you can add, edit
or delete the items to appear in your drop-down list.
9.
Click OK. Now back on the User-Defined tab your field names and drop down options should appear
as user-defined fields.
In the screen shot below the user-defined tab has been setup to capture sporting information about
students.
You can use WorkExpo's user-defined fields to capture any information about students or
employers.
WorkExpo 9.0 User Manual | 44
6
Arranging Placements
6.1
Arrangements Datasheet View
You can view Arrangements in DataSheet view from the Arrangements window. Click the View Datasheet
icon on the toolbar and the Datasheet view is displayed.
To sort the Datasheet grid:
1.
Place the cursor in the column you'd like to sort on
2.
Right click for the shortcut menu
3.
Choose sort ASC or DESC
4.
The Datasheet is now sorted by the selected field.
To filter the Datasheet grid:
1.
Place the cursor in the column you'd like to sort on
2.
Right click for the shortcut menu
3.
Choose sort Filter By Selection
4.
The Datasheet is now filtered by the selected field value.
OR use the options in the drop down box at the top of screen.
To print the Datasheet grid:
1.
Sort and/or filter the Datasheet as necessary
2.
Click the Print button
3.
If your settings are set to Print Preview the report will show first in preview.
To copy the Datasheet grid:
1.
With the Datasheet grid on screen, press CTRL + A to select all
2.
Open Microsoft Excel
3.
Choose Edit / Paste to paste the contents into Excel.
WorkExpo 9.0 User Manual | 45
7
Multiple Users
7.1
Multiple Users Overview
WorkExpo supports multiple users. For example, several teachers could share WorkExpo with
each logging into the database as a different user. The advantage of this is that each user's name and
contact details would appear on letters to parents and/or employers. You can login and log off from
within WorkExpo as well. From the File menu choose Log Off.
Note that the phone, fax and email numbers are associated with each login user. Edit these phone details
from Options/School/Add,Edit WorkExpo Users.
If there is only one user and that user does not have a password then the login dialog box does not
show.
7.2
Add/Edit Users
UsersTo add or edit a user in WorkExpo
l
From the WorkExpo Main Menu, click the large Options button.
l
In the school tab, click the link to Add/Edit/Delete WorkExpo users.
The WorkExpo Users dialog box is displayed.
Here you can add, edit or delete WorkExpo users.
7.3
Delete Users
To delete a user in WorkExpo
l
From the WorkExpo Main Menu, click the large Options button.
WorkExpo 9.0 User Manual | 46
l
In the school tab, click the link to Add/Edit/Delete WorkExpo users.
The WorkExpo Users dialog box is displayed.
Here you can delete WorkExpo users. Select the user row and press Delete on the keyboard.
7.4
Phone Fax Mobile Numbers
In previous versions of WorkExpo the school phone numbers were stored with the school details. With the
introduction of multiple-users in WorkExpo these details are now stored on a user-by-user basis.
To add/edit or delete school phone, fax and email details:
1.
From the WorkExpo main menu click the large Options button.
2.
In the school details section choose Add/Edit/Delete WorkExpo Users
3.
Add or edit the details for each WorkExpo user.
The phone, fax, mobile phone and email for the loggin-in user will appear in all documents and letters.
7.5
Passwords
7.5.1 Overview
Passwords allow WorkExpo to be password protected.
To set a password click Options / Password from the Main Menu.
To set or remove a password you must be logged in as the current user.
7.5.2 User Passwords
To add or remove a user password for a single user in WorkExpo
l
From the WorkExpo Main Menu, click the large Options button.
l
Select the Password tab.
Here you can set, change or remove a user password.
How to add or remove a password for multiple users of WorkExpo:
1.
Log into WorkExpo as the user you wish to set a password for.
Note that you can Log Off and change users without having to close WorkExpo. To do this choose Log
WorkExpo 9.0 User Manual | 47
Off from the File Menu.
2.
From the WorkExpo main menu click the large Options button.
3.
In the Options dialog click the Password tab.
4.
Add or edit the password for the logged-in WorkExpo user.
Next time WorkExpo starts you will be prompted for a password.
You must login as the user you wish to set a password for.
7.5.3 Effective Passwords
Whether your goal is to protect sensitive WorkExpo data — or to keep staff from reading
your personal e -mail — passwords will help. But not just any password will do. Learn
how to create the best type.
Passwords can keep prying eyes from seeing what they shouldn't if you take the time to create strong
ones and if you follow some simple rules of password maintenance. Follow our small business advice and
make yourself less prone to security breaches when running a business or starting a business.
How effective are the passwords you currently use? Ask yourself a few questions to check your current
computer security:
l
my birthday or my child's name?
TIP:
You should change your PC
l
password regularly, and
Windows XP makes it easy
to do. Simply open User
l
Do I routinely tick the box next to "Remember this password"
so I don't have to type them in every time?
l
Are my passwords written down where someone might find
them?
account where you want to
make the password
Do I use common words found in the dictionary for my
passwords?
Accounts in the Control
Panel and pick the user
Do I use passwords that someone could easily guess — like
l
Do I use the same password for everything?
change. Click on the option
If you answered yes to any of the questions, the data on your
to change or reset your
computer is vulnerable. Your passwords are not working as
password — the wording
hard as they could be.
may vary depending on
which version of Windows
Why Am I Vulnerable?
XP you use. You can also
Here's why the very common password practises noted above
create a password for your
put you at risk and what you can do to fix them:
account if you don't
currently use one.
Easy guesses: If someone in your office has access to your
computer, it's likely they also know something about you. So
avoid using your name or the names of family members or
pets as passwords. Avoid using information that's commonly known or readily available such as your
address, birthday or hobby.
Common words: Hackers can use programs that identify passwords based on dictionary words in
multiple languages. Avoid using common words for your password. It is safer to use a combination of
letters, numbers and symbols.
Automated passwords: When you tick the "Remember this password" boxes often encountered on
websites, you'll typically see logon screens pre-populated with dots or asterisks instead of your
password when you visit these sites. This can be dangerous if others have access to your computer.
Inexpensive, even free, programs are readily available that can decode the dots and asterisks. The best
option is to avoid using stored passwords, but either way, make sure your Windows logon is configured
with a strong password that you type in each time. That way, you eliminate the opportunity for someone
WorkExpo 9.0 User Manual | 48
to snoop around.
Writing passwords down: Passwords are only useful if you can remember them, but writing them
down on a piece of paper and leaving the paper where someone might see it isn't a good alternative
either. We'll talk about ways to create memorable passwords later. But if you have lots of passwords,
you might consider storing them in an encrypted format on your PC. Protect them with a really good
password that you'll be able to remember.
Using the same password: Many people use the same password — or some variation of it — for
everything. That reduces the need to remember lots of different passwords. However, it also means if
someone figures out your password once, they can access everything you've password -protected. Not
only is it a good idea to have different passwords, it's also a good idea to change them frequently.
What's a Strong Password?
A strong password will typically have the following characteristics:
l
It's at least eight characters long — and the longer the better
l
It includes upper and lower case letters, as well as numbers and symbols
l
It is changed frequently
l
A new password is significantly different than the previous one
Based on these criteria, the following are examples of strong passwords:
l
d&C24!Zp>>l8
l
*M@a09(b(aTQ
Those passwords would be difficult to crack — but they'd also be difficult to remember, especially if you
have a number of passwords with that level of complexity.
Creating Strong and Memorable Passwords
Computers running Microsoft Windows XP Professional, Windows Small Business Server 2003 as well as
Windows NT and Windows 2000 all support strong passwords. They also support pass phrases, which
can be easier to remember. Examples of pass phrases might be:
l
I ate (!!) mangoes in Cairns.
l
3 shoes @ the store cost $92.
Another approach is to select a phrase, but use only the first character of every word. For example:
l
Ocw13iJ.! (Our cat was 13 in Jan.!)
l
Mcif&h@17. (My cat is fat & happy @ 17.)
Another trick for creating easy to remember passwords is to string a couple of words together with
numbers and symbols. For instance:
l
2potatoes+beans$4
l
cOws@the2ndfArm
There are several ways to make pass phrases easier to remember. Since you'll be changing them every
few months, you might want to look to an upcoming event or something that holds special significance
for you. For instance:
l
Mum&Dad#25Annivers@ry
l
ruNNing@Cty2Surf#1teaM
Once you've created strong passwords or pass phrases, there are three ways to make sure they remain
effective:
1.
Always log off when you leave your PC unattended
2.
Change your passwords at least every 90 days
3.
Don't share your passwords with anyone
By putting the power of strong passwords to work, you'll help ensure your confidential information stays
that way.
WorkExpo 9.0 User Manual | 49
WorkExpo 9.0 User Manual | 50
8
Multiple Schools
8.1
Multi-School Edition In Brief
WorkExpo offers a Multi-School Edition. This edition of WorkExpo has all the features of the regular
version and additional features for working with multiple schools. You can purchase the multiple schools
edition of WorkExpo or upgrade to the multiple schools edition. This edition of WorkExpo would typically
be used by a Local Learning and Employment Network (LLENS) rather than a school.
Below is a list of features available in the Multiple Schools Edition
l
Add/Edit/Delete schools within WorkExpo
l
View/select students by school in the LIST tab in the Students window
l
View/select students by school in the Statistics tab of the Arrangements window
l
You can use the WorkExpo registered school's details or the student's current school details when
printing documents
l
You can assign individual students to a particular school or assign many students to a particular
school simultaneously.
l
Provides an option to import a school's specific WorkExpo data file into the current data file. This
would be useful if wanting to merge WorkExpo data files from several different schools into a single
large consolidated data file.
To order or upgrade to the multi-schools edition click here
(http://www.infoplan.com.au/workexpo/wePrice.htm)
8.2
Working with Multiple Schools - Overview
WorkExpo Multi Schools (MS) Edition supports multiple schools where students are assigned to different
schools. There is no limit to the number of schools you can add within WorkExpo Multi Schools Edition.
When a new school is added, the new school's address and contact details are also captured. Once the
school details have been added you can assign students as members of the new school. Each student
record in WorkExpo must be assigned as a member of a school. By default students are assigned as
members of the default or registered school. The registered school is the default school or college to
which the WorkExpo software is registered.
When you add a new student record you can assign the student as a member of a particular school. If
you don't assign a student, WorkExpo will automatically assign the student as a member of the
default registered school.
Student records can be assigned to schools individually or you can assign multiple students to a
particular school in a batch operation, thus saving time.
You can edit or delete existing schools. However, if you want to delete a school record and there are
students currently assigned to that school WorkExpo won't allow this operation until you delete or reassign all existing student members of that school.
WorkExpo 9.0 User Manual | 51
A student may only be assigned as a member of one school only.
When printing documents for students, WorkExpo will default to using the registered school's
details. Optionally you can use the particular details of the specific school when printing for students
assigned to that school. For example, say that the registered school is Demo High and you have imported
student records from Sample College. When you print the Work Experience Arrangement form for
students of Sample College, you can choose to use the school details of Demo High School or Sample
College.
As well as being able to import student records in the usual way, you can also import WorkExpo data files
from different schools. This may be useful if you want to merge WorkExpo data files from several
different schools. These files could be merged into a single large consolidated data file. Once this
consolidated file had been created you could print multi-school reports and gather Work Placement
information for detailed analysis across a range of schools.
To learn more about
See
Adding, editing and deleting school records.
Adding Editing and Deleting
Schools in WorkExpo
(Section 8.3)
How to import data files into WorkExpo from several schools.
Importing data in WorkExpo
Multi Schools Edition
(Section 8.7)
Dealing with schools that do not support WorkExpo.
Working with nonWorkExpo schools (Section
8.11)
Working with the School data file and Multi-school projects.
School data files and Multischool projects (Section
8.7)
Generating statistical information from multi-school sources.
Generating statistical
information (on-line
documentation)
WorkExpo Multi School Edition is available as an upgrade from the regular edition.
8.3
Add a New School
To add a new school in WorkExpo:
WorkExpo 9.0 User Manual | 52
1.
From the WorkExpo main menu click the large options button.
2.
In the School tab click the Add/Edit schools button. This opens the Add/Edit Schools dialog
3.
Click the Add New Button.
4.
Enter or edit the details of the school, including address and contact person.
5.
You can choose to use these school details for students assigned to this school in forms and reports,
otherwise WorkExpo will use the main (registered) school's details.
You can also double-click the schools field in the Students window to add a new school.
8.4
Edit School Details
To edit a school record in WorkExpo:
1.
From the WorkExpo main menu click the large options button.
2.
In the School tab click the Add/Edit schools button. This opens the Add/Edit Schools dialog
3.
Select the school by placing the cursor in the School name
4.
Click the Edit Button.
5.
Edit the details of the school as necessary.
6.
You can choose to use these school details for students assigned to this school in forms and reports,
otherwise WorkExpo will use the main (registered) school's details when printing.
You can also double-click the schools field in the Students window to edit a new school or click
on the "School/College" label.
8.5
Delete a School
To delete a school in WorkExpo:
1.
From the WorkExpo main menu click the large options button.
2.
In the School tab click the Add/Edit schools button. This opens the Add/Edit Schools dialog
3.
Select the school to delete by placing the cursor in the School name
4.
Click the Delete Button.
5.
Enter or edit the details of the school, including address and contact person.
6.
You can choose to use these school details for students assigned to this school in forms and reports,
otherwise WorkExpo will use the main (registered) school's details.
If you want to delete a school and there are students currently assigned to that school
WorkExpo won't allow this operation until you delete or re-assign all existing student members
of that school..
8.6
Delete Students By School
You can bulk delete students by a chosen school or you can choose to delete, say, all Year 10 students
from a particular school.
To delete students by school and/or Year/Homegroup:
1.
In the Students window from the Edit menu, choose Delete / Delete Students Wizard.
2.
In the first page of the wizard, select the school from which you'd like to delete students.
3.
You can choose to delete ALL students, a particular year or homegroup or selected students.
WorkExpo 9.0 User Manual | 53
4.
Click Finish and student records are deleted.
NOTES:
8.7
l
Deleting a student record also deletes all information associated with the student, including any
arrangements.
l
The Delete Wizard will display a count of any arrangements that will be deleted before changes are
committed.
l
Once the records are deleted they cannot be un-deleted.
Import Data Files - Overview
Importing WorkExpo data files from several different schools has the effect of combining the
student, employer and arrangement records into a single file. Using this single consolidated file you could
print multi-school reports and/or gather Work Placement information for detailed analysis across a range
of schools.
Here are some things to be aware of when importing WorkExpo data files from other schools.
1.
Before importing any school data file it's a very good idea to ensure that you have a good backup of
your current data file.
2.
The information you import from a particular school data file is only as good as has been entered into
that file in the first place. For example, it duplicate records exist in the original then the consolidated
database will also contain duplicates.
3.
Only the student, employer, arrangement and school details records are imported. No lookup tables
are imported, neither are any support tables containing information about visiting teacher lists, work
experience type lists, supervisor lists, student tracking, student preferences, student counselling, exit
details or user defined information.
4.
When you import a school data file all student records imported with that data file are assigned as
members of the imported school. Of course you can change this once the records are imported.
5.
Once the records have been imported and you try to re-import the same data file again WorkExpo
will warn you that the school's records have already been imported but will allow you to proceed if
you choose. This of course will lead to several duplicate records including duplicate arrangement
records.
6.
You cannot un-import a data file.
7.
It is recommended that if you are dealing with a large number of schools you create a schools folder
under the WorkExpo data file folder. This will make working with the data file easier.
8.
You can always create a new blank WorkExpo data file easily. Select File / New from the WorkExpo
menu bar. This create a blank empty data file and links to it, then opens it. If sample records records
are not required they can easily be deleted. Choose Delete Sample Records from the Tools / Utilities
menu in WorkExpo.
9.
You can generate statistical information showing trends across a range of schools. See generating
statistical information (on-line documentation)
10.
You can assign students as members of a particular school within WorkExpo. See assigning
students to schools (Section 8.10)
You cannot import school data files which themselves contain multiple schools.
To learn more about
See
Adding, editing and deleting school records.
Adding Editing and Deleting
School Records in
WorkExpo (Section 8.10)
How to import data files into WorkExpo from several schools.
Importing data in WorkExpo
Multi Schools Edition
(Section 8.9)
WorkExpo 9.0 User Manual | 54
8.8
Dealing with schools that do not support WorkExpo.
Working with nonWorkExpo schools (Section
8.11)
Working with the School data file and Multi-school projects.
Working with the School
data file and Multi-school
projects (Section 8.9)
Generating statistical information from multi-school sources.
Generating statistical
information from multischool sources ('Generating
Statistical Information' in
the on-line documentation)
Import School Data File
You can import WorkExpo data files from different schools. This may be useful if you want to merge
WorkExpo data files from several different schools. These files could be merged into a single large
consolidated data file. Once this consolidated file had been created you could print multi-school reports
and gather Work Placement information for detailed analysis across a range of schools.
To import a school data file into WorkExpo:
1.
From the WorkExpo main menu choose FILE from the menu, then IMPORT.
2.
Then choose import school data file.
3.
Browse to the data file. This will have an .mdb (Microsoft Data Base) extension.
4.
Click OK to import the file.
As an alternative to importing data files you can connect to a particular data file and open it. To do this,
choose File/Open from the file menu.
All student, employer and arrangement records are imported. In addition, the imported school's details
are also imported and the students are assigned as members of the imported school. However, no
counselling, tracking, EXIT, follow-ups or archive information is imported.
You cannot import school data files which are themselves multi-school data files.
8.9
Import School Data Files -Detailed Information
You can import WorkExpo data files from different schools. This may be useful if you want to merge
WorkExpo data files from several different schools. These files could be merged into a single large
consolidated data file. Once this consolidated file had been created you could print multi-school reports
and gather Work Placement information for detailed analysis across a range of schools.
To learn more about
See
Adding, editing and deleting schools.
Adding Editing and Deleting
School Records in
WorkExpo (Section 8.3)
How to import data files into WorkExpo from several schools.
Importing data in WorkExpo
Multi Schools Edition
(Section 8.7)
Dealing with schools that do not support WorkExpo.
Working with nonWorkExpo schools (Section
8.11)
WorkExpo 9.0 User Manual | 55
8.10
Working with the School data file and Multi-school projects.
Working with the School
data file and Multi-school
projects (Section 8.9)
Generating statistical information from multi-school sources.
Generating statistical
information from multischool sources ('Generating
Statistical Information' in
the on-line documentation)
Assign Students to a School
To assign an Individual student to a school in WorkExpo:
1.
From the WorkExpo main menu click the large Students button or click the Students button on the
tool bar.
2.
In the Students window, click the Detail tab. (In older versions this was called the Background tab)
3.
Select the school to assign from the School/College dropdown box
To assign Multiple students to a school in WorkExpo:
1.
From the WorkExpo main menu click the large Students button or click the Students button on the
tool bar.
2.
In the Students window, click the Detail tab. (In older versions this was called the Background tab)
3.
In the School/College dropdown box, double-click to bring up the Add/Edit schools dialog box.
4.
Click the Assign Students button to start the Assign students wizard.
You can also start the Assign Students wizard from the Schools Tab in the Options dialog.
8.11
Non WorkExpo Schools
If you wish to import data from a non-WorkExpo school here are the options available to you:
1.
Suggest that the school purchase, install and use WorkExpo.
2.
Import the data manually record by record using your copy of WorkExpo.
3.
If the data is stored electronically, you can contact Info Plan Software for a quote to re-work the file
into a WorkExpo readable format for import.
4.
Click the "Send comments on this topic" link at the top right and include details of the requirements
in your message.
WorkExpo 9.0 User Manual | 56
9
Printing
9.1
Print Work Experience Arrangement form(s)
What to do
Notes
1. With the WORKEXPO main
menu on your screen click on
the PRINT button.
WORKEXPO can print on the official department forms or print a facsimile.
2. The Print Wizard dialog box
will appear. You can choose to
print an arrangement form for
an individual student or a
group of students.
In this example we will print
for a group of students.
Select the print for “several
students…” option
Click NEXT
3.
Select “WE
Arrangement forms” and click
NEXT
4.
Select students
5.
Select to print on
official department forms.
You can select students by date or alternatively print forms for all
students in WORKEXPO
Do this by clicking “I want to print on official department forms”.
Choosing this option will print data only, so that you print on the official
forms.
6.
Choose Preview or print
and click FINISH
9.2
Sample Documents
WorkExpo can generate the following documents.
WorkExpo 9.0 User Manual | 57
Employer report form
Work experience arrangement form
WorkExpo 9.0 User Manual | 58
You can print all these documents directly from WorkExpo.
9.3
Letter Sample
WorkExpo 9.0 User Manual | 59
9.4
Certificate (Student)
WorkExpo 9.0 User Manual | 60
9.5
Statistics Sample
WorkExpo 9.0 User Manual | 61
9.6
Letter Setup and Margins
You can change the setup of letters and documents in print preview mode.
1.
Select the letter (or document) you wish to change and view it in Print Preview
2.
In print preview mode, click the FILE menu and choose PAGE SETUP
3.
In the MARGINS tab choose smaller or larger margins to move the letter around on the page as
necessary.
Letters in WorkExpo *do not* word wrap. So if you make the LEFT margin wider or the RIGHT
margin wider then check that the body text is not being truncated which may occur.
9.7
Troubleshoot - Printer Prints Blank Page
When printing the work experience arrangement form or the student certificate sometimes the printer
may print a blank page.
If the student or employer certificate is generating two pages - the certificate on the first page and a
blank second page, then your printer has not been set to Australian A4 size paper. All printers are initially
set to American "Letter" size paper which is shorter than Australian A4. The blank page is your printer
trying to fit the invisible bottom margin of page one onto a second page.
To fix this problem have your school's IT support person change the printer setup to A4 size.
WorkExpo 9.0 User Manual | 62
9.8
Print Wizard
Use the Print Wizard to print:
l
Multiple documents for an individual student.
l
Multiple copies of a single document for multiple students.
l
Lists and Reports.
l
Documents for Visiting Teachers.
l
Work Experience Arrangement Forms.
l
Statistics relating to work experience.
l
Mailing labels for employers.
l
Blank work experience arrangement forms.
l
Student and employer certificates.
l
Custom one-off letters to employers.
l
...and more
How to start the Print Wizard:
l
Click the large Print button on the main menu OR
l
Choose Print Wizard from the File menu.
Sorting and filtering results using the Print Wizard:
You can sort the results in the Print Wizard by choosing the sort order on the last page of the wizard.
You can specify a particular year level or homegroup or use a custom group (Section 4.14).
You can use date parameters in many reports.
WorkExpo 9.0 User Manual | 63
The Print Wizard gives you the most options when it comes to printing from WorkExpo.
9.9
Employer Evaluation Form
You can edit the criteria items in the employer evaluation form.
1.
Start WorkExpo and go to the Main Menu.
2.
Click the large OPTIONS button on the Main Menu.
3.
Click the "General" tab.
4.
Click the "Edit Criteria Items in Employer Evaluation form" link. (Highlighted in blue).
5.
There are 2 separate sets of criteria items. One for "work experience placements and another set for
non-work experience placement e.g. VET, VCAL
Edit the criteria item(s) here.
NOTE: You are not able to add or remove the number of criteria items but they *all* can be
changed. You able not to change the overall layout of the document.
WorkExpo 9.0 User Manual | 64
10
Import and Export
10.1
Troubleshoot importing records
Follow these steps to troubleshoot problems when trying to import records into WorkExpo from a
Microsoft Excel spreadsheet.
Possible problem
Resolution
Column missing
In Microsoft Excel check that all required columns are present. If a column is
missing then the import will fail.
More Detail:
The required columns are FirstName, LastName, DateOfBirth, Form,
Homegroup, Street, Suburb, Postalcode, ParentName, ParentPhone and Note.
All columns must be present including HomeGroup even if your school does not
have homegroups. In this case, include the Homegroup column and column
header but leave the column itself empty. Also ensure that columns are in the
correct sequence as in the above list.
Header missing or not
spelled correctly
Check that all headers are correctly spelled with no spaces in any of the
header names.
More Detail:
Ensure that that there are no spaces in *any* header row name. The header
row must always be Row 1. Compare the spelling of header row names with
the following: FirstName, LastName, DateOfBirth, Form, Homegroup, Street,
Suburb, Postalcode, ParentName, ParentPhone and Note.
Hidden column or row
within the data
Check that there are no hidden rows or hidden columns in your spreadsheet.
Hidden rows or hidden columns within the data will cause the import to fail.
More Detail:
Select the data area in your spreadsheet by choosing Select All from the Edit
menu. Then from the FORMAT menu choose Column then Unhide. Then from
the FORMAT menu choose ROW then unhide. Now deselect the data area and
check if there are any empty rows in the data area or empty columns. If so
delete these empty columns by selecting the column to delete and choosing
DELETE from the EDIT menu.
Hidden data in
spreadsheet
In Excel check that there are no columns to the right of the last data column
(NOTE) containing blank information.
More Detail:
If there is hidden data anywhere in the spreadsheet even in columns outside
the data area the import will fail. Try deleting several columns to the right of
the last column (Usually the NOTE column). To delete these columns select the
entire columns by clicking on the column headers and dragging to include
several columns. Then choose DELETE from the EDIT menu. Save the
spreadsheet and try again. Also check for rows below the last data row in the
spreadsheet.
File format conflict
WorkExpo is a Microsoft Access database. There may be file format and
version issues depending on the configuration of your machine and the version
of Microsoft Excel you have. In this case save the spreadsheet in an earlier
version of Microsoft Excel.
Save your spreadsheet as an Excel 5.0/95 spreadsheet.
More Detail:
WorkExpo 9.0 User Manual | 65
Systems are backwards compatible in Microsoft Office. Try saving the
spreadsheet in Microsoft Excel version 5.0 format. To do this within Excel
choose FILE then SAVE AS and in the Save As Type drop down box choose
Microsoft Excel 5.0/95 workbook. Then try importing again.
Corrupt workbook
The workbook may be corrupt. If all else fails, create a new blank spreadsheet
and copy and paste the selected data records into the new spreadsheet.
More Detail:
When you export from your school's database system into Microsoft Excel
sometimes additional unnecessary macros and code modules are also exported
and these may interfere with the import process. Open the spreadsheet
containing the data you wish to import. Select ALL, then choose COPY. Create
a new workbook and paste the data into the new workbook. Save then new
workbook and try importing from this new file.
You are getting the error message Field'ROW1'doesn't exist in the destination
table 'tblImportHeaders'
Error message
Field ROW1 doesn't
exist.
10.2
When school data is exported to Excel it sometimes exports a "ROW1"
column as the last column in the spreadsheet. This column is hidden but if you
check the column headers you will notice that the sequence is missing a letter
of the alphabet.
Check the column to the right of the last data column and unhide it. Choose
Format Column Unhide to see the hidden column. Remove this column
completely by selecting the entire column and choosing Delete from the Edit
menu.
Import Employer records
Import - employersYou can import employer records into WorkExpo from any external electronic system.
You must, however, do this as a 2 step process.
l
Export the required records from your system to an Excel file in .xls format
l
Import this file into WorkExpo by choosing Tools / Wizards /Import wizard
l
Select Import Employer records option from the Import wizard.
l
Follow the Import Wizard's instructions on screen.
Export employer records to an XLS spreadsheet, then use that spreadsheet as a template for your
import.
EMPLOYER FIELDS (Full List)
BusinessName
ContactSalutation
ContactFirstName
WorkExpo 9.0 User Manual | 66
ContactInitial
ContactLastName
EmplAddress
EmplSuburb
EmplPostalcode
EmplWorkPhone
EmplFaxPhone
EmplMobilePhone
TypeOfWE
EmplNote
StateSchool?
LetterName
ReservedText
ReservedDate
ReservedBoolean
ReservedNumber
EmplMailAddress
EmplMailSuburb
EmplMailPostalcode
EmplEmail
EmplWebSite
EmplIndustrySector
EmplIndustrySectorSub
EmplSize
EmplStatus
EmplAttend
EmplWorkSafety
EmplDress
EmplMultiSite
EmplOther
EmplDateCreated
ContactTitle
UserDefinedE1
UserDefinedE2
UserDefinedE3
UserDefinedE4
UserDefinedE5
EmplStartTime
EmplEndTime
EmplRate
Export employer records to an XLS spreadsheet, then use that spreadsheet as a template for your
import.
10.3
Update Import
WorkExpo 9.0 User Manual | 67
You can import student records into WorkExpo on a conditional basis using a update import. This is useful
when you want to update records from your central school database rather than replace them.
Here's how a update import of student records works:
1.
The initial import process is identical to a normal import of records.
2.
On the last page of the Import Students wizard you flag the Update Import check box to true.
3.
Any new student records not found to currently exist in WorkExpo are imported in the normal way.
4.
For found existing student records the update import wizard updates the student details only.
5.
Any changed address or contact information is updated for the existing student, all other details are
untouched.
6.
WorkExpo will look for a match on your school's StudentID field to determine an existing record.
If the StudentID field is empty, the Import wizard will look for a match on first name, last name
and date of birth.
10.4
Import signature images
Letters which appear in WorkExpo, including the letter to parent and letter to employer can have your
signature embedded in the document.
This will save you time if there are multiple letters to sign. The format of the signature must be a image
format (Bitmap .bmp)
Check the WorkExpo CD for a sample signature image file called UserSig.bmp in the ..Manual
Install/Common folder
You can use Windows PAINT program to view your image file before saving.
Follow these steps to import your signature into WorkExpo:
1.
Sign your signature on a small piece of paper.
2.
Scan the signature and save it as a Windows bitmap file (.bmp)
3.
Save the file in MS PAINT as a Windows Monochrome bitmap.
4.
The image size should be about 1.76 cm wide by about 1.00 cm tall
or about 200 x 100 pixels. In PAINT choose IMAGE / ATTRIBUTES to check the size.
5.
Save the file with a .bmp extension.
6.
Start WorkExpo and click the “Options” button from the main menu.
7.
Click the “Signatures” tab.
8.
Select signature being imported – either teacher or principal.
9.
Enter the path and filename to the signature.
10.
Click the “Import Signature” button.
Check the available options under “Use/Include signatures” . WorkExpo stores the signature internally in
the database for future use.
You can also export a signature file, if necessary, from WorkExpo.
You may wish to do this to check if the signature is correct.
10.5
Exporting
WorkExpo 9.0 User Manual | 68
You can export from WorkExpo. Use the Export wizard for best results.
To start the Export wizard choose Export from the File menu.
Also be aware that all data for WorkExpo is stored in a single file, by default:
c:\program files\workexpo\data.mdb
If you have a copy of Microsoft Access you can open this file directly and copy and paste rows from the
tables.
WorkExpo 9.0 User Manual | 69
11
Backup and Restore
11.1
About The Data File
The single file DATA.MDB is the most important one as far as WorkExpo is concerned. This single file
contains ALL your WorkExpo information including:
l
School details
l
User details
l
Teacher information
l
Employers
l
Students
l
Everything Else
If you look in the WorkExpo folder on your hard drive you will see several files which together make up
WorkExpo. However, all these files are replaceable except for one: DATA.MDB
It is important to be aware at all times where you WorkExpo data file is. How can you find out? Here are
a few different ways:
l
Click the yellow light bulb a few times and it will tell you the name and path of your current data file.
l
From the Main Menu in WorkExpo, click the Options button and then click the Data File tab.
l
Using Windows Explorer you can navigate to the WorkExpo folder (c:\program files\workexpo) and
see the Data file. In a network environment it may not be there but rather in a shared network drive
on a file server.
It is recommended that you turn on the data file path reminder feature in WorkExpo. Here's how:
1.
From the Main Menu in WorkExpo, click the Options button and then click the Data File tab.
2.
Place a tick in the box "Show the WorkExpo data file path in the title bar"
3.
WorkExpo will now always remind you which data file you are currently using and connected to.
Why is it so important to know about the data file?
It is important because you may have more than one data file on your system. You need to aviod
confusion else you may be writing records to an old or out-of-date file.
11.2
Automatic Multiple Backups
WorkExpo can create multiple backups of the data file. This means that if you save a bad data file, you
still have other good backups from which to retrieve data from in case of an emergency. WorkExpo will
append the day of the week to each file name so you have will have up to seven backups at any one
time. This setting is optional.
To turn on multiple backups:
1.
From the Main Menu click the Options button
2.
Click the Backup tab
3.
In the backup options place a tick in the box for Automatic Multiple Backups.
Each backup will have the day of the week appended to the file name creating up to seven backup
copies of the data file.
11.3
Backup Data File
IMPORTANT NOTE: You should regularly back-up your data.
WorkExpo 9.0 User Manual | 70
Your data file stores all information you enter into WorkExpo. The default file name is DATA.MDB
This file by default is located in c:\program files\workexpo\data.mdb
To backup this file you can copy it using Windows Explorer tools or WorkExpo can create backups for you.
Follow these steps to backup your WorkExpo data file:
1.
From the WorkExpo main menu choose the large Options button.
2.
Click the Back-up tab.
3.
The Backup Options dialog box will be displayed.
4.
In the File To Be Saved box enter the DATA.MDB file and its path. This is the file which stores all your
WORKEXPO data, including student, employer and arrangement data.
5.
In the Save As box enter the location and name of the backup. The location must pre-exist on your
system but the name for the Save As backup file can be new. You can also choose to be reminded to
backup on close.
6.
Click CLOSE or press ESC to close off the dialog box and save changes.
NOTES:
l
Remember that ALL your data is stored in a single file - DATA.MDB If you have a reliable recent
backup of this file you can completely restore WorkExpo with a minimum of fuss.
l
It is recommended that you backup to a network location. This is typically the most secure form of
backup.
l
You can tell WorkExpo to prompt you to backup when exiting the program. You can also restore from
a previous backup. Click the restore tab.
l
Also be aware that you can browse and use an existing data file. Choose Open from the File menu.
WorkExpo will also automatically save a daily copy of each backup for each day of the week in the
same folder you nominate. Optionally you save multiple copies of the file. Check the Automatic
Multiple Backups tab in the Options dialog.
11.4
Backing up to a CD
You can backup to CD if you are using Windows XP and you have a CD Burner installed. If you are using
Windows 2000 or earlier versions of Windows you will get a message which says "You cannot save in the
folder you specified" when you try to point to the CD Rom drive as the folder to save in.
Of course, if you don't have a CD burner installed you can't backup to CD.
Follow these steps to backup your WorkExpo data file to CD under Windows XP.
1.
In WorkExpo go to the Main Menu and click the large Options button.
2.
Click the Backup tab
3.
In the Save as box enter the path to the CD Rom drive or click the Browse button and navigate to the
CD Rom drive.
4.
Enter a File Name to save as e.g. DataBackupFriday.mdb
5.
Then click the Backup Now button.
6.
WorkExpo will tell you that the backup is successful, but what has happened is that Windows has
WorkExpo 9.0 User Manual | 71
copied the file to a temporary folder on the C: drive as C:\Documents and
Settings\<Username>\Local Settings\Application Data\Microsoft\CD Burning
7.
Next a pop-up window in the bottom right corner of Windows will appear.
8.
9.
10.
11.
This will offer to burn the file to a CD ROM. Of course, you must a CD Burner installed to use this feature.
Finally, click on the message balloon to start the Windows CD ROM burning wizard and follow the
instructions.
WorkExpo 9.0 User Manual | 72
12
Archiving
12.1
Archiving Records And End Of Year Rollover
What to do
Notes
1. With the WORKEXPO main
menu on your screen click the
TOOLS menu then choose
WIZARDS then ARCHIVE
wizard.
WORKEXPO can archive student records, employer records or
arrangement records. This helps maintain your database.
2. The Archive Wizard dialog
box will appear. You can choose
to archive arrangement
records, student records or
employer records.
In this example we will archive
student records.
Select “Work Experience
Arrangement records”
Click on the NEXT button...
3.
Select the records you
wish to archive in the box.
4.
12.2
Click ARCHIVE
WORKEXPO archives records by form or year level group.
Your records are now stored in an archive. You can browse the archive at
any time by clicking the ARCHIVE button then selecting “I’d like to
browse the archives”
NOTE: Records can be restored or deleted from the archive.
Archiving Records
WorkExpo provides three separate methods for archiving your data.
l
The Archive Wizard.
l
Advanced Archiving.
l
The End-Of-Year Rollover wizard
Each of these methods has pros and cons and depending on your situation you may choose one method over
the other becuase it suits the way you work and your particular requirements.
The most efficient and effective way to archive your data is to always archive your arrangement records first.
Then archive student or employer records as a second step. This means that if you wish to restore at a later
stage you can restore the student and employer records first, then restore the arrangement record. If you try
to restore an arrangement record without first restoring the corresponding student or employer record you will
delete the arrangement record rather than restore it. This is because an arrangement can't exist without both
WorkExpo 9.0 User Manual | 73
related student and employer records.
l
The automatic archive wizard will always archive records in the correct order so that there's no likelihood
of losing data.
l
You should archive all arrangement records for a period of at least five years. You can always print a copy
of an archived arrangement record even if you have deleted the relevant student and employer records.
l
Consider archiving student records for a period of one to two years before deleting them.
l
Consider archiving employer records who no longer offer work experience placements or for some other
reason are no longer part of the program.
l
You can restore, delete or print an archived arrangement record once in the archive.
l
Archived records can be restored or deleted from the archive. Once deleted from the archive they cannot
be restored.
l
Archived records are part of the file Data.mdb. When you save or backup this file you will also be backing
up your archives.
l
Double-clicking on any archived record in an archive will show details for the record in addition to further
options.
Arrangement records: First Into the Archive - Last Out of the Archive.
12.3
Archive Or Delete
In general terms you should archive records rather than delete them. Why?
12.4
l
By archiving records you have a permanent record of past programs.
l
You can print an arrangement record for a past student if the record has been archived.
l
You can compare past programs with present day programs.
l
Archiving records allows you to undo (or "un-archive") the record if you make a mistake.
l
You can delete records directly from the archive if necessary.
Auto Archive
You should archive your data so that you may refer to it in the future if necessary. At the end or
beginning of a year is the usual time to archive your data. The Auto-Archive wizard will archive your data
and clean out your student and arrangement windows.
What does Auto-Archive do?
l
Automatically archives all student records and all arrangement records within the WorkExpo data file.
l
Empties the records from both the students and arrangements windows so that these areas are ready
for new records.
l
This means that after auto-archiving there will be 0 students and 0 arrangements in the main
system.
l
You can view and or restore your records once archived. See Restore Archives (Section 12.8)
l
You can view the archives at any time by selecting ARCHIVES from the VIEW menu.
Are there any alternatives to Auto-Archive?
l
Yes, you can archive your records using the archive wizard instead. See the Archiving (Section
12.1) records tutorial.
l
Alternatively you can archive your records using a file-based approach. See File-based approach to
archiving records.
l
Another options is to archive arrangement records only and roll over the student records by
performing an update import (Section 10.3).
WorkExpo 9.0 User Manual | 74
12.5
Archive Data Sheet View
You can view Archives in DataSheet view from the Archives window. Click the View Datasheet icon on the
toolbar and the Datasheet view is displayed.
To sort the Datasheet grid:
1.
Place the cursor in the column you'd like to sort on
2.
Right click for the shortcut menu
3.
Choose sort ASC or DESC
4.
The Datasheet is now sorted by the selected field.
To filter the Datasheet grid:
1.
Place the cursor in the column you'd like to sort on
2.
Right click for the shortcut menu
3.
Choose sort Filter By Selection
4.
The Datasheet is now filtered by the selected field value.
OR use the options in the drop down box at the top of screen.
To print the Datasheet grid:
1.
Sort and/or filter the Datasheet as necessary
2.
Click the Print button
3.
If your settings are set to Print Preview the report will show first in preview.
To copy the Datasheet grid:
12.6
1.
With the Datasheet grid on screen, press CTRL + A to select all
2.
Open Microsoft Excel
3.
Choose Edit / Paste to paste the contents into Excel.
Browse Archives
1.
From the TOOLS/WIZARDS menu select "Archive Wizard".
2.
Select the "Browse" option.
3.
In the archive browse window, double-click a record to view detail for that archived record.
OR
From amywhere withing WorkExpo from the View menu, choose Archives.
You can restore an individual archived record by clicking the restore button on the detail record
dialog.
12.7
Print Archived Arrangement
HOW TO PRINT ARCHIVED ARRANGEMENT RECORDS
1.
Go to the archive browse window.
2.
Then select the the record by double-clicking it.
3.
Click the "Print" button.
WorkExpo 9.0 User Manual | 75
12.8
Restore Archived Arrangement
You can restore an archived arrangement record. Here's how:
1.
Go to the archive browse window.
2.
Then select the the record by double-clicking it.
3.
Press the "RESTORE" button.
If you want to restore ALL records press the RESTORE ALL button.
NOTE: Be aware of the problems of restoring archived arrangement records. Tell me more...
(Section 12.2)
WorkExpo 9.0 User Manual | 76
13
Reference
13.1
Getting Help
What to do
Notes
With the WORKEXPO main menu WORKEXPO has its own built-in on-line Windows help files.
on your screen click on the HELP
menu at the top of the screen.
Select CONTENTS from the dropdown menu.
13.2
13.3
Click on the topic heading to
move to that topic.
Topic heading appear in green and are underlined.
You can also select SEARCH to
search for information on a
particular topic.
If you are unable to find a topic select CONTENTS and click on “What I
want is not listed”. This displays a range of further options.
Keyboard Shortcuts
To do this...
Keyboard Shortcut
To move from record to record
Page Up or Page Down
Zoom in a text box
SHIFT & F2
To move from field to field
TAB (Forward) SHIFT + Tab (Backwards)
To move from tab to tab in a tabbed dialog
box
CTRL+Tab
Close Print Preview
ESC
Close a dialog box
ESC
Undo a record
Press Esc twice
Close a window
CTRL+W
To show the Windows print dialog box
CTRL+P
To open a drop-down list
F4
To tick an item in a tick box
Spacebar
To select the record number
F5
CUT
CTRL + X
COPY
CTRL + C
PASTE
CTRL + V
Mouse Shortcuts
WorkExpo 9.0 User Manual | 77
To do this...
Mouse Shortcut
Select an item in a list
Double-click on name
To sort records
Right-click and select Sort Ascending or sort descending
To filter records
Right-click and choose filter by selection
To remove filter or sort
Right-click and select remove filter/sort
To cancel a button that appears
on the screen after pressing it.
Slide the mouse off the button then release the left mouse button
Most of these shortcuts are use in many Windows programs.
13.4
Using Multiple WorkExpo Data Files
Follow these steps
How do I do this?
1. Start WINDOWS EXPLORER
Windows Explorer is the Windows File Management Tool that will
help you get the most out of WorkExpo.
2. Navigate to the WorkExpo folder
The default path is C:\Program Files\WorkExpo
3. Create a new folder below the
WorkExpo folder called “Files”
Choose FILE then NEW FOLDER from the Windows Explorer file
menu. Then name the new folder from it’s default name
”New Folder” to “Files”
4. Copy the file DATA.MDB from the
This will close the Options Dialog box and return you to the Main
WorkExpo folder to the WorkExpo/Files Menu window.
folder.
5. Start WorkExpo and linked back and In WorkExpo choose OPEN from the FILE menu, navigate to the
forward between the two data files.
data file and click OK. WorkExpo will link to that file and
remember it next time you start.
You now have two WorkExpo data files. This can be useful if you
need to make changes but worry about making mistakes. You
can also use this method as an alternative to archiving.
13.5
What Teachers Say About WorkExpo
"Thank you for the fantastic WorkExpo training session yesterday. I thought it was very well run,
informative and enjoyable - the most useful professional development I have done!
Kasia Kinsky
Careers Counsellor
Camberwell Girls Grammar
WorkExpo 9.0 User Manual | 78
“I have been a satisfied customer of WorkExpo for five years now. WorkExpo continues to get better and
better. ”
Nigel Murray
Cleeland Secondary College
"I have been doing wonderful things with WorkExpo and I think it is fabulous!"
Kerri Farrell
Copperfield College
"I've found WorkExpo to be a lifesaver. Over 100 students took up optional work experience this year so
it saved me lots of time. Very user friendly."
Julie Ripon
Careers Advisor
Gippsland Grammar
"As a fairly ordinary computer user I found WorkExpo very easy to learn and use. It has the NSW forms
and documents as an option. I highly recommend it! A lot of work has been done to make this software
idiot-proof!"
Brian Dean
Eden-Marine Technology College (NSW)
"May I thank you for both your products and your service, they have been tremendously valuable in
assisting me in my work."
Peter Astin
Mazenod College - Mulgrave North, Victoria
"The new additions are fantastic. I will document all interviews using the counselling section rather than
keep a separate written record."
Mark Paynter
Marist-Sion College
"The best bit of software I've ever bought!"
Melinda Savino
Nazareth College, Noble Park
"I’ve used several work experience software programs, but WorkExpo is definitely the best!"
Jacqui Dods
Billanook College
"WorkExpo prints out my arrangement forms in a snap!"
John Frawley
Rowville Secondary College
"I’ve been using the WorkExpo software for some time now. I don’t know how I managed without it"
Lainie Carroll
Mount Waverley Secondary College
"Without WorkExpo there is no way in the world that I would have managed all the paperwork for
sending 263 Year 10 students out on block release for two weeks."
Judith Clarke
St. Monica’s College, Epping - Victoria
"Indispensable! Can't live without it. Especially like the block list report WorkExpo generates. Gives me a
complete overview of my block."
Charles Hogarth, Our Lady of Sion College, Box Hill
13.6
What's New In Version 9.0
WorkExpo Version 9.0 introduces a range of new features and functionality that make it easier than ever
to manage you work experience or work placement program at your school or college.
Automatic Multiple Backups : In previous versions of WorkExpo you can create a backup copy of the
data file when exiting the program. In version 9.0 you can now tell WorkExpo to create multiple backups
of the data file. This means that if you save a bad data file, you still have other good backups from which
to retrieve data from in case of an emergency. WorkExpo will append the day of the week to each file
name so you have will have up to seven backups at any one time.
l
WorkExpo 9.0 User Manual | 79
Use School Logo with Certificates and Letters: Import your school logo into WorkExpo and use in
letters and certificates. Supported formats are .bmp, .jpg, .png and .gif.
l
Set fonts and font sizes for all letters in WorkExpo: When setting up letters in WorkExpo you are
now able to choose fonts and/or font sizes. Certificates and lists will still use WorkExpo defaults however.
l
Partial "Update import" of student records: With version 9.0 you can perform an update import
of student records from your school's central database. Any new records are added, any duplicate
records are ignored and any records which have changed are updated. This means that you can
effectively update student details at any time from your central database system without losing existing
student information.
l
Improved Letter Addressing: Many small employers (sole proprietors) have the contact name also
entered as the business name. For example, "Terry Jones" a self employed solicitor is enter as,
say, "Terry Jones" (BusinessName). WorkExpo is now sensitive to this and does not list two repetitive
lines on letters. Instead of two address lines: "Terry Jones" (Contact) at BusinessName ("Terry Jones"),
the contact name and business name are combined to a single line ("Terry Jones").
l
Improved Follow-ups/Reminders: Follow-ups within WorkExpo have been extensively re-worked
and improved. You can now view follow-ups in a variety of different ways/formats. Each view can be
printed. Follow-up options have been enhanced and follow-up information is more reliable and useful as a
result.
l
Tracking Student Progress - now allows multiple tracking: In previous versions of WorkExpo the
tracking feature was available on a single item basis. Version 9.0 allows multiple tracking for
each student. This means that if a student has two placements you can now track the progress of each
separately. You can link tracking to a specific arrangement. A new batch update wizard for tracking is
also available.
l
New Delete Wizard: Allows easy database clean up. With the new delete wizard you can delete
students by year level or by homegroup and delete them all easily. You can select several students from
any mix of year and/or homegroups and delete them all with a single click. The Delete wizard Works with
employer records too. In previous versions of WorkExpo you could only delete one student or employer
at a time.
l
Improvements in Archiving: In the archive wizard you can now multi-select students and/or
employers for archiving. The archives now display a new column which shows the Year that records were
archived, thus when browsing the archives you can see at a glance when records were archived. The
archived date and the user who archived the records is also visible. All archives are now available in a
Datasheet view which means that you can sort and filter the archives. You can also copy and paste
archived records into Excel. None of these things were possible in previous versions.
l
Help File completely re-written: The WorkExpo on-line help has been re-written and extended to
provide more assistance with common tasks, making it quick and easy to find the relevant help
information. State Specific information relating to work experience is also included. This provides quick
and easy reference to relevant state guidelines as they relate to work education.
l
Spell checking now available: When you edit letter content or other user-defined information in
WorkExpo 9.0 you can now press F7 to start the Office spell check wizard. This wizard is the same user
interface that you are used to using in Microsoft Word. WorkExpo taps into Microsoft Office and finds the
spell check wizard for you allowing you to spell check your text in WorkExpo with ease.
l
Arrangements DataGrid: When you view arrangements in the arrangements window you can now
opt to view a Data Grid of the arrangements. There are several built-in filters to allow you to sort and
group the arrangements list. You can control the sort order of the columns as well as the being able to
filter on any field to produce your own custom listing on screen. This listing can be printed directly from
the arrangements window without needing to go through the Print Wizard.
l
New Arrangements List Report - By Industry Sector: Now you can print out a list of
arrangements by Industry Sector. Each page contains a separate industry sector and students are
grouped by industry sector. For example, all students undertaking placements under the broad industry
grouping Office and Business Services are grouped together on the same page even though their
individual work types may be different. Each industry sector begins on a new page.
l
Parent Mobile Phone: WorkExpo now includes a new field for you to store the parent mobile phone
number in addition to the separate home phone number and parent work phone. Click the Parent
hyperlink in the students window MAIN tab to add/edit Parent mobile phone number.
l
Date Last Edited field: Student and employer records now have a "Date Last Edited". The system
updates this date automatically. This means you can view, say, the last five student records you have
edited by sorting on this field.
l
Improved Arrangement window statistics: The statistics available in the arrangements window
now provide the ability to drill down to find more detailed information. For example, a statistic may
reveal that there are 6 students on work experience during May. Double-click on this statistic to see who
those six students are.
l
WorkExpo 9.0 User Manual | 80
Improved Default Date Handling: You can now set the default date in letters and reports. All of
these letters have a date at the top. This date by default is set to the current date (computer system
date). You can now change this default behaviour in the Print Settings section of WorkExpo Options.
l
Use Specific Date for Letters: WorkExpo defaults to the current date for all letters and printed
documents. In version 9.0 you can override this behaviour and specify a date which WorkExpo will use
for all documents.
l
New field for Arrangements - Transport: This new field is associated with arrangements. The
Transport field records how a student is planning to get to and from the work experience venue, includes
a user specified look up list for use with the Transport drop down box e.g. bus, train, private car etc.
l
Warn if Student has Medical Condition: When creating new arrangements you can tell WorkExpo
to warn you if a particular student has a medical condition which may impact on your decision to place
the student. WorkExpo gathers this information from the student details area and alerts you when
creating new arrangements for the student.
l
Safe@Work: You can assign a date component to both the general and industry modules. A new
datasheet (list) view of the Industry module has been added. You can set options to tell WorkExpo to
completed the dates automatically. You can print lists of students who need to re-sit Safe@Work modules
or lists of students who have yet to undertake modules. WorkExpo also automatically maps work types to
industry. (Victoria Only)
l
Victoria/NSW Border Schools: When a student with a Victorian school has an employer in NSW,
WorkExpo will print a special Work Experience/Placement form for Victorian students who are working
with New South Wales employers. WorkExpo determines this by looking at the home school state and if it
is Victoria and the Employer is in NSW then WorkExpo will generate the special arrangement form.
l
Many other small subtle productivity improvements: Little things have been improved here and
there which make working with WorkExpo easier and more intuitive that ever before.
l
l
13.6.1 Upgrade Notes
Continued Software Support
Upgrading to the version 9.0 includes support until the next version is released. This includes web, phone
and email support to the school. All support calls will continue to be handled personally by Terry
Chapman.
Multiple Schools Edition available
WorkExpo 9.0 is also offered as a Multi-Schools Edition. This edition has all the features of the
standard WorkExpo package but also includes support for multiple schools. This means you can have
several cohorts of students assigned to several schools within the one WorkExpo database. This edition
would be suitable for LLEN's or VET cluster organizations. The Multi-Schools Edition allows you to import
data files from WorkExpo schools and WorkExpo will keep track of which schools students belong to. This
edition is available as a new full version or upgrade from an existing version. More details here
(Section 8.1).
See pricing (http://www.infoplan.com.au/workexpo/wePrice.htm) for costs.
Network (Multi-User) version now available.
If you share the WorkExpo database at your school with other teachers and/or across campuses you
need to upgrade to the Network edition of WorkExpo. This Multi-User edition of WorkExpo allows for up
to 5 simultaneous users. Network support is also included. The stand-alone version may only be used by
a single nominated teacher and does not include network support.
User Profiles and Software Settings
During the upgrade your data file will be modified structurally but the content of the data file will remain
unchanged. All of your user settings will also be migrated during the upgrade. If you share WorkExpo
with other users you will need to run the software upgrade on each user machine separately.
Setting the Defaults
The defaults settings which you have stored in your Windows registry will not be changed. All settings will
remain in the same (hive) place in the Windows registry.
Improved Installation routines
WorkExpo 9.0 will detect your version of Microsoft Office and install the correct version files. In the past
version issues with Microsoft Office and particularly, Microsoft Access caused some problems for school IT
support staff. The new installer detects versions and settings and installs the correct files seamlessly.
WorkExpo 9.0 User Manual | 81
14
Technical & Support
14.1
Troubleshooting
14.1.1 Trouble Shooting FAQ
What to do if:
Notes
1. Dates don’t seem to work
properly in WORKEXPO.
Go to WINDOWS utility CONTROL PANEL and select REGIONAL
SETTINGS. Make sure that AUSTRALIAN date formats are set. You
may need to check TIME/DATE. Set your WINDOWS time/dates
defaults as:
dd/MM/yyyy
2. Pages don’t seem to print
properly.
Go to WINDOWS utility CONTROL PANEL and select PRINTERS.
Select the Printer Properties.
Make sure that the paper size A4 is the global default setting in
WINDOWS.
3. Some paragraphs seem to be
overprinting onto other
paragraphs.
Make sure that A4 is your standard paper size in WINDOWS. (See
above) If the problem persists then preview the problem document in
WORKEXPO then select PRINT SETUP from the file menu and adjust
the margins manually.
4. WORKEXPO is not calculating
a student’s AGE properly
Go to WINDOWS utility CONTROL PANEL and select REGIONAL
SETTINGS. Make sure that AUSTRALIAN date formats are set. You
may need to check TIME/DATE. Set your WINDOWS time/dates
defaults as:
dd/MM/yyyy
5. My DATA.MDB file is too big
to fit on a floppy disk
You should backup the data file to a memory stick or a network
folder.
14.1.2 Phone and Fax Issues
The phone and fax details are related to each WorkExpo logged-in user, not the school. This is by design
as there can be multiple users each with different phone and fax details.
To add/edit or delete phone and fax numbers:
1.
From the WorkExpo Main Menu click OPTIONS.
2.
In the School Details section you will note that there are no fields for phone or fax.
3.
Click Add/Edit/Delete WorkExpo users.
4.
Each user can have their own phone and fax details.
You can add, edit or delete phone, fax and mobile phone numbers here.
WorkExpo uses the phone, fax and mobile details of the current logged in user.
To change the logged in user without exiting WorkExpo:
1.
From the File menu choose Log Off
2.
From the login dialog box select the user from the drop down list
WorkExpo 9.0 User Manual | 82
3.
Enter a password if necessary.
4.
You are now logged in as the selected user and WorkExpo will use the logged in user details in all
documents and letters.
14.1.3 Certificate Printing On Two Pages
The student and employer certificates are designed to print on one page only.
If the certificate is generating two pages - the certificate on the first page and a blank second page, then
your printer may not have been set to Australian A4 size paper.
l
All printers are initially set to American "Letter" size paper which is shorter than Australian A4.
l
The blank page is your printer trying to fit the invisible bottom margin of page one onto a second
page.
l
To fix this problem have your school's IT support person change the printer setup to A4 size.
If you are using a school logo with the certificate it may be that you have set the paper length for the
certificate too long.
To fix this display the certificate in print preview mode then:
14.2
1.
Click the Logo Settings button on the Print Preview toolbar.
2.
In the Logo settings dialog box make sure that Extra Page Depth is set to 0 cm.
System Requirements
Operating System: WorkExpo will operate on Windows NT 4 (Service Pack 6a), Windows 2000 or
Windows XP.
Note that Windows 95, 98 and Me are not supported although WorkExpo may run on these systems.
Internet Explorer: Internet Explorer 6.0 or higher is required. The required version of Internet
Explorer (currently) comes pre-installed on Windows XP and is available for free download for other
supported operating systems.
Microsoft Office: You must have Microsoft Office Professional installed on your machine. Office
Professional includes Microsoft Access which is required for WorkExpo. Setup will detect the Office version
upon install and install the correct matching version of WorkExpo.
Disk Space: WorkExpo requires less than 50 mb of disk space.
RAM: WorkExpo requires at least 256 mb RAM.
14.3
Support Options
Evaluation Support (Demo mode)
Every user evaluating WorkExpo is entitled to :
l
Unlimited email based support for the period of evaluation (30 days)
l
Unlimited access to the on-line support materials available on the Info Plan Software web site
Standard single-user support
Every single-user licensed WorkExpo user is entitled to :
l
12 months free phone/email based product support to person who purchased the software.
l
Unlimited access to the on-line support materials available on the Info Plan Software web site.
l
Critical bug fix updates for the version of software purchased.
l
Telephone support for the registered single-user only.
Network/Multi-User Support (Up to 5 users).
Every licensed multi-user level user of WorkExpo is entitled to :
l
Unlimited email based support for the duration of the multi-user license.
WorkExpo 9.0 User Manual | 83
l
Unlimited access to the on-line support materials available on the Info Plan Software web site.
l
Critical bug fix updates for the duration of the subscription license.
l
Telephone support for each member of the multi-license agreement.
Refund Policy
The refund policy is fully detailed in the End User License Agreement (Section 14.4) section. The
following is a summary:
l
Users must agree to the end-user-licence agreement before installing the software
l
An evaluation version of the software is provided to allow users to evaluate the software
l
Users should fully evaluate the software before purchasing
l
The software is provided "as is". No guarantees or warranties are provided
l
Info Plan Software does not provide refunds once software has been purchased
Submitting Suggestions and Reporting Issues
If you wish to make a suggestion or report an issue you have discovered using HelpStudio, you can do so
using the on-line form (http://www.infoplan.com.au/support/support.htm). Alternatively, you
can email Info Plan Software support at [email protected]
The amount of information you can provide us with about the nature of a problem you are having will
directly affect our ability to resolve it. The more information you can provide about your environment, the
steps to reproduce and any other relevant information the better!
Obtaining WorkExpo Product Updates and Patches
You can download any updates available to you directly from the Info Plan Software web site at :
http://www.infoplan.com.au/workexpo/wePatch.htm
14.4
Licence and Copyright
WORKEXPO - END USER LICENCE AGREEMENT AND COPYRIGHT:
=============================================================
By installing this SOFTWARE you have agreed to this license agreement when you clicked “I Agree” when
you ran the install wizard. By proceeding to install this SOFTWARE you have indicated your acceptance of
all the terms and conditions stated in this agreement.
This is a legal agreement between you (either as an individual or a single entity) and Info Plan Software
for this software product which includes computer software and may include associated media, printed
materials, and "online" or electronic documentation (the "SOFTWARE"). By installing, copying or
otherwise using this SOFTWARE you are agreeing to be bound by the terms of this agreement. If you do
not agree to the terms of this Agreement, do not install or use the SOFTWARE.
1 GRANT OF LICENSE. This agreement grants you the following rights.
(i) EVALUATION LICENSE
You may install and use an unlimited number of evaluation copies of the SOFTWARE on an unlimited
number of machines.
(ii) SINGLE USER LICENSE
You may install and use one copy of the SOFTWARE on a single computer. The primary user of the
computer on which the SOFTWARE is installed may make a second copy for his or her exclusive use on a
portable computer. This license is NOT transferrable to any other person at any time. Only the person
who purchased the SOFTWARE is licensed to use the SOFTWARE.
(iii) NETWORK (MULTI -USER) LICENSE
You may use as many copies of the SOFTWARE as your multi user license entitles you to, in the manner
specified above. You are also entitled to make a corresponding number of secondary copies for portable
computer use as specified above. Multi-user licenses are not transferrable.
2. COPYRIGHT. The SOFTWARE is owned by Info Plan Software and is protected by copyright laws and
international treaty provisions, as well as other intellectual property laws and treaties. The SOFTWARE is
licensed, not sold. You must therefore treat the SOFTWARE like any other copyrighted material.
3. TERM OF LICENSE. The license will continue until you physically destroy all copies of the SOFTWARE
and merged portions thereof, and return any original program media and documentation to Info Plan
Software.
4. OTHER RESTRICTIONS.
WorkExpo 9.0 User Manual | 84
(i) TRANSFER OF LICENSE
You may not transfer, nor rent, nor lease nor share the SOFTWARE with any other person or co-worker.
Each user of the software must be licensed specifically. In the case of a multi-user licence, licensed users
must be nominated at the purchase date. Multi-user licenses may not be transferred, leased, rented or
shared.
(ii) REVERSE ENGINEERING
You may not reverse engineer, decompile, or disassemble the SOFTWARE.
(iii) SEPARATION OF COMPONENTS
The SOFTWARE is licensed as a single product. Its component parts may not be separated for use on
more than one computer, or accessed in any way other than through the provided user interface.
(iv) TERMINATION
Without prejudice to any other rights, Info Plan Software may terminate this agreement if you fail to
comply with the terms and conditions of this agreement. In such event, you must destroy all copies of
the SOFTWARE and all of its component parts.
5. ENHANCEMENTS AND UPDATES. From time to time, at its sole discretion, Info Plan Software may
provide enhancements, updates, or new versions of the SOFTWARE on its then standard terms and
conditions thereof. This Agreement shall apply to such enhancements.
You may not remove any proprietary notices, labels, trademarks from the SOFTWARE or associated
documentation.
You may not modify, de-compile, disassemble, reverse engineer or translate the software.
LIMITED WARRANTY
You assume all responsibility for the selection of the SOFTWARE as appropriate to achieve the results you
intend and for the installation of, use of, and results obtained from the SOFTWARE. Info Plan Software
warrants that the media on which you obtained SOFTWARE shall be free of manufacturing defects. Except
for the limited warranty set forth herein, the SOFTWARE is provided "AS IS" to the maximum extent
permitted by applicable law.
Info Plan Software disclaims all warranties, either express or implied, including but not limited to implied
warranties of merchantability, fitness for a particular purpose, and non-infringement with respect to the
SOFTWARE and the accompanying documentation. Without limiting the foregoing provisions, Info Plan
Software makes no warranty that the SOFTWARE will be error-free or free from interruptions or other
failures or and makes no guarantee that the SOFTWARE will meet your requirements. The foregoing
provisions shall be enforceable to the maximum extent permitted by applicable law.
CUSTOMER REMEDIES. Info Plan Software and its suppliers' entire liability and your exclusive remedy
shall be, at Info Plan Software's option, either (a) return of the price paid or (b) repair or replacement of
the SOFTWARE that does not meet Info Plan Software's Limited Warranty and which is returned to Info
Plan Software with a copy of your proof of purchase. This Limited Warranty is void if failure of the
SOFTWARE has resulted from accident, abuse, misapplication or misunderstanding the purpose of the
software. Any such warranty period shall be at the entire discretion of Info Plan Software but will not
exceed a period of thirty (30) days from purchase date.
NO LIABILITY FOR CONSEQUENTIAL DAMAGES. In no event shall Info Plan Software or its suppliers
be liable for any damages whatsoever (including, without limitation, damages for loss of business profits,
business interruption, loss of business information, or other pecuniary loss) arising out of use of or
inability to use this Info Plan Software product, even if Info Plan Software or its dealer have been advised
of the possibility of such damages. Some countries do not allow the exclusion or limitation of certain
implied warranties or the limitation of the foregoing warranty or the exclusion or limitation of incidental
or consequential damages, in which case and to the extent such exclusion or limitation is not allowed
some of the foregoing limitations and exclusions may not apply to you.
HIGH RISK ACTIVITIES. The SOFTWARE is not fault-tolerant and is not designed or intended for use
in hazardous environments requiring fail-safe performance, including without limitation, in the operation
of nuclear facilities, aircraft navigation or communication systems, air traffic control, weapons systems,
direct life-support machines, or any other application in which the failure of the SOFTWARE could lead
directly to death, personal injury, or severe physical or property damage (collectively, "High Risk
Activities"). Info Plan Software expressly disclaims any express or implied warranty of fitness for High
Risk Activities.
GENERAL PROVISION. You shall have no right to sub-license any of the rights of this agreement, for
any reason. In the event of the breach by you of this Agreement, you shall be liable for all damages to
Info Plan Software, and this Agreement shall be terminated. If any provision of this Agreement shall be
deemed to be invalid, illegal, or unenforceable, the validity, legality, and enforceability of the remaining
portions of this Agreement shall not be affected or impaired thereby. In the event of a legal proceeding
arising out of this Agreement, the prevailing party shall be awarded all legal costs incurred.
WorkExpo 9.0 User Manual | 85
This Agreement constitutes the entire agreement between the parties for the supply of the SOFTWARE
and its associated documentation and supersedes all prior arrangements, agreements, representations,
and undertakings. This Agreement may not be changed or modified except by a written instrument duly
executed by each of the parties hereto.
MISCELLANEOUS. This Agreement shall be governed by and construed in accordance with the laws of
Australia, without reference to conflict of laws principles. If any provision of this Agreement is held
invalid, the remainder of this Agreement shall continue in full force and effect.
You shall be responsible for the payment of all taxes, duties, or levies that may now or hereafter be
imposed by any authority upon this Agreement for the supply, use, or maintenance of the SOFTWARE,
and if any of the foregoing taxes, duties, or levies are paid at any time by Info Plan Software, you shall
reimburse Info Plan Software in full upon demand.
ACKNOWLEDGEMENTS. You acknowledge that you have read this Agreement, understand it, and agree
to be bound by its terms and conditions.
Except where otherwise noted, all of the documentation and software included in the setup package is
copyright Info Plan Software.
All rights reserved - Info Plan Software
14.5
Networking WorkExpo
Summary: This article explains the network setup for WorkExpo, and describes the issues that IT
managers should consider when installing WorkExpo in a shared environment across a Local Area
Network (LAN).
Contents
l
Introduction
l
Automatic Network Installation
l
Manual Network Installation
l
Display the Data File Path in the WorkExpo Title Bar
l
Sharing Files Between Different Users of WorkExpo
l
WorkExpo Will Run Slower Across a LAN
l
WorkExpo File Format (Microsoft Access)
l
Conclusion
Introduction
WorkExpo is a Microsoft Access database. It consists primarily of two key files (databases) WORKEXPO.MDE (front-end) and DATA.MDB (back-end). It should be installed so that the data file may
be shared by different users at different locations while all other files including the front-end file
WORKEXPO.MDE reside on the local machine.
WorkExpo can automatically create a connection to a back-end file on a network drive. You do not need
to copy files manually. It is recommended that you use the FILE/OPEN command in WorkExpo to point
to a data file and connect to it.
Automatic Network Installation
Follow these steps to set WorkExpo up on a work station
1.
2.
3.
4.
Log onto the workstation where WorkExpo is to be installed
Install WorkExpo on the machine using the /Silent switch (silent install) e.g.
SETUP.EXE /silent
This switch accept all defaults during setup and installs WorkExpo to c:\program
files\workexpo
Start WorkExpo and test that the sample data is displayed correctly.
Register the software in the usual way. Register via Options/School. Enter your school name
then the registration code.
5.
From the WorkExpo main menu click the “Options” button
6.
Click the “Network” tab
WorkExpo 9.0 User Manual | 86
7.
Specify the path to the folder in the "Network Server data file location" box, then
8.
Click the "Create Network Connection" button
9.
WorkExpo carries out the following steps:
•
Checks to see if an existing WorkExpo data file (DATA.MDB) is found in your specified
network location
•
If an existing data file is found in the specified network location, WorkExpo connects
to it and renames the data file on local machine to data.old
•
If an existing data file is NOT found in the specified network location, WorkExpo
copies the current data file on the local drive to the specified server and then connects
to it. Then WorkExpo renames the old data file to c:\program
files\workexpo\data.old
File Name
Default Path
Path after Network Install
data.mdb
(Central data file)
c:\program files\workexpo
e.g. //server1/teacher/workexpo
All other files including
WorkExpo.mde
c:\program files\workexpo
c:\program files\workexpo
Only a single file data.mdb needs to reside on the network server. All other files should remain on
user ’s C:drive.
Manual Network Installation
Follow these steps to set WorkExpo up on a work station manually using Windows Explorer
1.
Log onto the workstation where WorkExpo is to be installed with full software installation and
registry permissions.
2.
Install WorkExpo normally on the machine using the /silent switch (Quiet install) e.g.
SETUP.EXE /silent
This switch accept all defaults during setup and installs WorkExpo to c:\program files\workexpo
3.
Start WorkExpo
4.
Register the software in the usual way. Register via Options/School. Enter your school name then
the registration code
5.
Close WorkExpo
6.
Using Windows Explorer move the single file c:\program files\workexpo\data.mdb to a network
server location
7.
Start WorkExpo
8.
WorkExpo will prompt for the data.mdb file location on startup
9.
Navigate to the network server location of data.mdb
WorkExpo re-connects to this network data file and stores its location for future use.
Display the Data File Path in the WorkExpo Title Bar
WorkExpo can display the current data file path in the title bar, to enable this:
1.
Open WorkExpo at the Main Menu
2.
Click the Options button
3.
In the Options dialog click the DATA FILE tab
4.
Click checkbox to enable “Show data file path in the title bar”
5.
WorkExpo displays the current data file path in the title bar.
Sharing Files between different WorkExpo users
WorkExpo 9.0 User Manual | 87
Users of WorkExpo can also share their data file (data.mdb) across a LAN so that updates and deletes
flow to all users. WorkExpo will handle any read/write conflicts internally.
WorkExpo Will Run Slower Across a LAN
WorkExpo with the data.mdb file deployed across a LAN will run slower than if the data file resided on
the user ’s hard drive. However, WorkExpo will run very much slower if the front-end file workexpo.mde
is also deployed on the server. It is strongly recommended that this is avoided and that workexpo.mde
is deployed on each user ’s hard disk.
WorkExpo File Format (Microsoft Access)
WorkExpo’s default file format is Microsoft Access. Check out the README.TXT file in the MANUAL
INSTALL folder on the WorkExpo CD. Provision is made for supporting various versions of Access and
instructions on installation are also contained there. For more information on converting WorkExpo files,
contact Info Plan Software (03) 9531 1091 or [email protected]
Conclusion
WorkExpo can be installed across a local area network for data sharing by several users. Only a single
file data.mdb needs to be deployed to the network server. Any other installation will mean that users
may lose WorkExpo program settings between sessions. Also WorkExpo may run considerably slower if
the front-end file workexpo.mde is deployed on the server. In this article, you learned about the
considerations that IT managers need to be aware of when developing and using WorkExpo in a LAN
environment.
14.6
Networking WorkExpo - Overview
WorkExpo is a Microsoft Access runtime database. It consists primarily of two key files (databases) WORKEXPO.MDE (front-end) and DATA.MDB (back-end). It should be installed so that the data file may
be shared by different users at different sites while all the program files (incl. front-end) reside on the
local machine.
A multi-user licence is required to network WorkExpo.
WorkExpo can automatically create a connection to a back-end file on a network drive. You do not need
to copy files manually.
1.
Install WorkExpo normally on any machine and accept all defaults.
2.
Register the software in the usual way. Register via Options/School
3.
Start WorkExpo.
4.
From the WorkExpo main menu click the “Options” button.
5.
Click the “Network” tab:
6.
Specify the path to the folder in the "Network Server data file location" box, then
7.
Click the "Create Network Connection" button.
WorkExpo will carry out the following steps:
l
Checks to see if a WorkExpo data file (DATA.MDB) exists in the specified network location.
l
If an existing data file is found in the specified network location, WorkExpo connects to it and
renames the data file on local machine to data.old
l
If an existing data file is NOT found in the specified network location, WorkExpo copies the
current data file on the local drive to the specified server and then connects to it. Then WorkExpo
renames the old data file to data.old
NOTES:
14.7
l
It is recommended that you use a UNC (Universal Naming Convention) connection rather than a
mapped drive connection to the data file.
l
Creating a network connection may result in somewhat slower performance as the data has to be
gather across the wire rather than from a fast hard disk.
l
If the Network is down WorkExpo will not function and will prompt the user for the location of the
data file. This may confuse some users.
l
You can use FILE /Open to navigate to a different WorkExpo data files.
Networking WorkExpo - Step by step
WorkExpo 9.0 User Manual | 88
Installing WorkExpo for use across a Local Area Network - Article
Summary:
This article explains the network setup for WorkExpo for version 6.0 and later, and describes the issues
that IT managers should consider when installing WorkExpo in a shared environment across a Local Area
Network (LAN).
Contents
Introduction
Automatic Network Installation
Manual Network Installation
Display the Data File Path in the WorkExpo Title Bar
Sharing Files Between Different Users of WorkExpo
WorkExpo Will Run Slower Across a LAN
WorkExpo File Format (Microsoft Access)
Conclusion
Introduction
WorkExpo is a Microsoft Access database. It consists primarily of two key files (databases) WORKEXPO.MDE (front-end) and DATA.MDB (back-end). It should be installed so that the data file may
be shared by different users at different locations while all other files including the front-end file
WORKEXPO.MDE reside on the local machine.
WorkExpo can automatically create a connection to a back-end file on a network drive. You do not need
to copy files manually. It is recommended that you use the FILE/OPEN command in WorkExpo to point to
a data file and connect to it.
Automatic Network Installation
Follow these steps to set WorkExpo up on a work station
Log onto the workstation where WorkExpo is to be installed.
1.
Install WorkExpo on the machine using the /Silent switch (silent install) e.g. SETUP.EXE /silent
2.
This switch accept all defaults during setup and installs WorkExpo to c:\program files\workexpo
3.
Start WorkExpo and test that the sample data is displayed correctly.
4.
Register the software in the usual way. Register via Options/School. Enter your school name then the
registration code.
5.
From the WorkExpo main menu click the “Options” button
6.
Click the “Network” tab
7.
Specify the path to the folder in the "Network Server data file location" box, then
8.
Click the "Create Network Connection" button
WorkExpo carries out the following steps:
l
Checks to see if an existing WorkExpo data file (DATA.MDB) is found in your specified network
location
l
If an existing data file is found in the specified network location, WorkExpo connects to it and
renames the data file on local machine to data.old
l
If an existing data file is NOT found in the specified network location, WorkExpo copies the current
data file on the local drive to the specified server and then connects to it. Then WorkExpo renames
the old data file to c:\program files\workexpo\data.old
l
File Name Default Path after Network Install data.mdb
l
Central data file = c:\program files\workexpo e.g. //server1/teacher/workexpo
l
All other files including WorkExpo.mde c:\program files\workexpo c:\program files\workexpo
l
Only a single file data.mdb needs to reside on the network server. All other files should remain on
user’s C: drive.
Manual Network Installation
Follow these steps to set WorkExpo up on a work station manually using Windows Explorer
1.
Log onto the workstation where WorkExpo is to be installed with full software installation and registry
permissions.
2.
Install WorkExpo normally on the machine using the /silent switch (Quiet install) e.g.
SETUP.EXE /silent
This switch accept all defaults during setup and installs WorkExpo to c:\program files\workexpo
WorkExpo 9.0 User Manual | 89
3.
Start WorkExpo.
4.
Register the software in the usual way. Register via Options/School. Enter your school name then the
registration code.
5.
Close WorkExpo.
6.
Using Windows Explorer move the single file c:\program files\workexpo\data.mdb to a network
server location.
7.
Start WorkExpo.
8.
WorkExpo will prompt for the data.mdb file location on startup.
9.
Navigate to the network server location of data.mdb
10.
WorkExpo re-connects to this network data file and stores its location for future use.
Display the Data File Network Path in the WorkExpo Title Bar
WorkExpo can display the current data file path in the title bar, to enable this:
1.
Open WorkExpo at the Main Menu.
2.
Click the Options button.
3.
In the Options dialog click the DATA FILE tab.
4.
Click checkbox to enable “Show data file path in the title bar”.
WorkExpo displays the current data file path in the title bar
Sharing Files between Different Users of WorkExpo
Users of WorkExpo can also share their data file (data.mdb) across a LAN so that updates and deletes
flow to all users. WorkExpo will handle any read/write conflicts internally.
WorkExpo Will Run Slower Across a LAN
WorkExpo with the data.mdb file deployed across a LAN will run slower than if the data file resided on the
user’s hard drive. However, WorkExpo will run very much slower if the front-end file workexpo.mde is
also deployed on the server. It is strongly recommended that this is avoided and that workexpo.mde is
deployed on each user’s hard disk.
WorkExpo File Format (Microsoft Access)
WorkExpo’s default file format is Microsoft Access. Check out the README.TXT file in the MANUAL
INSTALL folder on the WorkExpo CD. Provision is made for supporting various versions of Access and
instructions on installation are also contained there. For more information on converting WorkExpo files,
contact Info Plan Software (03) 9531 1091 or [email protected]
Conclusion
WorkExpo can be installed across a local area network for data sharing by several users. Only a single file
data.mdb needs to be deployed to the network server. Any other installation will mean that users may
lose WorkExpo program settings between sessions. Also WorkExpo may run considerably slower if the
front-end file workexpo.mde is deployed on the server. In this article, you learned about the
considerations that IT managers need to be aware of when developing and using WorkExpo in a LAN
environment.
14.8
Data File Overview
All the information that you enter into WorkExpo is stored in a single data file.
It's default name is Data.mdb and it normally resides in the C: \Program Files\WorkExpo folder. This file
contains all your important information and should be carefully backed-up regularly.
WorkExpo can create multiple backups of the data file. This means that if you save a bad data file, you
still have other good backups from which to retrieve data from in case of an emergency. WorkExpo will
append the day of the week to each file name so you have will have up to seven backups at any one
time. This setting is optional.
To turn on multiple backups:
1.
From the Main Menu click the Options button
2.
Click the Backup tab
3.
In the backup options place a tick in the box for Automatic Multiple Backups.
WorkExpo 9.0 User Manual | 90
Each backup will have the day of the week appended to the file name creating up to seven backup copies
of the data file.
Backup
It's a good idea to have two or more copies of your data file in case one is lost or unusable.
WorkExpo has an option to do this for you automatically. See Automatic Backups (Section
11.2).
14.9
Data File Corruption
A database data file can become corrupted in the following situations:
1.
Someone is using WorkExpo and switches their computer off while the connection to the data file is
open.
2.
There is a power surge or power failure while the database is in use.
3.
Someone tries to open the database with Word or Excel.
4.
Network issues which may impact on the data file.
Any of the above may or may not cause a data file to become corrupted but if this happens the file can
usually be repaired.
Always ensure that you have a good reliable backup of the data file at all times.
How to repair a corrupted database:
1.
Make a backup of the file you wish to repair before you begin.
2.
Start Microsoft Access.
3.
From the Tools menu choose repair and compact.