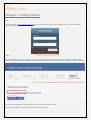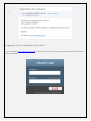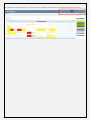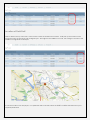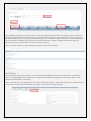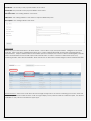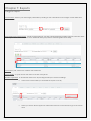
1
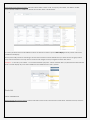
User Manual Date 16 August 2012 19/11/2013 27/11/2013 22/4/2014 29/4/2015 10/09/2015 Revision 1.0 1.1 1.2 [ to include Nov13 release notes] 1.3 [to include Dec 13- April 14 release notes] 1.4 [to include May 14 – April 15 release notes] 1.5 [to include May 15 – Sept 15 Release Notes] Description Initial User Guide User Guide [Office] User Guide [Office] User Guide [Office] User Guide [Office] User Guide [Office] By Dean Calapai Philippa Durante Philippa Durante Philippa Durante Philippa Durante Philippa Durante Table of Contents i-Dispatch Terms and Conditions ...............................................................................................................................................4 Introduction .................................................................................................................................................................... 4 3. Software Availability and Support .......................................................................................................................... 5 Office User ..................................................................................................................................................................................8 Chapter 1: Getting Started .............................................................................................................................................. 8 Logging In To Use I-Dispatch At The Office............................................................................................................... 9 Chapter 2: Staff ................................................................................................................................................................ 11 Adding Staff Individually ............................................................................................................................................ 12 Staff Skills & Qualifications .......................................................................................................................................... 12 Import Staff.................................................................................................................................................................... 13 Staff Availability Status ................................................................................................................................................ 14 Viewing & Editing Staff Details .................................................................................................................................. 15 Sending a Message to Field Staff Mobile Device.................................................................................................. 16 Sending an SMS to Field Staff Mobile Device ........................................................................................................ 16 Location of Field Staff ................................................................................................................................................. 17 Pending Staff ................................................................................................................................................................ 18 Chapter 3: Clients ............................................................................................................................................................ 19 Add Clients Individually .............................................................................................................................................. 19 Import Client ................................................................................................................................................................. 20 Sub Clients ..................................................................................................................................................................... 21 Quick Add Clients ........................................................................................................................................................ 22 Client Login ................................................................................................................................................................... 22 Chapter 4: Company Details ........................................................................................................................................ 25 Editing Company Details............................................................................................................................................ 25 Parts ................................................................................................................................................................................ 25 Broadcast Group ......................................................................................................................................................... 27 Staff Status..................................................................................................................................................................... 27 SMS Credit ..................................................................................................................................................................... 28 Subscription ................................................................................................................................................................... 28 Signature Message ...................................................................................................................................................... 29 Job Documents............................................................................................................................................................ 29 Forms .............................................................................................................................................................................. 31 Company Label ........................................................................................................................................................... 31 Chapter 5: Jobs ................................................................................................................................................................ 32 Add Job ......................................................................................................................................................................... 32 Import Job ..................................................................................................................................................................... 34 Viewing Jobs list information Office PC ................................................................................................................... 35 Changing Job Search Defaults................................................................................................................................. 36 Job Status ...................................................................................................................................................................... 36 Viewing Jobs Details On Office PC .......................................................................................................................... 37 Job Recurrence ........................................................................................................................................................... 47 PDF Job Cards .............................................................................................................................................................. 49 Chapter 6: Schedule ....................................................................................................................................................... 51 Scheduler View ............................................................................................................................................................ 51 Actual View .................................................................................................................................................................. 54 Chapter 7: Reports........................................................................................................................................................... 55 General Report ............................................................................................................................................................ 55 Sales Report .................................................................................................................................................................. 56 Parts Used ...................................................................................................................................................................... 57 Staff List .......................................................................................................................................................................... 58 Client List ........................................................................................................................................................................ 58 Parts List.......................................................................................................................................................................... 59 Time –Action ................................................................................................................................................................. 60 Bulk Invoice ................................................................................................................................................................... 61 Skills & Certificates ....................................................................................................................................................... 62 Chapter 8: Dashboard.................................................................................................................................................... 62 i-Dispatch Terms and Conditions Introduction These Terms and Conditions outlined below should be read and fully understood before using the i-Dispatch website hosted software, Smart Phone Applications and Mobile Computing Applications. i-Dispatch is a mobile workforce management tool designed for businesses, corporate and government organisations. The i-Dispatch website is owned by IntelliTrac Pty. Ltd a company incorporated in the state of Victoria Australia, having its principal office at 11 Scholar Drive Bundoora Victoria 3083 Australia. ABN 31-238 398-354. About idispatch Business name, I-dispatch a division of IntelliTrac Pty. Ltd. ATF The Calapai Family Trust ABN, 31238398354 Location Address, 11 Scholar Drive Bundoora 3083 Victoria Australia Landline Telephone number, +61 39467 6188 Facsimile Number and +61 3 94667188 Definitions "Confidential Information" includes all information exchanged between the IntelliTrac and You, whether in writing, electronically or orally, including the Software, but does not include information which is, or becomes, publicly available other than through unauthorised disclosure by the other party. "Data" means any data inputted by you or any users of your smartphone or mobile computing device or any other computer into the Software. "Intellectual Property Right" means any patent, trade mark, copyright, moral right, right in a design, know-how and any other intellectual or industrial property rights, anywhere in the world whether or not registered. "Software" means the i-Dispatch software available (as may be changed or updated from time to time by IntelliTrac) via the Website or any mobile application download. "Website" means the Internet site at the domain www.I-Dispatch.com.au or any other site operated by IntelliTrac. "IntelliTrac" Means IntelliTrac Pty. Ltd ATF The Calapai Family Trust Trading as IntelliTrac a company incorporated in the state of Victoria Australia, having its principal office at 11 Scholar Drive Bundoora Victoria 3083 Australia. ABN 31-238 398354 1. Overview I-Dispatch is a mobile workforce job dispatch application from IntelliTrac. You understand and agree that the Software licence is provided on a monthly or other periodical prepaid subscription on a per user basis. Users are categorised as Office Users and Mobile Users. An individual licence is required only for each Mobile User. The Software and Website is provided on an “as is” and “as available” basis. IntelliTrac disclaims all responsibility and liability for the availability, timeliness, security or reliability of the Software. IntelliTrac also reserves the right to modify, suspend or discontinue the Software with or without notice at any time and without any liability to you. It is Your responsibility to ensure that Your data is exported to your local personal computer and backed up regularly. 2. Use of Software You agree that you are responsible for your own communications, internet connectivity, internet fees and mobile data fees and for any consequences thereof. You agree that you will use the Software in compliance with all applicable local, state, national, and international laws, rules and regulations, including any privacy laws and laws relating to the export of data from your country of business. You agree that you will not use the Software to upload or distribute any content that infringes upon another party's intellectual property rights or other proprietary, contractual or fiduciary rights or obligations or is unlawful, defamatory, abusive, fraudulent, contains viruses, or is objectionable as may be reasonably determined by IntelliTrac. You agree that you will not authorize or encourage any third party to use the Software to upload or distribute any content that infringes upon another party's intellectual property rights or other proprietary, contractual or fiduciary rights or obligations or is unlawful, defamatory, abusive, fraudulent, contains viruses, or is objectionable as may be reasonably determined by IntelliTrac. You agree that you will not tamper with or encourage others to tamper with the Software in order to prevent others from using the Software. You agree that will keep safe your online username and password and will not disclose it to others. You agree that you will use the software in accordance with user manuals available online from within the software. You agree that you must maintain all software including antivirus and spyware on all computers, smartphones and mobile computers using the Software and provide a suitable internet connection. 3. Software Availability and Support IntelliTrac will aim to provide software availability of 99.97% uptime. However IntelliTrac will not and cannot be held liable for data loss. IntelliTrac will make all efforts to prevent disruptions to the software during normal business hours and during any software any upgrades, however there may be times when the Website and or the Software is inaccessible. Updates and upgrades are scheduled to avoid peak usage times based on Australian Eastern Standard Time Zones GMT+10 or ADST GMT+11. IntelliTrac is committed to providing excellent customer service and we aim to answer most online support issues within 4 business hours GMT+10 AEST or GMT+11 ADST, however, IntelliTrac makes no guarantee on the period of time before support is provided. 4. Payment In return for a pre-paid monthly|quarterly|6 monthly or yearly fee per user, IntelliTrac will provide the Software on a per user basis. You must pre-pay your user licence fees, you must pay this fee regardless of whether you intend to use the software on each day of the pre-paid period. A credit or refund cannot be claimed if you have not used the software during any portion of the prepaid period. Payment is strictly by an online payment gateway. Payment will start the day that you place this order. The first payment will be a pro-rata charge for the remaining portion of the monthly billing cycle. Billing is generated and payment is due on the first day of each month or other payment cycle by selection. If you do not prepay your account when due IntelliTrac has the right to terminate your service within 7 calendar days and without warning. You will be charged monthly in advance. All Software remains the property of IntelliTrac and you have rights to use the Software and access or retrieve data only when your fees are paid in full. 5. Intellectual Property Rights Intellectual Property Rights in the Software, the Website and any documentation relating to the Software remain the property of IntelliTrac. Intellectual Property Rights in the Data remain your property. You must maintain copies of all Data inputted into the Software. IntelliTrac adheres to its best practice policies and procedures to prevent data loss but does not make any guarantees that there will be no loss of Data. IntelliTrac expressly excludes liability for any loss of Data no matter how caused. 6. Representations and Warranties You acknowledge that you are authorised to use the Software and the Website and to access the information. If You are using the Software and accessing the Website on behalf of or for the benefit of an organisation then IntelliTrac will assume that You have the right to do so and that the organisation will be liable for your actions or omissions (including any breach of these Terms). The provision of, access to, and use of, the Software is on an "as is, where is" basis and at your own risk. You expressly acknowledge that due to circumstances often beyond the control of IntelliTrac, including (but not limited to) software viruses, power failure, electrical or topological interference, equipment malfunction, tampering by unauthorised persons and the actions and omissions by suppliers of telephone and internet services, the Software may not operate as designed. IntelliTrac does not warrant that the use of the Software will be uninterrupted or error free due to the above factors. It is your sole responsibility to determine that the Software meets the needs of your organisation and its use. IntelliTrac gives no warranty regarding the Software and the Website. Without limiting the foregoing, IntelliTrac does not warrant that the Software will meet your requirements or that it will be suitable for your purposes. To avoid doubt, all implied conditions or warranties are excluded in so far as is permitted by law, including (without limitation) warranties of merchantability, fitness for purpose, title and non-infringement. You warrant and represent that You are acquiring the right to access and use the Software and agreeing to these Terms and Conditions of this agreement for the purposes and on behalf of a business or organisation and that, to the maximum extent permitted by law, any statutory consumer guarantees or legislation intended to protect non-business consumers in any jurisdiction does not apply to the supply of the Software, the website or these Terms. 7. Privacy Unless the relevant party has the prior written consent of the other or unless required to do so by law: Each party will preserve the confidentiality of all Confidential Information of the other obtained in connection with these Terms and Conditions. Neither party will, without the prior written consent of the other, disclose or make any Confidential Information available to any person, or use the same for its own benefit, other than as stated by these Terms and Conditions. Each party's obligations under this clause will survive termination of these Terms and Conditions. The provisions of the above clauses shall not apply to any information which: Is or becomes public knowledge other than by a breach of this clause; Is received from a third party who lawfully acquired it and who is under no obligation restricting its disclosure; Is independently developed without access to the Confidential Information. 8. Limitation of Liability To the maximum extent permitted by law, IntelliTrac excludes all liability and responsibility to You (or any other person) in contract, tort (including negligence), or otherwise, for any loss (including loss of Data, profits and savings) or damage resulting, directly or indirectly, from the use of, or reliance on, the Software. If You suffer loss or damage as a result of IntelliTrac's negligence or failure to comply with these Terms and Conditions, any claim by You against IntelliTrac arising from IntelliTrac's negligence or failure will be limited in respect of any one incident, or series of connected incidents to the balance of your prepaid account. If You are not satisfied with I-Dispatch, your sole and exclusive remedy is to terminate your service. 9. Termination Your account will be automatically terminated if you do not prepay your account within seven (7) calendar days from when the account falls due. If you breach these Terms and Conditions, IntelliTrac may at its discretion terminate your use of the Software and the Website and may also suspend for any definite or indefinite period of time, your use of the Software and the website and access to any stored data. 10. Entire Agreement These Terms and Conditions represent the entire agreement between us in relation to the use of the Website and the Software and supersedes any prior agreement, understanding or arrangement between you and IntelliTrac, whether oral or in writing. You may not assign or transfer any rights to any other person without IntelliTrac's prior written consent. If any part or provision of these Terms and Conditions is invalid, unenforceable or in conflict with the law, that part or provision of the Terms and Conditions will be replaced with a provision which, as far as possible, accomplishes the original purpose of that part or provision. The remainder of this Agreement will be binding on both parties. If either party waives any breach of these Terms, this will not constitute a waiver of any other breach. No waiver will be effective unless made in writing. A person who is not a party to these Terms has no right to benefit under or to enforce any term of these Terms 11. Governing Law and Jurisdiction These Terms of Use will be governed by and construed in accordance with the laws of The Commonwealth of Australia in the State of Victoria Any claims, legal proceeding or litigation arising in connection with the software or website will be brought solely in The State of Victoria Australia, and you consent to the jurisdiction of such courts. These Terms and Conditions apply to the entire content of the website at www.i-dispatch.com.au, i-Dispatch.com.au, idispatch.net.au and i-Dispatch.net, and the respective smartphone and mobile computing applications. By registering and using the website and respective smartphone and mobile computing applications you agree to and accept the terms and conditions of use. Office User Chapter 1: Getting Started Step 1:Go to the website www.i-dispatch.com.au and if you are a first time user, select Register here. If you have already registered, enter your & Password and LOGIN Step 2:The Setup Wizard will step you through entering your company details, an Office Staff User, a Mobile Staff User and a Client. Read the Terms and Conditions and when satisfied Select the tick box I have read and agree. Select COMPLETE. Upon successful registration with I-Dispatch you will receive a welcome email. Please file this email as it contains your username and password. Logging In To Use I-Dispatch At The Office Go to the website www.i-dispatch.com.au and select Login on the homepage. Enter Your Username and Password and select LOGIN The Schedule screen will display. The menu options to navigate are found on the top right hand side of the screen. Chapter 2: Staff Staff fall under two different categories, office staff and mobile staff. Office staff may be set up as Job Dispatchers, Reporters or System Administrator. As Job Dispatchers they will have access only to the job and schedule tabs and their functionalities. As a reporter, in which case they will only have access to the reports page and its functionality or allocated to the System Administrator role, they will have access to everything at the web interface end. There is no charge for i-Dispatch for these three categories of user. Mobile staff may be set up as Mobile Staff or Sub-Contractors. The difference between the two user profiles is invoicing. When the sub-contractor creates an invoice from his mobile App, his invoice is to the business that he is subcontracted by. This appears in the file Sub-Let at the office end. The business then creates the invoice to the client. Permissions for the mobile staff and sub-contractor are set by the office staff. Mobile staff and sub-contractors will then be able to access various options on their mobile device depending on what has been selected in their profile Select Staff to open the Staff Menu screen shown below. Click Add Staff to individually add each staff member or Click Import Staff to upload your staff details via a spread sheet. Instructions for importing data can be found in Chapter 17. Adding Staff Individually Enter your staff details as shown below. Username:- The username which this person will use to log into the system Password:- The password which this person will use to log into the system First Name & Last Name:- The person’s name Mobile Number:- The person’s mobile number (please drop the first zero in the mobile number). Required to send optional SMS messages, such as reminders For Example 0413 604870 should be entered 413 604870 Email:- The person’s email address. Required to send optional email messages, such as reminders Phone:- The office or landline phone number Hourly Rate:- This can be either the persons salary hourly rate OR the persons charge out hourly rate. Overtime Rate:- This can be either the persons salary overtime rate OR the persons charge out overtime rate. Staff Role:- The Staff can be a Admin (Office Staff, Job Dispatcher or Reporter) or Workers in the field using Smart Phone Apps (Mobile Staff or Subcontractors). Staff Skills & Qualifications In the staff file you may enter skills or qualifications that the employee has accreditation for. A Certificate might be a Driver’s License, a First Aid Certificate, Plumbing qualification where as a skill may be a desirable attribute to match the worker to a job, for example the ability to speak a second language. o o o You may either select a certification from the drop down box, or type in a new item Enter an expiry date and select ADD You will then see a list of the staff member’s skills and qualifications appear on the right. Mobile Permissions:- Tick the functions you would like the mobile user to access on their mobile device. Think carefully about these options before selecting. Import Staff Staff need to be imported in batches, according to their staff type. For example System Administrator, Mobile Staff, Subcontractor, Job Dispatcher or Reporter. It is easiest to separate each staff type onto their own spread sheet. Select the staff type and ensure that the file is in an excel format. Choose File. This will open a browser window where you can locate the file. Click on the file to highlight and select Open Select Upload Selected File and the mapping grid will appear. Select the appropriate column heading to match the data in the column. For example select Staff First Name, in the column of data containing the employee’s first name. IF there is no header to match the data, then select DO NOT IMPORT. Ensure that you have mapped all the columns – if you take your mouse to the bottom of the spread sheet there is a scroll bar, which will take allow you to see any further columns on the right, if there are any. Once all the fields are mapped, select the Submit Excel File. Move your mouse off the submit Excel File button. If you get a message asking if you would like to continue select OK A success Message in Green will appear, indicating how many records have been inserted. Change the Staff type to the next grouping to import, and repeat the process. Staff Availability Status The office administrator and Job Dispatcher may manage a mobile Staff’s status by selecting View/Edit in the staff member profile. Selecting the Status, the To and From Dates and UPDATE USER. Mobile device users can also update their availability. (Please refer to the Smart Phone Section of this manual Chapter 40) Viewing & Editing Staff Details Click on the Staff Tab in the top menu bar. Click View/Edit and the following screen will be displayed Details may be changed and then UPDATE USER selected, or the user may be deactivated, by selected DEACTIVATE USER Sending a Message to Field Staff Mobile Device Click on Staff in the top menu bar. Click on Send Message. This message will appear under the messages icon of the mobile user. Messages sent are usually of a generic nature, where notes sent are specific to a job and will remain within the job file. Type your message and Send This message will be sent to the Gerry Gardner’s Smart Phone App. (Please refer to the Smart Phone Section of this manual) A transcript of messages sent can be seen by going to the Staff Messaging Tab and selecting the parameters required and SHOW CHAT HISTORY Sending an SMS to Field Staff Mobile Device To send an SMS to the mobile staff member’s phone from i-Dispatch, is an alternative to sending a message to iDispatch or sending notes. From the employee list select SEND SMS to activate this. SMS credits may be purchased via Company Details and SMS Credit. Location of Field Staff Click on Staff in the top menu bar. Click on Show under the header Last Location. It will pick up the location of the employee when the employee last changed a job. This might be the addition of a note, the change of a status or the addition of a signature for example. To see the location of an employee, on a particular date or all staff, select the Staff Location tab and enter in your required parameters. Pending Staff When entering new mobile staff they will appear under the Pending staff tab until payment has been received. Jobs cannot be assigned to staff while they are in Pending Staff Chapter 3: Clients Click on the Clients Menu The following screen will display Client Details may be added manually and individually by clicking Add Client, or may be uploaded from a spread sheet by clicking Import Client. Add Clients Individually Enter your client’s details as shown below. Clients may be companies or individuals. *Client Name:- The name the company is known by. This needs to be a unique entry from all other clients *Code:- A unique alpha and or numeric code given to this client *First Name:- The given name of the contact at the clients Last Name:- The last name of the contact at the clients *Company:- The companies official entity name, required for invoicing ABN (or Tax Number):- Clients ABN, required for invoicing Position:- the position on the client contact Email:- the email address of the client contact Phone:- the office phone number of the client contact Mobile – a mobile contact number Fax:- the fax number of the client contact *Address #1:-the physical address of the client Address #2:-the physical address of the client if it requires additional space Suburb:- the suburb of the physical address of the client State:- the state of the physical address of the client Country:- the country of the physical address of the client Postcode:-the postcode of the physical address of the client Mailing Address#1:- the mailing address of the client Mailing Address#2:- the mailing address of the client if it requires additional space Mailing Suburb:- the mailing suburb of the client Mailing State:-the mailing state of the client Mailing Country:- the mailing country of the client Mailing Postcode:- the mailing postcode of the client Notes: - Type in any notes relating to the client. PLEASE NOTE: items above proceeded with an asterisk * are mandatory fields. Import Client Select Upload Selected File. A grid will then appear, with the details from the spread sheet you are importing. The headers (column names) on your spread sheet are in the white font, on the darker blue background. From the drop down menu, select the type of data in the column, so that it will import into the correct field. For example in your spread sheet header for the first column is Client First Name, then select Client first Name from the drop down menu. Ensure that you have mapped all the columns – if you take your mouse to the bottom of the spread sheet there is a scroll bar, which will take allow you to see any further columns on the right, if there are any. Once all fields are mapped, so that the name on the spread sheet header matches the mapping name, OR DO NOT IMPORT is selected for columns with no data or no header match. Then Select Submit Excel File. Move your mouse off the Submit Excel File button. If you get a message asking if you would like to continue select OK. A Success Message in Green will appear, indicating how many records have been inserted. If there is a large number of records to be imported, you may need to refresh the screen for them to appear. Once clients are added, they will be displayed under the Client Menu as follows. Sub Clients Where a business will do third party jobs. For example a gardening business may have a client who is a real estate agent. The gardening business is employed to tidy gardens at residents managed by the real estate agent. These residents are third parties or sub clients. Click on the client who has appointed you to work at a third party location. Select Add Sub Client. The entry screen for the sub client contains all the same fields as the client. Sub clients cannot be imported Sub clients can then be seen in client lists as the name of the sub client then a dash and then the client’s name. This allows them to be easily identified as a sub client. Quick Add Clients Mobile users have a permissions option to Quick Add a client. This can be used when they are out in the field, and cannot get the complete client details to add them into the database. When the mobile user has “Quick Add” the client, the client will appear in the client list. Please note: A job cannot be saved to this client until their full contact details have been entered. Client Login You now have the option of creating a client login from the client file. If you tick this option the client will be emailed a user name and password to access i-Dispatch. NOTE: In order for this to work, you must have a valid email address set up in the client file. When the client logs into i-Dispatch, they will be able to add a new job into the system. This job will be unassigned and you will receive an alert advising you that they have just entered a new job in the system and to assign it. The client will also be able to see any progress of any existing jobs in the system. 1. In clients select the client you would like to access the system and tick to generate their login credentials 2. The client will receive an email advising them a login has been set up for them with their login details. 3. When the client logs into i-Dispatch they will only have access to add a new job or view existing jobs. To add a new job it will automatically pick up the client – their address and their contact details. The client will a. b. c. d. e. f. add the Job Title [what is to be done], a Job Customer Ref [a purchase order number or similar] their preferred date and time for the job to be done, change the priority if required any comments regarding the job. ADD JOB 4. To view existing jobs the user will select the Jobs tab and may search by any status and date range. Only that clients jobs will be listed – showing the job number the staff member allocated the status the date and time the job has been booked and the option to print out the job details. 5. Job Detail printout will enable the user to have a printed copy of the job they have entered into the system. Chapter 4: Company Details Editing Company Details Company details are entered at the time of setting up the company. If these details require editing at any time select Company Details. Make the required changes and UPDATE COMPANY DETAILS Parts Parts or inventory items may be added manually and individually by clicking ADD PART, or may be uploaded from a spread sheet by clicking UPLOAD EXCEL FILE. out fees. Parts may also be used for flat rate charges to clients for example call Add Parts Individually – Enter your Parts as shown below. Fill in the fields and select ADD PART. Part Name:- the country of the physical address of the client Part Code:-the postcode of the physical address of the client Purchase Price:- the mailing address of the client Sale Price:- the mailing address of the client if it requires additional space Description:- the mailing suburb of the client Import Parts Ensure that your saved Parts file is in an Excel format. Choose File to open a browser window. Navigate to the saved parts file. Click on the file to highlight and select Open. Select, Upload Excel file and the data mapping grid will appear below. Map the fields of data to the header options for example, the column of data containing the purchase price, should be linked to the header option Part Purchase Price. If there is a column of data where there is no matching header, select DO NOT IMPORT. When all columns of data have headers assigned, select Submit Excel File. Deactivate Parts. Click on the work active and a message will appear on the screen confirming your choice, select OK. Once the part has been made inactive, it will no longer display on the parts list under the JOB ID and parts, nor will it be available on the parts list on Android or Apple apps. Broadcast Group Staff may be added into teams or work groups, therefore allowing job dispatch to a single mobile worker or a team of staff. For example:- A project requires an Electrician, Plumber and Carpenter. You can allocate staff with those skills to a group and then allocate the broadcast to a Job. Or a new “Southern Region” team is established to undertake a project. Staff Status Click on Company Profile and Staff Status to add any staff availability status that applies to your business, which is not already in the list. Type the name in the Status Name field and then ADD STATUS SMS Credit If you are electing to send SMS messages to your mobile staff rather than use the messaging or notes features within iDispatch. SMS credits may be purchased in bulk packages of 100, 500, 1000 or 5000 from this screen. When the number of SMS has been selected you will be forwarded to a BPAY screen for payment. The credit history is reflected below this A tax invoice can be printed at any time from the Download Invoice option Subscription The Subscription tab allows you to see details of your i-Dispatch subscription renewals due and payment history. Any renewals due will appear in the first instance of opening the screen. Tick the boxes of those you wish to renew and PAY NOW. To review the historical payments made, SHOW MEMBERSHIP HISTORY INVOICE and a screen similar to the SMS credit screen will display and you may download copies of invoices from here. In the lead up to your trial finishing or your subscription falling due, you will receive a countdown to the end of the period. This allows the user to easily determine how many days they have left in their trial /subscription. This appears on the job and scheduler screens, on the upper right and side above the messages and notes, and also when you log into the program. Signature Message Signature messages allows the company to add a script or words around the signature capture. For example, asking the client to sign that goods have been received in good condition. o o o Company Details | Signature Message. Type in the message that you would like to appear on the mobile, for the customer to sign their name against. select ADD SIGNATURE Job Documents Service Reports / Quotes [Company Details |Job Documents] allows the mobile user to produce a quote or service report for a client on site. This report has the option of displaying or masking dollar values and requiring a signature. Company logos may also be added to these documents Select the document type of either Service Report or Quote In the Title field, type in the title you would like to appear on the top of the report Tick boxes to show price or document requires a client signature – if required If you would like a company logo to appear on the report, select Choose File and file the logo file via the bowser. Press ADD DOC When the document has been processed on the mobile side it will then appear in the job details tab, under job document. Here you can see any job documents produced, if they have a signature, who they were created by and open the document by selecting View, to view it. Forms Many of our clients require staff to complete a checklists at various stages of a job. For example an Occupational Health and Safety checklist before commencing a job. From Company Documents | Forms. Enter the name of your form, tick if you require the staff member to add their signature on completion. Enter the Name of each field and select the type of field the mobile employee requires for their response. Enter as many fields as required and then select Add Forms and fields. Forms are then added to the job from Jobs | Add Job, select to apply a form to a particular job status. Company Label These fields allow for clients with diverse needs to record specific different details regarding their jobs or industries. Clients may enter a name for these fields. Then under the Add Job| Job Additional Fields, these fields will display with the labels given. The data in these fields will display on both the Android and Apple apps. Chapter 5: Jobs Click on Jobs and the following screen will display. Click Add Job to individually add each job or Click Import Job to upload your job details via a spread sheet. Add Job The following screen will display. Please add your jobs. See an example below. Mandatory fields are marked with a small * If one of these fields has not been completed when adding a job, a message will appear advising which of the fields require data. To assign a job to multiple staff, hold eth CTRL key down and select the required employees. When adding a new job, the time defaults to near the current time, so jobs are not inadvertently added to times in the past. The fields against the other headings for example Job Additional Fields are hidden and only need to be completed if needed. Company signature is attached to a job, and has scripting, therefore the client will see sign that Goods have been received or sign to confirm work has been completed. [script is added from Company details | Company Signature] This option has now been linked to a job status, so the mobile employee will be prompted when they change a job status to get a signature. Forms are also applied to a job status. Click on the form, the job status that the mobile user will be prompted to complete the form and select ADD. Once the form has been completed on the mobile end, this may be viewed, by clicking on the JOB ID on the jobs list and under the company documents tab. PLEASE NOTE: Once a job is Save is selected a job reference number will be allocated. See Below Import Job Ensure that your saved Jobs file is in an Excel format. Follow the previous instructions to convert the file to excel if required. Choose the file to open a browser window. Navigate to the saved jobs file. Click on the file to highlight and select Open. Select Upload Selected File and the mapping grid will appear. Select the appropriate column heading to match the data in the column. In the columns for staff and client – the mapping occurs against each item. Select from the drop down arrow at the end of each line, which staff member and which client each job belongs to. Ensure that you have mapped all the columns – if you take your mouse to the bottom of the spread sheet there is a scroll bar, which will take allow you to see any further columns on the right, if there are any. Once all the fields are mapped, select the Submit Excel File. Move your mouse off the submit Excel File button. If you get a message asking if you would like to continue select OK. A success Message in Green will appear, indicating how many records have been inserted. Viewing Jobs list information Office PC Click on Jobs Menu:- Jobs may be viewed in a table format. By default the jobs displayed will be based on their booking date in ascending order one month in advance and one month in arrears of today’s date. Job priorities are clearly visible – Yellow = low priority, Amber = medium priority and Red = urgent. Job comments are visible by hovering your mouse over the JOB ID number on the job screen. When entering a job, there is a comments field. If comments are entered at any stage during the job, they are easily seen. Sorting Jobs:- may be done at a screen level, by selecting the up or down arrow to the right of an item. By selecting the down arrow in a particular column, you will sort all the jobs by highest to lowest values or Z-A alphabetically, based on the data contained in that column. By selectin the up arrow the sort will be the lowest to highest number or A-Z alphabetically. You may also select your own default sort criteria, for each time you open the job screen. Click on Schedule:- Jobs may also be viewed in a calendar function. Click on the job to open details. Changing Job Search Defaults A default list of jobs will appear when you first log into the job page [as noted above] . You may change these defaults by selecting CLICK HERE, selecting your search criteria and Search. Each time you enter the software the job search defaults most suited to your business will appear. Job Status Click on Jobs in the Menu Bar – View Status Column Job Status is updated by the field worker Smart Phone Application. (Please refer to the Smart Phone Section of this manual) or can be updated by Office PC The status Unassigned cam be used for clients who are importing jobs from spread sheets or other software, sometimes the jobs will not have times or staff assigned at the time of import. These will be imported into a category called Unassigned. Or you may have jobs which need to be done, without a specific timeframe, which are scheduled in around other jobs. These may be categorized as unassigned. Filtering by job status, available options are as per the screen shot below. Reschedule required appears when a job list when a mobile worker has requested the office reschedule a job. When you select this, a screen will display asking if you would like to transfer some of the attached items from the original job to the new job. Tick the boxes of those items you would like transferred to the new job and select SUBMIT. Viewing Jobs Details On Office PC Job Detail:- click on the job ID number and details of the job will then be displayed Staff Detail:- Staff Allocated to the Job is displayed Customer Detail:- Shows Customers Contact Information Email-SMS:- Use this menu to send a reminder email and SMS to the client and the mobile worker. Greener Pastures is the Customer. Luca Darling is the mobile staff. Select the top box for email and bottom box for SMS enter the message and SEND The system will confirm any emails or SMS’s sent in the table below the sending options. See Email Example Below Work Time:Click on the job ID and select work time. Three time options will display. System work time which is the time calculated automatically between starting and completing a job. And normal and overtime, both derived from Timelog entries via the mobile device. When an employee does not register a time log on the mobile device, this may be added by the office user. NOTE: The option to add a time log from the office module will only display once the status of the job is Completed. Part Used:- Use this menu to show Parts Used on the Job (as keyed in on Smart Phone by fieldworker). Parts may also be entered from the office module. When adding parts via the office both the item code and the item name will display to make part identification easier. Parts may be entered with a decimal quantity for example 0.5, 1.25 etc. This functionality is available on all three platforms – the office interface and both Android and Apple apps. Images and Signature:- Use this menu to show Pictures and Signatures taken on the Job.(via Smart Phone) Clients are able to download photos and signatures captured as part of a job, to their computer. Click on the image or signature and the View /Download option will display and select Download. Where the signature used is a company signature, that is one with scripting attached, the scripting message will display under the signature box Sending Job Notes:- Sending Notes and Documents from the Office to the Smart Phone. I-Dispatch allows the office to send documents to the Smart Phone relating to each job. These documents may be Instruction Manuals, OH&S Data Sheets etc. Notes and their attachments, may be sent from Add Job Note, when entering in a job, from the Communicate & Send option on the job list or from Notes within a job. When selecting the send option under Communicate you may now send either a job note, staff message or SMS via this one control. a. b. c. d. e. Press Send Type in your message. If you are sending the message as a note, you may add an attachment file. [the attachment file will not work for messages or SMS’s] Select if your communication is a note, message or SMS. It will default to note Press Send If you are using the SMS option, you will need to purchase SMS credits via the Company Details tab. Receiving Job Notes:When a mobile worker sends a job note, it will appear on the right hand side of the job screen [as well as under job notes when clicking on the JOB ID. o o o Click on the message to see details of the sender, job time the note was written To remove the message from the right hand panel tick the box, Mark As Read. To keep the message displaying in this panel, do not tick the box. o On the office module it will display with a paper clip indicating an attachment as it comes into the right hand panel. On the notes tab under the JOB ID it will display with a yes. An option to display or hide the messages and notes on the right hand side of the job screen is available. If this panel is hidden it makes more room on the screen for the job fields to display. If jobs or notes are received a number displays, so you can identify that new communications have been received. Location Map:- Use this menu to show locations of all job status updates. Selecting Show in the location column will reveal a map showing the staff member’s exact location at the time the status was changed. Invoice: - This menu item gives the user a number of options 2 options 1. To create an External Invoice. This option would be selected by clients using a 3rd party accounting system to generate their invoices. The invoice details are then entered retrospectively into the job for recording purposes. The invoice number, amount of the invoice and invoice date are entered and submitted. 2. To Generate Invoice option would be selected by client using i-Dispatch to invoice their clients in the first instance. Select if this is for invoice or warranty purposes, apply system hours to the invoice [exact time taken to complete the job] or alternatively apply rounded the time via the TimeLog either as regular or overtime in increments of 15 minutes. Enter the hours and over time to be charged to the client. Any parts allocated during the job will automatically feed through to the invoice. Select Generate Invoice The invoice may be either printed or emailed by selecting the appropriate option on the upper right. If you select to email the invoice, you will then be prompted to check the client email address or enter an email address if a default is not available, before selecting SEND. Company Logos may be added to invoices, .pdf Job card & reports o o o Company Details | Company Info In the company logo field, press Choose File and navigate to and select your logo. Select UPDATE COMPANY FILE Received Payment: - when an employee receives a payment on site from the client, these details and entered via the mobile unit and then will appear under Jobs and Received Payment. The invoice will then reflect that a payment has been received. Job Documents When a form or company document [quote or service report] is saved by the mobile worker, these documents may be opened and viewed via the Job documents tab. Rescheduled List: When the job you open has been part of a rescheduled job sequence. NOTE this tab will only display if the job is related to a rescheduled job. This tab will display: all jobs related to this job [before and after this job]; the date the job was rescheduled on and the comment regarding why the job was rescheduled. Job Recurrence In some businesses, jobs may have a pattern of repetition. For example a lawn mowing business may have regular clients whose lawn is mown fortnightly. Rather than entering a new job every fortnight, a recurrence may be setup, so the job will automatically reappear every fortnight. Select Recur job on the main job list Then select the frequency of the recurrence – daily, weekly or monthly. From here further options will be given as to the cycles of recurrence. For example if weekly is selected, the prompts will then be every ? weeks, and what day of the week. And how long the recurrences should continue. TIP: when selecting the start date of the recurrence remember that the job has already been entered and saved. Therefore by starting the recurrence on the same day as the entered job will create a duplication. If the job is fortnightly, the original job entry will be in week one and the recurrence start date will be week 3. Recurrency Alert If any job that currently has recurrences attached AND these recurrences are going to cease within the next month, then this tab will appear on the jobs screen. Jobs will be listed with the first and last date of the recurrences. Select Recur on the far right, and recur the jobs as usual for the next 12 months. Once the new recurrence is saved, this job will drop out of the alert list. Identify original job. When you have a contract to complete a job fortnightly for a client, this is set up as a recurring job in i-Dispatch. If the contract ends and the jobs beyond the end date need to be removed from your system, how do you find the original job in the sequence? We have added a new tab on the jobs screen called Recurrency List. This list displays any jobs which have a recurrency which has been created from them. 1. To remove any recurring jobs, select Recurrency List 2. Identify the job and press Recur 3. Scroll down to see the list of recurrent jobs originating from this job 4. Tick in the delete column of any jobs you would like to delete from your system. 5. Please note – you may only delete a job if the job status is Assigned. Recur jobs as Unassigned For clients who recur jobs for the future, sometime is it not possible to know which staff member is the most appropriate to undertake the work 6 months from now. A new field has been added to the create Recurrence job Screen allowing the mobile staff member to be set to unassigned for the recurrences. Copy Company signatures and company forms from original job to recurring jobs When a job is created with a company signature and or company form is attached and then this job is recurred, you now have the option of applying the company signature and form to the recurred jobs 1. 3. Create the original job and attach the company signature and or company form required Select Recur to move to the recur screen and set your recurrence options as per normal Tick to apply company forms and or company signatures 4. Click CREATE RECURRENCE JOBS 2. PDF Job Cards Tick the jobs to export and select Export To Job card PDF Format and press SUBMIT Tick the items you would like to print out with the Job Card, or select Check All, and press SUBMIT A list of the various documents will display for downloading and display as done previously. PLEASE NOTE: Company forms and Quotes/Service reports will print out to separate pdf documents. Job notes and Job images will be included as part of the main document, but will print on separate pages. Chapter 6: Schedule Scheduler View The default view is the current week, all mobile employees, all job status’s. Jobs will display in the scheduler as scheduled view. They will display coloured as per their current status. [key is on the right]. Today will be marked with grey through the date header. Jobs will display that are booked between 6am and 6pm [business hours] On the left hand side you will see scheduler, indicating that the scheduler is your current view option. EXPORT TO PDF on the left, will allow you to print a screen shot of the scheduler as it appears on the screen. Filter jobs by mobile staff member. On the left, the default will be All Mobile Staff. You may select the drop down and click on the name of one particular mobile employee, then the scheduler will refresh to only show jobs allocated to this person. Filter jobs by job status. Ticking or unticking job status key selections on the left then selecting UPDATE SCHEDULER, will cause the schedule to only display jobs of the status requested. For example you may not wish to show jobs cancelled, closed or rescheduled, so untick these and UPDATE SCHEDULER Date selection options: Above the scheduled jobs is your date selection bar. The < arrow will take you back and the > arrow will take you forward. If you selection on the right is Day, then the arrows will take you back and forward a day. If your selection on the right is Week, then the arrows will move you back and forward a week. If your selection is Month, then the arrows will move you back and forward a month. If you select the down arrow ˇ to the right of today a calendar will display and you may select a specific date. View job Details: Hover your mouse over a job on the scheduler to see the details. Click Show On Map at the bottom of this information to see where the job is. *TIP this will help in allocating subsequent jobs close to where the employee is currently working. Use the roller on your mouse to increase or decrease the focus on the map. Edit a job: Double click on a job on the calendar to open it up to edit it or cancel it. Add a job directly via the calendar, right click on an empty space and left click on Add Job. A quick job entry from is available. * NOTE adding a job via the scheduler is designed to be a quick entry option. If you require additional fields, forms, signatures etc, these will need to be added via the Add Job entry point under the Jobs tab. View jobs booked over a 24 hour day, on the bottom left hand side select Show 24 hours Actual View Change the view to Actual, you will see the actual time of the jobs. Therefore if s job was started and not completed, this will display as started and continue on [see the green bars on the below screen shot representing incomplete jobs]. If a job was due for completion at 10:30, but actually finished at 10:00, you can see this with this view. Jobs may be viewed, edited and added as per the scheduler view Choice of displayed jobs by status is as per scheduler view Option to display business hours or 24 hours is as per scheduler view Chapter 7: Reports General Report To select data: Enter in your date range parameters by clicking on the calendar icons at the right of each date field. Select SEARCH Data listed on the General report: JOB ID; Customer Ref No; Job Title; Job Booked Date; Address; Suburb; Postcode; State; Status Type; Client; Staff, Data from the 3 additional fields [only if data is entered against these fields] To search by Job, enter in the JOB ID in the search box To see details of a job, click on the arrow to the left of the job ID Reorder report data: To reorder the data on the report drag and drop the column headings. Click on the column label you would like the report to sort by When you see the arrows appear on either side of the line on the far left, let go of the mouse click. Repeat this process with as many headings as you wish to sort by Saving data to .xls. Click on the icon of the format you would like to save the report to. This will display on the upper left of the report and will save to the download folder on your computer. Sales Report Enter in your date range parameters by clicking on the calendar icons at the right of each date field. Select SEARCH Data listed on the Sales report: Invoice Number; Job Title; Invoice Date; Client; Staff; Payment Received; Amount; GST; GST incl. Amount; Customer Ref Number and Job Number. The sales report is great to clearly see which job’s payments are outstanding and what the amount of these payments are. Parts Used Enter in your date range parameters by clicking on the calendar icons at the right of each date field. Select SEARCH Data listed on the Part Used report: JobID; Job Title; Job Booked Date; Mobile staff; Part Added by; Part code; Part Name; Purchase Price; Sales Price; Sales Price Charged; Quantity; GST; Total; Gross Margin; Gross Margin as a % This report is great to see what parts and how many have been used for inventory control purposes. Also if a product is recalled, you can easily identify which customers have been allocated the part. And assess your part charges to ensure that your costs are being covered. Example Part Code entered Tap, with filter Contain selected, will pick up any part codes with the word tap in the code for example Tap Washers. I can then see 50 Tap washers have been used in the selected date range. Resizing columns: In order to display a filter, you may need to resize a column. Click on the line between the column you would like to increase and the next column to the right. A two sided arrow will appear with a message Drag to resize Drag the line between the two columns to the right to increase the size of the left column This method may also be used to hide columns, by dragging one column into the next Staff List Select GET STAFF LIST Data listed on the Staff List report: Staff ID; First Name; Last Name; Role; Mobile Number; Email; Active/Inactive; Created date In order to filter the report by all mobile staff, enter Mobile in the filter box and select Contains, this will select all staff with the word Mobile in their role. It is great to have a list of current staff to compare against your payroll. Client List Select GET CLIENT LIST Data listed on the Client List report: Client ID; Client Name; Client Code; Company; First Name; Last Name; Mobile; Phone; Email; Address 1; Address 2; Suburb; Post Code; State; Created Date. To sort by all clients with email addresses select the filter icon and the option Not is Empty and only clients with email addresses will display. This report is really useful for reviewing to ensure that customer contact details are up to date and to see gaps which may need to be filled. This may also be used for mail merges to keep in regular contact with clients. Example – to find any new clients – for customer relations purposes - Select created date 1/1/2015 and the filter Greater Than. This will display any new clients added to the database since the 1/1/2015. Parts List Select GET PARTS LIST Data Listed on the Part List report: Part ID; Part Name; Part Code; Purchase Price; Sales Price; Tax Rate; Active/ Inactive: Created Date. To filter all parts with a 10 % tax rate, Type 10 in the filter box then select EqualTo. Only parts with a tax rate of 10% will then be listed. You are able to filter data by more than one criteria at a time, for example filter all active parts with a 10% tax rate. This report is useful to ensure that your parts list is current that and that any parts made obsolete and replaced or parts which have undergone pricing changes have been deactivated and replaced in your database. Time –Action Enter in your date range parameters by clicking on the calendar icons at the right of each date field. Use the drop down arrow to select your employee then press SEARCH Data Listed on the Time-Action report: Date, time; Address; JobID; Status: Client; Staff; Description; Job Duration; Shift Duration, Travel Duration, Time Log entries or normal and overtime and Customer Reference Number. This report is great to use as a timesheet tool, to assist in the accurate production of payroll data. It provides simple analysis of billable time on the job, travel time and other time to make up a daily hours. Bulk Invoice In the instance where you may do multiple jobs for the one client, we now have the option of including multiple jobs on the one client invoice. o o Select the client, and date range of jobs. Tick the export box and Submit o Enter the invoicing details e.g. external, internal, invoice or warranty and generate invoice. Skills & Certificates In the instance where you would like to check any skills or certificates listed against your staff and the expiry dates of these documents, we now have the option of producing this information. o o o Select the skills-Certificates tab Press GET SKILLS –CERTIFICATES LIST Select any sorting or filtering criteria required Data Listed on the Skill & Certificate report: if the item is a skill or certificate, the name of the skill or certificate, the expiry date, the staff name and the staff members role. Chapter 8: Dashboard Select Dashboard from the menu selection on the top right. The dashboard will provide a summary of what is happening in your business today. It will display some simple measurement matrix to provide transparency and enable maximum business efficiencies. On the left hand panel we have: When opening the dashboard, it will default to today’s date. To change the date, click in the date field, select the date on the calendar and press set date. PLEASE NOTE, when changing the date, some data will not be available and will not revert to the previous date’s data. Data refresh frequency defaults is of every 5 minutes. This means the data on the dashboard will automatically update every 5 minutes. This frequency may be reduced to every 10, 30 or 60 minutes. If you require the dashboard to refresh more frequently, simply select the reload icon next to the address line. Jobs Started on time will display the number of jobs which started on time today. Number of Jobs on Today, will display the number of jobs started today. This information updates automatically from the job table. Num. of Available Staff On Today, reflects the number of staff with the status marked available. This information updates automatically from the staff records. Clients Served Today, will list clients who have jobs started today. As the status is changed to started they will appear in the list. You are able to send a SMS message or email to a client or clients from this screen. 1. Tick the boxes of the clients and select SEND SMS AND MESSAGE 2. If an email address and Mobile number have been provided for the client, they will automatically propagate the fields, if not, of there are different details, over type the fields to enter the correct contact details. 3. Tick if you would like to send the message by SMS or Email or both 4. Type in the message and press SEND Need Help, then enter your question in the box and select SEND. This message will come through to the support team. A member of our support team will then make contact with you, and respond to your query. On the right hand panel we have: Current Job Status Summary will display all jobs which are being worked on today, by their current status. To see a job, click on the number displayed, and a list of the jobs will appear. Staff by current status, will display all mobile staff and their current availability. If a mobile worker changes their availability, this will automatically update on the dashboard. The office is also able to send a message to the mobile staff member from the dashboard. 1. 2. 3. Select the employee [s] Type the message into the box provided Select SEND MESSAGE Job Notes and Staff Messages – any job notes or mobile staff messages, will automatically come through to the dashboard, for the job dispatcher to see. In the middle panel we have: Map View – you may view this by current location of all staff, the location of all jobs booked in today, or the current status of all today’s jobs. Clicking on the coloured marker will display details of the job, job time and location. The colours next to each of the job statuses in the summary, match the marker colours on the map, so you are able to identify at a glance, the current status of all jobs. Invoice displays any jobs completed today and in the last week that have been invoiced or are to be invoiced. This will ensure that you can easily see any jobs which could be invoiced to bring revenue into your business. Click on the numbers to see a list of the jobs which they relate to. Parts will display the units or quantity of parts used today and this week, and the value of these. This will assist with stock control, ordering and invoicing control. Jobs Outstanding displays the difference between the booked time and actual job start time. For example a job is due to start at 2:00pm and actually starts at 2:10pm. This will appear under Job Duration Exceptions shows any job which has gone over the duration set in the job details. For example when entering the job in the system it is enter with a duration of 30 minutes to complete the job and the job takes an hour, this job will display in the 30-60 minute area. This will allow the business to be aware of the length of time actually required to complete a job and therefore maximum efficiency in scheduling. Click on the numbers to see a list of the jobs which they relate to. 5-15 minutes. Businesses can then interrogate why jobs are starting late to better manage this. Numbers can be clicked on to see the jobs they pertain to. Assigning work based on job location. o You may change the Select date to tomorrow and SET DATE You may change the map view to All jobs booked in today [which will then represent tomorrow’s jobs] You may see the current job status summary of tomorrow’s jobs. ALL OTHER FIELDS WILL CONTINUE TO REFLECT TODAY’S DATA Assign unassigned jobs. When reviewing tomorrow’s jobs, you may Click on the number of to the right of Unassigned jobs, under Current Job Status Summary and see the summary detail of any jobs. Click the drop down arrow at the end of the staff field, to allocate a staff member. PLEASE NOTE: If you have staff that do not appear on your maps, or on the location tab in the job, please check they have the location settings turned on, on their mobile device. [Settings |Privacy| Location Services| i-Dispatch - check this is set to on, on the mobile device]