1
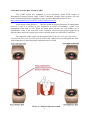
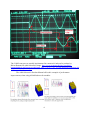
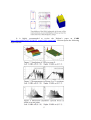
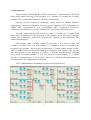
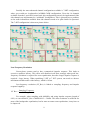
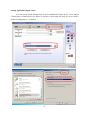
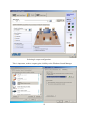
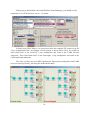
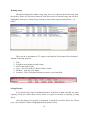
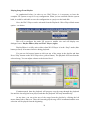
Ultimate Equalizer V6.0 Supplemental User Manual
April 2014.
New Features Implemented in Ultimate Equalizer 6.0 - Digital
1. Implemented CABS http://vbn.aau.dk/files/62729248/LF_sound_field_control.pdf
Also known as ARAM – Active Room Absorption Module
http://www.neumann-kh-line.com/kleinhummel/globals.nsf/resources/o800aram_bda_e_517277_rev_231106.pdf/$File/o800a
ram_bda_e_517277_rev_231106.pdf
There is also Convention Paper 7262, Presented at the 123rd Convention 2007
October 5-8 New York, NY, USA – “Multi-Source Room Equalization: Reducing
Room Resonances”, John Vanderkooy
Effectively, UE now offers two methods of room equalization, that can be used
together in minimum-phase or linear-phase modes: CABS and FIR inverted filtering.
2. Long Channel Delays: 0-168ms delays. This feature allows for adding long delays
to each channel for creating special “echo” effects in QUADRO (or other)
configuration.
3. Convolution engine has increased number of partitions to 16. The original 8partition option still available for the lowest latency.
4. 7.1 HT system configuration available. Also 7.2HT (BBM) and 7.4HT
(BBM+CABS) systems available.
5. Up to 1.47Hz low-frequency resolution.
6. Supports 16-channel LynxAES16 digital sound card and Delta1010LT analogue
sound card.
7. Runs Windows audio engine in WASAPI Exclusive Mode.
8. Added WAV Player.
This User Manual is intended to provide information about new features in version 6,
and should be read in conjunction with the full User Manual for version 5, and
available from Bodzio Software Pty. Ltd. website.
1
Controlled Acoustic Bass System (CABS)
The CABS system was explained in “Low Frequency Sound Field Control in
Rectangular Listening Rooms using CABS (Controlled Acoustic Bass System) will also
reduce sound transmission to neighbour rooms” by Sofus Birkedal Nielsen in 2011.
http://vbn.aau.dk/files/62729248/LF_sound_field_control.pdf
In the words of Mr Nielsen: “…The idea is that by proper placement of loudspeakers
close to a wall it is possible at low frequencies to create and maintain a plane wave
propagating from front to rear. When the plane wave hits the rear wall another set of
loudspeakers close to the wall will create a delayed version of the frontal signal but in
opposite phase and with a proper gain so the reflection at the rear wall will be cancelled….”
The ingenuity of the system can be summarised as If the first rear wall reflection is
cancelled then there are NO reflections at all but only a plane wave travelling from the front
wall loudspeaker(s) and being totally absorbed at the rear wall.
Delay ∆t = Distance/Speed of sound.
2
Incorporating CABS into the loudspeaker system is accomplished by adding two extra
subwoofer ports ( Port 14 and Port 16 on the example picture below), which receive signal
from subwoofer channel (Channel 5 on the picture below).
Delay and gain are adjusted via “Driver And Output Port Control” dialogue box – see
below.
At the end of the paper, Nielsen concludes: “…Listening to music being played
instead of a single frequency clearly shows that with CABS the booming bass is removed in
the source room and clearly reduced in the neighbour rooms. Maybe not surprisingly
CABS is not only improving the sound in the source room but will also reduce the sound
transmitted to neighbour rooms….”
An example of CABS Delay = 80ms, Reverse Phase and Channel Gain = -3dB is
shown on picture below. Top trace shown reference channel without any modifications.
3
The CABS concept was actually implemented in commercial subwoofer product by
Klein+Hummel in o800 Subwoofer range. http://www.neumann-kh-line.com/kleinhummel/globals.nsf/resources/o800aram_bda_e_517277_rev_231106.pdf/$File/o800aram_bd
a_e_517277_rev_231106.pdf
The o800 Subwoofer Product Manual offers this example of performance
improvement, when using ARAM subwoofer modules
4
It is highly recommended to review the Nielsen’s paper on CABS
http://vbn.aau.dk/files/62729248/LF_sound_field_control.pdf . Nielsen reports the following
improvements:
5
Placement resolution
The “CABS” delay is implemented via delay buffer. Therefore the smallest delay that
can be implemented by this method determines the distance resolution. Here is how it works.
Sampling frequency Fs, and speed of sound (340m/s) both determine the smallest
placement resolution via the following formula:
Placement resolution = (Speed of sound) / Fs
Thus, sampling frequency of 48kHz results in placement accuracy of 0.7cm, and
sampling frequency of 96kHz results in placement accuracy of 0.35cm. Both sampling
frequencies offer more than enough placement resolution.
For comparison, Vanderkooy, in his AES Perprint 7262. – “Multi-Source Room
Equalization: Reducing Room Resonances”, used 5kHz sampling, which results in 6.8cm
placement accuracy. In the same paper, Vanderkooy gives a brilliant summary of his room
equalization approach:
“…Summing up my room equalization philosophy, then, it is important to try to lessen the
peaks and dips in the room response at low frequencies, say below 150 Hz. However, as the
frequency rises one should do less and less, so that by say 300 Hz, the room response should
certainly not be altered……”
Adding Extra Spaciousness
There are two types of delays implemented in the program. Firstly, there is the
“Channel Delay”, which is mathematically calculated by multiplying transfer function by
exp(jωt). This delay is intended to be of short duration only (<1ms) and should be used for
the precise alignment of acoustic centres of loudspeakers.
Second delay is the “CABS” delay, which is implemented via delay buffer. This delay
is intended for much longer delay, up to 168ms. One application of such longer delays is the
CABS subwoofer system.
However, since all 16 output channels can be delayed by using “CABS Delay”, this
gives us an opportunity to experiment with sound effects, such as enhanced spaciousness.
Sounds reflected by more than 30-40ms are being perceived by our auditory system as
early “echo”. If this delayed sound is emitted via rear loudspeakers, one can easily create an
impression of the listener being located in significantly larger venue. This idea is explained
on the picture below. Rear-Left and Rear-Right signals are synthesized from Front-Left and
Front-Right signals by adding delays and perhaps adding some extra filtering, so that the rear
loudspeakers do not reproduce the full spectrum, but just a limited frequency range. This can
be adjusted entirely to your taste, to create the best illusion of an enlarged space behind you.
6
Once again, delay and gain are adjusted via “Driver And Output Port Control”
dialogue box – see below.
7
7.1 HT Operation
Most currently available Blu-Ray DVDs are mixed in 7.1 surround format. The DVD
Player menu option allowing you to downmix to 5.1 format or 2.0 format are no longer
available. This is particularly evident for 3D movies and concerts.
Keeping with the progress of technology, current version of Ultimate Equalizer
incorporates 7.1 channel configuration. You can even use “standard 7.1HT” configuration, or
“BBM 7.2HT” configuration or even “CABS+BBM 7.4HT” configuration. In order to
acquire the whole 8channels, you’ll need Delta1010LT sound card as the input device.
Secondly, when playing DVD recorded in audio 5.1 format on 7.1-capable DVD
player, the rear channels are often appearing as side channels on the DVD player analogue
outputs. This is obviously a problem as you would lose significant spatial component of the
sound field behind you.
The program offers a simple solution to this issue. You’ll need to create two
“profiles”, or project files: one with standard 7.1 assignment, where rear channels are
assigned to rear speakers – this is to play DVD mixed in 7.1 format, and the second “profile”
with 5.1 standard where the side DVD channels are assigned to rear speakers. This way you
have both options covered. Selection of “profiles” is normally accomplished by assigning
every profile to keyboard button 1-9. The you just press keyboard button “1” to upload
“Profile 1”, keyboard button “2” for “Profile 2” and so on….Playback will start automatically
if the Preferences are configured for such option.
The 7.2 BBM channel configuration is shown on the picture below.
8
Possibly the most advanced channel configuration available is 7.4HT configuration,
where you would use 4 subwoofers in BBM+CABS configuration. Given the 16 channels
available from the LynxAES16 sound card, this configuration can only be implemented if the
side channels are implemented as “wideband” loudspeakers. This is generally not a problem,
as the audio information available from side channels tends to be quite limited in spectrum.
The 7.4HT configuration is shown on picture below.
Low-Frequency Resolution
Linear-phase systems tend to have symmetrical impulse response. This leads to
excessive equalizer latency. This effect will manifest itself more strongly when good lowfrequency resolution is required for room equalization, therefore longer impulse response is
required = large latency. When equalizing 5.1HT or 7.1HT system, one needs to observe
maximum tolerable audio-video latency, which is 185ms.
Low-frequency resolution (LF_Res) is linked to sampling frequency and impulse
response length by:
LF Re s =
Sampling Frequency
IR Length
For example, when sampling with 48000Hz, and using impulse response length of
8192, we can obtain LF_Res of 48000/8192 = 5.86Hz. This bass resolution is sufficient for
most of the loudspeaker equalization, but for more accurate room equalization, it may have to
be improved.
9
Additionally, we need to determine partition length, which the convolution engine
will use in real-time. If we assume partition length of 1024, we will need 8 partitions to cover
the impulse response above. If we use linear-phase approach, the center of the impulse
response will be located at 4 x 21.33ms = 85.36ms. Since we are using “block processing”
approach, we need to read-in some data block before they can be processed. This takes time
and when we add typical sound card buffer processing delay, and IRQ processing delays, we
are likely to end up with total latency of 145ms (60ms more than the shift of the impulse
response peak). This latency is still quite acceptable, as we are well within the tolerable limit
of 185ms.
So, what would happen if we decide to double the LF_res?.
Now, the LF_Res = 2.93Hz. The impulse response length is now 16384, and we need
to double the number of partitions to 16, having the center of the impulse response located at
8 x 21.33ms = 170.72ms. On the top of this delay, we need about 60ms to cover for all other
delays, and the result will be 230.72ms – well outside the tolerable limit. If nothing else
changes in the example above, and we need to improve bass resolution again
(LF_Res=1.47Hz), we are likely to incur system latency of 460ms.
However, none of these issues matter when minimum-phase approach to
equalization/filtering is used. The peak of the impulse response in minimum-phase system is
typically located very close to the start of the impulse. In this case, improving the bass
resolution and increasing the length of the tail of the impulse response by allowing more
partitions works very well, as it does not increase latency at all. However more CPU power
will be required though.
Low-frequency resolution, latency, UE buffer size, and sampling frequency for full
digital system and 7.1Hybrid System are summarized in the table below.
The top section of the summary table shows “Full digital System” implemented via
LynxAES16 digital sound card. There are two versions of UE6 detailed there: 8-partition and
16-partition version, running two sampling frequencies: 48kHz and 96kHz. Each sampling
frequency is then characterized for 2in-8out system and 2in-16out system. So, for example, at
96kHz sampling frequency, the 16-partition option will run 2in-8out system, but will require
more powerful PC to run 2in-16out configuration. The 8-partition version of UE6 will run
2in-16out configuration at 96kHz.
The bottom section of the summary table shows “7.1 Hybrid System” consisting of
Delta1010LT and LynxAES16 sound cards. The important parameter in this section is the
Latency in Minimum-Phase (MP) and Linear-Phase (LP) modes, as this would determine the
mode of operation for your AV system.
10
Please note, that all the above figures were collected using i7 960 CPU, benchmarked
at 5948. This is quite old CPU, and currently available CPUs, like i7-4770K scores the
benchmark figure of 10374. This CPU would be a better option for UE6.
http://www.cpubenchmark.net/high_end_cpus.html
http://www.cpubenchmark.net/cpu.php?cpu=Intel+Core+i7+960+%40+3.20GHz&id=838
11
WAV Player
The built-in “WAV Player” allows you to acquire standard 16-bit/44.1kHz CDquality sound files from your hard disk, and play them back on a 24-bit/44.1kHz audio device
provided by the Realtek codec. No sound cards are necessary. Your motherboard alone
gives you the access to all processing power of the UE Technology, and if you have ALC889,
ALC898 or ALC1150 codecs, the resulting audio quality is on par with a good CD-player.
Consequently, a correctly set-up motherboard codec device should provide a playback
device, capable of 24bit/44.1kHz playback of 8 output channels. It is not necessary to set up
motherboard input recording device, since it will not be used by the WAV Player. The
“.WAV” file is read directly from the hard disk and after UE processing, it’s send to the
motherboard output device – which on a typical Windows 7/8/8.1 computer can be set to
24bit depth. It is worth noticing, that such computer is also capable of running audio engine
in WASAPI Exclusive Mode, which is also used by UE6.
Motherboard Considerations
The example below is based on one of the older ASUS motherboards and shown
below: ( http://www.asus.com/Motherboards/P6X58DE/).
ASUS P6X58D-E motherboard with 2 PCI slots and Realtek® ALC889 8-Channel
High Definition Audio CODEC.
12
Setting Up Realtek Input Codec
You can pretty much disregard the Line-in motherboard input device. Even when a
3.5mm plug is connected to line input, to activate it, this input can only be set to 16bit/2channel configuration – see below.
13
Since UE6 is a 24-bit software, there is no way to for UE6 capturing device to achieve
compatibility with the 16-bit motherboard Line-in input device. The consequence of this will
manifest itself when you attempt to activate “Play” button in “System Design” screen or
“Player Mode”. The program will attempt to use input device in 24-bit mode, and will
complain about incompatibility with an error message.
IMPORTANT NOTICE: When using 16-bit audio input device, DO NOT activate
“Play” button in “System Design” screen or “Player Mode” dialog box. ONLY activate
“Play” button in “Wave Player Mode”. You can select audio input device if your codec
allows you to set 24bit depth, but still, it will not be used.
On the other hand, the “Wave Player Mode” does not use motherboard input device.
The “.WAV” file is read directly from the hard disk and after processing, it’s send to the
motherboard output device – which can be set to 24bit depth – see next paragraph.
Setting Up Realtek Output Codec
The codec will typically sense and “un-grey” the Back Panel Analog devices, when a
3.5 jack is plugged into each socket – see below.
Selecting output 24-bit/44.1kHz
14
Selecting 8-output configuration.
This is important, as these outputs gain visibility to the Windows Sound Manager
15
Having set-up the Realtek codec and Windows Sound Manager, you should see the
output device in UE Preferences screen – see below.
In order to use WAV Player, it is necessary to have the complete UE system set up for
2-way configuration first. An example of such system is shown below. Here we would use
Out1+Out2+Out3 as the front-left, 3-way loudspeaker and Out4 as the CABS left-sink
subwoofer. Then Out5+Out6+Out7 as the front-right, 3-way loudspeaker and Out4 as the
CABS right-sink subwoofer.
This way, you have access to HBT equalization, linear-phase loudspeakers and CABS
room correction system by just using the motherboard audio.
16
The system depicted on the previous page can be implemented in a physical
configuration as on the picture below.
Using WAV Player
The basic job of the WAV Player is to create playlists and then play all songs from
the playlist one-by-one. Therefore, the first step in this process is to edit the playlist.
The editor is available via Playback->Edit Playlist menu option – see below.
This should open Playlist Editor as shown below.
17
Adding Songs
Pressing “Add Song” button will open dialog box allowing you to select any WAV
file to be added to the playlist.
You would repeat this process until you have filled this particular playlist with songs
you wish to be played from this particular playlist – see below.
18
Deleting Songs
Should you happened to add a wrong song, there is an option to delete this song from
the playlist. Please use left mouse button to click above the row with this song, and it will be
highlighted. Then press “Delete Song” button to remove this song from the playlist – see
below.
There can be a maximum of 127 songs in each playlist. Each song will be displayed
with the following statistics:
1.
2.
3.
4.
5.
6.
Title
Length in hour:minute:second format
Size on hard disk in Mb.
Type – they all will be of “Wave Sound” format
Bit Rate – typically 1411.2kbps
Location – this is full path+filename location on your hard disk.
Saving Playlist
You can basically create an unlimited number of playlists (within your HD free space
capacity). Each one could reflect a music theme or a genre or an artist or anything you may
fancy.
Once the editing of a playlist is completed, it should be saved for future use. Please
press “Save Playlist” button as highlighted on the picture below.
19
This will open a “Save” dialog box. There you can type-in the name of the playlist
and press “Save” button to have the playlist stored to your hard disk.
Loading Playlist
Loading a playlist is as simple as pressing the “Load Playlist” button – see below.
20
Playing Songs From Playlist
As emphasized before, in order to use WAV Player, it is necessary to have the
complete UE system set up for 2-way configuration. When you are satisfied with the system
built, it would be advisable to save the configuration as a project to the hard disk.
Now, the WAV Player can be activated from the Playback->Wave Player Mode menu
option – see below.
This will re-configure the main UE screen to smaller size and will display two
dialogue boxes: Playlist Editor (left) and WAV Player (right).
Playlist Editor is a fully active editor when WAV Player is in the “Stop” mode (blue
button pressed). It becomes inactive during playback.
You can use left mouse button to click on any of the songs in the playlist and then
Press “Play” button on the WAV Player box (yellow button). The playback will start from the
selected song. You can adjust volume to the desired level.
If uninterrupted, then the playback will progress song-by-song through the playback
list until the last song has been played, and then the playback will stop automatically.
At any time, you can select any of the songs from the playlist by clicking the left
mouse button above that row. Then, the currently played song will be terminated and the new
selection will be played from the beginning.
21
During the playback, the WAV Player box will display the percentage of file already
played so far, for example: Played=62.0% - see below.
Also, the name of UE system file configuration – “Realtek_8_channels_1024.hif” file
is displayed and the name of currently played song is also shown – “Song: A Taste Of
Honey.wav” – see below.
In order to exit from “Wave Player Mode” menu, you must stop the playback by
pressing “Stop” button (blue), and then select System Design->Current System main
menu option.
Sources of WAV files
1. One obvious source is your CD collection. Windows Media Player allows you to rip
your CDs directly to the hard disk Many other free media players available from the
internet also implement the same feature.
2. iTunes. When you purchase music from iTunes, it will most likely be delivered to
your PC in M4A format. You’ll need to convert this format to WAV file. The process
is very simple and is described in the next paragraph.
22
Using iTunes™ to convert M4A to WAV
1. An example song, David P. Stephens – Epiphany, is selected in iTunes™.
2. Go to File -> Create New Version –> Create WAV Version - see below.
23
3. After a few seconds, the WAV version will be displayed as well.
4. You can now add this new WAV song to one of the UE V6 Playlist.
24
Project File Compatibility
Please note, that project files for UE6 are larger in size than the older Project files.
Therefore, older files are not compatible with UE6. You will need to re-create project files
for UE6.
Driver files created with older versions of the program can be used with UE6 directly.
So there is no need to re-measure the drivers.
25