1
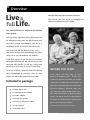
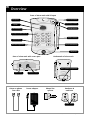
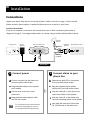
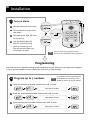
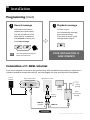
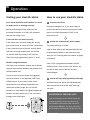
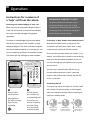
User Manual
The LiveLife Personal Medical Alarm
POWER ON
1
2
3
4
5
6
7
8
9
0
#
*
HELP
1 Overview
3 Installation Guide
6
Operating instructions
8
Troubleshooting
9
Specifications
10
Warranty
LiveLife
PERSONAL MEDICAL ALARMS
www.livelifealarms.com.au
©2015. LiveLife Alarms. All rights reserved.
1
Overview
Live a
full Life.
message that had been recorded previously.
The receiver can now assist by arranging for
someone to attend the user’s home.
The LiveLife Alarm is a simple to use medical
alert system.
The user wears a pendant with a HELP button. In
an emergency they press the HELP button and
the alarm system automatically calls up to 3
nominated family and friends that can assist.
The alarm unit will dial them in order until a
real person answers and acknowledges the ‘help’
‘help’ call. It can call landlines and mobiles.
If the first person on the list does not answer,
the alarm will then call the second person and
then the third person. It will try calling each
person up to five times in a cycle if necessary.
Once one of these 3 people answer the call and
BEFORE YOU START
then acknowledge by pressing a key on their
*This alarm can form part of your
phone, the alarm then plays the short ‘help’
advance emergency plan.
Included in package
Before you
install and operate the alarm you should
contact the 3 people who would receive a
help call in the eventuality you need help.
1 x Main alarm unit
2 x Pendants with necklace
1 x Power adaptor
1 x Phone line splitter
1 x Alarm to phone line cable
1 x User manual
We have included 3 ‘Receiver cards’ you
can share with these people which contain some instructions on how the alarm
works. The alarm should be tested before
it is used, so you will need to inform them
prior to you testing the alarm.
* Please read the medical disclaimer on page 11.
1 x Receiver card
©2015. LiveLife Alarms. All rights reserved.
2
Overview
Front of alarm unit with lid open
Microphone
Power on indicator
POWER ON
Low battery indicator
Speaker
Standby indicator
On-Off switch
Store phone number buttons
Handset button
1
2
3
4
5
6
7
8
9
0
#
*
Wireless antenna
Play recorded message
Record message button
Help button
HELP
Rear of alarm unit with cover open
Underneath of alarm unit
Back-up battery compartment
AAA
Power socket
Alarm to phone
line cable
Phone line socket
Power adaptor
AAA
Phone line
splitter
Pendants &
necklaces
Help button
©2015. LiveLife Alarms. All rights reserved.
3
Installation
Connections
Unpack your alarm from the box and locate all items (Refer to the list on page 1 of this manual).
Please note this alarm requires a standard landline service to be active in your home.
Standard installation
If you use a computer connected to the internet that uses an ADSL connection please refer to
‘Diagram B’ (page 5). The diagram below refers to a home using a landline without ADSL internet.
Existing
Phone
Powerpoint
Power
adaptor
Rear of alarm unit
CABLE B
Supplied
splitter
Wall phone socket
CABLE A
(supplied)
DIAGRAM A
A
Connect power
1 Choose a location for the alarm unit
near your phone wall socket.
2 Plug the power adaptor into a power
point nearby.
3 Lift the cover at the rear of the
alarm unit.
4 Plug the black power adaptor cable
into the rear socket.
TIP
It is a good idea to protect the alarm from
power surges by plugging it’s power in
B Connect alarm to your
phone line
1 Remove the cable (B) to your phone
from your wall phone socket.
2 Plug the supplied phone splitter
directly into your wall phone socket.
3 Plug the cable (B) to your phone into
one of the sockets in the splitter.
4 Plug the cable (A) to the alarm unit
into the remaining socket in the splitter.
5 Now plug the other end of the cable
(A) into the rear of the alarm unit.
to a powerpoint that is surge protected.
©2015. LiveLife Alarms. All rights reserved.
4
Installation
C
Turn on alarm
POWER ON
1 Flip open the alarm unit’s cover.
POWER ON
2 Turn the alarm on at the unit’s
side switch.
ON
OFF
3 The green power light will come
on and stay on.
1
2
3
4
5
6
7
8
9
0
#
*
POWER ON
4 The red standby light will
flash for 3 seconds during
HELP
start-up and then go out.
The unit will then beep once
to indicate it is ready.
TIP
After you install and program your alarm
please install 4 x AAA alkaline back-up batteries.
Programming
Now that you have completed setting up the connections to your alarm the next steps are to program
in up to 3 phone numbers on your contact list and record a ‘help message’.
D Program up to 3 numbers
1
phone number just repeat the process.
Do not use 000 as one of your numbers.
Enter the first phone number (include area code) to store.
*
2
TIP
If you make a mistake programming in a
1
Input phone number
*
Enter the second phone number (include area code) to store.
*
2
Input phone number
*
3 Enter the third phone number (include area code) to store.
*
3
Input phone number
*
©2015. LiveLife Alarms. All rights reserved.
5
Installation
Programming (Cont)
E
F
Record message
Playback message
Hold down both buttons
To listen to your
together and speak clearly
pre-recorded help message
into the microphone in the
press the play button.
alarm unit for a maximum
If you wish to record a new
of 6 seconds to record your
message repeat ‘Step E’.
voice help message.
#
TIP
TIP
YOUR INSTALLATION IS
NOW COMPETE
Your message should identify you
and be clear and concise.
Connection with ADSL internet
If you use a computer connected to the internet using ADSL broadband the procedure is identical to a
standard installation except that cable (B) must be plugged into your existing ADSL Filter/Splitter.
Power
adaptor
Rear of alarm unit
Wall phone socket
Phone
(existing)
Modem
(existing)
ADSL
MODEM
PHONE
ADSL
Splitter/Filter
Splitter
(existing)
(supplied)
LINE
CABLE A
(supplied)
CABLE B
DIAGRAM B
©2015. LiveLife Alarms. All rights reserved.
6
Operation
Testing your LiveLife alarm
How to use your LiveLife alarm
Your alarm should be tested before it is used
to make sure it is working correctly.
1
Activate the alarm
During an emergency or if you need help you
Before performing the test make sure the
activate the alarm system by pressing the ‘HELP’
nominated receivers of a ‘help’ call are aware
button on either the pendant (FOB) or the
that you are doing a test.
base alarm unit.
If the test does not work correctly
If the alarm does not work during the testing
2
you should firstly re-check all of the connections.
The alarm will beep 10 times.
If the connections are all correct and the alarm
still does not work properly then you should
Alarm will automatically dial numbers
After a short delay it will automatically dial the
programmed numbers in the order that they
re-set the alarm by turning it OFF and ON.
Then redo the programming: steps D, E and F.
were set it in (starting with the number assigned
to button 1).
Wireless range limitations
Each of the 3 programmed numbers will be
The alarm uses a wireless system with a limited
dialled 5 times. Each of these calls will last 45
range of transmission between the pendant and
seconds if they are not received and also
the base alarm unit.
acknowledged.
As part of your test you should try triggering
the ‘HELP’ button on the pendant (FOB) from
3
different parts of your home. Walls, doors,
Simultaneously the alarm will repeatedly play
furniture and some wireless equipment can
back the previously recorded ‘help’ message
reduce the wireless range. Do not use the
out loud.
Alarm will keep playing the help message
pendants in areas where the signal between the
pendant and base alarm unit is not consistent
enough to be relied upon.
POWER ON
2
ACCIDENTALLY PRESSING HELP
If you accidentally press the ‘HELP’ button and
activate the alarm, you can stop the alert by
3
1
2
3
4
5
6
7
8
9
0
#
*
turning OFF the alarm unit at the side switch
and then back ON again. The alarm will restart
and be ready to use when the red light goes out.
HELP
©2015. LiveLife Alarms. All rights reserved.
7
Operation
Instructions for receivers of
a ‘help’ call from the alarm.
Receiving and acknowledging a ‘help’ call.
2
ARRANGING SOMEONE TO HELP
The priority should be for someone to go to
your home and check on you. The ‘2-Way’
3
When one of your nominated people receive a
communication feature should be viewed as a
‘help’ call and answer it, they will immediately
secondary priority as the alarm is designed to
hear your recorded message being played
function firstly as an alert system.
repeatedly.
For them to acknowledge they have answered
Activating ‘2-Way’ hands-free communication
the call they must press any ‘number’ on their
Now that the alarm knows a real person has
telephone keypad. The alarm will then recognise
answered it will activate a hands-free ‘2-Way’
the call has been answered by a ‘real person’ and
communication with you and the receiver.
not an answering machine or automated system.
The alarm will stop calling any other numbers.
If you are near the base alarm unit (within 3 to 5
metres) you will be able to speak to the receiving
person via the microphone/speaker. If you are
4G
09.41
Mum
Home
Press any
number key
4G
09.41
to acknowledge
1
2
the call
not close enough the microphone may not pick
up your voice.
3
The two way communication will last for 45
4
5
6
7
8
9
seconds before the alarm sounds 3 warning
*
0
#
beeps to the receiver that indicate the call will
end in 10 seconds.
slide to answer
Favorites
Recents
Contacts
Keypad Voicemail
Extending the call
To extend the call for a further 60 seconds (max)
1
2
the receiver can press any key on their keypad.
Receive ‘HELP’
Receiver presses
After this time the call ends and the alarm goes
call from alarm.
any ‘number’ key
back into standby mode.
Once answered
to acknowledge call.
the ‘HELP’ message
The receiver can
begins to play
then try to speak to
repeatedly.
the caller if they
are close enough
to the alarm base.
©2015. LiveLife Alarms. All rights reserved.
45
55
Alarm warns
call will end
shortly
Call ends if
receiver chooses
not to extend
+
60
Call can be
extended for
60 seconds
8
Troubleshooting
Problem
Still having trouble?
Your nominated receiver(s) cannot
If your problem isn’t listed here or you are still
acknowledge the incoming ‘HELP’ call.
having trouble, you can read our frequently
The call acknowledgment will only work if the
asked questions at the ‘Your questions’ page at:
nominated receiver uses a ‘touch-tone’ phone.
www.livelifealarms.com.au
The alarm unit triggers for no apparent
Or you can email LifeLife Alarms at:
reason.
[email protected]
-Sometimes, there can be interference
from other wireless devices close by.
-You may have accidentally pressed the ‘HELP’
button on your pendant (FOB). Perhaps
re-adjust how you are wearing your pendant.
Message has poor sound quality.
You can try-recording your ‘HELP’ message
again (see Step F on page 5). Ensure you are
IMPORTANT ‘PLEASE READ’
Raising an alarm in an emergency
The best way to raise an alarm in an
emergency is to phone ‘000’ directly.
Inform your nominated receivers
Make sure you have spoken to the people
you have chosen to receive ‘HELP’ calls
speaking clearly and close to the front of the
prior to including them and *discuss a plan
alarm unit’s microphone/speaker.
of action in an emergency.
You can hear interference through the alarm.
Testing the unit regularly
Sometimes other electrical devices in a room
It is important you test the alarm unit
can interfere with the speaker in the alarm unit.
regularly to check it is working correctly.
You can try moving the alarm unit or try moving
Use the correct power adaptor
the electrical device you suspect may be causing
Only use the supplied power adaptor.
the interference away.
Protecting the alarm unit
2
The light on my pendant turns red.
Keep the unit away from direct sunlight and
If when the ‘HELP’ button is pressed the light
hot surfaces. It is a good idea to keep the
on the pendant (FOB) turns red instead of green
front lid closed unless you are changing
this indicates the battery needs to be replaced.
settings on the alarm unit.
Battery indicator
3
* Read the medical disclaimer on page 11.
If the light is red when pressed
replace the pendant battery
©2015. LiveLife Alarms. All rights reserved.
9
Specifications
Technical specifications
Operation during power blackouts
Power
Alarm unit
Pendant
Batteries
6.0V DC adaptor or 4 x AAA
The LiveLife alarm requires a mains, 240 volt
alkaline batteries as back-up
power supply to operate. It uses an alternative
1 x 12.0V A23S battery
power supply of 4 x AAA batteries (not included)
which can act as a back-up during a power
Adaptor
Input
Output
blackout. The batteries should only been seen as
100-240V, 50-60Hz 0.2A
6.0V, 1000mA
a back-up power source in the event of mains
power being unavailable for any period of time.
We recommend you use alkaline batteries. The
Wireless signal
Frequency
433.92MHz AM receiver
Range
50 metres free line of sight
batteries should be checked regularly and
replaced every twelve months.
Replacing back-up batteries
Hands-free Microphone
Distance
If when the unit is running on battery power only
Approx 3 to 5 metres from
the alarm unit
the power light on the alarm is red instead of
green the back-up batteries need replacing.
Underneath of alarm
Dimensions & weight
Dimensions
160mm x 105mm x 43mm
Weight
1.2kg
Open battery compartment
Programming
Open the compartment
on the bottom of the
alarm unit and place
4 x alkaline AAA batteries
in the correct position
and configuration.
AAA
Message
6 seconds maximum
Numbers
3 x programmable numbers
+
AAA
+
Battery indicators
Alarm unit
Low back-up batteries light
Pendant
Low battery light
-
AAA
AAA
+
+
AAA
AAA -
Back of pendant
Undo screws
NBNCo
Compatible
-
Undo both screws with a
Philips head screwdriver
to replace A 23s battery
©2015. LiveLife Alarms. All rights reserved.
10
Warranty
Warranty terms & conditions
The LiveLife Alarm comes with a standard 12
Circumstances that can void your warranty
months warranty from date of purchase. If the
Please be aware your warranty can become void
alarm unit or pendant has a manufacturing
if any of the following have occured:
defect causing it to fail within the first 12
months of purchase, we will replace it free of
charge or refund you the purchase price.
Troubleshooting procedure
If your Alarm has stopped working please refer
to the ‘Troubleshooting’ section of this manual
(a) The Alarm unit case has been opened or been
tampered with.
(b) The Alarm has been modified or not used in
accordance with the instructions supplied by
LiveLife
Alarms. ‘PLEASE READ’
IMPORTANT
on page 8 and check to see the cause of the
(c) The Alarm has been dropped or suffered
failure is not due to incorrect operation or that
damage from physical impact.
it can be easily rectified.
(d) The Alarm has been damaged by a fire or has
How to claim against your warranty
been damaged by being exposed to excessive
If after consulting the ‘Troubleshooting’ section
heat from direct sunlight or other sources.
the Alarm is still not working, then please
contact us to arrange to have the alarm
(e) The Alarm has been used with an incorrect
power adaptor.
returned for a warranty claim assessment.
(f) The Alarm has been subject to an incorrect
voltage due to lightning or a power surge.
Your guarantee under Australian
consumer law.
Our goods come with guarantees that cannot be
(g) The Alarm base unit has been subject to a
liquid spillage causing a failure.
excluded under the Australian Consumer Law.
(h) Leaking back-up batteries have been left in
You are entitled to a replacement or refund for a
the base alarm unit or pendant (FOB).
major failure and compensation for any other
reasonably foreseeable loss or damage.
You are also entitled to have the goods repaired
Contact details for warranty claims
Email:
[email protected]
quality and the failure does not amount to a
Phone:
03 5744 3580
major failure.
Website:
www.livelifealarms.com.au
or replaced if the goods fail to be of acceptable
©2015. LiveLife Alarms. All rights reserved.
11
Disclaimer
Downloadable instructions
Medical and legal disclaimer
This User manual is available as a downloadable
General information about medical matters
PDF on our website. Go to the ‘Alarm in detail’
page on our website for this and other guides.
List of downloadable guides
The LiveLife Alarm ‘User Manual’ contains general information
about medical and health matters. The information is not
advice, and should not be treated as such.
Limitation of warranties
The medical and health information within this ‘manual’ is
Quick install guide
provided “as is” without any representations or warranties,
User manual/troubleshooting
agents make no representations or warranties in relation to
express or implied. LiveLife Alarms and it employees and/or
Receiver instruction card
the medical and health information within this ‘manual.’
Warranty
Without prejudice to the generality of the foregoing paragraph,
LiveLife Alarms does not warrant that:
-The medical and health information on it’s website or in this
‘manual’ will be constantly available, or available at all; or
-Any medical and health information on it’s website and
within this ‘manual’ is complete, true, accurate, up-to-date,
or non-misleading.
Liability
You must not rely on the information within this ‘manual’ as
an alternative to medical advice from your doctor or other
health services provider.
If you have any specific questions about any emergency plan,
medical or health matters you should consult your doctor or
other professional health services provider or personal carer.
You should never delay seeking medical advice, disregard
medical advice, or commence or discontinue any medical
treatment because of information within this ‘manual’.
Liability
Nothing in this legal disclaimer will limit any of our liabilities
in any way that is not permitted under applicable law, or
exclude any of our liabilities that may not be excluded under
an applicable law.
LiveLife
PERSONAL MEDICAL ALARMS
www.livelifealarms.com.au
©2015. LiveLife Alarms. All rights reserved.