1
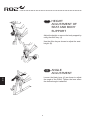
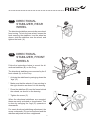
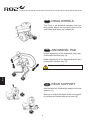
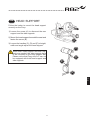
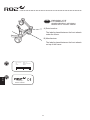
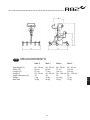
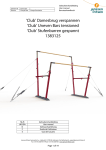
pony
TM
English user manual
© 2010 R82 A/S. All rights reserved.
The R82 logo and the Pony are registered trademarks of R82 A/S.
06.2011
GB
CONTENTS
Pony................................................................................... 3
Safety................................................................................. 4
Warranty............................................................................. 4
Tools................................................................................... 4
Maintenance....................................................................... 4
Ready for use..................................................................... 5
Height adjustment of seat and body support...................... 6
Angle adjustment................................................................ 6
G
B
Directional stabilizer, rear wheel......................................... 7
Directional stabilizer, front wheels...................................... 7
Drag wheels ...................................................................... 8
Abdominal pad................................................................... 8
Rear support....................................................................... 8
Head support...................................................................... 9
Handbrace........................................................................ 10
Armrest............................................................................. 10
Side supports................................................................... 11
Helper’s handle................................................................ 11
Vertical hand grips, mounted at the ends......................... 12
Vertical hand grips, mounted in the middle...................... 13
Product identification........................................................ 14
Measurements.................................................................. 15
Technical data.................................................................. 16
Producer........................................................................... 16
Distributor......................................................................... 16
2
GB
PONY
Congratulations on choosing the PONY. We are convinced that it will fully live up
to your expectations.
The PONY is a walking aid from R82 for children from 18 months to eight years
of age needing supplementary assistance with their daily walking. It comes in 4
different sizes.
This manual describe and illustrates all functions, and will enable you to take
maximum advantage of your PONY.
3
G
B
GB
SAFETY
Pony is CE-marked. This is your garantee that the product fulfills the required European
health- and safety demands. Pony is CE-marked according to the European Council Directive
93/42/EØF, class I, of 14. june 1993 regarding medical arrangements.
The durability of this product correspond to a life cycle of 5 years at normal use. Hereafter
the product must be rennovated (by R82 personel) to extend the life time.
Pony is solely for indoor use.
Remove the CE-mark, when re-building the product or when using other than original
R82 spare parts and fittings.
Check the strap before every use and replace any worn out parts before using this
product.
Never leave your child unattended in this product. Ensure constant supervision by
an adult. Incorrect use of the product, may cause serious injury to the user. Ensure
that the belt is securely fixed to the frame before every use.
GB
G
B
WARRANTY
R82 offers a 2-year warranty against defects in workmanship and materials and a 5-year
warranty on breakage of the metal frame caused by defects in welds. The warranty would
be adversely affected if the customer’s responsibility of servicing and/or daily maintenance
is not carried out according to the guidelines and intervals prescribed by the supplier and/or
stated in the manual. For further information, we refer to the R82 homepage/download. The
warranty can only be sustained if the R82 product is in use in the same country where it was
purchased and if the product can be identified by the serial number. The warranty does not
cover accidental damage, including damage caused by misuse or neglect. The warranty does
not extend to non-durable parts, which are subject to normal wear and tear and need periodic
replacement. The warranty is null and void if non-original R82 parts/accessories are used, or
if the product is repaired or altered by anyone other than an authorised R82 representative or
by trained personnel officially recognised by R82 for repair and maintenance of R82 products.
R82 reserves the right to inspect the product being claimed for and the relevant documentation before agreeing to the warranty claim, and to decide upon whether to replace or repair
the defective product. It is the customer’s responsibility to return the item being claimed for
under warranty to the address of purchase. The warranty is given by R82 or, subsequently,
an R82 dealer.
GB
TOOLS
Behind the rear support you will find a 4 mm Allan key.
This key is used to perform some of the adjustments described in this manual.
GB
MAINTENANCE
The Pony functions without any maintenance, but it is recommended to clean the frame
frequently.
Do not use any cleaning materials containing chlorine.
Adjustments and changes not described in this manual, must be made by authorized
R82 personel.
4
GB
READY FOR USE
Lift up the two bars on the frame. Except
Pony 0
NOTE: Remove black lever first, then:
A: Place the schroud over the bars.
B:Fasten the schroud with the four
Phillips headscrews.
Except Pony 0
Place the seat on the large vertical bar. Faaten
with the attached Allen key.
Install the angle adjustment bar:
A:Insert the bar into the smaller vertical bar.
Fasten with handle.
B:Place the pivoting end over the larger vertical
bar. Fasten with the Allen key.
Place the hand grip on the body support bar and
slide it to the top. Fasten with the Allen key.
Insert the body support into the larger vertical
bar and fasten with the Allen key.
Your PONY is assembled.
G
B
5
GB
A
HEIGHT
ADJUSTMENT OF
SEAT AND BODY
SUPPORT
Adjust the height or remove the body support by
using the Allen key. (A)
Use the Allen key as shown to adjust the seat
height. (B)
B
GB
G
B
A
ANGLE
ADJUSTMENT
Loosen the black lever (A) as shown to adjust
the angle of the PONY. Tighten the lever when
the desired angle is attained.
6
GB
DIRECTIONAL
STABILIZER, REAR
WHEEL
A
The directional stabilizer prevents the rear wheel
from turning. To lock the rear wheel, loosen the
knob securing the stabilizer, turn the wheel as
shown, slide the stabilizer over the wheel, and
tighten the knob. (A)
GB
DIRECTIONAL
STABILIZER, FRONT
WHEELS
Follow the instructions below to mount the directional stabiliser (B) on the Pony.
The directional stabilisers are mounted by the 2
front wheels (A) on the Pony.
A
* Activate the stabilisers by swinging down the
'legs' (E).
G
B
* Make sure that the wheels (A) are pointing in
the right direction as shown on the drawing.
* Place the stabiliser (B) over the frame behind
the wheels, as shown on the drawing.
C
* Tighten the screw (C)
When the directional stabilisers are mounted,
these are easily activated or de-activated. This
is done by swinging the 'legs' (E) upwards or
downwards.
E
B
D
For exact directional stabilising adjustment, the
screw underneath (D) can be loosened and the
stabiliser adjusted and then retightened.
7
GB
DRAG WHEELS
The Pony is as standard equipped with one
drag wheel. Mount the enclosed screw on the
rear wheel and fasten as needed (A).
A
GB
ABDOMINAL PAD
Height adjustment of the abdominal pad is performed with the Allen key. (A)
Depth adjustment of the abdominal pad is performed with the Allen key. (B)
Only for size 1+2+3
A
G
B
B
GB
REAR SUPPORT
Use the Allen key to adjust the height of the rear
support. (A)
A
Remove or adjust the depth of the rear support
by utilizing the handle behind the seat. (B)
B
8
GB
HEAD SUPPORT
Follow the below to mount the head support
correctly on the Pony:
1)Loosen the screw (A) to dismount the rear
support and the side supports.
2)Mount the head support beneath the seat and
fasten the screw (B).
A
3)Loosen the handles (C), (D) and (E) to height,
width and angle adjust the head support.
C
When both head support and side supports are needed, the side supports have
to be mounted on the body support bar.
Please notice that Pony size 2+3 can not
be equipped with both head support and
side supports.
D
E
B
G
B
9
GB
HANDBRACE
Height adjustment of the handbrace is done with
the Allen key (A).
Depth adjustment of the handbrace is done with
the Allen key (B)
A
B
GB
An armrest can be mounted together with the
handbrace. Dismount the body support (see
page 10) to switch the fittings.
Angle the armrest by using the black lever (A).
Adjust the height with the Allen key. (B)
A
G
B
C
ARMREST
B
Insert the hand brace into the cross bar of the
armrest fittings. (C)
10
GB
SIDE SUPPORTS
The side supports are mounted on the rear support bar.
Adjust the height with the attached Allen key
(A).
The side supports are individually adjustable in
width as shown. (B)
A
B
GB
HELPER’S HANDLE
1. To be able to place the helper’s handle, mount
the fittings first. Start by dismounting the two
screws as shown (A). Then place the fittings
and tighten the screws again. (B)
2. When the bar clicks into place tighten the
black lever as shown.
3. Height adjustment of the handle.
A
G
B
Do not lift the Pony by using the helper’s
handle.
B
11
GB
B
VERTICAL HAND
GRIPS, MOUNTED
AT THE ENDS
Mount the vertical hand grips at the end of the
hand brace in the following manner:
1)Pop out the stopper (A) with a screwdriver.
C
2)Insert the grip and the supplied bushing (B)
into the hand brace at the desired angle.
A
3)Tighten with the Allen key (C).
G
B
12
GB
VERTICAL HAND
GRIPS, MOUNTED
IN THE MIDDLE
A
1.Cut the grip material (A) and remove it from
the handbrace. Remove the stopper.
2.Determine placement of the hand grip (B)
and take measurements to determine length
of new grip material required for both sides
of the hand grip. Cut grip material (C) to fit
handle.
B
3.You can notch the grip material as shown (D)
for complete coverage of the handle.
4.Mount the inside piece of the grip material.
(Pouring some ethyl alcohol into the grip helps
it slide onto the hand brace). Mount the hand
grip (E) and tighten with the Allen key. Mount
the outer grip material and replace the stopper.
C
D
E
13
G
B
GB
PRODUCT
IDENTIFICATION
A)Serial number
The label is placed between the front wheels
under the frame.
B)Manufacturer
The label is placed between the front wheels
on top of the frame.
A
Dato: 31-01-02
SN:
Varenr:
Belast: kg
0840-01-111878-001
880003
5707292
G
B
134158
B
Parallelvej 3
DK-8751 Gedved
14
GB
MEASUREMENTS
Seat height (L)
Width (G)
Length (H)
Height (I)
Angle frequency (A)
Weight
Max load
Size 0
Size 1
Size 2
Size 3
24 - 38 cm
59 cm
67 cm
52 - 69 cm
32º
7 kg
30 kg
38 - 50 cm
69 cm
72 cm
60 - 82 cm
32°
10 kg
40 kg
48 - 64 cm
77 cm
104 cm
68 - 104 cm
32°
13,5 kg
50 kg
55 - 90 cm
103 cm
125 cm
93 - 130 cm
32º
17 kg
75 kg
15
G
B
GB
Frame:
TECHNICAL DATA
Chrome or powder lacquered Steel
Upholstery: PUR (Polyurethane foam)
GB
PRODUCER
GB
DISTRIBUTOR
R82 A/S
Parallelvej 3
8751 Gedved
Denmark
Please find your distributor on www.R82.com
G
B
16