1
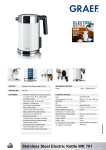
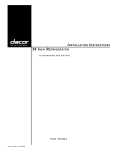
36” R e f r i g e r ato rs For Use With: EF36 version P-A IF36 version P-A Part No. 100502/13036903 Rev. C I n stall at i o n I n str u ct i o n s Table of Appliance Safety...........................................................................1 Installation Recommendations....................................................1 Design Specifications...................................................................2 Product Dimensions.....................................................................2 Door Swing Dimensions..............................................................2 Installation Specifications.........................................................2-3 Tools and Parts............................................................................2 Location Requirements.............................................................2-3 Electrical Requirements...............................................................3 Water Supply Requirements........................................................3 Contents Installation Instructions.............................................................4-7 Door and Drawer Removal..........................................................4 Pullout Freezer Drawer................................................................4 Reinstallation of the Doors.........................................................`5 Water Line Connection................................................................6 Plug in Refrigerator......................................................................6 Move Unit to Final Position..........................................................7 Level Unit.....................................................................................7 Installation Check List..................................................................7 Service Information.......................................................................8 Appliance Safety What You Need to Know About Safety Instructions Recognize Safety Symbols, Words, Labels DANGER Warning and Important Safety Instructions appearing in this guide are not meant to cover all possible conditions and situations that may occur. Common sense, caution and care must be exercised when installing, maintaining or operating appliance. DANGER – Immediate hazards which WILL result in severe personal injury or death. Always contact Dacor® about problems or conditions you do not understand. WARNING – Hazards or unsafe practices which COULD result in severe personal injury or death. WARNING CAUTION CAUTION – Hazards or unsafe practices which COULD result in minor personal injury or property damage. Installation Recommendations The importance of the installation of the Dacor® Built-In Refrigerator cannot be overemphasized. Installation should be done by a qualified installer. Before you begin the installation process, it is recommended that you read this entire Installation Instruction Manual. There are key details that you should take special care to observe during the installation. By reading these instructions carefully, you will make the installation process easier, problem-free and, most importantly, safe. Any questions or problems with the installation should be directed to your Dacor® dealer or the Dacor® Customer Service Department at 800.793.0093 or email customerservice@ dacorworld.com. You can also visit our website at www.dacor.com. Design Specifications Product Dimensions ◊ The depth from the front of the door (w/o door handles) to the back of the refrigerator chassis is 27 1/8” (689mm). ◊ The depth of the cabinet less door is 24” (610mm). ◊ The power cord is 40” (1016mm) long. ◊ The height from the top of the refrigerator to floor with the leveling legs in the down position is 70 1/8” (1781mm) ◊ The height from the top of the refrigerator to floor with Tools and IMPORTANT: ◊ The width from the refrigerator from edge to is 35 5/8” (905mm). Door Swing Dimensions The area to the left and the right of the appliance must permit both doors to open to a minimum of 90°. Allow a minimum of 2 1/2” (64mm) space between the side of the refrigerator doors and a corner wall. Installation Specifications Parts ◊ Installer: Leave these Installation Instructions with the homeowner. ◊ Homeowner: Keep these Installation Instructions for future reference. Save these Installation Instructions for the local electrical inspector’s use. Tools needed: Make sure that you have the necessary tools and materials available for a proper installation. ◊ Phillips screwdriver set ◊ Slotted screwdriver set ◊ Torx drive screwdriver set ◊ Provide sufficient length 8’ (2.4m) to allow for a minimum of a 24” (610mm) diameter service loop of 1/4” (6mm) copper tubing and saddle valve for the water line (Do not use selfpiercing valves) ◊ Copper tubing cutter ◊ Level - 2’ (.6m) and 4’ (1.2m) recommended ◊ Appliance Dolly able to support 700lbs (317kg) and adequate manpower to handle the weight of the appliance ◊ Various sized pliers ◊ Allen wrench set ◊ 3/8” hex bolt nut driver or socket set ◊ Crescent wrenches ◊ Cordless drill and assorted drill bits the leveling legs in the fully extended position is 71 1/4” (1810mm) at the front of the unit and 70 11/16” (1796mm) at the rear of the unit. ◊ Masonite, plywood, 1/8” pressed fiberboard, cardboard or other suitable material to protect finished flooring ◊ Appropriate materials to cover and protect the home and its furnishings during installation Location Requirements Your Dacor® refrigerator can be recessed in an opening between cabinets or installed at the end of a cabinet run using a side panel to enclose the refrigerator. WARNING Explosion Hazard – Keep flammable material and vapors, such as gasoline, away from refrigerator. Failure to do so can result in death, explosion, or fire. IMPORTANT: ◊ Observe all governing codes and ordinances. ◊ Do not install the refrigerator near an oven, radiator, or other heat source, nor in a location where the temperature will fall below 55°F (13°C). ◊ Floor must support the refrigerator weight, more than 600lbs (272kg), door panels and contents of the refrigerator. ◊ Ceiling height must allow for side tipping radius. ◊ Location should permit doors to open fully. Installation Specifications Electrical Requirements Rough-In Dimensions ◊ ◊ A grounded 3 prong non-GFCI electrical outlet should be placed 2” (51mm) from the right side cabinets or end panel. See “Electrical Requirements” for additional information. The plumbing for the water line can come through the floor flush to or from the back wall. See “Water Supply Requirements” for more information. WARNING Electrical shock Hazard – Plug into a grounded 3prong non-GFCI outlet. Do not remove ground prong. Do not use an adapter. Do not us an extension cord. Failure to do so can result in death, fire, or electrical shock. A 115VAC, 60 Hz, 15 Amp circuit breaker and electrical supply are required. A separate dedicated non-GFCI circuit, servicing only this appliance, is required. Your Dacor® refrigerator is equipped with a 40” (1016mm) 3-prong grounded power cord, which must be plugged into a 3-prong grounding-type non-GFCI wall receptacle. Follow the National Electrical Code and local codes and ordinances when installing the receptacle. See “Rough-In Dimensions” for location of the electrical supply. 36” IMPORTANT: A ground fault circuit interrupter (GFCI) is not recommended and may cause interruption of operation. Water Supply Requirements 70 1/2” Minimum 24” ◊ All installations must meet local plumbing code requirements. ◊ Connect to 1/4” (6mm) copper line to the house cold fresh water supply. ◊ Use a shut off valve between the refrigerator and supply. The shut off valve should be a drilled saddle valve. ◊ Do not use a self-tapping valve which reduces water flow and clogs more easily. ◊ Allow a minimum of 24” (610mm) diameter service loop of copper tubing outside the wall or floor for easy connection to the water supply. Cold water supply Connect the ice maker to a cold water line with water pressure between 30 and 120 PSI. If you have any questions about your water pressure, call your utility company. IMPORTANT: ◊ In homes with a Reverse Osmosis water treatment system, remove the water inlet connector from the “yellow” valve and attached to the “blue” valve. Make sure the water filter bypass plug is in place. Door Installation Instructions and Drawer Removal Pullout Freezer Drawer Some installations require door/drawer removal to transport the refridgerator to it’s final location. warning Danger To prevent accidental child entrapment or suffocation risk, do not remove the divider in the top freezer basket. To avoid electrical shock which can cause severe personal injury or death, observe the following: • Disconnect power to refrigerator before removing doors or drawer. Connnect power only after replacing doors or drawer. WARNING To avoid electrical shock which can cause severe personal injury or death, disconnect power to refrigerator before removing doors. After replacing doors, connect power. CAUTION To avoid damage to walls and flooring, protect vinyl or other flooring with cardboard, rugs or other protective material. 1. Unplug power cord from power source. CAUTION To avoid possible injury, product, or property damage, you will need two people to perform the following instructions To Remove: 2. Remove toe grille and bottom hinge cover(s). 1. Pull drawer open to full extension. 3. Remove top hinge cover from refrigerator door by removing Phillips screw and retain screw and cover for later use. 4. Unscrew 5/16” hex head screws from top hinge to remove hinge and retain all screws for later use. 5. Lift refrigerator door from center hinge pin. 6. Remove plastic sleeve, if present. Remove center hinge pin with a 5/16” hex head driver. Retain hinge pin and plastic sleeve for later use. 7. Remove Phillips screws to remove center hinge and retain all screws for later use. 8. Remove bottom hinge or stabilizing bracket with 3/8” hex head driver and retain screws for later use. Lift out bottom hinge pin (on freezer door models). 9. See drawer removal instructions. 2. Tilt the lower basket forward and lift to remove. 3. On each white drawer bracket is a basket cradle with two snap attachments. To release each cradle, unlatch the snaps by pushing them inward, away from the side bracket. Lift the cradles off of the rails. 4. Lift top of drawer front to unhook the drawer from the slides. Lift door front out to remove. Installation Instructions To Install: Reinstallation of the Doors 1. Pull both rails out to full extension. 2. While supporting door front, hook supports into slots located on inside of each slide. Note • All four drawer bracket supports must be in the proper slots for the drawer to function properly. 1. Install hinge assemblies: • Install top hinge loosely with 5/16” hex headscrews. • Install center hinge with Phillips screws. • Freezer door models: Install bottom hinge with 3/8” hex head screws. 2. Freezer door models: Insert bottom hinge pin. • Locate bottom hinge hole closest to outside edge of cabinet, and insert bottom hinge pin. Replace any door shims, if present. 3. Freezer door models: Place hinge side of freezer door on bottom hinge pin and hold freezer door upright while installing center hinge pin with 5/16” hex head driver. • Replace plastic sleeve. • Replace any applicable door shims. • Make sure the hinge pin is installed tightly. 4. Place hinge side of refrigerator door on center hinge pin. 3. Lower door front into final position. 5. While holding refrigerator door upright, tighten down top hinge with 5/16” hex head driver and replace hinge cover. 4. Place the basket cradles back onto the drawer slides. Align basket cradle snaps with the slots on the drawer brackets and press each cradle toward the bracket until it clicks. 5. Tilt the lower basket front down and set it down into the basket cradles. Connecting Installation Instructions the Water Supply warning 3. Place brass nut (A) and sleeve (B) on copper tube end as illustrated. Reminder: Do not use an old sleeve. The nut and sleeve are provided in the use and care packet. To reduce the risk of injury or death, follow basic precautions, including the following: • Do not attempt installation if instructions are not understood or if they are beyond personal skill level. • Observe all local codes and ordinances. 4. Place end of copper tubing into water valve inlet port. Shape tubing slightly. Do not kink – so that tubing feeds straight into inlet port. • Do not service ice maker unless specifically recommended in Use & Care Guide or published user-repair instructions. • Water damage due to an improper water connection may cause mold/ mildew growth. Clean up spills or leakage immediately! CAUTION To avoid property damage or possible injury, follow basic precautions, including the following: • Consult a plumber to connect 1⁄4” O.D. copper tubing to household plumbing to assure compliance with local codes and ordinances. • Confirm water pressure to water valve is between 35 and 100 pounds per square inch, 20 pounds per square inch without filter. • Do not use a self-piercing, or 3⁄16” saddle valve. Both reduce water flow and can become clogged over time, and may cause leaks if repair is attempted. • Tighten nuts by hand to prevent cross threading. Finish tightening nuts with pliers and wrenches. Do not overtighten. • Wait two to three hours before placing refrigerator into final position to check and correct any water leaks. Recheck for leaks after 24 hours. • Verify the copper tubing under the sleeve is smooth and free from defects. Do not reuse an old sleeve. 5. Slide brass nut over sleeve and screw nut into inlet port. Place adjustable wrench on nut (1) attached to plastic waterline and maintain position. Using second adjustable wrench turn the lower nut (2) counterclockwise and fully tighten while holding the upper nut in place. IMPORTANT: Do not overtighten. Cross threading may occur. 6. Pull on tubing to confirm connection is secure. Connect tubing to frame with water tubing clamp (C) and turn on water supply. Check for leaks and correct if necessary. Continue to observe the water supply connection for two to three hours prior to moving the refrigerator to its permanent location. Materials Needed: • 1⁄4” outer diameter flexible copper tubing • Shut-off valve (requires a 1⁄4” hole to be drilled into water supply line before valve attachment) • Adjustable wrench • 1⁄4” hex nut driver 1. Create service loop with copper tubing (minimum 2’ diameter). Avoid kinks in the copper tubing when bending it into a service loop. Do not use plastic tubing. 7. Monitor water connection for 24 hours. Correct leaks, if necessary. Plug in Refrigerator WARNING 2. Remove plastic cap from water valve inlet port. Electrical shock Hazard – Plug into a grounded 3prong non-GFCI outlet. Do not remove ground prong. Do not use an adapter. Do not us an extension cord. Failure to do so can result in death, fire, or electrical shock. Plug into a grounded non-GFCI 3-prong outlet. Move Unit Installation Instructions to Final Position IMPORTANT: To prevent floor damage, make sure levelers are raised (not touching the floor) and the unit is on rollers before moving. ◊ Place top of cardboard carton or plywood under refrigerator. Remove unit from dolly. ◊ Move the refrigerator straight back and evenly into the rough opening. Verify that the water tubing is not kinked and the power cord is not kinked. Leveling CAUTION Installation Checklist The importance of the proper installation of your Dacor Built-In Refrigerator cannot be overemphasized. Proper installation is the responsibility of the homeowner. IMPORTANT: To ensure a safe and proper installation, the following checklist should be competed by the installer to ensure that no part of the installation has been overlooked. Any questions or problems with this installations should be directed to your Dacor® dealer or the Dacor® Customer Service Department at 800.793.0093 or email customerservice@ dacorworld.com. You can also visit our website at dacor.com. Are all leveling legs extended down to make contact with the floor? Is the unit level? Is the power cord plugged into a properly grounded dedicated 3-prong non-GFCI outlet, which had been installed in accordance with all applicable electrical codes? To protect property and refrigerator from damage, observe the following: • Protect vinyl or other flooring with cardboard, rugs, or other protective material. • Do not use power tools when performing leveling procedure. To enhance the appearance and maintain performance, the refrigerator should be level. Is the water supply connected? Have you checked for leaks? Has the kickplate been installed properly? Note Have any installation/service problems been noted on the product registration card? Has the registration card been mailed? Complete all electrical and water supply connections before leveling. Materials Needed: • 3⁄8” hex head driver • Carpenter’s level 1. Remove toe grille. • Grasp firmly and pull outward to unclip. 2. Using hex head driver, turn the front adjustment screws (A) on each side to raise or lower the front of the refrigerator. 3. Using the hex head driver, turn each of these adjustment screws (B) to raise or lower the rear of the refrigerator. 4. Using the carpenter’s level, make sure front of refrigerator is 1⁄4” (6 mm) or 1⁄2 bubble higher than back of refrigerator and that the refrigerator is level from side to side. 5. Turn stabilizing legs (C) clockwise until firmly against floor. 6. Turn adjustment screws (A) counterclockwise to allow the full weight of the refrigerator to rest on the stabilizing legs. 7. Replace the toe grille. • Align the toe grille mounting clips with the lower cabinet slots. • Push the toe grille firmly until it snaps into place. Service Information If you need service, be sure to have the model and serial numbers when you call. You’ll find these numbers on the serial number plate located above the light shield in the fresh food compartment. Contact a Dacor® authorized Servicer, a Dacor® dealer, or the Dacor® Customer Service Department at 800.793.0093 or email [email protected] DANGER To reduce risk of injury or death, follow basic precautions, including the following: IMPORTANT: Child entrapment and suffocation are not problems of the past. Junked or abandoned refrigerators are still dangerous – even if they sit out for “just a few days.” If you are getting rid of your old refrigerator, please follow the instructions below to help prevent accidents. Before you throw away your old refrigerator or freezer: • Take off the doors. • Leave the shelves in place so children may not easily climb inside. Web Site: Phone: www.dacor.com (800) 793-0093 The information and images in this book are the copyright property of Distinctive Appliances, Inc. Neither this book nor any information or images contained herein may be copied or used in whole or in part without the express written permission of Distinctive Appliances, Inc. ©Distinctive Appliances, Inc. all rights reserved.