1
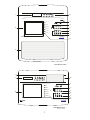
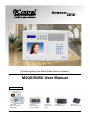
iCentral System One Music/Video/Intercom system. M200/M250 User Manual Products covered System One M200 Compact Master M250 Master System One D200 Door Stations Video & Non-Video System One Alloy Video Door Station System One R200 Room Stations System One K200 Desktop Stations Rev4.2 web: www.icentralsystems.com.au email: [email protected] Sales, Service, Spares consumer enquiries 1300 050 333 iCentral Trade & Dealer Enquiries Head Office Ness Corporation Pty Ltd ABN 28 069 984 372 Ph +61 2 8825 9222 Fax +61 2 9674 2520 [email protected] www.ness.com.au System One User manual rev 4.2 Document part number: 890-425 Covering the products: 100-932 M250 Master White 100-933 M250 Master Ivory 106-900 M250 Master with DAB+ White 106-901 M250 Master with DAB+ Ivory 100-946 M200 Compact Master Station White 106-947 M200 Compact Master Station Ivory 106-902 M200 Compact Master Black 106-903 M200 Compact Master with DAB+ White 106-904 M200 Compact Master with DAB+ Black 106-905 M200 Compact Master with DAB+ Ivory Copyright Notice All rights reserved. No part of this publication may be reproduced, transmitted or stored in a retrieval system in any form or by any means, electronic, mechanical, photocopying, recording, or otherwise, without the prior written permission of Ness. Ness reserves the right to make changes to features and specifications at any time without prior notification in the interest of ongoing product development and improvement. © 2013 Ness Corporation ABN 28 069 984 372 Contents Introduction...................................................................................................................................... 4 Features............................................................................................................................................... 4 Specifications.................................................................................................................................... 5 Key functions..................................................................................................................................6-8 Initial power-up................................................................................................................................. 9 Radio/clock functions – am/fm version................................................................................... 9 Setting the clock................................................................................................................................. 9 Radio operation.................................................................................................................................. 9 Tuning the radio.................................................................................................................................. 9 Storing radio presets.......................................................................................................................... 9 Using the wake-up alarm.................................................................................................................... 9 Radio/clock functions – dab+/fm version............................................................................ 10 Setting the clock............................................................................................................................... 10 Radio operation................................................................................................................................ 10 Tuning the radio................................................................................................................................ 10 Storing radio presets........................................................................................................................ 10 Using the wake-up alarm.................................................................................................................. 10 Other functions................................................................................................................................. 10 Intercom operation....................................................................................................................... 11 Door/gate station operation.............................................................................................................. 11 Lock output....................................................................................................................................... 11 Paging calls....................................................................................................................................... 11 Select calls........................................................................................................................................ 12 Music mode...................................................................................................................................... 12 Monitor mode.................................................................................................................................... 12 Privacy mode.................................................................................................................................... 12 Audio off mode................................................................................................................................. 13 Volume adjustment........................................................................................................................... 13 Desktop station – audio input........................................................................................................... 13 Auxiliary outputs............................................................................................................................... 13 Audio input selector.......................................................................................................................... 14 Video monitoring at the master........................................................................................................ 14 Video monitoring at additional video displays................................................................................. 14 Audio input jack................................................................................................................................ 14 Wireless audio input......................................................................................................................... 15 Help Menu........................................................................................................................................... 15 INTRODUCTION The System One TM Home Communication System can be installed using up to 20 stations offering great flexibility and convenience. This total Home Communications System continues to set the highest standards of quality and performance for which the System One TM name has become well known. FEATURES Colour video display with menu driven programming * 3 Video Inputs for door station cameras or alternative video sources * Video Monitoring of visitors at Door station(s) ** Supports up to 3 camera door stations ** Chime following for video, door call and lock functions ** Paging Calls to all stations Selective Calling to individual stations or groups of stations Door Call Hands Free Reply from all stations Auto or manual call cancel Privacy function Child Monitoring function Music On/Off function Digital local volume control at each station with independent control of communication and music volume levels at master Sensitive electret microphone Illuminated buttons with disable option Microphone Active indication Privacy indication System In Use indication Gate Status indication – can be used to indicate whether automatic gates are open or closed * Audio Input selector with LED indication * Piped Music and wake-up alarm from built-in AM/FM (or DAB/FM) Radio with Digital Clock * Switchable high frequency radio filter with LED indication * Optional piped music from auxiliary audio sources Inbuilt auxiliary audio input at master * Optional control of auxiliary devices Inbuilt Auxiliary Outputs at master with LED indication for each output * Lock release outputs available for each door station at master or at door station(s) 10 programmable door chimes Self test function * Compatible with 8-wire or 6-wire cabling * Feature available only on systems fitted with Master Station ** Feature available only on systems fitted with Master Station and Camera Door Station IMPORTANT NOTICE: The contents of this operating guide are for new installations. Replacement and upgraded systems may vary dependant on existing conditions and cable availability. The radio operation is dependant on a variety of environmental conditions. The radio signals of both AM and FM may vary dependant on signal strength and antenna reception and prevailing conditions. This system is supplied with standard internal antennas. Additional reception devices may be required 4 1 SPECIFICATIONS MASTER STATIONS Model Number Dimensions (in millimetres) Radio Clock Video Monitor M200 - COMPACT M250 - STANDARD M200: 231H x 319W x 62D (including 50mm recessed portion) M250: 388H x 322W x 91.5D (including 72.5mm recessed portion) AM/FM or DAB+/FM – both options with wake-up alarm and radio station presets Illuminated LCD Digital display 5.6” Colour TFT display ROOM STATION Model Number Dimensions (in millimetres) R200 (S1-R) 129H x 265W x 43.5D (surface mount version) 129H x 265W x 50D (recess mount version including 28mm recessed portion) DESKTOP STATION Model Number K200 (S1-DT) Dimensions (in millimetres) 85H x 180W x 112D DOOR STATIONS Model Number Dimensions (in millimetres) D200 (S1-FD) - Available as surface or recess mount, with or without camera D220 (Alloy) – Vertical surface mount with camera – optional flush mount plate available 129H x 265W x 43.5D (D200 surface mount version) 129H x 265W x 50D (D200 recess mount version including 28mm recessed portion) 173H x 98W x 2dD (D220 Alloy) 5 2 KEY FUNCTIONS 1. 2. 3. 4. 5. Display for Clock/Radio Volume Buttons Numbered Call Buttons – for calling individual stations Lock Release Button LED Indicators - Intercom Functions GREEN RED Talk/Monitor/Privacy Music/In Use/Audio Off 6. Mode Buttons PRIV MON MUS Turns Privacy mode on/off Turns Monitor mode on/off Turns Music mode on/off 7. Intercom Function buttons CLEAR HOUSE DOOR AUX 8. 9. 10. 11. 12. 13. 14. 15. 16. 17. Cancels intercom calls Press to communicate to all stations. Release to Listen Press to communicate to Door station. Release to Listen Controls auxiliary functions In-built speaker Video Display Camera Lighting Doorbell Button (Illuminated on D200 model) Video Camera Radio/Clock Buttons Audio Input Socket for MP3 Player, PC Audio, etc. Audio Source Selector Switch Right Angle Adaptor for audio input LED Indicators – General Functions TUNER AUX MUSIC RADIO FILTER GATE STATUS AUX OUTPUT 1 AUX OUTPUT 2 Indicates that Tuner is the selected input Indicates that Aux Music is the selected input High cut filter to reduce treble or radio noise Indicates automatic gate is open or closed Indicates when Aux Output 1 is active Indicates when Aux Output 2 is active 6 1 13 2 TUNER 3 AUX MUSIC 1 2 3 5 6 7 4 AM/FM FILTER 9 GATE STATUS 4 AUX OUTPUT 1 5 AUX OUTPUT 2 7 6 iCentral M250 Intelligent Central Systems 17 8 M250 Master Station 7 8 5 INITIAL POWER-UP On power up the master displays a blue welcome screen showing the applicable software version. Press the CLEAR button to clear screen the screen. RADIO/CLOCK FUNCTIONS – AM/FM VERSION SETTING THE CLOCK If the radio is on, press the POWER button to turn the radio off. The time will be displayed. Press and release the MEM button. While the minutes are flashing, press the UP or DOWN buttons to adjust the minutes. Press and release the MEM button again. While the hours are flashing, press the UP or DOWN buttons to adjust the hours and AM/PM. Press and release the MEM button once again. Press and release MEM to set the time and exit Time Set mode. Clock and radio setup applies only to systems fitted with a master station. Master Station clock and radio display RADIO OPERATION Press the POWER button at the master station to turn the radio on or off throughout the system. (Time is displayed when radio is turned off) Ensure the green TUNER indicator is illuminated at the master station (Press AUX then 3 if it is not) Press the MUS button at any station to enable Music mode for that station. (The red light will be on when Music mode is enabled) The radio volume can be adjusted individually at each station using the VOLUME buttons. Press the MUS button again to exit Music mode. TUNING THE RADIO Press the POWER button at the master station to turn the radio on. Press the BAND button to select AM or FM. Use the UP and DOWN buttons to select your desired radio station frequency. If radio presets have been stored, you can select programmed radio stations by pressing the buttons numbered 1 to 5. (Use the 5+ button followed by buttons 1 to 5 to select preset radio stations 6–10) You can use the ME-UP button to sequentially select programmed radio stations 1–10. STORING RADIO PRESETS Press the POWER button at the master station to turn the radio on. Use the UP and DOWN buttons to select the desired frequency. Press the MEM button. Press the desired preset button (1–5). Press the MEM button again to store the station. Note: For presets 6 to 10, press the 5+ button followed by one of the buttons 1 to 5. USING THE WAKE-UP ALARM Turn the radio ON Select the desired frequency Band and Station Turn the radio off again Press and hold the ALARM key until the MINUTES begin to flash Use the UP/DOWN keys to adjust the alarm time MINUTES Press the ALARM key again – the HOURS will begin to flash Use the UP/DOWN keys to adjust the alarm time HOURS Press the ALARM key again – ON or OFF will be displayed indicating the status of the alarm function Use the UP/DOWN keys to turn the alarm function ON or OFF as required Press the ALARM key once again to complete the alarm programming procedure and return to the current time NOTE: Ensure the radio is turned OFF so the radio can turn ON at the designated time. If the radio is left ON, the function will operate in reverse and the radio will turn OFF at the designated time. 9 6 Radio/Clock Functions - DAB+/FM Version Setting The Clock There is no need to set the clock. The first time the power button is pressed, the tuner will automatically scan for available digital radio stations and synchronize the time and date. The time is normally displayed when the radio is turned off however the time may be viewed while the radio is on by repeatedly pressing the INFO button until the time and date is displayed. There is a provision for manual adjustment (see below).* Clock and radio setup applies only to systems fitted with a master station. Master station clock and radio display Radio Operation ● Press the POWER button at the master station to turn the radio on or off throughout the system. (Time is displayed when radio is turned off) ● Ensure the green TUNER indicator is illuminated at the master station (Press AUX then 3 if it is not) ● Press the MUS button at any station to enable Music mode for that station. (The red light will be on when Music mode is enabled) ● The radio volume can be adjusted individually at each station using the VOLUME buttons. ● Press the MUS button again to exit Music mode. Tuning The Radio ● Press the POWER button at the master station to turn the radio on. ● (The tuner may automatically scan for available DAB radio stations if required by the tuner) ● Press the DAB/FM button to select DAB or FM. ● For DAB stations, use the BAND+ and BAND– buttons to cycle through the available radio stations and press ENTER to select the station you want to listen to. ● For FM stations, use the BAND+ and BAND– buttons to tune the desired radio frequency. ● (Press the BAND+/– buttons repeatedly to single step or press and hold to quickly scan) ● If radio presets have been stored, you can select programmed radio stations by pressing buttons M1 to M4 or press the SHIFT button followed by M5 to M8. Storing Radio Presets ● Eight DAB and eight FM radio presets may be stored. ● Press the POWER button at the master station to turn the radio on. ● Tune to the desired radio station as outlined above. ● Press and hold buttons M1 to M4 to store radio presets 1 to 4. ● To store radio presets 5 to 8, press the SHIFT button and then press and hold buttons M5 to M8. Using The Wake-Up Alarm ● Press the ALARM button to indicate the alarm status ● Press and hold the ENTER button to enter Alarm Program mode ● Press BAND+/– buttons to adjust selected parameter. ● Press ENTER button to select next parameter. ● Repeat above 2 steps until all parameters have been programmed. ● To exit Alarm Program Mode after changing any parameter, press the ALARM button. NOTE: If the alarm type is Radio, the radio will turn on at the designated alarm time using the last radio station to be used. Other Functions ● Pressing the AUTO button with DAB radio selected, forces the tuner to scan for all available DAB stations. ● Pressing the AUTO button with FM radio selected scans for the next FM station ● Pressing the INFO button displays additional information including Radio Text, Signal Strength, Time & Date etc. ● To select manual time adjustment, press and hold the INFO button until MANUAL TUNE is displayed. Press and release the INFO button so CLOCK SETTING is displayed. Press ENTER and then press BAND+/– buttons to change from AUTO UPDATE to MANUAL Use ENTER and BAND+/– buttons to adjust date and time. * Manual clock setting is available only in M200 master stations manufactured after October 2013. The date and time in earlier models is set by the time signal delivered by the DAB+ radio transmission and cannot be manually adjusted. 10 INTERCOM OPERATION DOOR/GATE STATION OPERATION When the Doorbell button is pressed at the front door station, the electronic chime is heard at all stations. On systems equipped with door camera and master, a video image of the visitor will appear at the master station for 20 seconds. To talk to the visitor at the front door station, press and hold the DOOR button at the master station or any room station. The green light will turn on indicating your microphone is active. Talk at a normal level then release the DOOR button to listen for a reply. To hold a conversation, press and hold the DOOR button to talk and release to listen. The video image of the visitor will remain visible at the master for the duration of communication to the door station and will reset 20 seconds after the DOOR button is released. Communication from the front door station will automatically cancel 20 seconds after the DOOR button is released. You can also manually cancel a call by pressing the CLEAR button. The visitor does not need to press any buttons to reply. All replies are ‘hands free’. LOCK OUTPUT As an optional feature, electronic door locks can be released and Automatic gates can be opened and closed from the master or any room station while communicating with a door station. TO ACTIVATE THE LOCK OUTPUT: Press and release the button at the master or any room station while communicating with the door station. NOTE: • For the optional Lock feature to be available, additional wiring is required at time of installation. • Stations set to Monitor mode will not receive PAGING calls and will not hear the DOORBELL. • Stations with volume set to minimum will not receive PAGING or SELECT calls and will not hear the DOORBELL. • Stations set to PRIVACY mode cannot reply hands free. • Do not make a call if the red light is flashing as this indicates that someone is already using the system to communicate. • On systems using more than one door station the chime must first be activated before you can communicate with a door station. If required, communication can be initiated with a particular door station from the master by pressing DOOR followed by 1, 2 or 3 (corresponding to the particular door station). Once communication has been initiated, the conversation can be continued by pressing and releasing the door button as outlined above. PAGING CALLS A Paging Call communicates to all other stations with the exception of door stations and is the best method of speaking to someone if you’re not sure where they are in the house. To page all stations: Press and hold the HOUSE button at the master station or any room station. The green light will turn on indicating your microphone is active. Talk at a normal level then release the HOUSE button to listen for a reply. The green light will turn off at your station and will turn on at all other stations enabling these to reply. To hold a conversation, press and hold the HOUSE button to talk and release to listen. The system will automatically cancel a call if no buttons have been pressed for approximately 20 seconds. You can also manually cancel a call by pressing the CLEAR button. When replying to a call there is no need to press any buttons. All replies are ‘hands free’. 11 8 SELECT CALLS A Select Call allows you to make an intercom call to a particular station or group of stations. Your installer will preset each of your room stations with a number and a numbering format (Single or Double Digit). To talk to another station, simply press and hold the number button for that station, talk, then release to listen. If your system has more than seven stations, see the section “Making a Select Call – Double Digit Format”. Making a Select Call – Single Digit format Press and hold a CALL button (1–7) at the master station or any room station. The green light will turn on indicating your microphone is active. Talk at a normal level then release the CALL button to listen for a reply. The green light will turn off at your station and will turn on at the called station enabling the other station to reply. Continue the conversation by pressing the selected number to talk and releasing the selected number to listen. The system will automatically cancel a call if no buttons have been pressed for approximately 20 seconds. You can also manually cancel a call by pressing the CLEAR button. Those replying to a call need not press any buttons. All replies are ‘hands free’. Making a Select Call – Double Digit format To call a station using a two digit station number, press the rst digit of the station number at the master station or any room station. The red light will begin ashing. Press and hold the second digit of the station number. The green light will turn on indicating your microphone is active. Talk at a normal level then release the second digit button to listen for a reply. The green light will turn off at your station and will turn on at the called station enabling the other station to reply. Continue the conversation by pressing the second digit button to talk and releasing it to listen. The system will automatically cancel a call if no buttons have been pressed for approximately 20 seconds. You can also manually cancel a call by pressing the CLEAR button. Those replying to a call need not press any buttons. All replies are ‘hands free’. MUSIC MODE Any station set to Music mode can listen to any other station being monitored, and can listen to music piped from the master station or input jack. Press the MUS button at any station to enable Music mode for that station. The red light will turn on indicating that Music mode is enabled. Adjust the volume control to the desired level. Press the MUS button again to disable Music mode. (The red light will turn off) MONITOR MODE Any station set to Monitor mode can be listened to by other stations. For example, to ensure that a baby is sleeping soundly or that a sick child or an elderly parent is comfortable at night. To Select Monitor Mode: Press the MON button at the station to be monitored. (The green light will turn on indicating the microphone is active) Select Music mode at any other station to listen to the monitored station Listening to monitored station(s) is more effective if the radio at the master station (or aux audio) is turned off. Stations set to monitor mode will not respond to paging calls, door calls and door chimes but will respond to Select Calls which allows for communication to the station being monitored To de-select Monitor Mode: Press the MON button. (The green light will turn off). PRIVACY MODE Privacy mode caters for situations where you want to prevent other stations from listening in to a particular room by disabling the station’s ability to reply to incoming calls. To select Privacy Mode: Press the PRIV button at the station where privacy is required. (The green light will ash indicating the station is in Privacy mode). To de-select Privacy Mode: Press the PRIV button. (The green light will turn off). Note: Music, Monitor and Privacy modes will reset in the event of a power disruption. Outgoing calls can still be made while in Privacy mode. 9 12 AUDIO OFF MODE The VOLUME buttons at each station control the audio volume for that station however some audio will still be heard even with the volume adjusted to minimum. To completely turn off all audio at any station, press and hold the MUS button until the red light begins to flash slowly. To turn the audio back on, press the MUS button. (The red light will turn off) VOLUME ADJUSTMENT Adjustment of the VOLUME buttons at the room stations will affect the volume for all audio functions including music, communication and chime at that station. Adjustment of the volume buttons at the master will affect music and communication separately depending on the mode that the master is in at the time the adjustment is made. If adjusting the volume while listening to music, the volume level for music will change at the master but the adjustment will have no affect on the volume level for communication (and door chime). If adjusting the volume while receiving communication, the volume level for communication (and door chime) will change but the adjustment will have no affect on the volume level for music. DESKTOP STATION – AUDIO INPUT The Desktop Station can be used as a computer speaker or to listen to music from an MP3 player. You will need an appropriate lead with a plug at one end to suit your audio device and a 3.5mm stereo plug at the other end to plug into your desktop station. To listen to your auxiliary audio device: Plug the appropriate audio lead into the Audio Input Socket at the bottom of the desktop station using the Right Angle Adaptor if required. Plug the other end of the audio lead into your computer or MP3 player. Ensure the Audio Source Selector switch, at the bottom of the desktop station, is switched in the direction of the arrow in Diagram A. Select Music mode on the desktop station by pressing the MUS button. Ensure that your Computer or MP3 player is turned on and playing. With the volume of the desktop station set to the normal level for communication, adjust the output volume on your computer or MP3 player so the volume from the desktop station is at the desired level. Set to Aux Audio Source Set to System Audio Source To listen to radio or auxiliary music from the master: Switch the Audio Source Selector switch, at the bottom of the desktop station, in the direction of the arrow in Diagram B. Ensure the radio is turned on at the master and Music mode is selected at the desktop station. AUXILIARY OUTPUTS This is a feature that can be used to control optional auxiliary devices. Press the AUX button followed by 1 at any station to activate or toggle (depending on setup) auxiliary output 1 Auxiliary Output 1 LED will illuminate at master indicating when output is active Press the AUX button followed by 2 at any station to activate or toggle (depending on setup) auxiliary output 2 Auxiliary Output 2 LED will illuminate at master indicating when output is active For systems not using a master, an optional Auxiliary Output board and additional wiring will be required. For systems with a master where this feature is to operate from room stations as well as from the master, one of the two following conditions will be required: 1. Additional wiring will be required between each room station and the master for systems configured to single digit keypad operation. 2. Systems configured to double digit operation will not require additional wiring however the 7 button must be used instead of the AUX button 10 13 AUDIO INPUT SELECTOR Press AUX button followed by 3 button at master to change the audio input source (Radio or Auxiliary Music) The TUNER LED or AUX MUSIC LED will illuminate indicating the active input NOTE: On systems configured for double digit operation, the 7 button may be used instead of the AUX button to conform with cases where the 7 button is used to activate the auxiliary outputs. This feature is only available on systems using a master station VIDEO MONITORING AT MASTER Press AUX button followed by 5 button at master to monitor Video 1 Press AUX button followed by 6 button at master to monitor Video 2 (if applicable) Press AUX button followed by 7 button at master to monitor Video 3 (if applicable) To manually cancel the displayed image, press AUX followed by 5, 6 or 7 (corresponding to the active video input) at master. Alternatively, pressing the AUX button followed by the HOUSE button at master will cancel the video image irrespective of the active video input. NOTE: The displayed video image will auto cancel after 90 min to prevent the display accidentally being left permanently on. On systems configured for double digit operation, the 7 button may be used instead of the AUX button to conform with cases where the 7 button is used to activate the auxiliary outputs. VIDEO MONITORING AT ADDITIONAL VIDEO DISPLAYS This refers to optional additional video displays that may be fitted beside room stations. Press AUX button followed by 5 button at a room station to monitor Video 1 Press AUX button followed by 6 button at a room station to monitor Video 2 (if applicable) Press AUX button followed by 7 button at a room station to monitor Video 3 (if applicable) To manually cancel the displayed image, press AUX followed by 5, 6 or 7 (corresponding to the active video input) at any room station. Alternatively, pressing the AUX button followed by the HOUSE button at any room station will cancel the video image irrespective of the active video input. NOTE: The displayed video image will auto cancel after 90 min to prevent the display accidentally being left permanently on. On systems configured for double digit operation, the 7 button may be used instead of the AUX button to conform with cases where the 7 button is used to activate the auxiliary outputs. RADIO FILTER When listening to the radio (particularly on the AM band), there can sometimes be a degree of background noise depending on signal strength and nearby sources of electrical interference. The master equipped with a high frequency filter that can be used to reduce this noise or just reduce treble if desired. Press the AUX button followed by the 4 button at the master to activate the filter. The Radio Filter Led will illuminate when the filter is turned on. Please note that the filter only affects audio from the AM/FM radio. NOTE: On systems configured for double digit operation, the 7 button may be used instead of the AUX button to conform with cases where the 7 button is used to activate the auxiliary outputs. AUDIO INPUT JACK If an optional Audio Input Jack has been fitted to your system, any audio source (iPod, MP, CD, Tape, Computer Audio) can be plugged into the jack allowing music from this source to be piped to all intercom stations. To set up and operate for systems using the M200 or M250 master: Ensure the audio source is connected to the Input Jack using the appropriate lead Press the AUX button followed by the 3 button to select the AUX MUSIC input Turn on the audio source, (iPod, MP3, CD, DVD, Tape, Computer) Press the MUSIC button (red MUSIC LED illuminates) at stations where music is to be heard Adjust the volume of the audio source (if volume control available) to an appropriate level Adjust volume at individual room stations as required NOTE: If your audio source does not have a means of controlling its output volume, the System Auxiliary Volume can be adjusted using the Audio Options menu in Program mode. Ideally, this volume level would be adjusted so that the volume from the speaker is roughly the same as when using the radio. 14 11 To set up and operate for systems not using a master: Ensure the audio source is connected to the Input Jack using the appropriate lead Ensure the radio is turned off using the Power button Turn on the audio source, (iPod, MP3, CD, DVD, Tape, Computer) Press the MUSIC button (red MUSIC LED illuminates) at stations where music is to be heard Adjust the volume of the audio source (if volume control available) to an appropriate level in conjunction with the volume and tone controls on the Input Jack Adjust volume at individual room stations as required WIRELESS AUDIO INPUT The WIRELESS AUDIO TRANSMITTER is an alternative to the hardwired Input Jack above and is an optional accessory which, in conjunction the FM radio on the master station, allows any audio source, (CD, DVD, Tape, Computer audio), to be piped to all intercom stations. To set up: Ensure the WIRELESS AUDIO TRANSMITTER is powered and connected to the audio source Turn on the audio source, (CD, DVD, Tape, Computer) Turn on the radio at the master station Tune the FM radio to the frequency of the WIRELESS AUDIO TRANSMITTER Sound from the audio source will be heard on that FM frequency The FM frequency can be stored as a radio preset which effectively becomes the Auxiliary Input selection key GATE STATUS INDICATOR This is an optional feature that allows you to determine from your master if your automatic gate is open or closed. The indicator can alternatively be used to indicate the status of any device fitted with an appropriate status switch. Note: For this option to operate, additional wiring and an appropriate status switch is required. HELP MENU The HELP MENU summarizes the 2nd function of certain keypad buttons in conjunction with the AUX button. Press and hold the i button to bring up the help menu Press the VOLUME + and – buttons to navigate between pages. Press CLEAR to exit the menu Page 2 of this menu shows the 2nd function of certain keypad buttons in conjunction with the ‘7’ button (Applicable to Double Digit format Only) 15 12