1
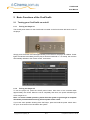
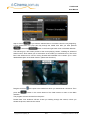
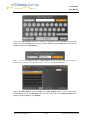
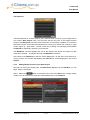
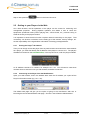
CinePlus2K
User Manual
CinePlus2K
User Manual
Version 0.8
A product of
CinePlus2K
User Manual
Table of Contents
1 INTRODUCTION ................................................................................................ 1-2 1.1 ABOUT THE CINEPLUS2K ................................................................................................. 1-2 1.2 ABOUT DIGITALL ............................................................................................................. 1-2 1.3 ABOUT THIS MANUAL ....................................................................................................... 1-3 2 BASIC FUNCTIONS OF THE CINEPLUS2K .................................................... 2-4 2.1 TURNING YOUR CINEPLUS2K ON AND OFF ......................................................................... 2-4 2.1.1 2.1.2 TURNING THE PLAYER ON ................................................................................................................................. 2-4 TURNING THE PLAYER OFF ................................................................................................................................ 2-4 2.2 GENERAL INTERFACE ORIENTATION .................................................................................. 2-5 2.3 PLAYING CONTENT ........................................................................................................... 2-6 2.3.1 RECOVERING A SHOW ....................................................................................................................................... 2-7 2.4 CREATING A NEW PLAYLIST.............................................................................................. 2-9 2.4.1 2.4.2 2.4.3 2.4.4 2.4.5 CREATING A NEW PLAYLIST NAME ..................................................................................................................... 2-9 ADDING MEDIA CONTENT TO YOUR NEW PLAYLIST ........................................................................................... 2-11 DELETING MEDIA CONTENT FROM YOUR NEW PLAYLIST ................................................................................... 2-13 EDITING AND MANAGING YOUR NEW PLAYLIST .................................................................................................. 2-13 COMPLETING, SAVING, AND TESTING YOUR NEWPLAYLIST ................................................................................ 2-13 2.5 GETTING TO YOUR PLAYER VIA THE WEB ........................................................................ 2-14 2.5.1 2.5.2 FINDING THE PLAYER’S IP ADDRESS ................................................................................................................ 2-14 CONNECTING TO THE PLAYER FROM THE WEB BROWSER ................................................................................. 2-14 Copyright © 2007 digitAll pty ltd
1-1
Last printed 7/12/2007 5:07:00 PM
CinePlus2K
User Manual
1 Introduction
1.1
About the CinePlus2k
The CinePlus2k is a digital media playback system designed for use in cinema, amusement
parks and museums. It is an easy to use, automated unit which we believe exceeds current
commercial requirements for reliability and image quality. The player can function alone or it
can be slaved into a complex, networked operating environment.
1.2
About digitAll
digitAll’s mission is, ‘to achieve excellence in the application of digital technology in content
production, storage, and distribution in the film, television, and multimedia industries.’ The
company has faithfully pursued this mission, both in the delivery of cutting edge digital
distribution and storage solutions to its client base, and through the continuous development
and improvement of digital solutions in house. Added to this is our comprehensive experience
in and commitment to the film industry, which is evident through the various creative and
content production activities of our organisation.
www.digitall.net.au
digitAll has been a living digital action research studio, with our Planet X division amongst the
first internationally to facilitate an integrated, lossless digital working environment for it’s
creatives. The environment has provided fertile ground for the creation, refinement and
application of digital solutions in a real world context.
www.d-cinema.com.au
d-Cinema.com.au is the latest business unit within the digitAll group, and is focused on the
application of digital technology for cinema media operations, including on-screen
presentation, session information displays, security, marketing and advertising.
Copyright © 2007 digitAll pty ltd
1-2
Last printed 7/12/2007 5:07:00 PM
CinePlus2K
User Manual
1.3
About this manual
This manual is divided into three parts;
(i) Basics for Everyday Use
The ‘Basics’ section of this manual steps the user through general Playback functions of the
player and is intended for staff who use the player for general presentation. This part of the
manual does not include information about organising or ingesting content, or other higher
level functions that are usually the responsibility of venue managers. Perhaps the easiest way
to describe the ‘Basics’ section is that it is for everyday users, while the next two sections will
be of greater interest to owner/operators.
(ii) Administrator Functions
Section II of the manual is designed for those with responsibility for managing content –
programming session playlists, time of day events, and the idiosyncrasies of how you want
your venue to run. It provides instruction for preparing a session, undertaking a quality control
check, importing media, media management, reviewing log files - in short, many of the tasks
often undertaken by the senior projectionist.
(iii) Operational Reference
For a detailed breakdown of the technical aspects of the player, refer to this section.
Copyright © 2007 digitAll pty ltd
1-3
Last printed 7/12/2007 5:07:00 PM
CinePlus2K
User Manual
2 Basic Functions of the CinePlus2k
2.1
2.1.1
Turning your CinePlus2k on and off
Turning the Player On
The On/Off power button for the CinePlus2k is located on the front bottom left hand corner of
the player.
Simply press the button and wait approximately one minute for the player to initialise. Power
lights will indicate immediately that the player has been switched on. At startup, the machine
automatically defaults to the Events screen, seen below.
2.1.2
Turning the Player Off
To turn the player off, press the On/Off power button. Shut down of the machine takes
approximately one minute. When the unit is completely shut down, the power indication light
will no longer be on.
Note – to ensure reliable operation; please allow the system to go through its complete
shut down procedure before turning off main power at the switch
If you have some problem shutting down the Player, press and hold the power switch down
for up to 10 seconds to force shutdown the system.
Copyright © 2007 digitAll pty ltd
2-4
Last printed 7/12/2007 5:07:00 PM
CinePlus2K
User Manual
2.2
General interface orientation
Section 2.2 provides an overview of the primary screens displayed on the interface,
explaining the function of each and how it can be operated. The main interface is divided into
three areas;
The Information Bar
The Menu Bar
The Main Screen
The Player Information Bar displays general information about the unit, such as its name
(I.D.), IP address, and the current time as programmed into the unit.
The Menu Bar allows navigation of the unit’s features and functions. This bar remains
consistent across screens (except when ‘pop up’ windows temporarily cover it.) The Menu
Bar contains a Current Active Playlist button, and then Play, AutoM (automation), Events, Edit
and Admin(istration) buttons.
Please Note: During playback, only the Playlist, Play, and AutoM buttons are available for
interaction. The other features are unavailable (greyed out) while the unit is playing content,
to ensure image and sound quality.
The Main Screen changes to reflect the function currently selected under the Menu Bar.
While the Menu Bar allows the user to navigate different areas of the machine, the Main
Screen is the interface section through which the user will actually operate the unit’s main
functions and features.
Copyright © 2007 digitAll pty ltd
2-5
Last printed 7/12/2007 5:07:00 PM
CinePlus2K
User Manual
2.3
Playing content
To play content you must first select a Playlist. A Playlist is a pre-programmed list of media
content you have organised on your player for presentation (e.g. a movie session containing
commercials, trailors, and the feature film.)
To select a Playlist, press the Playlist button, which is located on the far left hand side of the
Menu Bar.
A pop up window will appear displaying all current Playlists. Simply select the Playlist of your
choice and press
.
The pop up menu will then disappear, revealing contents of the selected Playlist in the Main
Screen. You will also note that the
Copyright © 2007 digitAll pty ltd
button is now highlighted on the Menu Bar.
2-6
Last printed 7/12/2007 5:07:00 PM
CinePlus2K
User Manual
To start the Playlist running, press the
button located in the bottom left hand
corner of the Main Screen. Your media show will now be playing.
Check the right hand side of the Main Screen, and you will see the Preview Window
showing the playing content, the name of the playing content, and time information.
The Preview Window
The Preview Window shows a ‘preview image’ of what is playing on the main window of the
server, if a preview is available. You will note a Stop, Pause, and Play button at the bottom of
the window, and control the current playing content. You will also notice a window displaying
elapsed time by hours, minutes, and seconds, of currently playing content.
You will also notice a Seek Bar that allows you to scroll backwards and forwards through the
media.
2.3.1
Recovering a show
Sometimes it may be necessary to restart a show from within a Playlist (e.g. because of a
mains power failure, fire alarm, etc.) Once you have powered up your machine after such an
event, you must manually select the media item you wish to continue with and the place
within that item you want to start from.
Step 1: Select the Playlist again
Step 2: Instead of pressing Play automatically, highlight the media item you wish to
commence from in the Playlist.
Copyright © 2007 digitAll pty ltd
2-7
Last printed 7/12/2007 5:07:00 PM
CinePlus2K
User Manual
Step 3: Press
if you wish the selected item to commence from the very beginning.
If your requirement is to jump part way through the media, then after you have pressed
, select the
button in the lower right hand corner of the Main Window.
This will bring up a full screen preview of the current playing content, including an advanced
Seek function, which allows you to track where in the media you would like to be. The Scroll
Bar is the easiest tool to use for moving forward and backward in the content. (For a more
detailed description of the Seek function, please see Section II.)
Drag the scroll bar
press the
Interface.
to the point in the media from which you would like to commence. Then
button in the centre bottom of the Seek screen to return to the Main
The program will now continue from that point.
Please Note: Your audience will see & hear you seeking through the content, unless you
shutter the picture, and mute the sound.
Copyright © 2007 digitAll pty ltd
2-8
Last printed 7/12/2007 5:07:00 PM
CinePlus2K
User Manual
2.4
2.4.1
Creating a new Playlist
Creating a New Playlist name
As outlined in the previous section, a Playlist is a pre-programmed list of media content you
have organised on your player for presentation (e.g. a movie session containing commercials,
trailers, and the feature film.) Section 2.4.1 will describe how to create a playlist from media
that is already contained within the player. For information about importing new media, see
Section II.
Step 1: Select the
button on the Menu Bar
The Edit Screen will now appear on the Main Screen.
button at the bottom of the Main Screen. A pop up
Step 2: Next, press the
display will appear with a space into which you can enter your New Playlist name.
Step 3: Click on the empty space to trigger a further keyboard pop up that allows you to type
in the New Playlist name.
Copyright © 2007 digitAll pty ltd
2-9
Last printed 7/12/2007 5:07:00 PM
CinePlus2K
User Manual
Enter your New Playlist name (for example, PlaylistTest.) Once complete, click the Ok
button. If you are satisfied with the name you have entered, click the Ok button on the pop up
display to return to the Edit Screen
Note: If you hit the Cancel button, no New Playlist will be recorded, and you will need to
commence the process from the beginning in order to create a New Playlist.
Step 4: The Edit Screen will now display your New Playlist name in the Current Active
Playlist button above the Data Grid. You will next need to fill in the Data Grid below with
items you want included in your Playlist.
Copyright © 2007 digitAll pty ltd
2-10
Last printed 7/12/2007 5:07:00 PM
CinePlus2K
User Manual
The Data Grid
The Data Grid lists all ‘content’ listed for play, and all actions or events, in your Playlist. When
you create a New Playlist name, you will notice that the only item in the Playlist Content
screen is the Wait Event command. This is because, as mentioned, in addition to content the
Data Grid includes commands and instructions for running your session (for example, it might
contain ‘lights up’, ‘lights down’, volume control etc.) Inserting and managing these Action
Commands is explained in Section II of the manual.
The WaitEvent command signifies the end of the Playlist, and places the system into idle
mode when reached. All Playlists end with the WaitEvent command.
At the base of the DataGrid you will also note a Play button, up and down arrow buttons for
moving content, and a button that displays the total time of content displayed in the current
Playlist.
2.4.2
Adding Media Content to your New Playlist
Now that you have your Playlist Title, with Wait Event displayed in the DataGrid, you can
begin ‘filling in’ the Playlist.
Step 1: Select the
button in the bottom left corner of the Edit screen to begin adding
content. You will notice that a blank item called none arises on the DataGrid.
Copyright © 2007 digitAll pty ltd
2-11
Last printed 7/12/2007 5:07:00 PM
CinePlus2K
User Manual
The title none also appears in the second button down on the right hand side of the Main
Screen. Clicking on
have loaded on your machine.
will refer you to the list of media items you
Step 2: Select the media item you wish to include under your New Playlist. Press the
button on the bottom right hand side of the screen
Step 3: The media item you have selected will now appear as the first item on your DataGrid.
Step 4: Repeat the process from Step 5, until you have included all of the media items you
need on your DataGrid.
Copyright © 2007 digitAll pty ltd
2-12
Last printed 7/12/2007 5:07:00 PM
CinePlus2K
User Manual
2.4.3
Deleting Media Content from your New Playlist
There may be items you want to remove from your NewPlaylist, now that you can see the list
as a whole
Step 1: Highlight the media item you wish to remove
Step 2: Select the
button at the bottom of the DataGrid
If you wish to re-add the item, simply move through the steps for Adding Media Content again
2.4.4
Editing and managing your New Playlist
Once you have all of the media items you wish to include in your New Playlist, you may want
to re-arrange those contents into a different order.
Step 1: Highlight the media item you wish to move up or down
Step 2: Note the Up
and Down
Arrow buttons at the bottom of the DataGrid. Click
on the Up arrow if you wish your media item to move up one or more spaces on the
DataGrid, or the Down arrow, if you wish to move the item one or more spaces down.
2.4.5
Completing, saving, and testing your NewPlaylist
Step 1: Once you have made all of the edits you wish to your NewPlaylist, press the
button at the bottom of the Data Grid.
Step 2: In order to see a preview of your NewPlaylist, select the item in the DataGrid that
you wish to commence from. If you want the Playlist to commence playing from the first item
through to the final item, highlight the first item. If you would like the Playlist to commence
from Item 5, then select Item 5 and it will play from Item 5 through to the last item on the
Playlist.
Step 3: Select the Play button on the Menu Bar.
Copyright © 2007 digitAll pty ltd
2-13
Last printed 7/12/2007 5:07:00 PM
CinePlus2K
User Manual
Step 4: Now press the
2.5
button in the lower left corner.
Getting to your Player via the Web
Via a Web browser, the full operations of the player can be access for monitoring and
management purposes. During playback operation, this allows a user to check the
equipments operational state (current playing item, volume levels, etc.), without having to
travel all the way to the players location.
It is important to aware that this function requires network connectivity to the player. That
connectivity can be wire or wireless, but the setting up of the network, security settings, etc.
are the responsibility of the organization Information Technology manager/advisor.
2.5.1
Finding the Player’s IP Address
Thou you can simply access the player from any web browser connected to the same network
as a player, you must first identify the IP address of the player to connect to it. The player’s
IP address is located on the Information Bar, in the top left corner, under the player’s NAME.
An IP Address consists of 4 numbers, for example 10.1.1.30. You will need to note those
numbers down to enter them into you web browser, and allow connection.
2.5.2
Connecting to the Player from the Web Browser
Open your web browser, and in the address area enter the IP Address you copied off the
Player’s information screen (eg. 10.1.1.30).
The default web page will give you the option of going to the manufactor’s web site, or
launching the remote administration web page. Choose “Launch Remote Administration”.
Copyright © 2007 digitAll pty ltd
2-14
Last printed 7/12/2007 5:07:00 PM
CinePlus2K
User Manual
The Web Browser will now display the same interface as the front of the Player unit. If the
unit is idle, the interface will default to the Event Screen. If the unit is playing content, the
interface will switch to the Play Screen, display current playing operations (current item,
preview image, audio levels, etc.).
You may program, manage and control the player from the Web Browser, as you would the
units touch screen interface.
Copyright © 2007 digitAll pty ltd
2-15
Last printed 7/12/2007 5:07:00 PM