1
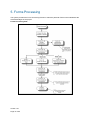
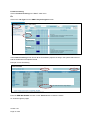
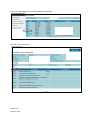
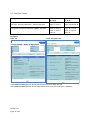
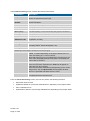
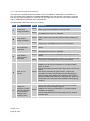
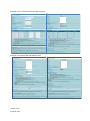
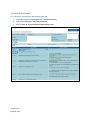
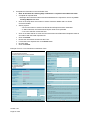
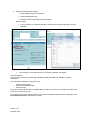
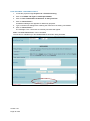
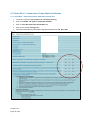
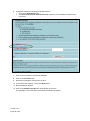
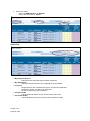
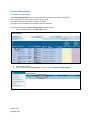
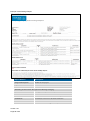
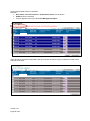
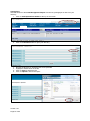
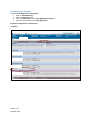
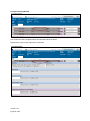
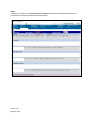
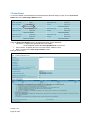
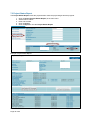
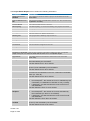
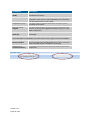
SWIFT USER MANUAL CONSULTANT MODULE March 2013 Table of Contents 1. INTRODUCTION ............................................................................................................................................. 4 1.1. SWIFT CONSULTANT MODULE ............................................................................................................................. 4 2. SWIFT OVERVIEW .......................................................................................................................................... 5 2.1. AUDIT AND STAGE TYPES ...................................................................................................................................... 5 2.2 LOGIN PROCESS ................................................................................................................................................... 6 3. PROJECT LIST ................................................................................................................................................. 7 4. SEARCH (PROJECT STATUS REPORT) ............................................................................................................... 9 4.1. SEARCH FOR A PROJECT........................................................................................................................................ 9 5. FORMS PROCESSING .................................................................................................................................... 13 5.1. PROCESS FORMS............................................................................................................................................... 16 5.1.1. Form Processing Pre-Conditions............................................................................................................ 18 5.2. FORM C & FORM M ......................................................................................................................................... 20 5.2.1. Procedure - Deed Design Verification Form C & M ................................................................................ 20 Revised Drawings ........................................................................................................................................... 24 Important Notes: ............................................................................................................................................ 24 5.3. FORM D AND FORM N ....................................................................................................................................... 26 5.3.1. Deed Pre -Construction Verification Form D/N ..................................................................................... 26 Important Notes: ............................................................................................................................................ 28 5.4. FORM Q – WORK ON LIVE SEWERS ...................................................................................................................... 31 5.4.1. Procedure – Deed Work on Live Sewers Form Q ................................................................................... 31 Important Notes: ............................................................................................................................................ 32 5.4.2. Deed Work on Live Sewers Form Q ....................................................................................................... 34 Important Notes: ............................................................................................................................................ 34 5.5. FORM S – REQUEST FOR SHUTDOWN OF WATER MAINS & NOTIFICATION OF CONNECTION BY TAPPING UNDER PRESSURE .... 36 5.5.1. Procedure – Deed Request for Shutdown of Water mains Form S ........................................................ 36 5.5.2. Procedure – Notification Features Form S ............................................................................................. 37 Important Notes: ............................................................................................................................................ 38 5.5.3. Procedure –Cancellation Procedure Form S .......................................................................................... 39 5.6. FORM T – NOTIFICATION OF INTENTION TO CARRY OUT TEST .................................................................................... 40 5.6.1. Procedure – Deed Asset Testing Notification – Form T ......................................................................... 40 Important Notes: ............................................................................................................................................ 42 5.6.2. Procedure –Cancellation Form T ........................................................................................................... 43 5.7. FORMS E & O – CONSTRUCTION / PUMP STATION VERIFICATION ............................................................................... 44 5.7.1. Procedure – Deed Construction Vefification Form E & O....................................................................... 44 Important Notes: ............................................................................................................................................ 46 5.8. FORM F & P –END OF DEFECTS/ PUMP STATION END OF DEFECTS LIABILITY PERIOD (DLP) VERIFICATION ......................... 47 5.8.1. Procedure – Deed End of Defects Liability Period Verification Form F & Form P ................................... 47 Important Notes: ............................................................................................................................................ 47 5.9. FORM G – VERIFICATION FORM ATTACHMENT SHEET .............................................................................................. 48 5.9.1. Procedure – Deed Verification Attachment Form G .............................................................................. 48 Important Notes: ............................................................................................................................................ 49 6. AUDITS ........................................................................................................................................................ 50 6.1 ACCESS AUDITS ................................................................................................................................................. 52 6.2 ISSUE MANAGEMENT ......................................................................................................................................... 55 6.2.1 Audit Findings Report ............................................................................................................................ 55 6.2.2 Issue Management Report ..................................................................................................................... 57 Version 1.01 Page 2 of 80 6.2.3 Complete Issue Management Report..................................................................................................... 59 6.2.4 Supervisor’s Reponses ............................................................................................................................ 62 6.3 ACCESSING PROGRESS REPORTS............................................................................................................................ 65 6.3.1 Project Status Report ............................................................................................................................. 65 6.3.2 Project Stage Report .............................................................................................................................. 68 3.3.3 Classification .......................................................................................................................................... 71 6.4 CLASSIFICATION DEFINITIONS ............................................................................................................................... 72 7. PROJECT MANAGEMENT.............................................................................................................................. 73 7.1 VIEW PROJECT DETIAILS ...................................................................................................................................... 73 7.2 VIEW FORMS .................................................................................................................................................... 75 7.3 PROJECT STATUS REPORT .................................................................................................................................... 76 7.4 VIEW DRAWINGS AND DATA FILES ........................................................................................................................ 79 7.5 VIEW FORM G COMMENTS.................................................................................................................................. 79 8. PROJECT COMPLETION ................................................................................................................................ 80 8.1. ACCEPTANCE OF WORKS (AOW) CERTIFICATE........................................................................................................ 80 8.2. CERTIFICATE OF COMPLETION (COC) CERTIFICATE ................................................................................................... 80 8.3. WARRANTY BOND ............................................................................................................................................ 80 Version 1.01 Page 3 of 80 1. Introduction South East Water is a leading provider of Water and Sewerage services of Melbourne, Australia. SWIFT provides a web-based application that provides: Standardised audit process Automated workflow A record of all audit results Access to users through Intranet & Internet Audit trail reporting Audit reports Audit questionnaire management Online generation of Project Completion certificates. 1.1. SWIFT Consultant Module The SWIFT Consultant Module contains the following functions to allow various information and documents to be submitted to South East Water throughout a project: Project List Forms Processing View Audit Report Search (Project Status Report) Issues Findings Report Project Stage Report This Consultant User manual outlines the processes performed by Consultants during South East Water Land Development and Deed projects. Version 1.01 Page 4 of 80 2. SWIFT Overview 2.1. Audit and Stage Types There are a number of different project Stages, each with an associated Audit, including: Design (D) Pre-construction (PC) Construction (C) Issues can be flagged at any of the project stages (I) Testing (T) Survey Live Connection Acceptance of Works (AW) Defects Liability Period (DL) End of Defects of Liability Period (ED) Warranty Bond (W) To initiate each stage of the project the Consultant submits a Form, with its associated audit. The system provides the following Forms, with their associated project stages: Form C / M - Construction Design Verification / Pump Station Design Verification: Design stage Form D / N – Pre-construction Verification / Pump Station Preconstruction Verification: Preconstruction and Survey stage Form T - Notification Of Intention To Carry Out Test: Testing stage Form Q - Work on Live Sewers: Live connection stage Form S - Request for Shutdown of Water Mains & Notification of Connection by Tapping Under Pressure (TUP): Live connection stage Form E / O - Construction Verification / Pump Station Construction Verification: Acceptance of Works stage Form F / P - End of Defects Liability Period (DLP) Verification / Pump Station End of Defects Liability Period (DLP) Verification: DLP stage Form G - Verification Form Attachment Sheet used to submit additional information or variations throughout the project Version 1.01 Page 5 of 80 2.2 Login Process Use the URL Log in using your SWIFT username and password Version 1.01 Page 6 of 80 3. Project List The Project List is the initial screen displayed by SWIFT after login It is also accessed by selecting Project List from the SWIFT main menu. The SWIFT Project Progress screen shows all the Consultant’s projects currently in the system. All Job Types within each project are shown with a visual indicator showing the status of each job. Field/Button Description Filter The projects can be filtered using drop list Project Status The projects can be filtered by Status using the drop list Search button Click on after applying the filter criteria from the drop list Page << and >> Page forwards or backwards Go to Page Insert page number and press GO Go button Used to go to the specified page number. Version 1.01 Page 7 of 80 Field/Button Description The Project List shows the project status details: Project Project name with the South East Water reference number Below each project name, the Job Types within the project will be listed E.g. Water, Sewer, Re-use Water, Sewer Pumping Station, Sewer Rising Main. The links allow the Consultant to access Forms Processing D This indicates the Design Verification phase of the project. If Form C / M have been submitted, the D column will be filled. PC This indicates the Pre-Construction Verification phase of the project. If Form D / N has been submitted, the PC column will be filled. C This indicates the Construction Verification phase of the project. If Form E / O has been submitted, the C column will be filled. AW This indicates the Acceptance of Works phase of the project. If the AOW Audit has been created and not yet closed, the AW column will be filled. DL This indicates the Defects Liability Period of the project. If the AOW Audit has been closed, the DL column will be filled. ED This indicates the End of Defect Liability Period of the project. If Form F / P has been submitted, the ED column will be filled. W This indicates the Warranty Period of the project. If the DLP Audit has been closed, the W column will be filled Design and Preconstruction Stages Issues I The red dot appears in the I column to indicate open issues on the project that require: Rectify before Construction Issues I The yellow dot appears in the I column to indicate open issues on the project that require: Rectify before AOW Construction Testing Survey AOW Stages Form E Construction Verification may be submitted There can be holds for rectifications before AOW or before DLP are issued Issues I The red dot appears in the I column to indicate open issues on the project that requires: Rectify before AOW Issues I The yellow dot appears in the I column to indicate open issues on the project that requires: Rectify before DLP Pre-Conditions Notes associated with the current phase of the project indicating any conditions that have not been met or available actions. Version 1.01 Page 8 of 80 4. Search (Project Status Report) The Search function allows SWIFT users to find a particular project and view all the project details. Projects can be located by one of following fields: South East Water Reference Number Consultant Reference Number Consultant Name Project Name Melway Reference Plan of Subdivision Number Address 4.1. Search for a Project 1. Click on Search (Project Status Report) from the SWIFT main menu. 2. View the Search screen 3. Enter one (or more) of the following criteria: The South East Water reference number in the South East Water Ref. field Part or all of the Consultant’s reference number in the Consultant Ref. field Part of all of the Consultant’s name in the Consultant Name field Part or all of the project’s name in the Project Name field The project location’s Melway map reference in the Melway Ref field The project’s Plan of Subdivision number (i.e. the property title registration number) in the Plan of Subdivision No. field Part or all of the project site’s address in the Street Name field Note: When searching by South East Water Reference, Plan of Subdivision, or Melway Reference, the whole reference number or ID must be entered. For all other fields, some or all of the text may be entered. 4. Click on the Search button Version 1.01 Page 9 of 80 5. A list of projects that match the search criteria is displayed in the Result of Search 6. The Result of Search section contains: Field/Button Description SEWL Reference No The reference number that the project is identified at South East Water. Project Name The Name assigned to the project. The link allows the Project Details for be viewed Job Type Name The type of job (i.e. Water, Sewer etc). Project Status Report The link allows the Project Status to be displayed for the selected project 7. If there are more than 10 projects found that match the search criteria, the list will be contained on multiple pages. Click on the page number links to navigate through the list of projects. Version 1.01 Page 10 of 80 8. Click on the link in the Project Name column to display the project details Example: View Project Details Version 1.01 Page 11 of 80 9. Click Report in the Project Status Report column to display the report Example: Project Status Report Version 1.01 Page 12 of 80 5. Forms Processing The system provides the Forms Processing function to allow the particular Forms to be submitted at the associated stages of the project Forms Processing flow: Version 1.01 Page 13 of 80 Forms Processing Click on Forms Processing in the SWIFT main menu Or Click on the Job Type from the SWIFT Project Progress screen The Forms Processing screen shows all the Consultant’s projects currently in the system that have not had the Certificate of Completion issued. Example: Forms Processing Enter the SEW Ref Number and click on the Search button to refine the search Or Scroll through the pages Version 1.01 Page 14 of 80 Click on the Job Type link to access the Forms for that project Example: Forms Processing Version 1.01 Page 15 of 80 5.1. Process Forms Job Type Water Job Forms E, F & G Sewer Job Forms C, D &T For Water, Sewer, Water External, Sewer External, Reuse water, and Recycled Water – External job types Form C, Form D, Form T, Form S Form Q Form E, Form F and Form G Sewer Pumping Station, Water Pumping Station, Sewer Rising Main and Pressure Reducing Station job types, Form M, Form N, Form O, Form P, Form T, Form S Form G Form O, Form P, Form N, From M, From T, Form Q Form G Examples: Water Job Sewer Rising Main Job The Forms Processing screen above (left) shows Forms for a Water job type The Forms Processing screen above (right) shows Forms for a Sewer job type i.e. Form Q Version 1.01 Page 16 of 80 The Forms Processing screen contains the following information: Field/Button Description Project Details This will show whether the project is a Development Deed or Notice of Agreement project type. SEW Reference Number The project’s reference number that the project is identified at South East Water. Consultant Name The Consultant assigned to the Project. Address The project site’s address. Suburb The project site’s suburb. Municipality The Municipality or council boundary the project is located in. Melway Ref The project site’s Melway map reference Post Code The project’s post code. Plan of SubDivision No. The project’s Plan of Subdivision number (i.e. the property title registration number). Job Details Job Type The Job type (e.g. Water, Sewer, Re-use Water, Sewer Pumping Station, Sewer Rising Main, etc). Job Open Date The date the Job was opened. Forms (the forms shown will depend on the job type) Forms The Form type. The link allows the Form to be submitted, edited, or viewed depending on the project status (see 5.1.1. Form Processing Pre-Conditions below). Note that if the Form’s pre-conditions have not been met, the form name will display without a link and the Consultant will not be able to access it. Form Name The Form type description. If the form has been submitted, the Print link will appear to allow the form to be Printed. If the form has been submitted, and depending on the current stage of the Job, the Upload Files link will appear to allow files to be uploaded and attached to the Form. Pre-Conditions Notes associated with the current phase of the project and any conditions that have not been met. From the Forms Processing screen, the user can perform the following functions: Submit the various Forms Update the details on a previously submitted form, depending on the project status Print a submitted Form Upload files to attach to a previously submitted form depending on the project status Version 1.01 Page 17 of 80 5.1.1. Form Processing Pre-Conditions The project pre-conditions determine whether a form is available for submission or modification. If a form has already been submitted, the Forms Processing screen will allow the Consultant to view and print the previously submitted form. Depending on the stage of the project, the Form may be modified and / or additional files uploaded to the submitted form. The table below outlines the project pre-conditions. Form C M D N Q S Name Construction Design Verification Pump Station Design Verification Pre-construction Verification Pump Station Preconstruction Verification Work on Live Sewers Request for Shutdown of Water Mains & Notification of Connection by Tapping Under Pressure (TUP) Version 1.01 Page 18 of 80 Action Conditions Submit Available for all new job types, except sewer pumping station, sewer rising main and pressure reducing station. Modify Allowed until the Construction Verification stage of the project, unavailable once Form E is submitted. Submit Available for all new sewer pumping station, water pumping station, sewer rising main and pressure reducing station job types Modify Allowed until the Pump Station Construction Verification stage of the project, unavailable once Form O is submitted. Submit Available once Form C is submitted and any design NC’s are closed. Modify Allowed until the Construction Verification stage of the project, unavailable once Form E is submitted. Submit Available once Form M is submitted and any design NC’s are closed. Modify Allowed until the Pump Station Construction Verification stage of the project, unavailable once Form O is submitted. Submit Available once Form C or M is submitted for Sewer job types. Multiple Form Qs may be submitted i.e. to enable multiple works on sewers. Must be submitted at least 2 working days prior to work on live sewers. Each Q form submitted for plug insertion, requires the submission of a form Q for the plug removal indicating the access number used. (Note: The exception to this is where plugs are installed and removed on the same day. These can be recorded in the comments notes instead of selecting plug insertion). Modify Not Available. Submit Current date must be later than the Commencement Date entered on Form D for Water job types. Multiple Form Ss may be submitted i.e. to enable multiple shutdowns and tapping. Must be submitted at least 5 working days prior to required shutdown date. Modify Not Available. Form T E O F P G Name Notification Of Intention To Carry Out Test Construction Verification Pump Station Construction Verification End of Defects Liability Period (DLP) Verification Pump Station End of Defects Liability Period (DLP) Verification Verification Form Attachment Sheet Version 1.01 Page 19 of 80 Action Conditions Submit Current date must be later than the Commencement Date entered on Form D or N. Multiple Form Ts may be submitted i.e. to enable multiple tests. Must be submitted at least 2 working days prior to testing. Allowed until the Construction Verification stage of the project, unavailable once Form E is submitted. All testing forms requesting SEWL personnal to attend MUST have a corresponding shut down form with Swabbing or chlorination ticked. If test failed or cancelled system requires the submission of new Testing form. Modify Not Available. Submit Forms C/M, D/N, Q, S and T must all be submitted (as appropriate for the job type). All previous audits must be closed. Current date must be later than the Testing Date on Form T. Current date must be later than the Shutdown date on Form S. Must be more than 8 hours after Form Q was submitted. Signed copy of Construction verification form must be uploaded Water quality results must be uploaded As constructed data must be uploaded. Ensure commissioning of watermains have been completed Modify Not Available. Submit Forms C/M, D/N, Q, S and T must all be submitted (as appropriate for the job type). All previous audits must be closed. Current date must be later than the Testing Date on Form T. Current date must be later than the Shutdown date on Form S. Must be more than 8 hours after Form Q was submitted. Modify Not Available. Submit Current date must be more than 3 calendar months later than the Acceptance of Works Certificate issue date. All previous audits must be closed. Modify Not Available. Submit Current date must be more than 3 calendar months later than the Acceptance of Works Certificate issue date. All previous audits must be closed. Modify Not Available. Submit Form C/M must be submitted. Multiple Form Gs may be submitted. Modify Not Available. 5.2.Form C & Form M The Consultant can login to the site and fill in the Form C or Form M to initiate the Design Audit process. Once the Form C or Form M is filled and submitted, the system will trigger an email notification to the Design Audit Supervisor. If a Consultant is unable to login the Administrator can to assist and enter the Form C or Form M Form Stage Job Type Form C Design Verification Form Water, Sewer, Water-External and Sewer-External Form M Design Stage Form M Design Plan Stage Sewer Pumping Station, Water Pumping Station, Sewer Rising Main and Pressure Reducing Station Sewer Pumping Station, Water Pumping Station, Sewer Rising Main and Pressure Reducing Station 5.2.1. Procedure - Deed Design Verification Form C & M 1. Locate the project through Project List or Form Processing 2. Click on the Job Type to View Project Details 3. Click on Form C/M – Design Verification Form link Note: The Forms not underlined are not yet linked, e.g. Form F Version 1.01 Page 20 of 80 4. Fill out the information within the Design Verification Form Complete the required fields Click on the button to select the “Abandonment of Asset” Use the drop down menus to select location and pipe material details NOTE: All fields marked with a red asterix are mandatory and must be completed Click on the Preview button Version 1.01 Page 21 of 80 View the details in the form For corrections click on the Back button Re-enter the data as required. Click on the Consultant assurance tick box Click on the Preview button. Form C/M may be modified up to the project commencement date entered on Form D Deed Preconstruction Version 1.01 Page 22 of 80 Click on the Upload File(s) Dialogue boxes appear on screen Click on Browse Browse your directory/s and identify the relevant design drawings Ensure all design drawings conform to South East Water’s naming convention: Digital format PDF indicating the SEWL Construction issue Revision number (if required) Click on Open the Design Drawing file to upload into the dialogue box Click on Upload Repeat the process as required, one single file in each dialogue box If there is more than five files to be submitted click on the Upload Files link again and repeat the process 5. Click on the Submit Form C/M The message: ‘Form C/M has been successfully submitted’ will appear Version 1.01 Page 23 of 80 Revised Drawings Revised plans and additional drawings can be submitted for a specific Job Type, through the Forms Processing screen using the Upload Files procedure. This function is available until all works have been verified and Deed Construction Verification Form E has been successfully submitted into the system. The submitted form can be viewed via Forms Processing or Search (Project Status Report) Important Notes: Some fields are still available for modification once Form D has been submitted. The Nominated Representative and the Consultant Reference number. The procedure is also used for the submission of Form M Design Verification This form is applicable for Sewer Pump Stations, Water Pumping Station, Sewer Rising Mains and Pressure Reducing Station Job Types. Example: Form C Water Submit and Preview Forms Version 1.01 Page 24 of 80 Example: Form C Sewer Preview and Submit Forms Example: Form M Preview and Submit Forms Version 1.01 Page 25 of 80 5.3.Form D and Form N 5.3.1. Deed Pre -Construction Verification Form D/N 1. Locate the project through Project List or Form Processing 2. Click on the Job Type to View Project Details 3. Click on Form D - Pre-Construction Verification Form Version 1.01 Page 26 of 80 4. Complete the information in the Verification form Note: A minimum of 5 working days notification is required from submission date. Complete all required fields - Developer and Contractor names and email addresses are required to receive any Issue Findings Reports that arise Click on the drop down menu button to select Contractor details and Live Sewer Contractor details. Sewer projects: Click on the button to select if the Geotechnical Report has been submitted If Yes is selected, the Geotechnical Report needs to be uploaded Tick in the selection criteria the form. Click on the date selector to enter the Commencement and Estimated Completion dates in accordance with the Deed requirements Click on Preview Review the information entered into the Form. If corrections are required click on the Back button Re enter data Click on Preview Example: Form D - Pre-Construction Verification Form Version 1.01 Page 27 of 80 5. Upload the Required Documents Public Liability Insurance Certificate Project Management Plan Audit Schedule incorporating Risk Assessment Sewer Projects: If the Yes button for Geotechnical Data is selected the Geotechnical Report must be uploaded 6. Click on the Submit Form D/N The message: ‘Form D/N has been successfully submitted’ will appear Important Notes: Once the Form has been electronically submitted, limited data fields are available for further modification. The data fields available for modification are: Commencement Date Estimated Completion Date Working Hours. Once the Commencement Date in the data field has expired, the form can no longer be modified and becomes a “read only” version. Any changes to the form requires a phone call to South East Water followed by the completion of the Form G Variation Form indicating the change. Version 1.01 Page 28 of 80 Example: Form D Sewer: Preview Version 1.01 Page 29 of 80 Submit Example Form D: Water Update Version 1.01 Page 30 of 80 Preview 5.4.Form Q – Work on Live Sewers 5.4.1. Procedure – Deed Work on Live Sewers Form Q 1. Locate the project through Project List or Form Processing 2. Click on the Job Type to View Project Details 3. Click on Form Q – Work on Live Sewers 4. View Form Q list Actions include: Add New Forms Record completed works Print Forms Version 1.01 Page 31 of 80 5. Click on Add New Form Type in relevant information into the applicable blank data fields Click on the Yes\No button to select Education and Plugging Click on the date selector to select the Connection Date - NOTE: A minimum of Two working days notification is required from today’s date Each Form Q submitted for Plug Insertion, requires the submission of a Form Q for the Plug Removal. Plugs installed and removed on the same day may be recorded in the comments section – and therefore not by clicking on Plug insertion button. Click on the Preview button and review the information If corrections are required click on the Back button Re-enter data as required Click on the Consultants Assurance Tick box Click Preview button. Click on the Submit Form Q button The message ‘Form Q has been successfully submitted’ will appear. An email message is sent automatically to the Water Company’s Live Sewer Connection Supervisor requesting validation of the form. Once the validation process is completed the Consultant will receive an E-mail with one of the following responses: Accepted - Approval has been confirmed for Live sewer works being carried out on the nominated connection date. Rejected – Live sewer works cannot be carried out on the nominated connection date. The consultant must postpone this activity, liaise with the Water Company Connection Supervisor and re-apply for another connection date. Important Notes: The Consultant is required to notify the Water Company within two working days from submission date of the proposed Live Sewer Works being undertaken by an Authorised Contractor. Each Form Q submitted for Plug Insertion, requires the submission of a Form Q for the Plug Removal Plugs installed and removed on the same day may be recorded in the comments section therefore NOT by clicking on Plug Insertion button. The proposed connection date must be a minimum of two working days from submission date. Only one Form Q can be submitted at a time for Sewer Plug Insertion and Plug Removal The form is electronically submitted and all data fields are available for modification until: The date shown in the “connection date” field has passed OR The form has been validated by the Water Company’s Live sewer Connection Supervisor If any of the above pre conditions have occurred, the form cannot be further modified and becomes a “read only” version. Notification of Completion Procedure must be followed for the database to confirm that all live sewer pre-conditions have been met. Version 1.01 Page 32 of 80 Example: Work on Live Sewers Version 1.01 Page 33 of 80 5.4.2. Deed Work on Live Sewers Form Q Notification of Completion Procedure The Consultant is required to notify the Water Company within two Working days of the Completed Live Sewer Works previously undertaken by the Authorised Contractor 1. Locate the project through Project List or Form Processing 2. Click on the Job Type to View Project Details 3. Click on Form Q – Work on Live Sewers 4. Fill out the information Click on the date selector to set the Connection date Type in the relevant information into the applicable blank data fields Enter The Access Permit number Click on the Preview button and review the information If corrections are required click on the Back button and re-enter data as required Click on the Consultant’s Assurance Tick box Click on the Preview button. Click on the Submit Form Q button The message ‘Form Q has been successfully submitted’ will appear Important Notes: The Live Sewer Contractor must provide the Consultant with the Access Permit number issued by Water Company. Once the Form has been submitted, no data fields are available for modification and the form becomes a “read only” version. All forms can be viewed via Forms Processing and Search (Project Status Report) Each Form Q electronically submitted on the database must be fully completed or problems will be encountered later in the Construction Verification process. Version 1.01 Page 34 of 80 Deed Work on Live Sewer Cancellation Procedure 1. Locate the project through Project List or Form Processing 2. Click on the Job Type to View Project Details 3. Click on Form Q – Work on Live Sewers 4. Type comments into the dialogue box outlining the reasons for the testing cancellation. 5. Click on the Cancel Form Q button The message ‘Form Q has been successfully cancelled’ will appear Note: The Undo Cancel button can be activated. This function is available until the Cancel Form Q button has being activated. Version 1.01 Page 35 of 80 5.5.Form S – Request for shutdown of Water Mains & Notification of Connection by Tapping Under Pressure 5.5.1. Procedure – Deed Request for Shutdown of Water mains Form S The Consultant is required to notify the Water Company within five working days from submission date of the proposed Water Shutdown/Tapping Under Pressure activities undertaken by the Contractor. 1. Locate the project through Project List or Form Processing 2. Click on the Water Job Type to View Project Details 3. Click on Form S – Request for Shutdown of Water Mains For Connections & Notification of Connection by TUP Form 4. Click on Add New Form 5. Fill out the information: Type relevant information into the applicable blank data fields Click on the button to select Shutdown or Tapping under Pressure Click on the date selector menu button to select the Connection Date Version 1.01 Page 36 of 80 5.5.2. Procedure – Notification Features Form S Notification of Swabbing and/or Chlorination activities: Select Yes/No buttons Fill out the dialog boxes Notification: No Physical Connections Into A Live Water Main Asset Select Tick Box Fill out the dialogue box Version 1.01 Page 37 of 80 Notification: Water Company Personnel are no longer required on the worksite Select Tick Box Fill out the dialogue box Once the form has been completed: 1. Click on the Tick box to confirm the consultant’s assurance for the form. 2. Click on the Preview button Review the information entered onto the form If corrections are required click on the Back button Re enter data as required Click on the Consultant’s Assurance Tick box again Click on the Preview button. 3. Click on the Submit Form S button The message ‘Form S has been successfully submitted’ will appear An email message is automatically sent to the Water Company’s Connection Supervisor requesting validation of the form. Once the validation process is completed, the consultant will receive an automated email with one of the following responses: Accepted - Approval has been confirmed for Shutdown or Tapping under Pressure connection being carried out on the nominated connection date. Rejected - Shutdown or Tapping under Pressure connection cannot be carried out on the nominated connection date. The consultant postpones this activity, liaises with the Water Company Connection Supervisor and re-apply for another connection date. Important Notes: The proposed connection date must be a minimum of Five working days from submission date. Once the form has been submitted, all data fields are available for modification until: The actual date shown in the Connection Data field has passed OR The form has been validated by the Water Company’s Connection Supervisor. If any of the above pre-conditions have occurred, the form cannot be further modified and becomes a “read only” version. All submitted forms can be viewed via Forms Processing and Search (Project Status Report) Version 1.01 Page 38 of 80 5.5.3. Procedure –Cancellation Procedure Form S 1. Locate the project through Project List or Form Processing 2. Click on the Water Job Type to View Project Details 3. Click on Form S – Request for Shutdown of Water Mains For Connections & Notification of Connection by TUP Form 4. Select the appropriate testing Form ID link for cancellation 5. Click on the Cancel Form S button An additional dialogue box appears to enter reason for cancellation information 6. Click on the Cancel Form S button The following message ‘Form S has been successfully cancelled’ will appear Note: The Undo Cancel button can be activated This function is available up to the Cancel Form S has button being submitted. Version 1.01 Page 39 of 80 5.6.Form T – Notification of Intention To Carry out Test 5.6.1. Procedure – Deed Asset Testing Notification – Form T 1. Locate the project through Project List or Form Processing 2. Click on the Water Job Type to View Project Details 3. Click on Form T Notification Of Intention To Carry Out Test 4. Click on the relevant Sewer or Water Job Type 5. Click on Add New Form 6. Fill out the information: Type relevant information into the applicable blank data fields Click on the date menu to select the Date and Time Note: A minimum of two working days notification is required from submission date. Click on the Tick Box data fields to nominate the test activities Typing in any additional information in the comments dialogue box This does not include any change to the date and time selected on the form. Version 1.01 Page 40 of 80 Form T can be used to request Water Company personnel to attend the site for the purpose of Swabbing and/or Chlorination activities during the testing phase of the project. Request Water Company personnel: 1. Tick the check box Are water Company Personnel required on site to operate the valves for Swabbing and Chlorination activities? Once this checkbox has been activated and Form T has been successfully submitted onto system A modified Notification of Shut Down Form is automatically displayed on the screen for data input. Refer to Form S procedure for data input process. Note: Both forms must be completed and submitted to ensure that the request is processed by the Water Company Version 1.01 Page 41 of 80 2. Click on the Preview button 3. Review the information entered onto the form 4. If corrections are required, click on the Back button 5. Re-enter data as required. 6. Click on the Consultant’s Assurance Tick box 7. Click on the Preview button. 8. Click on the Submit Form T button at the bottom of the form The message ‘Form T has been successfully submitted’ will appear Important Notes: Form T and modified Form S must be submitted together when a request for Water Company personnel to attend site for the purpose of swabbing and/or chlorination activities is made. Once the Test date shown in the data field has passed, the form cannot be further modified and becomes a “read only” version. Submitted forms can be viewed through Forms Processing and Search (Project Status Report) All Asset Notification forms previously submitted on the system can now be cancelled provided the proposed test date has not passed. Refer to the instructions in the cancellation procedure. Version 1.01 Page 42 of 80 5.6.2. Procedure –Cancellation Form T 1. Locate the project through Project List or Form Processing 2. Click on the Water Job Type to View Project Details 3. Click on Form T Notification Of Intention To Carry Out Test 4. Click on Cancel Form T An additional dialogue box appears for data entry purposes. 5. Type comments into dialogue box outlining the reasons for the testing cancellation. 6. Click on Cancel Form T The message ‘Form T has been successfully cancelled’ will appear Note: The Undo Cancel Button can be activated This function is available up to the Cancel Form T has button being activated. Version 1.01 Page 43 of 80 5.7.Forms E & O – Construction / Pump Station Verification 5.7.1. Procedure – Deed Construction Vefification Form E & O 1. Locate the project through Project List or Form Processing 2. Click on the Water Job Type to View Project Details 3. Click on Form E Construction Verification link 4. Click on the relevant Job Type link 5. Fill out the information by selecting the appropriate buttons for Yes, No or N/A Version 1.01 Page 44 of 80 6. Upload the construction drawings and data required: Click on the Upload file(s) link The Deed Construction Verification Form signed by the nominated Consultant and Contractor 7. Click on the Consultant’s Assurance Tick box 8. Click on the Preview button 9. Review the information entered onto the form 10. If corrections are required, click on the Back button 11. Re enter data as required. 12. Click on the Submit Form E button at the bottom of the form The message ‘Form E has been successfully submitted’ will appear Version 1.01 Page 45 of 80 Important Notes: The Form E link will not be available on the database until: All verification and Notification forms have been fully completed and submitted All audits carried out by the Water Company have a “Completed” status record. All Issue Findings Reports have been fully actioned and resolved by the Consultant and Water Company. All Form Q Plug Insertions are removed All Form Q Forms are completed. Under the Development Deed Conditions, there is a requirement for the Contractor to verify that the Construction works of a nominated job type has been carried out in accordance with the relevant MRWA Construction Code. At this stage of proceedings the contractor does not have access to enter forms into the SWIFT application, so there is a requirement for a scanned Hard cope End of Defects Liability Form (with signatures from the Contractor and your Company’s senior management representatives) to be uploaded with this electronic Form. Deed Form E Construction Verification has been electronically submitted, it becomes a “read only version”. Only verification Form G can be submitted via the database. Information required to be uploaded must be forwarded to Water Company Swift administrator to upload and forward to appropriate personnel. The submitted form can be viewed via the Forms Processing and Search Project Status Report The Form F Deed End of Defects Liability link will not be available on the database until a minimum three calendar months has passed from the date shown on the Acceptance Certificate. Version 1.01 Page 46 of 80 5.8. Form F & P –End of Defects/ Pump Station End of Defects Liability Period (DLP) Verification 5.8.1. Procedure – Deed End of Defects Liability Period Verification Form F & Form P 1. Locate the project through Project List or Form Processing 2. Click on the Job Type to View Project Details 3. Click on Form F End Defects Liability Period Verification 4. Click on the relevant Job Type 5. Click on the Consultant’s Assurance Tick Box. 6. A scanned copy of the signed Deed End of Defects Liability Form is Uploaded 7. Click on the Submit Form F button The message ‘Form F has been successfully submitted’ will appear Important Notes: Once the Form has been submitted it becomes a “read only” version. The Form F link will not be available on the database until a minimum of three calendar months has passed from the date shown on the Acceptance Certificate. Under the Development Deed Conditions, there is a requirement for the Contractor to verify that the Construction works of a nominated job type has been carried out in accordance with the relevant MRWA Construction Code. At this stage of proceedings the contractor does not have access to enter forms into the SWIFT application, so there is a requirement for a scanned Hard cope End of Defects Liability Form (with signatures from the Contractor and your Company’s senior management representatives) to be uploaded with this electronic Form. The submitted form can be viewed via the Forms Processing and Search (Project Status Report) Version 1.01 Page 47 of 80 5.9.Form G – Verification Form Attachment Sheet 5.9.1. Procedure – Deed Verification Attachment Form G 1. Locate the project through Project List or Form Processing 2. Click on the Job Type to View Project Details 3. Click on Form G Deed Verification Attachment 4. Click on the relevant Job Type 5. Click on Add New Form 6. Complete the relevant information into the Comments Field provided 7. Click on Preview 8. Review the information entered onto the form 9. If corrections are required, click on the Back button 10. Re enter data as required. 11. Click on the Consultant’s Assurance Tick box 12. Click on the Submit Form G button Version 1.01 Page 48 of 80 This procedure is also used for the submission of Form N Form N is applicable for Sewer Pumping Station, Water Pumping Station, Sewer Rising Main and Pressure Reducing Station Job Types. Important Notes: The Form G link will become available on the database when Form C Design Verification or Form M has been electronically submitted. Multiple forms can be submitted as required. The form can be used to notify the Water Company of delays, however must not be used to alter the commencement date in accordance to the Deed conditions. A maximum of a thousand characters can be typed into the Comments Field. When Form G has been submitted it becomes a “read only” version The submitted form can be viewed via the Forms Processing and Search (Project Status Report) Version 1.01 Page 49 of 80 6. Audits Each audit follows the Audit Process. It commences when the Consultant submits the Form associated with the type of Audit For example: Form D - Preconstruction Verification Form initiates a Preconstruction and Document Control Audit When Form is submitted, SWIFT automatically sends an email to the Audit Supervisor to create the audit. The Audit Supervisor then creates the audit in SWIFT. The Auditor then physically conducts the audit, and completes the audit questionnaire in SWIFT. If issues arise it is recorded into the SWIFT system and then evaluated by the Consultant An Audit Findings Report is generated for actions to be taken by Consultant Communications are processed through SWIFT until all actions are undertaken for the issue to be resolved and the Audit deemed closed. Role Function Audit Supervisor Generates the audit Reviews audit issues Assesses Consultant’s response Classifies audit for compliance Auditor Conducts requested audit to ensure compliance against the: MRWA Standards and Specifications Deed compliance Duty of care to O H & S and environment Consultant As per Development Deed Standard Conditions – Schedule 1 Contractor As per Development Deed Standard Conditions – Schedule 1 Issues Issues Design & Pre Construction phase Design & Pre Construction phase Rectify before Construction – Significant issues must be rectified prior to construction. Rectify before AOW – Minor items should be rectified prior to submission of Form E Construction Phase Construction Phase Rectify before AOW – Significant issues must be rectified prior to Submission of Form E Rectify before DLP - Minor items should be rectified prior to submission of Form F Version 1.01 Page 50 of 80 Audit Procedure Audit Issues Found YES NO Continue Audit Supervisor: Generates Audit Findings Report through SWIFT Report emailed to Developer and Contractor Further Issues found to be raised in new Audit. Consultant is sent the Audit Findings Report Open Audit Summary in SWIFT to view the Audit Findings Report Consultant: Search for the Audit through Audit Summary Uses Audit ID to find the Issue Management Report Consultant: Complete: Root Cause, Corrective Actions and Preventative Actions Re-Audit; Consultants response to be verified by Auditor Audit Supervisor: Reviews proposed actions Generates responses for the Consultant in the Issue Management Report Reviews Re-Audit comments Response not accepted: Accept Audit Supervisor: Classifies the issues for Accreditation Closed Version 1.01 Page 51 of 80 Accept Pending Review Consultant Responds Re-submits the Issue Management Report 6.1 Access Audits Access the audits 1. Search and locate the project through the Project List using the: Drop down Filter and click Search Drop down Filter and select File Number to enter the SEW Ref No. click Search Project Status field and click Search Clicking on the page buttons Enter a page number and click on Go 2. Click on Audit Summary Version 1.01 Page 52 of 80 3. View the Audits Summary All audits relevant to the Consultant can be viewed The system recognises the Consultant’s username and password and refines the view only to those audits relevant to that Consultant Note: The Total shows the total number of Issues The numbers in each subsequent column add up to the Total (Not the Total plus the numbers in the subsequent columns) Field/Button Description Search Functions: Enter information to narrow the search South East Water Ref Project number Audit ID Identify one specific audit Audit View Select and click on Search to refine the list: My Review Actions My Classifications Pending Audits All Open Audits All Closed Audits Column Headings: Click on the headings to change the order of the list Audit ID Each Audit has an identifying number Audit Name Stage or Job Type within the project Job Type Select to refine the search SEW Ref No. Project number Last Updated Records each time there is input into the audit Total Total number of audits relevant to the Audit Supervisor Response Accepted Shows the number of responses accepted Pre-Construction Rectify Before CONS: Construction AOW: Acceptance of Works Post Construction Rectify Before AOW: Acceptance of Works DLP: Defect Liability Period Icon: Short cut to Audit Findings Report Version 1.01 Page 53 of 80 4. Search for Audits Search by SEW Ref No.or by Audit ID Enter codes and click on Search Audit View My Response Actions Audits with new issues that require written responses My Retifications Audits that require actions to be completed by the Consultant In Review Responses from the Consultant have been recorded and submitted Responses require a review by the Supevisor No actions required by the Consultant All Open Audits Lists all audits still active. Check all issues have responses All Closed Audits Lists all audits that have been resolved and considered closed Version 1.01 Page 54 of 80 6.2 Issue Management 6.2.1 Audit Findings Report The Audit Findings Report is the record of the issues found from the audit of the project There may be one or more issues found in any one Audit An email is sent to the Consultant to review the report The report is also emailed to the Developer and the Contractor Consultants can view the Audit Findings Report through SWIFT 1. Click on the Icon next to the Audit ID number 2. View the list of audits 3. Click on the date in Findings Report column to view the Audit Findings Report Version 1.01 Page 55 of 80 Example: Audit Findings Report Report Section Description Project Description Details of the project Report Number Same as Audit ID number Audit Date Date of Audit \ Validation Summary of the Issues: Grouped into Rectify Catagory Question Query posed by the Audit Supervisor Issue ID Number of the Issue within the one Audit Reference Resources to consult to assist to rectify issue Comments Conditions to be met to facilitate resolution General Audit Comments More information to assist in resolution Instructions Refers to Issue Management requirements Version 1.01 Page 56 of 80 6.2.2 Issue Management Report This report facilitates the processes of: Flagging issues from an audit Submissions from the Consultant Responses from the Audit Supervisor 1. Click on the Audit Summary in the Main Menu 2. Click on the Audit ID number to open the Issue Management Report 3. View Issue Management Report Blue indicates the issue requires a response Grey indicates read only as the issue has had a response but is still open 4. Expand the report to view the responses Click on to expand or minimise the whole report Or click the Issue ID button for each issue to be completed individually Each of the issues indicated in blue must be addressed before submission Version 1.01 Page 57 of 80 Example: Issue Management Report Features: Project and audit information Issues Status shows: New issues that require action Issues that have had a response Shows the issues needing to be rectified before AOW or DLP View/Upload Files button Print Preview to check responses before submission Submit button Version 1.01 Page 58 of 80 6.2.3 Complete Issue Management Report 1. View the questions and comments posted by the Audit Supervisor 2. Determine the Root Cause Analyse of the fundamental cause of the issue Consult available resources: Contractor SEW personnel OHS Representatives Subject matter experts (eg environmental) Enter the details into the report 3. Determine Corrective Action Submit any revised documentation by uploading to the report Complete corrective actions and record in the report Record planned corrective actions with a due date in the report 4. Determine Preventative Action Analyse and plan long term preventative actions Record in the report Upload supporting documents 5. Upload files if required 6. Click on Print Preview Check all required fields have been completed 7. Click on Submit to send to the Audit Supervisor Note: Click on Submit before selecting to Print to prevent the loss of data 8. Check Audit Summary daily for Audit Supervisor’s responses Version 1.01 Page 59 of 80 All the required fields must be completed Example: Root Cause, Corrective Action or Preventative Action are not filled in Submit button is activated An alert appears at the top of the Issue Management Report When all issues have been responded to the report shows the issues in grey to indicate no futher action required at this point Version 1.01 Page 60 of 80 Upload Files Add attachments to the Issue Management Report: Documents, photographs or files from your directory 1. Click on View/Upload Files button at the top of the screen 2. Click on the Browse button to open your directory 3. 4. 5. 6. Browse the directory to locate the files to be uploaded Highlight or double click on the file Click on Open to attach the file Click on Upload to add to the report Version 1.01 Page 61 of 80 6.2.4 Supervisor’s Reponses View the Audit Supervisor’s Responses 1. Click on Audit Summary 2. Click on Audit ID number 3. View the Issue Status in the Issue Management Report 4. View the comments from the Audit Supervisor Examples of Supervisors’ Responses: Accepted Version 1.01 Page 62 of 80 Accepted Pending Review The issues have been accepted with a hold at AOW or DLP as shown Expand each Issue for the Supervisor’s comments Version 1.01 Page 63 of 80 Reject If ‘Reject’ is recorded on the Audit Supervisor’s Response another set of fields are opened for the Consultant to enter further information and submit again Version 1.01 Page 64 of 80 6.3 Accessing Progress Reports 6.3.1 Project Status Report Access the Project Status Report 1. Click on Search (Project Status Report) in the Main Menu 2. Enter the South East Water Ref. number 3. Click on Search 4. Select the Job Type report required 5. Click on Report in the Project Status Report column Version 1.01 Page 65 of 80 6. View the Audit Information section to check for any outstanding issues 7. Click on the Audit ID in the Audit Comments column to open the Issue Management Report Version 1.01 Page 66 of 80 8. View the Issue Management Report 9. Click on the Version 1.01 Page 67 of 80 button to expand the relevant Issue ID 6.3.2 Project Stage Report Project Stage Report is generated by the Audit Supervisor when all responses to the Audit are Accepted and Classified An email is sent to all relevant parties with the report attached No action is required of the Consultant Accessing the Project Stage Report 1. Locate the project through the Search (Project Status Report) 2. Click on Report in the Project Status Report column Version 1.01 Page 68 of 80 1. View the Audit Information section of the Project Status Report 2. Click on Stage Report Generated Note: All issues need to be resolved for that audit before the Project Stage Report can be generated 3. View the list of Project Audit Reports 4. Click on the date of the required Project Stage Report Version 1.01 Page 69 of 80 Features of the Project Stage Report Version 1.01 Page 70 of 80 Report Section Description Project Stage Report ProjectDetails Identifies the project details incuding the type of audit Eg Sewer Design Shows the date of the audit Audit Details Audit ID, the date the audit was conducted Shows the Audit Supervisor for this stage Classifications Shows the number of issues and their classifications Issues affecting accreditation Non conformance Issues not affecting accreditation Classifiaction Details Lists each issue and its classification under that particular Audit ID Question: Why the issue was raised Audit Comment: Information and responses from the audit Classification Comment: Information detailing the reasons for the type of classification attributed to that issue Final Comments Additional comments from the Audit Supervisor pertaining to the whole audit: Postive comments Opportunities for Improvement 3.3.3 Classification When all issues have been resolved the Audit Supervisor reviews the entire audit for the purposes of Classification Each issue in the audit is subject to a classification Not all classifications impact accreditation Classification details are recorded in the Project Stage Report Non-compliance issues impacting accredition Non-compliance issues NOT impacting accredition NC Consultant Third Party NC Contractor Product Defect NC Consultant and Contractor Other Version 1.01 Page 71 of 80 6.4 Classification Definitions DEFINITIONS AFFECTS ACCREDITATION NC Consultant This is an issue that has been judged to be due to a failure or non observance of the suppliers accredited management system and may affect accreditation. NC Contractor This is an issue that has been judged to be due to a failure or non observance of the suppliers accredited management system and may affect accreditation. NC Consultant & Contractor This is an issue that has been judged to be due to a failure or non observance of the suppliers accredited management system and may affect accreditation. NON ACCREDITATION Product Defect This is an issue that has arisen due to a manufacturing fault in a product supplied by others. This does not affect accreditation; however repeated occurrences may point to a need to review management procedures. rd 3 Party This issue is judged to be arisen to the actions of parties other than the accredited supplier. This issue does not affect accreditation; however repeated occurrences may point to a need to review management procedures. Failure to rectify will prevent issue of AOW or DLP. Other This is an issue that has arisen but cannot be attributed to the supplier, third party defect or product defect. This is unlikely to affect accreditation. Version 1.01 Page 72 of 80 7. Project Management 7.1 View Project Detiails The View Project Details screen shows the project and job details, along with information about each stage of the project. Links are provided with the stage details to view the form(s) submitted by the Consultant that is associated with the particular stage of the project. 1. 2. 3. 4. 5. Click on Search (Project Status Report) in the main menu Select search criteria Enter into the field Click on Search Click on the Project Name to the View Project Details screen View Project Details screen Version 1.01 Page 73 of 80 The View Project Details screen contains: Field/Button Description Project Details: This will also show whether the project is a Development Deed or Notice of Agreement project type. SEWL Reference Number The reference number that the project is identified at South East Water. Project Name The name assigned to the Project. Address The project site’s address. Suburb The project site’s suburb. Municipality The Municipality, or council boundary, the project is located in. Melway Ref The project site’s Melway map reference. Post Code The project’s post code. Plan of SubDivision No. The project’s Plan of Subdivision number (i.e. the property title registration number). Job Details Job Type The Job type Job Open Date The date the Job was opened. Consultant Name The Consultant assigned to the Project. Consultant Address The Consultant’s address. Contractor Name The Contractor assigned to the Job. Contractor Address The Contractor’s address. View Form G link The link allows Form G (Verification Form Attachment Sheet) to be viewed. Form G will be displayed in new screen. If a Form G has not been submitted for the job, the screen will display the following message: Verification form attachment sheet is not available for this Job View DLP Audit link The link allows the end of Defects Liability Period (DLP) audit report to be viewed. The DLP Audit details will be displayed in a new screen. If the end of DLP audit has not been conducted, the screen will display the following message: There are no audits available for the select criteria Stage Details: - for each stage completed for the job, the following information will appear: Stage Type Name The stage name. Stage Start Date The date the current stage was started. Stage End Date The date the current stage was completed. Priority The stage’s priority. View Form Details link The link allows the Form submitted to be viewed (see section Error! Reference source not found.). View Audit Detail link The link allows the audits’ details to be viewed (see section Error! Reference source not found.). Note: This link will only be shown if the current stage has been audited. Version 1.01 Page 74 of 80 7.2 View Forms To view the details of a submitted form associated with a particular stage of a job, click on View Form Details link in the View Project Details screen. From the View Form Details screen, the following actions can be performed: View Files: To display files uploaded by the Consultant. A link will appear beside the Files Uploaded field on the Form. Print Preview: To display the form in Preview mode, suitable to print. Back: To return to the View Project Details screen. Example View Form C Version 1.01 Page 75 of 80 7.3 Project Status Report The Project Status Report shows the project details. It lists the project stages and the progress. 1. 2. 3. 4. 5. Click on Search (Project Status Report) in the main menu Select search criteria Enter into the field Click on Search Click on Report to view the Project Status Report Example: Project Status Report Version 1.01 Page 76 of 80 The Project Status Report screen contains the following information: Field/Button Description SEWL Reference Number The reference number that the project is identified at South East Water. Plan of Subdivision No. The project’s Plan of Subdivision number (i.e. the property title registration number). Project Name The name assigned to the Project. Municipality The Municipality, or council boundary, the project is located. Suburb The project site’s suburb. Postcode The project site’s post code. Job Type The Job type (e.g. Water, Sewer etc). Melway Ref The project site’s Melway map reference. Consultant The Consultant assigned to the Project. Telephone The Consultant’s telephone number. Fax The Consultant’s fax number. Contractor The Contractor assigned to the Job. Telephone The Contractor’s telephone number. Fax The Contractor’s fax number. STAGE and STATUS – this section contains information related to each completed stage of the job. The STATUS fields will be blank for un-completed stages. Agreement The date and time the Deed or Agreement was executed (from ICE). Design Verification The date and time that the Design Verification Form (Form C) was submitted by the Consultant. The link allows Form C to be viewed. Pre-construction The date and time that the Pre-construction Verification Form (Form D) was submitted by the Consultant. The link allows Form D to be viewed. Construction The date and time that construction on the project commenced, as submitted on the Pre-construction Verification Form (i.e. Form D). The link allows Form D to be viewed. Test Request Shows the following: No of Requests – the number of Form Ts submitted by the Consultant (i.e. Notification of intention to carry out test). Latest Date – the date and time the most recent Form T was submitted. The link allows the Form Ts to be viewed. Live Connection Request Shows the following: No of Requests – the number of Form Qs submitted by the Consultant (i.e. Work on Live Sewer). Latest Date – the date and time the most recent Form Q was submitted. The link allows the Form Qs to be viewed. Construction Verified The date and time that the Construction Verification Form (Form E) was submitted by the Consultant. The link allows Form E to be viewed. Version 1.01 Page 77 of 80 Field/Button Description Works Accepted (AoW) The date and time that the Acceptance of Work (AOW) Certificate was issued. End of Defects The date and time that the End of Defects Liability period Verification Form (Form F) was submitted by the Consultant. The link allows Form F to be viewed. Completion (CoC) The date and time that the Certificate of Complete (COC) Certificate was issued. Warranty Bond Lodged The date and time that the Warranty Bond was lodged in the system, as well as the Lodgment Guarantee Type (i.e. Cash, Bank, Deposit etc). Warrant Bond Returned The date and time that the Warranty Bond was returned to the Consultant. The following buttons will be available if the related information is available. If the information is unavailable, the button will be shown grayed out and unavailable. View Drawings and Data File button The button allows the project design drawings and other documents that were uploaded with Form C and / or Form D when submitted by the Consultant to be viewed. View Form G Comments button The button links to Form G to view comments as the project progresses Version 1.01 Page 78 of 80 7.4 View Drawings and Data Files To view all files that have been uploaded by the Consultant throughout the project job e.g. project plans, design drawings, other files attached to Forms Click on the View Drawings and Data Files button in the Project Status Report A list of all files uploaded will appear in the View Uploaded Files screen Note: There is no link to open and view the document that has been loaded 7.5 View Form G Comments To view comments entered on all Form Gs submitted by the Consultant throughout the project, click the View Form G Comments button on the Project Status report screen. A list of all comments will appear in the View Form G Comments screen Version 1.01 Page 79 of 80 8. Project Completion 8.1. Acceptance of Works (AOW) Certificate Upon successful completion of construction, Asset Quality will issue an Acceptance of Works Certificate to the Consultant. Acceptance of Works Certificate is issued once all audits are closed, non-conformances resolved and Warranty Bond Paid. 8.2. Certificate of Completion (CoC) Certificate Certificate of Completion is issued upon submission of End of defects Verification by the Consultant. 8.3. Warranty Bond Warranty Bond is returned 2 years after COC is issued. For the two year period, the water company may require the Consultant or the Contractor to rectify any fault attributable to a deficiency in the design or construction. Version 1.01 Page 80 of 80