1
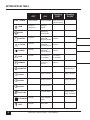
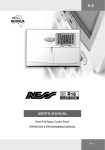
D 24 Control Panel and Dialler
User’s M A N U A L
Revision 2
Innovative Electronic Solutions
www.ness.com.au
Ness Corporation Pty Ltd ABN 28 069 984 372
Private Bag 23 Seven Hills NSW 1730 Australia
Ph +61 2 8825 9222 Fax +61 2 9838 8508
Email: [email protected]
D24 User Manual
REVISION 2 March 2012
Document Part No: 890-252
For the product 100-660 D24 Control Panel
SYDNEY
Ph 02 8825 9222 [email protected]
MELBOURNE
Ph 03 9875 6400 [email protected]
BRISBANE
Ph 07 3399 4910 [email protected]
PERTH
Ph 08 9328 2511 [email protected]
N55
Adelaide
Ph 08 8152 0000 [email protected]
Warnings & Notices
Ness Corporation manufacturing processes are accredited to ISO9001 quality standards and all possible care and
diligence has been applied during manufacture to ensure the reliable operation of this product. However there are
various external factors that may impede or restrict the operation of this product in accordance with the product’s
specification.
These factors include, but are not limited to:
1. Erratic or reduced radio range (if radio accessories are installed). Ness radio products are sophisticated low
power devices, however the presence of in-band radio signals, high power transmissions or interference caused
by electrical appliances such as Mains Inverters, Wireless Routers, Cordless Phones, Computers, TVs and other
electronic devices may reduce radio range performance. While such occurrences are unusual, they are possible.
In this case it may be necessary to either increase the physical separation between the Ness receiver and other
devices or if possible change the radio frequency or channel of the other devices.
2. Unauthorised tampering, physical damage, electrical interruptions such as mains failure, electrical spikes or
lightning.
3. Solar power inverters are a known source of electrical interference. Please ensure that this product and all
associated cabling is installed at least 3 metres away from a solar power inverter and its cabling.
WARNING: Installation and maintenance to be performed only by qualified service personnel.
CAUTION: Risk of explosion if battery is replaced by an incorrect type. Dispose of used batteries in accordance
with local regulations.
ADSL NOTICE: ADSL broadband data can interfere with the operation of your alarm dialler. It is recommended that
a quality ADSL filter be installed as per the filter manufacturer's guidelines in premises with an alarm dialler installed.
Copyright Notice
All rights reserved. No part of this publication may be reproduced, transmitted or stored in a retrieval system in any form or by
any means, electronic, mechanical, photocopying, recording, or otherwise, without the prior written permission of Ness.
Ness reserves the right to make changes to features and specifications at any time without prior notification in the interest of
ongoing product development and improvement.
© 2012 Ness Corporation Pty Ltd ABN 28 069 984 372
CONTENTS
Features...............................................................................................4
Keypad................................................................................................5
Keypad Display Table...........................................................................6
View Menu Operation ..........................................................................7
OPERATION.........................................................................................8
Arming............................................................................................9
Disarming........................................................................................9
AREA Operation.............................................................................10
Arming & Disarming Areas.............................................................11
Administrator Code........................................................................12
Monitor Mode................................................................................13
Panic Alarm...................................................................................14
Duress Alarm.................................................................................14
Medical Alarm...............................................................................15
Fire Alarm......................................................................................15
View Menu....................................................................................16
View Memory...............................................................................17
Excluding Zones.............................................................................19
Test Mode......................................................................................20
Siren Test......................................................................................21
PROGRAMMING
Programming Options Table...........................................................21
How to Program............................................................................22
User Code programming.......................................................... 22-23
Entry/Exit Timer programming........................................................24
Wireless Accessories.........................................................................25
Installation Record.............................................................................26
Operation Summary...........................................................................27
Ness D24 Features
• Powerful multizone commercial security
• Outputs are separately fused with
Automatic Reset Fuses
• 24 fully programmable zones
• Day Mode and Door Chime feature.
• Supports 8 Radio Devices (Radio
PIRs, Radio Reeds etc)
• 30 Event Memory
• Supports 8 Radio Keys
• Contact ID Dialler Format
• Ness Audible Dialler Format
• Separate 24 Hour Tamper input
• Single or Double Trigger Zones
• Remote LCD Keypads (Max 3)
• Fully programmable via the system
Keypad - Eliminates the need for
expensive programmers or Proms.
• Inbuilt Vibration Sensor Analyser
• All inputs and outputs are heavily
protected against lightning and high
voltage supply transients. An earth
terminal is provided for extra protection
• 30 User Codes
• Programmable Inputs to activate
selectable Outputs (Output Mapping)
• Manufactured with the latest SMD
Technology
• Ultra-Modern and Impact resistant
Housing
• Forced Arming Feature
• All programming data is permanently stored in a non-volatile EEprom
memory
• True Dynamic Battery Test every time
the Panel is Armed / Disarmed and
every hour
• Area Partitionable (3 Areas). Any Zone
can be programmed to any area, as
well as common areas
• Comes complete with an AC plug
pack and supports a 12V 7Ah battery
to maintain system security under all
power supply conditions
• Two separate Monitor Modes (Home
Mode)
4
Ness D24 Control panel - USER Manual
D24 Keypad
D24
1 2 3 4 5 6 7 8
9 10 11 12 13 14 15 16
17 18 19 20 21 22 23 24
F
M
ARM
ZONE
TAMPER
T
SYSTEM
POWER
FIRE
MEMORY
MONITOR
AREA 1
AREA 2
AREA 3
EXCLUDE
PROGRAM
TEST
BACKLIT
LCD ICON
DISPLAY
VIEW
ARM
1
2
3
MONITOR
4
5
6
AREA
7
8
9
EXCLUDE
P
0
E
PROGRAM BUTTON
PANIC
BUTTON
(Press & Hold)
ENTER BUTTON
KEYPAD DISPLAY TEST:
Press and hold E button.
Ness D24 Control panel - USER Manual
5
Keypad display table
OFF
1-24
ZONES
Zone sealed
ON
Flashing
FAST
Flashing
SLOW
Zone Alarms
Zone unsealed present (in Armed
or Monitor Mode)
ARM
Panel is
Disarmed
Panel is
Armed
Displaying
Zone Status
ZONE
T TAMPER
Normal
Displaying
Tamper Alarms
individual
present
Tamper Alarms
SYSTEM
Normal
Displaying
System Alarms
individual
present
System Alarms
POWER
Normal
Displaying
individual
Power Alarms
Power Alarms
present
Normal
Fire warning
(If enabled)
Fire alarm
(If enabled)
Normal
Memory Mode
New alarm in
Memory
F
FIRE
M MEMORY
or View key
pressed
Panel is in
Monitor Mode
MONITOR
AREA 1
AREA 2
6
Area 2 Armed
Area 2 Monitor
Exclude Mode
EXCLUDE
TEST
Area 1 Monitor
Area 3 Armed
AREA 3
PROGRAM
Area 1 Armed
Normal
User Program
Mode
Normal
Siren Test
Ness D24 Control panel - USER Manual
Zone or other
alarm Excluded
View menu operation
TAMPER ALARMS
To view
TAMPER
alarms
VIEW
2
E
1
2
3
5
External Tamper
Control Panel Tamper
Zone input Tamper
Radio Interface Tamper
SYSTEM ALARMS
To view
SYSTEM
alarms
VIEW
3
E
1
2
3
4
5
6
7
8
9
Keyswitch Panic
Dialler line fault
Keypad connection fault
Control Panel fault
Duress alarm
Panic alarm
Medical alarm
User Code alarm
Access to Installer Program mode
POWER ALARMS
To view
POWER
alarms
VIEW
4
E
1
2
3
4
9
Mains power failure
Backup Battery low
DC supply failed
Zone reference supply failed
Radio Device battery low
(1-8 shows which device has low battery)
0 Radio Key battery low
(1-8 shows which device has low battery)
To view
MEMORY
VIEW
E
MEMORY DISPLAY
MEMORY icon flashes to indicate
that Memory contains new events.
Memory can be viewed at any time.
1. Press
VIEW
E
2. M Memory icon turns on
Keypad icons will display the
most recent event as per the
Keypad Display Table
3. Step through the Memory
display by pressing the
VIEW
button. At each step,
the keypad icons display the
history of Arming, Disarming
and alarm events.
Press E to cancel the
Memory display at any time
Ness D24 Control panel - USER Manual
7
Operation
Arming and Disarming
Operating Modes
The Ness D24 micro computer based 24 zone
control panel is the heart of your security system
to which all your detection devices connect.
The Ness D24 will operate in one of the following
modes:
Each Zone of the panel can be connected to one
or more detection devices to protect separate
rooms of your premises.
Detection devices may be connected to the
D24 control system directly by cabling or with
optional wireless (Radio) devices.
The most common type of detection devices
are Passive Infra-Red Motion Detectors (or
P.I.R’s for short) and Reed Switches for doors
and windows.
Armed: The system is “On” and ready to detect
intrusion. 24 Hour Zones (if configured) are
still active. Area Partitioning means the panel
can be split into three separate “Areas” which
can be Armed and Disarmed independently of
each other.
Disarmed: The system is “Off”. This is the
normal mode when the premises are occupied.
Day Zones and 24 Hour Zones (if configured)
are still active.
Day Mode: The system is Disarmed and a zone
or zones have been setup to create an alarm
when activated. Often used as a doorway alert
in a shop.
Monitor Mode: Allows the system to be
“partially” Armed. For example, in a house, to
allow all perimeter zones, doors and windows,
to be Monitored (armed) at night.
24Hr Zones: Zones that have been setup to
be active in any mode. Usually used for Tamper
switches and Panic buttons.
8
Ness D24 Control panel - USER Manual
Arming & Disarming
Arming The System
If the D24 has not been programmed for Area operation, this method will Arm the entire system.
Press... (If Two Button Keypad Operation is disabled. This is the factory default.)
(If Two Button Keypad Operation is enabled.)
...or
...or
[CODE]
Three beeps will sound
(If Shortcut Arming is disabled.)
and the ARM icon will turn ON
ARM
Leave the premises within the Exit Delay Time. At the end of Exit Delay Time, 1 beep will sound
The control panel must be Armed prior to
vacating the premises in order to detect intruders.
Ensure that the panel is not in Program, Memory
or Exclude modes.
Note: If the panel is already in alarm, you must first
silence the alarm before you can Arm.
that those zones have been automatically
excluded. For maximum security, you should
return, Disarm, check the premises and then
Arm again. Continual warnings could mean that
a detector is faulty and may have to be manually
excluded.
Siren Warning:
Auto Exclude:
At the end of the exit time, all zones should
be Sealed. If any are Unsealed, the siren will
sound for 2 seconds as a warning to indicate
If the auto-exclude option is disabled, the siren
will sound for the duration of reset time if a zone
is Unsealed at the end of exit time.
DisArming The System
If the D24 has not been programmed for Area operation, this method will Disarm the entire system.
Press... [CODE]
Three beeps will sound
and the ARM icon will turn OFF
ARM
Disarm the panel during the Entry Delay Time to prevent unwanted “Alarm on entry”.
An error beep when attempting to Disarm may indicate:
Incorrect Code
or the panel is already Disarmed
or the panel is in Exclude mode
See Page 12 for Disarming Areas
Ness D24 Control panel - USER Manual
9
AREA OPERATION
Area Operation, Definition
Area Operation allows the 24 zones to be split into three Areas. The panel then effectively operates
as three separate systems sharing only the siren outputs and dialler. The three Areas can either
share one keypad or operate from multiple keypads.
User Codes - Operation
Areas can be operated by users holding Area Codes or Administrator Codes.
Area Codes are User Codes which are programmed to operate one Area only.
Administrator Codes are User Codes which can operate any Area.
Common Area - Operation
The Common Area refers to a zone or zones that have been assigned to more than one Area. The
Common Area is used in cases where the requirement is for a zone/s to automatically Arm or Disarm
depending on the state of the overlapping Areas.
The Common Area behaves as follows:
When all Areas are Armed, the Common Area automatically Arms
When any Area has Disarmed, the Common Area automatically Disarms
Example: Common Area Operation
Area 1 is Armed
Entrance
Area 2 is Armed
Entrance
KEYPAD
Entry
Door
COMMON AREA
Area 3 is Armed
Entrance
KEYPAD
Entry
Door
COMMON AREA
KEYPAD
Entry
Door
COMMON AREA
Office A
Office B
Office C
Office A
Office B
Office C
Office A
Office B
Office C
AREA 1
AREA 2
AREA 3
AREA 1
AREA 2
AREA 3
AREA 1
AREA 2
AREA 3
Common Area remains Disarmed
All Areas are Armed
Entrance
Common Area automatically Arms
Area 2 Disarms
Area 3 Disarms ...(and so on)
Entrance
KEYPAD
Entry
Door
COMMON AREA
Common Area remains Disarmed
Entrance
KEYPAD
Entry
Door
COMMON AREA
KEYPAD
Entry
Door
COMMON AREA
Office A
Office B
Office C
Office A
Office B
Office C
Office A
Office B
Office C
AREA 1
AREA 2
AREA 3
AREA 1
AREA 2
AREA 3
AREA 1
AREA 2
AREA 3
Common Area automatically
Disarms
10
The Common Area remains Disarmed
until all Areas are again Armed.
Ness D24 Control panel - USER Manual
Area Codes
To Arm your area
Most users of the panel should be assigned Area Codes. An Area Code allows you to Arm and
Disarm only the Area which has been assigned to that code. This makes Area operation as simple
as possible with the least number of keystrokes.
Press... [CODE]
Three beeps will sound
and your AREA icon will turn ON
or
or
Leave the Area within the Exit Delay Time. At the end of Exit Delay Time, 1 beep will sound
Shortcut Arming is NOT allowed for Area Code Arming.
To DisArm Your area
To Disarm the Area assigned to your code, simply enter your code followed by E.
Press... [CODE]
Three beeps will sound
and the respective AREA icon will turn OFF
Ness D24 Control panel - USER Manual
or
or
11
Administrator Codes
To Arm areas Using an Administrator Code
Using an Administrator Code to Arm selected Areas.
[CODE]
Press... ...or to Arm multiple Areas at once
and/or
and/or
[CODE]
Three beeps will sound
and the selected AREA icon/s will turn ON
or
or
Leave the Area within the Exit Delay Time. At the end of Exit Delay Time, 1 beep will sound
Shortcut Arming is allowed for Administrator Code
Arming.
When Shortcut Arming is enabled:
Two Button Keypad Operation is enabled: [CODE] is not needed.
Two Button Keypad Operation is disabled: [CODE] + E is not needed.
To DisArm areas Using an Administrator Code
Using an Administrator Code to Disarm selected Areas.
[CODE]
Press... ...or to Disarm multiple Areas at once
and/or
Three beeps will sound
and/or
[CODE]
and the selected AREA icon/s will turn OFF
or
...or a shortcut to Disarm all Areas
Press... [CODE]
Three beeps will sound
12
and all AREA icons will turn OFF
or
Ness D24 Control panel - USER Manual
or
or
Monitor Mode
Arming Monitor Mode
Monitor mode allows you to Arm selected zones
while others are ignored. Typically used to
monitor perimeter zones (doors and windows)
while you are at home.
Your system may be programmed to give the
choice of Arming two different Monitor areas
(Dual Monitor mode), otherwise there is one
Monitor area (Single Monitor mode).
Alarm types in Monitor Mode
The most common configuration (which is also
the factory default) triggers the keypad sonalert
(beeper) as well as a siren burst.
Zones must be sealed
Make sure that all zones in the Monitor area are
sealed before Arming Monitor mode.
Exit Delay
The Exit Delay time applies to Monitor mode.
Monitor mode alarms can be programmed to
trigger a number of different combinations of
siren, strobe, dialler and other alarms.
Arming Single Monitor mode
Press... ...or
...or
[CODE]
Arming Dual Monitor mode
Press... ...or
...or
...or
Ness D24 Control panel - USER Manual
13
Emergency Alarms
Panic Alarm
The keypad panic function may have been
programmed to be either:
Panic cannot be used while the panel is in
Program, Memory or Exclude mode.
Audible: Activates siren or buzzers
or Silent: If your system is monitored by a
Central Station, sends a Panic report by dialler.
(If Panic reports have been enabled by your
installer).
Note: Your installer may have installed a separate
panic button. To activate the panic alarm simply
press that button.
Press... Keypad Panic alarm is number 6 in the SYSTEM view.
(Press and hold for at least 1 second)
...or
(If Two Button Keypad Operation is enabled)
Duress Alarm
A DURESS alarm can be triggered to alert the
Central Monitoring Station that you are being
forced to Disarm the panel against your will.
By default, DURESS alarms do not sound any
audible alarms unless programmed to do so by
your installer.
To Disarm and simultaneously send a DURESS
alarm, prefix your User Code with the “Duress
Digit” when Disarming.
Duress alarm is number 5 in the
SYSTEM
view.
The factory default Duress Digit is 9. (It can be
any number from 0~9).
Disarm by pressing... [Duress Digit] [CODE]
The panel Disarms as normal and the Duress report is sent to the Central Monitoring Station.
• If DURESS alarm is used, avoid user codes that begin with
the same number as a duress digit.
• DURESS alarm can only used if your system is monitored
by a Central Station.
14
Ness D24 Control panel - USER Manual
Emergency Alarms
Medical Alarm
Your system may have been setup with a
Medical Alarm. This type of alarm can be used
to summon assistance for the elderly or infirm
who are living alone. A Medical Alarm is most
effective if the system is monitored by a Central
Monitoring Station.
Medical Alarms can be used in two ways:
1. Instant Medical Alarm: Immediately
sound the sirens and send a Medical Alarm
report to the Central Monitoring Station. (In this
case, the Medical Alarm Delay is set at zero
hours).
2. Inactivity Medical Alarm: The Medical
Alarm is reported if the Medical Alarm button
is NOT pressed within the pre-programmed
Medical Alarm Delay. (In this case, the Medical
Alarm Delay is set between 1 and 24 hours).
Instant Medical Alarm
Operation
1. If the Medical Alarm Delay is not being used,
simply press the designated Medical Alarm
button.
2. If the Medical Alarm Delay is being used, an
instant Medical Alarm can be sent by pressing
the button twice within 12 seconds. On the first
press, the keypad/s will beep once per second
during the 12 second period. On the second
press, the keypad/s will beep fast to indicate that
the Medical Alarm has been reported.
Inactivity Medical Alarm
Operation
The Inactivity Medical Alarm can be used to
summon assistance if a person has become
incapacitated and is not able to press their
Medical Alarm button.
For example, if the Medical Alarm Delay is set
for 24 hours, the Medical Alarm will be triggered
if the button is not pressed every 24 hours.
(Effectively, it is an, “I’m OK”, button).
When 20 minutes of the Medical Alarm Delay
time remains, and the Medical Alarm button has
not been pressed, the keypad/s will beep for 10
seconds as a reminder.
As a final warning that the Medical Alarm
delay is due to expire, the keypad/s will beep
continuously during the final 10 minutes.
Medical Alarm Button
The Medical Alarm button can be setup to take
the place of the keypad Panic button or it may
be a separate button. This must be determined
by your installer.
Medical alarm is number 7 in the
SYSTEM
view.
Fire Alarm
Your system may have smoke detectors
connected to 24 hour Fire inputs. If Fire inputs
are enabled, the alarm indication is by the Fire
icon on the keypad.
Fire inputs may be programmed to sound sirens
or report alarms, (if your system is monitored by
a Central Monitoring Station), or other actions as
setup by your installer.
Ness D24 Control panel - USER Manual
15
View Menu
The VIEW menu can be used at
any time to display the status of
Zone, Tamper, System and Power
inputs.
The status of these inputs can be displayed
“live” as it happens, or as a previous event in
Memory mode.
to view a current Alarm:
T
For example, if the TAMPER icon is flashing
indicating that a Tamper alarm is present.
T
To view Tampers
TAMPER
Press...
Zone indicators will show the state of the four Tamper
inputs:
Tamper 1: External Tamper.
Tamper 2: Control Panel Tamper.
Tamper 3: Zone Input Tamper.
Tamper 5: Radio Interface Tamper.
Press...
, the MEMORY and Tamper
icons will be on and a number will indicate
which TAMPER alarm is present.
To view System
SYSTEM
to view the status of all alarms:
Press...
[Repeat presses]
Press...
Repeated presses of the VIEW button will
cycle viewing of Zone, Tamper, System, Power
and Memory sub-menus.
Or, each sub-menu can be directly viewed by
Zone indicators will show the state of the eight System
inputs:
pressing
[1–6].
default view
The display always shows the zone menu by
default.
It will automatically revert back to the ZONE
menu after eight seconds if left in any other
view menu.
System 1: Keyswitch Panic
System 2: Dialler line fault
System 3: Keypad connection fault
System 4: Control panel fault
System 5: Duress Alarm
System 6: Panic Alarm
System 7: Medical Alarm
System 8: User Code Alarm
System 9: Access to Installer Program mode
To view Power
POWER
Press...
Zone indicators will show the state of the six Power
alarms:
To view Zones
ZONE
Press...
The zone indicators 1–24 will show the state of the 24
zones and possibly one or more other icons flashing to
indicate other alarms.
16
Power 1: Mains power failure
Power 2: Control panel backup battery is low
Power 3: DC supply failure
Power 4: Zone reference power failure
Power 9: Radio device battery low. (Zone indicators
1–8 will show which device)
Power 0: Radio Key battery low. (Zone indicators 1–8
will show which Radio Key)
Ness D24 Control panel - USER Manual
View Memory
How to view Memory
M
1. When the MEMORY icon is flashing to indicate there
is a new alarm in memory, pressing
will
display an icon, (for example, Zone, Tamper,
System etc), and a number to indicate the type
of alarm.
Memory Mode
Events indicated by keypad ICONs:
ICON
EVENT
Events are from memory
M
MEMORY
Zone alarms
1~24 [flashing]
2. In normal idle mode, (system is disarmed with
ZONE
the ZONE icon displayed), the memory history can
be displayed in sequence.
TAMPER
and
1~5
To view the Memory History, Press...
SYSTEM
and
1~8
POWER
and
1~0
, the
M
MEMORY
and
Tamper alarms
T
System alarms
Power alarms
icon will turn on.
Then press...
[Repeat presses]. At each
step, the keypad icons will display past events.
The Zone, Tamper, System and Power icons will
indicate what type of events are being displayed.
Memory is displayed backwards from most
recent event to the end of memory. The past 50
events are stored.
Fire Zone alarm
and
1~24 [flashing]
Arm
ARM
Disarm
ZONE
Monitor Mode
Press
to exit the Memory menu.
[slow flash]
Area 1 Arm
Area 2 Arm
Area 3 Arm
Area 1 Monitor Mode
[slow flash]
Area 2 Monitor Mode
[slow flash]
Also see Keypad Display Table, page 6
Ness D24 Control panel - USER Manual
17
Memory Viewing Examples
Examples of how to view Memory and the types
of events that might be shown.
Panel is Disarmed
(All zones are sealed).
ZONE
E
Press... VIEW
2
M
ZONE
Most recent event:
- Zone 2 alarm.
MEMORY
Press... VIEW
M
ARM
Next most recent event:
- Panel was Armed.
MEMORY
Press... VIEW
1
M
POWER
Next most recent event:
- Mains power failure.
MEMORY
Press... VIEW
...etc...Up to 50 events in memory.
Press
18
E
to exit Memory mode.
Ness D24 Control panel - USER Manual
ExcludE
Zones and other inputs can be Excluded so
that it does not generate alarms. Exclude is a
method of temporarily disabling an input.
Zone Exclude is not permanent. Excluded zones
are automatically INCLUDED next time the panel
is Disarmed.
When zones have been Excluded, the EXCLUDE
icon flashes continuously while the panel is
Disarmed and also when Armed.
Zones can be manually included by the same
method as Excluding. In Exclude mode, simply
use the [NUMBER]
sequence to turn OFF
the zone lights to be Included.
Zones can only be Excluded when the panel
is Disarmed.
To Enter Exclude Mode
Press...
[CODE]
...or
(If Shortcut Exclude is enabled)
To Exclude zones
(EXCLUDE and ZONE will be on) Press... [ZONE NUMBER]
The selected Zone numbers will turn on.
[ZONE NUMBER]
...etc
To Exclude Tamper alarms
Press...
(EXCLUDE and
The selected Tamper numbers will turn on.
T
TAMPER
will be on) [TAMPER NUMBER]
...etc
SYSTEM
will be on) [SYSTEM NUMBER]
...etc
POWER
will be on) [POWER NUMBER]
...etc
To Exclude System alarms
(EXCLUDE and
Press...
The selected System numbers will turn on.
To Exclude Power alarms
Press...
(EXCLUDE and
The selected Power numbers will turn on.
To Exit Exclude Mode
Press...
(EXCLUDE will flash while Disarmed and Armed)
Ness D24 Control panel - USER Manual
19
Automatic zone test
Test Mode
This is an option that helps avoid the situation of
a zone sensor going faulty or being disconnected
without it being noticed.
Test Mode allows the user to manually test all
audible and visual outputs without alarming
the panel.
When Automatic Zone Test is enabled by your
installer, a count is kept of the number of times
the panel is Armed and Disarmed. Any zone
which has failed to detect anything over the past
20 Armings is recorded and the
lights up.
indicator also
To find out which zones have been dormant:
Press...
The
Press... [CODE]
Press the keys below to operate each output.
Press the same key to turn the output off.
Pressing any other key will test that output and
cancel the current output.
To exit Test Mode.
Press...
KEYINDICATOR OUTPUT
11 Siren A, Tone 1
...or
(If Two Button Keypad Operation is enabled)
The zone indicators show which zones need
to be checked. To do this, walk test the zones
in question. The zone indicators which were
on should now be flashing. Any which are still
on and not flashing need to be checked by a
service person.
22 Siren B, Tone 1
33 Reset (internal screamer)
44 STROBE
5
5
AUX 1
6
6
AUX 2
7
7
KEYPAD BEEPS
81 Siren A, Tone 2
92 Siren B, Tone 2
To exit View test:
Press...
20
icon will turn on.
Ness D24 Control panel - USER Manual
Program Options Table
OPTION
OPTION No
FACTORY
DEFAULT
RANGE
User Code 1 (Master Code)
P1E
3 to 6 digits
User Code 2
P2E
3 to 6 digits
User Code 3
P3E
3 to 6 digits
User Code 4
P4E
3 to 6 digits
User Code 5
P5E
3 to 6 digits
User Code 6
P6E
3 to 6 digits
User Code 7
P7E
3 to 6 digits
User Code 8
P8E
3 to 6 digits
User Code 9
P9E
3 to 6 digits
User Code 10
P10E
3 to 6 digits
User Code 11
P11E
3 to 6 digits
User Code 12
P12E
3 to 6 digits
User Code 13
P13E
3 to 6 digits
User Code 14
P14E
3 to 6 digits
User Code 15
P15E
3 to 6 digits
User Code 16
P16E
3 to 6 digits
User Code 17
P017E
3 to 6 digits
User Code 18
P018E
3 to 6 digits
User Code 19
P019E
3 to 6 digits
User Code 20
P020E
3 to 6 digits
User Code 21
P021E
3 to 6 digits
User Code 22
P022E
3 to 6 digits
User Code 23
P023E
3 to 6 digits
User Code 24
P024E
3 to 6 digits
User Code 25
P025E
3 to 6 digits
User Code 26
P026E
3 to 6 digits
User Code 27
P027E
3 to 6 digits
User Code 28
P028E
3 to 6 digits
User Code 29
P029E
3 to 6 digits
User Code 30
P030E
Entry Delay Time
P17E
20 seconds
1 to 99 sec
Exit Delay Time
P18E
60 seconds
1 to 99 sec
PROGRAMMED
3 to 6 digits
Ness D24 Control panel - USER Manual
21
Programming
Program Mode
Programming User Codes
Various system options can be programmed by
the user. These options can only be accessed
from User Program Mode.
User codes are the P.I.N. codes used to operate
various panel functions, especially Arming and
Disarming. There are 30 User Codes and each
can be 3 to 6 digits long.
User Codes 1 to 30
Entry Delay Time
Exit Delay Time
For all other programming changes, talk to your
installer.
The panel will automatically exit User Program
Mode is no buttons are pressed within a one
minute period.
User Code 1 is always the Master Code.
User Codes 2 to 30 can be programmed to any
of these types:
Ordinary
Disabled
Administrator
Area
When programming codes, the User Code type
To enter Program Mode:
is displayed by the icons:
Press...
If User Code 1 was used to enter Program Mode,
the digits of any existing codes will be displayed
when programming a User Code.
[MASTER CODE]
ARM
To exit Program Mode:
Ordinary Code
Press...
An Ordinary Code is for systems configured
without Areas. Allows full access to the panel
except for entry to Program Mode.
then
[NN] = The Option Number of the code
being programming
To Program an Ordinary Code:
[NN]
[CODE]
[CODE]
The
ARM
icons will be ON.
Disabled Code
Any Code except the Master Code can be taken
out of service by programming its first digit to
be zero.
To Disable a Code:
[NN]
[CODE]
The
22
ARM
Ness D24 Control panel - USER Manual
[CODE]
icons will be ON.
Programming Codes
Administrator Code
Master Code
An Administrator Code is able to Arm and Disarm
all Areas of a Partitioned system, but it is not
allowed entry to Program Mode. Programming
is the same as an Ordinary Code.
A Master Code is able to Arm and Disarm all
Areas of a Partitioned system and is allowed
entry to Program Mode.
To Program an Administrator Code:
[NN]
[CODE]
[CODE]
The
icons will be ON.
ARM
Area Code
User Code 1 is always a Master Code, but all
other codes can be programmed as Master
Codes.
To Program a Master Code:
[NN]
[CODE]
The
ARM
[CODE]
icons will be FLASHING.
An Area Code is a code which only has access
to the Area assigned to that code.
The user does not need special instructions for
Arming and Disarming.
ARM [CODE] E Arms only the assigned
Area.
[CODE] E Disarms only the assigned Area.
See page 11 for details.
To Program an Area Code assigned to AREA1:
[NN]
[CODE]
[CODE]
The
icon will be ON.
To Program an Area Code assigned to AREA2:
[NN]
[CODE]
[CODE]
The
icon will be ON.
To Program an Area Code assigned to AREA3:
[NN]
[CODE]
[CODE]
The
icon will be ON.
Ness D24 Control panel - USER Manual
23
Programming Timers
Entry Delay Time
Entry Delay Time applies to Delay Zones and
gives you time to enter the premises and Disarm
without causing an alarm.
When a Delay zone is triggered, the panel will
go into alarm state if it is not Disarmed within the
Entry Delay time.
The Entry Delay Time can be programmed in the
range of 1 to 99 seconds.
To Program Entry Delay Time:
[1~99]
Example: Programming the Entry Delay Time
to be 35 seconds.
1. Press...
2. The existing Entry Delay Time is displayed
3. Press...
Enters the new time
EXit Delay Time
On Arming the panel, Exit Delay Time gives you
time to leave the premises without causing an
alarm.
Exit Delay Time applies to all zones (except 24
hour zones).
The Exit Delay Time can be programmed in the
range of 1 to 99 seconds.
To Program Exit Delay Time:
[1~99]
Example: Programming the Exit Delay Time
to be 90 seconds.
1. Press...
2. The existing Exit Delay Time is displayed
3. Press...
24
Enters the new time
Ness D24 Control panel - USER Manual
Ness Accessories
Ness Quantum Detectors
Ness CCTV Products
The Ness Quantum™ range of high-tech motion
detectors includes passive infrared detectors, dual
technology microwave and infrared, as well as ceiling
mounted 360° detectors.
The wide range of Ness CCTV equipment allows your
installer to design a professional state‑of‑the‑art system
for your home, office, shop or factory.
All Ness detectors are designed and manufactured
using the most modern technology and techniques to
ensure superior reliability and performance.
For safety and security, Ness CCTV provides solutions
for all video surveillance needs with a wide range of
quality DVRs, cameras and accessories. Ness IP based
CCTV solutions integrate seamlessly into today’s
online lifestyle.
Sirens
Switches
The range of warning devices includes horn speakers,
polytough siren covers, internal ‘screamers’ and
satellite sirens with their own battery backup.
A variety of switches are available for protecting doors
and windows. The line-up includes surface and flush
mount reed switches, emergency buttons, roller door
reed switches and the unique Nessensor™ vibration
sensor for highly effective perimeter protection.
Ness D24 Control panel - USER Manual
25
Ness Wireless Products
Optional Radio Accessories
Radio Keypad
A unique fully portable radio keypad.
The Ness Radio Keypad provides
totally wireless Arming/Disarming of
the control panel.
Ask your installer about the range of Ness radio devices
for the optional extra convenience of wireless remote
control and wireless detection.
Operating your Ness security system can be as
convenient as opening your car door. Ness Radio
Keys™ provide the benefits of separate ON, OFF and
PANIC buttons as well as optional control of auxiliary
outputs - all in a slim, waterproof remote control.
* Ness radio products require a Ness Radio Interface
(100-200) to be fitted to the control panel.
RK4
Radio Key
Also operates Home Mode and
provides a Panic alarm.
The Ness Radio Keypad is suitable for use as a portable
keypad or for adding an extra keypad in areas where it
is not possible to install wires.
RK3
Radio Key
Radio Keys
R12 Radio PIR
Fully waterproof, ultra slim 3 or 4 button Radio Keys for
remote control of the control panel.
With separate buttons for ON (Arm), OFF (Disarm),
PANIC and AUX functions (RK4 only). Including long
life lithium battery.
Radio Key Pendant
R15 Radio PIR
Radio Motion Detectors
Ness R15 Radio PIR and Ness R12 Radio PIR for
wireless motion detection.
Fully waterproof pendant style
transmitter can be used as a
portable wireless Panic button.
Can be used in combination with Ness hardwired
detectors in areas where it is not possible to install
wires. Includes long life lithium battery.
Supplied with a neckchain as
well as wristwatch straps. Ideal
for use as a medical alarm for
the elderly or infirm. (Central
Station Monitoring is especially recommended when
used for medical alarm purposes). Includes long life
lithium battery.
The Ness R15PET Pet Aware model detects humans
but is immune to household pets. Allows you to protect
your home with your pets inside.
Radio Smoke Detector
The Ness Radio Smoke Detector
provides a fully wireless smoke
detection option which can trigger
the panel's siren/s and dialler if
required (or as programmed by
Radio Reed Switch
Ness Radio Reed Switch for
wireless door and window
protection. Includes long life
lithium battery.
Top: RR2 Mini Radio Reed
Switch
Bottom:
RR3 Micro Radio Reed Switch
26
your installer.)
The Ness Radio Smoke Detector uses Photo-electric
smoke detection technology. On board sounder and
test button for the sounder and radio transmitter. A
single battery powers the smoke detector and the
transmitter. Includes 9V lithium battery.
Ness D24 Control panel - USER Manual
Installation Record
Date purchased:
Date installed:
Installation Company:
Telephone:
NESS D24
ALARM CONTROL PANEL
Monitoring Company:
Telephone:
ZONE LIST
DEVICE TYPE
DESCRIPTION
Zone 1
Zone 2
Zone 3
Zone 4
Zone 5
Zone 6
Zone 7
Zone 8
Zone 9
Zone 10
Zone 11
Zone 12
Zone 13
Zone 14
Zone 15
Zone 16
Zone 17
Zone 18
Zone 19
Zone 20
Zone 21
Zone 22
Zone 23
Zone 24
NOTES
© 2001 Ness Security Products
Ness D24 Control panel - USER Manual
27
Operation Summary
To ARM:
...or
...or
To DISARM or reset alarms:
[CODE]
[CODE]
To Arm MONITOR mode: ...or
...or
To exit MONITOR mode: To EXCLUDE zones: ...or
then:
To exit EXCLUDE mode:
[CODE]
[CODE]
[CODE]
[ZONE NUMBER]
[ZONE NUMBER]
(Up to 24 zones)
PANIC alarm: Press and hold for 1 second
...or
VIEW menu: To exit VIEW mode:
28
[Repeat presses]
Cycles viewing of
T
M
ZONE TAMPER SYSTEM POWER MEMORY
(Reverts to normal
ZONE
view)
Ness D24 Control panel - USER Manual
menus