1
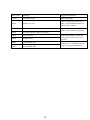
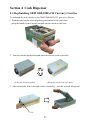
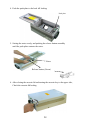
User’s Manual Chungho ComNet 7100/7200 ATM Complete ATM Services Contents Section 1 Introduction 1-1 Specifications ……. ...……………...………………..…………..………….. 2 Section 2 Operating Instructions 2-1 How to open the Electronic lock ………………….………..…...………..… 4 2-2 How To Switch On and Off…………………………..……………………... 5 2-3 How To Insert and remove Flash Card ……..…….………….……………… 6 Section 3 How to use Xtremo Control Panel Mode 3-1 How To Program..…………………………………………….... .....……….. 7 3-2 Error Codes and Suggested solutions ……………………………………… 11 Section 4 Cash Dispenser 4-1 Replenishing GBM1000(2000)-CH Currency Cassettes .…..….…. . .….… 27 Section 5 Receipt Printer 5-1 How To Replenish The Receipt Printer Paper ………………………….… 30 5-2 How To Clear Receipt Printer Jam ………………..……………………… 32 1 Section 1 Introduction 1-1 Specifications Customer Handling Unit Display - Screen size : 8″ - TFT color display with VGA - Resolution : 640×480 Keypad - 16 Numeric Keys for PIN and amount Input : 8 Function Keys Card Reader : Dip type C/R (ISO 1,2 Read) Cash Dispensing Unit Large Capacity Cassette - Approx. 1,000 notes per cassette x 1 (Option : 2,000 notes cassette) Fast Dispensing Speed - Max. 5 notes per second Number of Cassettes - 1 denomination for standard Reject bin - Up to 40 notes Control Unit M/T Switch CDU Receipt Printer 2 Power Supply Main Control Unit Processor : Intel Xscale PXA255 200MHz Main/Flash/NV RAM : 64MB/32MB/32KB 56K Modem or 10 Ethernet OS: Windows CE.NET CF 1 Port Serial : Asynchrony 8 Ports Document Handling Unit Receipt Print Unit Printing Method: Thermal Line Print Print Characters : English, Numeric, Line, Symbol, etc. Paper Setting : Semi-auto Loading method Paper Width : 59mm (Option:79mm) Print Speed : 100mm/sec (600dots line/sec) Receipt capacity : Max. 150mm Ø diameter EMI : FCC Class A Model Specification Dimensions (H×W×D) - 54.8”(1392mm) × 17.7”(450mm) × 21.6”(550mm) Weight - Approx. 220lbs (100Kg) Operating Environment - Temperature range: 50°F to 100°F(10°C to 38°C) - Relative humidity: Non-condensing 20% to 80% - Maximum altitude: 9850ft.(3,000m) 3 Section 2 Operating Instructions 2-1 How To Open the Electronic Lock TO OPEN 1. Press 1-2-3-4-5-6 2. Turn the dial clockwise (to the right) REMEMBER: Whenever you change the Combination on the lock, please do it with the door open. If anything wrong happens, you will be able to replace the lock. If you lose the combo or something goes wrong with the door closed, you will need to drill the door and incur into additional expenses. How To Change Combinations (Lock signal twice after each valid entry) 1. Press six zeros. 2. Press current combination once. 3. Press new combination twice. Invalid Combination Entry – Lock signal three times and old combination still valid Wrong Try Penalty (Standard feature.) - Entry of four consecutive invalid combinations initiates a 5-minute delay period. - LED flashes red at 10 second intervals. - At end of penalty period, two more consecutive invalid combinations will restart the 5-minute delay period. 4 2-2 How To Switch On And Off 2 To switch the main electric power to your Xtremo 7100, 7200 on or off, proceed as follows. 1. Unlock and open the fascia of your Xtremo 7100, 7200. 2. Confirm the Power Select Switch. (240V) 3. Press the switch to the required position: • On (pressed in at the Up side). • Off (pressed in at the Down side). Power Select Switch Power ON/OFF Switch Xtremo 7100, 7200 Note: After you have switched on the ATM power, it will take several minutes for the terminal to load all of its software and start displaying the application. 3. Close and lock the ATM. 4. If required, you can reset the ATM by following the above procedure. WARNING – FIRE AND PERSONAL INJURY HAZARD Install the ATM to a non – flammable surface such as a metal surface, otherwise fires may result. Do not place the ATM near flammable materials, otherwise fires may result. Do not hold the Inverter by the ATM cover when transporting it, otherwise the ATM may fall down, which could cause severe injury. Do not let any scraps of thread, paper, sawdust, dirt, metal shavings or other foreign objects get inside the ATM or onto the cooling fins, otherwise fires or problems with operation may result. Do not install and operate the Inverter if it is damaged or if some of the parts are missing. Doing so may result in severe personal injury. 5 2-3 How To Insert And Remove Flash Card (Xtremo 7100,7200) You can insert the Flash Card on the back of the Main Control Unit. You will find a slot in which you can plug the Flash card (as shown on the pictures). How to Backup/Download the Journal 1. Insert the Flash Card. 2. Place the central switch on “Maintenance” mode. 3. Enter your password, then select “Clerk”, “Journal”. 4. Select “View All” and “Back up”. 5. When you get the message “Back up complete”, remove the Flash Card and press “exit” 6 Section 3 How to use Xtremo Control Panel Mode 3-1 How to program Xtremo 7100,7200 To change the settings of the Xtremo 7100, 7200 you should access into the Main Menu. 1. Open the Top Part and place the switch on Maintenance. 2. Enter the Password. The merchant default password is 25800852. Overview of the Main Menu This is the Main Menu screen. It has the Clerk menu and sub-menus. < Clerk > 7 3-1-1 Clerk The Clerk Menu is most frequently used by the owner of the ATM. This menu can manage Cash Setting and other features. Clerk Settlement You must select this menu every time you add cash to a cassette. Please note that you need to insert the number of bills. How to add money: 1. Type on the keypad the number of bills you want to add. 2. This action will show three new buttons on the right: Insert, Clear, Exit. 3. Press “Insert”. This action will add the number in the “Total” and “Remaining” If you have entered the correct amount, now, you can press “Exit” to go back to the previous menu. How to cancel or correct the # of bills: 1. Press “Cassette Total”. This is going to clear all information. All boxes will show 0. 2. In order to add money, follow the previous instructions on “How to add money” If you want to print a receipt without clearing any information on the ATM, press “Trial Cassette Total”. This action is going to give you a printed record on the current cash set information. 8 Clerk Settlement Trial Close <ATM’s screen during connecting host> The “Trial Close” feature is designed to perform a Day Close Operation without actually closing out the machine. This operation will print a receipt with information on number of transactions, host and terminal total requested and total amount dispensed. This report is identical to the “Day Close” one. The only difference is that the Trial Close will not zero out the amounts. This report is useful if you wish to know current total statistics without closing them out. To run this report, press the relative side function key. Clerk Settlement Day Close This menu enables you to have a printed record on number of transactions, Host and Terminal total amounts requested and dispensed. This feature will automatically zero out the information. Transaction totals shown on the receipt are those ones starting from the last time a Day Close was performed. If you look carefully, the printed receipt will show two sections: Host and Terminal totals. The ATM automatically performs a Day Total everyday at a predetermined time by every Processing company. Under the host totals, you can see transactions occurred during this period of time. Under the terminal totals, on the other hand, you can see transactions occurred during the last time you performed the last Day Close until the moment you do it again. For this reason, if you perform a Day Close before or after the processor has done its automatic day close, you may see different values between what the terminal had reported and what the host reports. To avoid this, try to perform every day the day close at the closest time at which your processing company closes out. If you do not match your processor, the missing transactions will usually appear on the next total. REMEMBER: Once the ATM prints out this receipt, all values are reset to 0. Clerk Language Through this menu, you can set up to 7 languages to display on the ATM screen. Xtremo 7100, 7200 provides 7 different languages, English, French, Italian, Spanish, Korean, Japanese and Chinese. To enable/disable a language, just press the relative side function key 9 Clerk Journal Search You can select “View”, “Search”, “Delete” options for the Journal. This is a file database on the ATM’s hard disk, which contains all transactions recorded by the ATM. This is very useful in locating transaction disputes, transaction errors, or transaction occurred on the ATM. You can search the transaction records by the Year, the month, or the day. Once you insert the date, you can press “Search”, then “View”. The box “Total” shows the total number of records for the specific date you have inserted. <Search screen> It is always recommended to backup the journal before deleting it. (In order to backup the journal, please follow the instructions shown on page 6.) Clerk Password This menu enables you to set or modify your Clerk (operator) password: • input the current password • input the new password • re-input the new password (for confirmation) Clerk Next Surcharge Through this menu, you can modify the surcharge amount: 1. Choose surcharge amount you want to change including cents. 2. Click OK i.e. if you want to set $1.50 as surcharge, press 1-5-0 on the keypad. Then press “OK”. 10 3-2 Error Codes and Suggested Solutions 3-2-1 PCB Error Code Meaning Suggested Resolution 0E010 Port open error The connection between the PCB and the communication port is not established. Please check the connection between PCB and the PC. If problem persists, replace the cable or PCB board 0E111 Command time over 0E113 Response time over 0E121 Data NAK response retry over 0E123 NAK send retry over 0E131 Response frame error 0E132 Undefined response code 0E191 RX FIFO Error 0E192 RX Over Run 0E193 Other Communication Driver Error 0E211 Non defined application parameter or property 0E212 Sub program application double work 0E213 Command timing error 0E214 Non defined application command 0E231 Reset Dll Load Error 0E232 Reset Initial Error 0E233 Reset default Error 0E241 Watch Dog dll load error 0E242 Watch Dog registry error 0E243 Watch Dog map IO Base error 0E244 Watch Map Reset Base error 0E245 Watch Dog default Error 0E245 Watch Dog default Error Check the connection of the device cable, If problem persist replace the device, cable, or port. Software error. Please the manufacturer if these error happen. Software error. Please the manufacturer if these error happen. 11 0E251 GPIO Dll Load error 0E252 GPIO Registry error 0E253 GPIO Map IO base Error 0E254 GPIO Prot Number error 0E255 GPIO default error 0E411 PCB Status value error 0E421 Invalid data(Operator key initialize) 0E422 Invalid data(Maintenance key initialize) 0E423 Invalid data(Initialize) 0E433 Invalid data(Status) Software error. Please the manufacturer if these error happen. Reset the machine, If problems persists, please contact the service provider. 3-2-2 Card Read Error Code Meaning Suggested Resolution 1G010 Port open error Check the connection of the card reader cable, if problem persist replace the card reader, cable or the port 1G111 Command time over Check the connection of the device cable, If problem persist replace the device, cable, or port. 1G191 RX FIFO Error 1G192 RX FIFO Over error 1G193 Other Communication Driver Error 1G213 Command timing error 1G214 Non defined command 12 Software error. Please contact the manufacturer if these error happen. 3-2-3 Printer Error Code Meaning Suggested Resolution 2G010 Port open error 2G111 Response time over 2G191 RX FIFO Error 2G192 RX Over Run 2G193 Other Communication Driver Error 2G212 Sub program application double work 2G213 Command timing error 2G214 Non defined application command 2G215 Print data size over 2G231 Reset Dll Load Error 2G232 Reset Initialize Error 2G233 Reset default Error 2G4C2 Head open error Close the printer header and press reset 2G4C3 Head temperature error Check Header 2G4C4 Cutter error Parts need to be replaced Check the connection of the Printer cable, if problem persist replace the Printer, cable or the port 13 Software error. Reset the machine, if problems persist, please contact the manufacturer 3-2-4 CDU Error Code Meaning Suggested Resolution 4G010 Port open 실패 4G111 Response time over 4G112 Data response time over(STX) 4G113 Data response time over(ETX) 4G114 Time over 4G121 NAK receive retry over 4G123 NAK send retry over 4G132 Command mismatch 4G133 Close the reject box Please check if the reject bin is in 4G134 Divert act sensor error Reset the machine. If problems persist, please contact the service provider. 4G135 Jam 4G191 RX FIFO Error 4G192 RX Over Run 4G193 Other Communication Driver Error 4G211 Main send non defined command 4G212 Double work error 4G213 Command timing error 4G214 Receive non defined command 4G231 Reset Dll Load Error 4G232 Reset Initial Error 4G233 Reset default Error 4G411 Cash remain in cash tray 40011 Upper check sensor left jam 40012 Upper check sensor right jam 40013 Upper check sensor both jam 40014 Lower check sensor left jam Check the connection of the CDU cable, if problem persist replace the CDU, cable or the port Software error. Please contact the manufacturer if these error happen. Reset the machine. Bill jam or sensor failure. Look for the bill jam very thoroughly. 14 40015 Lower check sensor right jam 40016 Lower check sensor both jam 40017 Divert sensor left jam 40018 Divert sensor right jam 40019 Divert sensor both jam 4001A Eject sensor jam 4001B Exit sensor jam 40021 Pick up error 40022 Over dispense bill 40023 Upper box over eject 40024 Lower box over eject 40025 Motor under run 40032 No Reject box 40033 Insert upper cash box 40034 Insert lower cash box 40035 Divert sensor error 40041 Check sensor time out 40042 Divert timeout 40043 Eject timeout 40044 Exit timeout 40045 Diver eject timeout 40046 Reverse jam 40047 Divert error 40051 BCC error 40052 Command error 40053 Response time out 40054 ACK receive error Bill jam or sensor failure. Look for the bill jam very thoroughly. This error happens if there is no money in the machine but there is money in the software Contact the service provider for the maintenance Reject tray is not in all the way Insert the cassette Hardware failure. Reset the machine if problems persist, please contact the service provider. 15 40055 Undefined command receive 40056 Receive dispense command after cash end 40057 Eject Exit sensor jam 40058 Received dispense command over 50 notes or zero note 40059 Differ count eject sensor from exit sensor 4005A Differ count divert from eject sensor 41011 Upper check sensor left jam 41012 Upper check sensor right jam 41013 Upper check sensor both jam 41014 Lower check sensor left jam 41015 Lower check sensor right jam 41016 Lower check sensor both jam 41017 Divert sensor left jam 41018 Divert sensor right jam 41019 Divert sensor both jam 4101A Eject sensor jam 4101B Exit sensor jam 41021 Pick up error 41022 Over dispense bill 41023 Upper box over eject 41024 Lower box over eject 41025 Motor under run 41032 No Reject box 41033 Insert upper cash box 41034 Insert lower cash box Reset the machine, If problems persists, please contact the service provider. Bill jam or sensor failure. Look for the bill jam very thoroughly. Bill jam or sensor failure. Look for the bill jam very thoroughly. This error happens if there is no money in the machine but there is money in the software Contact the service provider for the maintenance Reject tray is not in all the way Insert the cassette 16 40035 Divert sensor error 40041 Check sensor time out 40042 Divert timeout 40043 Eject timeout 40044 Exit timeout 40045 Diver eject timeout 40046 Reverse jam 40047 Divert error 40051 BCC error 40052 Command error 40053 Response time out 40054 ACK receive error 40055 Undefined command receive 40056 Receive dispense command after cash end 40057 Eject Exit sensor jam 40058 Received dispense command over 50 notes or zero note 40059 Differ count eject sensor from exit sensor 4005A Differ count divert from eject sensor 43020 Good Operation 43021 Pickup error 43022 Mistracked note at feed 43023 Mistracked note at double detect 43024 Mistracted note at exit 43025 Note too long at exit 43026 Blocked exit 43027 Too many notes 43029 S11 sensor jam Hardware failure. Reset the machine if problems persist, please contact the service provider. Reset the machine, If problems persists, please contact the service provider. This error happens if there is no money in the machine but there is money in the software Reset the machine, If problems persists, please contact the service provider. 17 4302A Timing wheel 4302C Bad roller profile 4302D Reject error 4302E Exit quantified 4302F Note missing at double detect 43030 Reject rate exceed Hardware failure. Reset the machine if problems persist, please contact the service provider. Bill jam or sensor failure. Reset the machine, If problems persists, please contact the service provider. 43031 Jam at exit 43032 Interference recovery 43033 Suspect exit accountancy 43034 RAM error 43035 EPROM error 43036 Operation timeout 43037 RAM corruption 43040 Cassette motor echo error 43041 Mistracked note at S17 sensor 43042 Mistracked note at S23 sensor 43043 Reject gate open error Please check if the reject bin is in 43045 Note jam Bill jam or sensor failure. Reset the machine, If problems persists, please contact the service provider. 43046 S15/S16 error 43047 Pick up over 43048 Reject error 43049 Please insert cassette 4304A S17 jam 4304B S19 error 4304C S23 error 4304D Corrupted note count Hardware failure. Reset the machine if problems persist, please contact the service provider. Hardware failure. Reset the machine if problems persist, please contact the service provider. Please insert cassette Bill jam or sensor failure. Look for the bill jam very thoroughly. 18 4304E S15/S16 jam 4304F Undefined command 4G020 Prot close failure 4G122 Receive(STX) retry over 4G136 Reject sensor error 4G137 Dispense sensor error 4G192 Receiver over run 4G411 Cassette Error 4G444 No money in the machine 4G999 No cash box Hardware failure. Reset the machine if problems persist, please contact the service provider. Fetal error. Please contact the manufacturer Hardware failure. Reset the machine if problems persist, please contact the service provider. 3-2-5 ADA Error Code Meaning Suggested Resolution 6G010 Port open error 6G020 Port close failure 6G111 Command response time over 6G113 Response time over 6G114 Data receiving time over 6G191 RX FIFO Error 6G192 RX Over Run 6G193 Other Communication Driver Error 6G212 Double work error 6G213 Non-defined application command 6G214 Non-defined application command 6G433 Response error The connection between the ADA and the communication port is not established. Please check the connection between ADA and the PC. If problem persists, replace the cable or ADA board Check the connection of the Printer cable, if problem persist replace the card reader, cable or the port 19 Software error. Please contact the manufacturer if these error happen. 3-2-6 Modem Error Code Meaning Suggested Resolution 5G001 Port Error on Status 5G002 Port Close Error 5G004 Timeout Command on Initialize 5G005 Port Error on Initialize 5G008 No dial tone 5G010 Port error on dial 5G011 Port Open Error 5G013 Disconnection 5G014 Disconnection 5G015 Dial command error 5G017 Dial error 5G120 Line disconnection 5G030 Dialing time over 5G113 Dialing failed (Dialing retry over) 5G016 Invalid Command 5G212 Sub program application double work 5G122 ENQ Timeout 5G123 Data frame time over(ACK) 5G124 Data frame time over(STX) 5G125 Data frame time over(ETX) 5G045 Data frame time over(BCC) 5G127 Disconnect Response 5G128 Disconnect (EOT) 5G129 Disconnect(ETX) 5G126 Data frame time over(EOT) 5G029 Time out command error 5G136 Receive NAK retry over Please Reset the machine, if problems persist, please contact the service provider. 5G061 Unknown error after send Please Reset the machine, if problems persist, please contact the service provider. Check the connection of the Modem cable, if problem persist replace the modem, cable or the port Check the dial tone from the phone jack 20 Software error. Reset the machine, if problems persist, please contact the manufacturer 3-2-7 PED Error Code Meaning Suggested Resolution 0G010 Port open error 0G020 Port close failure 0G111 Poll time over 0G113 Response time over 0G121 Data NAK response retry over 0G123 NAK send retry over 0G131 Response frame error 0G132 Undefined response code 0G133 Mode mismatched 0G134 Response length error 0G191 RX FIFO Error 0G192 RX Over Run 0G193 Other Communication Driver Error 0G194 Command Response Error 0G195 Command Response Error 0G212 Double work error 0G213 Non-defined application command 0G411 Command retry over(IDLE) 0G423 Command retry over(Initial) 0G433 Command retry over(Status) 0G443 Command retry over, data error(PED mode) 0G453 Command retry Over(Normal mode) 0G463 Command retry over, data error(Set Working Key) 0G473 Data length error The connection between the PED and the communication port is not established. Please check the connection between PED and the PC. If problem persists, replace the cable or PED board Check the connection of the device cable, If problem persist replace the device, cable, or port. 21 Software error. Please contact the manufacturer if these error happen. Please Reset the machine, if problems persist, please contact the service provider 3-2-8 Work & Main Error Code Meaning Suggested Resolution 0J012 No match Mac Check Data Check the Mac Key and retry download MAC Data, If problems persists, please contact the service provider and processing company. 0J014 No match FS after Bank ID 0J015 No match FS after Terminal ID 0J016 No match FS after Response Type 0J018 No match FS after Mac Time Value 0J019 No match FS after Serial Number 0J020 No match FS after Response Code 0J021 No match FS after Reference Number 0J022 No match FS after Settlement Date 0J023 No match FS after Account Balance 0J024 No match FS after Available Balance 0J025 No match FS after Surcharge(Transaction SR) 0J026 No match FS after Response Text 0J031 No match FS after Date and Time 0J032 No match FS after Health Timer 0J033 No match FS after Working Key 0J034 No match FS after Surcharge(Configuration SR") 0J035 No match Response Sub Type 0J036 No match Destination Key 0J037 No match Encryption Key 0J040 No match FS after Mac Work Key Flag 0J041 No match FS after Response Sub Type Reset the machine. If problems persist, please contact the service provider and processing company. Check the des type, Reset the machine. If problems persist, please contact the service provider and processing company. Reset the machine. If problems persist, please contact the service provider and processing company. 22 Error Code Meaning Suggested Resolution 0J042 No match FS after Destination Key 0J043 No match FS after Encryption Key 0J044 No match FS after BIN Flag 0J045 No match FS after Triple Work key 0J046 No match FS after Offline PIN 0J047 No match FS after Offline wireless carrier Ivr Number 0J080 No match FS after LD Account Number 0J081 No match FS after LD Voucher Serial Number 0J082 No match FS after LD Voucher Expiration Date 0J083 No match FS after LD Voucher PIN 0J084 No match FS after LD Voucher Phone Number 0J085 No match FS after LD Voucher Customer service Phone Number 0J086 No match FS after LD Voucher Carrier IVR Number 0J087 No match FS after Sales Tax Rate 0J088 No match FS after Sales Tax Amount 0J089 No match FS after MOP ID 0J090 No match FS after LD Receipt Disclosure Information 0J091 No match FS after Wireless Customer Phone Number 0J092 No match FS after Convenience Fee(Money Transfer) 0J093 No match FS after Convenience Fee Tax(Money Transfer) 0J095 No match FS after Promotional(Money Transfer) 0J094 No match FS after Send Amount(Money Transfer) 23 Reset the machine. If problems persist, please contact the service provider and processing company. Error Code Meaning Suggested Resolution 0J096 No match FS after Confirmation Code(Money Transfer) 0J097 No match FS after MTCN(Money Transfer) 0J098 No match FS after Approved Amount(Money Transfer) 0J050 Bank ID length error Check the Bank ID, If problems persist, please contact the service provider and processing company. 0J051 Terminal ID length error Check the Terminal ID, If problems persist, please contact the service provider and processing company. 0J052 Response Type length error 0J053 Mac Time Value length error 0J054 Local Date, Local Time length error 0J055 Health Timer length error 0J056 Working Key length error Check the des type, If problems persist, please contact the service provider and processing company. 0J057 Mac Check Data length error Check the MAC setup, If problems persist, please contact the service provider and processing company. 0J058 Serial Number length error 0J059 Response Code length error 0J060 Configuration Request length error 0J061 Response Sub Type length error 0J062 Destination length error 0J063 Encryption length error 0J064 Mackey Work Key length error 0J070 No match Bank ID Reset the machine. If problems persist, please contact the service provider and processing company. If problems persist, please contact the service provider and processing company. If problems persist, please contact the service provider and processing company. Check the Band ID, If problems persist, please contact the service provider and processing company. 24 Error Code Meaning Suggested Resolution 0J071 No match Terminal ID Check the terminal ID, If problems persist, please contact the service provider and processing company. 0J072 No match Request Type If problems persist, please contact the service provider and processing company. 5J001 Phone Number length error Check the phone number 5J002 Send Receive Timeout(Dialing) 5J003 Receive error(Configuration SR) 5J004 Receive error(Cancel SR) 5J005 Receive error(BIN SR) 5J006 Receive error(Health message SR) 5J007 Receive error(Mac Work Key SR) 5J008 Send Receive Timeout(Configuration SR) 5J009 Send Receive Timeout(Host total SR) 5J010 Send Receive Timeout(Mac Work Key down SR) 5J011 Send Receive Timeout(Transaction SR) 5J012 Send Receive Timeout(BIN SR) 5J013 Send Receive Timeout(Health message SR) 5J014 Receive error(Cash position SR) EJ001 PED mode error EJ002 PED password error EJ003 PED single first key error EJ004 PED single second key error EJ005 PED single master checksum error EJ006 PED triple first key error EJ007 PED triple second key error EJ008 PED triple master checksum error EJ009 PED MAC key error Check the phone line, If problems persist, please contact the service provider and processing company. Check the des type and PED device 25 Check the master key data, If problems persist, please contact the service provider Error Code Meaning Suggested Resolution 2G4C1 No paper(receipt) Add receipt paper 4J001 Pickup retry over This error happens if there is no money in the machine but there is money in the software 0J001 Undefined, Check your money 0J002 No match amount, Check your money 00001 Out of memory 0000F Window error 000E0 Invalid Work class 000F0 Invalid DBM index please contact the service provider. Reboot the machine. If problems persist, please contact the service provider. Software error. if problems persist, please contact the manufacturer 26 Section 4 Cash Dispenser 4-1 Replenishing GBM 1000(2000)-CH Currency Cassettes To replenish the cash cassettes in the GBM 1000(2000)-CH proceed as follows. 1. Push the lock-bracket of the dispensing mechanism, at the same time, grasp the handle of the Cassette and pull out the cassette to the front. 2. Turn the cassette upside down and place the cassette in the even table. <At the time of cassette pulled> <Placing the cassette in the even table> 3. After rotating the lock to the right with a cassette key, open the cassette lid upward. Lock 27 4. Push the push plate to the back till locking. Push plate 5. Setting the notes evenly, and pushing the release button smoothly until the push plate contacts the notes. Notes Release button (Green) 6. After closing the cassette lid and turning the cassette key to the upper side, Check the cassette lid locking 28 7. Turn the cassette upside down. 8. Push the cassette into the dispensing mechanism till locking entirely. (NOTE: The lid of the cassette must be not set upward.) 9. Make sure that the handle is downward. (O) (X) 29 Section 5 Receipt Printer 5-1 How To Replenish The Receipt Printer Paper 5 To replace the printer paper proceed as follows: 1. Unlock and open the fascia of the Xtremo 7100, 7200. Receipt Printer 2. If there is any paper remaining on the paper roll core, tear between the roll and the printer. Press the paper feed switch until the remaining paper is fully ejected through the fascia exit slot. 3. Lift up the remaining printer roll (or empty core). Remove the spindle from the paper core and retain the spindle. 4. Remove enough paper from the new paper roll so that you do not have any traces of glue or tape marks on the roll. Tear or cut off the end of the supply roll to make a clean straight edge. 30 5. Insert the spindle through the core of the new paper roll. Make sure the spindle stops are fully pushed up against the paper roll core. 6. Lower the paper roll into the slots in the printer brackets so that the paper feeds forward from the top of the roll as shown. The spindle stops should be on the side viewed below. 7. Insert the leading edge of the roll into the printer slot until the printer starts to feed the paper through automatically. 8. When the paper stops feeding, press the feed switch once. The paper will feed through and cut automatically. If the paper does not emerge, refer to the section “How To Clear Receipt Paper Jams”. 9. Push the fascia back into the Xtremo 7100, 7200 and lock. 10. Select General Menu from the Maintenance Mode. 11. Press Reset. 31 5-2 How To Clear Receipt Printer Jams 5 To clear a jam within the receipt printer, proceed as follows: 1. Unlock and open the fascia of the Xtremo 7100, 7200. 2. Inspect the printer to see if you can identify the cause and location of the paper jam. 3. Tear the paper between the paper roll and the printer. Press the feed switch until the paper is fully ejected from the printer mechanism. If there is any paper jammed in the exit area, try to remove it carefully with your fingers. 4. Make sure that the paper roll can turn freely by spinning the paper roll backwards away from the fascia. If the roll or spindle do not turn freely, lift out the remaining paper roll from the printer and check that there are no foreign objects preventing the paper roll from rotating. If no obstruction can be found, replace the paper roll. 32 5. If the jammed paper is not visible, press the paper feed switch to fully eject the paper out of the exit slot. 6. If paper does not emerge from the exit slot, open the printer by pulling out the latch shown below, and pull the printer backwards. Carefully remove any torn paper with your fingers. 7. Close the printer by pulling out the latch and pushing the printer fully home before releasing the latch. 8. To reload the paper, make sure that the leading edge of the paper is fairly straight by tearing off the end of the supply roll to make a clean straight edge. 9. Insert the leading edge of the roll into the printer slot until the printer starts feed the paper through automatically. 10. When the paper stops feeding, press the feed switch once. The paper will feed through and cut automatically. 11. Push the fascia back into the ComNet Series and lock. 12. Select General Menu from the Maintenance Mode. 13. Press Reset. 33 35 36 37 38 39 40 41 42 43