1
1
RefSet CreateUpload
Windows Program to Create and Upload GSI, STR and/or Leica Database Files to a
Memory Card from a Surpac string file for the Automatic Reference Line and Stakeout
Program - RefSet Viva
Note: This version only works with RefSet Viva v2.5 and above
User Manual
Version 2.0
© Justin Gardner 2015
www.refset.com.au
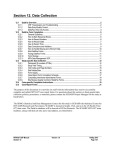
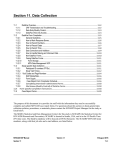
Contents
1. REFSET CREATEUPLOAD INSTALLATION.............................................. 2
2. USING REFSET CREATEUPLOAD ............................................................... 2
3. VISUAL C++ RUNTIME LIBRARIES ............................................................ 3
2
1. RefSet CreateUpload Installation
Extract the Install_RefSet_CreateUpload_{version}.exe file to any folder on the hard
drive
Navigate to the folder on the hard drive using Windows Explorer and double click on the
Install_RefSet_CreateUpload_{version}.exe file to run the installation
Click on Yes if you get a User Account Control message that says “Do you want to allow
the following program from an unknown publisher to make change to this computer?”
Follow the installation instructions to install Refset CreateUpload to the hard disk
A shortcut to the program will be placed in the Start menu and on the desktop
2. Using RefSet CreateUpload
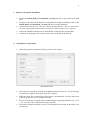
When the program is started the following screen will be shown
Start Menu Screen
Select the file to upload by clicking on the Select button next to the File To Upload entry
box and then navigate to the Surpac string file to upload
When the string file is selected the Upload Name is automatically set to the same name
as the string file, this may be changed if needed
Enter a String Range to upload using a standard Surpac string range definition (eg: 1,4 or
1;3 or 1,5,2 etc) or leave blank for all strings in the file
Select the description field (D1 to D4) to set the upload file Point IDs in the PtIDs From
selection box
3
Select the card drive to upload the files to in the Card Drive selection box
Under Files to Create on Card select the file types to upload (any combination of files
can be selected)
Check that the memory card is connected to the computer and press Upload to upload
the files
The file/s will then be copied to the memory card
When the file/s have been copied the program will check that the file/s are now on the
memory card and if the file/s do not exist a warning screen will appear
Information about the upload will be displayed in the report window including the point
coordinates of the points that are in the string file
If the Leica database is not created then see Visual C++ Runtime Libraries below for
instructions on how to fix this
Notes:
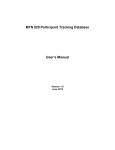
If there are points with duplicate Point ID’s in the string file then the duplicate Point ID’s
will be appended with a sequential number in the upload file/s (eg: If there is more than
one point in the string file with ‘1’ as the Point ID then the first will named ‘1’, the
second will be ‘1(1)’, the third will be ‘1(2)’, etc)
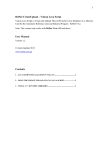
If there are points with blank Point ID’s in the string file then these points will not appear
in RefSet Viva as Control Points but will be used in the RefSet Viva map view to display
the string lines
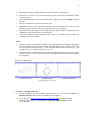
RefSet Viva Map Views:
All Point ID’s Set
Blank Point ID’s
Duplicate Point ID’s
(eg: Walls Shown as Lines Only)
3. Visual C++ Runtime Libraries
If after installation the Leica database program does not work then the Visual C++
Runtime Libraries may need to be installed on the computer
To do this go to http://support.microsoft.com/kb/2019667 and download and
install the latest version of the Visual C++ Redistributable Package suitable
for the computer