1
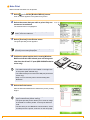
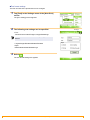
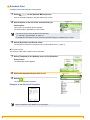
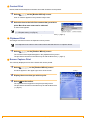
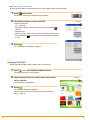
Brother Mobile Printing Software User's Guide The contents of this guide and the specifications of this product are subject to change without notice. Brother reserves the right to make changes without notice in the specifications and materials contained herein and shall not be responsible for any damages (including consequential) caused by reliance on the materials presented, including but not limited to typographical and other errors relating to the publications. The screen images in this guide may differ depending on your OS or printer. Version 0 1 How to use Brother Mobile Printing Software (Brother MPrint) This software provides an operation check sample for use with the PocketJet series. Printing This printer has eight different printing functions. 1 Select on the [Program] screen. The [Brother MPrint] screen appears. Windows Mobile 5.0 / 6 Professional / 6 Classic 2 Check that , , and on the screen. , , , Note Print → Refer to page 3 Schedule Print → Refer to page 6 E-mail Print → Refer to page 10 Task Print → Refer to page 7 Contact Print → Refer to page 8 Clipboard Print → Refer to page 8 Screen Capture Print → Refer to page 8 Image File Print → Refer to page 9 MPrint Utility → This function is not supported by the PocketJet series. , , appear Windows Mobile 6 Standard 2 Check that , , , , and appear on the screen. Schedule Print → Refer to page 6 E-mail Print → Refer to page 10 Task Print → Refer to page 7 • Note Print, Clipboard Print and Screen Capture Print is not available with Windows Mobile 6 Standard. Contact Print → Refer to page 8 Image File Print → Refer to page 9 MPrint Utility → This function is not supported by the PocketJet series. 2 Printing Note Print Memos saved with Notes can be printed. 1 Select on the [Brother MPrint] screen. A list of memos appears in the [Note Print] screen. 2 Select the memo that you wish to print. Only one memo can be selected. Folder list The selected memo is highlighted. To display the memos in each previously categorized folder, select the folder list. 3 Select [Preview] in the Printer menu. The [Print preview] screen appears. If [Print] was selected, printing will begin without the [Print preview] screen being displayed. 4 Position the printer and the device running Windows Mobile so that their IrDA infrared ports are facing each other less than 20 cm/7.9" apart (MW-120/260/PocketJet series only). • Make sure that the printer is turned on. • The IrDA infrared port is in the middle on the right side of the printer (MW-120/260 only) • The IrDA infrared port is next to the USB port (PocketJet series only). • Step 4 is not necessary when communicating with Bluetooth. 5 Select the Print button. After the Windows Mobile device detects the printer, printing begins. • The printed layout may differ depending on the size of paper selected with [Printer setting]. • The [Print preview] screen allows you to view an image of the data as it will be printed. Text may be difficult to read. • The first time you use Bluetooth communication, select a COM port for the printer, as shown on the next page. 3 Printing 20cm/7.9" Advanced settings Precise print settings can be specified. Printer settings 1 Select [Printer setting] in the [Print preview] screen. The [Printer setting] screen appears. 2 The following settings can be specified. ok button • Printer: Select the printer model which you are using. • Port: Specify the settings depending on the COM port where the Bluetooth connection was established. (For details, refer to the User's Guide.) • Paper size: Select the paper size which you want to use. The setting is adjusted according to the paper cassette that is loaded into the printer. • Printing orientation: Portrait/Landscape • Print mode: Normal/Global • Number of copies: 1 through 50/Collate 3 Select . The printer settings are applied. Graphics-processing settings 1 Select Graphics in the [Print preview] screen. The [Graphics process setting] screen appears. 2 The following settings can be specified. ok button • Half-tone: Dithering/Error Diffusion/None • Image processing: Full-size printing/Fit to paper 3 Select . The graphics-processing settings are applied. 4 Printing Text format settings The font and size of the printed text can be changed. 1 Tap [Font] in the Settings menu of the [Note Print] screen. The [Font setting] screen appears. 2 The following text settings can be specified. • Font: Tahoma/Courier New/Frutiger Linotype/Bookdings The fonts that can be used differ depending on the device. • Size: Largest/Larger/Standard/Smaller/Smallest • Style: Bold/Underline/Italic/Strikethrough 3 Select . The text format settings are applied. 5 Printing ok button Schedule Print Schedules saved with Calendar can be printed. 1 Select on the [Brother MPrint] screen. A list of schedules appears in the [Schedule Print] screen. 2 Select the box to the left of the schedule that you wish to print. Category list • More than one schedule can be selected. The selected file is indicated by a check mark. • The period of time to be printed can be specified. (→ “Printing a specified date” on page 7) • To display the schedules in each previously specified category, tap [Filter] in the menu. 3 Select [Preview] in the Printer menu. The procedure continues in the same way as with the Note Print (→ page 3). Template setting The layout in which data is printed can be specified. 1 Select [Template] in the Settings menu of the [Schedule Print] screen. The [Template] screen appears. 2 Select the template that you wish to use. 3 Select Template menu . The selected template is applied. Example of an A6 portrait template Various templates are available for A7-size paper. 6 Printing ok button Printing a specified date The period of time to be printed can be specified. 1 Select [Date] in the Settings menu of the [Schedule Print] screen. The [Date] screen appears. 2 ok button Change the date setting. • Start date/End date/In progress • Date 3 Select . The schedules included in the specified time period are displayed in the [Schedule Print] screen. Task Print Tasks and appointments saved with Tasks can be printed. 1 Select on the [Brother MPrint] screen. A list of tasks appears in the [Task Print] screen. 2 Select the box to the left of the task that you wish to print. More than one task can be selected. A check mark appears. • The period of time to be printed can be specified. (→ “Printing a specified date” on page 7) • The layout in which data is printed can be specified. (→ “Template setting” on page 6) The procedure continues in the same way as with the Note Print (→ page 3). 7 Printing Contact Print Names, address and telephone numbers saved with Contacts can be printed. 1 Select on the [Brother MPrint] screen. A list of contacts appears in the [Contact Print] screen. 2 Select the box to the left of the contact that you wish to print. More than one name can be selected. A check mark appears. The layout in which data is printed can be specified. (→ “Template setting” on page 6) The procedure continues in the same way as with the Note Print (→ page 3). Clipboard Print The images and text moved to the Clipboard can be printed. The Clipboard is the name of the location where data that was cut or copied is stored. 1 Select on the [Brother MPrint] screen. The contents of the Clipboard appear in the [Clipboard Print] screen. The procedure continues in the same way as with the Note Print (→ page 3). Screen Capture Print The currently displayed screen of the Pocket PC can be printed. 1 Select on the [Brother MPrint] screen. A toolbar appears in the upper-right corner of the screen. 2 Display the screen that you wish to print. 3 Select on the toolbar. The captured screen appears in the [Print preview] screen. The procedure continues in the same way as with the Note Print (→ page 3). 8 Printing Toolbar Screen capture print settings The time until the data is imported and the size of the captured area can be specified. 1 Select on the toolbar. The [Screen capture print settings] screen appears. 2 The following settings can be specified. ok button • Capture delay time: 0 to 10 seconds Specifies the length of time until the image is imported after is selected. • Capture range: Selection range (Use the stylus to select the desired area.)/Client (Area indicated by in the illustration at the right)/Desktop (Entire screen) 3 Select . The screen capture settings are applied. Image File Print Saved image files (in BMP, JPEG or PNG format) can be printed. 1 Select on the [Brother MPrint] screen. The [Image File Print] screen appears. 2 Tap the image file that you wish to print. Only one file can be selected. The selected file is highlighted. 3 Select . The [Print preview] screen appears. The procedure continues in the same way as with the Note Print (→ page 3). 9 Printing ok button E-mail Print Saved e-mails can be printed. 1 Select on the [Brother MPrint] screen. A list of e-mails appears in the [Email Print] screen. 2 Select the e-mail that you wish to print. Only one e-mail can be selected. The selected e-mail is highlighted. The layout in which data is printed can be specified. (→ “Template setting” on page 6) The procedure continues in the same way as with the Note Print (→ page 3). 10 Printing