1
QAD Enterprise Applications 2009
Standard Edition
User Guide
Master Data
Items/Sites
Pricing
Product Change Control
Compliance
Addresses
Logistics Accounting
Intrastat
Inventory Control
Physical Inventory
Global Tax Management
78-0714B
QAD 2009 Standard Edition
June 2009
This document contains proprietary information that is protected by copyright and other
intellectual property laws. No part of this document may be reproduced, translated, or modified
without the prior written consent of QAD Inc. The information contained in this document is
subject to change without notice.
QAD Inc. provides this material as is and makes no warranty of any kind, expressed or
implied, including, but not limited to, the implied warranties of merchantability and fitness for a
particular purpose. QAD Inc. shall not be liable for errors contained herein or for incidental or
consequential damages (including lost profits) in connection with the furnishing, performance,
or use of this material whether based on warranty, contract, or other legal theory.
QAD and MFG/PRO are registered trademarks of QAD Inc. The QAD logo is a trademark of
QAD Inc.
Designations used by other companies to distinguish their products are often claimed as
trademarks. In this document, the product names appear in initial capital or all capital letters.
Contact the appropriate companies for more information regarding trademarks and
registration.
Copyright © 2009 by QAD Inc.
QAD Inc.
100 Innovation Place
Santa Barbara, California 93108
Phone (805) 684-6614
Fax (805) 684-1890
http://www.qad.com
Contents
About This Guide . . . . . . . . . . . . . . . . . . . . . . . . . . . . . . . . . . . . . . . . . . . 1
Other QAD Documentation . . . . . . . . . . . . . . . . . . . . . . . . . . . . . . . . . . . . . . . . .
Online Help . . . . . . . . . . . . . . . . . . . . . . . . . . . . . . . . . . . . . . . . . . . . . . . . . . . . . .
QAD Web Site . . . . . . . . . . . . . . . . . . . . . . . . . . . . . . . . . . . . . . . . . . . . . . . . . . .
Conventions . . . . . . . . . . . . . . . . . . . . . . . . . . . . . . . . . . . . . . . . . . . . . . . . . . . . .
Chapter 1
2
2
3
4
Introduction to Master Data. . . . . . . . . . . . . . . . . . . . . . . . 5
Items/Sites . . . . . . . . . . . . . . . . . . . . . . . . . . . . . . . . . . . . . . . . . . . . . . . . . . . . . .
Pricing . . . . . . . . . . . . . . . . . . . . . . . . . . . . . . . . . . . . . . . . . . . . . . . . . . . . . . . . . .
Product Change Control (PCC) . . . . . . . . . . . . . . . . . . . . . . . . . . . . . . . . . . . . . .
Compliance . . . . . . . . . . . . . . . . . . . . . . . . . . . . . . . . . . . . . . . . . . . . . . . . . . . . . .
Addresses . . . . . . . . . . . . . . . . . . . . . . . . . . . . . . . . . . . . . . . . . . . . . . . . . . . . . . .
Logistics Accounting . . . . . . . . . . . . . . . . . . . . . . . . . . . . . . . . . . . . . . . . . . . . . .
Intrastat . . . . . . . . . . . . . . . . . . . . . . . . . . . . . . . . . . . . . . . . . . . . . . . . . . . . . . . . .
Inventory Control . . . . . . . . . . . . . . . . . . . . . . . . . . . . . . . . . . . . . . . . . . . . . . . . .
Physical Inventory . . . . . . . . . . . . . . . . . . . . . . . . . . . . . . . . . . . . . . . . . . . . . . . .
Global Tax Management (GTM) . . . . . . . . . . . . . . . . . . . . . . . . . . . . . . . . . . . . .
6
6
7
7
7
7
8
8
8
8
Section 1 Master Data . . . . . . . . . . . . . . . . . . . . . . . . . . . . . . 9
Chapter 2
Items/Sites . . . . . . . . . . . . . . . . . . . . . . . . . . . . . . . . . . . . 11
Introduction . . . . . . . . . . . . . . . . . . . . . . . . . . . . . . . . . . . . . . . . . . . . . . . . . . . . 12
Items . . . . . . . . . . . . . . . . . . . . . . . . . . . . . . . . . . . . . . . . . . . . . . . . . . . . . . . . . . 13
iv
User Guide — Master Data
General Item Data . . . . . . . . . . . . . . . . . . . . . . . . . . . . . . . . . . . . . . . . . 14
Codes and Master Comments . . . . . . . . . . . . . . . . . . . . . . . . . . . . . . . . 17
Inventory Data . . . . . . . . . . . . . . . . . . . . . . . . . . . . . . . . . . . . . . . . . . . . 18
Shipping Data . . . . . . . . . . . . . . . . . . . . . . . . . . . . . . . . . . . . . . . . . . . . . 20
Planning Data . . . . . . . . . . . . . . . . . . . . . . . . . . . . . . . . . . . . . . . . . . . . . 20
Cost Data . . . . . . . . . . . . . . . . . . . . . . . . . . . . . . . . . . . . . . . . . . . . . . . . 22
Customer and Supplier Items . . . . . . . . . . . . . . . . . . . . . . . . . . . . . . . . . 23
Product Lines . . . . . . . . . . . . . . . . . . . . . . . . . . . . . . . . . . . . . . . . . . . . . . . . . . . 24
Product Line Maintenance . . . . . . . . . . . . . . . . . . . . . . . . . . . . . . . . . . . 25
Product Line Accounts . . . . . . . . . . . . . . . . . . . . . . . . . . . . . . . . . . . . . . 25
Alternate Product Line Accounts . . . . . . . . . . . . . . . . . . . . . . . . . . . . . . 27
Sites . . . . . . . . . . . . . . . . . . . . . . . . . . . . . . . . . . . . . . . . . . . . . . . . . . . . . . . . . . . 28
Taxes . . . . . . . . . . . . . . . . . . . . . . . . . . . . . . . . . . . . . . . . . . . . . . . . . . . 28
Sites and Enterprise Material Transfer (EMT) . . . . . . . . . . . . . . . . . . . 29
Sites and Multiple Databases . . . . . . . . . . . . . . . . . . . . . . . . . . . . . . . . . 29
Site Security . . . . . . . . . . . . . . . . . . . . . . . . . . . . . . . . . . . . . . . . . . . . . . 30
Creating Sites . . . . . . . . . . . . . . . . . . . . . . . . . . . . . . . . . . . . . . . . . . . . . 30
Associating Domains with Sites . . . . . . . . . . . . . . . . . . . . . . . . . . . . . . 32
Site Connection Records . . . . . . . . . . . . . . . . . . . . . . . . . . . . . . . . . . . . 32
Deleting Sites . . . . . . . . . . . . . . . . . . . . . . . . . . . . . . . . . . . . . . . . . . . . . 33
Locations . . . . . . . . . . . . . . . . . . . . . . . . . . . . . . . . . . . . . . . . . . . . . . . . . . . . . . . 34
Permanent/Temporary Locations . . . . . . . . . . . . . . . . . . . . . . . . . . . . . . 35
Automatic Locations . . . . . . . . . . . . . . . . . . . . . . . . . . . . . . . . . . . . . . . 36
Location Types . . . . . . . . . . . . . . . . . . . . . . . . . . . . . . . . . . . . . . . . . . . . 36
Single Item Locations . . . . . . . . . . . . . . . . . . . . . . . . . . . . . . . . . . . . . . 36
Reserved Locations . . . . . . . . . . . . . . . . . . . . . . . . . . . . . . . . . . . . . . . . 37
Inventory Status Codes . . . . . . . . . . . . . . . . . . . . . . . . . . . . . . . . . . . . . . . . . . . . 39
Status Defaults . . . . . . . . . . . . . . . . . . . . . . . . . . . . . . . . . . . . . . . . . . . . 40
Overissue Policy . . . . . . . . . . . . . . . . . . . . . . . . . . . . . . . . . . . . . . . . . . 41
Restricting Transactions . . . . . . . . . . . . . . . . . . . . . . . . . . . . . . . . . . . . . 42
Chapter 3
Pricing. . . . . . . . . . . . . . . . . . . . . . . . . . . . . . . . . . . . . . . . 45
Introduction to Pricing . . . . . . . . . . . . . . . . . . . . . . . . . . . . . . . . . . . . . . . . . . . . 46
Using Best Pricing . . . . . . . . . . . . . . . . . . . . . . . . . . . . . . . . . . . . . . . . . . . . . . . . 48
Contents
Planning for Best Pricing . . . . . . . . . . . . . . . . . . . . . . . . . . . . . . . . . . . .
Setting Pricing Defaults . . . . . . . . . . . . . . . . . . . . . . . . . . . . . . . . . . . . .
Setting Up Analysis Codes . . . . . . . . . . . . . . . . . . . . . . . . . . . . . . . . . .
Setting Up Item Price Break Categories . . . . . . . . . . . . . . . . . . . . . . . .
Creating and Maintaining Price Lists . . . . . . . . . . . . . . . . . . . . . . . . . .
Repricing Orders in Sales Order Repricing . . . . . . . . . . . . . . . . . . . . . .
Repricing in Sales Order Maintenance . . . . . . . . . . . . . . . . . . . . . . . . .
Understanding Sales Order Maintenance Fields . . . . . . . . . . . . . . . . . .
Using List/Discount Table Pricing . . . . . . . . . . . . . . . . . . . . . . . . . . . . . . . . . . .
Creating Price Lists . . . . . . . . . . . . . . . . . . . . . . . . . . . . . . . . . . . . . . . .
Generating Price Lists by Item . . . . . . . . . . . . . . . . . . . . . . . . . . . . . . .
Copying Price Lists . . . . . . . . . . . . . . . . . . . . . . . . . . . . . . . . . . . . . . . .
Processing List/Discount Prices . . . . . . . . . . . . . . . . . . . . . . . . . . . . . .
Pricing Setup . . . . . . . . . . . . . . . . . . . . . . . . . . . . . . . . . . . . . . . . . . . . .
Chapter 4
49
51
52
59
61
80
84
86
88
89
92
94
97
98
Product Change Control . . . . . . . . . . . . . . . . . . . . . . . . . 99
Introduction . . . . . . . . . . . . . . . . . . . . . . . . . . . . . . . . . . . . . . . . . . . . . . . . . . .
PCR/PCO Life Cycle . . . . . . . . . . . . . . . . . . . . . . . . . . . . . . . . . . . . . . . . . . . .
PCR Life Cycle . . . . . . . . . . . . . . . . . . . . . . . . . . . . . . . . . . . . . . . . . .
PCO Life Cycle . . . . . . . . . . . . . . . . . . . . . . . . . . . . . . . . . . . . . . . . . .
Setting Up PCC . . . . . . . . . . . . . . . . . . . . . . . . . . . . . . . . . . . . . . . . . . . . . . . .
Preparing Data for Use with PCC . . . . . . . . . . . . . . . . . . . . . . . . . . . .
Setting Up PCC Control . . . . . . . . . . . . . . . . . . . . . . . . . . . . . . . . . . .
Defining Groups, Routing Slips, and Change Types . . . . . . . . . . . . .
Creating PCRs and PCOs . . . . . . . . . . . . . . . . . . . . . . . . . . . . . . . . . . . . . . . . .
Using PCR/PCO Function Maintenance . . . . . . . . . . . . . . . . . . . . . . .
Maintaining Text Records . . . . . . . . . . . . . . . . . . . . . . . . . . . . . . . . . .
Maintaining Item Records . . . . . . . . . . . . . . . . . . . . . . . . . . . . . . . . . .
Maintaining Product Structure Records . . . . . . . . . . . . . . . . . . . . . . .
Maintaining Routing Records . . . . . . . . . . . . . . . . . . . . . . . . . . . . . . .
Maintaining Formula Records . . . . . . . . . . . . . . . . . . . . . . . . . . . . . . .
Maintaining Process Records . . . . . . . . . . . . . . . . . . . . . . . . . . . . . . .
Maintaining Item Specifications . . . . . . . . . . . . . . . . . . . . . . . . . . . . .
Maintaining Trailers . . . . . . . . . . . . . . . . . . . . . . . . . . . . . . . . . . . . . .
100
103
103
104
106
107
108
110
119
122
123
124
125
127
128
129
129
130
v
vi
User Guide — Master Data
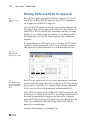
Reviewing PCO Data . . . . . . . . . . . . . . . . . . . . . . . . . . . . . . . . . . . . . . 131
Routing PCRs and PCOs for Approval . . . . . . . . . . . . . . . . . . . . . . . . . . . . . . . 132
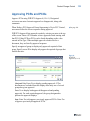
Approving PCRs and PCOs . . . . . . . . . . . . . . . . . . . . . . . . . . . . . . . . . . . . . . . 133
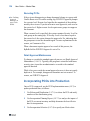
Rerouting PCOs . . . . . . . . . . . . . . . . . . . . . . . . . . . . . . . . . . . . . . . . . . 134
Detail Approval Maintenance . . . . . . . . . . . . . . . . . . . . . . . . . . . . . . . 134
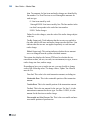
Incorporating PCOs into Production . . . . . . . . . . . . . . . . . . . . . . . . . . . . . . . . . 134
PCO Release and Distribution . . . . . . . . . . . . . . . . . . . . . . . . . . . . . . . 135
Incorporation Planning Report . . . . . . . . . . . . . . . . . . . . . . . . . . . . . . . 136
Incorporation Selection . . . . . . . . . . . . . . . . . . . . . . . . . . . . . . . . . . . . 137
Incorporation . . . . . . . . . . . . . . . . . . . . . . . . . . . . . . . . . . . . . . . . . . . . 138
Implementation . . . . . . . . . . . . . . . . . . . . . . . . . . . . . . . . . . . . . . . . . . 138
Closing PCRs and PCOs . . . . . . . . . . . . . . . . . . . . . . . . . . . . . . . . . . . . . . . . . . 139
Importing and Exporting PCRs and PCOs . . . . . . . . . . . . . . . . . . . . . . . . . . . . 139
Setting Up PCC Security . . . . . . . . . . . . . . . . . . . . . . . . . . . . . . . . . . . . . . . . . . 140
Access to PCO Maintenance Detail Functions . . . . . . . . . . . . . . . . . . 140
Restricting Access to Other Functions . . . . . . . . . . . . . . . . . . . . . . . . . 140
Chapter 5
Compliance . . . . . . . . . . . . . . . . . . . . . . . . . . . . . . . . . . 143
Introduction . . . . . . . . . . . . . . . . . . . . . . . . . . . . . . . . . . . . . . . . . . . . . . . . . . . . 144
Site Security . . . . . . . . . . . . . . . . . . . . . . . . . . . . . . . . . . . . . . . . . . . . . 144
Inventory Attributes . . . . . . . . . . . . . . . . . . . . . . . . . . . . . . . . . . . . . . . 145
Batch Control . . . . . . . . . . . . . . . . . . . . . . . . . . . . . . . . . . . . . . . . . . . . 145
Component Issue Control . . . . . . . . . . . . . . . . . . . . . . . . . . . . . . . . . . . 145
Lot Control . . . . . . . . . . . . . . . . . . . . . . . . . . . . . . . . . . . . . . . . . . . . . . 145
Multi-Lot Inventory Detail . . . . . . . . . . . . . . . . . . . . . . . . . . . . . . . . . . 146
Controlled Substances . . . . . . . . . . . . . . . . . . . . . . . . . . . . . . . . . . . . . 146
Setting Up Compliance . . . . . . . . . . . . . . . . . . . . . . . . . . . . . . . . . . . . . . . . . . . 146
Defining Inventory Attributes . . . . . . . . . . . . . . . . . . . . . . . . . . . . . . . . . . . . . . 149
Why Are Attributes Important? . . . . . . . . . . . . . . . . . . . . . . . . . . . . . . 150
Inventory Attributes Work Flow . . . . . . . . . . . . . . . . . . . . . . . . . . . . . 152
Attribute Descriptions . . . . . . . . . . . . . . . . . . . . . . . . . . . . . . . . . . . . . 152
Inventory Attribute Active Field . . . . . . . . . . . . . . . . . . . . . . . . . . . . . 154
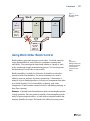
Using Work Order Batch Control . . . . . . . . . . . . . . . . . . . . . . . . . . . . . . . . . . . 157
Batch Control Work Flow . . . . . . . . . . . . . . . . . . . . . . . . . . . . . . . . . . 158
Contents
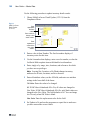
Assigning Batch Numbers to Work Orders . . . . . . . . . . . . . . . . . . . . .
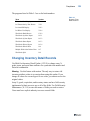
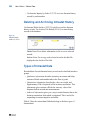
Changing Inventory Detail Records . . . . . . . . . . . . . . . . . . . . . . . . . . . . . . . . .
Using Lot Control . . . . . . . . . . . . . . . . . . . . . . . . . . . . . . . . . . . . . . . . . . . . . . .
Lot Control Work Flow . . . . . . . . . . . . . . . . . . . . . . . . . . . . . . . . . . . .
Lot Control Relationships . . . . . . . . . . . . . . . . . . . . . . . . . . . . . . . . . .
Deciding on Lot Control Level . . . . . . . . . . . . . . . . . . . . . . . . . . . . . .
Building Lot Master Records . . . . . . . . . . . . . . . . . . . . . . . . . . . . . . .
Modifying Lot Master Records . . . . . . . . . . . . . . . . . . . . . . . . . . . . . .
Automatic Lot Numbering . . . . . . . . . . . . . . . . . . . . . . . . . . . . . . . . .
Single Lot per Receipt . . . . . . . . . . . . . . . . . . . . . . . . . . . . . . . . . . . . .
Supplier Lot Numbers . . . . . . . . . . . . . . . . . . . . . . . . . . . . . . . . . . . . .
Expired Inventory Transactions . . . . . . . . . . . . . . . . . . . . . . . . . . . . .
Managing Component Issues . . . . . . . . . . . . . . . . . . . . . . . . . . . . . . . . . . . . . .
Component Issue Control . . . . . . . . . . . . . . . . . . . . . . . . . . . . . . . . . .
Co-product/By-product Component Issue Control . . . . . . . . . . . . . . .
Managing Controlled Substances . . . . . . . . . . . . . . . . . . . . . . . . . . . . . . . . . . .
Entering Country Codes . . . . . . . . . . . . . . . . . . . . . . . . . . . . . . . . . . .
Entering Authority Codes . . . . . . . . . . . . . . . . . . . . . . . . . . . . . . . . . .
Entering Control Numbers for Customers and Sites . . . . . . . . . . . . . .
Entering Control Numbers for Items . . . . . . . . . . . . . . . . . . . . . . . . . .
Entering General License Information . . . . . . . . . . . . . . . . . . . . . . . .
Entering Individual License Information . . . . . . . . . . . . . . . . . . . . . .
Chapter 6
158
159
161
162
163
164
165
166
167
169
171
171
172
172
172
173
174
174
175
175
177
178
Addresses . . . . . . . . . . . . . . . . . . . . . . . . . . . . . . . . . . . 179
Introduction . . . . . . . . . . . . . . . . . . . . . . . . . . . . . . . . . . . . . . . . . . . . . . . . . . .
Address List Types . . . . . . . . . . . . . . . . . . . . . . . . . . . . . . . . . . . . . . .
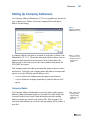
Setting Up Company Addresses . . . . . . . . . . . . . . . . . . . . . . . . . . . . . . . . . . . .
Company Banks . . . . . . . . . . . . . . . . . . . . . . . . . . . . . . . . . . . . . . . . . .
Company Addresses for Purchase Orders . . . . . . . . . . . . . . . . . . . . . .
Company Address and GTM . . . . . . . . . . . . . . . . . . . . . . . . . . . . . . . .
Company Address and 1099 Tax Reporting . . . . . . . . . . . . . . . . . . . .
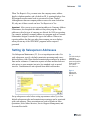
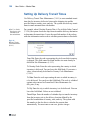
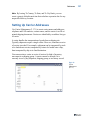
Setting Up Salesperson Addresses . . . . . . . . . . . . . . . . . . . . . . . . . . . . . . . . . .
Setting Up Customer Addresses . . . . . . . . . . . . . . . . . . . . . . . . . . . . . . . . . . . .
Creating Customer Addresses . . . . . . . . . . . . . . . . . . . . . . . . . . . . . . .
180
182
183
183
184
184
184
185
186
187
vii
viii
User Guide — Master Data
Customer Data . . . . . . . . . . . . . . . . . . . . . . . . . . . . . . . . . . . . . . . . . . . 188
Customer Credit Data . . . . . . . . . . . . . . . . . . . . . . . . . . . . . . . . . . . . . . 189
Customer Freight Data . . . . . . . . . . . . . . . . . . . . . . . . . . . . . . . . . . . . . 190
Other Customer Data . . . . . . . . . . . . . . . . . . . . . . . . . . . . . . . . . . . . . . 190
Adjusting Credit Limits . . . . . . . . . . . . . . . . . . . . . . . . . . . . . . . . . . . . 191
Creating Reserved Locations . . . . . . . . . . . . . . . . . . . . . . . . . . . . . . . . 192
Setting Up Supplier Addresses . . . . . . . . . . . . . . . . . . . . . . . . . . . . . . . . . . . . . 192
Setting Up Employee Addresses . . . . . . . . . . . . . . . . . . . . . . . . . . . . . . . . . . . . 193
Setting Up Country Codes . . . . . . . . . . . . . . . . . . . . . . . . . . . . . . . . . . . . . . . . 194
Setting Up Delivery Transit Times . . . . . . . . . . . . . . . . . . . . . . . . . . . . . . . . . . 196
Setting Up Carrier Addresses . . . . . . . . . . . . . . . . . . . . . . . . . . . . . . . . . . . . . . 197
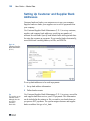
Setting Up Customer and Supplier Bank Addresses . . . . . . . . . . . . . . . . . . . . . 198
Setting Up Credit Terms and Trailer Codes . . . . . . . . . . . . . . . . . . . . . . . . . . . 200
Proximo Terms . . . . . . . . . . . . . . . . . . . . . . . . . . . . . . . . . . . . . . . . . . . 201
Base Date . . . . . . . . . . . . . . . . . . . . . . . . . . . . . . . . . . . . . . . . . . . . . . . 203
Credit Terms Interest . . . . . . . . . . . . . . . . . . . . . . . . . . . . . . . . . . . . . . 203
Base Days . . . . . . . . . . . . . . . . . . . . . . . . . . . . . . . . . . . . . . . . . . . . . . . 204
Trailer Codes . . . . . . . . . . . . . . . . . . . . . . . . . . . . . . . . . . . . . . . . . . . . 205
Setting Up Freight Charges . . . . . . . . . . . . . . . . . . . . . . . . . . . . . . . . . . . . . . . . 206
Freight List Maintenance . . . . . . . . . . . . . . . . . . . . . . . . . . . . . . . . . . . 207
Freight Zone Maintenance . . . . . . . . . . . . . . . . . . . . . . . . . . . . . . . . . . 208
Freight Class Maintenance . . . . . . . . . . . . . . . . . . . . . . . . . . . . . . . . . . 208
Freight Charges Maintenance . . . . . . . . . . . . . . . . . . . . . . . . . . . . . . . 209
Freight Terms Maintenance . . . . . . . . . . . . . . . . . . . . . . . . . . . . . . . . . 210
Changing or Merging Address Codes . . . . . . . . . . . . . . . . . . . . . . . . . . . . . . . . 211
Chapter 7
Logistics Accounting . . . . . . . . . . . . . . . . . . . . . . . . . . 213
Introduction . . . . . . . . . . . . . . . . . . . . . . . . . . . . . . . . . . . . . . . . . . . . . . . . . . . . 214
Logistics Charges . . . . . . . . . . . . . . . . . . . . . . . . . . . . . . . . . . . . . . . . . 214
Pending Vouchers . . . . . . . . . . . . . . . . . . . . . . . . . . . . . . . . . . . . . . . . 217
Logistics Accounting Programs . . . . . . . . . . . . . . . . . . . . . . . . . . . . . . 218
Setting Up Logistics Accounting . . . . . . . . . . . . . . . . . . . . . . . . . . . . . . . . . . . 222
Setting Up GL Accounts . . . . . . . . . . . . . . . . . . . . . . . . . . . . . . . . . . . 222
Setting Up NRM Sequence Numbers . . . . . . . . . . . . . . . . . . . . . . . . . 224
Contents
Setting Up the Control Program . . . . . . . . . . . . . . . . . . . . . . . . . . . . .
Defining Logistics Charge Codes . . . . . . . . . . . . . . . . . . . . . . . . . . . .
Defining Detailed Logistics Accounts . . . . . . . . . . . . . . . . . . . . . . . . .
Calculating Taxes for Logistics Charges . . . . . . . . . . . . . . . . . . . . . . .
Accrual Currency . . . . . . . . . . . . . . . . . . . . . . . . . . . . . . . . . . . . . . . . .
Accruing Inbound Logistics Charges . . . . . . . . . . . . . . . . . . . . . . . . . . . . . . . .
Creating Logistics Cost Elements . . . . . . . . . . . . . . . . . . . . . . . . . . . .
Updating Item Costs . . . . . . . . . . . . . . . . . . . . . . . . . . . . . . . . . . . . . .
Defining Terms of Trade . . . . . . . . . . . . . . . . . . . . . . . . . . . . . . . . . . .
Assigning Terms of Trade to Suppliers . . . . . . . . . . . . . . . . . . . . . . . .
Processing Purchase Orders . . . . . . . . . . . . . . . . . . . . . . . . . . . . . . . .
Processing Purchase Receipts . . . . . . . . . . . . . . . . . . . . . . . . . . . . . . .
Accruing Outbound Logistics Charges . . . . . . . . . . . . . . . . . . . . . . . . . . . . . . .
Updating Freight Terms . . . . . . . . . . . . . . . . . . . . . . . . . . . . . . . . . . .
Processing Orders . . . . . . . . . . . . . . . . . . . . . . . . . . . . . . . . . . . . . . . .
Processing Shipments . . . . . . . . . . . . . . . . . . . . . . . . . . . . . . . . . . . . .
Updating Pending Vouchers . . . . . . . . . . . . . . . . . . . . . . . . . . . . . . . . . . . . . . .
Vouchering Logistics Charges . . . . . . . . . . . . . . . . . . . . . . . . . . . . . . . . . . . . .
Voucher Maintenance . . . . . . . . . . . . . . . . . . . . . . . . . . . . . . . . . . . . .
Deleting and Archiving Logistics Charges . . . . . . . . . . . . . . . . . . . . .
Generating Logistics Reports . . . . . . . . . . . . . . . . . . . . . . . . . . . . . . . . . . . . . .
Chapter 8
225
227
230
233
235
235
236
237
237
238
239
243
245
245
246
249
253
254
254
260
261
Intrastat . . . . . . . . . . . . . . . . . . . . . . . . . . . . . . . . . . . . . . 263
Introduction . . . . . . . . . . . . . . . . . . . . . . . . . . . . . . . . . . . . . . . . . . . . . . . . . . .
Implementing Intrastat . . . . . . . . . . . . . . . . . . . . . . . . . . . . . . . . . . . . . . . . . . .
Setting Up Intrastat Codes . . . . . . . . . . . . . . . . . . . . . . . . . . . . . . . . . .
Setting Up Addresses for Declarants and Agents . . . . . . . . . . . . . . . .
Setting Up Intrastat Control . . . . . . . . . . . . . . . . . . . . . . . . . . . . . . . . .
Setting Up Commodity Codes . . . . . . . . . . . . . . . . . . . . . . . . . . . . . . .
Setting Up Intrastat Item Data . . . . . . . . . . . . . . . . . . . . . . . . . . . . . . .
Setting Up a Company Address for Each Site . . . . . . . . . . . . . . . . . . .
Entering Country Codes for Customers and Suppliers . . . . . . . . . . . .
Entering Net Weights for Intrastat Items . . . . . . . . . . . . . . . . . . . . . . .
Recording Intrastat Data for Orders . . . . . . . . . . . . . . . . . . . . . . . . . . . . . . . . .
264
266
266
267
268
270
271
272
273
273
274
ix
x
User Guide — Master Data
Entering Intrastat Data in Sales Order Maintenance . . . . . . . . . . . . . . 274
Entering Data in Order Intrastat Data Maintenance . . . . . . . . . . . . . . . 276
Automatically Updating Invoice History . . . . . . . . . . . . . . . . . . . . . . . . . . . . . 276
Manually Creating Intrastat History . . . . . . . . . . . . . . . . . . . . . . . . . . . . . . . . . 278
Printing Intrastat Declarations . . . . . . . . . . . . . . . . . . . . . . . . . . . . . . . . . . . . . . 279
Reprinting Intrastat Declarations . . . . . . . . . . . . . . . . . . . . . . . . . . . . . . . . . . . 281
Reviewing Intrastat History Information . . . . . . . . . . . . . . . . . . . . . . . . . . . . . 281
Deleting and Archiving Intrastat History . . . . . . . . . . . . . . . . . . . . . . . . . . . . . 282
Types of Intrastat Data . . . . . . . . . . . . . . . . . . . . . . . . . . . . . . . . . . . . . . . . . . . 282
Chapter 9
Inventory Control. . . . . . . . . . . . . . . . . . . . . . . . . . . . . . 285
Introduction . . . . . . . . . . . . . . . . . . . . . . . . . . . . . . . . . . . . . . . . . . . . . . . . . . . . 286
Setting Up Inventory Control . . . . . . . . . . . . . . . . . . . . . . . . . . . . . . . . . . . . . . 286
Creating Inventory Detail Records . . . . . . . . . . . . . . . . . . . . . . . . . . . . . . . . . . 287
Creating Inventory Transactions . . . . . . . . . . . . . . . . . . . . . . . . . . . . . . . . . . . . 288
Transfers . . . . . . . . . . . . . . . . . . . . . . . . . . . . . . . . . . . . . . . . . . . . . . . . 289
Receipts . . . . . . . . . . . . . . . . . . . . . . . . . . . . . . . . . . . . . . . . . . . . . . . . 290
Issues . . . . . . . . . . . . . . . . . . . . . . . . . . . . . . . . . . . . . . . . . . . . . . . . . . 290
Shipping Documents . . . . . . . . . . . . . . . . . . . . . . . . . . . . . . . . . . . . . . 291
Creating Inventory Transaction History . . . . . . . . . . . . . . . . . . . . . . . . . . . . . . 291
Transaction Types . . . . . . . . . . . . . . . . . . . . . . . . . . . . . . . . . . . . . . . . 291
Reviewing Transaction History . . . . . . . . . . . . . . . . . . . . . . . . . . . . . . 293
Creating Lot/Serial Number History . . . . . . . . . . . . . . . . . . . . . . . . . . . . . . . . . 294
Performing Cycle Counts . . . . . . . . . . . . . . . . . . . . . . . . . . . . . . . . . . . . . . . . . 295
ABC Class Code . . . . . . . . . . . . . . . . . . . . . . . . . . . . . . . . . . . . . . . . . 295
Cycle Counting Procedure . . . . . . . . . . . . . . . . . . . . . . . . . . . . . . . . . . 296
Creating Inventory Reports . . . . . . . . . . . . . . . . . . . . . . . . . . . . . . . . . . . . . . . . 298
Detail Allocation Inventory Report . . . . . . . . . . . . . . . . . . . . . . . . . . . 298
Stock Status Report . . . . . . . . . . . . . . . . . . . . . . . . . . . . . . . . . . . . . . . 298
Reorder Report . . . . . . . . . . . . . . . . . . . . . . . . . . . . . . . . . . . . . . . . . . . 298
Item ABC Status Report/Update . . . . . . . . . . . . . . . . . . . . . . . . . . . . . 298
Inventory Detail Report . . . . . . . . . . . . . . . . . . . . . . . . . . . . . . . . . . . . 299
Inventory Detail by Location . . . . . . . . . . . . . . . . . . . . . . . . . . . . . . . . 299
Current Surplus Inventory Report . . . . . . . . . . . . . . . . . . . . . . . . . . . . 299
Contents
Projected Surplus Inventory . . . . . . . . . . . . . . . . . . . . . . . . . . . . . . . .
Inventory Valuation Reports . . . . . . . . . . . . . . . . . . . . . . . . . . . . . . . .
Stock Journal . . . . . . . . . . . . . . . . . . . . . . . . . . . . . . . . . . . . . . . . . . . .
Device History Record Report . . . . . . . . . . . . . . . . . . . . . . . . . . . . . .
Checking Inventory Availability . . . . . . . . . . . . . . . . . . . . . . . . . . . . . . . . . . .
300
300
301
301
302
Chapter 10 Physical Inventory . . . . . . . . . . . . . . . . . . . . . . . . . . . . . 303
Introduction . . . . . . . . . . . . . . . . . . . . . . . . . . . . . . . . . . . . . . . . . . . . . . . . . . .
Deleting/Archiving Old Tags . . . . . . . . . . . . . . . . . . . . . . . . . . . . . . . . . . . . . .
Freezing Inventory Balances . . . . . . . . . . . . . . . . . . . . . . . . . . . . . . . . . . . . . .
Creating/Printing Tags . . . . . . . . . . . . . . . . . . . . . . . . . . . . . . . . . . . . . . . . . . .
Entering Initial Tag Counts . . . . . . . . . . . . . . . . . . . . . . . . . . . . . . . . . . . . . . .
Reviewing Results . . . . . . . . . . . . . . . . . . . . . . . . . . . . . . . . . . . . . . . . . . . . . .
Zeroing/Voiding Unused Tags . . . . . . . . . . . . . . . . . . . . . . . . . . . . . . . . . . . . .
Updating Inventory Balances . . . . . . . . . . . . . . . . . . . . . . . . . . . . . . . . . . . . . .
304
304
305
305
306
307
307
307
Section 2 Global Tax Management . . . . . . . . . . . . . . . . . 309
Chapter 11 Introduction to GTM . . . . . . . . . . . . . . . . . . . . . . . . . . . . 311
Global Tax Management . . . . . . . . . . . . . . . . . . . . . . . . . . . . . . . . . . . . . . . . .
Features . . . . . . . . . . . . . . . . . . . . . . . . . . . . . . . . . . . . . . . . . . . . . . . .
Considerations . . . . . . . . . . . . . . . . . . . . . . . . . . . . . . . . . . . . . . . . . . .
Tax Elements . . . . . . . . . . . . . . . . . . . . . . . . . . . . . . . . . . . . . . . . . . . . . . . . . .
312
312
313
313
Chapter 12 Implementing GTM . . . . . . . . . . . . . . . . . . . . . . . . . . . . . 315
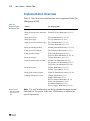
Implementation Overview . . . . . . . . . . . . . . . . . . . . . . . . . . . . . . . . . . . . . . . .
Setting Up Tax Jurisdictions . . . . . . . . . . . . . . . . . . . . . . . . . . . . . . . . . . . . . . .
Setting Up Country Codes . . . . . . . . . . . . . . . . . . . . . . . . . . . . . . . . . .
Setting Up State, Province, County Codes . . . . . . . . . . . . . . . . . . . . .
Setting Up Tax Zones . . . . . . . . . . . . . . . . . . . . . . . . . . . . . . . . . . . . .
Setting Up Tax Types . . . . . . . . . . . . . . . . . . . . . . . . . . . . . . . . . . . . . . . . . . . .
Setting Up Tax Classes and Usages . . . . . . . . . . . . . . . . . . . . . . . . . . . . . . . . .
316
317
317
317
317
320
321
xi
xii
User Guide — Master Data
Setting Up Rounding Methods . . . . . . . . . . . . . . . . . . . . . . . . . . . . . . . . . . . . . 323
Setting Up Tax Environments . . . . . . . . . . . . . . . . . . . . . . . . . . . . . . . . . . . . . . 324
Setting Up Trailer Charges . . . . . . . . . . . . . . . . . . . . . . . . . . . . . . . . . . . . . . . . 328
Setting Up Tax Bases . . . . . . . . . . . . . . . . . . . . . . . . . . . . . . . . . . . . . . . . . . . . 329
Setting Up GL Accounts . . . . . . . . . . . . . . . . . . . . . . . . . . . . . . . . . . . . . . . . . . 331
Setting Up Tax Rates . . . . . . . . . . . . . . . . . . . . . . . . . . . . . . . . . . . . . . . . . . . . 332
Tax Rate Maintenance . . . . . . . . . . . . . . . . . . . . . . . . . . . . . . . . . . . . . 333
Tax Rate Copy/Update . . . . . . . . . . . . . . . . . . . . . . . . . . . . . . . . . . . . . 338
Setting Up GTM Control . . . . . . . . . . . . . . . . . . . . . . . . . . . . . . . . . . . . . . . . . 339
Updating Other Records . . . . . . . . . . . . . . . . . . . . . . . . . . . . . . . . . . . . . . . . . . 341
Company and Site Addresses . . . . . . . . . . . . . . . . . . . . . . . . . . . . . . . . 341
VAT Registration Codes . . . . . . . . . . . . . . . . . . . . . . . . . . . . . . . . . . . 341
Customers, Suppliers, and End Users . . . . . . . . . . . . . . . . . . . . . . . . . 342
Product Lines and Items . . . . . . . . . . . . . . . . . . . . . . . . . . . . . . . . . . . . 343
Implementing Special Taxes . . . . . . . . . . . . . . . . . . . . . . . . . . . . . . . . . . . . . . . 343
Tax Exemptions . . . . . . . . . . . . . . . . . . . . . . . . . . . . . . . . . . . . . . . . . . 344
Tax Based on Partial Item Amounts . . . . . . . . . . . . . . . . . . . . . . . . . . 345
Custom Tax Calculation Methods . . . . . . . . . . . . . . . . . . . . . . . . . . . . 345
Luxury Taxes . . . . . . . . . . . . . . . . . . . . . . . . . . . . . . . . . . . . . . . . . . . . 347
Capped Taxes . . . . . . . . . . . . . . . . . . . . . . . . . . . . . . . . . . . . . . . . . . . . 347
Recoverable Taxes . . . . . . . . . . . . . . . . . . . . . . . . . . . . . . . . . . . . . . . . 347
Value Added Taxes (VAT) . . . . . . . . . . . . . . . . . . . . . . . . . . . . . . . . . 348
Tax-on-Tax . . . . . . . . . . . . . . . . . . . . . . . . . . . . . . . . . . . . . . . . . . . . . . 349
Discounted Taxes . . . . . . . . . . . . . . . . . . . . . . . . . . . . . . . . . . . . . . . . . 349
Retained Taxes . . . . . . . . . . . . . . . . . . . . . . . . . . . . . . . . . . . . . . . . . . . 350
Absorbed Taxes . . . . . . . . . . . . . . . . . . . . . . . . . . . . . . . . . . . . . . . . . . 351
Reverse-Calculated Taxes . . . . . . . . . . . . . . . . . . . . . . . . . . . . . . . . . . 351
Chapter 13 Processing GTM . . . . . . . . . . . . . . . . . . . . . . . . . . . . . . 353
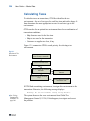
Calculating Taxes . . . . . . . . . . . . . . . . . . . . . . . . . . . . . . . . . . . . . . . . . . . . . . . 354
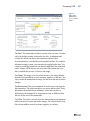
Specifying Tax Data . . . . . . . . . . . . . . . . . . . . . . . . . . . . . . . . . . . . . . . . . . . . . 356
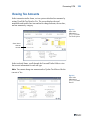
Viewing Tax Amounts . . . . . . . . . . . . . . . . . . . . . . . . . . . . . . . . . . . . . . . . . . . 359
Correcting Transaction Tax Amounts . . . . . . . . . . . . . . . . . . . . . . . . . . . . . . . . 361
General Ledger Effects . . . . . . . . . . . . . . . . . . . . . . . . . . . . . . . . . . . . . . . . . . . 362
Contents
Standard Cost . . . . . . . . . . . . . . . . . . . . . . . . . . . . . . . . . . . . . . . . . . . .
Average Cost . . . . . . . . . . . . . . . . . . . . . . . . . . . . . . . . . . . . . . . . . . . .
Reporting . . . . . . . . . . . . . . . . . . . . . . . . . . . . . . . . . . . . . . . . . . . . . . . . . . . . .
Printing Tax Information on Documents . . . . . . . . . . . . . . . . . . . . . . .
Tax Reports . . . . . . . . . . . . . . . . . . . . . . . . . . . . . . . . . . . . . . . . . . . . .
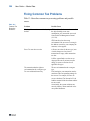
Fixing Common Tax Problems . . . . . . . . . . . . . . . . . . . . . . . . . . . . . . . . . . . . .
363
375
385
385
385
386
Index . . . . . . . . . . . . . . . . . . . . . . . . . . . . . . . . . . . . . . . . . . . . . . . . . . . 387
xiii
xiv
User Guide — Master Data
About This Guide
Other QAD Documentation
Online Help
2
QAD Web Site
Conventions
3
4
2
2
User Guide — Master Data
This guide covers the modules and functions for setting up and managing
date used throughout QAD 2008 Standard Edition.
Other QAD Documentation
• For software installation instructions, refer to the appropriate
installation guide for your system.
• For conversion information, refer to the Conversion Guide.
• For instructions on navigating the Windows and character
environments, see User Guide: Introduction.
• For instructions on navigating and using the QAD .NET User
Interface, see User Guide: QAD .NET User Interface.
• For instructions on navigating and using the QAD Desktop interface,
see User Guide: QAD Desktop.
• For information on using the product, refer to the User Guides.
• For technical details, refer to Entity Diagrams and Database
Definitions.
• To view documents online in PDF format, see the Documents on CD
and Supplemental Documents on CD.
Note Installation guides are not included on a CD. Printed copies are
packaged with your software. Electronic copies of the latest versions
are available on the QAD Web site.
For a complete list of QAD Documentation, visit the QAD Support site.
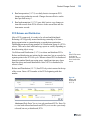
Online Help
QAD provides an extensive online help system. Help is available for most
fields found on a screen. Procedure help is available for most programs
that update the database. Most inquiries, reports, and browses do not have
procedure help.
About This Guide
For information on using the help system in the different environments,
refer to User Guide: Introduction, User Guide: QAD Desktop, and User
Guide: QAD .NET User Interface.
QAD Web Site
QAD’s Web site provides a wide variety of information about the
company and its products. You can access the Web site at:
http://www.qad.com
For users with a QAD Web account, product documentation is available
for viewing or downloading from the QAD Online Support Center at:
http://support.qad.com/
You can register for a QAD Web account at the QAD Online Support
Center. Your customer ID number is required. Access to certain areas is
dependent on the type of agreement you have with QAD.
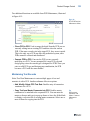
Most user documentation is available in two formats:
• Portable document format (PDF). PDF files can be downloaded from
the QAD Web site to your computer. You can view them with the free
Adobe Acrobat Reader.
• HTML. You can view user documentation through your Web browser.
The documents include search tools for easily locating topics of
interest.
3
4
User Guide — Master Data
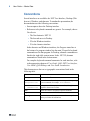
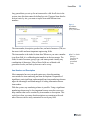
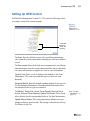
Conventions
Several interfaces are available: the .NET User Interface, Desktop (Web
browser), Windows, and character. To standardize presentation, the
documentation uses the following conventions:
• Screen captures show the Desktop interface.
• References to keyboard commands are generic. For example, choose
Go refers to:
• The Next button in .NET UI
• The forward arrow in Desktop
• F2 in the Windows interface
• F1 in the character interface
In the character and Windows interfaces, the Progress status line at
the bottom of a program window lists the main UI-specific keyboard
commands used in that program. In Desktop, alternate commands are
listed in the right-click context menu. In the .NET UI, alternate
commands are listed in the Actions menu.
For complete keyboard command summaries for each interface, refer
to the appropriate chapters of User Guide: QAD .NET User Interface,
User Guide: QAD Desktop, and User Guide: Introduction.
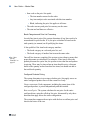
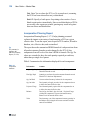
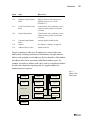
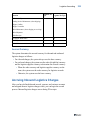
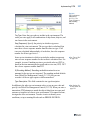
This document uses the text or typographic conventions listed in the
following table.
If you see:
It means:
monospaced text
A command or file name.
italicized
monospaced text
A variable name for a value you enter as part of an operating
system command; for example, YourCDROMDir.
indented
command line
A long command that you enter as one line, although it
appears in the text as two lines.
Note
Alerts the reader to exceptions or special conditions.
Important
Alerts the reader to critical information.
Warning
Used in situations where you can overwrite or corrupt data,
unless you follow the instructions.
Chapter 1
Introduction to
Master Data
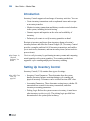
Master tables provide data used by other programs. This chapter gives
an overview of data defined in master tables.
Items/Sites
Pricing
6
6
Product Change Control (PCC)
Compliance
Addresses
7
7
Logistics Accounting
Intrastat
7
7
8
Inventory Control
Physical Inventory
8
8
Global Tax Management (GTM)
8
6
User Guide — Master Data
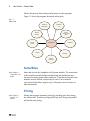
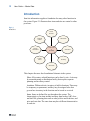
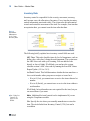
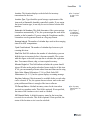
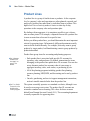
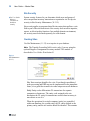
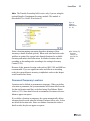
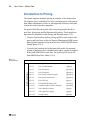
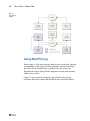
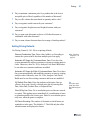
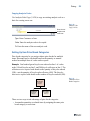
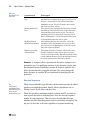
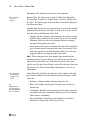
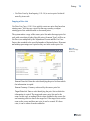
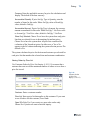
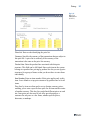
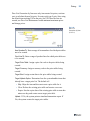
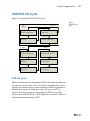
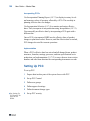
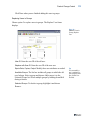
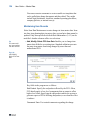
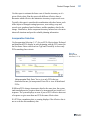
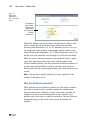
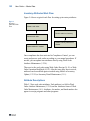
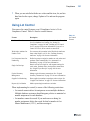
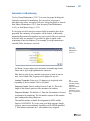
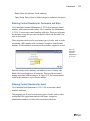
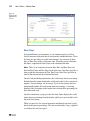
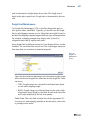
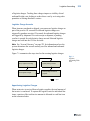
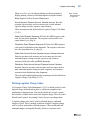
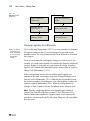
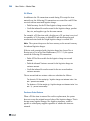
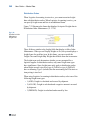
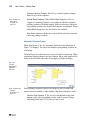
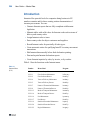
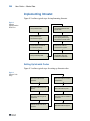
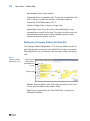
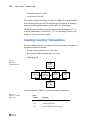
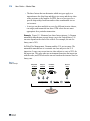
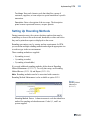
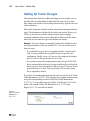
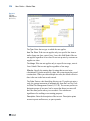
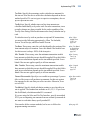
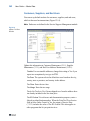
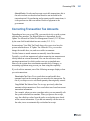
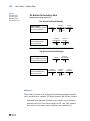
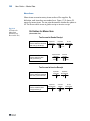
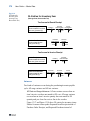
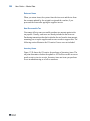
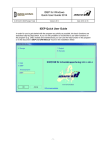
Master data provide basic business information to other programs.
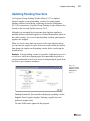
Figure 1.1 shows the programs discussed in this guide.
Fig. 1.1
Master Data
Global Tax
Management
Items/Sites
• Pricing
Product
Change Control
(PCC)
Physical
Inventory
Inventory
Control
Base Module
Intrastat
Compliance
Addresses
Logistics
Accounting
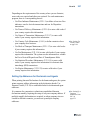
Items/Sites
¶ See Chapter 2,
“Items/Sites,” for
details.
Items and sites are the foundation of all system modules. The master data
in the Item/Sites module define manufacturing and distribution sites,
inventory locations, product lines, and items. Customer and supplier item
numbers are also defined, with pricing for each. Unit of measure
conversions defined here support entry of alternate units of measure in
other transactions.
Pricing
¶ See Chapter 3,
“Pricing,” for
details.
Pricing data supports automatic pricing by providing price lists during
key transactions. Two basic pricing models are used: best pricing model
and list/discount pricing.
Introduction to Master Data
7
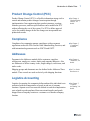
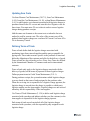
Product Change Control (PCC)
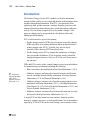
Product Change Control (PCC) is a flexible information storage tool to
control and monitor product changes from inception through
implementation. Item engineering data, product structures, routings,
formulas, processes, and item specifications can be modified in PCC
without affecting the rest of the system. Use PCC to define approval
cycles for product changes before the changes are incorporated into
production records.
¶ See Chapter 4,
“Product Change
Control,” for
details.
Compliance
Compliance lets companies manage compliance with government
regulations such as the FDA Current Good Manufacturing Practices, and
with international agreements such as NAFTA and GATT.
¶ See Chapter 5,
“Compliance,”
for details.
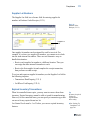
Addresses
Programs in the Addresses module define customers, suppliers,
salespersons, employees, carriers, banks, and company addresses. Also
use Addresses to define country codes, freight charges, credit terms, and
trailer codes.
¶ See Chapter 6,
“Addresses,” for
details.
Shipping groups and documents are also defined in the Addresses/Taxes
module. These records are used exclusively with shipping functions.
¶ See User Guide:
Distribution A.
Logistics Accounting
Logistics Accounting lets companies define and track the individual costs
associated with the transportation of goods in and out of company
locations. Separate sets of accounts are defined to track the transportation
costs related to goods purchased from an external supplier and goods
shipped from a company location to a customer or to another company
location.
¶ See Chapter 7,
“Logistics
Accounting,” for
details.
8
User Guide — Master Data
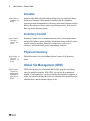
Intrastat
¶ See Chapter 8,
“Intrastat,” for
details.
Intrastat offers data collection and reporting tools for companies doing
business in European Union member countries and for companies
requiring written documentation of inventory movement. Intrastat collects
history data whenever there is sales or purchasing activity, then uses the
data to generate Intrastat reports.
Inventory Control
¶ See Chapter 9,
“Inventory
Control,” for
details.
Inventory Control receives transactions from other system applications
and provides balance and availability information where needed. It tracks
intersite transfers and their financial consequences, such as cost
variances, and automatically posts intercompany transfers.
Physical Inventory
¶ See Chapter 10,
“Physical
Inventory,” for
details.
Physical Inventory lets you conduct physical counts of all inventory
items.
Global Tax Management (GTM)
¶ See Section 2,
“Global Tax
Management,”
beginning on
page 309 for
details.
GTM offers precise tax calculations and flexible setup for calculating
taxes for multiple countries. With GTM, you can set up an unlimited
number of taxes and rates—each associated with customers, suppliers, or
items. You can also define when taxes are calculated, the formula used to
calculate them, and the amount subject to tax.
SECTION 1
Master Data
This section describes how to set up and use the master records that
form the base data in your database.
Items/Sites
Pricing
11
45
Product Change Control
Compliance
Addresses
143
179
Logistics Accounting
Intrastat
99
213
263
Inventory Control
Physical Inventory
285
303
10
User Guide — Master Data
Chapter 2
Items/Sites
This chapter discusses two essential elements in product definition:
items and product lines. Item records are used to define the actual
products that are kept in inventory and/or planned by planning
functions. Product lines group items for planning and accounting
purposes. In addition, sites, locations, and inventory status codes are
introduced.
Introduction
Items
12
13
Product Lines
Sites
24
28
Locations
34
Inventory Status Codes
39
12
User Guide — Master Data
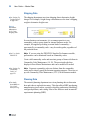
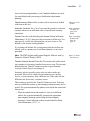
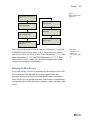
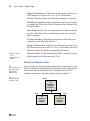
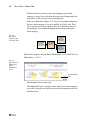
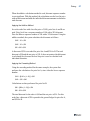
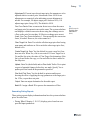
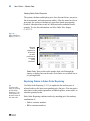
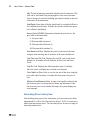
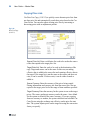
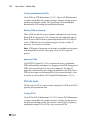
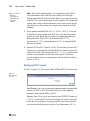
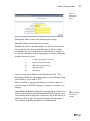
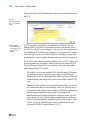
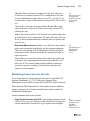
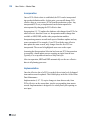
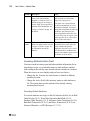
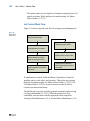
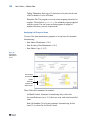
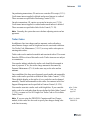
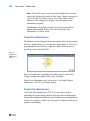
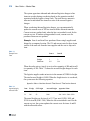
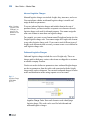
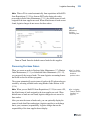
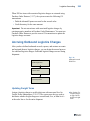
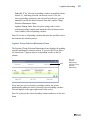
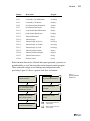
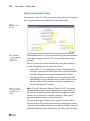
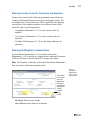
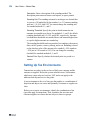
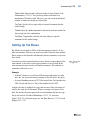
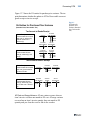
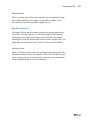
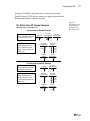
Introduction
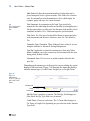
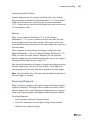
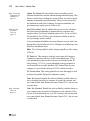
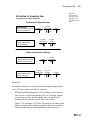
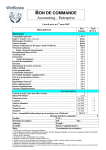
Item/site information supplies a foundation for many other functions in
the system. Figure 2.1 illustrates how items and sites are central to other
processes.
Fig. 2.1
Items/Sites
Product
Structures
Configured
Products
Routing/
Work Centers
Sales Quotes
Product Lines
&
Items/Sites
Inventory
Control
Sales Orders
Purchasing
Work Orders
This chapter discusses four foundational elements in the system:
Sites. All inventory-related functions can be done by site. A site may
be a manufacturing or distribution facility that requires separate
planning and inventory control.
Locations. Within each site, inventory is held in locations. These may
be temporary or permanent, and they may be assigned rules that
govern how inventory in the location can be issued or received.
Items. Items are defined for use throughout the system. The
characteristics of an item include inventory data such as ABC class
and shelf life, planning data such as order policies and lead time, and
price and cost data. The same item may have different characteristics
at each site.
Items/Sites
13
Product Lines. For planning and reporting purposes, items are
grouped by product line.
Items
Item records are created primarily for items and products that are stored in
inventory and/or planned by Material Requirements Planning (MRP) or
Distribution Requirements Planning (DRP). At this time, items are
assigned to product lines and default data used in inventory control, sales,
purchasing, planning, and costing is loaded. You can customize costs and
other information by company site once you set up the initial record.
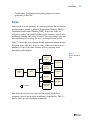
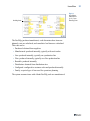
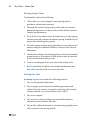
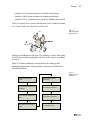
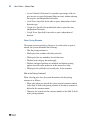
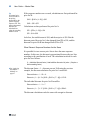
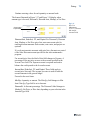
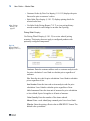
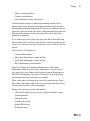
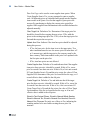
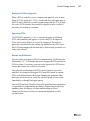
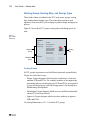
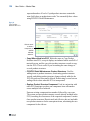
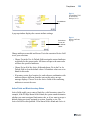
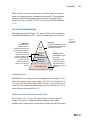
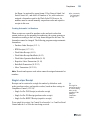
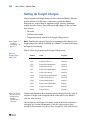
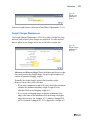
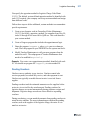
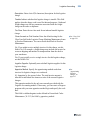
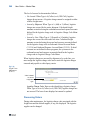
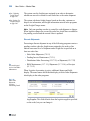
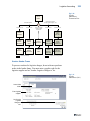
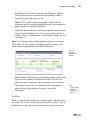
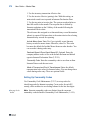
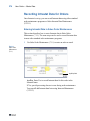
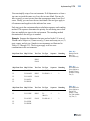
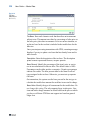
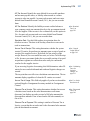
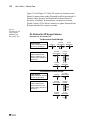
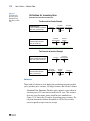
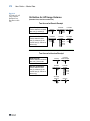
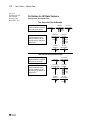
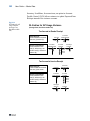
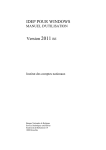
Figure 2.2 shows the major elements that are implemented during product
definition, in the order they are set up. Only product lines and items are
mandatory. Usage of the other elements varies by company and is
described in other chapters.
Fig. 2.2
Product Definition
Flow
Discount
Discount
Prices
Prices
Price
PriceLists
Lists
Product
Product
Structures
Structures
Product
Product
Lines
Lines
Items
Items
Formulas
Formulas
Routings
Routings
Process
Process
Definitions
Definitions
= Optional
Configuration
Configuration
Structures
Structures
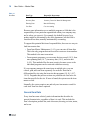
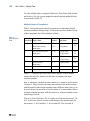
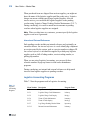
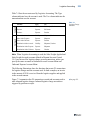
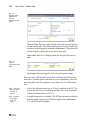
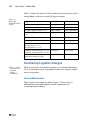
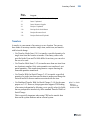
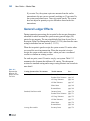
Item data is divided into four categories that roughly parallel how
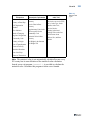
companies typically divide up the maintenance responsibility. Table 2.1
lists the data types and responsible departments.
14
User Guide — Master Data
Table 2.1
Item Data
Data Type
Responsible Department
General Data
Product Engineering or Research and Development
Inventory Data
Inventory Control or Materials Management
Planning Data
Material Planning
Cost Data
Cost Accounting
Because some information serves multiple programs, a field that is the
responsibility of one particular organization within your company may
not be where you expect it. For example, the default list price for a
product might be determined by the sales department, but this field is
considered cost data, normally maintained by accounting.
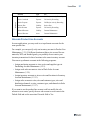
To support this potential division of responsibilities, there are two ways to
load item master data:
• From Item Master Maintenance (1.4.1), you can enter all item data.
This is the only program that can be used to create new item numbers.
This method is the most convenient.
• From separate programs, you can create the item record (1.4.3), then
enter planning data (1.4.7), inventory data (1.4.5), and cost data
(1.4.9). This method offers the most security, because access to the
individual programs can be restricted with menu security.
If your company manages the same items at multiple sites, you can
control, plan, and cost items separately for each site. Data can be
differentiated by site using the item-site data programs (1.4.16, 1.4.17,
1.4.18). Programs that process an item at a particular site first looks for
item data specific for the site. If none is found, the system uses the item
master record.
Internally, the system requires one and only one item master record for
each item. Item-site data is optional.
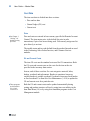
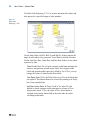
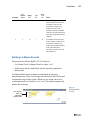
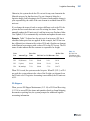
General Item Data
Every item has some relatively static information that describes its
general characteristics, regardless of how it is used. This includes the
item’s description, product line, unit of measure, drawing, revision, status,
and so on.
Items/Sites
15
Any general data you set up for an item must be valid for all sites in the
system, since this data cannot be defined per site. If general item data for
an item varies by site, you must set up the item with different item
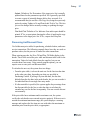
numbers.
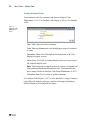
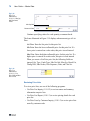
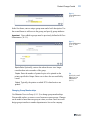
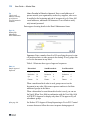
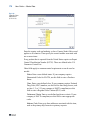
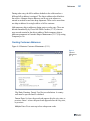
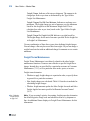
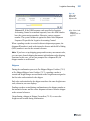
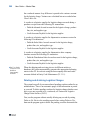
Fig. 2.3
Item Master
Maintenance
(1.4.1), Item Data
The item number, description, product line, and unit of measure (UM) are
the most visible and most important engineering fields.
The item number is the index for item data. Whenever you enter a number
in an Item field, it is validated against numbers in the item master. The
fields for unit of measure, group, type, and status permit virtually any
combination of characters. Most of these fields are validated with
generalized codes, and look-up browses can be set up.
Item Number and Description
Most companies have not escaped controversy when determining
conventions for item numbering and item descriptions. Proponents of
significant, semi-significant, and nonsignificant item numbering schemes
argue the advantages and disadvantages of coding information into an
item number.
With the system, any numbering scheme is possible. Using a significant
numbering scheme may be less important because users have access to
help windows that can be searched by item number or description. This
works best when you ensure that descriptions are consistent with each
other. Browses can be easily customized to sort by any field.
¶ See User Guide:
Manager
Functions for
details on
generalized
codes.
16
User Guide — Master Data
Item Unit of Measure
The item unit of measure (pt_um) is used for inventory balances, product
structures, manufacturing orders, planning, and reporting. Values can be
defined with generalized codes.
Different areas of a company may handle an item using different units of
measure. For example, an item may be moved in pallets but sold by the
box. For these cases, set up alternate units of measure and conversion
factors in Unit of Measure Maintenance (1.13).
When items are handled in different units of measure on purchase orders,
sales orders, and inventory transactions, the system automatically
converts the quantities from an alternate unit of measure to the item unit
of measure using the predefined conversion factors. In most cases, either
unit may be entered on transactions.
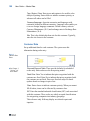
The formula for alternate unit of measure is:
Standard UM * Conversion = Alternate UM
Grouping Fields
If grouping items by product line does not satisfy the planning and
reporting requirements of all company departments, the item type and
group fields can also be used to group items. Both fields are used in the
planning and sales modules. The item type is also used for product
costing functions and cycle count reporting.
The promo group indicates an item is priced using the Trade Management
(TrM) module. Design groups are used in the Product Change Control
module to determine who is responsible for changes affecting the item.
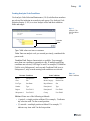
Item Status Code
Use Item Status Code Maintenance (1.1.5) to define status codes to
associate with items in Item Master Maintenance or Item Data
Maintenance. Status codes indicate where an item is in its life cycle from
planning through design, production, and obsolescence. For example, you
can set up a status code of AC to show that an item is actively
manufactured and sold, and one of OB to identify obsolete items.
Items/Sites
Use item status codes to restrict which transactions can occur for a
particular item. When you process an item transaction, the system checks
the item’s status code to verify that the transaction is not restricted. If it is,
an error message displays and you cannot proceed.
You also can use item status codes for selecting records in some reports
and other functions. For example, when you are updating ABC code
rankings and calculations using Item ABC Status Report/Update (1.5.9 or
3.6.3), you can enter a comma-separated list of item status codes to be
excluded. The function does not process items associated with specified
codes.
Codes and Master Comments
Codes such as group and type are useful because they provide a short,
convenient way to categorize and identify items. However, more
extensive information related to an item may be needed. For example,
Product Engineering maintains information concerning the
implementation of engineering change orders for an item. Purchasing
tracks specific supplier requirements and Quality Engineering stores
inspection-related text.
These requirements can be met by recording master comments. Each
master comment can have up to 99 pages of text. Master comments are
identified by reference, type, and language codes. When master
comments are added for an item, the item number is entered as the
reference code.
Use the Type field to identify different master comment records for the
same item number. For example, the type codes PE, PO, and QE can be
used for Product Engineering, Purchasing, and Quality Engineering. To
review all the master comments entered for an item, print the Item Master
Comments Report (1.5.12).
Master comments do more than store and organize textual information for
an item. They can also be copied into documents such as purchase orders,
sales quotations, and sales orders.
17
18
User Guide — Master Data
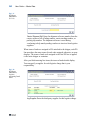
Inventory Data
Inventory control is responsible for the security, movement, accuracy,
and, in some cases, the allocation of inventory. Every item has inventory
control information associated with it. The system uses this information
to track and control the movement of the item. For example, if an item has
an expiration date, you cannot issue the item after that date.
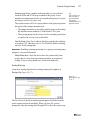
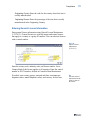
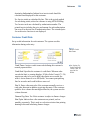
Fig. 2.4
Item Master
Maintenance
(1.4.1), Item
Inventory Data
The following briefly explains how inventory control fields are used.
ABC Class. This code classifies items by level of importance, such as
dollar value, with class A being the most important. The system uses
the ABC class code with cycle counting. You can add the code
directly or leave it blank. If left blank, you can have the system
calculate an item’s ABC class code by running the Item ABC Status
Report/Update (1.5.9 or 3.6.3).
Lot/Serial Control. This field determines whether the item must have a
lot or serial number when you process receipts or issues for it.
• If set to L (Lot), you cannot issue or receive the item without a lot
number.
• If set to S (Serial), you cannot issue or receive the item without a
serial number.
If left blank, lot/serial numbers are not required for the item, but you
can record them if you want.
¶ See “Using Lot
Control” on
page 161 for
details.
Note Additional lot/serial control can be implemented if you are
using the Compliance module.
Site. Specify the site where you normally manufacture or store the
item. The site defaults from Inventory Control (3.24), but can be
overridden.
Items/Sites
Location. This location displays as the default for inventory
transactions for the item.
19
¶ See “Locations”
on page 34 for
details.
Location Type. Type identifies special storage requirements of the
item such as flammable, humidity controlled, outside. If you assign
the item a location type, it can only be received into a location that
matches.
Automatic Lot Numbers. This field determines if the system assigns
lot numbers automatically. If Yes, the system assigns the work order
number as the lot number. If you are using the Compliance module,
lot numbers can be generated based on a lot group format.
¶ See Chapter 5,
“Compliance,”
for information
on lot groups.
Average Interval. The number of calendar days used as the averaging
interval in ABC computations.
Cycle Count Interval. The number of calendar days between cycle
counting this item.
Shelf Life. Shelf life indicates the number of calendar days you can
hold the item in inventory before it becomes unusable. The system
adds this figure to the item’s receipt date to calculate the expiration
date. You cannot allocate, ship, or issue expired inventory.
Allocate Single Lot. This field indicates whether the system should
always fill sales orders and work orders from a single lot of this item.
If Yes, you can manually allocate orders from more than one lot using
Sales Order Manual Allocations (7.1.6) or Work Order Bill
Maintenance (16.13.1), but the system displays a warning message.
Key Item. Indicates if this item must be available before a work order
can be released. If Yes, the system does not release work orders and
print picklists until there is enough of the item to allocate.
PO Receipt Status. A default inventory status for the item when
received on a purchase order. This field is optional. If not specified,
the status of the location or site is used as a default.
WO Receipt Status. A default inventory status for the item when
received on a work order. This field is optional. If not specified, the
status of the location or site is used as a default.
¶ See “Inventory
Status Codes” on
page 39.
20
User Guide — Master Data
Shipping Data
¶ See “Setting Up
Freight Charges”
on page 206.
The shipping department uses item shipping data to determine freight
charges. For example, freight charge calculations use the item’s shipping
weight to determine freight costs.
Fig. 2.5
Item Master
Maintenance
(1.4.1), Item
Shipping Data
In some business environments, it is a common practice to use
commodity codes to group items for internal business needs. For
example, all suppliers providing a certain kind of commodity—
represented by a commodity code—may be rated together, regardless of
the particular item.
¶ See User Guide:
PRO/PLUS.
Note If you are using the PRO/PLUS Supplier Performance module,
performance can be monitored based on commodity codes.
Create valid commodity codes and associate groups of items with them in
Commodity Code Maintenance (1.4.19). The associated code then
displays in Item Master Maintenance and can be modified if needed.
¶ See “Setting Up
Commodity
Codes” on
page 270.
Note Corporate commodity codes are distinct from the commodity
codes used to classify goods for Intrastat reporting purposes. These are set
up with Commodity Code Maintenance (2.22.3) in the Intrastat module.
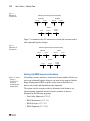
Planning Data
¶ For details
about MRP, see
User Guide:
Manufacturing.
The material planning department uses item planning data to determine
how and when to replenish inventory. This data affects MRP, purchasing,
manufacturing (work orders, repetitive schedules, and master scheduling),
configured products, and costing. Most of the fields are used in material
requirements planning (MRP).
Items/Sites
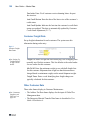
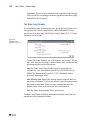
Fig. 2.6
Pur/Mfg Code
The Pur/Mfg (purchase/manufacture) code determines how items are
planned, costs are calculated, and cumulative lead times are calculated.
This code can be:
• Purchased: obtained from suppliers
• Manufactured: produced internally, typically with work orders
• Line: produced internally, typically on a production line
• Flow: produced internally, typically on a flow production line
• Routable: produced internally
• Distribution: obtained from distribution sites
• Configured: configured to customer order and produced internally
• Family: a special type of item used for operations planning
The system assumes items with a blank Pur/Mfg code are manufactured.
Item Master
Maintenance
(1.4.1), Item
Planning Data
21
22
User Guide — Master Data
Cost Data
The item cost data is divided into three sections:
• Price and tax data
• General ledger (GL) cost
• Current cost
Price
¶ See Chapter 3,
“Pricing,” for
details on using
price lists.
Price and costs are entered in base currency specified in Domain/Account
Control. The item master price is the default list price in sales
transactions, if price lists are not being used. You can only assign one list
price directly to an item.
The taxable status and tax code default from the product line and are used
in the Purchasing, Sales Orders/Invoices, and Customer Services
modules.
GL and Current Costs
The item GL costs are the standard costs used for GL transactions. Both
the GL costs and current costs are the costs for the item at the site
specified in the inventory data section.
In turn, each of these costs has five cost categories: material, labor,
burden, overhead, and subcontract. Burden is sometimes known as
variable burden or variable overhead. Overhead is known as fixed burden
or fixed overhead. Use Item-Site Cost Maintenance (1.4.18) to update the
GL and current costs for a particular site.
¶ These programs
are discussed in
User Guide:
Financials A.
Both the GL and current costs can be updated automatically during
routing and product structure roll-ups by using item cost utilities in the
Item Data Menu (1.4) or by using cost simulation programs in the Cost
Management module.
Items/Sites
23
Customer and Supplier Items
A customer may prefer to order using their own item number or an
industry standard number rather than the one your company uses.
Example Contractors may be required to order with a government
procurement code instead of your item number.
Use Customer Item Maintenance (1.16) to set up a cross-reference
between your item numbers and those used by a customer. A customer
may have more than one number that references a single internal item
number. If so, you can set up multiple relationships.
When a customer item number is specified on a sales order, the system
accesses the price, description, and other information associated with
your item number. Both item numbers appear on all sales and shipping
paperwork.
In scheduled orders, you can specify a customer item number in the
Customer Ref field as part of the set of values that identifies a scheduled
order line. This lets you set up multiple lines for the same internal item
number, ship-from site, ship-to address, and PO number. To require valid
customer items in the Customer Ref field, set Customer Ref is Customer
Item to Yes in Customer Schedules Control (7.3.24) or Container/Shipper
Control (7.9.24).
Customer item numbers appear in reports, inquiries, and browses and
under a Customer Ref heading in programs that manage scheduled orders
and shipper data.
You can also use Customer Item Maintenance to set up a cross-reference
between internal numbering systems. For example, your sales department
may have catalog numbers that differ from the item numbers used by
manufacturing. To set up an internal cross-reference, leave the Customer/
Ship-to field blank.
The same need to cross-reference numbers may exist for your suppliers.
Use Supplier Item Maintenance to create a cross-reference between your
suppliers’ numbers and your item numbers, as well as track the quoted
price and lead time. Specify supplier item numbers in Blanket Order
Maintenance, Purchase Order Maintenance, and Scheduled Order
Maintenance. Both your number and the supplier number displays on
reports, as well as in Purchase Order Receipts (5.13.1).
¶ See User Guide:
Release
Management.
24
User Guide — Master Data
Product Lines
A product line is a group of similar items or products. At the corporate
level, a company’s sales and operations are often planned, reported, and
analyzed by product line rather than by individual item or product. This
higher-level view of activity makes it easier to relate day-to-day
operations to the company sales and operations plan.
By dealing with an aggregate, it is sometimes possible to get a clearer,
more accurate picture. For example, a shipment forecast for a product line
is more accurate than a forecast for a specific item.
Before you define product lines, you should determine the most important
criteria for grouping items. Unfortunately, different departments usually
want to divide items differently. For example, Sales may want to group
products by target market, but Manufacturing wants to group products by
production method.
Product lines group items for accounting and planning purposes:
¶ See “Alternate
Product Line
Accounts” on
page 27 for
details.
• Each product line is associated with specific GL accounts for
inventory, sales, and purchases. By default, transactions for items
belonging to the product line update these GL accounts. You can also
set up alternate product line accounts when it is necessary to
aggregate inventory, sales, work orders, or purchasing by site.
• All of the planning programs including product line planning,
resource planning, MRP, MPS, and forecasting can be run by product
line.
• On sales, purchasing, and service/support management transactions,
an item’s taxable status defaults from the product line.
¶ See User Guide:
Financials A for
details on the
control program.
The system essentially operates on a standard cost basis, although it can
be used as an average cost system. The product line GL accounts are
oriented to standard cost accounting. The values for these accounts
default from Domain/Account Control (36.1). The accounting department
is usually responsible for approving these.
Items/Sites
25
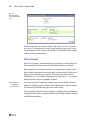
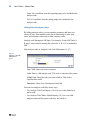
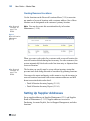
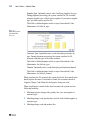
Product Line Maintenance
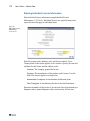
Use Product Line Maintenance (1.2.1) to define product lines and their
associated accounts.
Fig. 2.7
Product Line
Maintenance
(1.2.1)
The Taxable and Tax Class fields determine how taxes are usually
processed for items belonging to a product line.
GL accounts default from Domain/Account Control. You can accept the
default values or enter different account, sub-account, and cost center
codes.
The Default Sub-Account/Cost Center and Override fields let you enter
the same sub-account or cost center code for all accounts in a product
line. These fields are useful if you use standard account codes, but
differentiate product lines with sub-accounts or cost centers.
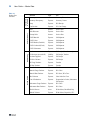
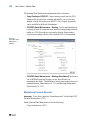
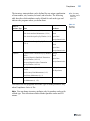
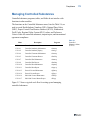
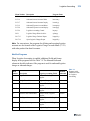
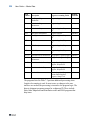
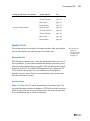
Product Line Accounts
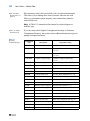
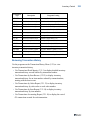
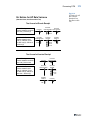
Table 2.2 lists each product line account, the account type, and typical
programs that use the accounts.
Note If you are using the optional Customer Consignment Inventory or
Supplier Consignment Inventory modules, an additional set of
consignment accounts can be update in Product Line Maintenance.
¶ See User Guide:
Distribution B.
26
User Guide — Master Data
Table 2.2
Work Order
Purchasing
Sales Accounts
Inventory
Accounts
Product Line
Accounts
Account
Type
Use
Inventory
Asset
Inventory Transactions
Inventory Discrepancy
Expense
Inventory Counts
Scrap
Expense
WO Receipt
Cost Revalue
Expense
GL Cost Change
Sales
Income
Invoice Post
Sales Discount
Expense
Invoice Post
Exempt Sales
Income
Invoice Post
COGS Material
Expense
SO Shipment
COGS Labor
Expense
SO Shipment
COGS Burden (Variable)
Expense
SO Shipment
COGS Overhead (Fixed)
Expense
SO Shipment
COGS Subcontract
Expense
SO Shipment
Purchases
Expense
PO Receipt (Non-Inventory)
PO Receipts (Accrued AP)
Liability
PO Receipt, Voucher
Overhead Applied
Expense
PO Receipt
PO Price Variance
Expense
PO Receipt
AP Usage Variance
Expense
Voucher
AP Rate Variance
Expense
Voucher
Floor Stock
Expense
WO Close
Material Usage Variance
Expense
WO Close
Material Rate Variance
Expense
WO Issue, WO Close
Mix Variances
Expense
Joint Order Set Close
Cost of Production
Expense
Nonproductive Labor, Subcontract
PO Receipts
Subcontract Usage Variance
Expense
WO Close
Subcontract Rate Variance
Expense
WO Close
Work in Process
Asset
Work Orders, Backflush, Rep
Method Variance
Expense
Work Orders, Repetitive, SFC
Items/Sites
Service
Account
Type
Use
Service Labor
Expense
Call/Project Activity Recording
Service Overhead
Expense
Call Activity Recording
Service Expense
Expense
Call/Project Activity Recording
Expense Due
Liability
Invoice Post
Service Returns
Expense
Call Activity Recording
Deferred Revenue
Liability
Contract Maintenance
Accrued Revenue
Asset
Contract Maintenance
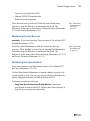
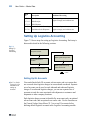
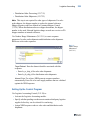
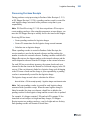
Alternate Product Line Accounts
In some applications, you may need to set up alternate accounts for the
same product line.
For example, you can specify only one inventory account in Product Line
Maintenance (1.2.1). If different locations within a site are used for raw
materials, WIP, and finished goods, you probably do not want to post
inventory transactions for these locations to the same inventory account.
You can set up alternate accounts in the following programs:
• Assign purchasing accounts to sites or sites and supplier types in
Purchasing Account Maintenance (1.2.5).
• Assign work order accounts to sites in Work Order Account
Maintenance (1.2.9).
• Assign inventory accounts to sites or sites and locations in Inventory
Account Maintenance (1.2.13).
• Assign sales accounts to sites, sites and customer types, sites and
distribution channels, or sites, customer types, and channels in Sales
Account Maintenance (1.2.17).
If you want to use the product line account code but modify the subaccount or cost center, specify the new sub-account or cost center in the
Default field and set the associated Override field to Yes.
27
28
User Guide — Master Data
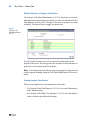
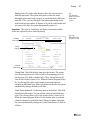
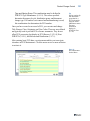
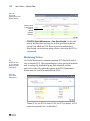
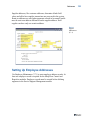
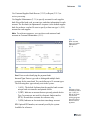
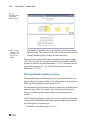
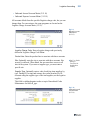
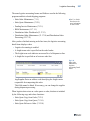
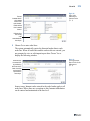
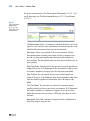
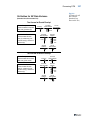
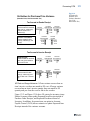
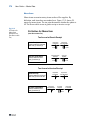
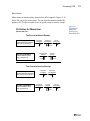
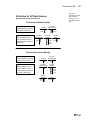
Figure 2.8 illustrates Inventory Account Maintenance. The other alternate
account programs are very similar.
Fig. 2.8
Inventory Account
Maintenance
(1.2.13)
During transaction entry, the system automatically retrieves and uses most
alternate inventory and purchasing accounts. Alternate work order and
sales accounts are retrieved and displayed and can be modified if needed.
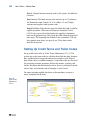
Sites
The site code identifies a specific warehouse or a group of buildings at
the same physical location. The site code in the inventory detail record is
a basic unit for inventory control and planning.
Sites are assigned to a specific GL entity and domain. Some programs,
such as MRP, work vertically within single sites. Others, such as
distribution requirements planning (DRP) and consolidated order
processing, work horizontally across two or more sites and possibly two
or more domains located in the same or different databases.
The system uses sites for inventory records, item costing, purchasing,
sales quotations, sales orders, forecasting, master scheduling, MRP, and
DRP. Not all programs operate by site. For example, departments and
work centers are not site specific.
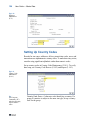
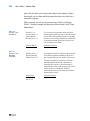
Taxes
¶ See “Company
and Site
Addresses” on
page 341.
To calculate taxes, you must set up a corresponding address code for each
site in Company Address Maintenance (2.12). On taxable transactions,
the system uses the site address to select the correct line-item tax
environment.
Items/Sites
29
Sites and Enterprise Material Transfer (EMT)
If you are using Enterprise Material Transfer (EMT), you must set up sites
to support processing of EMT sales orders. EMT lets you automatically
translate sales orders into purchase orders and transmit them to suppliers
in electronic data interchange (EDI) format using EDI eCommerce. EMT
also manages and coordinates changes so that sales order and purchase
order information is synchronized.
¶ See User Guide:
Distribution A for
details on EMT.
Multi-level EMT manages orders across multiple levels within an
organization. Order changes can be made at the top or bottom of the
hierarchy and are then transmitted up or down to the next level.
Two fields in Site Maintenance are directly related to EMT:
• Use the Default Supplier field to associate a default supplier with
each ordering site.
• If you are using direct allocations, set External Supplier to Yes.
Sites and Multiple Databases
Setting up sites for a single company is a very straightforward process.
The site entity defaults to the system entity and the database reference is
left blank. However, when the system is used to support multiple
company operations, several important questions must be resolved:
¶ See User Guide:
Supply Chain
Management for
information on
DRP.
• How many databases will be used?
• Will consolidated order processing be used?
• Will distribution requirements planning be used?
The answers to these questions are interrelated and require familiarity
with a number of other issues. Before answering these questions, be sure
to review the rest of this chapter.
For multiple, connected databases such as those used for consolidated
order processing or DRP, all the site codes in the system must be set up in
each database. When you set up the site code, you assign each site to a
specific database. When the system looks for information about this site,
it looks only in the assigned database.
If there are multiple databases that are functionally independent from
each other, as would be the case for consolidated order processing, each
database requires only the site codes for its own operations.
Tip
Database
connections are set
up using programs
on the Multiple
Database menu
(36.6).
30
User Guide — Master Data
Site Security
¶ See User Guide:
Manager
Functions for
details on
security.
System security features let you determine which users and groups of
users can perform inventory transactions at a particular site. Set up site
security in Site Security Maintenance (36.3.15).
Site security applies to programs that affect inventory data and have a site
field as part of the selection criteria. Site security does not affect inquiries,
reports, or delete/archive functions. In a multiple-domain environment,
site security must be defined separately for each domain.
Creating Sites
Use Site Maintenance (1.1.13) to set up sites in your database.
Note The Transfer Ownership field is active only if you are using the
optional Supplier Consignment Inventory module. This module is
described in User Guide: Distribution B.
Fig. 2.9
Site Maintenance
(1.1.13)
Site. Enter a unique identifier for a site. Even though consolidated
order processing and DRP may not be implemented in the immediate
future, it is a good idea to make site codes unique across all databases.
Entity. Entity codes differentiate GL transactions for separate
companies or businesses. The entity code assigned to the site
determines the GL entity for transactions created when inventory is
moved into or out of it.
When the operations for a single company (entity) are controlled
within one database, the system entity, the GL entity defined as the
primary entity, and the site entities should be identical. This remains
Items/Sites
31
true in each operating database, even if multiple databases are used
for consolidated order processing or distribution requirements
planning.
Default Inventory Status. Enter a status code to associate by default
with items at this site.
¶ See page 39 for
details.
Automatic Locations. Set to Yes if you want the system to create new
locations whenever an undefined value is entered in an inventory
transaction.
¶ See “Automatic
Locations” on
page 36 for
details.
Domain. Enter the code identifying the domain defined in Domain
¶ See “Associating
Domains with
Sites” on
page 32.
Maintenance (36.10.1) that you want to associate with this site. You
must specify a valid, active domain that you have access to. The
default is your current working domain.
If you change the default, the system ensures that the site does not
already exist as a primary site in a different domain, or an error is
generated.
Note The EMT Supplier and External Supplier fields are used by
Enterprise Material Transfer (EMT).
Transfer Variance Account. Enter the GL account code used to track
cost variances for inventory transfers between two sites. This account
defaults from the Transfer Variance account set up in Domain/
Account Control, but you can change it.
Inventory activity typically occurs at the site where orders are
processed. However, in a multi-site environment, you can ship,
receive, or issue inventory from a different site. If the other site has
different costs for an item, a variance occurs.
This variance is posted to the Transfer Variance account. If the two
sites are in different entities, an intercompany transaction may also be
posted. The system automatically updates costs at both the central and
remote sites.
• When the transfer-from and transfer-to sites are in different
entities, the system automatically generates the appropriate
intercompany balancing entries using the Intercompany
Inventory Control debit and credit accounts defined in Entity
Code Maintenance (25.3.1.1).
¶ See User Guide:
Distribution A.
32
User Guide — Master Data
• When the two sites are in the same entity, a balancing debit or
credit is posted to the Transfer Clearing account defined in
Inventory Control (3.24).
Associating Domains with Sites
Each site must be associated with a domain. When a site is associated
with the current working domain, it is considered a primary site;
otherwise, it is a connection record pointing to the domain where the
actual site-related data is maintained. The other domain can be in this
database or in another connected database.
When you are using multiple databases operating over a network, the
system uses the domain associated with a site to determine where
database records should be updated. For example, when a function such
as DRP requests information for a site, the system looks up the database
name associated with the domain record and accesses that database
automatically. This can be the current database, another database on the
same machine, or a remote database on another machine.
Site Connection Records
To help you manage the relationships among sites and domains, you can
optionally create connection records in related domains when you create a
new primary site.
Note You can also create a connection record directly by specifying a
domain other than your current working domain. In this case, the system
ensures that the site already exists as a primary site in a different domain,
or an error is generated.
Choosing Domains to Update
The system generates a list of active domains in the current database and
all databases defined in Database Connection Maintenance. You can
choose which domains to update from this list.
Before the list displays, you are prompted to set a default for the Update
field. Set this to Yes if you want to create connection site records in most
related domains. You can then change exceptions to No.
Items/Sites
Fig. 2.10
Creating
Connection
Records in Site
Maintenance
Note In a multi-database environment, all databases must be connected
or you cannot create a new primary site record. This is to ensure that the
site does not already exist as a primary site in a domain in another
database. This is also true when you delete a primary site, although in this
case, additional restrictions may prevent you from deleting the site.
Connection Site Defaults
The data associated with the site connection record defaults from the
primary site record but is validated in the target domain:
• The entity associated with the site must exist in the connection
domain or an error is generated.
• The connection record is created with the primary site’s default
inventory status if the inventory status is valid in the connection
domain. Otherwise, the first inventory status in that domain is used.
• The site connection record is created with the same Transfer Clearing
account, sub-account, and cost center as the primary site if this
combination is valid in the target domain. Otherwise, the value from
Inventory Control (3.24) in the target domain is used. If this is not
found, the value from Domain/Account Control (36.1) in the target
domain is used.
Deleting Sites
You can use Site Maintenance to delete a site record. The system
performs a number of validations if you attempt to delete a site to ensure
that it is not referenced and required by other data and transactions. You
cannot delete a site if it is associated with any of the following:
33
34
User Guide — Master Data
• Locations
• Inventory quantities
• Item-site planning data
• Open-quantity purchase requisitions
• Purchase orders with an open quantity to receive
• Purchase order receipt history data
• Sales quotes with an open quantity to release
• Sales orders with an open quantity to ship or an invoiced quantity
• Open work orders
• Physical inventory count tags
• Inventory movement security records
• Projects, project activity orders, worksheets, or worksheet detail
records created using Project Realization Management (PRM)
functions
• Family hierarchies, family-level plans, or end-item operations plans
created using Enterprise Operations Plan functions
If a primary site passes all these validations, the system performs
additional domain-related validations:
• All connection records must also be able to be deleted.
• In a multiple-database environment, the system checks that all
databases are connected before you can delete a primary site record.
If no other restrictions apply to the deletion, the primary site is deleted
and all connection records are also deleted from other domains in this and
connected databases. The system does not check other domains when you
delete a connection record.
Locations
A location defines an area such as a shelf, bin, or tank within a site. Since
inventory locations are a subset of site, the same location codes can be
used for different sites. A site can have an unlimited number of locations.
Although the system permits the use of blank location codes, this is not
recommended.
Items/Sites
35
Note The Transfer Ownership field is active only if you are using the
optional Supplier Consignment Inventory module. This module is
described in User Guide: Distribution B.
Fig. 2.11
Location
Maintenance
(1.1.18)
Select a location naming convention that takes advantage of how
inventory is detail allocated (picked). When work order and sales order
picklists are printed, the system looks through locations for available
inventory and makes detail allocations. It searches location codes in
ascending or descending order according to the setting in Inventory
Control (3.24).
Because of this, numeric location codes such as 1000, 1100, and 8000 are
recommended. If you use significant codes and allocate in ascending
order, the system allocates inventory in alphabetic order so that Inspect
would come before Stores.
Permanent/Temporary Locations
Locations can be defined as permanent or temporary. When you define
a location as permanent, the system maintains all location detail records
for that site/location until they are deleted using Zero Balance Delete/
Archive (3.23). Since detail records are maintained, locations with zero
balances appear on reports.
If you define a location as temporary, the system automatically deletes
inventory detail records when the location’s balance falls to zero. It does
not delete the location code. Since zero balance locations do not have
detail records, they do not appear on reports.
¶ See “Setting Up
Inventory
Control” on
page 286 for
details.
36
User Guide — Master Data
Automatic Locations
The system can automatically create location codes whenever you enter
an undefined value. Do this by setting Automatic Locations to Yes in Site
Maintenance (1.1.13). This option is useful if you frequently need to
define a new location while entering a transaction.
Note The system automatically creates new location codes without
verification. This means you can inadvertently create a new location code
from a typing error. For example, if you type STWCK instead of STOCK,
the system creates a location code called STWCK.
If a site has a complex network of storage locations, automatic locations
may be a useful feature. An alternate approach is to set up your main
locations in Location Maintenance (1.1.18) and define sublocations using
the lot reference field.
Location Types
Some items require special storage conditions, such as temperature
control or sterile environments. Storing these items in an inappropriate
location can cause inventory to become unusable. Location type codes
enable you to control the type of inventory stored in a location.
Specify the type code for a location in Location Maintenance (1.1.18).
Then, identify the items that require this type of storage by specifying the
same type code for the item in Item Inventory Data Maintenance (1.4.5)
or Item Master Maintenance (1.4.1).
When an item is received, the system checks the location and item type. If
they are not the same, an error displays.
Single Item Locations
Some locations can be used to store different types of the same kind of
material. For example, a vat may contain any kind of liquid, such as olive
oil, ammonia, or acetic acid. However, at any one time, you only want one
type of liquid in that location.
Items/Sites
Define these locations as single-item locations by setting Single Item to
Yes in Location Maintenance. When a location is designated as a single
item location, it can only have an on-hand balance for a single lot of one
item at a time.
37
Tip
Single item applies
to lot reference
also, if it is used.
Reserved Locations
Enter Yes in Reserved Locations to display the second frame of Location
Maintenance where you assign reserved locations to specified customers.
Reserved locations let you dedicate inventory to a specific customer or
customers to ensure an adequate supply for sales orders.
Note Use Reserved Location Maintenance (2.1.9.1) to make adjustments
to the reserved location data set up in Location Maintenance.
¶ See page 192.
Fig. 2.12
Location
Maintenance
(1.1.18), Reserved
Location Data
Enter a customer address and indicate whether this location is the
customer’s primary location. The primary location always defaults on
new sales quotes and orders. Each customer can have only one primary
location at a site, but you do not need to designate any reserved location
as primary.
When you create a sales order for a customer with a reserved location, the
reserved location defaults during line-item entry. For other customers, the
system automatically blocks sales order line-item entry or shipment from
a reserved location.
Important The system does not prevent you from reserving the same site
and location for multiple customers. You must ensure that only
appropriate customers are assigned to reserved locations. Use Reserved
Location Browse (2.1.9.2) and Report (2.1.9.3) to monitor customer
associations with reserved locations.
38
User Guide — Master Data
Reserved Locations and Inventory Status Codes
¶ See “Inventory
Status Codes” on
page 39.
The management of inventory in a reserved location depends on assigning
an appropriate inventory status code to the location.
Important Since all inventory detail records in the location must have
the correct status code, you should create new locations for the reserved
inventory.
Set up the status code in Inventory Status Code Maintenance (1.1.1)
before assigning it to the new location in Location Maintenance:
• Set Available to Allocate to No. This prohibits allocating inventory
from reserved inventory to undesignated customers. This setting does
not affect customers who have been assigned a reserved location.
• Set Nettable to No. This excludes reserved inventory from Materials
Requirement Planning (MRP) functions. Otherwise, the system
counts reserved inventory in its planning functions, and inventory
shortages for other customers may occur.
• Set Overissue to Yes or No, depending on your inventory
management policy on issuing inventory from a location that has a
zero or negative inventory balance.
• Set up restricted transactions for all non-sales order transactions. This
prohibits non-sales order transactions for reserved locations
inventory. For example, apply restrictions to work order component
issue, DRP shipments, RMA shipments, issue and receipt
transactions, and others that may allow other order functions to access
reserved-location inventory.
Effect of Reserved Locations in Sales Order Functions
When an item is entered on a sales order, the default location is normally
the one associated with the item in Item Master Maintenance. When
reserved locations exist for the order customer, a new method is used to
determine the default location.
The system checks for reserved location records for the ship-to customer
address, then the sold-to address, and finally the bill-to address. If a
record is found with Primary set to Yes, this location is used as the
Items/Sites
default. If reserved locations are defined for one of the order address
records but none are designated as primary, the first reserved location
found alphabetically within the site is used as the default.
The calculation of quantity available to allocate during line-item entry
takes into account inventory in the customer’s reserved locations, even
though the inventory status is defined with Available set to No.
Inventory Status Codes
Use Inventory Status Code Maintenance to create and modify inventory
status codes.
• Assign inventory status codes to sites with Site Maintenance (1.1.13)
and locations with Location Maintenance (1.1.18).
• Optionally assign default inventory status codes for purchase order or
work order receipts to individual items using Item Master
Maintenance (1.4.1), Item Inventory Data Maintenance (1.4.5), or
Item-Site Inventory Data Maintenance (1.4.16).
The inventory status code determines whether the inventory balance at a
site or location is:
• Nettable for material requirements planning calculations.
• Available for sales order and work order allocations. Allocations are
used to reserve inventory and assist in picking inventory to be
shipped or issued.
• Issued even if the site or location has a zero or negative inventory
balance.
• Not available for particular kinds of inventory transactions. For
example, material that is located in scrap locations should not be
used for sales order issues.
39
40
User Guide — Master Data
Fig. 2.13
Inventory Status
Code Maintenance
(1.1.1)
You must associate an inventory status code with every site or location
you set up. You may want to create a blank inventory status code to use
for most situations. This status code should be both nettable and available,
with no restricted transactions.
Status Defaults
Each site’s inventory status defaults to any locations you add to that site.
You can modify inventory status for individual locations as needed.
Item quantities received into inventory are assigned an inventory status
based on their associated item master data, inventory detail, or the site or
location into which they are received. You can use Inventory Detail
Maintenance (3.1.1) or Detail Maintenance by Item/Lot (3.1.2) to assign a
different status to an item’s quantity on hand.
¶ See Chapter 5,
“Compliance,”
for information.
If you are using the Compliance module, you can also define inventory
attributes, including status, in Work Order Maintenance. These attributes
are then used by default during the work order receipt.
You can modify default inventory attributes, including status, during most
receipt functions if the receipt location does not already include inventory
with different attributes.
Items/Sites
Overissue Policy
Whether or not you allow overissues depends on your own policies and
procedures. Some organizations determine that to maintain accurate
inventory balances, negative balances cannot be permitted.
In an online, interactive system, inventory records are updated when
inventory transactions are processed. Information is sometimes entered in
batch when people are not able to enter transactions in real time. Without
controls, inventory balances may temporarily be driven negative.
However, after all the transactions are entered, inventory balances should
not be less than zero.
If all of the following are in place and executed, inventory balances
should be accurate:
• Procedures for recording inventory movement
• Procedures for data entry
• Regular cycle counts
• Good stockroom practices such as proper labeling and organization
• Controlled stockroom (that is, people cannot just walk in and take
material)
If the Overissue field for the inventory status code is set to No, you may
be unable to record a shipment transaction for inventory that is known to
have shipped, because a work order receipt has yet to be processed. To
prevent unnecessary delays in processing transactions, the Overissue field
can be set to Yes. At the end of the day, a report can be run to check for
negative balances. Regular cycle counts also help identify problems.
In some regulatory environments, it may be better to set the Overissue
field to No. Here, data entry procedures should be developed to ensure the
timely entry of inventory transactions. This may be particularly true when
there are critical items controlled by lot or serial number.
Note Overissues are not prevented when components are issued during
inventory, work order, and repetitive backflush transactions. These
transactions assume that component inventory must have been issued if a
parent is received or an operation has been completed.
41
42
User Guide — Master Data
Restricting Transactions
You can use inventory status codes to control and manage how items,
sites, and locations are used in the system.
• You can specify whether particular kinds of transactions can occur for
individual items. For example, you typically inspect purchased items.
Use the PO Receipt Status field in Item Master Maintenance to assign
items received on purchase orders a default status that restricts
inventory transfers.
• You can determine for sites and locations whether you can initiate
particular transactions that affect them. For example, assign a scrap
location an inventory status code that restricts issues.
• You can also indicate whether particular transactions can be initiated
using CIM-load functions for items, sites, and locations
¶ See “Transaction
Types” on
page 291.
Not every inventory transaction can be restricted. Some system-generated
transactions are required to maintain data integrity. Table 9.2 in Chapter
9, “Inventory Control,” lists inventory transaction types and indicates
which ones cannot be restricted.
Some transaction types are not listed in Table 9.2. These transaction types
are used exclusively to prevent or allow actions in the system. Since no
inventory movement occurs, a transaction history record is not created.
Table 2.3 lists these transaction type codes with a brief description and the
name of one of the programs that creates the transaction.
Note Some of these transactions are created in more than one program.
In this case, the table simply indicates a typical program associated with
the transaction and is not intended to be a complete list.
Table 2.3
Transaction Types
Used to Restrict
Actions
Transaction
Type
Description
Program Creating
ADD-FC
Create a forecast for an item.
Forecast Maintenance (22.1)
ADD-PO
Add an item to a purchase order. Purchase Order Maintenance (5.7)
ADD-PS
Create a product structure
relationship.
Product Structure Maintenance (13.5)
ADD-RE
Create a repetitive schedule.
Schedule Maintenance (18.22.2.1)
ADD-RMA
Add an item to a return line on a
service/support RMA.
RMA Maintenance (11.7.1.1)
Items/Sites
Transaction
Type
Description
Program Creating
ADD-SEO
Add an item to a material order.
Material Order Maintenance (11.11.1)
ADD-SO
Add an item to a sales order or
RMA issue line.
Sales Order Maintenance (7.1.1)
ADD-SQ
Add an item to a sales quote.
Sales Quote Maintenance (7.12.1)
ADD-WO
Create a work order for an item.
Work Order Maintenance (16.1)
INC-PS
Create a product structure
relationship by incorporating a
PCO.
Incorporation (1.9.7.5)
ISS-RMA
Receive an item into inventory
on a service/support RMA.
RMA Receipts (11.7.1.13)
You can also use item status codes, defined with Item Status Code
Maintenance (1.1.5), to restrict transactions for an item. Item status codes
typically reflect the status of an item in its life cycle from planning
through design, production, and obsolescence. In contrast, inventory
status codes indicate what can be done with an item based on its physical
location or its current use in the system.
43
44
User Guide — Master Data
Chapter 3
Pricing
This chapter discusses the two available pricing models: best pricing
and list/discount table pricing.
Introduction to Pricing
Using Best Pricing
46
48
Using List/Discount Table Pricing
88
46
User Guide — Master Data
Introduction to Pricing
The system supports automatic pricing in a number of key transactions.
The simplest way to establish prices is by associating prices with items in
Item Master Maintenance. However, this approach is often too inflexible
to meet the needs of modern companies.
For greater flexibility, the system offers two pricing models based on
price lists: best pricing and list/discount table pricing. These models are
represented by submenus on the Pricing and Discount menu (1.10).
• Use price lists based on the best pricing model for sales orders, sales
quotes, and issue lines on Service/Support Management (SSM) return
material authorizations. Set up these price lists in SO/SQ/RMA Issues
Pricing Menu (1.10.1).
• Use price lists based on the list/discount table model for automatic
pricing of purchase orders, scheduled sales orders, supplier scheduled
orders, and SSM RMA receipt lines. Set up these price lists in PO/
Sched/RMA Rcpt Price Menu (1.10.2).
Table 3.1
Best Pricing Model
Pricing Menus
Menu
Menu Label
1.10.1
SO/SQ/RMA Issues Pricing Menu
Program
1.10.1.1
Price List Maintenance
pppimt.p
1.10.1.2
Price List Inquiry
pppiiq01.p
1.10.1.3
Price List Report
pppirp01.p
1.10.1.5
Price Lists by Customer Inquiry
pppiiq02.p
1.10.1.6
Price Lists by Item Inquiry
pppiiq03.p
1.10.1.8
Price List Copy
pppicp.p
1.10.1.13
Pricing What-If Inquiry (S/O)
sopiwiiq.p
1.10.1.15
Customer Orders by Price List Inquiry
pppiiq04.p
1.10.1.17
Sales Order Price Inquiry
soppiq.p
1.10.1.18
Sales Quote Price Inquiry
sqppiq.p
1.10.1.24
Pricing Control
pppipm.p
Pricing
List/Discount Model
Menu
Menu Label
47
Program
1.10.2
PO/Sched/RMA Rcpt Price Menu
1.10.2.1
Price List Maintenance
pppcmt.p
1.10.2.2
Price List Browse
ppbr003.p
1.10.2.3
Price List Report
pppcrp.p
1.10.2.4
Price List By Item Report
pppcrp01.p
1.10.2.5
Price List Copy
pppccp.p
1.10.2.6
Price List Generation By Item
pppcptup.p
1.10.13
Volume Discount Maintenance
sosdmt.p
1.10.14
Volume Discount Browse
sobr008.p
Additional pricing functions used in the system are described in other
guides.
• Service price lists are created in Service/Support Management and
used for contract pricing and call billing. They are defined and
managed entirely within SSM.
• Price lists defining default prices and planned costs for items, labor,
and expenses used in projects are created in the Project Realization
Management (PRM) module.
• Trade Management (TRM) is a separate product that interfaces with
sales orders and is used for complex promotional pricing. The
features of TRM are described in a separate guide.
Figure 3.1 illustrates how the system applies the best pricing and list/
discount pricing models to various orders.
¶ See User Guide A
for details on
service pricing.
¶ See User Guide:
PRM.
¶ See User Guide:
Trade
Management for
details.
48
User Guide — Master Data
Fig. 3.1
Two Pricing
Models
Using Best Pricing
Best pricing, or sales order pricing, enables you to create price lists that
accommodate a wide range of pricing situations. Instead of matching
price lists strictly through items or product lines, the system can
determine best prices using flexible categories of items and customers
called analysis codes.
Figure 3.2 gives steps for setting up a typical sales order pricing
operation. Each step is discussed in detail in the sections that follow.
Pricing
49
Fig. 3.2
Sales Order Pricing
Work Flow
Plan
Plananalysis
analysiscodes
codesand
andprice
price
lists.
lists.
Set
Setup
upprice
pricelists.
lists.
Set
Setpricing
pricingdefaults.
defaults.
Price
Priceorders.
orders.
Set
Setup
upanalysis
analysiscodes.
codes.
Reprice
Repriceorders.
orders.
Set
Setup
upitem
itemprice
pricebreak
break
categories.
categories.
Sales order pricing includes both the Analysis Code menu (1.8) and the
SO/SQ/RMA Issues Pricing menu (1.10.1). Sales order price lists are
used to price orders you create in Sales Order Maintenance (7.1.1), Sales
Quote Maintenance (7.12.1), and RMA Maintenance (11.7.1.1). Price
break categories allow volume price breaks for multiple items. Break
categories are assigned to item numbers.
Planning for Best Pricing
To use best pricing, you need to plan analysis codes and price lists. How
you use analysis codes depends on how you organize items and
customers. How you use price lists also depends on how you organize
items, but also on your product structures, and whether you manufacture
configured products, offer discounts on quantity volume, and many other
factors.
¶ For more
information on
RMAs, see
User Guide: SSM
B.
50
User Guide — Master Data
Planning Analysis Codes
To plan analysis codes, do the following:
1
Collect and review your company’s current pricing policies,
procedures, and associated structures.
2
Determine the benefit of using analysis codes with your current or
planned pricing practices. Analysis codes are best suited to extensive,
complex pricing structures.
3
If you decide to use analysis codes, determine how you want to group
inventory items and customers in relation to pricing. Establish a list of
unique codes identifying these groups.
4
For each customer and item group, determine how you want to select
members using the conditions available in Analysis Code Selection
Maintenance.
5
Consider the usefulness of combining analysis codes into hierarchical
pricing structures. All attributes of child analysis codes are inherited
by the associated parent analysis code.
6
Create a visual diagram of how you want to link analysis codes.
7
Review and modify all analysis codes defined and determine how
they will be associated with one or more price lists.
Planning Price Lists
In planning for price lists, consider the following questions:
1
Do you offer promotional discounts?
2
Do you engage in joint cooperative marketing agreements with
retailers where the amount of cooperative marketing is based on the
volume purchased over a period of time by the retailer?
3
Do you use coupons?
4
Do you convert savings resulting from seasonal fluctuations in
materials costs into customer discounts?
5
Do you offer additional discounts to customers in a geographical area
where a product is not moving quickly?
Pricing
6
Do you maintain a minimum price for a product that is the lowest
acceptable price offered, regardless of the number of discounts?
7
Do you offer volume discounts based on quantity and/or value?
8
Do you negotiate credit terms with your customers?
9
Do you negotiate freight terms and freight discounts with your
customers?
51
10 Do you want some discounts exclusive of all other discounts or
combinable with other discounts?
11 Do you want volume discounts based on a range of similar products?
Setting Pricing Defaults
Use Pricing Control (1.10.1.24) to set pricing defaults.
Discount Combination Type. Enter either Additive or Cascading to
instruct the system what to do when multiple price lists apply.
¶ See “Discount
Sequences” on
page 66.
Automatic AC Regen for Customers/Items. Enter Yes to have the
system automatically add new customers or items to existing analysis
codes. Otherwise, enter No. If No, Analysis Code Detail Build must
be run after new customers and items are added.
Automatic AC Regen for Edits of Customers/Items. Enter Yes to have
the system automatically add modified customers or items to existing
analysis codes. Otherwise, enter No. If No, Analysis Code Detail
Build must be run after existing customers and items are modified.
QO Default Price Date. Price date indicates which price lists are
Tip
effective for a quote. Specify a default price date by entering Due
Date, Order Date, Promise Date, or Required Date.
On a sales quote,
Order Date is the
field labeled Quote
Date.
Price QO by Line. Enter Yes to recalculate prices as lines are entered
in a quote. This updates prices immediately if a combination of items
or quantities qualifies for a better price. Enter No to recalculate prices
only once, when the quote is complete.
QO Factor Rounding. The number of decimals to which factors are
rounded in a sales quote. The default is 3. This field only has effect
when discounts are displayed as factors.
52
User Guide — Master Data
Display QO Discounts as. Valid values are Discounts or Factors. For
a 10% discount, the factor is 0.90 (or 1–0.10). The default is
Discount. This also controls the format for prompting of a discount.
SO Default Pricing Date. Specify a default price date for sales orders
by entering Due Date, Order Date, Performance Date, Promise Date,
or Required Date.
Price SO by Line. Enter Yes to recalculate prices as lines are entered
in a sales order. Enter No to recalculate prices only once, when the
order is complete.
SO Factor Rounding. The number of decimals to which factors are
rounded in a sales order. The default is 3.
Display SO Discounts as. Valid values are Discounts or Factors. For a
10% discount, the factor is 0.90 (or 1–0.10). The default is Discount.
This also controls the format for prompting of a discount.
¶ See User Guide:
Trade
Management for
details.
Promotions Prefix. If Trade Management (TrM) is installed, use this
field to identify price lists generated by TrM.
Setting Up Analysis Codes
Tip
These codes are not
the same as those
created in GL
Report Writer.
In best pricing, you classify customers and products using analysis codes.
Analysis codes are based on characteristics such as region, salesperson, or
item number, and can be linked to form combinations or sets. For
example, analysis codes can link regions, as shown in Figure 3.3.
Fig. 3.3
Parent and Child
Analysis Codes
Parent
AA
All
AllWestern
Western
European
European
Customers
Customers
Child
Child
NN
Northwestern
Northwestern
European
European
Customers
Customers
SS
Southwestern
Southwestern
European
European
Customers
Customers
Pricing
53
• Analysis Code N groups customers in Northwestern Europe.
• Analysis Code S groups customers in Southwestern Europe.
• Analysis Code A combines the two groups by linking codes N and S.
Code A is referred to as a parent code because Codes N and S are linked
to it. Codes N and S are referred to as child codes.
Fig. 3.4
N
Map of Example
Region Codes
A
(N + S)
S
Analysis code linking uses OR logic. For example, if code A links codes
N and S, any customer meeting the code N or code S criteria is included
in code A.
Figure 3.5 outlines commonly used procedures for setting up and
managing analysis codes. Each procedure is discussed in detail in the
sections that follow.
Fig. 3.5
Analysis Code
Work Flow
Create
Createand
andview
viewanalysis
analysis
codes.
codes.
Select
Selectanalysis
analysiscodes
codesfor
for
deactivation.
deactivation.
Create
Createand
andview
viewanalysis
analysiscode
code
conditions.
conditions.
View
Viewanalysis
analysiscode
codedetails.
details.
Create
Createand
andview
viewanalysis
analysiscode
code
links.
links.
View
Viewanalysis
analysiscode
codereports.
reports.
Build
Buildtables
tablesbased
basedon
onanalysis
analysis
codes.
codes.
Copy
Copyanalysis
analysiscodes.
codes.
54
User Guide — Master Data
Creating Analysis Codes
Create analysis codes for customers and items in Analysis Code
Maintenance (1.8.1). Use Analysis Code Inquiry (1.8.2) to view analysis
codes.
Fig. 3.6
Analysis Code
Maintenance
(1.8.1)
Type. Valid values are item or customer.
Code. Enter an alphanumeric code identifying a group of customers
or items.
Description. Enter a brief description of this particular code. This
displays in inquiry screens.
Active. Enter Yes. If No, a warning displays when you create a price
list with this analysis code.
Note This setting has no impact on the active status of customer and
item nodes associated with this analysis code. You can modify the
active status of nodes in Analysis Code Detail Maintenance (1.8.13).
Comments. Enter Yes to review or update comments.
Use Analysis Code Report (1.8.17) to view details for a range of analysis
codes. Enter the analysis code type, analysis code range, and analysis
detail selections to be included on the report.
Pricing
55
Creating Analysis Code Conditions
Use Analysis Code Selection Maintenance (1.8.4) to define how members
are selected for inclusion in an analysis code group. Use Analysis Code
Selection Inquiry (1.8.5) to review analysis codes and their condition
fields and ranges.
Fig. 3.7
Analysis Code
Selection Maint
(1.8.4)
Selection
Fields
Type. Valid values are item or customer.
Code. Enter an analysis code you created previously, considered the
parent code.
Condition Field. Enter a characteristic or qualifier. You can apply
more than one condition to an analysis code. If multiple qualifying
conditions are selected, AND logic is used. For example, if Condition
Field is set to Salesperson 1 and a second Condition Field is set to
Salesperson 2, only records meeting both conditions are selected.
Table 3.2
.
Customer Conditions
Item Conditions
Bill-to
Salesperson 2
Article
Item Number
Class
Site
Break Category
Product Line
List Type
Sort Name
Buyer/Planner
Site
Number
Type
Description 1
Type
Region
User Field 1
Description 2
User Field 1
Salesperson 1
User Field 2
Group
User Field 2
Wildcard. Enter one of the following wildcards:
• (.) period—a single position wildcard. For example, .2 indicates
any selection with 2 in the second position.
• (*) asterisk—a multiple position wildcard. For example, *2
indicates any item with 2 in the last position.
Valid Conditions
56
User Guide — Master Data
From. For a condition, enter the beginning range to be included in the
analysis code.
To. For a condition, enter the ending range to be included in the
analysis code.
Linking Sets of Analysis Codes
By linking analysis codes, you can organize customers and items in a
variety of ways. Item analysis codes can be linked only to other item
codes, and customer codes only to other customer codes.
Analysis code linking uses OR logic. For example, if code ABC links A,
B, and C, any customer meeting the criteria for A, B, or C is included in
ABC.
Link analysis codes in Analysis Code Link Maintenance (1.8.7).
Fig. 3.8
Analysis Code Link
Maintenance
(1.8.7)
Type. Valid values are item or customer.
Code. Enter a valid analysis code. This code is considered the parent.
Linked Code. Enter the code you want to link to. This code is
considered the child.
Description. Enter a brief description of this link.
You can view analysis code links in two ways.
• Use Analysis Code Link Inquiry (1.8.8) to view codes linked to a
parent code.
• Use Analysis Code Where-Linked Inquiry (1.8.9) to view child
analysis codes and the parent codes they are linked to.
Pricing
57
Building Analysis Codes
Use Analysis Code Detail Build (1.8.19) to build a table of items or
customers for each analysis code, based on analysis code rules and links
previously defined. Build analysis codes whenever these rules or links are
changed, when new codes are created, and when new items and customers
are created.
When you execute this program, the system displays a message listing the
number of nodes exploded and the execution start and stop time.
Pricing Control (1.10.1.24) gives you the option to automatically build
analysis codes when you add new customers and items or make changes
to existing customer and item records. However, if you change condition
fields for an analysis code, you must still run the build program. This
utility builds the data by analysis code type.
Warning Interrupting this utility can disable price lists that use analysis
codes. This utility must be completed in its entirety.
As the build proceeds, the system displays:
• Process Started. Date and time the program was initiated.
• Nodes Exploded. Current number of items or customers processed.
• Elapsed Time. Time it took for the system to update each item or
code.
• Process Stopped. Time the program completed.
At the end of the build, the system generates a summary report, listing the
analysis code type, code value, active status, and each customer or item
selected by the build.
Tip
Although builds
can be run online,
batch mode may be
more efficient due
to potentially long
run times.
58
User Guide — Master Data
Detailed Selection of Analysis Code Nodes
Use Analysis Code Detail Maintenance (1.8.13) to inactivate or reactivate
individual items and customers selected for a code. An asterisk in the Sel
field indicates an active node. Navigate to the item or customer you want
to modify. Then press Enter to toggle its current state.
Fig. 3.9
Analysis Code
Detail Maintenance
(1.8.13)
To select a node by name, press Go to access the update frame at the
bottom of the screen. You can type the first character of the node name to
go directly to its location in the list of nodes.
Note A deselected node can only become active again by being selected
in this program. Running Analysis Code Detail Build has no effect on its
status.
Viewing Analysis Code Nodes
There are two inquiries for viewing analysis code nodes:
• Use Analysis Code Detail Inquiry (1.8.14) to view specified analysis
codes and their nodes.
• Use Analysis Code Where-Used Inquiry (1.8.15) to view the analysis
codes to which a specified node belongs.
Pricing
59
Copying Analysis Codes
Use Analysis Code Copy (1.8.20) to copy an existing analysis code as a
basis for creating a new one.
Fig. 3.10
Analysis Code
Copy (1.8.20)
Enter the new
analysis code
name here.
Type. Enter Customer or Item.
Code. Enter the analysis code to be copied.
To. Enter the name of the new analysis code.
Setting Up Item Price Break Categories
Price break categories let you assign volume price breaks for multiple
items. Discounts can be calculated based on the quantity or amount
ordered on multiple lines of a sales order or quote.
Example One hundred green bicycles are ordered on line 1 of a sales
order, 100 red bicycles on line 2, and 200 bicycle reflectors on line 3. The
reflectors receive a price break based on the quantity of bicycles ordered
(200)—not the quantity of bicycles plus reflectors (400). The bicycles
also receive a price break based on the number of bicycles ordered (200).
Fig. 3.11
Cumulative Price
Break Categories
Price
PriceList
List
Price
PriceBreak
Break
Category
Category11
End
EndItem
ItemAA
Price
PriceBreak
Break
Category
Category11
End
EndItem
ItemBB
Price
PriceBreak
Break
Category
Category11
There are two ways to take advantage of price break categories:
• Accumulate quantities on related items by assigning the same price
break category to each item.
60
User Guide — Master Data
• Offer discounts on accessory items by assigning a price break
category to a price list to which the accessory item belongs and to the
item master of the accessory item’s principal item.
In the case illustrated in Figure 3.12, bicycle tire pumps belonging to
the price break category Accessories qualify for Price List A. Price
List A uses the price break category Bicycles to determine the price
for the pumps, even though the pumps do not belong to that price
break category.
Fig. 3.12
Price Break
Categories and
Accessory Items
Tire
TirePumps
Pumps
Item
ItemMaster
Master
Break
BreakCategory
Category
==Accessories
Accessories
Quantity/Amount
Quantity/Amount
Data
Datafor
for
Break
BreakCategory
Category
Accessories
Accessories
Price
PriceList
ListAA
Break
BreakCategory
Category
==Bicycles
Bicycles
Quantity/Amount
Quantity/Amount
Data
Datafor
for
Break
BreakCategory
Category
Bicycles
Bicycles
Enter break categories in Item Master Maintenance (1.4.1) and Price List
Maintenance (1.10.1.1).
Fig. 3.13
Price Break Cat
Field of Item
Master
Maintenance
(1.4.1)
Price Break Cat
field
Item Number. Enter an item code.
Price Break Cat. Enter a category name. Name price break categories
as you like, but make sure that you enter the same names on price lists
and other items.
Pricing
61
Creating and Maintaining Price Lists
A price list defines all the information necessary to correctly price an item
for a customer. A price list applies to the customer or item codes you
assign to it as follows:
• A single item number
• A single customer number
• A group of customers belonging to an analysis code
• A group of items belonging to an analysis code
• All customers
The discount type, referred to as the amount type, defines the purpose of a
price list. There are several discount types, and they can be combined. A
price list also defines minimum quantities, effective dates, and other
information you may want to extend to your customers.
¶ See “Discount
Types” on
page 61.
When an order is entered, the system determines which price lists apply,
examines those lists, and determines which of them yield the best price
for the order. Applicable price lists may have been determined using the
same or different criteria.
¶ See “Calculating
Best Prices” on
page 65.
Discount Types
The Amount Type field determines the discount type assigned to a price
list. Possible choices are:
• List Price. Used as the item list price. List prices also set allowable
minimum and maximum prices, if selected for a given line item, even
if the list price is manually overridden.
List prices are the foundation of pricing logic.The choice of
exclusive, base, combinable, and base combinable as the Comb Type
does not apply to list prices. They must be set up with a Comb Type
of combinable.
• Discount%. Percentage subtracted from the item list price.
• Discount Amt. Amount subtracted from the item list price.
• Markup. Percentages added to item cost in a specified cost set. Must
be either a base or exclusive combinable type.
• Net Price. Discounts resulting in a fixed price. Must be either a base
or exclusive combinable type.
62
User Guide — Master Data
• Accrual. Similar to Discount%, except that a percentage of the net
price accrues to a specified general ledger account, without reducing
the net price, and independent of discount.
• Credit Terms. Specified for an order or quote, independent of other
discount types.
• Freight List. Specified for an individual order or quote line item,
independent of discount.
• Freight Terms. Specified for an order or quote, independent of
discount.
Other Pricing Elements
The system processes pricing by line item. As a sales order or quote is
entered, the system determines the following:
• Who the pricing customer is
• Which price lists combine with other price lists
• Which price lists are candidates for each line item
• Whether break category discounts apply
• Whether configured products are included, and whether pricing
applies across the entire product or at the current level only
• Which price list yields the best overall price for the customer
Who Is the Pricing Customer?
When selecting price lists, the system determines who the pricing
customer is as follows:
• When sales orders are entered, the system uses the customer number
in the Ship-To field as the pricing customer if the ship-to customer is
defined in the customer master.
• Otherwise, the system uses the customer number in the Sold-To field
as the pricing customer.
Pricing
Discount Combinability
The best possible new price of a line item is determined by considering
multiple discounts and combining various discounts. Combination types
instruct the system how price lists combine with other price lists for
purposes of multiple discounts and best pricing calculations. The choices
are:
• Base. The standard discount for customers that serves as the basis for
additional discounts and can be combined with any non-exclusive
price list. Base price lists are exclusive of other base price lists.
• Combinable. Incremental price lists intended to combine with base
and other combinable price lists.
• Base-Combinable. Incremental price lists intended to combine base
price lists only.
• Exclusive. Exclusive price lists that cannot be combined with any
other price lists.
The best discount the system arrives at is one of the following: best base
price plus all combinable discounts, best base price plus the best base
combinable price list, and the best exclusive price list.
Markup and net price lists must be of combination type base or exclusive.
List price tables provide pricing history and set minimum/maximum
prices. They are the foundation for the pricing logic. For pricing
structures with an Amount Type of list price, the combination type does
not apply. They must be set up with a Comb Type of combinable.
Price List Candidates
The system finds candidates by matching the customer number and the
item number on a sales order with the customer code and the item code on
the price lists. A match is found if all of the following conditions are true:
• Customer code on the price list equals:
• The customer entered on the order
• Any customer analysis code associated with this customer
• Blank, indicating the price list applies to all customers
63
64
User Guide — Master Data
• Item code on the price list equals:
• The item number entered on the order
• Any item analysis code associated with this item number
• Blank, indicating the price list applies to all items
• The order currency and price list currency are the same.
• The start and end dates are effective.
Break Categories and Price List Processing
As each line item is priced, the system determines if any lines need to be
accumulated for price breaks. If so, the price calculated is based on the
total quantity (or amount) on all qualifying line items.
A line qualifies if the item break category matches:
• The break category on a selected price list, and
• The break category of another line item on the same order.
¶ See “Other
Pricing
Elements” on
page 62.
Once all line items are completed, the system reviews them to ensure that
proper discounts are calculated. For example, if line item 4 affects the
quantity discount for a prior line, the system reviews that line and updates
its pricing. There may be times when an item should receive a discount
based on the quantity ordered on other line items, but should not add to
the total break quantity.
Configured Products Pricing
The system determines in two stages whether price lists apply across an
entire configured product line or at the current level only.
Factor contestants. Each component, including the parent item of the
configured product, is priced independently and then totaled.
Best overall price. The system calculates the net price for the entire
configured item, using the rolled-up list price, discounted by only those
discounts that apply across the entire configuration.
The system then compares the net price with the best overall net price and
chooses the better of the two.
Pricing
65
Calculating Best Prices
In best pricing, multiple discounts are considered and applicable
discounts combined to determine the best possible net price for a line
item, as illustrated in Figure 3.14.
Fig. 3.14
How Best Pricing
Works
LP
LP
Base
Lists
B1
B1
Best List Selected
Best Price**
Selected
B2
B2
B3
B3
E1
E1
DISCOUNT
PRICES
List Price
List*
Combinable
Lists
Price Calculated
from Set
B3
B3
C1
C1
C2
C2
Applicable Lists
Selected
C1
C1
C2
C2
C3
C3
C1
C1
C2
C2
C3
C3
B3
B3
Best Set
Selected
BC2
BC2
B3
B3
C3
C3
Base
Combinable
Lists
BC1
BC1
Best List Selected
BC2
BC2
BC2
BC2
Exclusive
Lists
E1
E1
Price Calculated
from Set
BC2
BC2
Best Set
Selected
B3
B3
E1
E1
Best List Selected
E1
E1
E2
E2
*Or item master price if no list price list exists.
**Best price is validated against min/max of list price list (if used).
Multiple price lists may apply. The best discount is:
• The best base price plus all combinable discounts, or
• The best base price plus the best base-combinable price list, or
• The best exclusive price list
When the system has found all qualifying price lists, it then determines
what combinations result in the best price. The rules for combining price
lists are based on the Comb Type field in Price List Maintenance.
Table 3.3 lists how the system uses price lists.
66
User Guide — Master Data
Table 3.3
How Price Lists
Are Used
System Function
What happens
Building the Best List
Price
The system evaluates each applicable List Price price list. If
more than one is found, the lowest price is used. If no List
Price list is found, the Price field from the Item Master
Maintenance is used. The price is stored in the List Price
field of the sales order or quote.
Building the Best Net
Price
The system accesses each applicable Discount%, Discount
Amt, Markup, and Net Price price list. It then determines
what combination yields the lowest price. The rules for
combining price lists are based on the Com Type field in
Price List Maintenance. The Discount and Net Price fields
are then updated on the sales order or quote.
Modifying Price for
Minimum or Maximum
If the calculated Net Price on a sales order is above the
maximum or below the minimum price (set on List Price
price lists in Price List Maintenance), the Net Price on the
sales order or quote is adjusted.
Manually Overriding
Calculated Prices
The calculated List Price, Discount, and Net Price can be
manually changed on a sales order or quote (if you have
security access to these fields). When this occurs, the system
records a Manual discount, which is the difference between
the system-generated price and the price entered.
Example A company offers a promotional discount to customers in a
geographic area. For qualifying customer A, this discount is better than
the standard discount. Qualifying customer B, however, qualifies for a
better discount than the geographic discount. The system assigns the
better discount, so customer B is not penalized for qualifying for the
promotion.
Discount Sequences
Tip
A discount is
combinable when
more than one price
list is used to
determine net price.
When using combinable type discounts, the discounts can either be added
together or multiplied/cascaded. Specify which calculation to use in
Pricing Control for all orders and price lists.
When the cascading calculation method is chosen and GL accounts are
used to track discounts to individual price lists, the discount sequence
number becomes important. This is because the individual discount
amounts can differ depending on the order in which they are applied. The
net price of the order is the same regardless of sequence numbering.
Pricing
When the additive calculation method is used, discount sequence number
is not significant. With this method, the calculation uses the best list price
with each discount and adds the individual discount amounts to obtain the
total discount.
Applying the Additive Method
In a sales order line with a best list price of $100, price lists A and B are
used. Price list A has a sequence number of 100 with a 20% discount.
Price list B has a sequence number of 200 with a 30% discount. Using the
additive method, the system calculates the discounts as follows:
$100 * .20 = $20
$100 * .30 = $30
$20 + $30 = $50
A discount of $20 is recorded for price list A and $30 for B. The total
discount is $50 and the net price is $50. It does not matter which discount
is calculated first, because the best list price is used to calculate both
individual discounts.
Applying the Cascading Method
Using the cascading method for the same example, the system first
performs the calculations for price list A, since it has the lower sequence
number:
$100 – [$100 x (1–.20)] = $20
$100 – $20 = $80
Calculations are then performed for price list B:
$80 – [$80 x (1–.30)] = $24
$80 – $24 = $56
The total discount for the order is $44 and the net price is $56. For this
order line, a discount of $20 is posted in the general ledger for price list A,
and $24 for B.
67
68
User Guide — Master Data
Tip
If a manual price
list is included in
the pricing
determination, the
system assigns it
sequence 999. This
ensures that manual
discounts are
calculated last
when the cascading
method is used.
If the sequence numbers are reversed, calculations are first performed for
price list B:
$100 – [$100 x (1–.30)] = $30
$100 – $30 = $70
Calculations are then performed for price list A:
$70 – [$70 x (1–.20)] = $14
$70 – $14 = $56
As before, the total discount is $44, and the net price is $56. But the
discount posted for price list A has changed from $20 to $14; and the
discount for price list B has changed from $24 to $30.
When Discount Sequence Numbers Are the Same
It is possible for two or more price lists to have the same sequence
numbers. In this case, the discount is proportioned between the two lists
according to the contribution of each. The calculation involved for each
price list is as follows:
(1 – individual discount factor) / total additive discount x list price – (list price x
total cascading factor)
¶ See “Applying
the Additive
Method” on
page 67.
The discount factor = 1 – discount percent. Following the previous
example, the discount calculation for price list A would be:
Discount factor = 1 – .20 = .8
Discount = (1 – .8) / .5 x {$100 – [$100 x (.7 * .8)]} = $17.60
The individual discount for price list B would be:
Discount factor = 1 – .3 = .7
Discount = (1 – .7) / .5 * {$100 – [$100 x (.7 * .8)]} = $26.40
The discount calculation works the same with a negative discount.
Pricing
Creating a Price List
Use Price List Maintenance (1.10.1.1) to define item codes, customer
codes, discounts, and other information pertaining to a price list. Create as
many price lists as you need to satisfy your pricing requirements. If you
do not use price lists, the system uses the Price field in the item master.
Fig. 3.15
Price List
Maintenance
(1.10.1.1)
Price List. Enter a code identifying the price list.
Customer/Analysis Code. Enter a customer address code, analysis
code, or leave blank for all customers.
Item/Analysis Code. Enter an item number, analysis code, or leave
blank for all items.
Currency. Enter the code indicating the currency for this price list.
The default is the base currency.
UM. Enter a unit of measure or leave blank for all units of measure.
Start. The first day this price list is effective. If left blank, the price
list is effective for any date prior to the expiration date.
Expire. The last day this price list is effective. The date must be
greater than or equal to the start date. If left blank, this implies no
expiration.
Proceed to the next frame.
69
70
User Guide — Master Data
Description. The description of your price list (optional).
¶ See “Discount
Types” on
page 61.
Amount Type. The choices are Accrual, Credit Terms, Discount%,
Discount Amt, Freight List, Freight Terms, List Price, Markup, and
Net Price. The amount type of the list affects which fields display in
the following frames.
Quantity Type. Specify the type of quantity to be used in determining
quantity breaks in the price list detail, as well as the way the system
uses the value in the Minimum Order field.
• Quantity: the price breaks are determined by the number of items
ordered. If the cumulative order quantity for an item is less than
Minimum Order, the order entry program displays a warning
message following line-item entry.
• Amount: the price breaks are determined by the total extended list
price of items ordered, measured in the price list currency. If the
total order amount is less than Minimum Order, the order entry
program displays a warning message at the trailer.
Note When using price lists with quantity type amount and the
minimum amount is greater than zero, the best list price for the item
must also be greater than zero. If the best list price for the item is
equal to zero, the price list will not be selected for the order line item.
Set list prices for items in Item Master Maintenance or Price List
Maintenance.
¶ See “Discount
Combinability”
on page 63 for
details.
Comb Type. This field describes how price lists combine with other
price lists for multiple discount and best pricing calculations. Valid
values are:
• Exclusive. Cannot combine with any other price list.
Tip
Markup and net
price lists must be
of combination type
base or exclusive.
• Base. Can combine with any price list that is not exclusive or
another base.
• Combinable. Identifies an incremental price list that is intended
to combine with other combinable and base price lists. List price
tables must be combinable.
• Base-Combinable. Identifies an incremental price list that is
intended to combine only with base price lists.
Pricing
Minimum Order. Specify a minimum quantity or currency amount to
be enforced during order entry when this price list is selected. Use of
this field depends on the value of Quantity Type.
• Quantity: Specify the minimum order quantity that should be
allowed on an order that selects this price list. When you enter an
order, the system compares the cumulative line quantity of each
item with this field. If the order quantity is less, a warning
displays. Additionally, in Sales Order Maintenance only, if you
choose to continue ordering a below-minimum quantity, the
system may prompt you to enter a reason code. This occurs when
Keep Booking History is Yes in Sales Order Control.
• Amount: Specify the minimum currency amount that needs to be
on an order to use this price list. If a price list is selected for an
order, this amount is compared with the total order amount. If the
Minimum Order value is greater, a warning displays at the order
trailer.
Note Even when a warning displays, the price list is still applied to
the order. The warning lets you know that minimum requirements
have not been met. You can then decide if this appropriate for your
needs.
Max Qty. In conjunction with Qty Type specified, either the
maximum order item quantity or maximum order currency amount
allowed for price list; default is 0 (zero).
Break Cat. In conjunction with specified Min Net Ord value, an
additional category by which item quantities or currency amounts can
accumulate for required price list minimum. Enter blank if you aren’t
using break categories. Otherwise, enter the item master break
category code associated with the item being priced or the break
category code assigned to another item. The default is blank.
Config Disc. Either Yes or No. Applicable to configured products. If
Yes, the price list applies to everything in a configured product, when
pricing a configured item (otherwise ignored). If No, it only applies to
the specific item.
Manual. Enter Yes if this price list should only be considered during
line item pricing when it is specified in the Manual price list field.
Enter No if this price list should be considered anytime it applies to
the customer or item.
71
72
User Guide — Master Data
Max Orders. Defines the maximum number of orders that can be
priced using this list for a given customer. This field is for reference
only. It is normally used with manual price lists, which might, for
example, apply only once for a new customer.
Tip
Disc Sequence. In conjunction with Comb Type specified, a
The system applies
lower numbers
first.
numerical value indicating the order in which the system applies price
list discounts relative to other price list discounts with which it can be
combined; default is 10.0. A discount sequence can be decimal.
Print. Enter Yes if the price list should be shown on associated sales
order documents and invoices; otherwise, enter No. The default is
Yes.
Promotion Type, Promotion. These fields only have values if you are
using the interface to Advanced Pricing Management.
Cost Set. Applicable cost basis for markup price lists only. Either
blank if standard cost or the current cost set associated with the item
being priced; default is blank.
Comments. Enter Yes to review or update remarks related to this
price list.
Depending on the amount type of the price list you are editing, the system
displays a different frame. Figure 3.16 illustrates the frame that displays
when the amount type is Credit Terms, Freight List, or Freight Terms.
Fig. 3.16
Price List
Maintenance
(1.10.1.1), Min Qty
and Credit Terms
Fields
Min Qty field
Credit
Terms field
Min Qty. Enter a quantity or amount. The Min Qty field changes to
Min Amt if the Qty Type field is set to amount.
Credit Terms. Choose a credit term. The Cr Terms label changes to
Frt Terms or Freight List, depending on your selection in the Amount
Type field.
Pricing
73
Continue entering values for each quantity or amount break.
The frames illustrated in Figure 3.17 and Figure 3.18 display when
amount type is Accrual, Discount%, Discount Amt, Markup, or Net Price.
Fig. 3.17
Account and
Project fields
Discount Acct, Sub-Acct, CC, and Project. For Discount%, Discount
Amt, Markup, or Net Price price lists, enter an account code for
tracking discount amounts. Sub-account, cost center, and project are
optional.
If you do not associate accounts with price lists, discounts are posted
to the Sales Discount account specified in the order maintenance
program.
For accrual price lists, the label of this field changes to Expense. A
percentage of the net price accrues to the account specified in the
Accrual Acct field. The Expense account is required and used to
balance the credit posted to the Accrual account.
Accrual Acct, Sub-Acct, CC, and Project. These fields apply to
accrual price lists only. The account you enter is used to track the
accrual amounts in the general ledger.
Proceed to the next frame.
Min Qty. A quantity or amount. The Min Qty field changes to Min
Amt if the Qty Type field is set to Amount.
Discount%. A discount percentage. The Discount% label changes to
Markup%, Net Price, or Disc Amt, depending on your selection in the
Amount Type field.
Price List
Maintenance
(1.10.1.1), Discount
and Accrual
Account Fields
74
User Guide — Master Data
Fig. 3.18
Price List
Maintenance
(1.10.1.1), Min Qty
and Discount%
Fields
Min Qty field
Discount% field
Continue specifying values for each quantity or amount break.
The frame illustrated in Figure 3.19 displays when amount type is List
Price.
List Price. Enter the list price for this price list.
Min Price. Enter the lowest allowable price for this price list. If a
lower price is entered on a sales order, this price is used instead.
Max Price. Enter the highest allowable price for this price list. If a
higher price is entered on a sales order, this price is used instead.
When you create a List Price price list, the following fields are
ignored: Qty Type, Comb Type, Min Net Ord, Max Qty, Break Cat,
Config Disc, Max Orders, Disc Sequence, Print, and Cost Set.
Fig. 3.19
Price List
Maintenance
(1.10.1.1), List
Price, Min and Max
Price Fields
Reviewing Price Lists
To review price lists, use one of the following programs:
• Use Price List Inquiry (1.10.1.2) to review names and summary
information on price lists.
• Use Price List Report (1.10.1.3) to review pricing details for each
price list.
• Use Price Lists by Customer Inquiry (1.10.1.5) to review price lists
sorted by customer code.
Pricing
• Use Price Lists by Item Inquiry (1.10.1.6) to review price list detail
sorted by item code.
Copying a Price List
Use Price List Copy (1.10.1.8) to quickly create new price lists based on
existing ones. You can copy a price list into any currency or adjust
existing price lists with increased or decreased prices.
The system makes a copy of the source price list under the target price list
code with a start date of today. Specific prices (Amount Type List Price or
Net Price) are multiplied by the Adjustment Percent and the Cur Conv
Factor, then rounded to the specified number of decimal places. Discount
and markup percentages are copied as they are in the source price list.
Fig. 3.20
Price List Copy
(1.10.1.8)
Source Price List. Enter the code identifying the price list from which
the information is copied.
Source Currency. Currency code used by the source price list.
Target Price List. Enter a code identifying the price list to which the
information is copied. The target and source price list can be the
same. In this case, an ending effective date is added to the source list
and a starting effective date to the target list. If the target list is not the
same as the source and does not exist, it can be created. If it does
exist, it can be either cleared or added to.
75
76
User Guide — Master Data
Target Currency. Enter the currency for the system to use on the target
prices. The source and target currency can be the same—leave blank
for the system to default to the source currency. If you are copying
from one currency to another, the system calculates and displays a
default Cur Conv Factor using the exchange rates effective on the
price list start date. The system adjusts prices on the target list using
the conversion factor you specify.
UM. Either an item unit of measure to which price list applies or blank
if the price list applies for all units of measure; default is blank.
Cust/Supplier Cat. Either the customer code or the customer analysis
code for which price list applies, or blank if price list applies to all
customers; default is blank.
Item Cat. Either the item code or the item analysis code for which
price list applies, or blank if price list applies for all items; default is
blank.
To. Either the last value within a range or blank if range is not
specified; default is blank.
Start. Start date defaults to today’s date and defines the start date for
the new pricing structure created by the copy. This field is applied
differently by the system in different situations:
• If the source and target codes and currency are the same and the
date entered matches the start date currently on the source price
list, a new price list is not created. Instead, the existing price list
is modified according to any adjustment percentage entered.
• In other cases when the source and target codes and currency are
the same, the system uses the start date as the start effective date
on the target list and adds an ending effective date on the source
list (day before target’s start date).
• If the source and target codes are different, the start date is used
on the target and the source list is not affected.
Expire. Either the last date (MM/DD/YY) target price list is effective
or blank if price list is effective any date on or after start date; default
is blank.
Pricing
Adjustment%. Percent (up or down) target price list amounts are to be
adjusted relative to source price list amounts. Enter 100.0 for no
adjustment or a numerical value indicating percent adjustment is
needed. For example, 90 adjusts target price list down 10%; 110
adjusts target price list up 10%, The default is 100.0.
Curr Conv Factor. Enter a conversion factor to use when the source
and target price list currencies are not the same. The system calculates
and displays a default conversion factor using the exchange rate in
effect on the price list start date. If effective exchange rates are not
found, Curr Conv Factor defaults to 1. You can modify the conversion
factor, if needed. However, the value cannot be 0.
Clear Target List. Enter Yes to delete all other target price lists having
same name and attributes or No to not delete other target price lists;
default is No.
Create Target List. Enter Yes (the default) to create a new list if one
does not exist. When No, a list is not created. If Create Target List is
Yes and the list exists, the value of Clear Target List determines if the
list is cleared before the copy, or if an end effective date is added to
the old prices.
Update. Enter No (the default) and set Print Audit Trail to Yes to print
a report of potential changes before they are made. Specify Yes to
update price lists based on the parameters specified.
Print Audit Trail. Enter Yes (the default) to print an audit report
showing the effect of applying the copy parameters to the target price
list. If No, a report does not print.
Output. Enter an output destination for the audit report.
Batch ID. Assign a Batch ID to process the transaction off line.
Generating Pricing Reports
Three pricing reports display information about how the system calculates
prices for order lines:
• Pricing What-If Inquiry (1.10.1.13) displays prices based on user-
specified input parameters.
Tip
Specify rates in
Exchange Rate
Maintenance
(26.4).
77
78
User Guide — Master Data
• Customer Orders by Price List Inquiry (1.10.1.15) displays the price
lists used to price a customer’s orders.
• Sales Order Price Inquiry (1.10.1.17) displays pricing details for
selected order lines.
¶ See “Pricing
History” on
page 85.
• Use Sales Order Pricing Report (7.15.7) to view pricing history
records created for each change to an order line’s pricing.
Pricing What-If Inquiry
Use Pricing What-If Inquiry (1.10.1.13) to review what-if pricing
scenarios. This inquiry does not apply to configured products with
optionally configured components.
Fig. 3.21
Pricing What-If
Inquiry (1.10.1.13)
Customer. Enter the customer address code or customer analysis code
for price calculation. Leave blank to calculate prices regardless of
customer.
Site. Enter the site code for price calculation. Leave blank to calculate
prices regardless of site.
Item Number. Enter the item code or item analysis code for price
calculation. Leave blank to calculate prices regardless of item.
Unit of measure. Enter the item unit of measure for price calculation
or leave blank if price list applies to all units of measure.
Order Quantity. Enter the number of line items ordered.
Manual. Enter a code identifying a manual price list or leave blank.
Effective. Enter the pricing effective date in MM/DD/YY format. The
default is the system date.
Pricing
79
Currency. Enter the applicable currency for price list calculations and
display. The default is the base currency.
Accumulated Quantity. If price list Qty Type is Quantity, enter the
number of items for this order. Either Ord Qty value or Break Qty
value; default is Ord Qty.
Accumulated Amount. If price list Qty Type is Amount, the currency
amount accumulated for this order. Either Ord Qty * List Price value
or Accum Qty * List Price value; default is Ord Qty * List Price.
Show Only Selected. Choose Yes to have the system show only price
lists that are selected for use in determining list and net prices.
Choose No to have the system show all price lists considered for
evaluation of the list and net prices. In either case, a Yes or No
appears in the Sel column indicating the system selection process.The
default is Yes.
The system calculates the price for the item and customer you selected for
each price list that matches the selected item and customer combination.
Viewing Orders by Price List
Use Customer Orders by Price List Inquiry (1.10.1.15) to ensure that a
customer does not exceed the maximum number of orders or to see how a
price list is used.
Fig. 3.22
Customer Orders
by Price List
Inquiry (1.10.1.15)
Customer. Enter a customer number.
Price List. Enter a price list that applies to this customer. If you want
to see all orders for this customer, leave blank.
Open SOs Only. Yes if you want to see open sales orders only.
Choose No if you do not want to limit the inquiry.
80
User Guide — Master Data
Viewing Sales Order Discounts
The system calculates and displays price lists, discount factors, net prices,
line item amounts, and order amounts online. After line items have been
processed, the system recalculates previous lines based upon quantity
breaks if subsequent lines result in a different total accumulated order
quantity. To view this information, use Sales Order Price Inquiry
(1.10.1.17).
Fig. 3.23
Sales Order Price
Inquiry (1.10.1.17)
When the
cursor is
positioned on
the line item
you want,
press Enter to
see related
pricing
information.
Sales Order. Enter a sales order number, then scroll through the
inquiry to display lines on the order. Press Enter on a selected line to
see pricing details.
Repricing Orders in Sales Order Repricing
Tip
To open a sales
order for repricing
in Sales Order
Repricing (7.1.11),
set Fixed Price in
the order header or
line item to No.
Use Sales Order Repricing (7.1.11) to update the list and net price of
selected orders to the latest corresponding price list price. You can reprice
sales orders so that ordered quantities are added together, across orders, to
calculate quantity breaks.
Sales Order Repricing combines orders by matching price lists and any
combination of:
• Sold-to customer numbers
• Bill-to customer numbers
Pricing
• Ship-to customer numbers
• Purchase order numbers
• Any combination of these four factors
Customers that do not have centralized purchasing can still receive
quantity and volume discounts based upon purchases made from other
intracompany purchasing departments. Line items on combined orders are
repriced as if they are on the same order, which means that line items with
the same break category (or the same item number) have their order
quantities accumulated.
If you want an open sales order to be repriced in Sales Order Repricing,
the Fixed Price field in the sales order header or the line item frame must
be set to No. Otherwise, the order is skipped, even if it matches selection
criteria.
The Fixed Price field appears in:
• Customer Maintenance
• Sales Quote Maintenance, header and line
• Sales Order Maintenance, header and line
• RMA Maintenance, header and line
Fixed Price defaults from Customer Maintenance to Sales Quote
Maintenance, and then to Sales Order Maintenance. If you do not use
sales quotes, the value defaults directly from Customer Maintenance to
Sales Order Maintenance.The value of Fixed Price on an order header
determines the default for each line as it is added.
When a sales quote is released to an order, the system resets the Fixed
Price value on the order header to the value associated with the customer.
The line item Fixed Price value is unchanged.
During order repricing, you have the option to:
• Check credit limits after new prices are applied and make various
credit adjustments
• Print sales orders
• Combine sales orders
• Include RMA issues
• Recalculate taxes
81
82
User Guide — Master Data
Use Sales Order Repricing (7.1.11) to reprice and print sales orders and
sales quotes for a specified range of order numbers.
Fig. 3.24
Sales Order
Repricing (7.1.11)
Use the Sales Order, Sold-To, Bill-To, and Ship-To fields to narrow the
range of sales orders to be processed. Leave blank to include all orders.
Use the Last Price Date, Order Date, and Due Date fields to select orders
to process by date.
Check Credit. Enter Yes to check customer credit limits and past-due
invoices, and generate an audit report. Enter No to bypass credit
check and generate audit report only; default is Yes. If Yes, you can
change the values of related credit check fields.
Print Sales Order. If Yes, the Print field is set to Yes on all orders that
are repriced. This allows them to be selected for printing even if they
have been printed before.
Set/Clear Action Status. If Check Credit is Yes, enter Yes (the
default) to check customer credit status prior to release or No to
bypass status check. If Yes, the value of New Action Status is
assigned to the Action Status field on the sales order for orders
exceeding credit limits.
Pricing
New Action Status. If Set/Clear Action Status is Yes, leave blank to
clear the status, Hd to place on hold, or any other valid status code;
default is blank. Make sure that codes are entered consistently by
entering the allowed codes into Generalized Codes Maintenance
(36.2.13) for field so_stat.
Check Credit Hold. If Yes, the system checks the customer Hold field
before clearing the Action Status of an order. If the Hold field is Yes,
indicating the customer is on credit hold, the Action Status of orders
is not cleared.
Hold Over Credit Limit. If Yes, the system compares the customer
balance to the customer credit limit. The customer balance includes
open invoices and, optionally, open sales order amounts. If the
customer balance is less than the predefined credit limit and the
action status is blank, the order is not placed on hold.
Check Past Due Invoices. Used in combination with the
Automatically Set Action Status field. If both are Yes, then sales
orders for customer with credit problems are automatically placed on
hold by setting the action status to the value specified. Otherwise,
sales orders are simply listed with all the credit status information
Include Sales Orders. If Yes, the system adds open sales order values
to open invoice totals in determining the credit limit. See the
description for Hold Over Credit Limit.
Days. The number of days after which the system considers an
invoice past due when checking past due invoices.
Amount. The maximum total invoice amount allowed to be overdue
after which the system places orders on credit hold for past due
invoices.
Combine Sales Orders. If Yes, the system combines sales orders with
matching values based on the Yes/No settings in the four Match
fields: sold-to, ship-to, bill-to, and purchase order number.
Include RMA Issues. If Yes, the system includes RMA issues in sales
order repricing.
Recalculate Taxes. Indicate whether the sales taxes should be
recalculated for the sales orders being repriced.
83
84
User Guide — Master Data
Use Sales Order Price Inquiry (1.10.1.17) or Sales Quote Price Inquiry
(1.10.1.18) to verify if items are priced correctly.
Repricing in Sales Order Maintenance
Sales Order Repricing (7.1.11) reprices a range of sales orders at one
time. You can also reprice individual sales orders or lines directly in Sales
Order Maintenance (7.1.1).
This kind of repricing is controlled with the Reprice field. Reprice always
defaults to No in Sales Order Maintenance and cannot be modified for
new orders.
On existing orders, enter No to have repricing only occur when requested
for a particular line. This protects orders from inadvertent changes and
minimizes the number of times pricing history records are updated.
For existing orders, Reprice has several functions in Sales Order
Maintenance. When Reprice is Yes for a line:
• You can update List Price, Discount, and Net Price fields during line
item entry.
• If prices were determined automatically, the system automatically
recalculates the best price for the item, using current data.
• You can review and modify the bill of material for an existing
configured line item. If you change the bill, the cost and price are
automatically recalculated.
• You can update the discount account, sub-account, cost center, and
project for an existing line item.
Table 3.4 summarizes the effect of the Reprice field on sales order lines.
Table 3.4
Reprice Field
Settings and Pricing
Updates
Modify Sales Order
Line
If Reprice = Yes
If Reprice = No
For lines with manual
override price
For lines with automatically
calculated price
1. No automatic calculation. 1. Recalculate the best price.
2. Allow update of price.
2. Allow update of price.
No price updating.
No price updating.
Pricing
85
Reprice Field and the Sales Order Header
Reprice works differently in the sales order header than in the sales order
line. When Reprice is Yes in the header, Reprice is set to Yes for each line
and cannot be changed.
Additionally, setting Reprice to Yes in the header lets all order lines be
candidates for repricing, even if only one line item is entered or
maintained. This is useful where items are similar, have the same break
category, or the same item number.
If Reprice is No in the header, you can still reprice at the line level by
setting Reprice to Yes for each relevant line.
Repricing and Manual Prices
If you manually specify a price for a line item, the system does not
automatically change this price, even if you request repricing. To
manually adjust the price again, set Reprice to Yes for the order or the line
item. Then you can update the List Price, Net Price, and Discount fields
during order entry.
Although repricing a manually priced line never changes the manual
entry, it may adjust discounts based on current information. This
processing logic supports posting to the intended discount accounts as
identified in price list records. It also enables you to track discount
programs in the general ledger.
Pricing History
The system maintains history records for pricing changes. These records
detail the source of each price and discount per order/line. Use Sales
Order Pricing Report (7.15.7) to view this information.
Pricing history is also maintained for manually entered prices, and gives a
complete record of the source (manual or price list) of each price used for
a sales order. Using this information, the system preserves manually
entered prices even when Reprice is Yes.
Tip
Pricing history
documents the
source of the
current prices only.
86
User Guide — Master Data
Pricing history ensures that out-of-balance posting to discount accounts
does not occur. When posting discounts to the general ledger, price list
history is used, not the difference between list and net, since there can be
many discounts, each with different account numbers.
Understanding Sales Order Maintenance Fields
Several fields in Sales Order Maintenance (7.1.1) relate to best pricing.
Fig. 3.25
Pricing Fields in
Sales Order
Maintenance
(7.1.1)
Line Pricing
Manual
Fixed Price
Reprice
Line Pricing. Affects only newly created orders. On existing orders, it
defaults to No and cannot be changed. For new orders, it defaults
from Price SO by Line in Pricing Control (1.10.1.24). Enter Yes to
have the system recalculate price breaks for the order as lines are
entered. Enter No to recalculate only once, when order entry is
complete.
Manual. Enables you to manually enter a price list code to be
considered for order lines. This price list must be set up with Manual
set to Yes in Price List Maintenance (1.10.1.1). Manual price lists do
not necessarily determine the order line price, but are used in
conjunction with other price list search algorithms to determine the
best price.
Fixed Price. Sets the default for each line added to the order. Only
lines with Fixed Price set to No are updated by Sales Order Repricing
(7.1.11). Defaults from the Fixed Price setting defined for the Sold-To
address.
This use of fixed price should not be confused with fixed prices as
used in service pricing, which enable the customer to be invoiced for
a fixed price regardless of the actual cost of items, labor, and
expenses recorded.
Pricing
87
Reprice. Enter Yes at the order header to have the system reprice
Tip
modified line items. The system also reprices other line items
belonging to the same break category as a modified item. Otherwise,
enter No. If No, you can still reprice line items individually in the
order detail pop-up window. If Reprice is No on the order header and
you enter a new line, the system automatically reprices it.
This field only
affects the current
maintenance
session.
Important The value of Fixed Price, not Reprice, determines which
orders are repriced by Sales Order Repricing.
Fig. 3.26
Line Item
Price fields
Pricing
Pop-Up
Line Item
Fixed Price
Pricing Date. This field defaults from the order header. The system
uses the pricing date as the effective date in determining prices for
this line item. The field is editable only if Vary Pricing Date by SO
Line in Sales Order Control is Yes. When the control program field is
No, the Pricing Date of the order header is used and cannot be
changed on individual lines. When you update the header, the system
automatically changes the date on all lines.
Credit Terms Interest %. Credit terms interest for this line. This field
defaults from the header. You can edit the value on individual lines
only if Vary Pricing Date by SO Line in Sales Order Control is Yes.
When the control program field is No, the header value is used and
cannot be changed on individual lines. When you update the header,
the system automatically changes the Credit Terms Interest % field on
all lines.
Sales Order Line
Item Price Fields
88
User Guide — Master Data
Reprice. Editable only if Reprice is No in the order header. In this
case, you can select individual line items for repricing. When set to
Yes for a line, the List Price, Discount, and Net Price fields can be
edited, and if the original price was calculated by the system, it is
automatically recalculated.
Manual. Defaults from the Manual field in the sales order header. You
can specify a different manual price list for this line, as needed. This
field only has effect if Reprice is Yes.
Fixed Price. Initially defaults from the order header, but can be
unique for each line. Determines whether this sales order line is
considered by Sales Order Repricing (7.1.11) and whether automatic
repricing can occur for this line item in Sales Order Maintenance.
Using List/Discount Table Pricing
List/discount table pricing is an alternative to the best pricing model. It is
used for pricing different kinds of orders than best pricing, including
scheduled orders, purchase orders, returns to suppliers, and receipts in
RMA Maintenance.
In this model, prices are defined when an item is set up in the item master.
Price lists are used to store other pricing structures, including prices in
foreign currencies, prices or discounts for a certain unit of measure such
as a case or full truckload, discounts at different quantity levels, or prices
calculated as a percentage markup over GL cost.
Price lists and discount tables can be associated with suppliers and
customers, and provide defaults for transactions where they are used.
Note Service/Support functions use price lists in a slightly different way.
For RMA receipts, the price list is derived from the warranty or contract
associated with the item being returned. The RTS, however, is exactly like
a purchase order, and derives a price list from the supplier master record.
Four types of price lists can be defined in Price List Maintenance
(1.10.2.1):
• Type M. Percent markups or markdowns from item GL cost.
• Type D. Percent discounts from item master price.
Pricing
• Type P. Fixed discount prices, used primarily for net pricing and
foreign currency pricing.
• Type L. Multiple list price tables.
Discount price lists can also be used for quantity-break pricing. During
transaction entry, the system looks for one price list when calculating net
item price on scheduled orders or RMA returns, and when calculating
cost on purchase orders. If an applicable price is not found, either the item
master list price is used, or GL cost minus overhead.
Note RMA returns are an exception; if no price is found on the list, the
return price defaults to zero.
Use Price List Maintenance (1.10.2.1) to maintain list and discount price
tables. During implementation, use Price List Generation by Item
(1.10.2.6) to create price tables from existing list prices in the item master.
Once price lists are created, you can quickly create lists in other
currencies using Price List Copy (1.10.2.5).
Creating Price Lists
Each item has a base price expressed in base currency. Price lists are used
to store other pricing structures, such as prices in other currencies, prices
or discounts for a certain unit of measure (for example, a case or full
truckload), discounts at different quantity levels, or prices calculated as a
percentage markup over GL cost.
The system looks for a matching price list in the following order:
1
Currency, price list, item number, unit of measure
2
Currency, price list, item number
3
Currency, price list, product line (with item number blank)
4
Currency, price list (with product line and item number blank)
If no match is found, the item base price displays, converted to the
currency of the order.
Default price lists are derived in different ways, depending on the kind of
transaction.
89
90
User Guide — Master Data
• Purchase Orders: Price lists are associated with suppliers in Supplier
Maintenance and provide defaults when purchase orders, blanket
orders, and supplier scheduled orders are created.
• Customer Scheduled Orders: Price lists are associated with customers
in Customer Maintenance and provide defaults when customer
scheduled orders are created.
• Return to Supplier (RTS): These service orders follow the same
processing as purchase orders.
• Return Material Authorizations: A credit price list is associated with
warranty and contract types. This price list provides the default in
RMA Maintenance and is used for RMA receipt line credits.
Only one price structure can be applied to each order. You cannot set up a
price list with base prices in a foreign currency and then access another
price list to apply quantity discounts to those foreign currency prices.
You can create price lists and discount tables under the same pricing code.
If you do, remember to consider the following. If you create minimum or
maximum price ranges, you must ensure that they include any range set
on the associated discount table. This is because the minimum and
maximum prices on price tables take precedence over discount table
prices.
Different price structures can be entered for specific units of measure.
This enables you to set up discounts so that if, for example, you buy a
case (CS), you get a better price than if you buy only one unit (EA).
Total This Level GL Cost and Total GL Cost are display-only fields. The
categories whose elements are included are material, labor, burden, and
subcontract. Total GL cost is the total GL cost for the item’s default site. It
includes all cost elements for this level and lower levels. Total This Level
GL Cost is used as the default purchase price. It includes this-level costs,
excluding any overhead cost elements. Both purchase and selling prices
are for one unit of the item using the item unit of measure.
Pricing
Fig. 3.27
Price List
Maintenance
(1.10.2.1)
Price List. Enter a code identifying the price list.
Currency. Specifies the currency of the transactions that are subject to
this price list. A price list is used only if the currency of the
transaction is the same as the price list currency.
Product Line. Enter the product line associated with this price
structure. This field can be left blank. Since each item in the system
belongs to a product line, pricing by product line lets you set up price
structures for a group of items so that you do not have to enter them
individually.
Item Number. Enter an item number if this price applies only to this
item. Leave blank to set up price structures by product line or for all
items.
Price lists by item are often used to set up foreign currency prices,
enabling you to enter a specific base price for an item stated in terms
of another currency. This also lets you define different prices at each
site. Item prices are also used if you offer special pricing to a
customer for only one or a few items, whether specific prices,
discounts, or markups.
91
92
User Guide — Master Data
UM. The unit of measure associated with this price list structure. This
field can be left blank if the pricing applies to any unit of measure.
Unit of measure is useful for defining special prices based on the unit
of measure of the transaction.
Start/Expire. Enter dates if the list should only be considered effective
for a defined period of time. If blank, the system considers the prices
to be effective indefinitely.
Amount Type (L/P/D/M). Determines whether the price list is a list
price table or discount table:
L: List price table
P: Discount table (net price)
D: Discount table (discount %)
M: Discount table (markup %)
Item Master List Price. Displays the price for one unit of the item,
using the item stocking unit of measure, at the item’s default site.
Total This Level GL Cost. Displays the total GL cost for the item’s
default site. It includes all cost elements for this level and lower
levels.
Total GL Cost. Displays the default purchase price. It includes
this-level costs, excluding any overhead cost elements.
Price Table List Price. Price or cost for one unit of the item, using the
price table unit of measure. Overrides the item master list price or
cost.
Minimum Price/Maximum Price. A range of acceptable values for the
line item net price/cost (list price/cost minus any discounts). If the
line item net price/cost is outside this range, the system displays an
error message.
Generating Price Lists by Item
After defining item prices in the item master, you can create price tables
automatically. Use Price List Generation by Item (1.10.2.6) to create price
tables from item master prices. You can create prices for one or a range of
items and product lines.
Pricing
93
Price List Generation by Item uses only item master list prices, not item
cost, to calculate the new list price. It creates only type L price lists, using
the default item stocking UM as the price list UM. Once the lists are
created, use Price List Maintenance to add minimum/maximum prices
and change prices.
Fig. 3.28
Price List
Generation by Item
(1.10.2.6)
Item Number/To. Enter a range of item numbers for which price tables
are to be created.
Prod Line/To. Enter a range of product lines for which price tables are
to be created.
Target Price Table. Assign a price list code to the price tables being
created.
Target Currency. Assign a currency code to the price tables being
created.
Target Start. Assign a start date to the price tables being created.
Target Update Option. Determines how the system handles items that
already have a target price list. The default is S.
• Skip: Skips the item and does not create a price table for it.
• Clear: Deletes the existing price table and creates a new one.
• Expire: Sets the expire date of the existing price table to start date
minus one day, and creates a new target price table.
Update. If No, the system prints a simulated transaction report. If
Yes, the system creates the target price tables.
94
User Guide — Master Data
Copying Price Lists
Use Price List Copy (1.10.2.5) to quickly create alternate price lists from
one base price list and automatically recalculate prices based on the Cur
Conv Factor. You can also adjust existing price lists by increasing or
decreasing prices with an adjustment percent.
Fig. 3.29
Price List Copy
(1.10.2.5)
Source Price List. Enter a valid price list code to be used as the source
of the data copied to the target price list.
Target Price List. Enter the code to be used as the destination of the
copy. Target and source can be the same. In this case, an ending
effective date is added to the source list and a starting effective date to
the target. If the target list is not the same as the source and does not
exist, it can be created. If it does exist, it can be either cleared or
added to.
Source Currency. Enter the currency of the prices being copied.
Pricing information and currency rate from the source price list are
copied to the target price list for the range of item numbers specified.
Target Currency. Enter the currency for the system to use on the target
prices. The source and target currency can be the same—leave blank
for the system to default to the source currency. If you are copying
from one currency to another, the system calculates and a default Cur
Conv Factor using the exchange rate effective on the price list start
date. The system adjusts prices on the target list using the conversion
factor you specify.
Pricing
Item and To. Enter a range of item numbers to be used as selection
criteria in choosing prices to be copied.
Start. Start date defaults to today’s date and defines the start date for
the new pricing structure created by the copy. This field is applied
differently by the system in different situations:
• If the source and target codes and currency are the same and the
date entered matches the start date currently on the source price
list, a new price list is not created. Instead, the existing price list
is modified according to any adjustment percentage entered.
• In other cases where the source and target codes and currency are
the same, the system uses the Start Date as the start effective date
on the target list and adds an ending effective date on the source
list (one day before target’s start date).
• If the source and target codes are different, the start date is used
on the target and the source list is not affected.
Expire. If specified, the system uses the Expiration date as the end
effective date for the target price list.
Adjustment %. Defaults to 100.00%. Specific prices (Amount Type P)
are multiplied by the adjustment percent, then rounded to the
specified number of decimal places. Discount and markup
percentages (Amount Type D and M) are also multiplied by the
adjustment percent. If the percentage is greater than 100%, amounts
are increased. If the percentage is less than 100%, amounts are
decreased.
Cur Conv Factor. Enter a conversion factor to use when the source
Tip
and target price list currencies are not the same. The system calculates
and displays a default Cur Conv Factor using the exchange rate in
effect on the price list start date. If effective exchange rates are not
found, Cur Conv Factor defaults to 1. you can modify the conversion
factor, if needed. However, the value cannot be 0.
Specify rates in
Exchange Rate
Maintenance
(26.4).
Clear Supplier Price. Determines if the supplier prices are cleared
before copying in the new prices.
• If No, prices are added to the existing supplier-item prices.
• If Yes, existing supplier-item prices are cleared and the new
prices are added.
95
96
User Guide — Master Data
Price List Copy can be used to create supplier-item quotes. When
Create Supplier Item is Yes, you are prompted to enter a supplier
code. All adjusted prices are calculated and copied into the supplieritem records as the Quote Cost for that supplier. Quote prices are
accessed by purchasing to display the current price quoted by a
supplier. Other supplier-item information is also available but must be
adjusted manually.
Clear Target List. Defaults to No. Determines if the target price list
should be cleared before copying the new prices. If No, adds the
prices to the existing target price list. If Yes, clears the target price list
first and then copies the new prices.
Update Item Price. Indicate if the item base price should be adjusted
during this process.
• If Yes, the base price for the item is set to the target price. Two
other conditions must be true: the source price list must have a P
or L amount type, and the target price list currency must be the
base currency. Each item number on the price list is updated with
the first price on the price list.
• If No, item base prices are not affected.
Create Supplier Item. Defaults to No and indicates that if the supplier
item price does not exist, it should be created. If this is Yes, a new
price is created if one does not exist. If this is No, a list is not created.
If Create Supplier Item is Yes and the price exists, the value of Clear
Supplier Price determines if the price is cleared before the copy, or if
an end effective date is added to the old price.
Create Target List. Defaults to Yes and indicates that if the target
price list does not exist, it should be created. If this is Yes, a new list
is created if one does not exist. If this is No, a list is not created. If
Create Target List is Yes and the list exists, the value of Clear Target
List determines if the list is cleared before the copy or if an end
effective date is added to the old prices.
Round to Two Decimal Places, Round to Nearest Whole Number,
Round to Nearest Ten, Round to Nearest One Hundred, Round to
Nearest One Thousand. Set only one of these to Yes, indicating the
rounding method to be used when creating the new price list
structure.
Pricing
Update. Defaults to No. Determines if the target price list is actually
updated based on the parameters specified. No is generally specified
to create a report of potential changes before they are made. It is
recommended that you run Price List Copy first, using the report-only
option by setting Update to No and Print Audit Trail to Yes. This lets
you review changes before actually creating or updating the target
price.
Print Audit Trail. Defaults to No. Indicates if an audit report should be
printed. If Yes, a report prints showing the effect of applying the copy
parameters to the target price list. If No, a report does not print.
Processing List/Discount Prices
Use list/discount price tables for purchasing, scheduled orders, and some
service transactions. The following example shows how they are used on
purchase orders, but the process is similar for other transactions.
When entering an order, the Price Tbl and Disc Tbl fields display in the
header. These fields record the price table and discount table code for the
transaction. Values for both default from the supplier, but you can
override them if necessary. Using control program options, you can
require users to enter price and discount tables.
To calculate the net cost, the system does two things:
• From the price table, it selects the unit cost for the line item due date
or the order entry date, depending on what you specified in
Purchasing Control. If pricing is by item due date, the due date
defaults from the due date in the order header, but you can override it
for individual lines from single-line entry mode.
• If a discount table is specified, the system applies the percentage from
the discount table for the line or order due date to calculate the
extended net cost for the line item quantity. You can override this net
cost manually.
If the price table has a minimum and/or maximum cost, the system
verifies the calculated or user-entered net price against it. If the net cost is
outside the minimum/maximum range, the system displays a warning
message and replaces the line item net cost with either the maximum or
minimum price from the price table, as appropriate.
97
98
User Guide — Master Data
Pricing Setup
Settings in two control programs affect list/discount pricing:
• Purchasing Control (5.24) for purchase orders and RTSs
• Sales Order Control (7.1.24) for customer scheduled orders
Enter appropriate values for the following fields:
Discount Table Required. This field determines how strictly discount
tables are used to control order entry.
• If No, items can be entered whether or not a discount table exists.
• If Yes, only items from an existing discount table can be entered,
and only if the price list item, unit of measure, and currency
match the order item, unit of measure, and currency exactly.
In searching for a valid price, blank is not considered a match. If
discount tables are set up with a blank item or unit of measure, a price
is never found. If you are pricing by product line rather than item
number, this field should be set to No. Prices can be overridden unless
the field is protected through security.
Price Table Required. This field determines how strictly price lists
are used to control order entry.
• If No, items can be entered whether or not a price list exists.
• If Yes, only items from an existing price list can be entered, and
only if the price list item, unit of measure, and currency match the
order item, unit of measure, and currency exactly.
In searching for a valid price, blank is not considered a match. If price
lists are set up with a blank item or unit of measure, a price is never
found. If you are pricing by product line, this field should be set to
No. Prices can be overridden unless the field is protected through
security.
Price by Line Due Date. Specifies whether the system selects the list
and discount price based on order date or line item due date.
Chapter 4
Product Change
Control
Product Change Control (PCC) lets you control and monitor product
changes. Approval cycles let you control how and when suggested
changes are incorporated into your production tables.
Introduction
100
PCR/PCO Life Cycle
Setting Up PCC
103
106
Creating PCRs and PCOs
119
Routing PCRs and PCOs for Approval
Approving PCRs and PCOs
133
Incorporating PCOs into Production
Closing PCRs and PCOs
132
134
139
Importing and Exporting PCRs and PCOs
Setting Up PCC Security
140
139
100
User Guide — Master Data
Introduction
The Product Change Control (PCC) module is a flexible information
storage tool that enables you to control and monitor product changes from
inception through implementation. With PCC, you can modify item
engineering data, product structures, routings, formulas, processes, and
item specifications without affecting the records that control production
activity. You can define an approval cycle for product changes. After
approval, changes can be incorporated into the database tables that
manage product definition.
PCC is built around two types of documents:
• Product change requests (PCRs) record requests for product changes.
PCRs only affect your product definitions when incorporated into a
product change order (PCO). Typically, they are not strictly
controlled. More than one PCR can exist per item.
• Product change orders (PCOs) manage the introduction of changes
into your product definitions. PCOs are usually strictly controlled
through an approval process. Only one PCO can exist for an item at
any one time.
PCRs and PCOs can be used to control changes to most item-related data
in a manufacturing environment, including the following:
• Basic item master data maintained in Item Data Maintenance (1.4.3).
Tip
PCC replaces the
engineering change
order (ECO)
programs available
from menu 13.13.
• Additions, changes, and removals of product structure and formula
records, including alternate BOMs, maintained in Product Structure
Maintenance (13.5) and Formula Maintenance (15.5).
• Additions, changes, and removals of product routings and processes
maintained in Routing Maintenance (14.13.1), Routing Maintenance
(Rate Based) (14.13.2), Process Definition Maintenance (15.13), and
Process/Formula Maintenance (15.18).
• Additions, changes, and removals of item specification and test steps
developed in Item Specification Maintenance (19.1.13).
A single PCO can affect numerous item numbers, formulas, product
structures, routings, processes, or item specifications. New item numbers
required by PCOs or PCRs can be created using a screen similar to Item
Product Change Control
Data Maintenance (1.4.3), accessed from PCR and PCO Maintenance.
The revision number of an item added this way is blank until the PCO
adding it is finally implemented.
Add new items needed by a PCR or PCO with an inactive status to ensure
they do not appear prematurely on production reports, and are not visible
to MRP. While new items are inactive, you can set up additional data,
such as inventory, planning, and costing. When implemented, a PCO can
change an inactive item’s status to active.
Note You cannot maintain item/site data using PCC functions. It is
usually better to maintain such data locally by sites. You also cannot use
PCC to maintain alternate routings or co/by-product structures.
To use PCRs and PCOs, you first create new production and planning
records, or copy existing records into PCRs/PCOs from production
database tables. If you copy records, you can modify them in the PCO and
specify the required product changes. These changes do not affect
database tables used for production and planning until the PCO is
approved and incorporated. When this happens, modified records and any
new records are copied from the PCO back into the production
environment.
Figure 4.1 illustrates the process of copying data into a PCO, making
changes, and updating the production tables.
101
102
User Guide — Master Data
Fig. 4.1
PCO Change
Process
QAD ERP
PCO (Base)
PCO (with changes)
Item Files
Item Files
Item Files
Structures &
Formulas
Structures &
Formulas
Structures &
Formulas
Routings &
Processes
Routings &
Processes
Routings &
Processes
Item Specs
Item Specs
Item Specs
QAD ERP
Implement
PCO
QAD ERP
Item Files
Item Files
Structures &
Formulas
Structures &
Formulas
Routings &
Processes
Routings &
Processes
Item Specs
Item Specs
Approve
PCO and
Incorporate
Product changes are copied into production and planning tables after an
effective date is set for a PCO. The effective date becomes the start date
for new records. This way, product changes can be used for planning
before the actual effective date arrives and before the records are used for
production.
Any changes made by a PCO to item records are copied into master item
tables in a separate implementation step on the PCO effective date.
Product Change Control
103
PCR/PCO Life Cycle
Figure 4.2 represents the PCR/PCO life cycle.
Fig. 4.2
Tasks in
This Box Are
Optional
Create
Createand
andmaintain
maintainPCR.
PCR.
Not Approved
Approve
ApprovePCR.
PCR.
Approved
Route
RoutePCR
PCR
Not Approved
Close
ClosePCR.
PCR.Create
CreatePCO.
PCO.
Approved
Create
Createand
andmaintain
maintainPCO.
PCO.
Release
Releaseand
anddistribute
distributePCO.
PCO.
Route
RoutePCO.
PCO.
Incorporate
IncorporatePCO.
PCO.
Approve
ApprovePCO.
PCO.
Implement
ImplementPCO.
PCO.
PCR Life Cycle
PCRs can contain the same information as PCOs, but cannot be taken past
the approval stage to release. They are useful for companies that receive
requests from various sources, such as customers or field representatives,
and hold the requests for further processing. You can set up PCC to
require a PCR approval process. Once approved, PCRs are typically
closed or converted into PCOs. A PCR, approved or not, has no effect on
the system until converted into a PCO.
PCR/PCO Life
Cycle
104
User Guide — Master Data
Creating and Maintaining PCRs
Create PCRs in PCR Maintenance (1.9.2.1). Also use PCR Maintenance
to capture and modify item, product structure, formula, routing, process,
and item specification records. The Type/Design Group combination
determines the PCR routing slip and distribution group.
Routing PCRs for Approval
When a PCR is ready for review, comment, and approval, route it using
Route PCR for Approval (1.9.2.4). Groups and users who must approve
the PCR can be notified with or printed output that the PCR is ready for
review. PCRs that have been routed for approval can be revoked, if
necessary, for revision or correction.
Note PCR approval groups are not the same as standard security groups
used throughout the system. They apply only to the PCC approval
process.
Approving PCRs
Use PCR/PCO Approval (1.9.6.1) to monitor the queue of submitted
PCRs, add comments, and approve or disapprove each PCR. Disapproved
PCRs can be routed back to reviewers for reapproval. The order of
approvals is determined by the routing slip attached to each PCR. Once a
PCR has been approved electronically by all necessary personnel, it can
be closed, or converted into a PCO using PCR Maintenance (1.9.2.1).
PCO Life Cycle
The life cycle of a PCO is more extensive than that of a PCR, since PCOs
typically affect production data.
Creating PCOs
Create PCOs in PCO Maintenance (1.9.2.13). Also use PCO Maintenance
to capture and modify item, product structure, formula, routing, process,
and item specification records. You can also create PCOs by copying or
combining existing PCOs or PCRs, or by converting PCRs.
Product Change Control
Routing for PCOs for Approval
When a PCO is ready for review, comment, and approval, route it using
Route PCO for Approval (1.9.2.16). Groups and users who must approve
the PCO can be notified by e-mail or printed output that the PCO is ready
for review. PCOs that have been routed for approval can be revoked, if
necessary, for revision or correction.
Approving PCOs
Use PCR/PCO Approval (1.9.6.1) to monitor the queue of submitted
PCOs, add comments, and approve or reject each PCO. Disapproved
PCOs can be routed back to reviewers for reapproval. The order of
approvals is determined by the routing slip attached to each PCO. Once
the PCO has been approved electronically by all necessary personnel, it is
ready to be released.
Release and Distribution
You can release only approved PCOs to manufacturing. Use Release and
Distribution (1.9.7.1) to monitor the queue of approved PCOs and choose
PCOs to release. If necessary, you can revoke approval of a PCO before
release and return it for revision or correction.
Once released and distributed, the PCO can no longer be rejected or
modified. Any changes affecting the PCO must be released as separate
PCOs. At distribution time, the system automatically generates either
hard-copy release notices or e-mail for a defined group of users, either
immediately or through batch print queues.
Once a PCO has been officially released, the manufacturing organization
is responsible for implementing the changes. Engineering can specify a
mandatory date for changes, or allow manufacturing to select a
changeover date based on least cost, minimum disruption, or other
relevant factors.
105
106
User Guide — Master Data
Incorporating PCOs
Use Incorporation Planning Report (1.9.7.3) to display inventory levels
and monetary values of inventory affected by a PCO. This can help in
planning effective dates for changes.
Use Incorporation Selection (1.9.7.4) to monitor and assign effective
dates. Then, incorporate it into production using Incorporation (1.9.7.5).
You can modify an effective date by incorporating a PCO again with a
different date.
Once a PCO is incorporated, MRP uses the effective dates of product
changes to plan future orders. However, until the effective date is reached,
PCO changes do not affect current operations.
Implementation
When a PCO’s effective date has arrived and all changed items, product
structures, formulas, routings, processes, and item specifications are in
production, use Implementation (1.9.7.13) to move the new item revision
numbers and other item data into the corresponding item master records.
Setting Up PCC
To set up PCC:
¶ See “Setting Up
PCC Security” on
page 140 for
details.
1
Prepare data in other parts of the system for use with PCC.
2
Set up PCC Control.
3
Define user groups.
4
Define approval routings.
5
Define document change types.
6
Set up PCC security.
Product Change Control
107
Preparing Data for Use with PCC
To prepare data in other parts of the system for use in PCC, do the
following:
1
Print existing ECOs, if any, using ECO by ECO Number Report
(13.13.3). Implementing PCC disables ECO functions. You print
ECOs in order to reenter them as PCOs.
2
Determine which manufacturing processes you want to control with
PCC, and activate the appropriate sections. There are four possible
activation programs:
• Execute Enable PCC Structure Maintenance (13.13.22). Set
Structures to Yes to control product structures. This automatically
disables ECO functionality in menu 13.13.
• Execute Enable PCC Routing Maintenance (14.22). Set Routings
to Yes to control product routings.
• Execute Enable PCC Formula Maintenance (15.22). Set
Formulas and Processes to Yes to control formulas and processes.
• Execute Enable PCC Item Spec Maintenance (19.1.22). Set Item
Specifications to Yes to control item specification.
Important Once you enable PCC and thereby disable ECO functions, do
not use the ECO functions. Enabling PCC makes changes to your system
that cannot be reversed.
3
Set up e-mail definitions for your system in E-mail Definition
Maintenance (36.4.20). PCC uses e-mail to contact users during the
approval process and life cycle of change documents.
4
Create user IDs in User Maintenance (36.3.1). PCC users must be
defined before they can be added to groups involved in PCC
activities. Assign user passwords, or have users select their own. You
can increase PCC security by requiring users to reenter passwords
before accessing PCR/PCO Approval.
If you are using e-mail to notify users of PCC activities, make sure
that each user has a valid e-mail address and definition.
¶ See User Guide:
Manager
Functions for
information on
E-Mail Definition
Maintenance.
108
User Guide — Master Data
Note For security audit purposes, you cannot delete a user ID in
¶ See User Guide:
Manager
Functions for
information on
users and
security.
User Maintenance after it has been successfully used for login.
Instead, unneeded IDs are deactivated. When a user who is involved
in the PCC life cycle is deactivated, be sure to update PCC groups and
routing slips so that e-mail notifications are not sent to users who no
longer can access the system; for example, those who have left the
company.
5
Set up printers and batch IDs (36.13.2, 36.14.1, 36.14.3). Users can
be notified at various points in the PCC life cycle either by printed
reports or e-mail. Batch IDs are useful for running large print jobs
during off-hours. Also, PCOs can be distributed (1.9.7.1),
incorporated (1.9.7.5), and implemented (1.9.7.13) using batch IDs
that execute nightly.
6
Initialize PCOs in PCC Control (1.9.24). The first time you enter PCC
Control, you are prompted to initialize PCOs to current revision level.
Answer Yes to have the system create PCO *000000*, which records
current revision numbers for all items in the system. The initial
revision numbers serve as a starting point for Item Revision History
Browse (1.9.9.6).
Setting Up PCC Control
Use PCC Control (1.9.24) to specify how PCRs and PCOs are processed.
Fig. 4.3
PCC Control
(1.9.24)
Auto Number. Enter Yes to generate document numbers automatically
when a new PCR or PCO is created. Enter No to enter numbers
manually when creating PCRs or PCOs.
Security. Enter Yes to verify user identity when PCR/PCO Approval
(1.9.6.1) is accessed. If Yes, users are prompted to enter a password
before the screen displays. The password they enter must match the
one associated with their user record in User Maintenance (36.3.1).
Product Change Control
109
Enforce PCO Approval Group Sequencing. Specify whether the
system lets you complete approval of a PCR or PCO even if it has not
yet been approved by a member of a group with a lower sequence
number. Approval sequences are assigned to groups in Routing Slip
Maintenance.
No (the default): The system displays a warning message if approvals
are attempted out of sequence. You can ignore the warning and
complete the approval.
Yes: The system displays an error message if you attempt to approve
a PCR or PCO out of sequence. You cannot complete the current
approval.
This field also controls whether a group member can update the
Approved field on a PCR or PCO if it has already been approved by a
member of a group with a higher approval sequence. When the field
is Yes, the system displays an error.
Fig. 4.4
PCC Control
(1.9.24), Auto
Number Frame
Prefix. If Auto Number is Yes, the system assigns a prefix based on
Tip
the PCR/PCO Type specified and associates the prefix with the Next
PCR/PCO field to create a unique number. Multiple prefixes can be
specified. Use the null prefix for types that do not reference a specific
prefix.
Types are defined
in PCR/PCO Type
Maintenance
(1.9.1.9).
Next PCR/PCO. The next number available for an associated prefix.
When the prefix is used to label a new document, the portion of the
number after the prefix is determined by this field.
110
User Guide — Master Data
Defining Groups, Routing Slips, and Change Types
Three kinds of data are defined in the PCC setup menu: groups, routing
slips, and document change types. These three data structures work
together to form a model of your company’s product change and approval
process.
Figure 4.5 shows how PCC groups, routing slips, and change types are
used.
Fig. 4.5
PCC Setup
Functions
PCO No. 1
Type:
Design Group:
Revision
Aries Design Team
Approved By:
Design Team
Sustaining Engineer
Industrial Engineer
Materials Planning
Mfg. Supervisor
Cost Accounting
__________
__________
__________
__________
__________
__________
_______________
_______________
_______________
_______________
__________
__________
__________
__________
Approval
Group
Distribution:
Distribution
Group
Routing
Slip
Creating Groups
In PCC, groups represent users with different functional responsibilities.
Groups are used in three ways:
• Design. Groups designate which users have authority to create and
maintain PCRs and PCOs. For example, members of an engineering
team might make up one design group. PCRs and PCOs are organized
by type and design group, since the design group is the driving force
behind change development.
• Distribution. Groups designate which users are notified automatically
when a PCO has been released.
• Approval. Groups designate which users have authority to approve
PCRs and PCOs.
Use Group Maintenance (1.9.1.1) to define PCC groups.
Product Change Control
111
Fig. 4.6
Group Maintenance
(1.9.1.1)
In the first frame, enter a unique group name and a brief description. Use
the second frame to add users to the group, and specify group attributes.
Important Users added to groups must be previously defined with User
Maintenance (36.3.1).
Fig. 4.7
Group Maintenance
(1.9.1.1), Add
Users
Expire Date. Optionally, enter a date when the user is no longer
considered an active member of the group.
Copies. Enter the number of printed copies to be printed on the
printer specified in Output. Enter zero to have the user notified by
e-mail.
Output. Typically, the printer on which PCC-related notices are
printed.
Changing Group Memberships
Use Maintain Users in Group (1.9.1.3) to change group memberships.
You can add, replace, or remove a user from one or more groups. Changes
can be made to more than one group at a time, as when a user in several
design groups transfers to another department or leaves the company.
Tip
Specify the e-mail
address in User
Maintenance
(36.3.1).
112
User Guide — Master Data
Fig. 4.8
Maintain Users in
Groups (1.9.1.3)
After you select the option you want, one of the following frames
displays.
Adding Users to Groups
Choose option 1 to add users to groups. The Add User frame displays.
Fig. 4.9
Maintain Users in
Groups (1.9.1.3),
Add User
Expire Date, Copies, Output. To modify these user attributes, enter
new values.
List Groups for User ID. Optionally specify the ID of a user to display
only groups to which this user belongs or leave blank to display all
defined PCC groups to which the user being added does not currently
belong. Specifying groups can be useful when defining one user’s
membership so that it resembles that of another user.
Available Groups. Select a group to add the user to, and choose Add.
Select multiple groups by holding down Shift during selection.
Selected Groups. To deselect a group, highlight it and choose
Remove.
Product Change Control
113
Click Done when you are finished adding this user to groups.
Replacing Users in Groups
Choose option 2 to replace users in groups. The Replace User frame
displays.
Fig. 4.10
Maintain Users in
Groups, Replace
User
User ID. Enter the user ID of the old user.
Replace with User ID. Enter the user ID of the new user.
Expire Date, Copies, Output. Modify these user attributes as needed.
Available Groups. The list box includes all groups to which the old
user belongs. Select a group and choose Add to move it to the
Selected Groups list. Select multiple groups by holding down Shift
during selection.
Selected Groups. To deselect a group, highlight it and choose
Remove.
Tip
You can modify a
user’s attributes by
specifying the same
user in both User
ID fields.
114
User Guide — Master Data
Removing Users from Groups
Select option 3 to remove users from groups. The Remove User frame
displays.
Fig. 4.11
Maintain Users in
Groups, Remove
User
User ID. Enter the user ID of the user being removed.
Available Groups. The list box includes all groups to which the user
being removed belongs.
Defining Approval Routings
Approval routings specify who needs to approve a change, and in what
order approvals are required. Approval routings are represented by
routing slips, which can be created manually or copied from routing
templates and modified. Routing slips also indicate who is to be notified
when documents are approved. Every PCR and PCO requiring approval
must have a routing slip.
Create original routing slips in Routing Slip Maintenance (1.9.1.5), or
copy existing routing slip templates and make required modifications. If
you modify a routing template, the changes only affect new PCRs and
PCOs.
Product Change Control
115
Fig. 4.12
Routing Slip
Maintenance
(1.9.1.5)
Routing Slip. Enter a unique code identifying the routing.
Description. Enter a description of the routing.
Severity List. Enter a code indicating the severity list to be used for
this routing. Severity lists are predefined lists of defects, ranked
according to how severe each defect is considered. For example, a
severity list of hardware defects might appear as follows, with higher
numbers being more severe.
5
Cosmetic/typographical correction
10
Minor drawing/layout change
20
Major drawing/layout change
30
Wrong dimensions
40
Missing part
Create severity lists in Reason Codes Maintenance (36.2.17) by
defining typical defects and assigning them severity rankings. Group
reason codes by a type such as PCC.
When a member of a group with authority to reroute an approval
rejects a change in PCR/PCO Approval, a prompt for severity level
displays.
Users Notified at Submit or Approval. A routing slip can include a list
Tip
of users to be notified at the beginning and end of the approval cycle.
Users notified must be defined as system users, but do not have to be
members of PCC groups. The system determines the appropriate
e-mail address from data specified in User Maintenance.
Separate multiple
user IDs with
commas.
116
User Guide — Master Data
Tip
Users E-mailed at Submit or Approval. Enter e-mail addresses of
Check e-mail
addresses carefully
to avoid errors.
This field cannot be
validated.
persons outside your organization, such as key suppliers, who are to
be notified at the beginning and end of an approval cycle. Enter full
e-mail addresses, maximum 240 characters. Leave blank to notify
only internal personnel.
Enter approval routing details in the Detail Maintenance frame.
Fig. 4.13
Routing Slip
Maintenance,
Detail Maintenance
Sequence. Enter a number from 0 to 999 specifying the group’s signoff position relative to other groups in the routing. If zero, groups can
review the document in any order.
Table 4.1 illustrates three types of approval sequences.
Table 4.1
Sample Approval
Sequences
Hierarchical
Semi-Hierarchical
Non-Hierarchical
Engineering 0
Engineering
0
Engineering 0
Production
10
Production
0
Production
0
QA
20
QA
0
QA
0
Finance
30
Finance
10
Finance
0
When a non-hierarchical order is used, groups can review the
document in any order. Skip some sequence numbers to facilitate
addition of groups in the future.
When a hierarchical or semi-hierarchical order is used, you can use
the Notify When Next field in combination with the Next Only field
in PCR/PCO Approval to display only those PCOs approved by all
subordinate groups.
¶ See page 109.
Set Enforce PCO Approval Group Sequencing to Yes in PCC Control
to ensure that users follow the correct sequence during approval.
Product Change Control
117
Severity Level. Enter a number indicating what severity of defect
Tip
results in PCRs and PCOs being rerouted to this group. Lower
numbers mean that minor defects are rerouted to this group. If you are
not using severity levels, enter zero.
The severity level
acts as a filter to
prevent needless
review and
streamline the PCO
approval process.
The system reroutes a PCO to a group whenever the group in question
has approved the change document and:
• The change document is rejected by another group on the routing
slip that has reroute authority (Can Re-Route is Yes), and
• The rejecting group sets the reroute level to a number greater than
or equal to the severity level in this field.
Can Re-Route. Enter Yes to indicate that this group has the authority
to reroute a PCO when they reject it. To effectively disable rerouting,
enter No for all routing slips.
Important Disabling rerouting means that every group on a routing must
reapprove a corrected document.
Notify When Next. Check this box to have the system notify each
group when it is next, based on sequence number, in an approval
routing. Users to notify should have valid e-mail addresses.
Routing Slip Copy
Create new routing slips based on existing routing slip templates in
Routing Slip Copy (1.9.1.7).
Fig. 4.14
Routing Slip Copy
(1.9.1.7)
The list of users to notify at submission and approval defaults from the
source routing and can be modified. When you press Go, you are
prompted to copy the routing detail. Respond Yes to have the system copy
118
User Guide — Master Data
approval routing details for each group from the source routing to the new
routing. If you respond No, groups can still be added later using Routing
Maintenance.
Defining Document Change Types
Use PCR/PCO Type Maintenance (1.9.1.9) to set up codes for PCR and
PCO types. The type code determines whether the change document is a
PCR or a PCO, and determines the routing slip, distribution group, prefix,
and number.
Defining document change types requires careful planning. Some criteria
to consider are:
• Purposes of the PCO, such as to enhance safety, upgrade
functionality, reduce cost
• Product lines affected by the PCO
• Design areas affected by the PCO, such as electrical, mechanical, or
pneumatic
• Approvals required for the PCO
Fig. 4.15
PCR/PCO Type
Maintenance
(1.9.1.9)
Type. Enter a code identifying this type of change document.
Design Group. Enter a group defined in Group Maintenance that has
design responsibility for this type of change document.
Description. Enter up to 24 characters describing this document type.
Document Type. Indicate whether this type is used for PCRs or
PCOs.
Product Change Control
Prefix. An optional, three-character prefix for document numbers,
used to distinguish different kinds of changes. Prefixes and number
sequences are defined in PCC Control and used when Auto Number
is Yes to determine the number for a new PCO or PCR. If you enter a
prefix that is not set up in the control program, a warning displays.
Routing Slip. Enter the routing slip associated with documents of this
type. The routing slip determines which groups must approve the
document and in what order.
Distribution. Enter the group to be notified when documents of this
type are released and distributed with Release and Distribution
(1.9.7.1).
Creating PCRs and PCOs
This section focuses on creating PCOs in PCO Maintenance (1.9.2.13).
PCR Maintenance (1.9.2.1) is almost identical to PCO Maintenance and
is not described separately. It contains two additional functions that
enable you to create a PCO based on an approved PCR.
PCO Maintenance (1.9.2.13) is a large and complex program used to
create PCOs and add and modify all product change data, including any
of the following types:
• Basic header data
• Text detail
• Item detail
• Product structure/formula detail
• Routing/process detail
• Item specification detail
• Trailer data
Submenus in PCO Maintenance enable you to navigate from one PCO
section to another.
119
120
User Guide — Master Data
The header frame of PCO Maintenance contains basic information about
the PCO.
Fig. 4.16
PCO Maintenance
(1.9.2.13), Header
Frame
¶ See “Routing
PCRs and PCOs
for Approval” on
page 132 for
details.
A PCO is uniquely identified by a combination of Number, ID, and
Domain fields. If you enter a combination that does not already exist, a
new PCO is created. An error displays if you try to perform maintenance
on a distributed PCO, and a warning displays if you open a PCO already
routed for approval. If you continue despite the warning, any approvals
are essentially revoked, and the document must be rerouted for approval.
If you do not enter a number and Auto Number is Yes in PCC Control, the
system automatically generates a number based on your entries in PCO
Type and Design Group. PCO Type determines the prefix and number,
which default from PCC Control.
ID. Enables you to create multiple PCOs with the same PCO number
for grouping purposes. Typically used to divide large PCOs into
smaller ones for ease of implementation. When you open a PCO with
a shared number and different ID, you are warned that related PCOs
exist.
Domain. Use this field to enter an optional domain name; the field is
not validated and does not automatically create any physical link to,
or interaction with, another system database. This field is intended for
multi-domain installations where product development and
manufacturing are performed at separate locations. In this case, the
same change can have different implementation details at different
factories, accommodating variations in specific item numbers, work
centers, and so on. Domain then becomes an important selection
criterion in PCR/PCO Import/Export (1.9.13).
Product Change Control
121
Type and Design Group. This combination must be defined in
Tip
PCR/PCO Type Maintenance (1.9.1.9). The values specified
determine the approval cycle, distribution group, and document
change type. If a number is not entered and autonumbering is used,
this combination also determines the PCO number.
Review routing slip
and distribution
group data for a
PCO in the trailer,
using the Trailer
Maintenance menu.
The same
information
displays in
PCR/PCO Close
(1.9.14).
Once you have created or accessed a PCO, you can enter and change
Title, Reason, Class, Originator, and User Codes. These are user-defined
and typically used to provide PCO reference summaries. They do not
affect PCO processing, but display in PCO Browse (1.9.2.14), Print
PCR/PCO (1.9.9.1), and Release and Distribution (1.9.7.1).
After entering basic PCO data, a section menu enables you to navigate
elsewhere in PCO Maintenance. Click the arrow next to a menu selection
to activate it.
Fig. 4.17
PCO Maintenance,
Section Menu
122
User Guide — Master Data
Using PCR/PCO Function Maintenance
This program provides several utilities to support the copying and
merging of PCOs and PCRs. A submenu displays several choices.
Fig. 4.18
PCO/PCR Function
Maintenance Menu
• Change PCO Number. Used to change the Number, ID, and/or
Domain fields of the PCO you are currently editing. Enter new values
for these fields to have the system execute the required change
immediately. Once completed, the PCO can no longer be accessed
using the old number/ID/domain values.
• Close PCO to PCO. Used to merge detail from the PCO currently
being edited into another existing PCO, then close the current PCO. If
the same item, product structure, or formula records exist in the target
PCO, the corresponding records are not copied.
• Copy PCO from PCO/PCR. Used to copy all or part of the detail
from another PCO/PCR into your current document. If the same
records already exist in the target PCO, they are not copied.
• Copy PCO to PCO/PCR. Used to copy all or part of the detail from
your PCO to another one. If the same records are already included in
the target PCR/PCO, they are not copied.
Product Change Control
123
Two additional functions are available from PCR Maintenance, illustrated
in Figure 4.19.
Fig. 4.19
PCO/PCR Function
Maintenance Menu
• Close PCR to PCO. Used to merge the detail from the PCR you are
currently editing into an existing PCO and then close the current
PCR. If the same records exist in the target PCO, they are not copied.
This is the only way a PCR can affect the production system, since
PCRs cannot be released and distributed.
• Convert PCR to PCO. Converts the PCR you are currently
modifying to a PCO. You are prompted for a new PCO type and
design group, since the current type is designed for PCRs. Once you
enter a valid PCO type and design group combination, the PCR
becomes a PCO with the same number.
Maintaining Text Records
Select Text Data Maintenance to enter multiple pages of text and
associate it with a PCO. Another submenu offers two options.
• Add, Modify, Delete PCO Text Data. Enables entry of transaction
comments for a PCO.
• Copy Text from Master Comments into PCO. Enables master
comments to be attached to the requested PCO. You can enter the
master reference and type in a pop-up frame or leave the fields blank
to display a selection list of existing master comments. Select one or
more of them for copying into the PCO.
Tip
Define master
comments with
Master Comment
Maintenance
(1.12).
124
User Guide — Master Data
You can use master comments to create reusable text templates that
can be pulled into change documents and then edited. They might
include legal disclaimers, checklists, standard operating procedures,
company policies, or internal surveys.
Maintaining Item Records
Select Item Data Maintenance to enter changes in item master data. Itemsite data, item planning data, inventory data, cost and price data cannot be
updated. Only data specified with Item Data Maintenance (1.4.3) can be
modified. Another submenu offers two selections.
Tip
You cannot add
new item numbers
with this function.
• Add, Modify, Delete PCO Item Data. Enables you to change item
master data fields for an existing item. Standard validation prevents
the same item master from being changed by more than one
undistributed PCO.
Fig. 4.20
Add, Modify,
Delete PCO Item
Data
Key fields in the program are as follows.
End Product. Specify the end product affected by the PCO. Often,
PCO details apply to low-level components that are meant to affect
higher-level items. Specifying the end product enables the system to
generate reports of PCOs affecting that product, even when the effect
is indirect.
Comments. Enter Yes to attach comments regarding the change.
Product Change Control
New Rev. Enter a revision level indicator for the item. The item’s
revision level is updated when the PCO is implemented. Revision
levels are alphanumeric codes such as 1b, aa, B3, c.34, 6q3. To use
strictly numeric values, fill the number with zeros (0001, 0002, and so
on).
125
Tip
Revision levels can
be skipped, but
cannot be specified
in descending
sequence.
The New Rev value must be greater than the Released Rev value,
which shows the revision level of the most recently released PCO
affecting the item.
Status. New items created for a PCO can be given an item status that
prevents their use in live transactions. The status field on the PCO can
be set so that at implementation the restricted status is replaced with
an active one.
• Direct Item Master Access. Enables you to add a new item number
and/or enter item master data directly into the production database.
This is the only function in PCO Maintenance that directly affects
production records. All others build data for incorporation after an
approval process.
Tip
This function is just
like Item Data
Maintenance
(1.4.3).
Item numbers are created in real time rather than in the engineering
work space, since important functions may require that they exist
before the PCO is released. Impact analysis and the creation of a
quotation request are examples of functions that depend on the
existence of item numbers.
Maintaining Product Structure Records
To use these functions, Product Structures must be Yes in Enable PCC
Structure Maintenance (13.13.22). Otherwise, Structure Data
Maintenance is not available from the Select PCR/PCO Section submenu.
Select Structure Data Maintenance to enter product structure additions,
changes, and removals. Formula-controlled items must be updated in
Formula Data Maintenance.
Another submenu offers four selections:
• Copy Product Structure into PCO. Copies product structure records
into the PCO to serve as a basis for further modification. Displays the
current indented bill of material for a given parent item, through a
Tip
To attach comments
to changes made
with these
functions, set
Comments to Yes.
126
User Guide — Master Data
requested number of levels. Copied product structures contain the
same field values as production records. You can modify these values
using PCR/PCO Detail Maintenance.
Fig. 4.21
Copy Product
Structure into PCO
Click the arrow
to select a
component; an
asterisk
indicates
selection.
• Copy Where Used into PCO. Works the same as Copy Product
Structure into PCO, except it displays an indented where-used bill of
material screen, and lets you select product structure records to copy
into the PCO. This is useful if you are making the same change to
several product structures.
• PCR/PCO Detail Maintenance–Product Structures. Used for
adding items to product structures, deactivating product structure
records, and editing product structure changes already added to the
PCO. Records are not actually deleted. Deactivating a record sets an
ending effective date when the PCO is incorporated.
• Replace Product Structure Component. Used in conjunction with
other PCO functions to replace one component item with another
across multiple bills of material.
Enter an existing component item number followed by a new one.
The system accesses product structure records already included in the
PCO, searching for occurrences of the requested component. It marks
these product structures Deactivated (end effective date set) and adds
new product structures for the same parent items, substituting the new
component for the old one.
Product Change Control
127
Fig. 4.22
Replace Product
Structure
Component
Multiplier. Modifies the Qty Per value for the new component. The
quantity per of the old component is multiplied by this number to
determine the quantity per for the new component. As an example, an
old component has a quantity per of 2. The multiplier is set to 0.5.
The quantity per for the new component is 1.
Other detailed product structure data, such as Scrap % and Op, are
copied from the existing record, although you can use other PCO
Maintenance functions to change them.
To replace one component item with another across all bills of
material, create a PCO and use Copy Where-Used into PCO to
include every product structure record that used the old component.
Then, use Replace Product Structure Component to deactivate the
existing product structure records and add new ones that specify the
new component. In this way, you can set up mass component
maintenance on a PCO in two relatively simple steps.
Maintaining Routing Records
Important To use these functions, Routings must be Yes in Enable PCC
Routing Maintenance (14.22).
Select Routing Data Maintenance to make additions, changes, and
removals to both standard and rate-based routings. To modify processes,
use Process Data Maintenance.
128
User Guide — Master Data
The Routing Data Maintenance submenu has three selections:
• Copy Routing to PCR/PCO. Copies routing records into the PCO.
Displays the operation for a routing and enables you to select any
number of steps for inclusion in the PCO. Once copied, operations
can be modified with Detail Maintenance.
• PCR/PRO Detail Maintenance – Routing. Used to add operations to
a routing, deactivate operation steps, and edit routing changes already
added to a PCO. Records are not actually deleted. Deactivating a
record sets an ending effective date when the PCO is incorporated.
Fig. 4.23
PCR/PRO Detail
Maintenance –
Routing
• PCR/PRO Detail Maintenance – Routing (Rate Based). Works just
like Add/Edit/Deactivate Routing, except for differences in
maintained data fields. The differences are the same as those between
standard Routing Maintenance (14.13.1) and Routing Maintenance
(Rate Based) (14.13.2).
Maintaining Formula Records
Important To use these functions, Formulas must be Yes in Enable PCC
Formula Maintenance (15.22).
Select Formula Data Maintenance to do the following:
• Copy formulas into a PCO
Product Change Control
129
• Copy where-used data into a PCO
• Maintain PCR/PCO formula details
• Replace formula components
These functions work just like the Product Structure Maintenance
functions, except for differences in maintained data fields. The
differences are the same as those between Product Structure Maintenance
(13.5) and Formula Maintenance (15.5)
¶ See “Maintaining
Product Structure
Records” on
page 125.
Maintaining Process Records
Important To use these functions, Processes must be Yes in Enable PCC
Formula Maintenance (15.22).
Use Process Data Maintenance to add, edit, deactivate, and copy
processes. These functions work just like the Routing Data Maintenance
functions, except for differences in maintained data fields. The
differences are the same as those between Routing Maintenance (14.13.1)
and Process Definition Maintenance (15.13).
Maintaining Item Specifications
To use these functions, Item Specifications must be Yes in Enable PCC
Item Spec Maintenance (19.1.22).
Use Item Specification Maintenance to manage changes to quality tests
associated with an item. You can copy item specifications defined in the
Quality Management module and modify them in the PCO.
A submenu provides two selections:
• Copy Item Specification From Quality Module. Copies item
specification records into the PCO. Displays the current sequence of
steps for a given parent item and routing.
¶ See “Maintaining
Routing Records”
on page 127.
130
User Guide — Master Data
Fig. 4.24
Copy Item
Specification From
Quality Module
Click the arrow
to select a test
step; an
asterisk
indicates
selection.
• PCR/PCO Detail Maintenance – Item Specification. Used to add,
modify, and deactivate test steps for an item specification that has
already been added to a PCO. Records are not actually deleted.
Deactivating a record sets an ending effective date when the PCO is
incorporated.
Maintaining Trailers
Tip
PCR/PCO Close
(1.9.14) displays
almost the same
information.
Use Trailer Maintenance to maintain important PCO data fields, and to
close or reopen a PCO. This program displays release process information
such as routing slip, distribution group, date submitted, and date
approved. It is the only option that appears in the PCO Maintenance
section menu for closed (but undistributed) PCOs.
Fig. 4.25
PCO Trailer
Maintenance
Closed. If Yes, the PCO is closed. If No, the PCO is opened. A PCO
cannot be reopened once it is distributed.
Product Change Control
131
Expected Cost. Optional. The expected cost of the PCO.
Disposition. Optional. A user-defined code to describe the
arrangement, grouping, or urgency of the PCO. Validated against
codes set up in Generalized Codes Maintenance (36.2.13) for field
ecm_ecr_dspn.
PCO Ref. Information-only. A cross-reference comment for a closed
PCO.
Mandatory. Optional. The latest date on which the PCO must be
Tip
implemented. A warning message is generated in Incorporation
Selection (1.9.7.4) if an effective date is assigned to the PCO that is
later than this date.
The mandatory date
is an engineering
instruction to
manufacturing,
since the
manufacturing
group is responsible
for PCO
incorporation.
Reviewing PCO Data
Use PCR/PCO Detail Inquiry (1.9.2.8) to display PCR or PCO details.
Use Print PCR/PCO (1.9.9.1) to select and print a range of PCO/PCR
details. Selection criteria include number, type, and created by. Set a
comment page range to include comment pages attached to the PCO.
The Approvals field determines whether or not approvals are printed. To
print PCOs in various life-cycle stages, use the status fields: Presubmission, Submitted, Approved, Released, Incorporated, Implemented,
Closed.
Use PCO Status Browse (1.9.11) to review the current status of PCRs and
PCOs. The following statuses reflect the position of the PCR or PCO in
the change life cycle:
• Submitted
• Rejected
• Approved
• Released (PCO only)
• Distributed (PCO only)
• Incorporated (PCO only)
• Implemented (PCO only)
• Closed
Use Approval Browse (1.9.6.2) to review sign-offs for a given PCO,
including pending and completed approvals, individual approvers, and
date of the approvals.
132
User Guide — Master Data
Routing PCRs and PCOs for Approval
Tip
Use 1.9.2.4 for
PCRs.
Route PCOs for approval using Route PCO for Approval (1.9.2.16). To
route PCRs, use Route PCR for Approval. After a PCO is submitted, it
can be approved with PCR/PCO Approval.
Once a PCR or PCO has been routed, the system restricts changes to the
document to ensure that the approved document is the most current. If a
routed PCR or PCO is accessed in the maintenance function, a warning
displays. If you continue despite the warning, you can modify the PCO,
but all approvals are reset to No, and each group on the routing must
reapprove.
If a group disapproves a PCO and severity levels apply, the PCO can be
rerouted to selected groups based on the severity of changes required.
Only approvals of groups that need to review the document are reset.
Fig. 4.26
Route PCO for
Approval (1.9.2.16)
Tip
Set Unsubmt Only
to No if you want to
revoke a submitted
PCO.
Route PCO for Approval lists PCOs in order, beginning with the number
you enter in the first frame. Select PCOs to display by PCO Type, Design
Group, and By (Created By). Use Unsubmt Only to display unsubmitted
PCOs, or set it to No to see both submitted and unsubmitted PCOs.
Select a PCO for submittal, and set Sbmt to Yes in the bottom frame. The
system displays a submit date for the PCO. To unsubmit a submitted PCO
for which no approvals have been given, set Sbmt to No. A partially
approved PCO must first have all electronic approvals changed from Yes
to No. Once unsubmitted, additional changes can be made, and the
approval cycle started again.
To attach comment pages, set Comment to Yes.
Product Change Control
133
Approving PCRs and PCOs
Approve PCOs using PCR/PCO Approval (1.9.6.1). Designated
reviewers can enter electronic approvals or disapprovals, along with
comments.
When Enforce PCO Approval Group Sequencing is Yes in PCC Control,
users must follow the correct sequence during approval.
¶ See page 109.
PCR/PCO Approval lists approval records by criteria you enter at the top
of the screen. Enter a PCO number to have approvals listed starting with
that PCO. Either PCRs or PCOs can be listed depending on the value
entered in DocType. When multiple approval records exist for a
document, they are listed by approval sequence.
Specify an approval group to display only approvals required of that
group. Specify a user ID to display only approvals required of groups that
include that user.
Fig. 4.27
PCR/PCO
Approval (1.9.6.1)
Unsigned Only. Enter Yes to display pending approvals. If Yes,
documents are excluded from the display when only one of several
groups has given approval.
Enter No to display both approved/disapproved and pending
approvals. For each required approval, the group designated to
perform the approval displays.
Appr. Enter No to disapprove previously approved PCOs. Enter Yes
to approve previously disapproved PCOs.
134
User Guide — Master Data
Rerouting PCOs
¶ See “Defining
Approval
Routings” on
page 114 for
details.
If the reviewer disapproving a change document belongs to a group with
Can Re-Route set to Yes on the routing slip, PCR/PCO Approval prompts
for a reroute level. Reroute level signifies the magnitude of the problem
noted by the reviewer. If you do not want to reset approvals, enter zero for
the reroute level. Higher reroute levels require more groups to reapprove
the document.
When a reroute level is specified, the system examines Severity Level for
each group on the routing slip. If Severity Level is less than or equal to
the reroute level, the system changes the approval to No, indicating that
the group must review the document again. To enter explanations for the
reroute, set Comment to Yes.
When a document requires approval as a result of this process, the
ByReRt field in PCR/PCO Approval is set to Yes.
Detail Approval Maintenance
To change or override the standard approval process, use Detail Approval
Maintenance (1.9.6.13). Typically, this program is controlled with menu
security, since it provides an administrative override to the standard
approval function.
While it lets you override the normal approval process, it does not exactly
duplicate it. For example, disapproved documents are not rerouted. To
reroute, use PCR/PCO Approval.
Incorporating PCOs into Production
Once a PCO is approved, use the PCO Implementation menu (1.9.7) to
update production data, as follows:
1
Use Release and Distribution (1.9.7.1) to release the PCO and notify
members of the distribution group.
2
Use Incorporation Planning Report (1.9.7.3) to analyze the impact of
the PCO on current inventory and help determine the best effective
date for incorporation.
3
Use Incorporation Selection (1.9.7.4) to specify an effective date.
Product Change Control
4
Run Incorporation (1.9.7.5) on a daily basis to incorporate PCO
changes into production records. Changes become effective on the
date specified in step 3.
5
Run Implementation (1.9.7.13) on a daily basis to copy changes to
item data records from PCOs effective on the current date into the
item master records.
135
PCO Release and Distribution
After a PCO is approved, it is ready to be released and distributed.
Releasing a PCO typically means transferring ownership of it from a
design organization to a manufacturing or production organization.
Distributing means notifying members of a distribution group of a PCO’s
release. This can be done with hard-copy reports or e-mail, depending on
how the routing slip is set up.
Use Release and Distribution (1.9.7.1) to release and distribute PCOs.
Release and distribution are initiated at the same time, but are recorded as
separate points in the PCO life cycle. When a released PCO is distributed
through a standard batch processing queue, significant time may elapse
between release and actual distribution. Once a PCO is distributed, its
release is final.
Tip
Since PCRs cannot
be released to
production, they are
never listed on the
screen.
Release and Distribution (1.9.7.1) lists PCOs by criteria entered at the top
of the screen. Enter a PCO number to list PCOs beginning with that
number.
Fig. 4.28
Release and
Distribution
(1.9.7.1)
Unreleased Only. Enter Yes to view only unreleased PCOs. Enter No
to view both released and unreleased PCOs, or to revoke a previously
released, but not yet distributed, PCO.
136
User Guide — Master Data
Rels. Enter Yes to release the PCO, or No to unrelease it, assuming
the PCO has been released but not yet distributed.
Batch ID. Specify a batch queue for printing release notices. Leave
blank to print notices immediately. Since actual distribution of PCOs
occurs only after reports are printed, queuing may result in lag time
between release and distribution.
Incorporation Planning Report
Incorporation Planning Report (1.9.7.3) helps planning personnel
evaluate the impact on inventory of implementing a PCO on a given
effective date. To run the report, enter a specific PCO number, ID and/or
database, site, effective date, and cost method.
Tip
This summary is
similar to the
Materials Summary
Report (13.8.20).
The report shows the summarized BOM/formula of each parent item from
all product structure/formula records changed by the PCO. It lists
components from all levels of the item’s BOM or formula. The Qty Per
values are extended to show the total quantity required per end item,
rather than per single-level parent.
Table 4.2 summarizes the information displayed for each component.
Table 4.2
Component
Amounts
Information
Amount
Original Qty Reqd
Quantity per end-item for the currently effective product
structures/formula records.
Final Qty Reqd
Quantity per end-item for product structure/formula records
after the PCO has been implemented.
Qty On Hand
Current on-hand inventory balance for the component.
Qty On Order
Total quantity of supply on order for the component due on
or before the entered effective date.
Projected Usage
Total demand quantity required for the component due on
or before the entered effective date.
Balance
Total of Qty On Hand + Qty On Order – Projected Usage,
yielding the component’s expected on-hand inventory
balance as of the entered effective date.
Value
Total monetary cost of the component inventory quantity in
the Balance field, using the item costs associated with the
entered Cost Method.
Product Change Control
137
Use this report to estimate the future cost of obsolete inventory as of a
given effective date. Run the report with different effective dates to
determine which effective date minimizes inventory scrap/rework costs.
Typically, this report is considered in combination with other factors, such
as the impact of changed routings/processes, new tooling, scrap and
rework costs, purchased part lead times, and the mandatory date for the
change. Nonetheless, future component inventory balances are relevant in
almost all situations and provide valuable planning information.
Incorporation Selection
Use Incorporation Selection (1.9.7.4) to set PCO effective dates. Released
and distributed PCOs display in order beginning with the PCO entered in
the first frame. Enter criteria such as Type and Created By to show only
PCOs matching those criteria.
Fig. 4.29
Incorporation
Selection (1.9.7.4)
Unincorporated Only. Enter Yes to view only PCOs that are
distributed but not yet incorporated. Enter No to view all distributed
PCOs.
If different PCOs change item master data for the same item, the system
(and standard practice) requires them to be incorporated in revision level
sequence. The system displays an error if you set PCO effective dates out
of sequence or give more than one PCO the same effective date.
If a PCO has a mandatory date, a warning displays if the effective date is
not on or before this mandatory date.
138
User Guide — Master Data
Incorporation
Once a PCO effective date is established, the PCO can be incorporated
into product definition tables. At this point, you can still change PCO
effective dates or even remove PCOs from the production system. Any
incorporated PCO not yet implemented can be unincorporated or
reincorporated by changing the PCO effective date.
Incorporation (1.9.7.5) updates the database with changes from PCOs for
which effective dates have been set. Incorporation makes change data
available to MRP, DRP, and the other preproduction modules.
Incorporation generates an audit trail report of database updates and any
errors encountered. For example, if two PCOs with the same effective
date update the same records, only changes from the first PCO are
incorporated. The second is highlighted as an error on the report.
Assuming that Incorporation Selection has been run, PCO Incorporation
is essentially a batch update process requiring no input from the user.
Typically it is set up and executed as a daily batch job.
After incorporation, MRP and DRP automatically use the new effective
dates in all planning processes.
Implementation
Once the effective date of a PCO is reached, the revision level of changed
item numbers must be updated. This field displays in the Rev field of Item
Data Maintenance.
Implementation (1.9.7.13) copies changes to item data records, from
PCOs effective on the current date, into the corresponding item master
records. Implementation is designed to be a daily batch job requiring no
user input.
Product Change Control
139
Closing PCRs and PCOs
Use PCR/PCO Close (1.9.14) to close or reopen any PCO that has not
been assigned an effective date in Incorporation Selection (1.9.7.4). You
can close PCOs that have been released and distributed but not
incorporated. Close undistributed PCOs in the trailer of PCO
Maintenance.
Closed. If Yes, the PCR or PCO is closed. This field is reference-only,
and does not establish a link to another PCO in the same way as Close
PCO to PCO function in PCO Maintenance.
Tip
Also use this
program to close
PCRs that are not
closed by becoming
part of a PCO.
¶ See page 130 for
details on PCO/
PCR trailer fields.
PCO Ref. Optionally, enter a value as a cross-reference.
Closing a PCR or PCO in this way makes a PCO available for export to
another system database.
Importing and Exporting PCRs and PCOs
Use PCR/PCO Import/Export (1.9.13) to export closed PCO data to an
ASCII file for import into another database or application, such as a
Product Data Management system.
Fig. 4.30
PCR/PCO Import/
Export (1.9.13)
Use the import function to restore archive files created by PCR/PCO
Delete/Archive (1.9.15), which is similar to standard delete/archive
programs.
Important You cannot restore PCR/PCO archive files using the standard
Archive File Reload (36.16.5).
140
User Guide — Master Data
Re-Process. Only available when you are importing data. Enter Yes
to have the Type and Design Group of imported PCRs and PCOs set
to blank. The closed status is also removed and set to blank. This
enables you to assign new types and design groups appropriate for the
new domain. If No, a PCO with a Type and Design Group
combination that does not exist in the new domain is not imported.
Setting Up PCC Security
Since PCC activities can affect your production environment, the
following security steps are advised:
¶ See “Setting Up
PCC Control” on
page 108 for
details.
• Set Security in PCC Control to Yes for additional control of
approvals.
• Place menu-level security on PCR and PCO Maintenance programs,
and on update functions elsewhere in the system.
Access to PCO Maintenance Detail Functions
Each submenu in PCR and PCO Maintenance exists as a menu entry in
the Product Change Utility menu (1.9.25). Using Menu Security
Maintenance (36.3.10) to restrict access to a program on menu 1.9.25 also
restricts access to the corresponding program in PCO Maintenance.
Example Restricting access to Item Data Maintenance (1.9.25.3) also
restricts access to the Item Data Maintenance screen of PCR or PCO
Maintenance.
Restricting Access to Other Functions
Once PCC is implemented, prevent direct modification of controlled
records by setting menu security on the following programs:
• For product structures, Product Structure Maintenance (13.5),
Product Structure Copy (13.9), Component Change (13.10), Alternate
Structure Maintenance (13.15), and Configured Structure
Maintenance (8.1)
• For routings, Routing Maintenance (14.13.1), Routing Maintenance
(Rate Based) (14.13.2), Routing Copy (14.13.6), Routing Update
(14.13.7)
Product Change Control
• For formulas, Formula Maintenance (15.5), Formula Copy (15.8),
Batch Quantity Change (15.9)
• For processes, Process Definition Maintenance (15.13), Process
Definition Copy (15.16), Process/Formula Maintenance (15.18)
• For item specifications, Item Specification Maintenance (19.1.13)
Additionally, set menu security on Detail Approval Maintenance
(1.9.6.13). Only use this program in situations that require immediate
modifications of PCO approvals.
141
142
User Guide — Master Data
Chapter 5
Compliance
The Compliance module lets companies manage compliance with
government regulations such as the FDA Current Good Manufacturing
Practices, and with international agreements such as NAFTA and
GATT.
Introduction
144
Setting Up Compliance
146
Defining Inventory Attributes
149
Using Work Order Batch Control
Changing Inventory Detail Records
Using Lot Control
157
159
161
Managing Component Issues
172
Managing Controlled Substances
173
144
User Guide — Master Data
Introduction
¶ See “Setting Up
Compliance” on
page 146.
This section includes a brief description of each compliance feature. Once
you choose the features you will use, you can begin setup. Features using
item data, user information, and other elements may require setup in
additional programs.
Table 5.1
Compliance Menu
Menu
Description
Program
1.22
Compliance Menu
1.22.1
Lot Master Maintenance
clltmt.p
1.22.2
Lot Master Inquiry
icltmiq.p
1.22.4
Work Order Attribute Maintenance
clatmt.p
1.22.5
Work Order Attribute Browse
clbr001.p
1.22.9
Work Order Batch Browse
clbr002.p
1.22.13
Lot Group Maintenance
cllgmt.p
1.22.14
Lot Group Inquiry
cllgiq.p
1.22.16
Controlled Substances Menu
1.22.19
Multi-Lot Inventory Detail Update
clltamt.p
1.22.22
Lot Master Build
clltbd.p
1.22.23
Lot Master Delete/Archive
clltup.p
1.22.24
Compliance Control
clclpm.p
Site Security
¶ See “Managing
Controlled
Substances” on
page 173 for
Controlled
Substances Menu
details.
Site security is not part of the compliance module, but is frequently used
in conjunction with other compliance features. Site security enables
administrators to control user access to sites by individual and group
membership. It integrates user maintenance and security control with
inventory transactions at the site level. Only authorized users can process
inventory transactions for secured sites.
¶ See User Guide:
Manager
Functions for
details on site
security.
Site Security Maintenance (36.3.15) is located on the System Security
Menu in the Manager Functions module.
Compliance
Inventory Attributes
Attribute information can be entered on work orders, increasing control
over the tracking of materials through manufacturing and into inventory.
With these attributes, you can use batch and other work order processes to
meet your business requirements. There are several ways to assign default
inventory attributes and change existing attributes such as assay
percentage, grade, expire date, and inventory status.
Especially important is the ability to assign an inventory status during
work order or purchase order receipt. This status can be used to override
the status normally assigned to a location. Using receipt statuses reduces
the need for separate physical locations for regulated business practices.
Note You do not need to have the Compliance module to assign
inventory statuses during receipt. However, this feature is especially
useful in regulated environments.
Batch Control
Batch control enables you to assign batch numbers to work orders. Batch
numbers can be used for traceability and reporting. You can enter batch
numbers as you create work orders or add them to existing work orders
through a maintenance window.
Component Issue Control
Compliance features let you restrict items issued to work orders to those
listed on the bill of material (BOM) or valid substitutes. There is a similar
control for receipts of co-product/by-product items.
Lot Control
You can enforce unique lot numbers, define lot groups for assigning lot
numbers, update inventory attributes for multiple lots, restrict receipts to a
single lot, generate reports with lot numbers as an index, enter supplier lot
numbers, and manage expired inventory.
145
146
User Guide — Master Data
Multi-Lot Inventory Detail
You can change inventory assay %, grade, status, and expire date
attributes based on lot/serial number.
Controlled Substances
You can maintain lists of regulatory agencies, link a regulatory or control
number to an address code or site, associate a regulatory or control
number to an inventory item, and record general ledger (GL) and
individual license information for U.S. exports.
Setting Up Compliance
Compliance features are activated and configured in Compliance Control
(1.22.24).
Fig. 5.1
Compliance
Features and
Compliance
Control
Batch
Control
Work Order
Attributes
Lot Control
Compliance
Control
Multi-Lot
Attribute
Update
Component
Issues
Controlled
Substances
Compliance
147
Use Compliance Control, illustrated in Figure 5.2, to set up these features.
Fig. 5.2
Compliance
Control (1.22.24)
Compliance Active. Enter Yes or No depending on which compliance
features you want to use:
No: Only lot control features are active, based on the setting of Lot
Control Level.
Yes: Work order attributes (including batch numbers), expired
inventory transactions, and controlled substances are active.
Modify Component Issue. Enter Yes to issue any component to a
Tip
work order. Enter No to restrict items issued to a work order to those
listed on the work order bill of material (BOM) or valid substitute
items.
Set up substitute
items in Item
Substitution
Maintenance
(13.19).
Modify Co/By-Product Receipts. Enter No to require all receipts to be
valid items or substitute items for a co-product or by-product in a
joint work order set. Enter Yes to allow any item to be received as an
unplanned receipt.
Lot Control Level. Enter 0, 1, or 2.
0–Allow Duplicate Lot Numbers. Any lot number can be specified
for any item number.
1–Unique Lot/Serial per Item Number. You cannot assign an item on
an order a lot or serial number that is already used by that item on
another order. For example, if work order WO1 assigns item A a lot
number of 10, no other purchase or work order can assign lot number
10 to item A.
148
User Guide — Master Data
2–Unique Lot/Serial Numbers. You cannot assign an item a lot or
serial number that is already used by another item in inventory. For
example, if item A has a lot number of 10, item B cannot be assigned
a lot number of 10. Rework work orders, expense work orders, and
distribution orders do not have this restriction.
¶ For more
information on
the effects of the
Single Lot fields,
see “Single Lot
per Receipt” on
page 169.
Single Lot per WO Receipt. Indicate whether work order receipts are
restricted to a single lot.
No: Multiple receipts for an order can use the same lot number, if
needed.
Yes: A new lot number is required for each receipt.
This setting determines the default for the Single Lot field of Work
Order Receipts (16.11) and Work Order Receipt Backflush (16.12),
where it can be changed as needed.
Note The Single Lot settings have no effect when Lot Control Level
is set to 0.
Tip
Single Lot per PO Receipt. Indicate whether purchase order receipts
This setting also
affects Returns to
Supplier (RTS) in
the Service/Support
Management
module. When this
field is Yes and you
have received an
item lot, you cannot
receive it again on
an RTS.
are restricted to a single lot.
No: Multiple receipts for an order can use the same lot number, if
needed.
Yes: A new lot number is required for each receipt.
This setting determines the default for the Single Lot field of
Purchase Order Receipts (5.13.1), where it can be changed as needed.
Single Lot per REPET Receipt. Indicate whether end-item receipts in
repetitive transactions are restricted to a single lot.
No: Multiple receipts for an order can use the same lot number, if
needed.
Yes: A new lot number is required for each receipt.
This setting determines the default for the Single Lot field of
Repetitive Labor Transaction (18.14), as well as Backflush
Transaction (18.22.13) and Move Transaction (18.22.19) in
Advanced Repetitive.
Compliance
149
Defining Inventory Attributes
Attributes are critical to managing the flow of inventory in a warehouse.
Of the various attributes, status is the most important, since you can
restrict transactions based on status. When compliance is active, you have
more options for setting and using attributes.
Typically, the status of an item is determined by its location. In a
regulated environment, a special status for quarantined items is often
created and assigned to a particular location. Quarantined items are held
in that location until they are inspected, approved for use, and transferred
to a stocking location.
The use of separate physical locations may not be required, however, if
items are marked for quarantine with some other method. For example,
some companies use a removable label. You can use inventory statuses to
support this business methodology.
To implement this practice in the system, you first create a quarantine
status in Inventory Status Code Maintenance (1.1.1). Then specify this
status as the active default for purchase order and work order receipts in
Item Master Maintenance. When items are received, the system assigns
each lot a quarantine status, overriding the status of the location. After the
lot is inspected and approved, the inventory status can be changed using
Multi-Lot Inventory Detail Update (1.22.19). The lot no longer needs to
be physically transferred to change its status.
Figure 5.3 illustrates setting inventory attributes in the work order
Attributes frame. While batch and lot numbers are not technically
attributes, they are located on the same frame so that they can be entered
at order creation and updated during work in process.
Tip
You can also set
default inventory
attributes for
purchase orders and
repetitive
transactions.
150
User Guide — Master Data
Fig. 5.3
Work Order
Maintenance
(16.1), Attributes
Frame
The Attributes
frame displays
in Work Order
Maintenance
and Work Order
Attribute
Maintenance.
Work order attributes are stored in the work order master. When a work
order is created, Receipt Status and Active default from Item-Site
Inventory Data Maintenance (1.4.16). If Compliance Active is Yes, you
can assign work order attributes, batch number, and lot number to end
items in Work Order Maintenance (16.1). When Compliance Active is No
and the item is lot controlled, only the Single Lot field can be modified.
When you receive items into inventory, you can modify assay %, grade,
expire date, and receipt status, unless items with the same lot and
reference numbers already exist in the location with different attributes. If
you have not specified attributes on the work order and no inventory
detail records exist, the system assigns default values from location or site
records.
Note You can always modify attributes at receipt, regardless of the
setting of Compliance Active.
Why Are Attributes Important?
While attributes are described here primarily for work orders, attributes
also relate to purchase orders, repetitive transactions, and advanced
repetitive transactions. Attributes you enter on an order eventually are
assigned to inventory records during order receipt—whether it is a
purchase order, work order, or repetitive transaction. The only difference
among order types is where in the order process the attributes are
assigned.
Compliance
The inventory status attribute can be defined for any unique combination
of item number, site, location, lot/serial, and reference. The following
table describes which attributes can be defined for each order type and
indicates the programs where you define them.
¶ See “Inventory
Attribute Active
Field” on
page 154.
Table 5.2
Order or
Attribute Type Menu
Attributes
Work Order
Work Order Maintenance (16.1)
Assay%
Work Order Attribute Maintenance (1.22.4)
Grade
Work Order Receipts Pop-Up Window (16.11) Expire Date
Receipt Status/Active
Purchase Order
Purchase Order Receipts Pop-Up Window
(5.13.1)
Assay%
Grade
Expire Date
Receipt Status/Active
Repetitive
Repetitive Labor Transaction Pop-Up Window Assay%
(18.14)
Grade
Advanced Repetitive Backflush Transaction
Expire Date
Pop-Up Window (18.22.13)
Receipt Status/Active
Advanced Repetitive Move Transaction
Pop-Up Window (18.22.19)
Inventory Status Item-Site Inventory Data Maintenance
(1.4.16)
PO Rcpt Status
WO Rcpt Status
Item Inventory Data Maintenance (1.4.5)
Item Master Maintenance (1.4.1)
Inventory Status Location Maintenance (1.1.18)
Inventory Status
Site Maintenance (1.1.13)
You can use the two programs in boldface type to modify attributes only
when Compliance Active is Yes.
Note You can change inventory attributes only for purchase orders with
a blank type. This restriction excludes blanket purchase orders and PO
returns.
151
Inventory
Attributes
152
User Guide — Master Data
Inventory Attributes Work Flow
Figure 5.4 shows a typical work flow for setting up inventory attributes.
Fig. 5.4
Inventory
Attributes Work
Flow
Create
Createaawork
workorder.
order.
Receive
Receiveorder
orderinto
intoinventory.
inventory.
Process
Processwork
workorder.
order.
Update
Updateinventory
inventoryattributes
attributesas
as
needed.
needed.
Update
Updateattributes
attributesififneeded
needed
Once compliance has been activated in Compliance Control, you can
create and process work orders according to your normal procedures. If
needed, you can update item attributes directly using Work Order
Attribute Maintenance (1.22.4).
Then receive the work order using Work Order Receipt (16.11) or Work
Order Operation Backflush (16.19). After the items have been received,
attributes can be modified again as needed using Multi-Lot Inventory
Update (1.22.19) or Inventory Detail Maintenance (3.1.1).
Attribute Descriptions
Table 5.3 lists work order attributes. Each attribute is a field in Work
Order Attribute Maintenance (1.22.4) and the Attributes frame of Work
Order Maintenance (16.1). Attributes, lot number, and batch number also
appear in receipt programs and other programs.
Compliance
Table 5.3
Attribute
Description
Usage
Assay%
The presence, absence, or quantity Formulations may require a minimum
of one or more components, usually assay percentage. These values are
expressed as a percentage.
reviewed prior to allocating or picking
stock from inventory.
Grade
Identifies the quality or physical
properties of an inventory quantity.
Graded products include raw
materials, intermediates, and
finished goods.
Formulations may require a minimum
grade. These values are reviewed prior
to allocating or picking stock from
inventory. Grade may determine the
price charged for the finished product.
Expire
Date
The expiration date for items that
eventually spoil, and for
pharmaceuticals that lose potency
over time.
If you try to allocate, ship, or issue
expired inventory, you get an error
message. If expired inventory is
recertified, assign a new expiration
date in Inventory Detail or Multi-Lot
Attribute Update.
Receipt
Status
The default receipt status for the
order.
Items may require a status assigned to
them upon receipt. For example,
dangerous or fragile items may need
quarantine or inspection before
shipment or component issue. Define
status codes in Inventory Status Code
Maintenance (1.1.1).
Active
Indicates whether the inventory
status code entered in Receipt
Status should override status
assigned in item, site, and location
data.
Use this field to override default
settings assigned in item, site, and
location data records. See “Inventory
Attribute Active Field” on page 154
for more information.
Batch
An arbitrary number for tracking a
quantity scheduled to be produced
or in production. See “Using Work
Order Batch Control” on page 157
for information on using batch
numbers.
You can use batch numbers for
tracking a group of lots or a portion of
a lot. The system does not validate
batch number, but you can report on
batches with Work Order Batch
Inquiry (1.22.9).
Attribute
Descriptions
153
154
User Guide — Master Data
Attribute
Description
Usage
Single Lot Determines whether each receipt
from a work order should be
assigned to a single lot. This is a
default setting you can change at
receipt. Single Lot also appears in
Purchase Order Maintenance. See
“Using Lot Control” on page 161
for details.
For additional control, you can force
each receipt to be received into a
single lot by setting to Yes.
Lot
Number
When Single Lot is No, you can enter a
lot number for this work order. The
system validates this field for
uniqueness when Lot Level is set to 1
or 2. With the above conditions met,
entering a lot number at order reserves
that number in the lot master.
The lot number for this work order.
Enter a lot number in this field. See
“Using Lot Control” on page 161
for information on using lot
numbers.
If the order is for a serialized item,
this field is automatically set to Yes
and cannot be changed. You cannot
change this setting under the following
conditions: once items have been
received against this order (line item
for POs), for rework or expense work
orders (type R or E), or if the order is
part of a joint work order set.
Inventory Attribute Active Field
You can override inventory status and other attribute information for an
item during receipt, except when the status or other attribute conflicts
with existing items with the same lot and reference number at a location.
When this occurs, an error displays and you have two choices:
• Change the site, location, lot, and reference to identify a different
inventory location.
• Change the Active field of the inventory status or other attribute to
No. The system then uses the attribute of the already existing
inventory detail record.
Overriding Default Attributes
To override attributes at receipt, set the Set Attributes field to Yes in Work
Order Receipt (16.11), Work Order Operation Backflush (16.19),
Purchase Order Receipts (5.13.1), Repetitive Labor Transaction (18.14),
Backflush Transaction (18.22.13) and Move Transaction (18.22.19) in
Advanced Repetitive, or RTS Receipts (11.7.3.13).
Compliance
155
Fig. 5.5
Set Attributes Field
in Work Order
Receipt (16.11)
Set Attributes
field.
A pop-up window displays the current attribute settings.
Fig. 5.6
Set Active to
Yes to use
the attribute
values.
Change attributes as needed and choose Yes in the associated Active field
to use your selections.
• Choose Yes in the Use As Default field to assign the entered attributes
as defaults for the current order. All future receipts to the same order
will have the specified attributes.
• Choose No in all of the Active fields and choose Yes in the Use As
Default field to clear the default values. All attribute values are set to
blank for this order.
• If inventory exists for a location, lot, and reference combination with
attributes that are different from the ones on this order, an error
message displays. Choose No in the Active fields of the conflicting
attributes to correct the error.
Active Fields and Blank Inventory Status
Active fields enable you to enter a blank for a valid inventory status. For
example, if the PO Rcpt Status field is blank, the system cannot determine
whether you want to assign a blank status code, or if you want to accept a
default setting previously assigned to an item, location, or site. The
Active field solves this problem. If the Status field is blank and Active is
Receipt Attributes
Pop-Up
156
User Guide — Master Data
Yes, then a blank status is assigned. Otherwise, if the Status field is blank
and Active is No, the system assigns the status based on another default,
as described in Table 5.4.
Attribute Order of Precedence
Table 5.4 shows the search order the system uses to determine default
inventory attributes during receipt. If values have not been defined in any
of these programs, the default attribute is blank.
Table 5.4
Attribute Search
Order
Order of
Location of Inventory
Precedence Status Values
Menu
Number
Field Name
1
Work Order Maintenance
16.1
Receipt Status
Work Order Attribute
Maintenance
1.22.4
Receipt Status
Item-Site Inventory Data
Maintenance
1.4.16
PO Rcpt Status
Item Master Maintenance
1.4.1
2
3
WO Rcpt Status
PO Rcpt Status
Active
Yes
Yes
Yes
Yes
WO Rcpt Status
Yes
Yes
4
Inventory Detail
Maintenance
3.1.1
Inventory Status
N/A
5
Location Maintenance
1.1.18
Inventory Status
N/A
6
Site Maintenance
1.1.13
Inventory Status
N/A
Figure 5.7 illustrates how these rules can be applied. In this example,
assume that all of the items are in the same lot and have the same
reference number.
Item A, which has a default inventory status of 5, cannot be received into
Location L. This is because the same item already exists in this location
with the same lot and reference numbers and a different status. Item A can
be received into Locations M or N with a status of 5, since neither of these
locations contains inventory with the same lot or reference number as the
items being received.
If Item A’s Active field were No, it could be received into Locations L, M,
or N. In this case, Item A’s status would change to the default status for
the location—2 for Location L, 3 for Location M, 4 for Location N.
Compliance
157
Fig. 5.7
Inventory Status
Example
Site G
Location
L
Location
M
Location
N
Status = 2
Status = 3
Status = 4
Item A
Lot = A-100
Ref = 10
Status = 2
Item A
Lot = A-100
Ref = 10
Status = 5
Active = Yes
Using Work Order Batch Control
Batch numbers group and categorize work orders. Use batch control to
assign batch numbers to work orders for compliance reporting and
traceability. You can assign the same batch number to a group of work
orders run through a single manufacturing process. You can assign one
batch number per work order receipt session.
Batch traceability is a single-level function. It identifies work orders
associated with a batch number. Lot and serial numbers are used to
identify, report on, and trace inventory transactions. A lot number is
unique to a given finished product or collection of components that make
up a finished product. Use lot traceability to identify work order
components. A batch number cannot be used for scheduling, planning, or
shop floor reporting.
Example A pharmaceutical manufacturer makes acetaminophen powder
in large quantities. Each run results in a batch of acetaminophen powder
ready for processing into tablets—a batch with an assigned number that
uniquely identifies its origin. This batch is the tablet processing source
Tip
If you have
multiple batches on
a single work order,
use a different
receipt for each
batch.
158
User Guide — Master Data
that is packaged in various sized bottles, each labeled with a lot number.
The lot number uniquely identifies the item in inventory, traceable by
work order receipt, which in turn uniquely identifies the work order and
its batch number.
Batch Control Work Flow
Figure 5.8 shows a typical work flow for setting up and managing
batches.
Fig. 5.8
Batch Control
Work Flow
Activate
Activatecompliance.
compliance.
Assign
Assignbatch
batchnumbers
numberstotowork
work
orders.
orders.
Receive
Receivework
workorder,
order,updating
updating
transaction
transactionhistory.
history.
Once compliance has been activated, you can assign batch numbers to
work orders directly in Work Order Maintenance or use Work Order
Attribute Maintenance (1.22.4). When the work order is received, the
batch number is stored in inventory transaction history for later reporting.
Assigning Batch Numbers to Work Orders
You will probably assign the batch number when you assign work order
attributes during work order creation. You can also use Work Order
Attribute Maintenance (1.22.4) to assign numbers.
When you receive the items into inventory with Work Order Receipts
(16.11) or Work Order Operation Backflush (16.19), batch numbers are
recorded in transaction history.
You can review batch numbers using:
• Transaction Detail Inquiry (3.21.1)
• Reports on the Work Order Reports Menu (16.3)
• Reports on the Lot/Serial Number Menu (3.22)
Compliance
159
The programs listed in Table 5.5 use or list batch numbers.
Table 5.5
Menu
Number
Transaction Detail Inquiry
3.21.1
Lot Transactions by Date Browse
3.22.1
Lot Actual Bill Inquiry
3.22.3
Lot Where-Used Inquiry
3.22.4
Work Order Batch Browse
1.22.9
Work Order by Order Report
16.3.1
Work Order by Item Report
16.3.2
Work Order Status Report
16.3.3
Work Order History Report
16.3.6
Work Order Release Print
16.6
Multiple Work Order Release Print
16.7
Work Order Split
16.9
Changing Inventory Detail Records
Use Multi-Lot Inventory Detail Update (1.22.19) to change assay %,
grade, status, and expire date attributes for a particular item number and
lot/serial combination.
Warning Use this feature with caution. The only way to restore old
inventory attribute values is to reassign them using this update. If you
change all values for a record type to a new value, you cannot recover the
original values.
Assay %, grade, expire date, and inventory status can have field security
implemented to limit access to any or all of the fields. Use Field Security
Maintenance (36.3.19) to enter the names of fields you need to restrict.
Users must have explicit authority to access secured fields.
Programs Using
Batch Numbers
160
User Guide — Master Data
Use the following procedure to update inventory detail records:
1
Choose Multi-Lot Inven. Detail Update (1.22.19) from the
Compliance Menu.
Fig. 5.9
Multi-Lot Inven.
Detail Update
(1.22.19)
Enter
appropriate
selection
criteria.
Enter values to
change in Old
Value column.
Enter
replacement
values in the
New Value
column.
2
Enter a value in Item Number. The first lot number displays if
inventory exists for this item.
3
Use the lot number that displays, enter a new lot number, or clear the
Lot/Serial field to update items with blank lot/serial numbers.
4
Enter, singly or by range, sites, locations, and references for which
you have access privileges.
Note Leaving Site, Location, or Ref blank changes inventory
attributes for all sites, locations, and lot references.
5
Enter old attribute values, set the All fields, and enter new attribute
settings in the lower half of the frame.
Old Value. Enter the value to be changed.
All. If Old Value is blank and All is Yes, all values are changed to
New Value. If Old Value is blank and All is No, only blank values are
changed to the New Value. The field defaults to No. You can change
it to Yes only when Old Value is blank.
New Value. Enter the replacement value for the field.
6
Set Update to No and run the program as a report first to make sure
you have entered the correct values.
Compliance
7
When you are satisfied with the new values and the item, lot, and site
data listed on the report, change Update to Yes and run the program
again.
Using Lot Control
You can use lot control features even if Compliance Active is No in
Compliance Control. Table 5.6 lists lot control features.
Table 5.6
Feature
Description
Lot Control Level
Controls enforcement of unique lot numbers. Lot Control
Level is a database-level setting. See “Setting Up
Compliance” on page 146 and “Deciding on Lot Control
Level” on page 164 for more information. If you set Lot
Control Level to 0, all lot controls are turned off.
Work Order Attribute Lot
Number Field
You can enter the lot number in the Work Order Attributes
frame when Single Lot is No. See “Defining Inventory
Attributes” on page 149 for more information.
Lot Groups and Auto Lot
Numbering
Define lot groups to assign lot numbers to work orders and
purchase orders automatically. See “Automatic Lot
Numbering” on page 167 for more information.
Single Lot Receipts
Restrict receipts to a single lot, with separate settings for
work orders, purchase orders, and repetitive transactions.
See “Single Lot per Receipt” on page 169 for more
information.
Expired Inventory
Management
Manage expired inventory transactions. See “Expired
Inventory Transactions” on page 171 for more information.
Supplier Lot Numbering
Enter supplier lot numbers on purchase order receipts. See
“Supplier Lot Numbers” on page 171 for more information.
Reports by Lot Number
Make reports using lot numbers as an index.
When implementing lot control, be aware of the following restrictions:
• Lot control cannot enforce lot uniqueness across multiple databases.
Multiple-database customers should integrate policies to maintain lot
number uniqueness for each database.
• Lot numbers cannot be reused. If you make an error during lot
number assignment, delete the record for that lot number in Lot
Master Maintenance (1.22.1), and then reassign it.
Lot Control
Features
161
162
User Guide — Master Data
• The system cannot correct duplicate lot numbers assigned prior to lot
control activation. Delete duplicate lot numbers using Lot Master
Delete/Archive (1.22.23).
Lot Control Work Flow
Figure 5.10 shows a typical work flow for setting up and managing lots.
Fig. 5.10
Lot Control
Work Flow
Define
Definelot
lotcontrol
controllevels.
levels.
Assign
Assignlot
lotgroups
groupstotoitems.
items.
Delete
Deleteduplicate
duplicatelot
lotnumbers.
numbers.
Receive
Receiveitems
itemson
onwork
workorders.
orders.
Build
Buildlot
lotmaster
masterfile
filerecords
records
based
basedon
ontransaction
transactionhistory.
history.
Define
Definelot
lotgroups
groupsfor
forautomatic
automatic
numbering.
numbering.
Update
Updateinventory
inventoryattributes
attributes
and
andmanage
manageexpired
expiredinventory
inventory
as
asneeded.
needed.
To implement lot control, define defaults in Compliance Control for
purchase orders, work orders, and repetitive. Then delete any existing
duplicate lot numbers using Lot Master Delete/Archive (1.22.23). Use
Lot Master Build (1.22.22) to create lot master records for all lots
referenced in transaction history.
Then define the lot groups needed to generate automatic numbers using
Lot Group Maintenance (1.22.13). When the groups have been
established, associate them with the appropriate items using Item
Inventory Data Maintenance (1.4.5) or Item Master Maintenance (1.4.1).
Compliance
When items are received on work orders, purchase orders, or repetitive
orders, the system generates lot numbers automatically. You can update
inventory attributes and manage expired inventory as needed using
Multi-Lot Inventory Update (1.22.19) or Inventory Detail Maintenance
(3.1.1).
Lot Control Relationships
The settings described in Figure 5.11, along with the auto-lot settings in
Item Master Maintenance (1.4.1), affect lot numbering on several levels.
Fig. 5.11
Order Level
Each work order,
purchase order, or
repetitive transaction can
be restricted to a single lot
per receipt or received
into several lots. If the
single-lot setting is No
and auto lot numbering is
not used, you can
manually enter a lot
number to use at order
receipt.
Auto
Lot
Lot
Number
Single Lot
per Receipt
Lot Control Level
Item Level
Each lot-controlled item can be
either automatically numbered
or manually numbered.
Database Level
Sets database- wide
lot number
requirements and
opens up access to
the order-level and
item-level lot number
settings.
Lot Control Level
This database-level setting is the most straightforward to employ. If you
want to use single lot per receipt settings, Lot Control Level must be 1 or
2. If you do not want to use either of these features, you can still use Lot
Control Level to control lot number uniqueness for each item (level 1) or
across all items in inventory (level 2).
Single Lot per Receipt and Lot Number Field
If you select level 1 or level 2 lot control, then you can use single-lot
settings. You can have a different default setting for work orders,
purchase orders, and repetitive transactions. Further, the single-lot setting
Lot Control
Hierarchy
163
164
User Guide — Master Data
can be changed for each order at the time of receipt. A receipt lot number
can be specified in the Work Order Attributes frame when the single-lot
setting is No and auto lot numbering is not used.
Auto Lot Numbering
Automatic lot numbering works with any lot level setting. Since
automatic lot numbering is set for each item, you can choose to have
some items auto numbered and some not.
Deciding on Lot Control Level
Table 5.7 shows five different ways of combining lot control features.
Table 5.7
Example
Lot
Control
Level
Single
Lot
Lot
No.
Auto
Lot
No.
1
0
–
–
Y
When Lot Control Level is 0,
none of the lot control features
work.
2
1
Y
–
Y
Items with the same item
number cannot have the same
lot number; orders are restricted
to a single lot by default, the lot
number field in work order
attributes is inaccessible, and
the item is auto numbered.
3
2
Y
–
Y
Lot numbers across all items
must be unique. The remainder
is the same as example 2.
Lot Control
Settings
Effect
Compliance
Example
Lot
Control
Level
Single
Lot
Lot
No.
Auto
Lot
No.
4
1
N
+
Y
Items with the same item
number cannot have the same
lot number; orders are not
restricted to a single lot by
default, the item is auto
numbered, and the lot number
value in work order attributes is
set by the system and cannot be
changed.
5
2
N
+
N
Lot numbers across all items
must be unique; orders are not
restricted to a single lot by
default, the lot number field in
work order attributes is
accessible, and the item is not
auto numbered.
165
Effect
Building Lot Master Records
You must run Lot Master Build (1.22.22) whenever:
• Lot Control Level is changed from 0 to either 1 or 2.
• Archived records are loaded back into the inventory transaction
history table.
Lot Master Build creates lot master records based on inventory
transaction history. These records represent a historical list of all lot and
serial numbers used in the system. Whenever you assign a new lot or
serial number and Lot Control Level is 1 or 2, the system automatically
updates the lot master.
Fig. 5.12
Item Number,
Date, and
Transaction
Number fields
Lot Master Build
(1.22.22)
166
User Guide — Master Data
You can enter any combination of item number, date, and transaction ID
ranges. Before updating the database, set Update to No to generate a
listing of changes that will be made. Review the listing to verify that it is
correct. Then rerun the program with Update set to Yes.
Modifying Lot Master Records
Use Lot Master Maintenance (1.22.1) to manually add, modify, or delete
lot master records. Adding records is not recommended, since the records
created with this program are not associated with an order, limiting the
traceability.
This function is typically used to add additional data. Many user-defined
fields are provided to support custom reporting requirements.
Fig. 5.13
Lot Master
Maintenance
(1.22.1)
Item Number
and Lot/Serial
fields
Specify an item number and lot/serial number. When you press Go, the
system displays the order number and line or ID that created the lot or
serial number. The date the record was created and the ID of the user
creating the record also display.
You can update the following fields:
Expired Inv Trans. An inventory transaction type allowed for
executing transactions on expired inventory for this item and lot
number.
Lot UM. An alternate unit of measure for this specific lot. This field is
for reference only.
Lot UM Conversion. A factor for converting the Lot UM to the item
unit of measure. This field is for reference only.
Compliance
167
Automatic Lot Numbering
Use Lot Group Maintenance (1.22.13) to create lot groups defining the
format for automatic lot numbering. You can restrict lot groups to
individual sites or they can apply to all sites. Assign lot groups to items in
Item Master Maintenance (1.4.1), Item Inventory Data Maintenance
(1.4.5), or Item Master Copy (1.4.12).
If a lot group record is altered or removed after lot numbers have been
generated, the continuity of lot numbers will be broken. Additionally,
automatically generated lot numbers are not recycled if they are not used
at the time they are assigned. It is possible for gaps to appear in the
sequencing of auto lot numbers if, for example, a receipt transaction is
canceled before inventory is received.
Fig. 5.14
Lot Group
Maintenance
(1.22.13)
Lot Group. Assign a name to the automatic lot numbering format.
Name can be up to eight alphanumeric characters.
Site. Enter a value if you want this lot group to be used at one site
only. Leave blank if the lot group can be applied to any site.
Leading Characters. Enter up to 12 characters to be placed at the
Tip
beginning of the lot number. Can be left blank.
The lot number,
including leading
characters,
sequence number,
and trailing
characters, can be
up to 18 characters
long.
Sequence Length. Enter a number between 5 and 10. This is the
length of the numeric portion of the automatic lot numbers.
Sequence Number. The default is 1. Enter the first number to be used
in automatic lot numbering. The lot number consists of this number,
plus leading and trailing characters.
The smallest number available for assignment is 00001 and the
largest is 9999999999. If you are using a six-digit sequence length,
you may want to start automatic lot numbers with 100000 instead of
1. This number increments by 1 when numbers are assigned.
168
User Guide — Master Data
Trailing Characters. Enter up to 12 characters to be placed at the end
of the lot number. Can be left blank.
Execution File. The program to execute when assigning automatic lot
numbers. The default is gpauto01.p, the standard program supplied
with the system. You can create custom programs to assign lot
numbers based on your own requirements.
Assigning Lot Groups to Items
Use one of the item maintenance programs to set up items for automatic
lot numbering:
• Item Master Maintenance (1.4.1)
• Item Inventory Data Maintenance (1.4.5)
• Item Master Copy (1.4.12)
Fig. 5.15
Item Master
Maintenance
(1.4.1)
Item must be
lot controlled.
Enable
automatic
numbers and
define format.
Three fields affect automatic lot numbers:
Lot/Serial Control. Automatic lot numbering only works with
lot-controlled items (set to L). It does not work with serial-controlled
items.
Auto Lot Numbers. Yes activates automatic lot numbering for this
item if L is selected in Lot/Serial Control.
Compliance
Lot Group. An optional lot group format. If Lot Group is blank, Lot/
Serial Control is L, and Auto Lot Numbers is Yes, work orders are
assigned a lot number equal to the Work Order ID. However, lot
numbers must be entered manually on purchase order and repetitive
receipts in this case.
169
¶ See “Automatic
Lot Numbering”
on page 167.
Creating Automatic Lot Numbers
When receipts are created for purchase orders and work orders that
contain items set up for automatic lot numbering, the system generates a
lot number according to the Lot Group format assigned to the item. The
lot number cannot be changed. The following programs assign automatic
lot numbers:
• Purchase Order Receipts (5.13.1)
• RTS Receipts (11.7.3.13)
• Work Order Receipt (16.11)
• Work Order Receipt Backflush (16.12)
• Work Order Operation Backflush (16.19)
• Repetitive Labor Transaction (18.14)
• Backflush Transaction (18.22.13)
• Move Transaction (18.22.19)
Note Rework and expense work orders cannot be assigned automatic lot
numbers.
Single Lot per Receipt
Receipts can be restricted to a single lot number by default on work
orders, purchase orders, and repetitive orders, based on three settings in
Compliance Control (1.22.24):
• Single Lot Per WO Receipt (work order receipt)
• Single Lot Per PO Receipt (purchase order receipt)
• Single Lot Per REPET Receipt (repetitive receipt)
To use single lot receipts, Lot Control Level must be 1 or 2 and Lot/Serial
Control must be L or S for the item being received.
Tip
The single lot
restriction can also
be selected during
order receipt,
regardless of the
setting in
Compliance
Control.
170
User Guide — Master Data
If these criteria are met and Single Lot is Yes on the order or line being
received:
• Items received in the same transaction must have the same lot
number.
• Each receipt transaction requires a new lot number.
Set Single Lot to No to allow the same lot number to be used for multiple
receipts. The single lot restriction works the same way for all three order
types, so you can adapt the settings to your needs.
¶ For more
information, see
“Automatic Lot
Numbering” on
page 167.
Note When Auto Lot Numbers is Yes and a lot group is specified in the
item master, the system automatically increments the numeric portion of
the lot number for each successive receipt against the same order or line.
This means that you cannot receive the same lot in multiple receipt
transactions or receive multiple lots in the same transaction, regardless of
whether Single Lot is Yes.
During order entry, you can modify the default value of Single Lot in any
of the following programs:
• Purchase Order Maintenance (5.7)
• Blanket Order Maintenance (5.3.1)
• Work Order Maintenance (16.1)
• Work Order Attribute Maintenance (1.22.4)
• Repetitive Labor Transaction (18.14)
• Backflush Transaction (18.22.13)
• Move Transaction (18.22.19)
Compliance
171
Supplier Lot Numbers
The Supplier Lot field is a reference field for entering supplier lot
numbers in Purchase Order Receipts (5.13.1).
Fig. 5.16
Purchase Order
Receipts (5.13.1)
Supplier Lot
field
One supplier lot number can be assigned for each lot received. For
example, if you have two supplier lot numbers, you cannot receive both
into the same internal lot number. There are two alternative ways to
handle this situation:
• Receive each supplier lot number to a different location. Then you
can assign the same internal lot number to each.
• Receive the first supplier lot and complete the receipt transaction;
then perform a second receipt.
To review and report on supplier lot numbers, use the Supplier Lot field in
the following inquiries:
• Transactions Detail Inquiry (3.21.1)
• Lot Where-Used Inquiry (3.22.4)
Expired Inventory Transactions
When lot-controlled items expire, you may want to remove them from
inventory. Expired inventory cannot be sold or issued for manufacturing.
However, for lot-controlled items, you can specify a transaction type that
can occur for any expired items in a lot.
Tip
Lot Control Level must be 1 or 2 before you can use expired inventory
features.
¶ See “Setting Up
Compliance” on
page 146.
Inventory is expired
if it has an
expiration date
before today.
172
User Guide — Master Data
Example If you enter ISS-UNP (Unplanned Issue), the system lets you
make an unplanned issue transaction, even though inventory has expired.
This is true only for the item number and lot number identified on this lot
master record.
¶ See “Modifying
Lot Master
Records” on
page 166.
Use the Expired Inv Trans field in Lot Master Maintenance (1.22.1) to
specify this transaction type.
Managing Component Issues
¶ See “Setting Up
Compliance” on
page 146.
Compliance provides options for restricting component items issued to
work orders to those on the bill of material (BOM) or defined as valid
substitutes. You can implement a similar control for receipts of
co-product and by-product items.
Component Issue Control
Use the Modify Component Issues field in Compliance Control (1.22.24)
to control issues to work orders. Set this field to No to require that all
items issues are on the work order BOM or are valid substitute items.
Choose Yes to allow any item to be issued to the work order.
Valid substitute items are defined in Item Substitution Maintenance
(13.19). When Modify Component Issues is No, issues are allowed for
those items with valid substitutes.
Co-product/By-product Component Issue Control
Tip
Items entered
through Work
Order Bill
Maintenance
(16.13.1) can
be issued to a work
order regardless of
control program
settings.
Use the Modify Co/By-Product Receipts field in Compliance Control to
control receipts for co-products and by-products.
• Set this field to No to require all receipts to be valid items or
substitute items for a co-product or by-product in a joint work order
set.
• Choose Yes to allow any item to be received as an unplanned receipt.
Compliance
173
Managing Controlled Substances
Controlled substance programs, tables, and fields do not interfere with
functions in other modules.
The functions on the Controlled Substance menu, listed in Table 5.8, are
used to record Health Industry Numbers (HIN), National Drug Codes
(NDC), Export Control Classification Numbers (ECCN), Harmonized
Tariff Codes, Regional Value Content (RVC) values, and Preference
Criteria Codes for controlled substances, import/export, and international
agreement compliance.
Table 5.8
Menu
Description
1.22.16
Controlled Substances Menu
1.22.16.1
Controlled Authority Maintenance
Program
clctamt.p
1.22.16.2
Controlled Authority Inquiry
clctaiq.p
1.22.16.4
Controlled Customer Maintenance
clctcmt.p
1.22.16.5
Controlled Customer Browse
clbr003.p
1.22.16.7
Controlled Site Maintenance
clctsmt.p
1.22.16.8
Controlled Site Browse
clbr004.p
1.22.16.10
Controlled Item Maintenance
clctpmt.p
1.22.16.11
Controlled Item Report
clctprp.p
1.22.16.13
General License Maintenance
clglimt.p
1.22.16.14
General License Report
clglirp.p
1.22.16.16
Individual License Maintenance
clilimt.p
1.22.16.17
Individual License Master Report
clilirp.p
Figure 5.17 shows a typical work flow for setting up and managing
controlled substances.
Controlled
Substances Menu
(1.22.16)
174
User Guide — Master Data
Fig. 5.17
Controlled
Substances
Work Flow
Enter
Entercountry
countrycodes.
codes.
Enter
Enternames
namesofofauthorities.
authorities.
Enter
Entercontrol
controlnumbers
numbersand
and
associate
associatethem
themwith
with
customers
and
vendors.
customers and vendors.
Enter
Entergeneral
generallicense
license
information
informationand
andapply
applyitittoto
selected
countries.
selected countries.
Enter
Enterindividual
individuallicense
license
information
informationand
andapply
applyitittoto
selected
items.
selected items.
Associate
Associatesites
siteswith
withcontrol
control
numbers.
numbers.
Associate
Associateitems
itemswith
withcontrol
control
numbers.
numbers.
Entering Country Codes
¶ See “Setting Up
Country Codes”
on page 194.
Use Country Code Maintenance (2.14.1) to define country codes,
including information about a country’s membership in international
organizations and their DEA status. You can also categorize countries by
assigning each one to a country group using a coding system—such as the
US Export Administration codes.
Entering Authority Codes
Enter authorities in Controlled Authority Maintenance (1.22.16.1). These
authorities are assigned, along with country codes, to customers, sites,
and items.
Fig. 5.18
Controlled
Authority
Maintenance
(1.22.16.1)
Authority. Enter a descriptive acronym or short name, up to eight
characters long. For example, enter DEA for Drug Enforcement
Administration or WHO for World Health Organization.
Compliance
Name. Enter the full name for the authority.
Type, Group. Enter values to further categorize authorities on reports.
Entering Control Numbers for Customers and Sites
Use Controlled Customer Maintenance (1.22.16.4) to associate control
numbers with customers and vendors. Use Controlled Site Maintenance
(1.22.16.7) to associate control numbers with sites. These two programs
are the same except that you enter an address code in the first and a site
code in the second.
These programs can be used to store many types of codes, such as codes
associating a DEA number with a customer, foreign tax identification
numbers, or other numbers associated with customers, suppliers, or sites.
Fig. 5.19
Controlled
Customer
Maintenance
(1.22.16.4)
Enter the country code, authority, and address or leave Country code
blank if this record applies to all countries. Then specify the control
number associated with the address. In Figure 5.19, the control number
could be the customer’s export license number.
Entering Control Numbers for Items
Use Controlled Item Maintenance (1.22.16.10) to associate control
numbers with items.
This programs can be used to store many types of codes, such as codes
associating DEA registration numbers with items, foreign tax
identification numbers, or other codes associated with items.
175
176
User Guide — Master Data
Fig. 5.20
Controlled Item
Maintenance
(1.22.16.10)
Enter the country code and authority or leave Country blank if this record
applies to all countries. Then specify the control number associated with
one or more items.
Every product that is exported from the United States requires an Export
Control Classification Number (ECCN). These are defined in the U.S.
Commerce Control List.
Other fields apply to common control requirements or can be used as
needed.
Status. Enter a user-defined status. If your company requires
Harmonized Codes for NAFTA, use this field to enter a Producer
Status.
Class. Enter a user-defined class. If your company requires National
Drug Code (NDC) numbers, use this field to enter drug classes, such
as class 1, 2, or 3. If your company is NAFTA compliant, use this
field to enter a Regional Value Content (RVC) value.
Preference Criteria. Enter a user-defined preference criteria. If your
company is NAFTA compliant, use this field to enter appropriate
codes.
Address Code. Enter up to three addresses associated with the item,
such as the primary ship-from site or primary exporter.
Compliance
177
Originating Country. Enter the code for the country where this item is
usually manufactured.
Originating Percent. Enter the percentage of the item that is usually
manufactured in the Originating Country.
Entering General License Information
Enter general license information using General License Maintenance
(1.22.16.13). General licenses are typically import and export licenses
that apply to a country or a group of countries. You can associate licenses
with a control number.
Fig. 5.21
General License
Maintenance
(1.22.16.13)
Enter the country code, authority code, and license number. Leave
Country blank if this license applies to all countries. Enter the control
number or ECCN number, defined in Controlled Item Maintenance.
If needed, enter country groups, start and end dates, maximum per
shipment values, annual shipment values, and currency for this item.
Tip
The start and end
dates determine the
effective dates of
the license.
178
User Guide — Master Data
Entering Individual License Information
Enter individual license information using Individual License
Maintenance (1.22.16.16). Individual licenses are typically import and
export licenses that apply to individual items.
Fig. 5.22
Individual License
Maintenance
(1.22.16.16)
Enter the country code, authority code, and license number. Leave
Country blank if this license applies to all countries. Specify the start and
end dates for the license and the address codes.
Licensee. The company granted the license.
Producer. The manufacturer of the product under license. Use this
field if the license applies to a single item.
Intermediate Consignee. An intermediate distribution point.
Final Consignee. A distribution point that is the final destination.
Enter an item number if this license is for one item. Specify maximum per
shipment values, annual shipment values, and currency for this item.
Chapter 6
Addresses
You can associate addresses and other information with address codes
that can be used throughout the system.
Introduction
180
Setting Up Company Addresses
183
Setting Up Salesperson Addresses
Setting Up Customer Addresses
186
Setting Up Supplier Addresses
192
Setting Up Employee Addresses
Setting Up Country Codes
185
193
194
Setting Up Delivery Transit Times
Setting Up Carrier Addresses
196
197
Setting Up Customer and Supplier Bank Addresses
Setting Up Credit Terms and Trailer Codes
Setting Up Freight Charges
206
Changing or Merging Address Codes
211
200
198
180
User Guide — Master Data
Introduction
Addresses functions enable you to enter a wide range of records used
elsewhere in the system—from customers and suppliers to credit terms
and freight codes.
Table 6.1 lists programs in the Addresses/Taxes menu and shows where
address codes are used.
Table 6.1
Addresses/Taxes
Menu (2)
Menu
Name
Where Used
2.1
Customers Menu
Sales Orders/Invoices, Customer
Schedules, Accounts Receivable, Project
Realization Management, and Service/
Support Management modules.
2.3
Suppliers Menu
Purchasing, Supplier Schedules, Accounts
Payable, and Service/Support Management
modules.
2.5
Salespersons Menu
Sales Orders/Invoices, Accounts
Receivable, Project Realization
Management, and Service/Support
Management modules.
2.7
Employees Menu
Service/Support Management, Shop Floor
Control, Repetitive.
2.9
Address List Type
Maintenance
Address maintenance.
2.10
Address List Type Browse
Address maintenance.
2.11
Address Code Change
Address maintenance.
2.12
Company Address
Maintenance
System reports and screens. Bill-to/ship-to
addresses in Purchasing. Ship-to address in
Accounts Payable. Printed on outgoing
documents such as sales orders, invoices,
service contracts, statements, and draft
payments. Addresses for entities.
Addresses for sites required for Global Tax
Management (GTM) and Enterprise
Material Transfer (EMT).
2.13
Global Tax Management
(GTM)
See Section 2, “Global Tax Management,”
beginning on page 309.
2.14
Country Code Menu
Taxes, Intrastat, address maintenance,
delivery times, user maintenance.
2.16
Delivery Transit Time Menu
Order-entry functions.
Addresses
Menu
Name
Where Used
2.17
Carriers Menu
Shipping functions.
2.18
Shipping Group/Document
Menu
Shipping functions. For information on
shipping groups, see User Guide:
Distribution A.
2.19
Credit Terms/Trailer Codes
Menu
Transactions for sales, purchasing, service/
support, accounts payable, and accounts
receivable.
2.20
Freight Charges Menu
Transactions for sales, purchasing, service/
support, accounts payable, and accounts
receivable.
2.21
Customer/Supplier Banks
Menu
Accounts Payable and Receivable.
2.22
Intrastat
See Chapter 8, “Intrastat,” on page 263.
2.24
Addresses/Taxes Control
Address functions.
Except for employee addresses, all addresses are stored in the same
address table, ensuring consistency of information. An eight-character
address code assigned to each address is the key identifier of that address.
An address code can be associated with different address types. For
example, an employee address code can be used as a salesperson address
for sales and commission reporting, and as a supplier address for
reimbursement of expenses.
Fig. 6.1
Companies
Companies
Suppliers
Suppliers
Customers
Customers
Company
Company
Banks
Banks
Supplier
Supplier
Remit-tos
Remit-tos
Customer
Customer
Ship-tos
Ship-tos
Docks
Docks
End
EndUsers
Users
Salespersons
Salespersons
Customer
Customer
Supplier
SupplierBanks
Banks
Address Table
Engineers
Engineers
Employees
Employees
Address Table
Relationships
181
182
User Guide — Master Data
The system stores information on customers, suppliers, and salespersons
in master tables, using address codes as an index. A cross-reference table
(ls_mstr) describes the links between these tables and the centralized
address table.
Address List Types
Since addresses are stored in a common table, the system automatically
assigns each a list type code. The list types in Table 6.2 are reserved for
use by the system.
Table 6.2
Address List Types
List Type
Originating Function
C/S_Bank
Customer/Supplier Bank Maintenance
Carrier
Carrier Maintenance
Company
Company Address Maintenance
Customer
Customer Maintenance
Dock
Dock Maintenance
Enduser
End User Address Maintenance
Engineer
Engineer Maintenance
Our_Bank
Bank Maintenance
Remit-to
Supplier Remit-to Maintenance
Ship-to
Customer Ship To Maintenance
Slsprsn
Salesperson Maintenance
Supplier
Supplier Maintenance
To group addresses in other ways, you can manually assign an unlimited
number of additional list type codes to any address. Use Address List
Type Maintenance (2.9) to create your own address groups.
List types determine which addresses are included in look-up browses and
reports. For example, when presenting look-up information in the
Customer field of Sales Order Maintenance (7.1.1), the system includes
only addresses with the list type Customer.
Addresses
183
Setting Up Company Addresses
Use Company Address Maintenance (2.12) to set up addresses for each of
your company sites. Define at least one company bill-to and ship-to
address for purchasing.
Fig. 6.2
Company Address
Maintenance (2.12)
A company address code must be assigned to each entity in Entity Code
Maintenance (25.3.1.1). The details associated with the address code are
printed on draft payments from that entity. In the United States, the
address code is also used to access the correct address information for
1099-MISC tax reports.
¶ See User Guide:
Financials A for
details on entities
and 1099 tax
reports.
Your company name and address automatically prints on quotes, orders,
and invoices. To display your company name and address on menus and
reports, set up the following special address codes:
• ~screens defines the company name that appears on all menus.
• ~reports defines the company name that is printed at the top of all
reports.
Company Banks
Use Company Address Maintenance to associate banks with company
addresses. Bank information prints on Accounts Receivable drafts and
Accounts Payable check forms. Bank information includes mailing
address, account type, branch code, and tax IDs. If the account is for
electronic funds transfer, an electronic data interchange (EDI) number is
specified.
¶ See “Setting Up
Customer and
Supplier Bank
Addresses” on
page 198.
184
User Guide — Master Data
Company Addresses for Purchase Orders
Use Company Address Maintenance to enter a company’s bill-to and
ship-to addresses for purchasing. When the site code on a purchase order
line corresponds to a company address code, that company address is
used as a ship-to address when printing purchase orders. When using
consolidated order processing, this allows a single purchase order to be
printed for multiple ship-to addresses.
Company Address and GTM
Use Company Address Maintenance to set up tax environments for
company addresses. Global Tax Management calculates taxes based on
company address rather than site. Set up each site with a company address
record that uses the same address code as the site code. On taxable
transactions, the system uses the site address to select the correct lineitem tax environment.
To provide defaults for missing address codes, set up a special address
code called ~taxes. If you enter a line-item ship-from or ship-to site with
no corresponding address code, the ~taxes address code is used to select
the line-item tax environment.
Company Address and 1099 Tax Reporting
In the United States, the Internal Revenue Service requires companies to
submit an annual 1099 form on some kinds of payments to certain
suppliers.
A federal tax ID can be reported as a payer on a 1099 report only when:
• A company address record exists with that federal tax ID.
• The Tax Report field for that address is Yes.
• That tax reporting address is associated with the entity filing the 1099
report. Assign a tax reporting address to an entity in Entity Code
Maintenance (25.3.1.1).
Important If an entity is assigned an address with Tax Report set to No,
voucher amounts from that entity are not included in any 1099 report.
Addresses
185
When Tax Report is Yes, you must enter the company name, address
details, telephone number, and a federal tax ID. A warning displays if an
IRS magnetic media control code is not entered in Name Control.
Although more than one company address can use the same federal tax
ID, only one of those records can have Tax Report set to Yes.
Important After you set up a tax reporting address in Company Address
Maintenance, do not update the address in any other program. Only
addresses with a list type of company are allowed for 1099 tax reporting.
For example, updating a company address in a program such as Customer
Maintenance assigns a customer list type to the address. When a tax
reporting address has list types other than company, an error displays
when you run any of the 1099-MISC programs and no output is
generated.
Setting Up Salesperson Addresses
Use Salesperson Maintenance (2.5.1) to set up salesperson codes. For
each salesperson, specify a default commission percentage and a userdefined territory code. Enter detailed commission percentages for product
lines and/or customers. Commission reports calculate amounts from net
sales prices or gross margins (net price less standard cost) on posted
invoices. Commissions are not reported from debit/credit memos.
Tip
Use Sales Analysis
functions to
establish monthly
quotas and generate
quota reports. See
User Guide:
Distribution A.
Fig. 6.3
Salesperson
Maintenance
(2.5.1)
Set up salesperson codes before setting up customer codes. Up to four
default salesperson codes and commission percentages can be associated
with each customer. These associations are used as defaults in Sales
Quotations, Sales Orders/Invoices, Service/Support Management, and
Accounts Receivable.
186
User Guide — Master Data
Use Salesperson Payments Report (2.5.16) to review paid invoices and
unapplied payments, sorted by salesperson.
Setting Up Customer Addresses
Customer addresses are used for sales quotations, sales orders, invoices,
and in accounts receivable. They are also used for service/support
documents such as calls, contracts, and return material authorizations
(RMAs).
¶ See “Creating
Reserved
Locations” on
page 192 for
information on
setting up
reserved
locations for
customers.
Values associated with customer addresses determine default values in
programs that reference customers, as well as determining how customer
transactions are processed. For example, Credit Hold determines whether
orders for a customer are automatically put on credit hold. Reserved
locations associated with customer addresses determine how order
inventory is allocated.
A sales order or sales quotation references three customer addresses. The
addresses can be the same or each can be different.
• Sold-to customer. The customer placing the order.
• Bill-to customer. The customer paying the invoice.
• Ship-to customer. The customer receiving the order.
Many sales order fields derive defaults from customer address records.
Sales order header information such as default credit terms and currency
are determined by bill-to customer, as is trailer information such as
accounts receivable accounts. Other fields default from the sold-to
customer, unless a customer record was entered for the ship-to address for
the order. These include site, language, taxable status and other tax
defaults, salesperson, commission, remarks, ship via, and FOB point.
There are several ways to set up sold-to, bill-to, and ship-to customers,
depending on the extent to which they share defaults.
If site, language, price list information, and so on are the same for sold-to
and ship-to customers, set up these addresses in one step using Customer
Ship-to Maintenance (2.1.13). If the defaults differ, set up the addresses in
both Customer Maintenance (2.1.1) and Customer Ship-to Maintenance.
Addresses
During order entry, the bill-to address defaults to the sold-to unless a
different bill-to address is assigned. The ship-to address also defaults to
the sold-to. Alternate ship-to addresses can be set up in advance or
entered as needed for one-time drop shipments. There can be more than
one ship-to address for a single sold-to or bill-to customer.
Add temporary ship-to addresses during quote or order entry. These are
deleted automatically by Closed AR Delete/Archive (27.23) when no
open records remain for the ship-to address. Make temporary ship-to
addresses permanent in Customer Ship-to Maintenance (2.1.13) by setting
Temporary to No.
Creating Customer Addresses
Figure 6.4 illustrates Customer Maintenance (2.1.1).
Fig. 6.4
Customer
Maintenance
(2.1.1)
City, State, Province, County. Used for tax calculations. A country
code must be specified and is validated.
Format. Enter 0 to have the postal code appear after the city, state, or
province. Enter 1 to have the postal code appear before the city, state,
or province.
Multiple. Enter Yes to enter up to four salesperson codes.
187
188
User Guide — Master Data
Type, Region, Class. Enter types and regions to be used for sales
analysis reporting. Enter classes to indicate customer priority, as
when not all orders can be filled.
Currency/Language. Associate currencies and languages with
customers located in different countries. Language codes enable you
to access foreign language comments. Define currency codes in
Currency Maintenance (26.1) and exchange rates in Exchange Rate
Maintenance (26.4).
Site. This is the default ship-from site for this customer. Typically,
enter the site closest to the customer.
Customer Data
Set up additional data for each customer. The system uses this
information during order entry.
Fig. 6.5
Customer Data
Frame
¶ See Chapter 3,
“Pricing,” for
more details.
Price and Discount Table. These provide defaults for scheduled
orders only. Sales orders use the best pricing model.
Fixed Price. Enter Yes to indicate that prices negotiated with the
customer are fixed. Enter No to indicate that prices negotiated with
the customer are not fixed. Prices not fixed are subject to batch
updates based on changes in price lists.
Class. Enter classes to indicate customer priority. When you cannot
fill all orders, items can be allocated by customer class.
SIC. Enter the standard industrial classification (SIC) code associated
with this customer. These codes are widely accepted classifications
for categorizing companies into industry groupings.
This reference-only field may display on selected reports and
inquiries.
Addresses
189
Invoice by Authorization. Indicate how invoice totals should be
calculated and displayed for this customer.
No: Invoice totals are calculated by line. This is the typical method
for calculating totals, unless the customer is using AR Self-Billing.
Yes: Invoice totals are calculated by authorization number. The
printed invoice includes the price and amount for each authorization
line as well as the total for all authorization lines. The extended price
for each invoice line item is not displayed.
Customer Credit Data
Set up credit information for each customer. The system uses this
information during order entry.
Fig. 6.6
Customer Credit
Data Frame
Credit Terms. Assign a credit terms code defining this customer’s
normal payment terms.
Credit Hold. Specifies the customer’s credit limit. When an order
exceeds the limit, a warning displays. If Sales Order Control (7.1.24)
requires an order to be put on hold when limits are exceeded, the
order’s Action Status is set to HD (hold). You cannot print packing
lists for an order until credit holds are removed.
Disc %. Enter a discount value if the customer normally receives a
total order discount in addition to pricing discounts. If the customer
qualifies for a volume discount higher than this, the system uses the
volume discount.
Finance Chg. Enter Yes if this customer is subject to finance charges.
Stmt Cycle. Indicate how often statements are printed, such as
monthly or quarterly. This is used as a selection criteria when printing
dunning letters and calculating finance charges.
¶ See “Setting Up
Credit Terms and
Trailer Codes” on
page 200 for
details.
190
User Guide — Master Data
Dun Letter. Enter Yes if customer receives dunning letters for past-
due invoices.
Last Credit Review. Enter the date of the last review of the customer’s
credit status.
Last Credit Update. Indicates the last time the customer’s credit limit
status was updated. This date is automatically updated by Customer
Credit Limit Adjustment (2.1.7).
Customer Freight Data
Set up freight information for each customer. The system uses this
information during order entry.
Fig. 6.7
Customer Freight
Data Frame
¶ See “Setting Up
Freight Charges”
on page 206 for
details.
Freight List. Enter a freight list code identifying a set of shipping rates
normally used for this customer. This list defaults to the order header
for new orders for this customer.
Min Frt Wt. Enter the minimum weight to use with bulk freight lists
for this customer. Shipments that weigh less than this amount are
charged based on minimum weight, not the actual shipment weight.
Freight Terms. Enter a code identifying how freight charges are
typically calculated for this customer.
Other Customer Data
Three other frames display in Customer Maintenance:
¶ See “Customers,
Suppliers, and
End Users” on
page 342.
• The Address Tax Data frame displays for the input of Global Tax
Management data.
• The Enterprise Material Transfer Data frame is described in User
Guide: Distribution A.
Addresses
• The Bank Accounts frame in Customer Maintenance is the same as
the one in Supplier Maintenance.
Adjusting Credit Limits
191
¶ See “Setting Up
Customer and
Supplier Bank
Addresses” on
page 198.
Use Customer Credit Limit Adjustment (2.1.7) to increase or decrease
customer credit limits defined in Customer Maintenance (2.1.1)
automatically. Select a range of customers based on address code, region,
class, current credit limit, date of last credit review, or date of last credit
update.
Adjustment %. Enter a percentage for adjusting the credit of selected
customers. Indicate decreases with negative percentages.
Compound/Simple. The system uses one of three methods to calculate
a new credit limit amount. N is the number of days since the last time
the customer’s credit limit was updated.
Table 6.3
Method
Formula
Compound Interest
Old credit limit x (1 + Adjustment % /100)N
Simple Interest
Old credit limit x (1 + N *Adjustment % /100)
Fixed Interest
Old credit limit x (1 + Adjustment % /100)
Interest Calculation
Methods
Values entered here determine the method used to adjust credit limit
amounts. Table 6.4 identifies the settings required for each method.
Table 6.4
To Choose
This Method...
Set Cumulative/
Fixed to...
Set Compound/
Simple to...
Compound Interest
Cumulative
Compound
Simple Interest
Cumulative
Simple
Fixed Percentage
Fixed
Cumulative/Fixed. Specifies whether the adjustment percentage is a
fixed percentage or a cumulative daily percentage, applied to every
day since the last credit limit update.
Update Credit Limit. Enter Yes to update the customer’s credit limit
and set the last credit update date to the system date in Customer
Maintenance (2.1.1). Enter No to review the report without updating
the customer record.
Calculation of
Credit Limit
192
User Guide — Master Data
Creating Reserved Locations
Use the functions on the Reserved Locations Menu (2.1.9) to associate
any number of reserved locations with a customer address. One of these
locations can be designated as the customer’s primary location.
¶ See “Reserved
Locations” on
page 37 for
details.
Note You can also create this association directly in Location
Maintenance (1.1.18).
Fig. 6.8
Reserved Location
Maintenance
(2.1.9.1)
When you create a sales order for a customer with a reserved location, the
reserved location defaults during line-item entry. For other customers, the
system automatically blocks sales order line-item entry or shipment from
a reserved location.
¶ See “Reserved
Locations” on
page 37 for
details.
The location you specify must be set up with an inventory status that
prevents items from being allocated or considered by planning functions.
You can use the report and inquiry on this menu to view the inventory in
reserved locations associated with various customer addresses and drill
down to associated sales order detail:
• Detail Allocation Inventory Inquiry (2.1.9.5)
• Detail Allocation Inventory Report (2.1.9.6)
Setting Up Supplier Addresses
Set up supplier addresses in Supplier Maintenance (2.3.1) and Supplier
Remit-to Maintenance (2.3.13). Supplier addresses are used in
Purchasing, Accounts Payable, Service/Support Management, and other
functions.
Addresses
Supplier addresses, like customer addresses, determine default field
values and affect how supplier transactions are processed in the system.
Remit-to addresses are used when payments created in Accounts Payable
must be sent to an address different from the supplier address. Each
supplier can have only one remit-to address.
Fig. 6.9
Supplier
Maintenance
(2.3.1)
Setting Up Employee Addresses
Use Employee Maintenance (2.7.1) to enter employee address records. At
least one employee record is required for the Shop Floor Control and
Repetitive modules. Employee records must be created before defining
engineers in the Service/Support Management module.
193
194
User Guide — Master Data
Fig. 6.10
Employee
Maintenance
(2.7.1)
Setting Up Country Codes
Records for tax zones, addresses, delivery transit time codes, users, and
transactions use alphanumeric country codes. To make data entry easier,
consider using significant alphabetic rather than numeric codes.
Set up country codes in Country Code Maintenance (2.14.1). To verify
data setup, use Country Code Browse (2.14.2) and Report (2.14.3).
Fig. 6.11
Country Code
Maintenance
(2.14.1)
Tip
Country Code. Enter a 3-character code identifying a country. If a
The European
Community (EC)
and other areas may
require numeric
codes.
group of countries is subject to the same tax type, set up a country
code for the group.
Addresses
195
Name. Enter the name of the country. Since the name displays on
printed addresses, enter the complete name of the country rather than
an abbreviation. You cannot specify the same country name for two
country codes.
Alternate Code. Optionally, enter an alternate code for:
• Sorting in Country Code Browse
• The International Organization for Standards (ISO) country code
Each user must be associated with a country code in User
Maintenance. That country code maps to the alternate code you enter
here. If you do not have an alternate country code specified here, the
system displays an error message in User Maintenance.
¶ See User Guide:
Manager
Functions.
ISO country codes must be defined in Generalized Codes
Maintenance. If you enter an alternate code that is used for another
country, the system displays a warning message.
The ISO country code helps determine the locale for the user. The
system uses the ISO code to set up date and number formats and other
interface elements for each user's session.
EC Country. This code identifies member countries of the European
Union (EU). This information determines whether an inventory
transaction relates to an intra-EU inventory movement that should be
included in Intrastat reporting. This field is not used for GTM.
NAFTA Country. Reference only. Identifies member countries of the
North American Free Trade Agreement.
DEA Country. Reference only. Identifies countries under the
jurisdiction of the United States Drug Enforcement Administration.
GATT Country. Reference only. Identifies countries as members of
the General Agreement on Tariffs and Trade.
Country Group. Use this field to categorize countries. Use letter codes
such as those assigned by current Export Administration Regulations.
Country Type. Reference only. Use this field to categorize countries.
Use letter codes such as those assigned by current Export
Administration Regulations. This field is for reference only.
Comments. Enter Yes to display a screen for recording special
requirements, restrictions, or other GTM specifications.
¶ See Chapter 8,
“Intrastat,” on
page 263.
196
User Guide — Master Data
Setting Up Delivery Transit Times
Use Delivery Transit Time Maintenance (2.16.1) to enter standard transit
time data for inventory deliveries between the shipping site and the
specified ship-to country, state, and city. The system uses delivery transit
times in some automatic date calculations.
¶ See User Guide:
Distribution A for
information on
date calculations.
For example, when Calculate Promise Date is Yes in Sales Order Control
(7.1.24), the system checks the ship-from site and the delivery destination
to determine the transit time. It uses the specified number of days along
with date information on the order to calculate promise dates or due dates.
Fig. 6.12
Delivery Transit
Time Maintenance
(2.16.1)
From Site. Enter the code representing the site from which inventory
is shipped. This field cannot be blank and the site must already be
defined in Site Maintenance (1.1.13).
To Country Code. Enter the code representing the country to which
inventory is delivered. You can leave this field blank. If you enter a
value, it must already be defined in Country Code Maintenance
(2.14.1).
To State. Enter the code representing the state to which inventory is
to be delivered. You can leave this field blank. This code is validated
against codes entered in Generalized Codes Maintenance for
delt_state, if any.
To City. Enter the city to which inventory is to be delivered. You can
leave this field blank. Values are not validated.
Transit Days. Enter the number of calendar days to transfer inventory
from the inventory site to the delivery location defined by the
specified combination of country, state, and city. The system adds
this number to the due date to calculate the promise date
automatically. You must enter a non-zero, positive integer.
Addresses
Note By leaving To Country, To State, and To City blank, you can
create a generic default transit time that calculates a promise date for any
unspecified delivery location.
Setting Up Carrier Addresses
Use Carrier Maintenance (2.17.1) to create carrier names and addresses,
telephone and FAX numbers, contact names, and the carrier’s tax ID on
printed shipping documents. Carriers are identified by an address list type
of carrier.
A carrier handles the transportation of goods from a shipping site.
Typically shipments require a single carrier. However, sometimes a series
of carriers is needed. For example, a shipment can be transported by truck
to be loaded onto a train, transported by train to be loaded onto a ship,
then transported by ship to its final destination.
You can associate a carrier or series of carriers for kind of inventory
movement in a shipping group. A carrier cannot be deleted if it is
currently in use by any shipment, shipping group, or tax history record.
Fig. 6.13
Carrier
Maintenance
(2.17.1)
197
198
User Guide — Master Data
Setting Up Customer and Supplier Bank
Addresses
Customer banks are banks your customers use to pay your company.
Supplier banks are banks your suppliers use to receive payments from
your company.
Use Customer/Supplier Bank Maintenance (2.21.1) to set up customer,
supplier, and company bank addresses, specifying any number of
accounts for each bank. Specify bank branch codes and begin/end dates
for using the accounts on payments. If you transfer funds electronically,
record each bank’s mailing address, tax IDs, and EDI IDs.
Fig. 6.14
Customer/Supplier
Bank Maintenance
(2.21.1)
To set up bank addresses to be used in payments:
Tip
You can also set up
customer banks,
although these are
not used by
Accounts
Receivable.
1
Set up bank address information.
2
Define bank accounts.
Use Customer/Supplier Bank Maintenance (2.21.1) to set up a record for
each supplier bank that receives your EFT payments. This information
can be included in the printout or file you send to your bank whenever
you process EFT payments. The system assigns customer and supplier
banks an address list type of c/s_bank.
Addresses
199
Use Customer/Supplier Bank Browse (2.21.2) or Report (2.21.3) to
review your setup.
Use Supplier Maintenance (2.3.1) to specify accounts for each supplier
bank. Record the bank code, account type, and other information for each
account. The first bank (in alphanumeric sequence) is the default supplier
bank for each new voucher. Be sure to specify at least one type 1 (ALL)
account for each supplier.
Note For reference purposes, you can also record customer bank
accounts in Customer Maintenance (2.1.1).
Fig. 6.15
Bank Accounts
Frame in Supplier
Maintenance
(2.3.1)
Bank. Enter a code identifying the payment bank.
Account Type. Enter a type code to distinguish multiple bank
accounts for the same bank. You can define up to 10 account types.
The following three types already exist in the system:
• 1 (ALL). The default. Indicates that the supplier bank account
accepts both wire transfers and printed checks.
• 2 (PRT). Indicates an account that accepts only printed checks.
Type 2 accounts are not used for electronic funds transfers
(EFTs). Record these accounts for reference only.
• 3 (EDI). Indicates an electronic data interchange account.
EDI. Optional EDI number, not currently used by the system.
Available for reference.
Tip
Designate at least
one bank account as
type 1 (ALL) so
that the AP check
selection and
printing programs
can always find a
bank account for
payments.
200
User Guide — Master Data
Branch. Optional and not currently used by the system. Available for
reference.
Bank Account. The bank account code can have up to 23 characters.
Set Domain/Account Control (36.1) to validate 11- and 12-digit
customer and supplier bank account codes.
Begin/End Dates. Enter the time period in which this bank is valid for
supplier payments. When you run Payment–Automatic Checks
(28.9.9), the system selects this bank as the supplier’s destination
bank for the payment only if the check date falls within the begin/end
date range. The beginning date defaults to the system date. The end
date remains open unless you specify one. These dates can be
modified at any time.
Setting Up Credit Terms and Trailer Codes
Set up credit terms codes in Credit Terms Maintenance (2.19.1). The
system uses credit terms codes to calculate the default due date, discount
date, and discount for any goods and services bought or sold. Each of
these fields can be overridden manually. Credit terms codes are also used
for processing customer payments, debit/credit memos, vouchers, and
checks. Due dates and discount dates can be fixed, or calculated from the
invoice date, end of month, end of fortnight, or end of week.
For terms requiring multiple due dates or discount dates, set up twotiered, compound credit terms.
Fig. 6.16
Credit Terms
Maintenance
(2.19.1)
Addresses
Proximo Terms. Proximo terms are a type of credit term used in
France and some other countries. They enable you to manage due
dates so that you process most payments only once a week, once a
fortnight, or monthly, ensuring that customers have adequate time to
pay. Specify the minimum number of days that must elapse between
the invoice date and the payment due date.
Base Date. Specify a base date as the start date for due date
calculations. Do this in situations where goods are shipped in advance
of a negotiated invoice date but payment is made relative to the
invoice date.
Credit Terms Interest. Specify a credit terms interest percentage for
recalculating line item prices. You can also give favored customers a
grace period on the payment due date by specifying the base days.
Both the Disc Date From and Due Date From fields support end of
fortnight (option 3) and end of week (option 4), as well as invoice
date (option 1) and end of month (option 2).
Proximo Terms
Define proximo terms if your company processes payments only on
certain days of the month. All payments may be due the same day (for
example, the 10th of next month), regardless of invoice date. You specify
this by setting Due Date From to 2, indicating the end of month.
In another example, invoices for the first half of the month are due on the
15th of the following month. Invoices for the second half of the month are
due on the last day of the following month. For these terms, set Due Date
From to 3 (end of fortnight).
Similarly, invoices for the first week are due at the end of the first week of
the following month, invoices for the second week are due at the end of
the second week of the following month, and so on. For these terms, set
Due Date From to 4 (end of week).
However, if you specify only the Due Date From, the amount of time
between the invoice date and the payment due date may be too short for a
reasonable response. For example, for the end of month proximo terms
described above, an invoice dated September 30 would be due October
10. To prevent this situation, specify the Min Due Days. This feature
201
202
User Guide — Master Data
moves the due date to the next period whenever the number of days
between the invoice date and the payment due date is too short for a
reasonable response.
There are many ways to set up proximo terms. Table 6.5 through
Table 6.7 illustrate sample proximo terms defined with Credit Terms
Maintenance.
Table 6.5
Proximo Terms:
One Month
Due Days = 10
Due Date From = 2
(End of Month)
Min Due Days = 15
You want to process payments on the 10th of the
month, and there must be at least 15 days between the
invoice date and the payment due date. For monthly
proximo terms, Due Days identifies the calendar day
of the payment month. Specify Due Days only for
end-of-month proximo terms.
If Invoice Date Is:
June 1–30
Payment Due Date Is:
July 10
Due Date From = 3
(End of Fortnight)
Min Due Days = 30
Your payment due date is either the 15th or the 30th
of the following month, depending on the invoice
date. Customers always have at least 15 days to pay.
Table 6.6
Proximo Terms:
Bimonthly
(Fortnight)
For end of fortnight, the system uses 15th of the
month during discount/due date calculations if
transaction date is prior to 15th of the month. If
transaction date is after 15th, the system uses end of
current month in its calculations. Finally, if
transaction date falls on 15th or last day of month,
transaction date is used.
Invoice Dates:
June 1–14
June 15–30
Payment Due Dates:
July 15 and July 31
Addresses
203
Table 6.7
Due Date From = 4
(End of Week)
Min Due Days = 30
Your payment due dates are the Saturday of every
week in the following month, depending on the
invoice date. Customers always have at least 15 days
to pay.
For end of week, the system uses the date of the
subsequent Saturday during discount/due date
calculations. If the transaction occurs on a Saturday,
it uses the transaction date.
Invoice Dates:
June 1–3
June 4–10
June 11–17
June 25–July 1
Payment Due Dates:
July 8
July 15
July 22
July 29
August 5
Base Date
Base Date lets you specify a start date for due and discount date
calculations. This enables you to calculate dates that match customer
expectations. For example:
• In inflationary environments where pricing is time-dependent.
• For special promotions.
• If your company has a tightly negotiated contract with a significant
cash flow effect. In this case you may want to specify a credit terms
code with a base date to ensure that the customer does not have to pay
too soon.
When you specify a Base Date, the system uses the later of the invoice/
ship date or the base date when calculating discount and due dates.
Credit Terms Interest
Credit terms interest percentages enable you to:
• Accrue estimated inflation increases included in sales and purchases.
• Track the interest component of an item price or cost separately from
its list price component. Separate postings to accounts for credit terms
interest applied and accrued are required under generally accepted
accounting principles, since currency gain/loss is only an estimate.
Proximo Terms:
Weekly
204
User Guide — Master Data
Fig. 6.17
Credit Terms
Maintenance
(2.19.1)
Base Days
In hyperinflationary environments, it is a common practice to offer a
favored customer a due date that is later than the standard due date. These
free days are not subject to credit terms interest. You can specify these
days as Base Days in the credit terms code. When the system calculates
due dates, it appends the Base Days to the calculated due date.
Note There is no connection between Base Date and Base Days, nor
between Base Days and Due Days. In the latter case, Due Days specifies a
time period that increments the Due Date From. Base Days specifies an
interval that increments the calculated due date.
On sales and purchasing transactions, the credit terms interest percentage
defaults from the transaction header credit terms code for the customer or
supplier. You can change it if necessary. If you do, the system does not
automatically update the credit terms interest percentage. A warning
displays if the percentage in the header does not match the percentage for
the credit terms code.
On sales transactions, a pop-up in the line item frame displays the credit
terms interest percentage from the header, which you can override for the
line item if necessary.
When you press Go, the system increments and displays the item’s price
based on the interest percentage. The line item discount, if any, is applied
to calculate the item’s net price.
Addresses
205
On purchasing transactions, GL entries are created at PO receipt (5.13.1).
Credit terms interest applied is debited and accrued interest is credited.
These accounts are specified in Purchasing Control (5.24).
On sales transactions, GL entries are created at invoice post (7.13.4).
Credit terms interest applied is credited and accrued interest is debited.
These accounts are specified in Sales Order Control (7.1.24).
Note Currently, the system does not calculate adjusting entries on late
payments.
Trailer Codes
In addition to line item charges and tax amounts, orders often have
miscellaneous charges such as freight and service associated with them.
Use Trailer Code Maintenance (2.19.13) to set up trailer codes prior to
entering sales orders.
Trailer codes can be marked as taxable and associated with a GL account.
Enter the GTM tax class of this trailer code. Trailer items are not subject
to commission.
You can also indicate whether the trailer code should be discounted at
time of payment. If Yes, the trailer charge amount is discounted by
Payment Maintenance (27.6.4) in the same way as the sales and tax
amounts.
Once established, the three most frequently used taxable and nontaxable
trailer codes can be specified as defaults in Sales Order Control (7.1.24).
These defaults display on the trailer of every order but can be changed
manually. Taxable and nontaxable trailer codes for contracts in Service/
Support Management can be specified in Contract Control (11.5.24).
You can also associate a trailer code with freight lists. If you want this
trailer code to be used rather than the ones defined in Sales Order Control
(7.1.24), you must set Use SO Freight List Trailer Code to Yes in Sales
Order Control.
¶ See “Trailer
Code” on
page 207.
Note If you are using the PRO/PLUS Container and Line Charges
¶ See User Guide:
PRO/PLUS.
module, trailer codes are also used to specify line charges during sales
order line-item entry.
206
User Guide — Master Data
Setting Up Freight Charges
Many companies add freight charges to sales orders and RMAs. When the
system calculates freight terms, it takes into account the shipper,
ship-from site, ship-to address, shipment weight, currency, minimum
weight, and other factors. Data affecting freight charges is derived from
three sources:
• The order
• Customer information
• Freight information entered in the Freight Charges menu
¶ See Chapter 7,
“Logistics
Accounting,” on
page 213.
Note Enabling the optional Logistics Accounting module changes how
freight charges are tracked and billed. See Chapter 7 for details on setting
up Logistics Accounting.
Table 6.8 lists the programs in the Freight Charges menu.
Table 6.8
Freight Charges
Menu (2.20)
¶ See User Guide :
Distribution A for
details on how
freight is
calculated for a
sales order.
Number
Name
Program
2.20.1
Freight List Maintenance
sofrlmt.p
2.20.2
Freight List Browse
sobr002.p
2.20.4
Freight Zone Maintenance
sofrzmt.p
2.20.5
Freight Zone Browse
sobr006.p
2.20.7
Freight Class Maintenance
sofrclmt.p
2.20.8
Freight Class Browse
sobr001.p
2.20.10
Freight Charges Maintenance
sofrcmt.p
2.20.11
Freight Charges Browse
sobr005.p
2.20.12
Freight Charges Report
sofrcrp.p
2.20.13
Freight Terms Maintenance
sofrtmt.p
2.20.14
Freight Terms Browse
sobr003.p
2.20.24
Freight Control
sofrctmt.p
Freight terms determine how shipping costs are displayed on the order. A
customer’s freight costs can appear on the order trailer or be added to
each line item unit cost.
Once freight lists and terms are defined, assign default lists and terms to
customers in Customer Maintenance. Each new sales quote or order
created for the customer uses these values. Freight list, zone, and class are
Addresses
used to determine the freight charge for an order. The freight zone is
based on the ship-to postal code. Freight class is determined by the item
sold.
Freight List Maintenance
Use Freight List Maintenance (2.20.1) to define charges that apply to
sales quotes, orders, and RMAs. Typically, you need at least one freight
list for each shipping company you use. More than one freight list may be
needed if the shipping company supports different types of transportation.
For example, a shipping company may ship by train, by truck, by
refrigerated truck, and by regular semi-trailer.
Set up freight lists for different currencies if your shipper delivers to other
countries. You can also define lists per site if the same shipper transports
from more than one warehouse or manufacturing site.
Fig. 6.18
Freight List
Maintenance
(2.20.1)
Type. Specify whether freight charges are based on the weight of each
unit or on the total weight of the items that use this freight list. Valid
entries are:
• UNIT: Freight charges are calculated for individual units based
on each unit’s shipping weight.
• BULK: Freight charges are calculated based on the total weight
of applicable items. Weight is calculated for each order line as the
unit weight multiplied by the line item quantity.
Trailer Code. This value links a freight list with the appropriate GL
account to use when charging amounts on the sales quote, sales order,
or pending invoice trailer.
207
208
User Guide — Master Data
Note If the trailer codes you associate with freight lists are not the
same as the default trailer codes in Sales Order Control, you must set
Use SO Freight List Trailer Code to Yes in Sales Order Control.
Otherwise, errors display and freight is not calculated in order
maintenance programs.
Freight Mode. An optional code that can be used to describe the
transportation method. Define values in Generalized Codes
Maintenance for field fr_mode.
Freight Zone Maintenance
The distance an item is shipped can be an important factor in determining
an order’s freight charges. Use Freight Zone Maintenance (2.20.4) to set
up geographical areas related to freight lists. Relate zones to sites by
specifying values in the Site field.
Fig. 6.19
Freight Zone
Maintenance
(2.20.4)
Zones are bounded by a beginning and ending range of postal codes.
Assign a starting and ending effective date, as needed.
Freight Zone Maintenance only sets up zones. Use Freight Charges
Maintenance (2.20.10) to determine charges.
Freight Class Maintenance
Use Freight Class Maintenance (2.20.7) to set up classes used in
calculating the freight charges defined in Freight Charges Maintenance.
Freight class distinguishes different types of shipments requiring different
charges. For example, a fragile class is charged at a higher rate because it
requires extra handling.
Addresses
209
Fig. 6.20
Freight Class
Maintenance
(2.20.7)
Associate freight classes with items in Item Master Maintenance (1.4.1).
Freight Charges Maintenance
Use Freight Charges Maintenance (2.20.10) to relate a freight list, class,
and zone, and to specify how charges are calculated. Use start and end
dates to phase in new charges if fees rise or fall after a certain date.
Fig. 6.21
Freight Charges
Maintenance
(2.20.10)
Maximum and Minimum Weight. Enter the highest and lowest weight
that can be used with a freight charge. Set up weight boundaries to
include all potential shipping weights.
Normally, the freight charges apply to the boundary weight.
However, in two cases, this is not true.
• If you enter a minimum weight of 0 (zero), the freight calculation
excludes the minimum boundary weight. Freight is never
calculated if the actual shipping weight is 0.
• If you set up overlapping ranges so that the maximum of one
range is the same as the minimum of the next range, the higher
range takes priority. For example, if 1-5 pounds is charged $10
and 5-10 pounds is charged $15, $15 is applied to a weight of 5.
210
User Guide — Master Data
Freight Charge. Indicates a flat rate per shipment. The amount to be
charged per order or per item as determined by the Type field in
Freight List Maintenance.
Freight Charges Per UM Over Minimum. Indicates a surcharge over
minimum. The freight charge per unit of measure over the minimum
listed for this freight list in the Minimum Weight field. This is
calculated per order or per item, based on the Type field in Freight
List Maintenance.
Freight Charge Per Freight List UM. Indicates a weight-based fee.
The freight charge for the unit of measure specified for the freight list
in Freight List Maintenance.
Use any combination of these three types when defining freight charges.
You can charge a flat rate plus a rate based on weight. Or you can charge a
weight-based rate but with an additional charge for amounts over a certain
minimum.
Freight Terms Maintenance
Freight Terms Maintenance is not directly related to the other freight
maintenance functions. Terms are not related to a specific freight list or
charge. Instead, they are specified for a particular customer in Customer
Maintenance (2.1.1), or for a particular sales order, quote, or invoice.
Freight terms determine:
• Whether to apply freight charges to a particular order, or specify them
in general for a particular customer.
• How freight charges are calculated. Table 6.9 lists the six methods for
calculating freight charges.
• Whether freight amounts update the Sales Freight Accrued and Sales
Freight Applied accounts specified in Domain/Account Control
(36.1).
¶ See “Updating
Freight Terms”
on page 245.
Note If you are using Logistics Accounting, freight terms also determine
the default logistics charge code and whether accrual is by shipment or
line. An additional frame displays in Freight Terms Maintenance for this
information.
Addresses
211
Table 6.9
Type
Description
Add
Freight is calculated, accrued, and placed on the trailer.
Allow
Freight is calculated, accrued, and shown as a negative amount on
the trailer.
Collect
Freight is calculated and placed on the trailer. However, the freight
charges are not tracked through the Sales Freight Accrued and the
Sales Freight Applied accounts. The customer will pay freight
charges directly to the freight carrier when the shipment is
delivered.
Include
Freight is calculated, accrued, and added to the item’s unit price
(after you exit the order line item screen).
Prepaid
Freight is calculated and tracked through the Sales Freight
Accrued and Sales Freight Applied accounts, but not included on
the order or customer invoice because it has been prepaid or is
already a part of the normal selling price.
Will Call
Freight is not calculated or accrued—the customer is responsible
for the shipping arrangements.
By defining freight terms, you can assign your own codes and
descriptions to these six types.
Changing or Merging Address Codes
To change or merge address codes, use Address Code Change (2.11).
Use Address Code Change (2.11) for two purposes:
• To change an address code if a company changes its name or if your
business changes its coding scheme.
• To merge an address with another existing business entity, as required
when one business acquires another.
Merging is allowed only under the following conditions:
• Both the old and new address codes must have a single address list
type that is the same for both. Customer and end user list types are
considered the same when merging.
For example, an address code for a customer cannot be merged with
an address code for a supplier, or an address code that is used for both
a customer and supplier cannot be merged with another address code
used for a customer and supplier.
Freight Term Types
212
User Guide — Master Data
¶ See “Creating a
Price List” on
page 69.
• No price lists exist for the old and new address codes where the only
difference is the value in the Customer/Analysis Code field. If lists
like this are defined, you must adjust the pricing information in Price
List Maintenance (1.10.1.1) before attempting to merge.
Fig. 6.22
Address Code
Change (2.11)
¶ See User Guide:
Distribution A for
information on
shipping groups.
When your input matches the conditions for merging, you are prompted
to merge the old address into the new address. If you respond Yes, most
information for the old address code such as sales, purchases, AR, AP,
and master comments is added to the new one.
For example, any totals maintained by address are summarized, such as
open accounts receivable and sales history by customer, open accounts
payable and purchase history by supplier.
Bank account information is not merged, however. You must decide
manually whether accounts for the old address should be added to the new
address.
Note Supplier address codes entered on routing operations are not
changed by this function. Review your standard operations, routings, and
processes whenever a supplier address code is changed.
If you merge address codes, and both old and new address codes are
already associated with a shipping group or shipment, the old address
code is deleted rather than changed. This prevents duplication in the
group.
Chapter 7
Logistics Accounting
Logistics Accounting lets you define and track individual costs
associated with the transportation of goods in and out of company
locations.
Introduction
214
Setting Up Logistics Accounting
222
Accruing Inbound Logistics Charges
Accruing Outbound Logistics Charges
Updating Pending Vouchers
253
Vouchering Logistics Charges
254
Generating Logistics Reports
261
235
245
214
User Guide — Master Data
Introduction
Logistics costs are the costs incurred when a product is moved from one
location to another. These costs can include not only the freight charges
paid to carriers, but also insurance, duty, customs clearance, handling
charges, and so on. Depending on the freight terms, these costs can be
paid by the supplier and recharged to the customer within the item price
or as a trailer charge. They can also be paid by the customer directly to the
carrier, insurer, customs, and so on.
As manufacturing companies increasingly look for cheaper materials and
components from remote sources, logistics costs have become a more
significant aspect of cost management. Accurate product and customer
profitability information that includes the total cost of purchasing or
selling items supports better pricing and financial analysis decisions.
Logistics Charges
The individual costs payable to third-party suppliers for the transportation
of goods are referred to as logistics charges. Logistics Accounting lets
you define logistics charges for any inbound and outbound transportation
costs payable to third-party suppliers.
Inbound logistics charges are the transportation costs associated with
purchasing items from external suppliers. Outbound logistics charges are
the transportation costs associated with the shipment of items from a
company location to customers or other company locations.
For some companies, a significant proportion of purchases are imports.
Logistics costs have a large financial impact since they can represent a
high percentage of the total delivered cost and must be included in price
comparisons with local sources. In Logistics Accounting, inbound
logistics charges are considered part of the overall cost specific to each
item and included in the item cost.
For other companies, the shipment of goods by third-party carriers is a
frequently occurring expense. Tracking the amounts owed to carriers as a
separate liability in the general ledger (GL) provides better control over
invoices from suppliers. Identifying variances in expected freight charges
and actual invoice amounts reduces the risk of duplicate or over payment
Logistics Accounting
215
of logistics charges. Tracking these charges improves visibility of total
outbound freight costs, helping to reduce these costs by reviewing order
quantities or seeking alternative carriers.
Logistics Charge Accruals
When items are purchased or shipped, you can accrue logistics charges as
part of the process. GL accruals for inbound logistics charges are
triggered by purchase receipts. GL accruals for outbound logistics charges
are triggered by shipments. For each receipt or shipment, a pending
voucher is created for each logistics charge accrual. Inbound logistics
charges are built into the GL cost for items.
Note See “Accrual Currency” on page 235 for information on how the
system determines the accrual currency used for inbound and outbound
logistics charges.
Figure 7.1 summarizes the steps involved in accruing logistics charges.
Fig. 7.1
Logistics
Accounting Work
Flow
Set
Setup
upLogistics
LogisticsAccounting.
Accounting.
Update
Updatepending
pendingvouchers.
vouchers.
Accrue
Accruelogistics
logisticscharges.
charges.
Select
Selectpending
pendingvouchers
vouchersfor
for
payment.
payment.
= optional
Apportioning Logistics Charges
When an invoice is received from a logistics supplier, the total amount of
the invoice is vouchered. To capture the logistics costs for individual line
items, a portion of the total invoice amount is allocated to each line item
on the associated order.
216
User Guide — Master Data
The system apportions inbound and outbound logistics charges to line
items on an order during vouchering based on the apportion method
associated with the logistics charge code. The total invoice amount is
allocated to individual line items as a ratio of the accrued logistics
charges.
When vouchering inbound logistics charges, you can automatically
update the current costs of PO line items with the allocated amounts.
Current costs are updated only when the last cost method is used for the
current cost set. If another costing method is used, current costs for
purchased items are not updated.
Example Item A and item B are purchased from a single supplier and
shipped to a company location. The GL and current costs for these items
consist of the unit cost from the item supplier and the cost to ship each
item.
Table 7.1
Example Item
Costs
Item A
Item B
Material
10
12
Freight
3
2
Total cost
$13
$14
When the order arrives, item A is received in a quantity of 400 and item B
in a quantity of 200. Table 7.2 shows the accrued freight charges for each
item.
The logistics supplier sends an invoice in the amount of $2000 for freight.
The total accrued freight is $1600. When the freight invoice is vouchered,
the system uses the following equation:
Apportion Value = Line Item Accrual / Total Accrual * Total Invoice Amount
Table 7.2
Apportioning by
Accrued Value
Item
PO Qty
GL Freight
Accrued Freight
Apportion Value
A
400
$3
$1200
1200 / 1600 * 2000 = $1500
B
200
$2
$400
400 / 1600 * 2000 = $500
The actual freight cost for item A is $3.75 per unit ($1500 / 400) and
$2.50 for item B ($500 / 200). When the last cost method is used for the
current cost set, the system updates the current costs for items A and B
with the allocated values.
Logistics Accounting
You specify the apportion method in Logistics Charge Code Maint
(2.15.1). The default, system-defined apportion method is identified with
code 01. If required, your company can set up custom methods and assign
them different codes.
Follow these steps to define additional, custom methods to accommodate
special requirements.
1
Create a two-character code in Generalized Codes Maintenance
(36.2.13) for field lc_apportion_method. Use a number from 50 to 99;
codes 01 through 49 are reserved for QAD use. This code identifies
your custom method.
2
Create a Progress program that includes the apportionment logic.
3
Name the program laappmxx.p, where xx is your two-character
code. Place the program in your PROPATH so the system can find it.
4
Modify Voucher Maintenance to call your new program when the
method is not 01. The subprogram of Voucher Maintenance that
needs to be modified is apvolaa5.p.
Example You create a new apportionment method, identified with code
50. You should use program file laappm50.p to store method 50.
Pending Vouchers
Vouchers convey authority to pay invoices. Vouchers control who
receives payment, how much they receive, and when payment is sent.
Vouchers are typically recorded after an invoice is received from a
supplier.
Pending vouchers track the estimated amounts owed to suppliers before
an invoice is received for the actual amount. Pending vouchers for
logistics charges are created automatically during purchase receipts and
shipments. Logistics charge accruals are also referred to as pending
vouchers.
During vouchering, you can match the amounts from pending vouchers to
actual invoice amounts. The more information provided on the pending
voucher, such as the supplier of the logistics charge, the easier it is to
match to an invoice.
217
218
User Guide — Master Data
When purchased items are shipped from an item supplier, you might not
know the name of the logistics supplier until the goods arrive. Logistics
charges can accrue without specifying a logistics supplier. After an
invoice arrives, you can define the logistics supplier on the pending
voucher using Logistics Charge Pending Voucher Maintenance (2.15.7).
During vouchering, it is easier to match invoice amounts to pending
vouchers when logistics suppliers are assigned.
Note When you ship items to a customer, you must specify the logistics
supplier or an error is generated.
Internal and External References
Each pending voucher includes an internal reference and, optionally, an
external reference. An internal reference is a code identifying a shipment
or receipt created by the system, such as a receiver number or shipper ID.
An external reference is an identifier supplied by a third-party logistics
supplier, such as a bill of lading number, carrier tracking number, or
packing slip number.
When you are using Logistics Accounting, you can specify these
reference numbers in pop-up frames in some order maintenance
programs.
During vouchering, use internal and external references to help match
invoices from logistics suppliers to pending vouchers.
Logistics Accounting Programs
Table 7.3 lists the programs used in Logistics Accounting.
Table 7.3
Logistics
Accounting
Programs
Menu Number
Description
Program Name
2.15
Logistics Accounting Menu ...
2.15.1
Logistics Charge Code Maintenance
lalcmt.p
2.15.2
Logistics Charge Code Inquiry
lalciq.p
2.15.4
Terms of Trade Maintenance
latotmt.p
2.15.5
Terms of Trade Inquiry
latotiq.p
2.15.7
Log Charge Pending Voucher Maint
lapvomt.p
2.15.13
Inbound Account Maintenance
laiacmt.p
Logistics Accounting
Menu Number
Description
219
Program Name
2.15.14
Inbound Account Inquiry
laiaciq.p
2.15.16
Outbound Accrual Account Maint
laoacrmt.p
2.15.17
Outbound Accrual Account Inquiry
laoacriq.p
2.15.19
Outbound Expense Account Maint
laoexpmt.p
2.15.20
Outbound Expense Account Inquiry
laoexpiq.p
2.15.24
Logistics Accounting Control
lacpm.p
28.21
Logistics Charge Delete/Archive
aplaup.p
28.17.13
Logistics Charge Variance Report
laaprp01.p
28.17.14
Open Logistics Charges Report
laaprp02.p
Note For convenience, the programs for defining and reporting logistics
accounts are also located on the Logistics Charge Account Menu (1.2.21)
with other product line detail accounts.
Modified Programs
When Logistics Accounting is enabled, additional fields and frames
display in the programs listed in Table 7.4. The Inbound/Outbound
column in the table indicates if the program is used for outbound logistics
charges or inbound charges.
Table 7.4
Menu
Number
Description
Logistics Accounting Fields
2.3.1
Supplier Maintenance
Terms of Trade, Logistics
Supplier
Inbound/
Outbound
Inbound
2.20.13
Freight Terms Maintenance
Logistics Charge Code
Outbound
5.3.1
Blanket Order Maintenance
Terms of Trade, Logistics
Supplier
Inbound
5.5.1.13
Scheduled Order Maintenance
Terms of Trade, Logistics
Supplier
Inbound
5.7
Purchase Order Maintenance
Terms of Trade, Logistics
Supplier
Inbound
5.13.14
PO Shipper Maintenance
Carrier Shipment Ref, Logistics Inbound
Supplier
5.13.16
PO Fiscal Receiving
Carrier Shipment Ref, Logistics Inbound
Supplier
7.1.1
Sales Order Maintenance
Logistics Supplier
Outbound
Programs with
Additional Fields
for Logistics
Accounting
220
User Guide — Master Data
Menu
Number
Description
Logistics Accounting Fields
Inbound/
Outbound
7.9.2
Pre-Shipper/Shipper
Workbench
Logistics Supplier
Outbound
7.9.8
Sales Order Shipper
Maintenance
Logistics Supplier
Outbound
7.9.15
Sales Order Shipments
Logistics Supplier, Shipment
ID
Outbound
7.12.1
Sales Quote Maintenance
Logistics Supplier
Outbound
7.13.1
Pending Invoice Maintenance
Logistics Supplier, Shipment
ID
Outbound
11.7.1.1
RMA Maintenance
Logistics Supplier, Shipment
ID
Outbound
11.7.1.13
RMA Receipts
Logistics Supplier, Shipment
ID
Outbound
11.7.1.16
RMA Shipments
Logistics Supplier, Shipment
ID
Outbound
12.17.13
Distribution Order Workbench Freight Data, Logistics Supplier Outbound
12.17.14
Distribution Order
Maintenance
Freight Data, Logistics Supplier Outbound
12.17.21
Distribution Order Processing
Freight Data, Logistics
Supplier, Shipment ID
Outbound
12.17.22
Distribution Order Shipments
Freight Data, Logistics
Supplier, Shipment ID
Outbound
28.1
Voucher Maintenance
Voucher Logistics Charges,
Include Blank Suppliers,
Logistics Charge Code
Both
The programs listed in Table 7.5 perform additional processing when
Logistics Accounting is used. In most cases, no changes to the user
interface are needed; the processing is internal to the program logic. The
discrete shipment programs prompt for a shipment ID. These include
Sales Order Shipments and distribution order and RMA programs that
ship items.
Logistics Accounting
Table 7.5
Menu
No.
Description
Additional Processing
5.2.18
Build PO from Requisitions
Copies terms of trade from supplier
record to new POs; copies logistics
supplier from Logistics Charge Code
Maintenance; calculates tax on logistics
charges
5.3.6
Blanket Order Release to PO
Copies terms of trade and logistics
supplier from blanket orders to released
POs; calculates tax on logistics charges
5.13.1
Purchase Order Receipts
Creates pending vouchers, accrues
logistics charges, and calculates taxes
5.13.7
Purchase Order Returns
Updates GL logistics charge accounts
5.13.13
PO Container Maintenance
Verifies all referenced PO lines have the
same terms of trade as the first PO line
added
5.13.20
PO Shipper Receipt
Creates pending vouchers, accrues
logistics charges, and calculates taxes
5.19
Purchase Order Cost Update
Recalculates costs after terms of trade
codes are changed
7.1.1
Sales Order Maintenance (for
EMT purchase orders)
Generates EMT POs with logistics data;
copies terms of trade from the PO supplier
and copies logistics supplier from
Logistics Charge Code Maintenance;
calculates tax on logistics charges
7.7.1
Container Workbench
7.7.5
SO Container Maintenance
Verifies all referenced sales order lines
have the same freight terms as first SO
line added
7.9.5
Pre-Shipper/Shipper Confirm
Creates pending vouchers, accrues
logistics charges, and calculates tax
7.9.7
Pre-Shipper/Shipper Auto
Confirm
Creates pending vouchers, accrues
logistics charges, and calculates tax
7.9.15
Sales Order Shipments
Creates pending vouchers, accrues
logistics charges, and calculates tax
7.9.21
Shipper Unconfirm
Reverses GL transactions created during
confirmation
7.12.5
Sales Quote Copy from Order
7.12.6
Sales Quote Copy from Quote
Copies logistics data from the source
document to the target document
7.12.10
Sales Quote Release to Order
Programs with
Additional
Processing for
Logistics
Accounting
221
222
User Guide — Master Data
Menu
No.
Description
Additional Processing
11.7.1.1
RMA Maintenance
11.7.1.13
RMA Receipts
Creates pending vouchers, accrues
logistics charges, and calculates tax
11.7.1.16
RMA Shipment
12.17.21
Distribution Order Processing
12.17.22
Distribution Order Shipments
Creates pending vouchers, accrues
logistics charges, and calculates tax
Setting Up Logistics Accounting
Figure 7.2 shows steps for setting up Logistics Accounting. Each step is
discussed in detail in the following sections.
Fig. 7.2
Setting Up
Logistics
Accounting
Set
Setup
upGL
GLaccounts.
accounts.
Define
Definelogistics
logisticscharge
chargecodes.
codes.
Set
Setup
upNRM
NRMsequence
sequence
numbers.
numbers.
Define
Definelogistics
logisticsaccounts
accountsby
by
product
productline
lineand
andsite.
site.
Set
Setup
upthe
thecontrol
controlprogram.
program.
= optional
Setting Up GL Accounts
¶ See User Guide:
Financials A for
information on
setting up
accounts.
You can define default GL accounts, sub-accounts, and cost centers that
are accessed when logistics charges are accrued and vouchered. Separate
sets of accounts can be used to track inbound and outbound logistics
charges. For outbound logistics charges, you can use separate sets of
accounts to track the costs associated with shipments to customers and
shipments to other company locations.
Each logistics charge account is identified by an account code, an optional
sub-account code, and an optional cost center code. Use the functions on
the General Ledger Setup Menu (25.3) to set up GL accounts before
defining default logistics accounts in the Logistics Accounting module.
Logistics Accounting
223
Table 7.6 lists the accounts used by Logistics Accounting. The Type
column indicates how the account is used. The Use column indicates the
transaction that uses the account.
Outbound
Inbound
Table 7.6
Account
Type
Use
Accrual
Liability
PO Receipt, Voucher
Expense
Expense
PO Return
Variance
Expense
Voucher
Sales Order Accrual
Liability
Shipment, Voucher
Sales Order Expense
Expense
Shipment
Sales Order Variance
Expense
Voucher
Distribution Order Accrual
Liability
Shipment, Voucher
Distribution Order Expense
Expense
Shipment
Distribution Order Variance
Expense
Voucher
Logistics Charge
Accounts
Note When Logistics Accounting is used, the Sales Freight Applied and
Sales Freight Accrued accounts defined in Domain/Account Control
(36.1) are not used for logistics charge accrual transactions, unless you
specify the same accounts in Outbound Accrual Account Maint and
Outbound Expense Account Maint.
The following illustrations show the functions that create GL transactions
for logistics charges and the accounts used. In both examples, an invoice
in the amount of $110 is received from the logistics supplier and applied
to the accrued amount.
Figure 7.3 summarizes the GL transactions created and accounts used to
track inbound logistics charges. Inbound logistics charge accruals are
triggered by purchase receipts.
¶ See page 235.
224
User Guide — Master Data
Fig. 7.3
Inbound GL
Transactions
Inbound Logistics Charge Transaction Summary
PO Return
PO Receipt
Inventory
Accrual
100
Expense
100
Inventory
-100
-100
Voucher
Accrual
Variance
Accounts
Payable
10
100
110
Figure 7.4 summarizes the GL transactions created and accounts used to
track outbound logistics charges.
Fig. 7.4
Outbound GL
Transactions
Outbound Logistics Charge Transaction Summary
Shipment
Expense
Return
Accrual
100
Expense
100
Accrual
-100
-100
Voucher
Accrual
100
Variance
10
Accounts
Payable
110
Setting Up NRM Sequence Numbers
¶ See User Guide:
Manager
Functions for
details on
Number Range
Management.
All pending vouchers must have an internal reference number. Before you
can accrue outbound logistics charges, you must set up separate Number
Range Management (NRM) sequence codes used as identifiers for
discrete sales order and distribution order shipments.
The system uses the sequence codes to determine what format to use
when assigning sequential internal reference numbers to discrete
shipments in the following programs:
• Sales Order Shipments (7.9.15)
• RMA Maintenance (11.7.1.1)
• RMA Receipts (11.7.1.13)
• RMA Shipments (11.7.1.16)
Logistics Accounting
225
• Distribution Order Processing (12.17.21)
• Distribution Order Shipments (12.17.22)
Note This step is not required for other types of shipments. For sales
order shippers, the shipper number is used as the internal reference.
Shipper sequence codes are defined in Container/Shipper Control
(7.9.24). When distribution orders use shipper documents, the shipper
number is also used. Inbound logistics charge accruals use receiver or PO
shipper numbers as internal references.
Use Number Range Maintenance (36.2.21.1) to create sequence
parameters for sales order shipments and distribution order shipments.
RMAs use sales order sequences.
Fig. 7.5
Number Range
Maintenance
(36.2.21.1)
Target Dataset. Enter the dataset identifier associated with this
sequence:
• Enter la_so_ship_id for sales order shipments.
• Enter la_do_ship_id for distribution order shipments.
Internal. Enter Yes to have NRM generate sequence numbers
automatically. Enter No to let users supply numbers that are validated
against the NRM sequence.
Setting Up the Control Program
Use Logistics Accounting Control (2.15.24) to:
• Activate the Logistics Accounting module.
• Specify whether pending vouchers must contain a third-party logistics
supplier before they can be selected for vouchering.
• Assign NRM sequence codes to sales order and distribution order
shipments.
226
User Guide — Master Data
• Specify default GL accrual, expense, and variance accounts for
tracking inbound and outbound logistics charges. You can define a
separate set of default outbound accounts for sales order and
distribution order shipments.
If you only want to track inbound logistics charges, you can leave the
Outbound fields blank. If you only want to track outbound logistics
charges, you must first define inbound accounts when Verify GL
Accounts is Yes in Domain/Account Control.
The accounts defined in Logistics Accounting Control are used as the
defaults when you create a logistics charge code in Logistics Charge Code
Maint (2.15.1). Since these are default accounts, none of the static data or
transactions that reference them are changed when these accounts are
modified in Logistics Accounting Control.
Fig. 7.6
Logistics
Accounting Control
(2.15.24)
Use Logistics Accounting. Enter Yes to enable the functionality in the
Logistics Accounting module. When you enable Logistics
Accounting, additional logistics accounting fields are activated in
other modules.
¶ See “Vouchering
Logistics
Charges” on
page 254.
Match Blank Suppliers. When No, only pending vouchers with a
defined logistics supplier display when logistics charges are selected
for vouchering in Voucher Maintenance (28.1). The default is No.
Logistics Accounting
When set to Yes, you can indicate during vouchering whether to
display pending vouchers with blank suppliers using the Include
Blank Suppliers field in Voucher Maintenance.
Accrual Account, Expense Account, Variance Account. Enter the
accounts, sub-accounts, and cost centers used to track inbound
logistics charge accruals, expenses, and variances.
These accounts provide the defaults in Logistics Charge Code Maint
(2.15.1).
Sales Order Shipment Sequence ID. Enter the NRM sequence code
used for sales order shipments. The sequence code must have the
target dataset la_so_ship_id.
Distribution Order Shipment Sequence ID. Enter the NRM sequence
code used for distribution order shipments. The sequence code must
have the target dataset la_do_ship_id.
Sales Order Accrual Account, Expense Account, Variance Account.
Enter the accounts, sub-accounts, and cost centers used to track
outbound logistics charge accruals, expenses, and variances
associated with sales order and RMA shipments.
Distribution Order Accrual Account, Expense Account, Variance
Account. Enter the accounts, sub-accounts, and cost centers used to
track outbound logistics charge accruals, expenses, and variances
associated with distribution order shipments.
The sales order and distribution order accounts provide the defaults in
Logistics Charge Code Maint (2.15.1).
Defining Logistics Charge Codes
Use Logistics Charge Code Maintenance (2.15.1) to define codes for each
logistics charge incurred and payable to a third-party supplier when
purchasing or shipping items. You can also define the accrual, expense,
and variance accounts used to track each logistics charge. These accounts
default from Logistics Accounting Control, but you can change them.
A logistics charge code can be used for inbound charges, outbound
charges, or both. There is nothing to indicate whether a logistics charge
code is used for outbound or inbound purposes. When an inbound and
outbound charge is managed differently, define two separate codes.
227
¶ See “Include
Blank Suppliers”
on page 256.
228
User Guide — Master Data
Inbound Logistics Charges
Inbound logistics charges can include freight, duty, insurance, and so on.
You can indicate whether an inbound logistics charge is taxable and
assign default tax parameters.
¶ See “Creating
Logistics Cost
Elements” on
page 236 for
details on cost
elements.
To accrue inbound logistics charges and include them in the cost of
purchased items, you must associate a separate cost element with each
logistics charge code used for inbound purposes. You cannot assign the
same cost element to more than one logistics charge.
For example, you create a cost element named Freight and assign it to the
Freight logistics charge code. You cannot assign the Freight cost element
to any other logistics charge code. If you want to track different types of
freight, such as domestic and overseas, you must create a cost element for
each logistics charge code.
Outbound Logistics Charges
Outbound logistics charges include the cost of freight only. These are
charges paid to third-party carriers when items are shipped to a customer
or another company location.
You do not need to define tax parameters since outbound freight charges
use the tax parameters from the trailer code associated with the freight
charge on the order or shipment. You can track outbound charges for sales
orders and distribution orders using separate sets of accounts.
Fig. 7.7
Logistics Charge
Code Maint
(2.15.1)
Logistics Charge Code. Enter an 8-character code identifying a
logistics charge. This code can be used for both inbound and
outbound logistics charges.
Logistics Accounting
229
Description. Enter a brief (24 characters) description for this logistics
charge.
Taxable. Indicate whether this logistics charge is taxable. This field
applies when the charge code is used for inbound purposes. Outbound
freight charges use the tax parameters associated with the freight
charge on the order or shipment.
Tax Class. Enter the tax class used for an inbound taxable logistics
charge.
Close Accruals on First Voucher. Enter the default setting for the
Close Line field in the Logistics Charge Matching Maintenance frame
in Voucher Maintenance. You can override the default in Voucher
Maintenance.
¶ See “Close Line”
on page 259.
No: If you might receive multiple invoices for this charge, set this
field to No. For example, a freight charge may include one invoice for
overseas shipping and another for transportation from the dock to
your warehouse.
Yes: If you typically receive a single invoice for this logistics charge,
set this field to Yes.
Logistics Supplier. Optionally enter a default logistics supplier for this
logistics charge.
Apportion Method. Specify the apportioning method used when
invoices for logistics charges are vouchered.
01: Apportion by the accrued value. The total invoice amount is
allocated to individual line items as a ratio of the accrued logistics
charges.
This apportion method is the only one currently provided with the
Logistics Accounting module. If necessary, you can create a Progress
program with your own apportion method logic and specify the code
here.
This field is validated against codes defined in Generalized Codes
Maintenance (36.2.13) for field lc_apportion_method.
¶ See
“Apportioning
Logistics
Charges” on
page 215.
230
User Guide — Master Data
Fig. 7.8
Logistics Charge
Code Maint,
Inbound Frame
¶ See “Creating
Logistics Cost
Elements” on
page 236 for
details.
Cost Element. Optionally enter a cost element to associate with this
logistics charge. The system uses the values in this cost element when
accruing inbound logistics charges for individual items.
Define accrual, expense, and variance accounts for this logistics charge
code. These accounts are used as the defaults when you define detailed
accounts in Inbound Account Maintenance (2.15.13), Outbound Accrual
Account Maintenance (2.15.16), and Outbound Expense Account
Maintenance (2.15.19).
Defining Detailed Logistics Accounts
Although inbound and outbound logistics accounts are defined for each
logistics charge in Logistics Charge Code Maintenance, you may want to
define logistics accounts at a more detailed level.
You can separately track logistics charges by product line at multiple sites
within the same entity. For example, you may want to track logistics
charges for different product lines at different sites using separate
accounts.
Use the following programs to specify GL accrual, expense, and variance
accounts used for inbound and outbound logistics charges by product line,
site, and supplier or customer type:
• Inbound Account Maintenance (2.15.13)
Logistics Accounting
231
• Outbound Accrual Account Maint (2.15.16)
• Outbound Expense Account Maint (2.15.19)
All accounts default from the specified logistics charge code, but you can
change them. For convenience, the same programs are located on the
Logistics Charge Account Menu (1.2.21).
Fig. 7.9
Inbound Account
Maintenance
(2.15.13)
Logistics Charge Code. Enter a logistics charge code previously
defined in Logistics Charge Code Maint.
Product Line. Enter the product line to associate with these accounts.
Site. Optionally enter the site to associate with these accounts. Site
security is enforced. When blank, the user must have access to all
sites in the system. If you enter a supplier type, you must enter a
specific site.
¶ See User Guide:
Manager
Functions for
details about
security.
Supplier Type. Optionally enter a code classifying item suppliers by
type. During PO receipts and returns, the system searches for GL
accounts using the supplier type of the item supplier, not the logistics
supplier.
This field is validated against codes set up in Generalized Codes
Maintenance for field vd_type.
Fig. 7.10
Outbound Accrual
Account Maint
(2.15.16)
232
User Guide — Master Data
Supplier Type. Optionally enter a code classifying suppliers by type.
During shipment processing, the system searches for GL accounts
using the supplier type of the logistics supplier. If you enter a supplier
type, you must enter a specific site.
This field is validated against codes set up in Generalized Codes
Maintenance for field vd_type.
Fig. 7.11
Outbound Expense
Account Maint
(2.15.19)
Customer Type. Optionally enter a code classifying customers by
type. During shipment processing, the system searches for GL
accounts using the type of the order customer.
This field is validated against codes set up in Generalized Codes
Maintenance for field cm_type.
Channel. Optionally enter a code identifying a distribution channel.
This field is validated against codes set up in Generalized Codes
Maintenance for field so_channel.
When searching for GL accounts, the system first looks for a match in the
detail logistics accounts. If no match is found, the accounts entered in
Logistics Charge Code Maint for the logistics charge are used.
When searching for a match in the detail accounts, the system uses the
following hierarchy:
1
Matching logistics charge code, product line, site, and supplier or
customer type
2
Matching charge code, product line, and site with a blank supplier or
customer type
3
Matching charge code and product line
Logistics Accounting
233
Calculating Taxes for Logistics Charges
The system calculates taxes on logistics charges and creates tax detail
records for them, identified with unique tax transaction types.
For inbound charges, the tax status depends on the tax data defined for the
charge in Logistics Charge Code Maintenance. Outbound charges use the
tax parameters associated with the freight charge on the order or
shipment.
For details on calculating taxes with Global Tax Management (GTM), see
the chapters in the GTM section of this book.
The tax point for a logistics charge is based upon the setting of Accrue
Tax at Receipt for applicable tax rate in Tax Rate Maintenance
(2.13.13.1). The value of this field applies to both inbound and outbound
charges.
• For inbound charges, if Accrue Tax at Receipt is Yes, taxes accrue at
receipt. When this field is No, taxes accrue at vouchering.
• For outbound charges, if Accrue Tax at Receipt is Yes, taxes accrue at
shipment. When this field is No, taxes accrue at vouchering.
Taxes on logistics charges are not displayed to the user and do not print on
formal inbound or outbound documents. They can be viewed using Tax
Detail by Transaction Inquiry (2.13.15.2) and Report (2.13.15.3). They
can, however, be viewed and edited during vouchering in Voucher
Maintenance (28.1).
Inbound Tax Calculations
When determining the tax environment for inbound charges, the system
uses the following data:
• The ship-from tax zone of the logistics charge supplier, if available;
otherwise, the tax zone of the purchase order line site
• The ship-to tax zone from the purchase order line site
• The tax class of the logistics charge supplier, if available; otherwise;
the tax class of the purchase order line site
If the system cannot find a tax environment, the default tax environment
from Global Tax Management Control (2.13.24) is used.
¶ See Section 2,
“Global Tax
Management,”
beginning on
page 309.
234
User Guide — Master Data
When determining the tax rate, the system uses:
• The tax class of the logistics charge
• The tax usage of the logistics charge supplier, if available; otherwise,
the tax usage of the purchase order line site
Table 7.7 lists the inbound logistics tax types and the related standard tax
transaction type.
Table 7.7
Inbound Logistics
Tax Types
Function
Standard Tax Type
Logistics Tax Type
Purchase Order Maintenance
20
48
PO Fiscal Receiving
23
26
Purchase Order Receipts
21
27
Blanket Order Maintenance
Blanket Order Release to PO
Build PO from Requisitions
PO Shipper Receipt
Outbound Tax Calculations
The calculation of taxes on outbound logistics charges is similar to the tax
calculation that occurs for the associated order. Unique logistics charge
tax transaction types are used. These tax transaction types can be used to
distinguish the tax on the freight accrual from the standard transaction
tax.
Table 7.8 lists the outbound logistics tax types and the related standard tax
transaction type. Distribution orders do not have a standard tax type since
unless you are using Logistics Accounting, taxes are not calculated.
Table 7.8
Outbound Logistics
Tax Types
Function
Standard Tax
Type
Logistics Tax Type
Sales Quote Maintenance
10
40
Sales Order Maintenance
11
41
Sales Order Maintenance (when generating an
EMT PO)
20
48
Distribution Order Maintenance
N/A
42
Logistics Accounting
Function
Standard Tax
Type
Logistics Tax Type
Sales Order Shipments
13
43
SO Shipper Maintenance
14
44
DO Shipment
N/A
45
RMA Maintenance
36
46
Pending Invoice Maintenance (when shipping)
Shipper Confirm
Shipper Unconfirm
RMA Maintenance (when shipping or receiving)
RMA Shipments
RMA Receipts
Accrual Currency
The system determines the accrual currency for inbound and outbound
logistics charges as follows:
• For inbound charges, the system always uses the base currency.
• For outbound charges, the system uses the order (freight list) currency
and the logistics supplier currency to determine the accrual currency:
• When the order currency and logistics supplier currency are the
same, the system uses the order currency for logistics accruals.
• Otherwise, the system uses the base currency.
Accruing Inbound Logistics Charges
After you have defined inbound accrual, expense, and variance accounts
and assigned them to logistics charges codes, you can begin the accrual
process. Inbound logistics charges accrue during PO receipts.
235
236
User Guide — Master Data
Fig. 7.12
Inbound Accrual
Work Flow
Create
Createcost
costelements
elementsfor
for
logistics
logisticscharges.
charges.
Assign
Assignterms
termsofoftrade
tradetotoitem
item
suppliers.
suppliers.
Update
Updateitem
itemcosts
costswith
with
logistics
logisticscharges.
charges.
Create
Createpurchase
purchaseorders.
orders.
Define
Defineterms
termsofoftrade.
trade.
Receive
ReceivePO
POline
lineitems.
items.
Creating Logistics Cost Elements
¶ See User Guide:
Financials A for
more information
on cost elements
and product
costing.
Use Cost Element Maintenance (30.17.1) to set up separate cost elements
for logistics charges in the GL cost sets assigned to sites that receive
purchased items. The cost elements must be in the Material or Overhead
cost category.
Create a cost element for each logistics charge you want to accrue. For
example, you could create separate cost elements for domestic freight and
overseas freight, or create only one cost element for freight. Associate
logistics cost elements with individual logistics charge codes in Logistics
Charge Code Maintenance (2.15.1).
In the corresponding current cost sets, add the same logistics cost
elements in the same cost category only when Costing Method is set to
Last in Cost Set Maintenance (30.1). When the last cost method is used,
the system can update current logistics costs when pending vouchers are
closed in Voucher Maintenance (28.1). When the costing method is
Average or None, logistics costs are not updated in the current cost set.
Note Whether vouchering updates costs depends on the setting of
Current Cost from AP in Inventory Control (3.24). When this is Yes,
Voucher Maintenance updates the logistics charge cost element in the
current cost set associated with PO line items. Otherwise, the cost update
does not occur.
Logistics Accounting
Updating Item Costs
Use Item-Element Cost Maintenance (30.17.5), Item Cost Maintenance
(1.4.9), Item-Site Cost Maintenance (1.4.18), or Item Master Maintenance
(1.4.1) to add logistics cost elements associated with logistics charges to
purchased items in the GL cost set and enter this-level logistics costs for
those items. You must enter GL cost values in order to accrue logistics
charges during purchase receipts.
Add the same cost elements to the current cost set when the last cost
method is used for current costs. The value of the current cost will be
updated when logistics charges are vouchered if Current Cost from AP is
Yes in Inventory Control.
Defining Terms of Trade
Terms of trade define both the logistics charges associated with
purchasing items from external suppliers and the party responsible for
paying each. These trade terms are specific to the purchase of items and
define the obligations of the customer and seller for the delivery of goods.
Terms of trade are also referred to as Inco Terms. Inco Terms are defined
by the International Chamber of Commerce and used in international
contracts.
Terms of trade only apply to the logistics charges associated with the
delivery of goods, not the terms of payment for those logistics charges.
Define payment terms in Credit Terms Maintenance (2.19.1).
During purchase receipts, the system determines which logistics charges
to accrue based on the terms of trade assigned to the purchase order.
When the receiving site is responsible for a logistics charge payment, the
logistics charge is accrued since the charge is payable to a third-party
logistics supplier, not the item supplier. Logistics charges are not accrued
when they are the responsibility of the item supplier.
Use Terms of Trade Maintenance (2.15.4) to define each logistics charge
associated with a purchase and indicate whether you (the customer) or the
item supplier is responsible for the logistics charge payment.
Each terms-of-trade record can include all of the logistics charges
associated with a purchase, with the responsible party assigned to each
logistics charge.
237
238
User Guide — Master Data
Fig. 7.13
Terms of Trade
Maintenance
(2.15.4)
Terms of Trade. Enter an 8-character code identifying the terms of
trade.
Description. Enter a brief (24 characters) description for the terms of
trade.
Charge. Enter a logistics charge code to include in these terms of
trade.
Description. This field displays the description defined in Logistics
Charge Code Maint.
Responsibility. Assign the party responsible for paying the logistics
charge.
Customer: The site receiving PO line items is responsible for the
logistics charge payment. This charge is accrued during purchase
receipts when Logistics Accounting is active.
Supplier: The item supplier is responsible for paying this logistics
charge. No accrual takes place.
Assigning Terms of Trade to Suppliers
¶ See “Setting Up
Supplier
Addresses” on
page 192.
Assign default terms of trade to applicable item suppliers in Supplier
Maintenance (2.3.1). The default terms of trade are used when the
supplier is entered on the order header of a purchase order, blanket order,
or supplier scheduled order.
Logistics Accounting
239
Note When a PO is created automatically from requisitions in Build PO
from Requisitions (5.2.18) or from an EMT order during sales order
processing in Sales Order Maintenance (7.1.1), the default terms of trade
assigned to the item supplier are used. When default terms of trade are not
found, logistics charges do not accrue for these orders.
Fig. 7.14
Supplier
Maintenance,
Logistics
Accounting Data
Terms of Trade. Enter the default terms of trade for this supplier.
Processing Purchase Orders
When you create an order in Purchase Order Maintenance (5.7), Blanket
Order Maintenance (5.3.1), or Scheduled Order Maintenance (5.5.1.13),
you can specify the terms of trade. The same logistics accounting frames
and fields are used in all three programs.
¶ See User Guide:
Distribution A for
details on
purchase orders.
The system automatically copies terms of trade to the PO when orders are
created by releasing a blanket order using Blanket Order Release to PO
(5.3.6)
Note When you use Build PO from Requisitions (5.2.18) to create a PO,
the default terms of trade assigned to the item supplier are used. When
default terms of trade are not found, logistics charges do not accrue for
these orders.
After you enter the terms-of-trade code, you can optionally display the
terms-of-trade detail lines and assign a logistics supplier to each charge
that is your (customer) responsibility. Logistics charges that are the
responsibility of the item supplier do not display.
¶ See “Assigning
Terms of Trade to
Suppliers” on
page 238.
240
User Guide — Master Data
Fig. 7.15
Purchase Order
Maintenance,
Logistics
Accounting Data
Frame
Terms of Trade. Enter the terms-of-trade code used to accrue logistics
charges for this order. This field defaults from the terms-of-trade code
associated with the supplier in Supplier Maintenance. When this field
is blank, logistics charges do not accrue for this order.
Show Detail. Enter Yes to display details for the specified terms of
trade.
Fig. 7.16
Logistics
Accounting Detail
Frame
Log Supplier. Enter the supplier of the selected logistics charge.
After you enter a PO line item, the system recalculates the PO line item
unit cost to exclude logistics costs that are your responsibility, since they
are not payable to the item supplier, except when one of the following is
true:
¶ See “Using List/
Discount Table
Pricing” on
page 88.
• A price list with an amount type of L (list) is attached to the PO. The
¶ See “Customer
and Supplier
Items” on
page 23.
• A supplier quote price is available. The PO line item unit cost defaults
system uses the list price from the price table. Price lists are defined
in Price List Maintenance (1.10.2.1).
from the supplier quote price defined in Supplier Item Maintenance
(1.19) for the item and supplier.
Logistics Accounting
241
Otherwise, the system checks the GL cost set for any cost element in the
Material category for that line item. If a cost element is linked to a
logistics charge code belonging to the PO terms of trade and the charge is
your responsibility, the value of the cost element is excluded from the PO
unit cost.
If you change the terms of trade or assign a different code to the PO, the
system does not recalculate unit costs for existing line items. You can
manually update the PO unit cost of each line item or use Purchase Order
Cost Update (5.19) to automatically recalculate and update the unit costs.
Example Table 7.9 shows how the unit cost of an item on a PO line is
calculated when price lists are applied. In this example, the PO line item
has a Material cost element with a value of $10 and a Freight cost element
in the Material cost category with a value of $1 in the GL cost set. The PO
terms of trade indicate that the customer is responsible for freight.
Table 7.9
Price
List
Amount Type
Price List
Value
PO Net Unit
PO Unit Cost PO Discount Cost
PL1
L (list)
$11.50
$11.50
0.0%
$11.50
PL2
D (discount)
5.0%
$10.00
5.0%
$9.50
PL3
P (price)
$6.66
$10.00
33.4%
$6.66
PL4
M (markup)
7.5%
$10.00
-7.5%
$10.75
When PL1 is used, the system uses the list price. When PL2, PL3, or PL4
are used, the system subtracts the value of the Freight cost element from
the PO unit cost. If Logistics Accounting is not enabled, the PO unit cost
is $11.
PO Shippers
When you use PO Shipper Maintenance (5.13.14) or PO Fiscal Receiving
(5.13.16) to record PO line items and quantities listed on formal shipping
documents or packing lists, the system prompts for additional logistics
accounting information.
PO Unit Cost
Calculations with
Price Lists Applied
242
User Guide — Master Data
Fig. 7.17
PO Shipper
Maintenance
(5.13.14)
Carrier Shipment Ref. Enter the shipment reference number from the
carrier, such as a bill of lading number, carrier tracking number, or
packing slip number. The shipment reference is used during
vouchering to help match pending vouchers to invoices from logistics
suppliers.
When terms of trade are assigned to POs attached to the shipper, each PO
line must have the same terms-of-trade code assigned; otherwise, an error
displays. The terms-of-trade code assigned to the first PO line is applied
to the entire shipper or container.
After you finish entering line items, the terms-of-trade details display.
You can specify a supplier for each logistics charge that is your
responsibility.
Fig. 7.18
PO Shipper
Maintenance,
Logistics
Accounting Detail
Frame
Log Supplier. Enter the third-party supplier for this logistics charge.
Logistics Accounting
Processing Purchase Receipts
During purchase receipt processing in Purchase Order Receipts (5.13.1)
or PO Shipper Receipt (5.13.20), a pending voucher record is created for
each logistics charge associated with a purchase receipt that is your
responsibility.
Note PO Fiscal Receiving (5.13.16) does not perform a PO receipt or
create pending vouchers. After using this program to set up a shipper, you
must use PO Shipper Receipt to actually receive the items on the shipper.
Receiving PO line items:
• Creates pending vouchers for logistics charges
• Creates GL transactions for the logistics charge accrual amounts
• Calculates tax on logistics charges
When a pending voucher is created in Purchase Order Receipts, the
receiver number is used as the internal reference and the packing slip
number is used as the external reference. Pending vouchers created in PO
Shipper Receipt use the shipper number as the internal reference and the
carrier shipment reference from the PO shipper as the external reference.
For each PO line received into inventory, the system checks each cost
element for that line item in the Material or Overhead category in the GL
cost set. If the cost element is linked to a logistics charge code belonging
to the PO terms of trade and the charge is your responsibility, a pending
voucher is automatically created for that logistics charge.
The logistics charge accrual value is calculated as follows:
Accrual Value = PO line receipt quantity * logistics charge cost element value
Note Only one pending voucher is created for each logistics charge
associated with a purchase receipt. When the same logistics charge is
linked to another line item cost element, a detail line is added to the
pending voucher for that logistics charge and the accrual value is updated.
For example, if a shipper contains 5 POs and each PO contains 10 line
items that are each subject to freight and duty charges, PO Shipper
Receipt creates two pending vouchers—one for freight and one for duty.
Each pending voucher will contain 50 detail lines.
243
244
User Guide — Master Data
GL Effects
In addition to the GL transactions created during PO receipt for item
material cost, the following GL transactions are created for each PO line
received with an associated logistics charge:
• Debit Inventory for the PO line logistics charge accrual value.
• Credit the inbound Accrual account for the logistics charge, product
line, site, and supplier type for the same amount.
For example, a PO line item with a freight cost of $1 per item is received
in a quantity of 50. Inventory is debited $50 and the inbound accrual
account associated with the freight logistics charge is credited $50.
Note The system always uses the base currency as the accrual currency
for inbound logistics charges.
If the tax code associated with a logistics charge has Accrue Tax at
Receipt set to Yes in Tax Rate Maintenance (2.13.13.1), the system
creates the following GL transactions:
• Debit AP Tax Recoverable for the logistics charge tax accrual
amount.
• Debit the inbound Variance account for the logistics charge tax
variance amount.
• Credit the inbound Accrual account for the tax accrual and tax
variance amounts.
The tax accrual and tax variance values are calculated as follows:
Tax Accrual = PO line receipt qty * logistics charge cost element value * tax
rate * percent recoverable
Tax Variance = PO line receipt qty * logistics charge cost element value * tax
rate * (1 - percent recoverable)
Purchase Order Returns
When a PO line item is returned for credit or replacement, the system
does not reverse the original accrued value of the logistics charges. This is
because some logistics charges, like freight or insurance, could be
payable to a third-party supplier regardless of whether the items are
returned.
Logistics Accounting
245
When PO line items with associated logistics charges are returned using
Purchase Order Returns (5.13.7), the system creates the following GL
transactions:
• Debit the inbound Expense account for the accrual value.
• Credit Inventory for the same amount.
Important Do not return items with associated logistics charges by
entering negative numbers in Purchase Order Maintenance. You must use
Purchase Order Returns to post the correct GL transactions to update the
logistics charge accounts.
Accruing Outbound Logistics Charges
After you have defined outbound accrual, expense, and variance accounts
and assigned them to logistics charges, you can begin the accrual process
for outbound logistics charges. Outbound logistics charges accrue during
shipments.
Fig. 7.19
Update
Updatefreight
freightterms.
terms.
Outbound Accrual
Work Flow
Process
Processorders.
orders.
Process
Processshipments.
shipments.
Updating Freight Terms
Assign a logistics charge to each freight term with an accrual level in
Freight Terms Maintenance (2.20.13). The system uses the type code to
determine whether freight charges are accrued and, if so, at what level—
at the order line or for the entire shipment.
¶ See “Setting Up
Freight Charges”
on page 206 for
details on freight
terms.
246
User Guide — Master Data
The level of accrual is determined as follows:
• No Accrual. When Type is 4 (Collect) or 6 (Will Call), logistics
charges do not accrue. A logistics charge cannot be assigned to either
of these freight terms.
• Accrue by Shipment. When Type is 1 (Add) or 2 (Allow), logistics
charges are accrued for the entire shipment. Calculated freight
amounts are tracked using the outbound accrual and expense accounts
defined for the logistics charge code in Logistics Charge Code Maint
(2.15.1).
• Accrue by Line. When Type is 3 (Prepaid) or 5 (Include), logistics
charges are accrued for each order line item. Calculated freight
amounts are tracked using the accrual and expense accounts defined
for the logistics charge code in Outbound Accrual Account Maint
(2.15.16) and Outbound Expense Account Maint (2.15.19). If detail
accounts are not defined in these programs, the system uses the
outbound accrual and expense accounts defined for the logistics
charge code in Logistics Charge Code Maint.
When logistics charges are accrued by shipment or by order line, you
must assign the logistics charge code used to track the logistics charges
incurred and payable to a third-party carrier.
Fig. 7.20
Freight Terms
Maintenance
(2.20.13)
Value is based
on current
freight term
type.
Logistics Charge Code. Enter a code identifying a logistics charge.
When Type is set to 4 (Collect) or 6 (Will Call), logistics charges are
not accrued. The lower frame displays but cannot be updated.
Processing Orders
During order maintenance, the logistics charge code associated with the
freight term and the default supplier, if any, are displayed. The logistics
supplier can be changed.
Logistics Accounting
247
The same logistics accounting frames and fields are used in the following
programs and their related shipping programs:
• Sales Order Maintenance (7.1.1)
• Sales Quote Maintenance (7.12.1)
• Pending Invoice Maintenance (7.13.1)
¶ See User Guide:
Distribution for
more information
on sales orders.
• RMA Maintenance (11.7.1.1)
• Distribution Order Workbench (12.17.13)
• Distribution Order Maintenance (12.17.14) and Distribution Order
Processing (12.17.21)
After you have finished entering order line items, the logistics accounting
detail frame displays when:
• Logistics Accounting is enabled.
• A freight terms code is specified on the order header.
• The freight terms code indicates an accrual level of shipment or line.
• A freight list is specified on at least one order line.
Fig. 7.21
Sales Order
Maintenance,
Logistics
Accounting Detail
Frame
Log Supplier. Enter an address code identifying the freight carrier
responsible for transporting this order.
This field cannot be blank. If necessary, you can change the supplier
during shipment processing.
When logistics data exists on a sales quote or order, this data is included
by the following copy and release functions:
• Sales Quote Copy from Order (7.12.5)
• Sales Quote Copy from Quote (7.12.6)
• Sales Quote Release to Order (7.12.10)
248
User Guide — Master Data
Distribution Orders
When Logistics Accounting is not active, you cannot associate freight
data with distribution orders. When Logistics Accounting is active, you
can specify freight terms and lists in an additional frame.
Figure 7.22 illustrates the frame that displays for input of freight data in
Distribution Order Maintenance (12.17.14).
Fig. 7.22
Distribution Order
Maintenance,
Freight Data
These fields are similar to the freight fields that display in Sales Order
Maintenance. When you set Display Weights to Yes, the system displays a
freight frame for each line item. In this frame, you can override the
Freight Class and Freight Ship Weight that defaults from the item master.
The freight terms code determines whether you are prompted for a
logistics supplier. In distribution orders, only some freight term types
have significance. Since freight terms only apply to distribution orders
when freight accrual is involved, type 4 (Collect) or type 6 (WillCall)
have no meaning. Type 5 (include) also has no meaning for DOs since no
item pricing is involved.
When using Logistics Accounting in distribution orders, select one of the
following freight term types:
• 1 (ADD): Freight is calculated and accrued by shipment.
• 2 (ALLOW): Freight is calculated and a negative amount is accrued
by shipment.
• 3 (PREPAID): Freight is calculated and accrued by line.
Logistics Accounting
Customer Scheduled Orders
Logistics charges accrue on customer scheduled orders only when the
ship-to customer in Scheduled Order Maintenance (7.3.13) has a default
freight list and freight terms code defined in Customer Maintenance
(2.1.1). Charges accrue when the default freight terms indicate an accrual
level of shipment or line.
Shippers
When you use Container Workbench (7.7.1) or SO Container
Maintenance (7.7.5) to create containers, the first sales order line item
sets the freight terms for the entire container. The system verifies that
items added from other order lines have the same freight terms as the first
order line added.
These containers are then referenced on shippers using Sales Order
Shipper Maintenance (7.9.8) or Pre-Shipper/Shipper Workbench (7.9.2).
When you select sales order items for shipment, you can update the
logistics supplier associated with the attached sales order in the Logistics
Accounting Detail frame shown in Figure 7.21.
Each sales order attached to the shipper or container on a shipper must use
the same freight terms; otherwise an error displays. The freight terms
code assigned to the first sales order line is applied to the entire shipper.
Note You can combine sales order lines with and without freight lists on
the same shipper or container.
Processing Shipments
When you process a shipment, the logistics charge code and the logistics
supplier are displayed. The supplier can be updated if necessary. Before
logistics charges can be accrued during the shipment process, a logistics
charge code, logistics supplier, and shipment identifier must be defined.
Processing shipments:
• Creates pending vouchers for logistics charges
• Creates GL transactions for the logistics charge accrual amounts
• Calculates tax on logistics charges
249
250
User Guide — Master Data
¶ See “Updating
Freight Terms”
on page 245.
The system uses the freight terms assigned to an order to determine
whether an accrual is created for each order line or the entire shipment.
¶ See “Setting Up
Freight Charges”
on page 206.
The system calculates freight charges based on the order, customer or
ship-to site information, and freight information entered in the programs
on the Freight Charges menu.
Note Only one pending voucher is created for each shipment or shipper.
When logistics charges are accrued by order line, detail lines are added to
the pending voucher and the accrual value is updated.
Discrete Shipments
Processing a discrete shipment in any of the following programs creates a
pending voucher when the freight terms assigned to the order or line
indicate an accrual level of shipment and a freight list is specified on at
least one order line:
• Sales Order Shipments (7.9.15)
• Pending Invoice Maintenance (7.13.1)
• Distribution Order Processing (12.17.21) or Shipments (12.17.22)
Tip
You can ship and
receive from RMA
Maintenance.
• RMA Maintenance (11.7.1.1), Shipments (11.7.1.16), or Receipts
(11.7.1.13)
When Logistics Accounting is active, additional frames and fields
display. The same frames and fields that display in Sales Order Shipments
also display in the other programs.
Fig. 7.23
Sales Order
Shipments,
Logistics
Accounting Detail
Log Supplier. This field defaults from the logistics supplier specified
on the order, but you can change it.
Logistics Accounting
251
Fig. 7.24
Sales Order
Shipments,
Shipment ID
Shipment ID. If the NRM sequence code specified in Logistics
Accounting Control is an internal sequence, leave this field blank to
have the system assign a number. Otherwise, enter a sequence
number. The system validates it against the Sales Order Shipment
Sequence ID specified in Logistics Accounting Control.
When a pending voucher is created in discrete shipment programs, the
shipment ID number is used as the internal reference and the bill of lading
(BOL) number is used as the external reference.
Note If you have set up shipping groups and inventory movement codes,
you can create formal shipping documents in distribution order shipping
functions. In this case, you are not prompted for a shipment ID; the
shipper number is used instead.
Shippers
During the confirmation process in Pre-Shipper/Shipper Confirm (7.9.5)
or Pre-Shipper/Shipper Auto Confirm (7.9.7), a pending voucher is
created and freight charges accrued based on the freight terms assigned to
the first sales order attached to the shipper.
Each sales order attached to the shipper must have the same freight terms
code; otherwise, an error displays.
Pending vouchers created during confirmation use the shipper number as
the internal reference and the carrier shipment reference from the shipper
as the external reference.
Unconfirming a shipper in Shipper Unconfirm (7.9.21) reverses the
freight accrual created during confirmation.
¶ See “Sales Order
Shipment
Sequence ID” on
page 227.
252
User Guide — Master Data
Return Material Authorizations (RMAs)
¶ See User Guide:
Service/Support
Management B
for details on
RMAs.
RMAs are limited to the receipt of items returned by customers and the
issue of replacement items. In RMA Maintenance (11.7.1.1), you can
receive items returned by a customer as well as ship replacement items
back to the customer. RMA Maintenance performs the functions of both
RMA Receipts (11.7.1.13) and RMA Shipments (11.7.1.16).
In all three programs, you can define the logistics supplier and enter a
shipment ID used as the internal reference when a pending voucher is
created. Since RMAs are similar to sales orders, the logistics accounting
fields and processing are the same as Sales Order Maintenance and Sales
Order Shipments.
GL Effects
During shipment, the system creates a GL transaction for the entire
shipment or for each line, depending on the freight terms.
A sales order shipment creates the following GL transactions:
• Debit the Sales Order Expense account for the logistics charge,
product line, site, customer type, and channel.
• Credit Sales Order Accrual for the logistics charge, product line, site,
and supplier type.
A distribution order shipment creates the following GL transactions:
• Debit the Distribution Order Expense account for the logistics charge,
product line, site, customer type, and channel.
• Credit the Distribution Order Accrual account for the logistics charge,
product line, site, and supplier type.
Accrual Currency
For outbound logistics charges, the system uses the order (freight list) and
logistics supplier currencies to determine the accrual currency.
• If the order currency is the same as the logistics supplier currency,
that currency is used for accruals.
• Otherwise, the system uses the base currency for accruals.
Logistics Accounting
253
Updating Pending Vouchers
Use Logistics Charge Pending Voucher Maint (2.15.7) to update a
logistics supplier on an open pending voucher. You cannot update
pending vouchers closed during vouchering in Voucher Maintenance
(28.1). For convenience, Logistics Charge Pending Voucher Maint is also
located on the Accounts Payable menu as 28.12.
Although you can match invoice amounts from logistics suppliers to
pending vouchers with blank suppliers in Voucher Maintenance (based on
the control setting), it is easier to match pending vouchers when logistics
suppliers are assigned.
When you receive more than one invoice for the same logistics charge,
you can enter the supplier from the first invoice and voucher the amount,
then change the supplier on the pending voucher before vouchering the
second invoice.
Example A single pending voucher is created for freight and you receive
two invoices, one from a shipping agent for transporting the goods to a
local port and another from a local carrier for transporting the goods from
the dock to your company warehouse.
Fig. 7.25
Logistics Charge
Pending Voucher
Maintenance
(2.15.7)
Pending Voucher ID. Enter a number identifying a pending voucher.
Supplier. Enter a logistics supplier. Entering a supplier does not
update the original order.
No other fields can be updated in this program.
254
User Guide — Master Data
Table 7.10 shows the sources for the internal and external reference fields
when pending vouchers are created for logistics charges.
Table 7.10
Internal and
External Reference
Sources
Program
Internal Reference
External Reference
Purchase Order Receipts (5.13.1)
Receiver Number
Packing Slip Number
PO Shipper Receipt (5.13.20)
Shipper Number
Carrier Shipment Ref
Pre-Shipper/Shipper Confirm (7.9.5)
Shipper Number
Carrier Shipment Ref
Pre-Shipper/Shipper Auto Confirm
(7.9.7)
Shipper Number
Carrier Shipment Ref
Sales Order Shipments (7.9.15)
Shipment ID
Bill of Lading
Pending Invoice Maintenance (7.13.1)
Shipment ID
Bill of Lading
RMA Maintenance (11.7.1.1)
RMA Receipts (11.7.1.13)
RMA Shipments (11.7.1.16)
Shipment ID
Bill of Lading
Distribution Order Processing (12.17.21) Shipment ID
Distribution Order Shipments (12.17.22)
Bill of Lading
Distribution Order Processing and
Shipments with shipping groups
Carrier Shipment Ref
Shipper Number
Vouchering Logistics Charges
¶ See User Guide:
Financials A for
details on
Voucher
Maintenance.
When invoices arrive from logistics suppliers, use Voucher Maintenance
(28.1) to match the accruals on pending vouchers to the logistics supplier
invoice for payment.
Voucher Maintenance
When Logistics Accounting is enabled, Figure 7.26 shows the two
additional processing paths added to Voucher Maintenance for
vouchering logistics charges.
Logistics Accounting
255
Fig. 7.26
Voucher
Maintenance
Transaction Flow
Voucher
Voucher
Header
Header
PO Number not entered
Voucher Logistics Charges = Yes
PO Number entered
Auto Select = Yes
Auto Select = No
PO No. not entered
Voucher Logistics
Charges = No
Auto Select = No
Auto Select = Yes
Logistics
Logistics
Charge
Charge
Auto
AutoSelect
Select
Receiver
Receiver
Auto
AutoSelect
Select
Receiver
Receiver
Selection
Selection
Maintenance
Maintenance
Receiver
Receiver
Matching
Matching
Detail
Detail
Voucher
Voucher
Distribution
Distribution
Logistics
Logistics
Charge
Charge
Matching
MatchingDetail
Detail
Logistics
Logistics
Charge
Charge
Selection
Selection
Maintenance
Maintenance
Open
Open
Receivers
Receivers
Receiver
Receiver
Matching
Matching
Maintenance
Maintenance
Voucher
Voucher
Trailer
Trailer
Logistics
Logistics
Charge
Charge
Matching
Matching
Maintenance
Maintenance
Logistics
Logistics Detail
Detail
Matching
Matching
Maintenance
Maintenance
= standard functionality
= Logistics Accounting enabled
Voucher Header Frame
To process vouchers for logistics charges, do not reference purchase
orders in the header frame. You must enter a supplier code for the
logistics supplier and set Voucher Logistics Charges to Yes.
Fig. 7.27
Voucher
Maintenance (28.1)
Leave Order
blank.
Enter logistics
supplier.
Set Voucher
Logistics
Charges to
Yes.
256
User Guide — Master Data
Voucher Logistics Charges. Enter Yes to voucher logistics charges.
Enter No to voucher expenses.
¶ See “Setting Up
the Control
Program” on
page 225.
Include Blank Suppliers. When Match Blank Suppliers is Yes in
Logistics Accounting Control, you can indicate whether to display
pending vouchers with blank supplier fields for selection. Otherwise,
only pending vouchers for the specified supplier are displayed. When
Match Blank Suppliers is No, this field is not available.
Auto Select. Indicate whether you want to define selection criteria for
retrieving pending vouchers.
Automatic Selection Frame
When Auto Select is Yes, the Automatic Selection frame illustrated in
Figure 7.28 displays. You can select multiple open pending vouchers for
vouchering.
The same frame is used when receivers are selected for vouchering. When
vouchering logistics charges, the Item Number, Buyer, and Approved By
fields are not available since they do not apply to logistics charges.
Fig. 7.28
Voucher
Maintenance,
Automatic
Selection
¶ See “Internal and
External
References” on
page 218.
Select pending vouchers to process by ranges of dates, external and
internal reference numbers, order number, ship-from, and ship-to codes.
Voucher Open Qty/Amt. If Yes, Invoice Amt defaults to the open
amount on the selected pending voucher in the Logistics Charge
Matching Detail frame. If No, Invoice Amt is zero.
Logistics Accounting
257
Select All. If Yes, all retrieved pending vouchers are marked with an
asterisk (*), indicating selection, on the next screen. If No, the
retrieved pending vouchers are not selected. In both cases, you can
manually override the default selection from the Logistics Charge
Selection Maintenance frame.
Logistics Charge Code. Enter a logistics charge code to select
associated pending vouchers that match the other selection criteria.
Leave blank to select all pending vouchers.
Press Go to retrieve all pending vouchers that meet the specified criteria
and continue the selection process.
Logistics Charge Selection Maintenance Frame
The Logistics Charge Selection Maintenance frame displays the pending
vouchers matching the selection criteria. If you specified Yes to Select
All, an asterisk (*) appears next to each pending voucher in the Sel
column.
Fig. 7.29
Total
Every time you select or deselect a pending voucher, the system
automatically updates the total of currently selected pending vouchers.
The total appears in the upper right corner of the screen.
Press Go to process the selected pending vouchers and move to the next
frame.
Voucher
Maintenance,
Logistics Charge
Selection
Maintenance
258
User Guide — Master Data
Logistics Charge Matching Detail Frame
Logistics Charge Matching Detail consists of two frames. When you
access this screen after going through Logistics Charge Selection
Maintenance, the top frame displays selected pending vouchers.
Otherwise, you must add pending vouchers manually.
Fig. 7.30
Voucher
Maintenance,
Logistics Charge
Matching Detail
Determines if
this line is
closed.
The pending voucher is not closed until you close each pending voucher
line. Any potential variance amount is displayed. This amount will be
booked if you close the associated line.
Closing pending vouchers for logistics charges does not happen
automatically like it does for receivers when you voucher the remaining
open quantity on the receiver. There are two scenarios where the system
automatically closes a pending voucher for logistics charges:
• If the logistics charge has been defined with Close Accruals on First
Voucher set to Yes, the Close Line field in Voucher Maintenance
defaults to Yes also. If you do not change this setting, the pending
voucher is closed automatically by the system when the voucher
amount equals the remaining open amount.
• If you choose the Auto Select option and set Voucher Open Qty/Amt
to Yes, the system automatically closes the selected pending vouchers
unless you change the Close Line field to No.
Use the fields in Logistics Charge Matching Maintenance to maintain
invoice amounts, display details, and close pending vouchers shown in
Logistics Charge Matching Detail.
Logistics Accounting
259
Invoice Amt. Enter the invoice amount from the logistics supplier.
This field defaults to the open amount on the pending voucher if
Voucher Open Qty/Amt was set to Yes.
Details. If Yes, a frame displays the pending voucher order line
information and the accrued and applied amounts. You can update the
applied amounts for individual order lines.
Close Line. Indicate whether vouchering is complete for this logistics
charge. This field defaults from Close Accruals on First Voucher in
Logistics Charge Code Maintenance for this logistics charge, but you
can change it.
Note If you need to reopen a closed pending voucher, you can change
Close Line to No. Any variance previously recorded is reversed. You
cannot open a closed pending voucher that has been paid.
Fig. 7.31
Voucher
Maintenance,
Details
Applied Amount. This field lets you change the amount applied from
the total invoice amount to individual order lines. The sum of the
applied amounts for each order line must equal the invoice amount.
The amounts for each line are calculated based on the apportion
method defined for the charge in Logistics Charge Code
Maintenance.
GL Effects
When you indicate that vouchering is complete against a logistics charge
by setting Close Line to Yes, the system calculates the variance, if any, as
the difference between the invoice amount and the accrued amount less
¶ See
“Apportioning
Logistics
Charges” on
page 215.
260
User Guide — Master Data
the vouchered amount. Any difference is posted to the variance account
for the logistics charge. Variances are calculated but not recorded when
Close Line is No.
A voucher to a logistics supplier for logistics charges accrued during a
purchase receipt creates the following GL transactions:
• Debit the inbound Accrual account for the logistics charge, product
line, site, and supplier type.
• Credit Accounts Payable for the logistics supplier.
A voucher to a logistics supplier for shipments to customers creates the
following GL transactions:
• Debit the Sales Order Accrual account for the logistics charge,
product line, site, and supplier type.
• Credit Accounts Payable for the logistics supplier.
A voucher to a logistics supplier for shipments to other company
locations creates the following GL transaction:
• Debit the Distribution Order Accrual account for the logistics charge,
product line, site, and supplier type.
• Credit Accounts Payable for the logistics supplier.
¶ See User Guide:
Financials A for
details on
intercompany
accounts.
When the shipping and receiving sites are in different entities or
databases, the system automatically generates the appropriate balancing
entries in the GL for each site using the Intercompany debit and credit
accounts defined in Entity Code Maintenance (25.3.1.1).
Deleting and Archiving Logistics Charges
The system keeps all of your unvouchered pending vouchers online for an
unlimited time. There is no automatic purge of this information at period
or year end. To delete pending vouchers for logistics charges that have not
been, or are not expected to be, vouchered, use Uninvoiced Logistics
Charge Delete/Archive (28.21).
First, run the program without actually deleting any records by setting
Delete to No. Review the resulting report before setting Delete to Yes;
then run the program again to delete the pending vouchers that match the
Logistics Accounting
261
selection criteria. When Archive is Yes, the system copies the selected
records to an ASCII file that can be reloaded using Archive File Reload
(36.16.5).
Generating Logistics Reports
Table 7.11 lists logistics accounting reports and inquiries with a brief
description of their purpose.
Table 7.11
Report
Description
Logistics Charge Code Inquiry
(2.15.2)
Displays details for individual logistics charge codes.
Terms of Trade Inquiry (2.15.5) Displays the logistics charge codes and
responsibilities associated with a terms-of-trade
code.
Inbound Account Inquiry
(2.15.14)
Displays account, sub-account, and cost center
information maintained in Inbound Account Maint.
Outbound Accrual Account
Inquiry (2.15.17)
Displays account, sub-account, and cost center
information maintained in Outbound Accrual
Account Maint.
Outbound Expense Account
Inquiry (2.15.20)
Displays account, sub-account, and cost center
information maintained in Outbound Expense
Account Maint.
Logistics Charge Variance
Report (28.17.13)
Displays only those logistics charges where the
amount accrued differs from the amount paid.
Open Logistics Charge Report
(28.17.14)
Shows all open logistics charges. Can be run with a
historical date to show what was open as of a prior
date.
Logistics
Accounting Reports
262
User Guide — Master Data
Chapter 8
Intrastat
European Union (EU) regulations require member nations to submit
reports concerning Intra-EU trade. The term Intrastat (for Intra-EU
Trade Statistics Reporting) refers to the system used by customs
officials to monitor this trade. The system fully supports Intrastat
reporting requirements.
Introduction
264
Implementing Intrastat
266
Recording Intrastat Data for Orders
274
Automatically Updating Invoice History
Manually Creating Intrastat History
Printing Intrastat Declarations
Reprinting Intrastat Declarations
276
278
279
281
Reviewing Intrastat History Information
281
Deleting and Archiving Intrastat History
282
Types of Intrastat Data
282
264
User Guide — Master Data
Introduction
Intrastat offers powerful tools for companies doing business in EU
member countries and for those wanting written documentation of
inventory movements. You can:
• Generate Intrastat reports that are fully compliant with Intrastat
legislation.
• Maintain tables with valid values for Intrastat codes such as terms of
delivery and country codes.
• Assign Intrastat codes to items.
• Enter country codes for ship-to customers and suppliers.
• Record Intrastat codes for practically all order types.
• Create automatic entries for qualifying Intra-EU inventory movement
transactions.
• Edit Intrastat data manually before final declaration printing.
• Print and reprint Intrastat declaration reports.
• Create Intrastat inquiries by order, by invoice, or by voucher.
Table 8.1 lists the functions on the Intrastat menu.
Table 8.1
Intrastat Menu
(2.22)
Number
Menu Label
Program
2.22.1
Intrastat Setup Menu ...
2.22.1.1
Flow Indicator Maintenance
ieflowmt.p
2.22.1.2
Flow Indicator Browse
iebr002.p
2.22.1.4
Terms of Delivery Maintenance
ietodmt.p
2.22.1.5
Terms of Delivery Browse
iebr008.p
2.22.1.7
Nature of Transaction Maintenance
ienotmt.p
2.22.1.8
Nature of Transaction Browse
iebr004.p
2.22.1.13
Mode of Transport Maintenance
iemotmt.p
2.22.1.14
Mode of Transport Browse
iebr003.p
2.22.1.16
Port Maintenance
ieportmt.p
2.22.1.17
Port Browse
iebr005.p
2.22.1.19
Statistical Procedure Maintenance
iespmt.p
2.22.1.20
Statistical Procedure Browse
iebr007.p
2.22.1.22
Region Maintenance
ieregmt.p
Intrastat
Number
Menu Label
Program
2.22.1.23
Region Browse
iebr006.p
2.22.3
Commodity Code Maintenance
iecommt.p
2.22.4
Commodity Code Browse
iebr001.p
2.22.6
Item Intrastat Data Maintenance
ieptmt.p
2.22.7
Item Intrastat Data Inquiry
ieptiq.p
2.22.11
Order Intrastat Data Maintenance
iedmt.p
2.22.12
Order Intrastat Data Report
ieordrp.p
2.22.13
Intrastat Maintenance
iehmt.p
2.22.14
Intrastat Inquiry
iehiq.p
2.22.15
Intrastat Inquiry by Invoice
iehinviq.p
2.22.16
Intrastat Inquiry by Voucher
iehvouiq.p
2.22.17
Intrastat Inquiry by Order
iehordiq.p
2.22.19
Intrastat Declaration Print
iehprt.p
2.22.20
Intrastat Declaration Reprint
iehrprt.p
2.22.23
Intrastat Delete/Archive
iehup.p
2.22.24
Intrastat Control
iepm.p
265
Before Intrastat data can be collected and reports generated, you must set
up and initialize several Intrastat codes and an Intrastat control program.
These codes and settings are used during sales and purchase order
processing. Figure 8.1 shows a general work flow for Intrastat.
Fig. 8.1
General Intrastat
Work Flow
Implement
ImplementIntrastat.
Intrastat.
Reprint
ReprintIntrastat
Intrastatdeclarations.
declarations.
Record
RecordIntrastat
Intrastatdata
dataatatorder
order
entry,
entry,automatically
automaticallycreating
creating
Intrastat
history
records.
Intrastat history records.
Look
Lookup
upIntrasat
Intrasathistory
history
information.
information.
Optionally,
Optionally,create
createIntrastat
Intrastat
history
historyrecords
recordsmanually.
manually.
Delete/archive
Delete/archiveobsolete
obsolete
records.
records.
= Data from this task flows into
Intrastat History
Print
PrintIntrastat
Intrastatdeclarations.
declarations.
= Data for this task comes from
Intrastat History
266
User Guide — Master Data
Implementing Intrastat
Figure 8.2 outlines typical steps for implementing Intrastat.
Fig. 8.2
Intrastat
Implementation
Work Flow
Set
Setup
upIntrastat
Intrastatcodes.
codes.
Associate
AssociateIntrastat
Intrastatdata
datawith
with
specific
specificitems.
items.
Set
Setup
upaddresses
addressesfor
for
declarants
declarantsand
andagents.
agents.
Set
Setup
upaddress
addressrecords
recordsfor
for
each
eachshipping
shippingand
andreceiving
receiving
site
siteinvolved
involvedininintra-EU
intra-EUtrade.
trade.
Set
Setparameters
parametersand
anddefaults
defaults
for
forIntrastat
Intrastatprocessing.
processing.
Enter
Entercountry
countrycodes
codesfor
for
customers
customersand
andsuppliers.
suppliers.
Set
Setup
upcommodity
commoditycodes.
codes.
Specify
Specifynet
netweight
weightand
andnet
net
weight
weightUM
UMfor
foreach
eachitem
item
involved
involvedininintra-EU
intra-EUtrade.
trade.
Setting Up Intrastat Codes
Figure 8.3 outlines typical steps for setting up Intrastat codes.
Fig. 8.3
Intrastat Code
Setup
Enter
Entervalid
validcodes
codesfor
forflow
flow
indicators.
indicators.
Enter
Entervalid
validcodes
codesfor
formodes
modesofof
transportation.
transportation.
Enter
Entervalid
validcodes
codesfor
forterms
termsofof
delivery.
delivery.
Enter
Entervalid
validcodes
codesfor
forports.
ports.
Enter
Entervalid
validcodes
codesfor
fortypes
typesofof
transactions.
transactions.
Enter
Entervalid
validcodes
codesfor
forstatistical
statistical
procedures.
procedures.
Activate
Activatecountry
countrycodes
codesfor
forEU
EU
countries.
countries.
Enter
Entervalid
validcodes
codesfor
forregions.
regions.
Intrastat
267
Depending on the requirements of the country where you use Intrastat,
some codes are required and others are optional. For each maintenance
program, there is a corresponding browse.
• Use Flow Indicator Maintenance (2.22.1.1) to define at least two flow
indicators: one for Arrivals transactions and one for Dispatches
transactions.
• Use Terms of Delivery Maintenance (2.22.1.4) to enter valid codes if
your country requires this information.
• Use Nature of Transaction Maintenance (2.22.1.7) to enter valid
codes if your country requires this information.
• Use Country Code Maintenance (2.14.1) to define countries where
your company does business.
¶ See “Setting Up
Country Codes”
on page 194.
• Use Mode of Transport Maintenance (2.22.1.13) to enter valid codes
if your country requires this information.
• Use Port Maintenance (2.22.1.16) to enter valid codes if your country
requires this information. The system uses the information to validate
the Port of Arrival/Dispatch and Port of Transshipment fields.
• Use Statistical Procedure Maintenance (2.22.1.19) to enter valid
codes if your country requires this information for electronic data
interchange (EDI) transactions.
• Use Region Maintenance (2.22.1.22) to enter valid codes if your
country requires this information.
Setting Up Addresses for Declarants and Agents
When printing Intrastat Declarations for declarants and agents, the system
prints company address information in the declaration header. Use
Intrastat Control (2.22.24) to establish defaults for declarant and agent
addresses.
It is common for companies to submit one consolidated Intrastat
declaration monthly, requiring the setup of only one company address. If
multiple monthly declarations are required, as when company sites are
located in different countries, you must set up multiple company
addresses.
¶ See “Setting Up a
Company
Address for Each
Site” on
page 272.
268
User Guide — Master Data
Setting Up Intrastat Control
Use Intrastat Control (2.22.24) to set system-wide parameters for Intrastat
processing and system-wide defaults for Intrastat data fields.
Fig. 8.4
Intrastat Control
(2.22.24)
¶ See “Manually
Creating Intrastat
History” on
page 278.
Use Intrastat. Enter No if you do not want the system to automatically
create Intrastat history records. If No, you can still create records
manually.
Enter Yes to have the system automatically create Intrastat history
records for applicable invoice and receiver lines.
• Invoice Post (7.13.4) automatically creates an Intrastat history
record for each sales invoice line that relates to both an Intrastat
item and a shipment to or receipt from another EU country.
• All programs that create purchase receivers (prh_hist records)
automatically create an Intrastat history record for each receiver
line that relates to both an Intrastat item and a shipment to or
receipt from another EU country.
¶ See User Guide:
Distribution A for
information on
EMT.
Note If you use Enterprise Material Transfer (EMT), the system
automatically determines which trading partner is responsible for
reporting direct-shipment transactions when the supplier and end
customer are in different EU-member countries. It then creates
appropriate Intrastat history records as required.
The system determines whether a sales invoice or receiver line is
involved in Intra-EU inventory movement by comparing the country
codes associated with the ship-from or receipt site and the Country of
Destination/Dispatch for the related order line. If the codes are not the
Intrastat
269
same and both relate to EU countries, the transaction is an Intra-EU
transaction. If source and destination countries are the same, the
transaction is considered domestic.
An invoice or receiver line is considered an Intrastat item when
Intrastat Item is Yes in the corresponding order line.
Imp/Exp Default. This field determines the default for Imp/Exp on
many order maintenance programs. Imp/Exp controls whether the
Intrastat Data frame appears during order maintenance. Enter Yes if
most of your sales orders and other order types are subject to IntraEU reporting. Otherwise, enter No.
Intrastat Net Weight Unit of Measure. Enter the unit of measure code
you use to indicate kilograms, the unit of measure in which the net
weight of Intrastat transactions must be reported. If the net weight in
the item master is not expressed in this unit, the system converts it.
Intrastat Net Weight Minimum. Enter the minimum legal net weight to
be reported for an Intrastat transaction. The system rounds up the
extended net weight for the transaction to this value.
Flow Indicator Arrivals/Flow Indicator Dispatches. Enter the codes
Tip
used in your country to indicate Intrastat arrival and dispatch
transactions.
Define these codes
first in Flow
Indicator
Maintenance
(2.22.1.1).
PO Reference Date Logic. Enter 1, 2, or 3 to indicate the method you
use to assign a reference date to purchasing-related Intrastat history
records.
1. Inventory transaction effective date
2. Voucher effective date
3. Tax point or voucher date. The system records whichever date falls
earlier in the month. The tax point date is the 15th day of the month
following the transaction effective date.
For sales-related Intrastat transactions, the reference date is always
set to the invoice effective date.
The reference date assigned to an Intrastat history record determines
when it is reported. Reference date is the main criterion for selecting
Intrastat history records for reporting.
SO Reference Date Logic. Enter 1, 2, or 3 to indicate the method you
use to assign a reference date to sales-related Intrastat history records.
270
User Guide — Master Data
1. Use the inventory transaction effective date.
2. Use the invoice effective (posting) date. With this setting, an
uninvoiced record is not reported in Intrastat Declaration Print.
3. Use the tax point or invoice date. The system records whichever
date falls earlier in the month. The tax point date is defined by
Intrastat regulations as the 15th day of the month following the
transaction effective date.
The reference date assigned to an Intrastat history record determines
when it is reported. Reference date is the main criterion for selecting
Intrastat history records for reporting.
Include Memo Items. Enter Yes if you typically create Intrastat
history records for memo items. Otherwise, enter No. This value
becomes the default for Include Memo Items on order headers. You
can override it during order entry.
Declarant Branch ID and Agent Branch ID. Optional. Enter the
company address codes to use as the default declarant and default
agent in Intrastat Declaration Print (2.22.19).
Commodity Code. Enter the commodity code to use when an Item
Intrastat Data record does not exist.
Mode of Transport and Port of Transshipment. Enter the default
transportation code values for Intrastat orders. You can change these
values during order entry. These are optional fields.
Setting Up Commodity Codes
Use Commodity Code Maintenance (2.22.3) to set up codes for
classifying goods for Intrastat reporting. Create codes for each EU
country, since each has its own coding scheme for the last four digits.
¶ See page 20 for
details.
Note Intrastat commodity codes are distinct from the corporate
commodity codes defined in Commodity Code Maintenance (1.4.19).
Intrastat
271
Fig. 8.5
Commodity Code
Maintenance
(2.22.3)
Country. Enter a valid country code for each country in which your
company has sites.
Commodity Code. Enter a commodity code.
Description. Enter a description of the commodity.
Supplementary UM. Enter an optional supplementary unit of
measure. For conversions, this value must be defined in Unit of
Measure Maintenance (1.13).
Some commodity codes require that an item be tracked in a specified
unit of measure. If the line UM differs from the supplementary UM
when Intrastat history records are created, the line quantity is
converted to the supplementary UM.
Setting Up Intrastat Item Data
Use Item Intrastat Data Maintenance (2.22.6) to associate Intrastat data
with inventory items involved in Intra-EU transactions. The values
entered here appear in orders as defaults, and can be changed at order
entry. Create a record for each EU country.
Fig. 8.6
Item Intrastat Data
Maintenance
(2.22.6)
Authority. For Intrastat purposes, always set this to INSTAT.
Country. Enter a country code.
272
User Guide — Master Data
Item Number. Enter an item number.
Commodity. Enter a commodity code. To associate a commodity code
with a country, you must also associate it with that country in
Commodity Code Maintenance (2.22.3).
Country of Origin. Enter a country of origin code.
Intrastat Item. Enter Yes to have the system automatically create
Intrastat history records for the item. For items for which you do not
want Intrastat records created, such as intangible goods or items
related to motorized vehicles, enter No.
Setting Up a Company Address for Each Site
Use Company Address Maintenance (2.12) to set up address records for
each shipping and receiving site used in Intra-EU inventory movements.
This program also lets you associate each site with a country and region
code.
Fig. 8.7
Company Address
Maintenance (2.12)
Specify the site
code entered in
Site Maintenance
(1.1.13).
Country Code
Address. Enter an address code. If the code you entered is for a new
record, enter the address in the address fields.
State. Enter a region code in the State field if one is required on
Intrastat declarations.
Intrastat
Entering Country Codes for Customers and Suppliers
Country codes entered in the following programs become defaults for
Country of Destination/Dispatch on customer and supplier orders. You
can change these codes at order entry. This is useful when the shipping/
receiving site of the supplier/customer is in a different country from
where the order is sent (triangulation).
• Use Supplier Maintenance (2.3.1) to enter country codes for
suppliers.
• Use Customer Maintenance (2.1.1) to enter country codes for
customers.
• Use Ship-To Maintenance (2.1.13) to enter ship-to addresses for
customers.
Entering Net Weights for Intrastat Items
Use Item Master Maintenance (1.4.1) or Item Inventory Data
Maintenance (1.4.5) to specify net weight and net weight unit of measure
(UM) for each item involved in Intra-EU inventory movements.
Note The Corporate Commodity Code field in Item Master Maintenance
does not reference Intrastat commodity codes.
Fig. 8.8
The UM field
is to the right
of the Net
Weight field.
The system
calculates net
weight when
creating
Intrastat
history
records.
Net Weight. Enter item net weight.
Unit of Measure. Enter item unit of measure.
Item Master
Maintenance
(1.4.1), Item
Shipping Data
273
274
User Guide — Master Data
Recording Intrastat Data for Orders
Once Intrastat is set up, you can record Intrastat data using either standard
order maintenance programs or Order Intrastat Data Maintenance
(2.22.11).
Entering Intrastat Data in Sales Order Maintenance
This section describes how to enter Intrastat data in Sales Order
Maintenance (7.1.1). The same steps can be used to record Intrastat data
in most other standard order maintenance programs.
1
Use Sales Order Maintenance (7.1.1) to enter an order as usual.
Fig. 8.9
Sales Order
Maintenance
(7.1.1)
Imp/Exp field
Imp/Exp. Enter Yes to record Intrastat data for this order in the
Intrastat frame.
If No, special processing does not occur during order maintenance.
You can still add Intrastat data later using Intrastat Maintenance
(2.22.13).
Intrastat
275
Fig. 8.10
Record
Intrastat data in
the Intrastat
frame of the
order header.
Fields default
from Intrastat
Control.
Sales Order
Maintenance,
Intrastat Frame
(7.1.1)
Defaults from
the country
code
associated with
the ship-to.
2
Choose Go to enter order lines.
The system automatically copies the Intrastat header data to each
order line. When all order lines and the order trailer are entered, you
are prompted to view or edit import/export data. Choose Yes to
display the following window.
Fig. 8.11
Scroll through
the order lines
by positioning
the cursor in the
Order Line field
and using the
Up and Down
arrow keys.
In most cases, Intrastat codes entered in the order header apply to all
order lines. Where there are exceptions to this, Intrastat information
can be entered and maintained at the line level.
Viewing Intrastat
Data in Sales Order
Maintenance
(7.1.1)
276
User Guide — Master Data
Entering Data in Order Intrastat Data Maintenance
Use Order Intrastat Data Maintenance (2.22.11) to enter all Intrastat data
in one frame and to review and modify Intrastat data at any time between
order entry and shipment. However, you can only delete order data using
the appropriate order maintenance program. At invoice posting, this
information is recorded in Intrastat history.
Fig. 8.12
Order Intrastat Data
Maintenance
(2.22.11)
Use Order
Intrastat Data
Maintenance
to enter all
Intrastat data
in one frame.
Automatically Updating Invoice History
Intrastat data records are copied to Intrastat history records automatically
during sales order shipment and purchase order receipt. The system can
update unreported records during subsequent vouchering or invoicing.
However, once Intrastat records have been reported on a final Intrastat
declaration, the system no longer updates them.
Voucher Updates
Voucher Maintenance (28.1) automatically updates the Intrastat history
record associated with each voucher receiver line when the line closes.
The following Intrastat data is recorded for each voucher receiver line:
¶ See “PO
Reference Date
Logic” on
page 269.
• Reference date (if reference logic is 2 or 3)
• Statistical value in base currency
• Invoice value in transaction currency
• Voucher number
• Invoice value in base currency
Intrastat
277
• Voucher date
Note When a voucher is modified or deleted after it has been reported,
you must correct the Intrastat history manually using Intrastat
Maintenance (2.22.13). If a voucher is deleted before it has been reported,
the system updates the receiver’s Intrastat history record appropriately.
When the total vouchered quantity for a receipt exceeds the receipt
quantity, the system does not collect any more Intrastat data. This is true
even when the receipt history has not been reported. When this situation
occurs, you should modify the quantity on one of the associated vouchers
or correct the Intrastat history manually using Intrastat Maintenance.
Invoice Updates
Intrastat history records associated with shipment lines are updated at
invoice post when the shipment Intrastat record has not been reported.
Posting the invoice has these effects:
• Changes the Intrastat history record type from 1, indicating a
shipment, to 9, indicating an invoice. This effectively deletes the
shipment record.
Note For standard sales orders, only one type of Intrastat record
exists at a time.
• Updates the invoice number and invoice date fields in the history
record.
In addition, if SO Reference Date Logic is set to 2 in Intrastat Control, the
reference date is updated with the invoice date.
If you are using the Customer Consignment Inventory module, invoicing
a consigned shipment has additional effects on unreported shipment
records. Since customers are only invoiced for the portion of a shipment
they have used, both shipment and invoice type history records can exist
simultaneously until all inventory is consumed. Posting the invoice
updates any unreported shipment data for consigned inventory as follows:
• The quantity shipped is reduced by the quantity invoiced. When the
quantity on the shipment record is reduced to zero, it is deleted and
reporting is done on the record created during invoicing.
• Invoice value in transaction and base currency is recalculated using
the current sales order price.
¶ See User Guide:
Distribution B for
details on
consignment.
278
User Guide — Master Data
• Statistical value in base currency, net weight, and supplementary
units are recalculated based on the invoiced quantity.
• When SO Reference Date Logic is 2 in Intrastat Control, the invoice
number and invoice date are updated and the reference date is
updated with the invoice date.
Manually Creating Intrastat History
¶ See “Printing
Intrastat
Declarations” on
page 279.
Use Intrastat Maintenance (2.22.13) to add and modify Intrastat history
records directly. This is useful for data that are not entered automatically,
such as:
• DRP transactions
• Transfers that use transactions on the Inventory Transfer Menu (3.4)
• Installed base item movements in Installed Item Move (11.3.13)
• Goods sent out for processing in the Advanced Repetitive module
using the programs on the Subcontract Shipping Menu (18.22.5)
Note You cannot modify Intrastat history records that have been
declared on a final print.
Fig. 8.13
Intrastat
Maintenance
(2.22.13)
Reference. Specify which document contains the Intrastat data. This
field is normally updated by the system and displays the order type,
order number, and order line or reference (invoice number or receiver
number).
Intrastat
279
Invoice Value. Enter the invoice value in transaction currency.
Invoice Cur. Enter the currency designation for this invoice.
Statistical Value. Enter the statistical value of the order. This field
defaults from the invoice value in base currency.
Supplementary Units. The system calculates and displays the number
of supplementary units, based on the supplementary UM associated
with the item’s commodity code, if any. If the line quantity UM is
different from the commodity code’s supplementary UM, the system
automatically applies the conversion factor defined in Unit of
Measure Maintenance.
If a supplementary UM is not available, supplementary units are not
calculated.
Net Weight. Enter the weight of the transaction in kilograms. The unit
of measure for kilograms is specified in Intrastat Control. If net
weight is not specified, it is calculated based on the net weight and
UM associated with the item in Item Master Maintenance.
Printing Intrastat Declarations
Use Intrastat Declaration Print (2.22.19) to print Intrastat declarations that
are fully compliant with Intrastat regulations. You can print declarations
for arrivals, dispatches, or both, in any of four forms: trial, final,
summary, or detail. The Intrastat declaration report layout is generic,
allowing it to be customized locally using standard Progress tools.
Fig. 8.14
Arrivals field and
Dispatches field
Trial/Final field
Intrastat
Declaration Print
(2.22.19)
280
User Guide — Master Data
Tip
Reference Date and Site. Enter a range of reference dates or sites for
Intrastat
Declaration Print
only selects
Intrastat history
records that have
not been reported
on a final
declaration.
Intrastat history records to be included in the declaration.
Print Intrastat Declaration Arrivals and Dispatches. Enter Yes in both
fields to print both kinds of declarations.
Trial/Final. Enter Trial to print a draft of the declaration. Enter Final to
print the declaration in final form. The system prompts you to
confirm that the declaration printed correctly. Choose No to reprint
the document. Choose Yes to update selected Intrastat history records
so they are not included on another declaration. Records are updated
as follows.
• Reference to the declaration on which the record was reported
(Period, Submit Date, and Declarant field).
• Reported invoice value and statistical value.
• Reported field is set to Yes.
• Intrastat Declaration ID is added to each declared record.
Summary/Detail. Enter Summary to print a summary report organized
by the following:
• Commodity Code
• Terms of Delivery
• Nature of Transaction
• Country of Dest/Disp
• Mode of Transport
• Country of Origin
• Port of Arr/Disp
• Region of Origin/Dest
• Port of Transshipment
• Statistical Procedure
Enter Detail to print each record as an individual line item.
Year, Period, Declarant, Agent. Specify for which year, period
(month of year), submit date, declarant, and agent you are printing the
Intrastat declaration.
Intrastat
281
Submit Date. Defaults to the system date. This date prints on the
declaration.
Reprinting Intrastat Declarations
Use Intrastat Declaration Reprint (2.22.20) to reprint declarations
submitted in the past. You have the option of reprinting in summary or
detail, regardless of how the original was printed.
Fig. 8.15
Intrastat
Declaration Reprint
(2.22.20)
Declaration ID. Enter the ID of the declaration to be reprinted. This is
a unique identifier automatically assigned to all Intrastat history
records included in a final Intrastat declaration. This ID is printed on
the Intrastat declaration. Use Next/Previous to scroll through history
records to find the declaration you want to reprint.
Reviewing Intrastat History Information
Four inquiries are available for reviewing Intrastat history information.
All show the same information, but differ by search criteria and sort
methods.
• Use Intrastat Inquiry (2.22.14) to review Intrastat history records by
transaction ID (the sequence in which the system creates them).
• Use Intrastat Inquiry by Invoice (2.22.15) to review Intrastat history
records by invoice number.
• Use Intrastat Inquiry by Voucher (2.22.16) to review Intrastat history
records by voucher number.
282
User Guide — Master Data
• Use Intrastat Inquiry by Order (2.22.17) to review Intrastat history
records by order number.
Deleting and Archiving Intrastat History
Use Intrastat Delete/Archive (2.22.23) to delete or archive Intrastat
history records. Use Archive File Reload (36.16.5) to return history
records to the database.
Fig. 8.16
Intrastat Delete/
Archive (2.22.23)
Delete. Enter Yes to delete information or No to review selected
records.
Archive. Enter Yes to copy each selected record to the disk file
displayed in the Archive File field.
Types of Intrastat Data
Recorded data for each Intrastat history record can be classified into three
groups:
• Qualitative information describes inventory movement and helps
customs officials understand trends in the flow of goods.
• Quantitative information describes the value, net weight, and
supplementary UM (if required) of the inventory movement. This
information gives customs officials the currency value of the
shipment both in net and unit measurements.
• Audit trail information gives you a way to match Intrastat data to the
business transactions from which it originated. This is useful for
responding to customs inquiries and audits.
Table 8.2 lists the various data fields that belong to the three types of
Intrastat data.
Intrastat
Table 8.2
Qualitative
Information
Quantitative Information
Audit Trail
Country of Dest/Disp
Invoice Value in Transaction
Currency
VAT Registration
Number
Invoice Value in Base
Currency
Flow Indicator
Supplementary Units in the
UM as required for the
Commodity Code
Reference to the underlying
sales invoice or receiver line;
that is, Order Type, Order
Number, Order Line,
Receiver/Invoice
Reference Date
Mode of Transport
Region of Origin/Dest
Commodity Code
Country of Origin
Port of Transshipment
Statistical Value in Base
Currency
Net Weight in the Intrastat
Net Weight UM
Quantity in the item’s
stocking UM or order line
UM for memo items
Address, Site, and Item
Number
Terms of Delivery
Statistical Procedure
Port of Arr/Disp
Nature of Transaction
Note The statistical value is not automatically calculated because every
EU country has its own definition of the statistical value calculation.
Instead, a user exit program, iestatvl.i, is provided to calculate the
statistical value. Customize this program to insert a new formula.
Intrastat Data
Types
283
284
User Guide — Master Data
Chapter 9
Inventory Control
Inventory Control supports a broad range of activities including
management of inventory transactions, lot/serial tracing, and inventory
counting.
Introduction
286
Setting Up Inventory Control
286
Creating Inventory Detail Records
Creating Inventory Transactions
287
288
Creating Inventory Transaction History
Creating Lot/Serial Number History
Performing Cycle Counts
Creating Inventory Reports
295
298
Checking Inventory Availability
302
291
294
286
User Guide — Master Data
Introduction
Inventory Control supports a broad range of inventory activities. You can:
• Create inventory transactions such as unplanned issues and receipts
or inventory transfers.
• Monitor inventory transactions and history records created elsewhere
in the system, including lot/serial tracing.
• Generate reports and inquiries on the value and availability of
inventory.
• Perform cycle counts to verify inventory quantities on hand.
Receipts to inventory and issues from inventory change a location’s
inventory balance and affect the General Ledger (GL). Inventory Control
provides a complete audit trail of all inventory transactions, and enables
you to track tools, documents, and non-inventory items (but not work-inprocess items).
¶ See Chapter 10,
“Physical
Inventory,” for
details.
Use it to verify inventory by performing inventory counts and comparing
actual quantities with system quantities. Two counting methods are
supported: cycle counting and physical inventory counting.
Setting Up Inventory Control
Inventory Control (3.24) contains three types of settings:
¶ See “ABC Class
Code” on
page 295.
• Inventory Count Parameters. These determine how the system
handles inventory balance variations during cycle counting and
physical inventory. Tolerances can be set based on item ABC class.
• Accounting Parameters. These determine costing issues, whether GL
transactions are created for inventory transactions, and other
inventory accounting parameters.
• Picking Logic. Before the system can move inventory, it must know
what inventory to select, or pick. The picking logic specified here
determines how the system picks inventory.
Inventory Control
287
Fig. 9.1
Inventory Control
(3.24)
Picking Order. Enter the method to use for selecting inventory during
detail allocation:
1–Location. The system looks for inventory by location.
2–Lot/Serial. The system looks for inventory by lot/serial
number.
3–Date. The system looks for inventory by the date the item was
created or received.
4–Expire Date. The system looks for inventory by item expiration
date.
Ascending or Descending. Enter Ascending to have the system pick
the oldest or lowest number first. Enter Descending to have the
system pick the newest or highest number first. As an example, if
Picking Order is by Date and Ascending order is specified, the first
item picked is that with the oldest create or receipt date.
Creating Inventory Detail Records
Inventory detail records precisely define inventory balances and
locations. Each record includes:
• Item number
• Site
• Location (if used)
288
User Guide — Master Data
• Lot/serial number (if used)
• Lot reference (if used)
The system calculates total item inventory by adding all on-hand balances
from inventory detail records. Records also provide details on inventory
status codes and expiration dates, grades, and assay percentages.
Modify inventory attributes using Inventory Detail Maintenance (3.1.1)
or Detail Maintenance by Item/Lot (3.1.2). Use Inventory Detail by Lot
Inquiry (3.1.13) to generate a report.
Creating Inventory Transactions
Inventory transactions move inventory to or from a location. Examples of
inventory transactions include:
• Issuing existing inventory to a work order
• Receiving purchased materials into inventory
• Shipping goods
Fig. 9.2
Inventory
Transaction Flow
Purchase
Purchase
Order
Order
Receipts
Receipts
Inspection
Inspection
Raw
Raw
Materials
Materials&&
Service
Service Items
Items
Work-inWork-inProcess
Process
Finished
Finished
Goods
Goods
Shipments
Shipments
to
toCustomer
Customer
Use the programs in Table 9.1 to create inventory transactions.
Table 9.1
Inventory Transfer
Menu (3.4)
Menu
Number
Program
3.4.1
Transfer–Single Item
3.4.2
Transfer–Multi Item
3.4.3
Transfer With Lot/Serial Change
Inventory Control
Menu
Number
Program
3.4.4
Batchload Transfer With Lot/Serial Change
3.7
Issues–Unplanned
3.8
Issues–Return to Supplier
3.9
Receipts–Unplanned
3.10
Receipts–Sales Order Return
3.11
Receipts–Return to Stock
3.12
Receipts–Backward Exploded
289
Transfers
A transfer is a movement of inventory to a new location. You can use
three kinds of inventory transfers: single item, multi-item, and transfer
with lot/serial change.
• Use Transfer–Single Item (3.4.1) to transfer a specified quantity of a
single item from one location to another. If inventory status codes
specified in the From and To fields differ for an item, you can select
the one to be used.
• Use Transfer–Multi Item (3.4.2) to transfer more than one item from
one location to another. Only entire quantities are transferred—not
partial quantities. This transaction generates a report showing the
items and quantities transferred.
• Use Transfer With Lot/Serial Change (3.4.3) to transfer a specified
quantity of a single item from one location to another and change the
lot/serial and lot reference numbers associated with the item.
• Use Batchload Transfer With Lot/Serial Change (3.4.4) for the same
purpose as 3.4.3. However, this program also supports CIM loading
of inventory information by allowing you to specify values for fields
that are prompted for interactively in the standard Transfer With Lot/
Serial Change.
This is especially important when using CIM load to transfer data
between the system database and an external system.
¶ See User Guide:
Manager
Functions for
details on CIM.
290
User Guide — Master Data
If Verify GL Accounts is Yes in Domain/Account Control, the system
checks the GL calendar to ensure that the effective date specified for a
transfer is within an open fiscal period. The default effective date is the
system date. If a shipping group exists for a transfer, you can create a
shipper for the transferred items.
Receipts
A receipt is when inventory is brought into a location. Receipts increase
the quantity on hand of an item at a particular location. Use the following
programs to receive inventory that does not have an existing or open
order:
• Use Receipts–Unplanned (3.9) to receive miscellaneous inventory
such as floor stock items sent back from production, or materials from
a manufacturing order that has been closed from an accounting
standpoint.
• Use Receipts–Sales Order Return (3.10) to tag a receipt as a return
only if you do not use Sales Orders/Invoices. This is not a complete
return since it does not update sales or commission history, and does
not generate a credit invoice.
• Use Receipts–Return to Stock (3.11) to return to stock miscellaneous
items that have been temporarily moved elsewhere.
• Use Receipts–Backward Exploded (3.12) to increase inventory
quantity for an item at a designated site and location and decrease
inventory for its components. Backward-exploded receipts are often
used in kitting or simple assembly operations, where there is no need
for a work order. Recording receipt of a finished item indicates that an
associated set of items was used.
Issues
An issue sends inventory to a different location. For example, when
components are issued to a work order, they are removed from the
stocking location and issued to the work-in-process (WIP) location.
Inventory issues reduce quantities on hand at the issuing location.
Inventory Control
291
• Use Issues–Unplanned (3.7) to record miscellaneous inventory issues
such as floor stock items sent to production or materials sent to
engineers for testing. You can also issue items to a manufacturing
order that closed from an accounting standpoint.
• Use Issues–Return to Supplier (3.8) to tag an issue as a return. This is
not a complete return since it does not update purchasing or receiving
history, or current cost. To process a complete return, use functions in
the Purchasing module.
Shipping Documents
Many countries require that formal shipping documents accompany any
movement of goods, even when goods are merely transferred, not sold. If
you are using shipping groups, you can record shipping information and
generate shipping documents from all the inventory transfer programs.
Creating Inventory Transaction History
Every inventory transaction creates a record in the inventory transaction
history table. Each record has a unique, sequential transaction number, a
transaction type, and includes the following information:
• Transaction data
• Inventory data
• Cost data
• GL transaction data
• User ID of the person entering the transaction
Transaction Types
The transaction type code identifies the function used to initiate the
inventory change. Table 9.2 lists the transaction type codes included in
inventory history records with a brief description of each type and the
name of one of the programs that creates the transaction.
Note Many of these transactions are created in more than one program.
In this case, the table simply indicates a typical program associated with
the transaction and is not intended to be a complete list.
¶ See the Shipping
chapter in User
Guide:
Distribution A for
details.
292
User Guide — Master Data
¶ See “Inventory
Status Codes” on
page 39.
Each inventory status code can include a list of restricted transactions.
This allows you to manage how items, locations, and sites are used.
However, to maintain system integrity, some transactions cannot be
restricted this way.
Note In Table 9.2, transactions that cannot be restricted appear in
boldface type.
¶ See User Guide:
Distribution B.
If you are using either Supplier Consignment Inventory or Customer
Consignment Inventory, the system creates additional transaction types to
manage consigned inventory.
Table 9.2
Inventory
Transaction Types
Transaction
Type
Description
Program Creating
CST-ADJ
Standard cost adjustment
Item Master Maintenance (1.4.1)
CUM-RADJ
Cumulative received adjust
Cumulative Received Maintenance
(5.5.5.13)
CUM-RRES
Cumulative received reset
Cumulative Received Reset to Zero
(5.5.5.14)
CUM-SADJ
Cumulative shipped adjust
Cumulative Shipped Maintenance
(7.5.16)
CUM-SRES
Cumulative shipped reset
Cumulative Shipped Reset (7.5.18)
CYC-CNT
Cycle count adjustment
Cycle Count Results Entry (3.14)
CYC-ERR
Cycle count error
Cycle Count Results Entry (3.14)
CYC-RCNT
Cycle count recount
Cycle Count Results Entry (3.14)
ISS-CHL
Location change issue
Inventory Detail Maintenance (3.1.1)
ISS-DO
Distribution order shipment Distribution Order Shipments (12.17.22)
ISS-FAS
Final assembly order issue
Sales Order Shipments (7.9.15)
ISS-GIT
Distribution order receipts
Distributed Order Receipts (12.15.20)
ISS-PRV
Return to vendor (supplier)
Purchase Order Return (5.13.7)
ISS-RV
return to vendor (supplier)
Issues–Return to Supplier (3.8)
ISS-SO
Issue sales order item
Sales Order Shipments (7.9.15)
ISS-TR
Inventory transfer issue
Transfer–Single Item (3.4.1)
ISS-UNP
Inventory unplanned issue
Issues–Unplanned (3.7)
ISS-WO
Issue work order item
Work Order Component Issue (16.10)
ORD-PO
Purchase order booking
Purchase Order Maintenance (5.7)
ORD-SO
Sales order booking
Sales Order Maintenance (7.1.1)
ORD-SEO
Material order booking
Material Order Maintenance (11.11.1)
Inventory Control
Transaction
Type
Description
Program Creating
RCT-CHL
Location change receipt
Inventory Detail Maintenance (3.1.1)
RCT-DO
Distribution order receipt
Distributed Order Receipt (12.15.20)
Sales Order Shipment (7.9.15)
RCT-FAS
Receive final assembly
RCT-GIT
Distribution order shipment Distribution Order Shipments (12.17.22)
RCT-PO
Purchase order receipt
Purchase Order Receipts (5.13.1)
RCT-RS
Inventory return to stock
Receipts–Return to Stock (3.11)
RCT-SOR
Inventory sales order return
Receipts–Sales Order Return (3.10)
RCT-TR
Inventory transfer receipt
Transfer–Single Item (3.4.1)
RCT-UNP
Inventory unplanned receipt Receipts–Unplanned (3.9)
RCT-WO
Receive work order item
Work Order Receipt (16.11)
RJCT-WO
Reject work order item
Work Order Receipt (16.11)
TAG-CNT
Physical inventory update
Inventory Balance Update (3.16.21)
WIP-ADJ
Work-in-process adjustment WIP Material Cost Revaluation (16.22)
WO-CLOSE
Work order close
Work Order Accounting Close (16.21)
Reviewing Transaction History
Use the programs on the Transaction History Menu (3.21) to view
inventory transaction history.
• Use Transactions Detail Inquiry (3.21.1) to display detailed inventory
transaction history records ordered by transaction number.
• Use Transactions by Item Browse (3.21.2) to display inventory
transaction history for an item number ordered by transaction date,
starting with the most recent.
• Use Transactions by Order Report (3.21.13) to display inventory
transaction history by sales order or work order number.
• Use Transactions by Item Report (3.21.14) to display inventory
transaction history by item number.
• Use Transactions Accounting Report (3.21.16) to display the costed
GL transactions created for each transaction.
293
294
User Guide — Master Data
• Use Average Cost Accounting Report (3.21.17) to list selected
transactions involving average cost computations. The report shows
quantity, unit cost, and inventory value for the beginning balance, the
change data, and the ending balance.
• Use Transactions Delete/Archive (3.21.23) to remove transactions
from the system when online history is no longer needed.
Creating Lot/Serial Number History
Lot/serial control is an inventory attribute assigned in Item Master
Maintenance. When you mark an item as lot/serial controlled, you cannot
issue or receive the item without specifying a number.
As transactions are processed for an item, its lot/serial number is included
in transaction history. Lot/serial numbers provide greater tracking control
by creating records of an item’s movement through the manufacturing
process.
¶ For details, see
the PRO/PLUS
User Guide.
Note The PRO/PLUS WIP Lot Trace module (WLT) affects lot/serial
collection and reporting features, while adding detailed component, work
in process (WIP), and finished goods lot/serial tracing and reporting
options. If you are using the optional PRO/PLUS module, WIP Lot Trace
is available as menu option 3.22.13.
To review lot/serial history information, use the programs on the Lot/
Serial Number Menu (3.22).
• Use Lot Transactions by Date Browse (3.22.1) to review an item’s
inventory transactions by date.
• Use Lot Transactions by Tran Browse (3.22.2) to review an item’s
inventory transactions by transaction number.
• Use Lot Actual Bill Inquiry (3.22.3) to display components used to
make a lot/serial controlled item.
Show Duplicates. Enter Yes to allow transactions to appear more than
once in an inquiry display. For example, a purchase receipt (RCT-PO)
can appear once in relation to a work order issue (ISS-WO) and again
in relation to an inventory status change (ISS-CHL). Enter No to have
transactions appear only in the first sequence found.
Inventory Control
295
Max Workfiles. Enter a number telling the system how many
workfiles to create during execution. The default is 500. Entering a
value greater than your system’s processing capacity can cause the
system to fail. To reduce the number of workfile records, narrow the
range of items selected.
• Use Lot Where-Used Inquiry (3.22.4) to display all top-level items
containing a lot/serial numbered component.
Show Duplicates. Enter Yes to allow transactions to appear more than
once in an inquiry display. Enter No to have transactions appear only
in the first sequence found.
Performing Cycle Counts
You can count and compare actual, on-hand inventory balances with
system-maintained quantities using either of two counting methods:
• Cycle counting (Inventory Control)
• Physical counting (Physical Inventory)
In each method, you count inventory by site, location, item, and lot/serial
number. Cycle counting involves counting groups of items on a regular or
cyclic schedule. A physical count involves counting all items, usually
once a year.
During cycle counting, you enter manual count figures in the system. The
system then compares the manual count figures with its figures. If there
are discrepancies, the system checks the error tolerances defined in
Inventory Control. If a count figure is within tolerance, it is accepted and
the system’s figure is updated. If a count figure is not within tolerance, the
item in question must be recounted. The system accepts recount quantities
that are out of tolerance.
ABC Class Code
The ABC class code classifies items by their importance in a
manufacturing system and determines count frequencies. Class A items
are counted more frequently than class B items. Class B items are counted
more frequently than class C items.
¶ See Chapter 10,
“Physical
Inventory,” for
details.
296
User Guide — Master Data
Use Item Master Maintenance (1.4.1) or Item Inventory Data
Maintenance (1.4.5) to assign ABC class. You can also have the system
calculate it automatically by running Item ABC Status Report/Update
(1.5.9 or 3.6.3).
For each ABC class, assign item tolerances (percentage and amount) in
Inventory Control. When count discrepancies arise, the system checks
item tolerances by class.
Cycle Counting Procedure
Whether you select items for cycle counting or have the system select
them, the basic steps are as follows:
1
Print a cycle count worksheet.
2
Count the items listed on the worksheet.
3
Enter the initial count quantity in the system.
4
Review the results and enter recount quantities if necessary.
Printing Cycle Count Worksheet
Use Cycle Count Worksheet Print (3.13) to print a worksheet listing items
selected for cycle counting, their locations, ABC code, last count date (if
applicable), and the quantity on hand. Use the worksheet to record the
count quantities.
The system selects items by comparing the current date with the item’s
last count date. If the elapsed time is greater than the period specified in
the Cycle Count Interval field in Item Master Maintenance, the system
selects the item for cycle counting. If this is the first time you are cycle
counting an item, the system selects it by item number.
Entering Initial Count
Enter the count quantity in Cycle Count Results Entry (3.14). When
entering the initial count quantity, set Cycle Count Type to I (Initial).
Inventory Control
If an item’s count quantity does not match the system’s, the system checks
to see if the count is within both the percent tolerance and the amount
tolerance. If it is, the system updates its quantity accordingly. If the count
is not within tolerance, the item must be recounted.
Tip
Tolerances are
specified in
Inventory Control
by ABC class.
Fig. 9.3
Cycle Count
Results Entry
(3.14)
Entering a Recount
Use Cycle Count Results Entry (3.14) to enter recount figures. Set Cycle
Count Type to R (Recount). If a recount quantity is still out of tolerance,
the system alerts you to this, but nevertheless updates its figures.
Reporting Cycle Count Results
After completing the cycle count, use Cycle Count Results Report (3.15)
to generate a count report showing:
• Items counted
• In-tolerance quantity
• In-tolerance percent
• Items recounted
297
298
User Guide — Master Data
Creating Inventory Reports
Use the reports on Inventory Detail (3.1) and Inventory Reports Menus
(3.6) to check inventory statuses and values (current and GL).
Detail Allocation Inventory Report
Use Detail Allocation Inventory Report (3.1.5 or 2.1.9.6) to review how
much detail-allocated inventory exists in a site or location for ranges of
items, sites, locations, addresses, or inventory status codes. The summary
report lists detail-allocated inventory totals by item or site. The detail
report also lists specific lot, serial, and reference, information. You can
optionally display sales order information on the detail report.
Stock Status Report
Use Stock Status Report (3.6.1) to review an item’s total quantity on hand
and quantity on order by site. The report gives information for each
location containing the item. Location information shows each item’s lot/
serial number, reference number, and quantity on hand.
Reorder Report
Use Reorder Report (3.6.2) to see if an item is below the reorder point or
safety stock. The report shows all locations containing the item and
indicates those below the reorder point or safety stock. Also shown are
any open orders for the item, the quantity open, and the supplier name.
Item ABC Status Report/Update
Use Item ABC Status Report/Update (3.6.3) by product line or site to
calculate item ABC class codes. Calculations can be made by a
combination of either sales or issues and cost or gross profit. Three fields
can be updated for existing records:
• ABC class codes
• Item average usage
• Cycle count intervals
Inventory Control
You can also change default ABC classification percentages. Depending
on the option selected, the report lists items in descending sales or issue
value, and shows an item’s old and new ABC classifications.
Inventory Detail Report
Use Inventory Detail Report (3.6.5) to see inventory availability status in
detail or summary format. The summary report lists item inventory
information at the site level:
• Quantity on hand
• Available quantity on hand
• Non-nettable quantity
• Quantity required
• Quantity allocated
• Quantity on order
The detail report adds detailed information by location within the site:
• Quantity on hand
• Quantity allocated
• Item characteristics such as expire date, grade, assay %, and
inventory status
Inventory Detail by Location
Use Inventory Detail by Location (3.6.6) to see item inventory
information by location:
• Quantity on hand
• Item characteristics such as expire date, grade, assay %, and
inventory status
Current Surplus Inventory Report
Use Current Surplus Inventory Report (3.6.8) to review current surplus
quantities and GL value by product line within a site. The system
determines surplus by the absence of issue activity based on a userspecified issue date.
299
300
User Guide — Master Data
Reports can be generated in detail or summary format. The summary
report shows information for product lines within a site. The detail report
shows item information for each product line in the site. In both reports,
totals are shown for expired value and value on hand, by site and for the
report.
Projected Surplus Inventory
Use Projected Surplus Inventory (3.6.9) to review projected surplus
inventory for a future effective date based either on MRP requirements or
average use. Choose either current cost or GL cost for surplus cost
computations. For these calculations, the expiration date for items is the
system date, not the effective date. You can include firm planned orders or
MRP planned orders on the report, which are marked On Order.
Reports can be generated in summary or detail format. The summary
shows the total expired value and ending value for each product line
within a site. The detail report shows item information within each
product line in the site, total expired value, ending value, quantity on
order, expired quantity, and ending quantity.
Inventory Valuation Reports
Inventory valuation reports display the inventory value of quantities on
hand by product line or location. Some reports show inventory values as
of a specified date. You can include negative inventory in each report, and
on some you can select whether items with an initial GL value of zero are
valued using this initial zero or the first available cost.
• Use Inventory Valuation Report (3.6.13) to review the value of
inventory in a site by product line or item number. The total value of
each item is shown, with a grand total for the product line.
• Use Inventory Valuation by Location (3.6.14) to review the value of
inventory in each location of a site by product line or item number.
The total value of each location is shown, with a grand total for the
site.
• Use Inventory Valuation as of Date (3.6.15) to review the value of all
items in a product line as of a user-specified date. The total inventory
in each site is shown, with a grand total for the product line.
Inventory Control
• Use Inventory Valuation as of by Loc (3.6.16) to review the value of
inventory in each location of a site on a user-specified date. The total
value of each location is shown, with a grand total for the site. To
have the system consider locations that have had detail records
deleted since the effective date, set Recalculate Deleted Locations to
Yes.
Stock Journal
In many countries, businesses are required to validate inventory
movement over a range of dates to verify that no fraud occurred in
inventory accounting.
Use Stock Journal (3.6.18) to validate the movement in inventory
balances over a range of dates. The report shows all inventory
transactions, together with beginning and ending stock balances.
In addition, the report contains the following information for each
inventory movement:
• Shipper number
• Invoice number when appropriate
• Order number when appropriate
• Quantity received or issued
• Transaction date
• Effective date
• Customer or supplier address code
• Internal transaction number for tracking purposes
• Transaction type
Device History Record Report
Use Device History Record Report (3.6.20) to display the production
history of a finished device—if it is a serialized end item—or an end lot of
finished devices. Multiple levels of component history can be included.
The output of this report can be used by medical device manufacturers to
help satisfy the reporting requirements outlined in Food and Drug
Administration 21 CFR Part 820, that require the following information:
301
302
User Guide — Master Data
• The dates of manufacture
• The quantity manufactured
• The quantity released for distribution
• Any device identifications and control numbers used
The report includes the components used, their lot or serial numbers, the
date of issue, the ID of the user who performed the issue transaction, and
the transaction number. In addition the labor recorded is displayed with
the user ID of the user who recorded the labor and the transaction ID.
Checking Inventory Availability
Use the following programs to quickly check inventory locations and:
Tip
Nettable inventory
is available to
allocate.
• Use Inventory Detail by Item Browse (3.2) to see an item’s total
nettable and non-nettable inventory, sorted by site. Item location
information is also shown.
• Use Inventory Detail by Site Browse (3.3) to see the total quantities
on hand by site, sorted by item number. Item location information is
also shown.
• Use Stock Availability Browse (3.17) to review stock availability in a
single site or in all sites.
• Use Allocated Inventory Inquiry (3.18) to review total item quantities
on hand for a site. Allocated and unallocated quantities for an item are
also shown. Allocated quantity detail information includes:
• Type of order (sales order or work order)
• Order number
• Quantity allocated
• If it is a detail (Picked) or a general (Qty Alloc) allocation
• Use Unallocated Inventory Inquiry (3.19) to review non-detail-
allocated inventory for a specified item, by site and location. Site
information shows quantity on hand and quantity allocated. Location
information shows unallocated quantity for the location. Expiration
date and grade are also shown. Unallocated quantity can include
quantities reserved by general allocations.
Chapter 10
Physical Inventory
This chapter explains how to use the system to determine how much
physical inventory is actually on hand.
Introduction
304
Deleting/Archiving Old Tags
304
Freezing Inventory Balances
305
Creating/Printing Tags
305
Entering Initial Tag Counts
Reviewing Results
306
307
Zeroing/Voiding Unused Tags
307
Updating Inventory Balances
307
304
User Guide — Master Data
Introduction
¶ See “Performing
Cycle Counts” on
page 295 for
details.
Physical Inventory enables you to count and compare actual, on-hand
inventory balances with on-hand quantities maintained in the system.
This can also be done with cycle counting.
To perform a physical inventory count, first determine the items you want
to count and the count frequency. Each item to be counted must have a
system-generated count tag, used to record item count information.
The steps for conducting a physical inventory are:
1
Delete the tags from the previous physical inventory.
2
Freeze inventory balances.
3
Create and print tags.
4
Enter initial tag counts.
5
Review results and enter recounts if necessary.
6
Void/zero count unused tags.
7
Update inventory balances.
Deleting/Archiving Old Tags
Before creating new tags for an inventory count, delete tags from the last
count using Tag Delete/Archive (3.16.23). This program:
• Deletes specified tags.
• Archives deleted tag information.
• Generates a report showing all deleted tags.
Typically, you delete only tags that have been posted using Inventory
Balance Update (3.16.21).
Delete. Enter No to review tags selected for deletion without actually
deleting them. The system generates a report showing tag numbers
selected for deletion and whether they have been posted or voided.
Enter Yes to actually delete selected tags.
Archive. Enter Yes to have deleted tag information archived.
Physical Inventory
305
Archive File. Enter the file to which you want the system to archive
deleted tag information.
Freezing Inventory Balances
After deleting old tags, freeze the inventory to be counted using Inventory
Balance Freeze (3.16.4). The system records the current quantity on hand
for all selected inventory and uses this record to carry out the inventory
count.
Note Freezing inventory does not prevent the system from processing
regular inventory transactions. Changes to inventory during a count must
be included for the count to be accurate.
Select inventory to be frozen using one or more of the following criteria:
• Site
• Location
• Product Line
• Item Number
• ABC Class
Creating/Printing Tags
Each item to be counted needs a tag showing the item’s site, location, and
item number. Then record count information on the tag. In the event of a
recount, recount information goes on the same tag.
The system provides two types of count tags: item and bulk. Use Item Tag
Create (3.16.1) to create tags for selected items. You can select items by
item number, site, product line, or ABC class. Enter no selection criteria
to create tags for all items in your system.
Use Bulk Tag Create (3.16.2) to create bulk tags. Bulk tags are the same
as item tags, except that the item information on bulk tags is blank. Use
bulk tags to count items that do not have item tags.
Tip
Specify a single
selection (site
10000) or a range
(site 10000 to
20000). To select
all items, leave the
range blank.
306
User Guide — Master Data
To find out how many bulk tags you need, use any one of the following:
• Tag Inquiry (3.16.8)
• Tag Report (3.16.13)
• Uncounted Tag Report/Update (3.16.15)
Tip
In the event of
errors, delete
incorrect tags using
Tag Delete/Archive
(3.16.23), then
recreate and print
new ones.
After creating count tags, use Tag Print (3.16.6) to print both types of
tags. You can print tags on most standard-size forms. Default forms are
set to print on 3 x 5 inch card stock. You can optionally print the tag
number in bar code format if your system is formatted to do so.
Note Before deleting bulk tags, void the tags using Tag Void Status
Update (3.16.7).
Entering Initial Tag Counts
Tip
At this point, only
the frozen
inventory quantities
are updated.
After counting tagged items, enter the count in the system using Tag
Count Entry (3.16.11). Tag Count Entry accepts all quantities, even those
that are out of tolerance. Enter any changes resulting from post-freeze
inventory transactions.
Example The frozen quantity of Item Z is 100. After inventory freeze,
50 units of Item Z are issued. The inventory count shows 47 units of Item
Z on hand. Enter a count quantity of 97 (50 + 47).
Fig. 10.1
Tag Count Entry
(3.16.11)
Physical Inventory
Reviewing Results
After entering count results, review the results using Inventory Variance
Report (3.16.18). Look for out-of-tolerance quantities or other problems.
You can print the report by variance amount.
Recount out-of-tolerance items. Use Tag Recount Entry (3.16.12) to enter
recount information on the same item tags or bulk tags used for the initial
count.
Zeroing/Voiding Unused Tags
Before a count is complete, all tags must be either counted or voided. Use
Uncounted Tag Report/Update (3.16.15) to ensure that all item and bulk
tags are accounted for. This report shows only tags that have not been
voided or set to zero.
Set Tag Count to Zero. Some tags may be left over, either because
items were not found or were counted using bulk tags. These cannot
be voided. Set this field to Yes for leftover tags.
Use Tag Void Status Update (3.16.7) to declare unused bulk tags void.
Only voided bulk tags can be deleted.
Updating Inventory Balances
When all tags are accounted for and count results are satisfactory, use
Inventory Balance Update (3.16.21) to update quantity-on-hand balances.
The system changes each item’s quantity on hand to the difference
between the frozen quantity on hand and the count quantity.
Example The frozen quantity of Item Z is 100. The count quantity (50
issued, 47 counted) is 97. The update quantity is –3. The updated quantity
on hand for Item Z is 97.
307
308
User Guide — Master Data
SECTION 2
Global Tax
Management
This section describes how to set up and use Global Tax Management
(GTM).
Introduction to GTM
Implementing GTM
Processing GTM
311
315
353
310
User Guide — Master Data
Chapter 11
Introduction to GTM
This chapter provides a general overview of the Global Tax
Management (GTM) module.
Global Tax Management
Tax Elements
313
312
312
User Guide — Master Data
Global Tax Management
Global Tax Management (GTM) supports multinational enterprises in
calculating taxes on business transactions. The types of taxes, the
formulas used to calculate them, and when taxes are assessed often vary
considerably between countries. GTM can process taxes for multiple
countries within the same database.
Features
GTM offers an unlimited number of taxes and rates—each associated with
customers, suppliers, or items. You can also define when taxes are
calculated, the formula used to calculate them, and the amount subject to
tax.
GTM also supports the following situations and conditions:
• Taxes based on geographic location, effective date range, tax class,
item usage, or the nature of a company’s business
• Tax exemptions
• Taxation by line item or by order total
• Taxes based on a percentage of the item amount
• Trailer charges with multiple tax classes
• Luxury taxes for item amounts greater than a specified value
• Capped taxes that cannot exceed a specified maximum
• Taxes that include other tax amounts
• Purchase taxes recoverable against tax collected on sales
• Ability to override system-calculated tax amounts during transaction
entry
• Reverse calculation of tax amounts from line items that already
include tax
• Taxes your company absorbs rather than passes on to the customer
• Remittance of purchase taxes directly to the government instead of to
the supplier
Introduction to GTM
• Exclusion of credit term discounts from tax amounts
• Ability to generate general ledger entries for purchase taxes at receipt
of goods or supplier invoice
Since GTM accommodates a variety of taxation conditions, manual
overrides of automated calculations are usually not needed. Furthermore,
once GTM is set up, updates are very simple.
Considerations
• GTM does not currently support unit-based taxes, such as $0.05 per
can of soda.
• GTM does not calculate taxes on distribution orders generated by the
Distribution Requirements Planning module. In this situation,
generate sales orders instead of distribution orders.
• GTM does not adjust sales commission reporting. Commissions are
always based on item prices including tax. Adjust your commission
structure to compensate.
Tax Elements
Every country in the world has a unique system for assessing taxes.
However, most systems share common elements:
• Business transactions can be subject to many kinds of taxes—sales
taxes, domestic import duties, inventory transfer taxes, royalty fees,
and so on. In GTM, a tax that is peculiar to a region and individually
calculated and reported is a tax type.
• Regions that assess tax include countries (or groups of countries),
states, provinces, counties, districts, and cities. In GTM, a region that
assesses tax is a tax zone.
• Within a tax zone, a tax type can affect all people and items, or only
some of them. In GTM, customers, suppliers, and items can be
grouped by tax class. Similarly, a tax can be assessed at a different
rate based on a customer’s operation or how items are used. GTM can
group people and items by tax usage.
313
314
User Guide — Master Data
• The three factors that can determine which tax types apply to a
transaction are the ship-from and ship-to tax zones and the tax class
of the customer or the supplier. In GTM, the set of tax types for a
specific ship-to/ship-from zone and tax class combination is a tax
environment.
• A tax type can have multiple tax rates for different item tax classes,
tax usages, and transaction tax dates. GTM selects the rate most
appropriate for a particular transaction.
Example Figure 11.1 illustrates how these factors interact. A German
automobile manufacturer exports luxury cars to the United States. U.S.
tax rates depend on the class of the vehicle. For example, the rate for
luxury cars is 30%.
In Global Tax Management, Germany and the U.S. are tax zones. The
automobile manufacturer is a customer tax class subject to the U.S.
import tax. Luxury cars are an item tax class subject to a rate of 30% for
the import tax. The sales order tax environment associates the import tax
with the order, and GTM selects the tax rate based on the item tax class for
luxury cars.
Fig. 11.1
GTM Example
Ship-From
Tax Zone
Germany
Ship-To
Tax Zone
U.S.
Customer
Tax Class
Auto
Tax Environment
Germany to U.S.
Tax Type
Import Tax
Tax
Taxon
onSales
Sales
Order
Order
Item Tax
Class
Luxury
Tax Rate
30%
Chapter 12
Implementing GTM
This chapter describes the data required to set up GTM and define
special kinds of taxes.
Implementation Overview
316
Setting Up Tax Jurisdictions
Setting Up Tax Types
317
320
Setting Up Tax Classes and Usages
Setting Up Rounding Methods
323
Setting Up Tax Environments
Setting Up Trailer Charges
Setting Up Tax Bases
328
329
Setting Up GL Accounts
Setting Up Tax Rates
324
331
332
Setting Up GTM Control
339
Updating Other Records
341
Implementing Special Taxes
343
321
316
User Guide — Master Data
Implementation Overview
Table 12.1 lists the activities and functions used to implement Global Tax
Management (GTM).
Table 12.1
Programs Used to
Implement GTM
¶ See External
Interface Guide:
Sales and Use
Tax.
Activity
Use this program...
Setting up country codes
Country Code Maintenance (2.14.1)
Setting up state/province and county
codes
Generalized Codes Maintenance (36.2.13)
Setting up tax zones
Tax Zone Maintenance (2.13.3.13)
Setting up tax types
Tax Type Maintenance (2.13.1.1)
Setting up tax classes and tax usages
Tax Class Maintenance (2.13.1.5)
Tax Usage Maintenance (2.13.1.9)
Setting up rounding methods
Rounding Method Maintenance (2.13.1.17)
Setting up tax environments
Tax Environment Maintenance (2.13.5.1)
Setting up trailer charges
Trailer Code Maintenance (2.19.13)
Trailer Tax Detail Maintenance (2.13.1.21)
Setting up tax bases
Tax Base Maintenance (2.13.1.13)
Setting up general ledger accounts
Account Code Maintenance (25.3.13)
Sub-Account Code Maintenance (25.3.17)
Cost Center Code Maintenance (25.3.20)
Setting up tax rates
Tax Rate Maintenance (2.13.13.1)
Tax Rate Copy/Update (2.13.13.5)
Setting up the control program
Global Tax Management Control (2.13.24)
Updating existing base records
Customer Maintenance (2.1.1)
Supplier Maintenance (2.3.1)
End User Address Maintenance (11.9.1)
Product Line Maintenance (1.2.1)
Item Master Maintenance (1.4.1)
Service Category Maintenance (11.21.9)
Note U.S. and Canadian taxes can also be calculated using an external
Sales and Use Tax system. In this case, GTM must be set up based on
special requirements.
Implementing GTM
317
Setting Up Tax Jurisdictions
The first step to implementing GTM is setting up codes that define
countries, states, provinces, counties, and tax zones.
Setting Up Country Codes
Set up country codes in Country Code Maintenance (2.14.1). After
defining country codes, specify the default code for most tax zones
records in Global Tax Management Control (2.13.24).
¶ See “Setting Up
Country Codes”
on page 194.
Setting Up State, Province, County Codes
GTM uses state/province and county codes to determine the correct tax
zone for an address. If these codes are inconsistent, the system may assign
the wrong tax zone. Use Generalized Codes Maintenance (36.2.13) to
require users to enter a valid state, province, or county code by setting up
values for fields ad_state and ad_county.
Note After you set up validation, you cannot leave these fields blank
during data entry.
Setting Up Tax Zones
Tax zones identify geographic regions subject to the same set of tax types
and levels of tax reporting. All customer, supplier, and company address
records belong to a tax zone. On sales, purchasing, and other transactions,
the system uses tax zones to determine the tax environment.
A separate tax zone is required for each country, state, province, county,
city, and postal zone that has distinct tax reporting requirements. Since
one tax zone can include reporting and tax calculations for another, tax
zones are organized into hierarchies. Set up higher-level zones before
lower-level ones. For example, set up countries before their component
states, states before counties, and so on.
¶ See User Guide:
Manager
Functions for
information on
generalized
codes.
318
User Guide — Master Data
Tax Zone Hierarchies
How you set up a tax zone depends on its position in the hierarchy. To
include a tax zone in the tax total and reporting for another zone, specify
the first zone’s sums-into zone. The sums-into zone can be at a higher
level or at the same level.
For example, a city tax zone included in provincial tax reporting sums
into the provincial tax zone. Or, a tax zone for a suburb included in
metropolitan tax reporting sums into the city tax zone. In the tax zone
record, specify whether the first zone has its own subtotal on the main
report and whether it also has its own reporting.
Fig. 12.1
Tax Zone
Hierarchies
Parent-Component Hierarchy
CAN
CAN-QUE
CAN-ALB
CAN-ONT
Phantom Hierarchy
CA
LA-CO
LA-CITY
PASA
Subtotal
Subtotal Reporting
Reporting
Tax
TaxZone
Zone This
ThisLevel
Level Zone
Zone
CAN
Yes
Yes
CAN
Yes
Yes
CAN-QUE
Yes
Yes
CAN-QUE
Yes
Yes
CAN-ALB
Yes
Yes
CAN-ALB
Yes
Yes
CAN-ONT
Yes
Yes
CAN-ONT
Yes
Yes
Subtotal
Subtotal Reporting
Reporting
Tax
ThisLevel
Level Zone
Zone
TaxZone
Zone This
CA
Yes
Yes
CA
Yes
Yes
LA-CO
Yes
Yes
LA-CO
Yes
Yes
LA-CITY
Yes
Yes
LA-CITY
Yes
Yes
RES
No
No
RES
No
No
PASA
No
Yes
PASA
No
Yes
RES
Figure 12.1 illustrates two hypothetical tax zone hierarchies.
• Parent-Component Hierarchy. The Canadian provinces Quebec,
Alberta, and Ontario are subject to both federal and provincial taxes.
The component tax zones CAN-QUE, CAN-ALB, and CAN-ONT
sum into zone CAN. All four zones are reporting zones in their own
right and are subtotaled.
• Phantom Hierarchy. Reseda, a suburb of Los Angeles, is taxed in the
same way as Los Angeles and does not have a subtotal on the city tax
report. Tax zone RES sums into LA-CITY but is not subtotaled and is
not a separate reporting zone.
Implementing GTM
Pasadena is subject to Los Angeles county tax and does not have a
subtotal on the county tax report. Tax zone PASA sums into zone
LA-CO. It is not subtotaled but is a distinct reporting zone.
Tax Zone Maintenance
Set up tax zones in Tax Zone Maintenance (2.13.3.13). To verify data
setup, use Tax Zone Browse (2.13.3.14) and Report (2.13.3.15). To verify
sums-into relationships, use Tax Hierarchy Browse (2.13.3.17) and
Report (2.13.3.18).
Fig. 12.2
Tax Zone
Maintenance
(2.13.3.13)
Tax Zone. Enter a 16-character code to identify a unique geographic
region for tax types. Set up tax zones for every level at which separate
tax calculations and reporting are required, starting with the top level
and working downward. For example, set up countries before states,
states before counties, and so on.
Description. Enter the description of the tax zone. You are not
prevented from entering the same description for multiple tax zones.
The description prints on most reports and browses, as space permits.
Country Code. This code identifies the country that assesses tax. For
new tax zones, the value defaults from Global Tax Management
Control (2.13.24).
319
320
User Guide — Master Data
State. Enter the code for the state or province included in the tax
zone.
County. Enter the code for the county included in the tax zone.
City. Enter the name of the city included in the tax zone.
Post. If necessary, enter the postal code included in the tax zone. If
taxes never vary by postal code, do not set up tax zones by postal
code.
Subtotal This Level. Enter Yes or No to determine whether custom tax
reports can show subtotals for this tax zone. No standard reports show
tax amounts by tax zone.
Reporting Zone. Enter Yes or No to identify whether the tax zone
directly assesses tax.
Sums-Into Tax Zone. Enter a code identifying the parent tax zone that
actually assesses tax for the geographic region defined above. The
description, country code, state, county, city, and postal code display.
¶ See “Setting Up
GTM Control” on
page 339.
In addition to the geographic tax zone codes, set up an error code and
specify it in Global Tax Management Control (2.13.24). When you enter
or update an address record, GTM attempts to match the address to a tax
zone for the country, state/province, county, and city. If it cannot find a
tax zone for the country, it assigns the error zone.
To make it easier to identify error conditions, set up a meaningful code,
such as ERROR-ZONE.
Setting Up Tax Types
Tax types are individually calculated and reported as regional taxes or tax
exemptions. Examples include Canadian PST/GST, California sales tax,
federal excise tax. On transactions, the system calculates taxes for line
items and trailer charges based on the tax types specified in their tax
environments.
Tip
Preface the type
with the country
code or state/
province.
A separate tax type is required for each tax or tax exemption you report
separately. The tax detail reports print in alphanumeric order by tax type
code. Consider this when assigning codes for tax types.
Implementing GTM
321
Set up tax types in Tax Type Maintenance (2.13.1.1). To verify data setup,
use Tax Type Browse (2.13.1.2) and Report (2.13.1.3).
Fig. 12.3
Tax Type
Maintenance
(2.13.1.1)
Tax Type. Enter a 16-character code for a tax or tax exemption that is
separately calculated and reported to a specific jurisdiction.
Description. Enter the description of the tax type. Description prints
on most reports and browses, as space permits.
Setting Up Tax Classes and Usages
Depending on your tax system, set up tax class and/or tax usage codes to
accommodate differences in taxation within a tax zone. Table 12.2 lists
some typical situations and describes how to implement them.
Table 12.2
Situation
Implementation
Customers and/or suppliers in a tax zone
are subject to different tax types or tax
exemption types.
Set up tax classes for these customers and/
or suppliers.
Product lines and/or items are subject to
different tax types or tax exemption types.
Items are always subject to the tax types in
the line item tax environment. There is no
way to override this. You can set up tax
classes for product lines and items.
However, they are only used to select tax
rates.
On sales transactions, trailer charges are
subject to different tax types or tax
exemption types.
Trailer charges are always subject to the tax
types in the transaction tax environment.
There is no way to override this. You can
set up tax classes for trailer charges;
however, they are only used to select tax
rates.
Customers and/or suppliers are subject to
different tax rates for a tax type.
Set up tax usages for these customers and
suppliers.
Tax Classes vs. Tax
Usages
322
User Guide — Master Data
Situation
Implementation
Items are subject to different tax rates for a If items have the same rates on all
tax type.
transactions, set up tax classes. However, if
rates can differ by transaction, based on the
intended usage of the item, set up the tax
usage codes to reference during transaction
entry.
Trailer charges are subject to different tax
rates for a tax type.
Set up tax classes for these trailer charges.
Set up tax class codes in Tax Class Maintenance (2.13.1.5). To verify data
setup, use Tax Class Browse (2.13.1.6) and Report (2.13.1.7).
Fig. 12.4
Tax Class
Maintenance
(2.13.1.5)
Tax Class. Enter a 3-character code that identifies a group of
customers, suppliers, product lines, items, service categories, or
trailer charges subject to special taxation.
• For customers and suppliers, the tax class helps determine the tax
environment.
• For product lines, the tax class determines the tax rate for new
items.
• For items, service categories, and trailer charges, the tax class
helps determine the tax rate for tax types in the tax environment.
For more detailed tax exemption reporting, remember to set up tax
classes for exemptions.
Description. Enter a description of the tax class. The description
prints on most reports and browses, as space permits.
Set up tax usage codes in Tax Usage Maintenance (2.13.1.9). To verify
data setup, use Tax Usage Browse (2.13.1.10) and Report (2.13.1.11).
Fig. 12.5
Tax Usage
Maintenance
(2.13.1.9)
Implementing GTM
323
Tax Usage. Enter an 8-character code that identifies a group of
customers, suppliers, or items subject to special taxation on a specific
transaction.
Description. Enter a description of the tax usage. The description
prints on most reports and browses, as space permits.
Setting Up Rounding Methods
During transaction entry, the system calculates numbers that must be
rounded up or down to the nearest tenth, hundredth, or other unit before
they can be printed on reports or displayed on the screen.
Rounding conventions vary by country and tax requirements. In GTM,
you can define multiple rounding methods and assign the appropriate one
to each tax type in the tax environment.
Three rounding methods are supplied:
• 0 (rounding to ones)
• 1 (rounding to tenths)
• 2 (rounding to hundredths)
If you need additional rounding methods, define them in Rounding
Method Maintenance (2.13.1.17). To verify data setup, use Rounding
Method Browse (2.13.1.18) and Report (2.13.1.19).
Note Rounding methods can also be associated with currencies.
Rounding Method Maintenance is also available as option 36.2.9.
Fig. 12.6
Rounding Method
Maintenance
(2.13.1.17)
Rounding Method. Enter a 1-character numeric code that identifies a
method for rounding calculated amounts. Codes 0, 1, and 2 are
system supplied.
324
User Guide — Master Data
Description. Enter a description of the rounding method. The
description prints on most browses and reports, as space permits.
Rounding Unit. The rounding unit must be an integer or a decimal that
is a power of 10 multiplied by the numbers 1 or 5. Common rounding
units are 1, 10, 0.01, and 0.10. You cannot change the rounding unit
for standard methods 0, 1, and 2.
Rounding Threshold. Specify the point at which transaction tax
amounts are rounded up or down. For methods 0, 1, and 2, the default
rounding thresholds are 0.5, 0.05, and 0.005, respectively. Amounts
less than these thresholds are rounded down, and amounts higher than
or equal to higher amounts are rounded up.
The rounding threshold can be any number for rounding to the nearest
dime, nickel, quarter, centavo, pfennig, and so on. Rounding is based
on the absolute value of the amount to be rounded. (–9.99 rounds to
–10.0 just as 9.99 rounds to 10.0.) You can change the rounding
threshold for standard methods 0, 1, and 2.
Decimal Point. Specify whether the decimal point is a period or a
comma.
Setting Up Tax Environments
Transactions are subject to the tax laws of both your company and the
customer or supplier. Before the system calculates taxes, it determines
which taxes (state sales tax, local tax, VAT, and so on) apply to the
addresses that ship and receive the goods.
A tax environment is the set of tax types that applies to a combination of
ship-from and ship-to tax zones and optionally a customer or supplier tax
class.
Before you set up tax environments, identify the combinations of tax
types that apply to transactions. Then, determine the tax zones and
customer/supplier tax classes that are subject to these tax groups.
Implementing GTM
325
You can simplify setup of tax environments. If all shipments to or from a
tax zone are taxed the same way, leave the tax zone blank. You may be
able to specify a sums-into tax zone that encompasses many lower-level
zones. Finally, you can leave the tax class blank if the tax types apply to
all customers and suppliers in the indicated tax zones.
Each tax type in the environment has a calculation sequence and rounding
method. The sequence determines the priority for calculating taxes when
there are multiple tax types in the environment. The rounding method
determines how the tax type is rounded.
Example Suppose that shipments that start and end in the U.S. state of
Florida can be subject to (1) state tax only, (2) state and county tax, or (3)
state, county, and city tax. Sample tax environments are illustrated in
Tables 12.3 through 12.5. The tax types apply to all tax zone
combinations in the environments.
Table 12.3
Ship-From Zone Ship-To Zone
Tax Class Tax Type
Sequence
Rounding
FL
–
1
2
FL
FL-STATE
Default Florida
State Tax
Environment (1)
DRUG
FOOD
Table 12.4
Ship-From Zone Ship-To Zone
Tax Class Tax Type
Sequence
Rounding
FL
FL-ALTSP
–
FL-STATE
1
2
FL
FL-LMARY
DRUG
FL-SEMCO 2
2
FL
FL-LONGW
FOOD
FL
FL-SANFO
FL
FL-WINSP
Environment for
Cities Subject to
Florida Tax and
Seminole County
Tax (2)
Table 12.5
Ship-From Zone Ship-To Zone
Tax Class Tax Type
Sequence
Rounding
FL
FL-APOPK
–
FL-STATE
1
2
FL
FL-LUNDE
DRUG
FLORACO
2
2
FL
FL-OCOEE
FOOD
FL-ORLAN 3
2
FL
FL-OVIED
FL
FL-WINPK
Environment for
Cities Subject to
Florida Tax,
Orange County
Tax, and Orlando
City Tax (3)
326
User Guide — Master Data
Set up tax environments in Tax Environment Maintenance (2.13.5.1). To
verify data setup, use Tax Environment Browse (2.13.5.2) and Report
(2.13.5.3).
Fig. 12.7
Tax Environment
Maintenance
(2.13.5.1), Tax
Zones/Tax Class
Combinations
Tax Environment. Enter a 16-character code that identifies a set of tax
types for a tax zone/tax class combination. On transactions, this code
identifies the transaction or line item tax environment.
Description. Enter a description of the tax environment. Unique
descriptions make selecting zones easier, but the system does not
prevent you from entering the same description for multiple tax
environments. The description prints on most reports and browses, as
space permits.
Ship-From Zone. You can specify the tax zone from which goods are
shipped. However, if all shipments to the environment’s ship-to zone
are taxable regardless of origin, leave the ship-from zone blank.
Ship-To Zone. You can specify the tax zone to which goods are
shipped. However, if all shipments from the environment’s ship-from
zone are taxable regardless of destination, leave the ship-to zone
blank.
TxC (Tax Class). You can enter tax classes for customers and/or
suppliers subject to the tax types in the environment. If all shipments
are taxable regardless of customer or supplier, leave the tax class
blank. Do not enter item tax classes; GTM only uses these to select
tax rates.
Description. This field contains a description of the combination of
ship-from, ship-to, and tax class.
Implementing GTM
327
Fig. 12.8
Tax Environment
Maintenance
(2.13.5.1), Tax
Types, Sequences,
and Rounding
Methods
Tax Type. Enter the type codes to include in the environment. The
codes you enter apply to all combinations of ship-froms, ship-tos, and
tax classes in the environment.
Seq (Sequence). Specify the priority in which tax types are
calculated in a tax environment. The tax type that is calculated first
must have a lower sequence number than the other tax type. If all
taxes are calculated independently of each other, leave the sequence
number for all tax types set to 1.
In tax-on-tax situations in which a tax includes another tax amount,
enter a lower sequence number for the tax that is calculated first. For
example, in some Canadian provinces, provincial sales tax (PST) is
based on the item amount plus the goods and services tax (GST). GST
has a lower sequence number than PST.
¶ See “Tax-on-Tax”
on page 349.
R (Rounding Method). Rounding method determines how tax
amounts for the tax type are truncated. The rounding method defaults
from Global Tax Management Control (2.13.24), but you can
override it if the tax type requires a different method.
Type Description. This field contains the tax type description.
In addition to the other tax environment codes, set up an error code and
specify it in Global Tax Management Control (2.13.24). When you enter a
transaction, GTM attempts to match the ship-to/ship-from tax zones and
customer or supplier tax class to a tax environment. If it cannot find one,
it assigns the error environment. To make it easier to identify error
conditions, set up a meaningful code such as ERROR-ENVIRON.
¶ See “Setting Up
GTM Control” on
page 339.
328
User Guide — Master Data
Setting Up Trailer Charges
Sales transactions often have additional charges such as freight, service,
and labor that are independent of individual line items. In the system,
these charges are known as trailer charges because they appear at the end
of the transaction.
Each trailer charge has a default taxable status and an optional default tax
class. This information is defined in the trailer code record. However, in
GTM, you can also set up trailer charge detail records to support
exception conditions when a trailer charge has a different taxable status
and/or tax rate for some tax types and customer tax classes.
Example If service charges are normally exempt from California sales
tax but professional services are taxable at 5%, you can set this up in at
least two ways.
• If you defined tax types for tax exemptions, define a taxable trailer
code. Set up a taxable trailer tax detail for the tax type/tax class
combination. Finally, set up a 0% tax rate for exempt trailer charges
and a 5% rate for the professional services class.
• If you plan to report all exempt amounts under tax type NON-TAX,
define a non-taxable trailer code. Set up a taxable trailer tax detail for
the tax type/tax class combination. Finally, set up a 5% tax rate for the
professional services class. You do not need a 0% tax rate because
this is supplied by default.
If you have not already implemented trailer code records, do so in Trailer
Code Maintenance (2.19.13). Then, identify the exception conditions and
set up the corresponding records in Trailer Tax Detail Maintenance
(2.13.1.21). To verify data setup, use Trailer Code Browse (2.19.14) for
trailer codes and the Trailer Tax Detail Browse (2.13.1.22) and
Report (2.13.1.23) for trailer tax details.
Fig. 12.9
Trailer Tax Detail
Maintenance
(2.13.1.21)
Implementing GTM
329
Trailer Code. Enter a trailer code previously set up in Trailer Code
Maintenance (2.19.13). You can set up trailer tax details for a
maximum of 99 trailer codes. However, you can set up an unlimited
number of trailer tax details per trailer code.
Tax Type. Specify the tax type subject to special treatment for this
trailer charge.
Taxable. Specify whether amounts for this trailer code are taxable for
the tax type/tax class combination.
Tax Class. If applicable, enter the tax class subject to special
treatment for this trailer charge.
Setting Up Tax Bases
By default, tax is based on 100% of the item amount, exclusive of any
other tax amounts. However, an item’s tax can be based on some amount
that is greater or less than the item amount. In these situations, set up a tax
base record.
A tax base record is required whenever tax is based on a percentage of the
item amount. A tax base is also required whenever tax is based on the
item amount plus a previously calculated tax amount. This situation is
sometimes called tax-on-tax.
Example
• In Brazil, whenever you sell an old fixed asset and replace it with a
new one, tax is assessed on a percentage of the old asset’s sale price.
• In some Canadian provinces, PST (Provincial Sales Tax) includes the
GST (Goods and Services Tax) in the taxable base for PST.
Assign a tax base to multiple tax types and tax rates if the percentage of
value is the same for all situations. When you assign a tax type to a tax
base, the tax base becomes part of all tax environments that use tax type.
Set up tax bases in Tax Base Maintenance (2.13.1.13), shown in
Figure 12.10. To verify data setup, use Tax Base Browse (2.13.1.14) and
Report (2.13.1.15).
¶ See “Tax-on-Tax”
on page 349.
330
User Guide — Master Data
Fig. 12.10
Tax Base
Maintenance
(2.13.1.13)
Tax Base. Enter an 8-character code that describes an item amount
subject to tax. This amount can either be a percentage of sales price or
the sales price plus other tax amounts. For a tax-on-tax situation, set
up the tax base for the tax that is included in the taxable base for the
other tax.
Once you start processing transactions with GTM, a warning message
displays if you try to update a tax base that has already been used in
other records.
Description. Enter the description of the tax base. The description
prints on most reports and browses, as space permits.
Base Percent. Identify the percentage of the item’s price or cost to
use in tax calculations for this tax base. The default value is 100%.
Percentages can be either positive or negative. Negative percentages
indicate tax credits. The base percent must be the same for all tax
types assigned to the tax base. Otherwise, you must set up separate
tax bases.
On transactions, the system uses the base percent for the tax type to
calculate the taxable base amount for each line item or trailer charge.
Base Value. Identify the type of item amount for the taxable base. Do
not change this setting. The only supported type is sales price. Line
item and trailer charge amounts are taxed based on the price at which
you buy or sell them. GTM does not support tax based on general
ledger cost.
Implementing GTM
Line. The system automatically assigns a line number when you
assign a tax type to the tax base. Assign up to 99 tax types to a tax
base. When you add a new tax base, the system assigns the next
sequential line number. To display a previously entered tax type, enter
its line number. To delete a line, press F5 or Ctrl+D.
Tax Type. Assign the tax base to its tax types. During tax calculations,
the tax rate for the tax type is applied to the taxable base portion of
the item amount.
Description. This field contains a description of the tax type.
Setting Up GL Accounts
GTM calculates tax amounts separately for each tax rate. Before you set
up tax rate records, verify that you have all the necessary tax accounts,
sub-accounts, and cost centers in the general ledger (GL) chart of
accounts. If any are missing, set them up.
Depending on the nature of your tax rates, some or all of the tax amounts
listed in Table 12.6 are represented in the general ledger.
Table 12.6
Amount
Explanation
Sales tax
A liability credited for sales tax payable. It is updated by
Invoice Post (7.13.4) and AR DR/CR Memo Maintenance
(27.1).
Sales tax absorbed
A liability credited whenever your company absorbs tax
instead of charging it to the customer This occurs, for
example, when your company gives an item to a customer
but you still pay tax on it even though the sales price is
zero. It is updated by Invoice Post (7.13.4) and DR/CR
Memo Maintenance (27.1).
Recoverable tax
An asset debited for recoverable amounts or a liability
when treated as a contra account to sales tax payable. It is
updated by Purchase Order Receipts (5.13.1), PO Shipper
Receipt (5.13.20), and confirmed AP vouchers (28.1, 28.6,
28.7).
Retained tax
A liability credited when you withhold tax on purchases
and remit it directly to the government instead of to the
supplier. It is updated by Purchase Order Receipts
(5.13.1), PO Shipper Receipt (5.13.20), and the AP
voucher confirmation programs (28.6, 28.7).
Tax Amounts
Posted to GL
331
332
User Guide — Master Data
¶ See User Guide:
Financials A.
The relevant general ledger maintenance functions are as follows:
• Account Code Maintenance (25.3.13)
• Sub-Account Code Maintenance (25.3.17)
• Cost Center Code Maintenance (25.3.20)
To verify data setup, use browse and report programs in the General
Ledger Setup Menu (25.3).
After you update your chart of accounts, specify the default codes for new
tax rate records in Domain/Account Control (36.1). If necessary, you can
later override these codes for individual tax rates.
Setting Up Tax Rates
GTM tax rate records enable you to configure the software to support
many different kinds of taxes and transaction conditions. The major
decision points are as follows. Not all decisions apply to all tax types in
all countries.
¶ See
“Implementing
Special Taxes” on
page 343.
• The tax type, tax class, tax usage, and starting/ending date range to
which the tax rate applies
• The percentage used to calculate tax
• Whether taxes are calculated by line or by transaction total
• The taxable base, or item amount subject to tax
• The minimum/maximum item amounts subject to tax
• The amount of purchase tax that is recoverable against sales tax
• The tax calculation method
• Whether a user can override system-calculated tax amounts
• Whether tax amounts are reverse-calculated from item amounts that
already include tax
• The GL accounts, sub-accounts, and cost centers to which tax
amounts involving this tax rate are posted
• Whether the tax on purchased items sold as part of a service contract
are absorbed rather than collected
• Whether purchase tax amounts are retained and paid directly to the
government rather than remitted to suppliers
Implementing GTM
333
• Whether purchase taxes are accrued for GL reporting upon receipt of
goods or the supplier invoice
• Whether taxes are based on sales minus credit terms discounts or on
the full sales amount
Note Set up tax rates by tax class or tax usage only for exception
conditions. Otherwise, leave these fields blank so that the system can
apply the tax rate to as many transactions as possible.
Before you set up tax rate records, define the following default values in
Global Tax Management Control (2.13.24). For more information on
these fields, see the indicated pages:
• Tax Method (page 335)
• Tax-By-Line (page 335)
• Accrue Tax at Receipt (page 337)
• Discount Tax at Invoice (page 337)
• Discount Tax at Payment (page 337)
• Update Tax Allowed (page 336)
You can later override these values for individual tax rates. Subsequent
changes to the control program do not update existing rates.
Tax Rate Maintenance
To define tax rates, use Tax Rate Maintenance (2.13.13.1). To verify data
setup, use Tax Rate Browse (2.13.13.2) and Report (2.13.13.3).
Note If you change a tax rate once you start using it on transactions, a
warning displays. The system recalculates taxes on open transactions
whenever you access the transaction record.
¶ See “Setting Up
GTM Control” on
page 339.
334
User Guide — Master Data
Fig. 12.11
Tax Rate
Maintenance
(2.13.13.1)
Tax Type. Enter the tax type to which the rate applies.
Item Tax Class. If the tax rate applies only to a specific line item or
trailer charge tax class, enter it here. Leave this field blank if the tax
rate applies regardless of tax class. Do not set up rates by customer or
supplier tax class.
Tax Usage. If the tax rate applies only to a specific tax usage, enter it.
Leave blank if the tax rate applies regardless of tax usage.
Effective. Specify the starting date for using this tax rate in tax
calculations. If you do not specify a date, the system inserts the record
creation date. When you enter multiple tax rates, the default effective
date is the one in the last record entered.
Tax Code. Enter a code identifying this tax rate. If you do not enter a
code, the system increments it automatically from the Last Tax Code
in Global Tax Management Control (2.13.24). You can use prefixes to
designate groups of tax rates, but be aware that future tax rates will
have the same prefix unless you override it. Tax code has no
significance for auditing or accounting purposes.
Description. Enter the description of the tax rate. Description prints
on most reports and browses, as space permits.
Implementing GTM
335
Tax Rate. Specify the percentage used to calculate tax amounts for
this tax rate. How the rate is used in the calculation depends on the tax
method specified. To use tax types to report tax exemptions, also set
up zero-percent tax rates.
Tax-By-Line. Specify whether taxes on line item amounts are
calculated individually or by order total. On sales transactions, taxes
on trailer charges are always totaled for the order regardless of the
Tax-By-Line setting. Debit/credit memos also always calculate tax by
total.
To calculate taxes by total on purchase receipt and AP transactions,
you must set the following appropriately: Allow Tax Included,
Accrue Tax at Receipt, and Recoverable Percent.
¶ See “Value
Added Taxes
(VAT)” on
page 348.
Tax Base. If necessary, enter the code that identifies the portion of the
¶ See “Tax Based
on Partial Item
Amounts” on
page 345.
item amount subject to taxation. Leave this blank if the taxable base
for this tax rate is always 100% of the item price.
Min. Taxable. If necessary, enter the minimum transaction taxable
base amount to which this tax rate should be applied. How this field is
used in tax calculations depends on the tax method specified. Leave
blank if the tax rate applies equally to all item amounts.
¶ See “Luxury
Taxes” on
page 347.
Max. Taxable. If necessary, enter the maximum transaction taxable
¶ See “Capped
Taxes” on
page 347.
base amount to which this tax rate should be applied. How this field is
used in tax calculations depends on the tax method specified. Leave
blank if the tax rate applies equally to all item amounts.
Percent Recoverable. Specify a recoverable tax percentage if you are
able to offset some or all purchase tax amounts for this rate against
the amounts for this rate that you collect on sales. Otherwise, leave
set to 0.00%.
¶ See “Recoverable
Taxes” on
page 347.
Tax Method. Specify which calculation routine to use when this tax
rate is applied. The standard tax methods are 01, 02, 11. If you leave
this field blank, calculation method 01 is assumed.
If you are using the Sales and Use Tax Interface, specify tax method
20. If you are importing tax amounts from an external system and do
not want to recalculate them, specify method 03.
You can also define custom methods, but be sure to follow the
program naming convention.
¶ See page 345.
336
User Guide — Master Data
¶ See “Correcting
Transaction Tax
Amounts” on
page 361.
Update Tax Allowed. Decide whether users can modify system-
¶ See “ReverseCalculated
Taxes” on
page 351.
Allow Tax Included. Specify whether this tax rate reverse-calculates
calculated taxable base and tax amounts during transaction entry. This
feature is useful for overriding the system if there is a need to match
amounts on manually issued documents. However, the system does
not maintain an audit trail of changes. In some environments, the
government may require you to set this to No.
taxes from line item amounts on transactions for customers and
suppliers whose Tax In (tax included) status is Yes. If you set Allow
Tax Included to Yes, GTM reverse-calculates tax based on the tax
rate’s percentage and tax method.
A tax environment should have no more than one tax type with a rate
having Allow Tax Included set to Yes. Multiple tax-included rates can
lead to tax calculation errors.
Note Tax is always added to trailer charges regardless of the setting
of Tax In.
EC Sales List. This setting is used only on tax rates for European
Community countries with recoverable value-added taxes. If Yes,
sales and purchases that use these tax rates are included in the EC
Sales Listing (2.13.15.8), a report submitted to the government as
verification that recoverable purchase VAT claimed back by your
company is correct for the amount of VAT it collected on sales.
EC Process Work. This setting identifies tax rates that apply to work
performed in another European Community country.
Sales Tax Account. Identify the sales tax liability credited whenever
tax is calculated on sales to a customer. Account, sub-account, and
cost center default from Domain/Account Control (36.1), but you can
override them.
¶ See “Absorbed
Taxes” on
page 351.
Sales Tax Absorbed. Identify the sales tax liability credited whenever
your company pays tax instead of charging it to the customer. If the
tax rate is for an absorbed tax, set to Yes. Account, sub-account, and
cost center default from Domain/Account Control (36.1), but you can
override them.
Implementing GTM
337
AP Tax Account. Identify the asset debited for recoverable purchase
and accounts payable taxes, or liability when treated as a contra
account to sales tax payable. Account, sub-account, and cost center
default from Domain/Account Control (36.1), but you can override
them.
AP Tax Retained. Identify the liability account credited whenever
your company remits tax amounts directly to the government instead
of to the supplier. If the tax rate is for a retained tax, set this option to
Yes. Account, sub-account, and cost center default from Domain/
Account Control (36.1), but you can override them.
¶ See “Retained
Taxes” on
page 350.
Expiration Date. Use this field to phase in expiration dates for
obsolete tax rates. This date is the last day when the tax rate can be
used on transactions.
Accrue Tax at Receipt. This setting determines whether the system
creates GL entries for purchase tax amounts upon receipt of goods or
receipt of the supplier invoice. By default, the tax point is goods
receipt. However, for recoverable tax rates, set Accrue Tax at Receipt
to No, because you cannot deduct the recoverable portion of tax paid
on purchases against tax collected on sales until you confirm the
voucher for the supplier invoice.
If you are using Logistics Accounting, this field determines when GL
entries for taxes on both inbound and outbound logistics charges are
created.
The tax point does not affect tax calculations on transactions. The tax
amounts display regardless of when the GL entries are created.
¶ See “General
Ledger Effects”
on page 362.
¶ See “Calculating
Taxes for
Logistics
Charges” on
page 233.
Accrue Tax at Usage. This field only applies if you have activated the
optional Supplier Consignment Inventory module in Consignment
Control.
¶ See User Guide:
Distribution B.
Discount Tax at Invoice. This setting determines whether the tax rate
¶ See “Discounted
Taxes” on
page 349.
calculates taxes based on the sales amount minus credit terms
discounts, but displays an order net total of full sales amount plus
discounted tax amount. If tax is based on the full sales amount, set
this to No.
Discount Tax at Payment. This setting is similar to Discount Tax at
Invoice, except that the net order total is the discounted sales amount
plus the discounted tax amount.
338
User Guide — Master Data
Comments. Set to Yes to record transaction comments for the tax rate.
This is useful for recording government regulations and other legally
required text for tax reports.
Tax Rate Copy/Update
To streamline the task of entering tax rates, group the required rates for a
tax type/item tax class/tax usage/effective date combination. Set up a
generic rate first, then copy with Tax Rate Copy/Update (2.13.13.5) and
customize it as necessary.
Fig. 12.12
Tax Rate Copy/
Update (2.13.13.5)
Current Tax Code. Enter the tax code of the tax rate to copy. The tax
type, item tax class, tax usage, current effective date, current tax rate
percentage display for the selected rate.
New Tax Code. Leave blank for the system to assign the next
available tax code, incremented from the Last Tax Code value in
Global Tax Management Control (2.13.24). Alternately, enter a
previously unassigned value.
New Effective Date. Specify the starting date for using the new tax
rate in tax calculations. If you do not specify a date, the system inserts
the record creation date. When you enter multiple tax rates, the
default effective date is the one in the last record entered.
New Tax. Enter the percentage for the new tax rate.
Tax Rate Copy/Update redisplays information from the source tax rate
and allows you to customize settings.
Implementing GTM
339
Setting Up GTM Control
In Global Tax Management Control (2.13.24), enter the following values
to complete setup of the control program.
Fig. 12.13
Global Tax
Management
Control (2.13.24)
These field
affect tax
history and
reporting.
Tax Zone. Enter the default tax zone to be used during transaction
entry when the system cannot find a matching tax zone for an address
record.
Tax Environment. Enter the default tax environment to be used during
transaction entry when the system cannot match the ship-to/ship-from
tax zones and customer or supplier tax class to a tax environment.
Country Code. Enter a code to display as the default in Tax Zone
Maintenance. This code represents the top-level in the tax zone
hierarchy.
Rounding Method. Enter the default rounding method for tax types in
Tax Environment Maintenance. Rounding method determines how
tax amounts for the tax type are truncated.
Tax Method, Tax-By-Line, Accrue Tax at Receipt, Discount Tax at
Invoice, Discount Tax at Payment, Update Tax Allowed. These fields
all set defaults for the corresponding fields in Tax Rate Maintenance.
Update History Allowed. This setting determines whether users can
change tax history detail records. This setting is relevant only if Keep
Tax History is also Yes.
¶ See “Tax Rate
Maintenance” on
page 333.
340
User Guide — Master Data
Keep Tax History. This setting determines whether the system creates
tax history records. Tax history records are always created on a peritem basis. This setting must be Yes if Update History Allowed is Yes.
¶ See “VAT
Registration
Codes” on
page 341 for
information on
how codes are
defined.
Validate VAT Registration. Enter Yes for the system to validate that
VAT registration numbers are in one of the required formats for
European Union countries. Validation occurs when they are recorded
in the Address Tax Window of various address maintenance
programs.
If you set this to Yes because most of your business is within Europe,
but you also trade with non-EU countries, you must override the
default validation logic so that you can leave the Tax ID–State (VAT
Registration) field blank for the non-EU addresses. To do this, set up
a blank generalized code for Tax ID–State (vat_ccode) in Generalized
Codes Maintenance (36.2.13).
Print VAT Registration. This setting specifies whether the system
includes VAT registration numbers on printed documents. Set it to
Yes to print the relevant VAT registration numbers on documents such
as sales quotes, sales orders, invoices, DR/CR memos, purchase
orders, blanket orders, shippers, vouchers, service/repair orders, and
material orders.
Display Detail on Reports. This setting determines whether you can
print a summary of tax amounts on printed documents such as
purchase orders, receipts, sales quotes, sales orders, and invoices. You
can print tax summaries in document print programs only if both the
control program setting and the Print Trailer field are set to Yes. Tax
detail information prints only on documents that have a trailer.
Display Taxable/Non-Taxable on Trailer. This setting determines
whether taxable and non-taxable amounts are displayed or printed in
document trailers. When using different tax rates, currency rules,
discounts, and rounding methods, non-taxable and taxable amounts
shown in trailers may be incorrect. To avoid the display of misleading
tax amounts, set this field to No when Tax-By-Line is No and
different lines have multiple tax classes.
Implementing GTM
Updating Other Records
Company and Site Addresses
In GTM, company sites require a corresponding company address record
because taxes are calculated by address, not site. Every company site
must have an address record with the same address code as the site code.
Create records in Company Address Maintenance (2.12). Add city,
county, state, and country, and tax information to new records.
As a precaution, create a ~taxes record to provide a default tax zone
whenever a transaction is missing a company site code.
VAT Registration Codes
After initial product installation, VAT Registration Format Init (2.13.3.25,
utvatreg.p) loads an initial set of format definitions for valid valueadded tax (VAT) registration code formats required for European Union
(EU) countries. The initial data load includes valid format definitions for
EU member countries as of January 2007.
Use VAT Registration Format Maint (2.13.3.20) to define codes needed if
additional countries join the EU. Specify a VAT prefix (country code),
country name, and up to 9 valid formats. Processing functions validate
that the specified VAT code matches a format defined for the associated
country in this program.
Use the following standards for creating a format:
• Do not enter the country code as a prefix. The system builds valid
records by adding the value from the VAT Prefix field.
• 9 represents any number 0-9.
• A represents any letter A-Z.
• X represents any number 0-9 or letter A-Z.
• Define a record with blank VAT Prefix to allow for a blank ID in any
addresses in a country without a VAT registration number.
Note The Dutch format (VAT prefix NL) requires the letter B as a hardcoded character in position 10: 999999999B99.
341
342
User Guide — Master Data
Customers, Suppliers, and End Users
You can set up default tax data for customers, suppliers, and end users,
which is then used on transactions (Figure 12.14).
Note End users are defined in the Service/Support Management module.
Fig. 12.14
Address Tax Data
Window
Update this information in Customer Maintenance (2.1.1), Supplier
Maintenance (2.3.1), and End User Address Maintenance (11.9.1).
Taxable. For non-taxable addresses, change this setting to Yes if you
report tax exemptions by tax type in GTM.
Tax Zone. The system selects the default tax zone based on the city,
county, state or province, and country in the address.
Tax Class. Enter the tax class.
Tax Usage. Enter the tax usage.
Tax In. Set Tax In to Yes if items shipped to or from the address have
tax already included in the line item price.
Tax ID–Federal. For reference and documentation purposes, enter a
federal tax identification number. When the Print Tax ID on Invoice
field in Sales Order Control is Yes, the output of Invoice Print
(7.13.3) includes the value of Tax ID–Federal. This also applies to
other programs that let you print invoices.
Implementing GTM
343
Tax ID–State or VAT Registration. For reference and documentation
purposes, enter either a state or provincial tax identification number
or a value-added tax registration number.
If you activated VAT registration in Global Tax Management Control
(2.13.24), this field displays the label VAT Registration. The numbers
for European Union countries are validated based on formats defined
in VAT Registration Format Maint (2.13.3.20).
¶ See “VAT
Registration
Codes” on
page 341.
When you enter an ID in a customer or supplier record, the system
checks that it has a valid EU country prefix. If it does, the system
verifies that the rest of the number matches the format for that
country. If either the prefix or number is invalid, an error displays.
The system does not verify that the country prefix matches the
country code in the customer or supplier address. For example, the
system does not prevent you from entering a French tax ID for a
German supplier.
Tax ID–Misc 1, 2, 3. For reference and documentation purposes, enter
any other tax identification numbers that are useful.
Within City. This setting determines whether the address is in the city
limits for taxation purposes. It affects only GTM processing that
occurs in conjunction with the Sales and Use Tax Interface for U.S.
tax processing.
¶ See External
Interface Guide:
Sales and Use
Tax.
Product Lines and Items
In Product Line Maintenance (1.2.1) and Item Master Maintenance
(1.4.1), enter the GTM item tax class in all product line and item records.
If necessary, change the taxable status to Yes to accommodate exemption
reporting.
If you are using the Service/Support Management module, assign tax
classes to service categories in Service Category Maintenance (11.21.9).
Implementing Special Taxes
This section provides additional information on how to implement certain
kinds of taxes in GTM.
¶ See User Guide:
Service/Support
Management A.
344
User Guide — Master Data
Tax Exemptions
In GTM, tax exemptions are set up by tax type. You can implement
separate tax types for each exemption, or group all exemptions into one
tax type. Select the approach that supports the level of detail required for
governmental reporting.
Reporting by Exemption
1
In Tax Type Maintenance (2.13.1.1), set up a separate tax type for
each exemption.
2
In Tax Environment Maintenance (2.13.5.1), assign the type to each
tax environment affected by the exemption.
3
In Tax Rate Maintenance (2.13.13.1), set up 0% tax rates for each
exemption tax type.
If the exemption is by customer or supplier, set up 0% rates by usage
code. If the exemption is by item or trailer charge, set up 0% rates by
item tax class.
4
In the respective maintenance programs, set the Taxable status of all
exempt customers, suppliers, product lines, items, and trailer charges
to Yes.
Transactions with a non-taxable status do not calculate tax, but you
will be unable to report the reason, since GTM cannot match the
exempt amounts to the exemption tax types in the tax environment.
Aggregate Reporting
1
In Tax Environment Maintenance (2.13.5.1), assign the default tax
type NON-TAX to each tax environment in which exemptions can be
reported in aggregate.
You do not have to set up this type; it is supplied by default. Once you
do this, GTM automatically classifies all non-taxable transaction
amounts as type NON-TAX.
2
In the respective maintenance program, set the Taxable status of all
exempt customers, suppliers, product lines, items, service categories,
and trailer charges to No.
Implementing GTM
When the system encounters a non-taxable transaction amount, it
applies a 0% tax rate to it. This rate is already set up in the system.
Tax Based on Partial Item Amounts
By default, GTM calculates tax for 100% of the item amount. However,
tax can be based on a smaller percentage. In these situations, set up a tax
base record in Tax Base Maintenance (2.13.1.13), specifying the
appropriate Base Percent. Assign this tax base to multiple tax types and
tax rates if the Base Percent is the same for all situations.
Custom Tax Calculation Methods
The transaction detail screen displays the following tax-related amounts
for line items and trailer charges:
• Total line item or trailer charge amount
• Line item or trailer charge amount not subject to tax
• Line item or trailer charge amount that is subject to tax
• Total tax amount
• Recoverable and nonrecoverable tax amounts
• For sales transactions, any tax your company absorbs rather than
passes on to the customer
• For purchase transactions, any tax your company retains for direct
payment to the government
To calculate tax amounts, GTM can use one of several standard
calculation programs. Alternately, to resolve a localization issue, write a
custom program. Specify a default program and override it as necessary
for individual tax rates.
Table 12.7 summarizes the differences among the tax calculation methods
supplied with the system.
345
346
User Guide — Master Data
Table 12.7
Standard GTM Tax
Methods
Method Program
01
Explanation
txmeth01.p This generic method supports most taxes.
Tax Amount = Tax Rate * Item Amount
Note: For reverse-calculated taxes, Tax Amount = Tax Rate *
[Item Amount / (1+Tax Rate)]
Taxable Base = Item Amount * Tax Base Percent
If Taxable Base < Min. Taxable, Tax Amount = Min. Taxable
If Taxable Base > Max. Taxable, Tax Amount = Max. Taxable
Recoverable Amount = Tax Amount * Recoverable Percent
02
txmeth02.p Same as method 01 except that it supports luxury taxes and
capped taxes that are assessed only on specific taxable base
amounts.
If Taxable Base < Min. Taxable, Tax Amount = 0
If Taxable Base > Max. Taxable, Tax Amount = 0
03
txmeth03.p Indicates you are importing tax amounts from an external system
and do not want to recalculate them.
11
txmeth11.p Same as method 01 but has a regressive calculation for reversecalculated taxes.
Tax Amount = Tax Rate * Item Amount
20
txmeth20.p Indicates that Quantum, through the Sales and Use Tax API,
calculates taxes for each line item.
For custom programs, the file naming convention is txmeth##.p, where
## is the numeric identifier referenced in Tax Rate Maintenance. Use an
identifier from 50 to 99; identifiers 00 through 49 are reserved for QAD
use.
To implement the custom tax method, specify the identifier as the Tax
Method in Tax Rate Maintenance (2.13.13.1). If the custom method is the
default method for new tax rates, also specify it in Global Tax
Management Control (2.13.24).
Set up a value in generalized codes for the new method so that it displays
in the look-up on the Tax Method field in Tax Rate Maintenance.
Implementing GTM
Luxury Taxes
Luxury taxes are assessed only on transaction amounts that exceed a
specified minimum. For example, a 30% luxury tax may apply only to
automobiles costing more than $30,000.
Two settings in Tax Rate Maintenance (2.13.13.1) govern setup of luxury
taxes.
Min. Taxable. This setting identifies the minimum amount subject to
tax. In the above example, Min. Taxable is $30,000.
Tax Method. For luxury taxes, set Tax Method to 02. Whenever the
transaction taxable base amount is less than the Min. Taxable amount
for the tax rate, the final tax amount is zero.
Capped Taxes
Capped taxes are assessed only on transaction amounts less than a
specified maximum. For example, a 10% capped tax applies only to
transaction amounts under $1,000.
Two settings in Tax Rate Maintenance (2.13.13.1) govern setup of capped
taxes:
Max. Taxable. This setting identifies the maximum amount subject to
tax. In the above example, Max. Taxable is $1,000.
Tax Method. For capped taxes, set Tax Method to 02. Whenever the
transaction taxable base amount exceeds the Max. Taxable amount
for the tax rate, the final tax amount is zero.
Recoverable Taxes
Taxes are recoverable whenever your company is eligible to offset a
percentage of tax on purchases against tax collected on sales. Recoverable
taxes are common in Europe.
The following settings in Tax Rate Maintenance (2.13.13.1) govern setup
of recoverable taxes.
Percent Recoverable. The percentage of purchase tax that can be
recovered for the tax rate.
347
348
User Guide — Master Data
AP Tax Account. GL account, sub-account, and cost center for
posting recoverable tax amounts. This account is used by Purchase
Order Receipts (5.13.1), PO Shipper Receipt (5.13.20), and
confirmed accounts payable vouchers (28.1, 28.6, 28.7).
A recoverable tax is an asset when debited for recoverable purchase
and accounts payable taxes, or a liability when treated as a contra
account to sales tax payable. The default accounts are specified in
Domain/Account Control (36.1), but you can override them.
EC Sales List. Set to Yes to include sales and purchases that use these
tax rates in the EC Sales Listing (2.13.15.8), a report submitted to the
government as verification that recoverable purchase VAT claimed by
your company is correct for the amount of VAT it collected on sales.
Accrue Tax at Receipt. Determines when GL entries for purchase tax
amounts are created. For recoverable taxes, set this to No because the
tax point is receipt of supplier invoice.
Value Added Taxes (VAT)
Value added taxes are common in Europe and Canada. In certain
European countries, it is a legal requirement to calculate VAT amounts
based on invoice totals. This is accomplished by setting Tax-By-Line to
No in Tax Rate Maintenance.
This setting by itself is not sufficient to ensure that purchase receipts and
AP transactions are taxed on the order total. You must set three other
fields appropriately.
Percent Recoverable. The percentage of purchase tax that can be
recovered for the tax rate must be set to 100%.
Accrue Tax at Receipt. This field determines when GL entries for
purchase tax amounts are created. For VAT taxes, set this to No so
that GL transactions are created for tax amounts during vouchering,
not receipt.
Allow Tax Included. Set this field to No so that GTM does not reverse-
calculate tax amounts.
Implementing GTM
Tax-on-Tax
In a tax-on-tax situation, one tax amount is included in the calculation for
another tax amount. For example, in some Canadian provinces, Provincial
Services Tax (PST) is based on the item amount plus the federal Goods
and Services Tax (GST).
To set up a tax-on-tax, define the calculation priority of the two taxes and
assign the included tax as the tax base of the other tax.
1
In Tax Environment Maintenance (2.13.5.1), assign both tax types to
the tax environment. Assign the included tax type a lower sequence
number than the other tax type. This ensures that the included tax is
calculated first. In the Canadian example, GST has a lower sequence.
2
In Tax Base Maintenance (2.13.1.13), define a tax base and assign it
to the included tax type. In the Canadian example, GST is the
included type.
3
In Tax Rate Maintenance (2.13.13.1), set up tax rates for both tax
types. In the rate for the tax-on-tax, specify the tax base for the
included tax. In the Canadian example, you would set up rates for
both GST and PST, then specify the tax base in the PST rates.
Discounted Taxes
In the United Kingdom and some other countries, tax is assessed only on
what the customer actually pays—that is, on the sales amount minus
credit terms discounts. When taxes are discounted, the net order amount
can vary, depending on whether the credit terms discount is applied to the
tax amount.
In Tax Rate Maintenance (2.13.13.1), two settings govern the setup of
discounted taxes: Discount Tax at Invoice and Discount Tax at Payment.
• For both settings, the order tax amount is the discounted sales amount
multiplied by the tax rate.
• For discounting at invoice, the net order amount is the full sales
amount plus the discounted tax amount. When payment is received,
the system checks that the customer has paid within the discount
349
350
User Guide — Master Data
period. If the customer is still eligible for the discount, the system
discounts the sales amount and adds it to the discounted tax amount to
recalculate the net order amount.
• In contrast, for discounting at payment, the net order amount is
calculated later as the discounted sales amount plus the discounted
tax amount.
• Under both systems, if the discount period expires, both the accounts
receivable and accounts payable payment programs automatically
adjust tax amounts upward. The net order amount is recalculated as
the full sales amount plus the full tax amount.
Example If the sales amount is 100.00, the credit terms are 2% Net 30,
and the tax rate is 10%, the system calculates the discount at invoice as
follows:
Disc Sales Amt:
100.00 – (100.00 * 2%) = 98.00
Disc Tax Amt:
(98.00 * 10%) = 9.80
Net Order Total:
(100.00 + 9.80) = 109.80
Initially, only the tax is discounted. If the customer is still eligible for the
discount when payment is received, the sales amount is discounted to
98.00 and the payment amount to apply changes to 107.80.
For discounting at payment, the calculation is as follows.
Disc Sales Amt:
100.00 – (100.00 * 2%) = 98.00
Disc Tax Amt:
(98.00 * 10%) = 9.80
Net Order Total:
(98.00 + 9.80) = 107.80
If the customer is late, the discount tax amount reverts to the nondiscounted tax amount of 10.00 and the payment amount to apply changes
to 110.00.
Retained Taxes
In some countries, the government declares that large customers of small
suppliers are required to remit tax amounts directly to the government
instead of to the supplier. Customers of these suppliers pay the purchase
amount minus tax to the supplier but are required to calculate, post, and
periodically pay the tax amounts on their purchases directly to the
government.
Implementing GTM
Use Tax Rate Maintenance (2.13.13.1) to specify the GL accounts, subaccounts, and cost centers for AP Retained Tax. To designate a tax rate as
a retained tax, set the field to Yes.
Absorbed Taxes
Absorbed sales tax is a liability you can incur whenever your company is
liable for tax but does not charge it to the customer. For example, if you
give an item to a customer, you may still pay tax even though the item’s
sales price is zero. Absorbed sales tax is also called withheld or retained
sales tax.
Use Tax Rate Maintenance (2.13.13.1) to specify the GL accounts, subaccounts, and cost centers for Sales Tax Absorbed. To designate a tax rate
as an absorbed tax, set the field to Yes.
Reverse-Calculated Taxes
Sometimes, item amounts already include tax. For transaction documents
and reporting, you must reverse-calculate the tax from the item amount.
The system reverse-calculates tax from the line item price on sales and the
item cost on purchases. On sales transactions, it reverse-calculates the
taxable base by subtracting the tax amount from the total amount on the
line/trailer.
GTM supports two kinds of reverse calculations, as specified by the tax
method in the tax rate.
Example For tax method 01, the calculation works as follows:
Tax Amount = Tax Rate * (Item Price/1 + Tax Rate)
0.10 * (100.00/1.10)
0.10 * 90.90 = 9.09
Tax Base = Item Price – Tax Amount
100.00 – 9.09 = 90.91
351
352
User Guide — Master Data
In contrast, for tax method 11 (regressive taxation), the calculation is as
follows:
Tax Amount = Item Price * Tax Rate
100.00 * 0.10 = 10.00
Tax Base = Item Price – Tax Amount
100.00 – 10.00 = 90.00
To set up a reverse-calculated tax, do the following:
• In the address maintenance program, set Tax In to Yes. The tax
included status for the customer/supplier ship-to address determines
the default tax included status on transactions. The transaction tax
included status becomes the default status for line items.
• In Tax Rate Maintenance (2.13.13.1), set Allow Tax Included to Yes
for all tax rates applied to items that already include tax. In addition,
specify Tax Method 01 or 11.
Tax is reverse-calculated only for transactions in which the transaction or
item Tax In status is Yes and the tax rate Allow Tax Included status is Yes.
Note The ability to reverse-calculate taxes in GTM does not affect sales
commission reporting using sales analysis programs. Commissions are
always based on item prices inclusive of tax. For items that include tax,
you may have to adjust your commission structure.
Chapter 13
Processing GTM
This chapter describes how GTM processes tax transactions. It also
discusses general ledger transactions created for tax amounts under
standard and average costing.
Calculating Taxes
354
Specifying Tax Data
356
Viewing Tax Amounts
359
Correcting Transaction Tax Amounts
General Ledger Effects
Reporting
362
385
Fixing Common Tax Problems
386
361
354
User Guide — Master Data
Calculating Taxes
To calculate taxes on transactions, GTM first identifies the tax
environment—the set of tax types for each line item and trailer charge. It
then determines the most appropriate tax rate for each tax type in the
environment.
GTM searches for an optimal tax environment based on a combination of
transaction conditions:
• Ship-from tax zone for the line item
• Ship-to tax zone for the transaction
• Customer or supplier tax class, if any
Figure 13.1 summarizes GTM’s search priority for selecting a tax
environment.
Fig. 13.1
Selection of Tax
Environment
Identify
IdentifyTax
TaxZones
Zonesfor
forShipShipFrom
Fromand
andShip-To
Ship-ToAddresses
Addresses
Customer
CustomerTax
TaxClass
ClassExists?
Exists?
Yes
No
Tax
TaxEnvironment
Environmentfor
forTax
TaxZones
Zones Yes
and
andClass?
Class?
Matching
MatchingTax
TaxEnvironment
Environment
Selected
Selected
Yes
Tax
TaxEnvironment
Environmentfor
forTax
TaxZones
Zones
Only?
Only?
No
Warning
WarningDisplays
Displaysand
andDefault
Default
Environment
EnvironmentUsed
Used
If GTM finds a matching environment, it assigns this environment to the
transaction. Otherwise, the following message displays:
Warning: No tax environment found, using default.
¶ See “Fixing
Common Tax
Problems” on
page 386.
The system then uses the error environment from Global Tax
Management Control (2.13.24). If this happens, investigate and correct
the problem.
Processing GTM
355
Table 13.1 describes the tax environment selection criteria for different
transaction amounts.
Table 13.1
Item
Ship-To Tax Zone
Ship-From Tax Zone
Tax Class
Inventory items
Transaction ship-to tax Line item ship-from
zone
tax zone
Transaction tax
class, if any
Memo items
Transaction ship-to tax Transaction ship-from
zone
tax zone
Transaction tax
class, if any
Trailer charges
Transaction ship-to tax Transaction ship-from
zone
tax zone
Transaction tax
class, if any
Tax Environment
Selection Criteria
Next, GTM searches for the tax rate for each tax type in the tax
environment. For each tax type, GTM searches for an optimal tax rate
based on a combination of transaction and line item conditions:
• Tax class
• Tax usage
• Transaction tax date
Figure 13.2 summarizes the search priority for selecting a tax rate for a
tax type. GTM selects a rate only if there is a complete match between the
conditions of the transaction and the tax rate. Any nonmatching criteria
must be blank. For example, if a tax rate has a matching item tax class and
tax date but a different tax usage, it is not selected.
Fig. 13.2
Selection of Tax
Rate
Rate
Ratefor
forItem
ItemTax
TaxClass,
Class,Tax
Tax
Usage,
Usage,and
andTax
TaxDate?
Date?
No
Rate
Ratefor
forItem
ItemTax
TaxClass
Classand
and
*
Tax
TaxDate?
Date?*
No
Yes
Matching
MatchingRate
RateSelected
Selected
Rate
and
Ratefor
forTax
TaxUsage
Usage
andTax
Tax
*
Date?
Date?*
No
*
Rate
Ratefor
forTax
TaxDate?
Date?*
No
Error
ErrorDisplays
Displaysand
andNo
NoRate
Rateisis
Selected
Selected
* Remaining
tax rate fields must be blank.
356
User Guide — Master Data
If GTM finds a matching rate, it uses this rate for the tax calculation.
Otherwise, the following message displays:
Error: Tax rate does not exist.
“Tax Type” “Tax Class” “Tax Usage”
¶ See “Fixing
Common Tax
Problems” on
page 386.
The message displays the tax type, tax class, and tax usage not found, and
no tax is calculated. If this happens, investigate the problem.
Table 13.2 describes the tax rate selection criteria for different transaction
amounts.
Table 13.2
Tax Rate Selection
Criteria
Item
Tax Class
Tax Usage
Tax Date
Inventory items
Item tax class, if any Transaction tax
usage, if any
Transaction tax date
Memo items
Transaction tax
class, if any
Transaction tax
usage, if any
Transaction tax date
Trailer charges
(1) Tax class from
trailer charge detail,
if any
Transaction tax
usage, if any
Transaction tax date
(2) Trailer charge
tax class, if any
(3) Transaction tax
class, if any
Specifying Tax Data
All transactions subject to tax have tax data windows accessible in the
header, line item, and trailer frames. Figure 13.3 illustrates the tax pop-up
in the Sales Order Maintenance (7.1.1) header. Most values specified in
the header can be modified for each line.
Processing GTM
357
Fig. 13.3
Sales Order
Maintenance
(7.1.1), Header
Frame
Tax Date. The transaction tax date is used to select tax rates. At order
entry, the default tax date is the order due date. At shipment and
receipt, the default tax date is the transaction effective date.
In some situations, you should specify another tax date. For example,
when processing a return, you can enter the original order date. You
cannot override the transaction tax date for individual line items and
trailer charges. GTM does not use a tax rate if the transaction’s tax
date is outside the tax rate’s effective date range.
Tax Usage. Tax usage is used to select tax rates. Tax usage defaults
from the relevant address record: customer, supplier, or end user. You
can override the transaction tax usage for line items but not for trailer
charges.
Tax Environment. The tax environment is used to select tax types for
the transaction. The ship-from/ship-to tax zones and tax class, if any,
determines the default tax environment. A line item can have a
different tax environment if its ship-from tax zone is different from
the one for the rest of the transaction.
Tax Class. Tax class is used to select the transaction tax environment
and/or tax rates for items and trailer charges. Tax class defaults from
the relevant address record: customer, supplier, or end user.
358
User Guide — Master Data
For inventory items, the default tax class is the item tax class. For
memo items, the default tax class is the transaction tax class. For
trailer charges, the tax class is the one for the (1) trailer tax detail, (2)
trailer charge, or (3) transaction, depending on which one the system
finds first.
Taxable. The taxable status determines how tax types apply to the
transaction. If Taxable is No, the amount is nontaxable. However, if
Taxable is Yes, the amount can also be nontaxable if you use tax types
and zero-percent tax rates to report tax exemptions.
The customer, supplier, or end user taxable status determines the
default status of the transaction. If the transaction taxable status is No,
the entire order has this status.
For inventory items, the default status is the item status. For memo
items, the default status is the transaction taxable status. For trailer
charges, the status is the one for the (1) trailer tax detail, (2) trailer
charge, or (3) transaction, depending on which one the system finds
first.
Tax In. Tax In (tax included) determines whether tax is already
included in line item amounts. If it is, the system reverse-calculates
the tax from the item amount and displays it along with the other tax
amounts.
The customer, supplier, or end user Tax In status determine the
default status of the transaction. You can override this status for line
items. For an amount to be tax included, Tax In must be Yes, and the
Allow Tax Included setting for the tax rate must be Yes.
Note Tax is always added to trailer charges, regardless of the value
of Tax In.
Processing GTM
359
Viewing Tax Amounts
In the transaction trailer frame, review system-calculated tax amounts by
setting View/Edit Tax Detail to Yes. The screen displays the total
nontaxable and taxable line item and trailer charge amounts, the tax date,
and tax amounts by category.
Fig. 13.4
Sales Order
Maintenance
(7.1.1), View/Edit
Tax Detail Option
Set to Yes to
view tax
records.
In the tax detail frame, scroll through the Line and Trailer fields to view
the tax rate information for each tax type.
Note You cannot change tax amounts unless Update Tax Allowed for the
tax rate is Yes.
Fig. 13.5
Sales Order
Maintenance
(7.1.1), Tax Detail
Record
360
User Guide — Master Data
Line. Tax amounts for line items and trailer charges are identified by
line number. Use Next/Previous to scroll through the amounts for
each tax type.
0: Line items taxed by total.
1 through 99998: Line items taxed by line. The line number in the
tax detail corresponds to the order line item number.
99999: Trailer charges.
Trailer. For trailer charges, enter the code of the trailer charge subject
to the tax.
Tax By. Output only. Total indicates that the tax rate was applied to
the order total for all items and trailer charges taxed at this rate. Line
indicates that the tax rate was applied separately to each item and
trailer charge.
Edited. Output only. This setting indicates whether the tax amount
was ever changed from the system-calculated amount.
The system also displays the factors GTM used to calculate the tax:
transaction tax date, tax rate, tax code, tax environment, tax type, item or
trailer charge tax class, and tax usage.
Depending on how you set up the tax rate, you may be able to change
some of the following values. To change values, Update Tax Allowed
must be Yes.
Trnx Amt. This value is the total transaction amount, excluding tax.
Nontaxable Base. This is the nontaxable portion of the transaction
amount.
Taxable Base. This is the taxable portion of the transaction amount.
Tax Amt. This is the tax amount for the tax type. For line 0, it is the
transaction tax amount for the tax type. For lines 1-99999, it is the
amount for the line item or trailer charge.
Recoverable and Non-Recover Tax. This is the recoverable and non-
recoverable portions of purchase tax.
Processing GTM
Absorb/Retain. On sales and accounts receivable transactions, this is
the sales tax that was absorbed and therefore not included in the
transaction total. On purchasing and accounts payable transactions, it
is the purchase tax that was retained for direct payment to the
government.
Correcting Transaction Tax Amounts
Depending on how you set up GTM, you can selectively override systemcalculated tax amounts. The default behavior is determined first by
Update Tax Allowed in Global Tax Management Control (2.13.24) then
by the same field in individual tax rate records (2.13.13.1).
In transactions, View/Edit Tax Detail always lets you review how the
system calculated taxes. If Update Tax Allowed is Yes, you can also
change the taxable base, tax, and recoverable tax amounts.
Use this feature to match amounts on manually issued documents.
Typically, you edit tax amounts only when transaction tax amounts must
exactly match an external document. You can also edit taxes when
entering transactions for which you have not set up standard rates.
However, the system does not maintain an audit trail of changes, so
accounting regulations may prevent you from using this capability.
If you do edit tax amounts, one of the following messages displays when
you exit transactions:
Recalculate Tax. Enter Yes to recalculate tax and taxable base
amounts based on the current data you entered in the transaction. Do
this if you ship or receive a different quantity than originally entered.
Copy Edited Tax Values. Enter Yes to copy previously edited tax
amounts to this transaction or No to recalculate taxes based on current
transaction information.
For example, when you enter a purchase order, you can manually edit
the system-calculated tax amounts. When you process the receipt,
copy the edited tax values from the order or recalculate taxes based
on the current information. If you did not manually edit the taxes in
the order, taxes are automatically recalculated at receipt.
361
362
User Guide — Master Data
If you enter Yes, the system copies tax amounts from the earlier
transaction to the one you are currently working on. If you enter No,
the system recalculates taxes. Taxes are copied exactly. The system
does not adjust for quantity or price differences between the two
transactions.
General Ledger Effects
During transaction processing, the tax point for the tax rate determines
when and for which accounts the system creates general ledger (GL)
entries for tax amounts. The tax point defaults first from Accrue Tax at
Receipt in Global Tax Management Control (2.13.24), then from the same
setting in individual tax rate records (2.13.13.1).
When the tax point is goods receipt, the system creates GL entries when
you record the receiving transaction. When the tax point is invoice
receipt, the system creates entries later—when you enter a confirmed
voucher or confirm an existing voucher.
For each tax point, exact GL entries vary by cost system. Table 13.3
summarizes the elements that influence GL entries. The subsequent
sections for standard costing and average costing illustrate tax accruals in
more detail.
Table 13.3
Elements that
Influence GL
Entries for Each
Tax Point
Costing System at Site, Tax Amount
Taxable Amount
See...
Standard, Recoverable
Inventory Items
page 364
Purchase Price Variances
page 365
AP Usage Variances
page 366
AP Rate Variances
page 367
Memo Items
page 368
Returned Items
page 368
Standard, Non-Recoverable
Average, Recoverable
Inventory Items
page 370
Purchase Price Variances
page 371
AP Usage Variances
page 372
AP Rate Variances
page 373
Memo Items
page 374
Returned Items
page 368
Inventory Items
page 376
Processing GTM
Costing System at Site, Tax Amount
Average, Non-Recoverable
Taxable Amount
See...
AP Usage Variances
page 377
AP Rate Variances
page 378
Memo Items
page 379
Returned Items
page 379
Inventory Items
page 381
AP Usage Variances
page 382
AP Rate Variances
page 383
Memo Items
page 384
Returned Items
page 384
363
Standard Cost
This section shows tax accruals for a simple purchase order and voucher,
first for recoverable taxes, then for non-recoverable taxes.
Recoverable Tax
Most European countries have a sales tax system that allows recovery of
tax on purchases. A recoverable purchase tax amount is one that you are
allowed to offset against sales tax payable. Such tax amounts are tracked
separately in the GL. For Global Tax Management, they update the AP
Tax account for the tax rate. For recoverable taxes, the tax point is
normally invoice receipt. However, as a comparison, this section shows
the entries for both tax points.
Inventory Items
Figure 13.6 shows the GL entries for purchases of inventory items. The
tax point determines whether the update to AP Tax Recoverable occurs at
goods receipt or invoice receipt. Inventory items are items you purchase
to use in manufacturing or to sell to customers.
¶ To review the
entries for
average cost, see
“Average Cost”
on page 375.
364
User Guide — Master Data
Fig. 13.6
GL Entries for
Inventory Item
(Standard Cost/
Recoverable Tax)
GL Entries for Inventory Item
(Standard Cost, Recoverable Tax)
Tax Accrual at Goods Receipt
Goods Receipt:
Entries created for received
item cost (1) and tax (2)
Voucher Confirmation:
Entries created for item
cost (3) and tax (4)
Inventory
100.00 1
Purchase
Order Receipts
1 100.00
2 10.00
Purchase
Order Receipts
100.00 3
10.00 4
AP Tax
Recoverable
10.00 2
Accounts
Payable
3 100.00
4 10.00
Tax Accrual at Invoice Receipt
Goods Receipt:
Entries created for received
item cost (1) but not for tax
Voucher Confirmation:
Entries created for item
cost (2) and tax (3)
Inventory
100.00 1
Purchase
Order Receipts
100.00 2
Purchase
Order Receipts
1 100.00
Accounts
Payable
2 100.00
3 10.00
AP Tax
Recoverable
10.00 3
Variances
Three kinds of variances occur during the purchasing/accounts payable
cycle: purchase price variance, AP usage variance, and AP rate variance.
Purchase Price Variance. Purchase price variance occurs when an
inventory item’s PO cost does not match its GL cost. This variance
does not occur for memo items, which have no standard cost.
Processing GTM
365
Figure 13.7 shows the GL entries for purchase price variance. The tax
point determines whether the update to AP Tax Recoverable occurs at
goods receipt or invoice receipt.
Fig. 13.7
GL Entries for Purchase Price Variance
(Standard Cost, Recoverable Tax)
Tax Accrual at Goods Receipt
Goods Receipt:
Entries created for received
item cost (1), variance (2),
and tax on item cost +
variance (3)
Voucher Confirmation:
Entries created for item
cost (4), variance (5), and
tax (6)
Inventory
100.00 1
Purchase
Price Variance
25.00 2
Purchase
Order Receipts
100.00 4
25.00 5
12.50 6
Purchase
Order Receipts
1 100.00
2
25.00
12.50
3
AP Tax
Recoverable
12.50 3
Accounts
Payable
4 100.00
5
25.00
12.50
6
Tax Accrual at Invoice Receipt
Goods Receipt:
Entries created for received
item cost (1) and variance
(2) but not for tax
Voucher Confirmation:
Entries created for item
cost (3), variance (4), and
tax on item cost + variance
(5)
Inventory
100.00 1
Purchase
Order Receipts
100.00 3
25.00 4
Purchase
Purchase
Order Receipts Price Variance
1 100.00 25.00 2
25.00
2
Accounts
Payable
3 100.00
4 25.00
5 12.50
AP Tax
Recoverable
12.50 5
AP Rate and Usage Variance. AP rate variance occurs when an
item’s invoice cost does not match its PO cost. AP usage variance
occurs when an item’s invoice quantity does not match its PO
quantity and you close the receiver line in the voucher.
GL Entries for
Purchase Price
Variance (Standard
Cost, Recoverable
Tax)
366
User Guide — Master Data
Figure 13.8 and Figure 13.9 show GL entries for inventory items.
Entries for memo items update Expensed Item Receipts instead of
Purchase Order Receipts, and Expensed Purchases instead of
Inventory. In addition, for memo items, an option in Accounts
Payable Control (28.24) allows variances to update Expensed Item
Receipts instead of the variance accounts.
Fig. 13.8
GL Entries for AP
Usage Variance
(Standard Cost,
Recoverable Tax)
GL Entries for AP Usage Variance
(Standard Cost, Recoverable Tax)
Tax Accrual at Goods Receipt
Goods Receipt:
Entries created for received
item cost (1) and tax (2)
Voucher Confirmation:
Entries created for item
cost (3), variance (4), tax
on item cost (5), and tax on
variance (6)
Inventory
100.00 1
Purchase
Order Receipts
1 100.00
2 10.00
Purchase
Order Receipts
100.00 3
10.00 5
AP Usage
Variance
40.00 4
AP Tax
Recoverable
10.00 2
Accounts
Payable
3 100.00
40.00
4
10.00
5
4.00
6
AP Tax
Recoverable
4.00 6
Tax Accrual at Invoice Receipt
Goods Receipt:
Entries created for received
item cost (1) but not tax
Voucher Confirmation:
Entries created for item
cost (2), variance (3), tax
on item cost (4), and tax on
variance (5)
Inventory
100.00 1
Purchase
Order Receipts
100.00 2
AP Usage
Variance
40.00 3
Purchase
Order Receipts
1 100.00
Accounts
Payable
2 100.00
40.00
3
10.00
4
4.00
5
AP Tax
Recoverable
10.00 4
4.00 5
Processing GTM
367
Fig. 13.9
GL Entries for AP
Rate Variance
(Standard Cost,
Recoverable Tax)
GL Entries for AP Rate Variance
(Standard Cost, Recoverable Tax)
Tax Accrual at Goods Receipt
Goods Receipt:
Entries created for received
item cost (1) and tax (2)
Voucher Confirmation:
Entries created for item
cost (3), variance (4), tax
on item cost (5), and tax on
variance (6)
Inventory
100.00 1
Purchase
Order Receipts
1 100.00
2 10.00
Purchase
Order Receipts
100.00 3
10.00 4
AP Rate
Variance
30.00 5
AP Tax
Recoverable
10.00 2
Accounts
Payable
3 100.00
30.00
4
10.00
5
3.00
6
AP Tax
Recoverable
3.00 6
Tax Accrual at Invoice Receipt
Goods Receipt:
Entries created for received
item cost (1) but not tax
Voucher Confirmation:
Entries created for item
cost (2), variance (3), tax
on item cost (4), and tax on
variance (5)
Inventory
100.00 1
Purchase
Order Receipts
100.00 2
AP Rate
Variance
30.00 3
Purchase
Order Receipts
1 100.00
Accounts
Payable
2 100.00
30.00
3
10.00
4
3.00
5
AP Tax
Recoverable
10.00 4
3.00 5
368
User Guide — Master Data
Memo Items
Memo items are non-inventory items such as office supplies. By
definition, such items have no standard cost. Figure 13.10 shows GL
entries for memo items. The tax point determines whether the update to
AP Tax Recoverable occurs at goods receipt or invoice receipt.
Fig. 13.10
GL Entries for
Memo Item
(Standard Cost,
Recoverable Tax)
GL Entries for Memo Item
(Recoverable Tax)
Tax Accrual at Goods Receipt
Goods Receipt:
Entries created for received
item cost (1) and tax (2)
Voucher Confirmation:
Entries created for item
cost (3) and tax (4)
Expensed
Purchases
100.00 1
Expensed
Item Receipts
1 100.00
2 10.00
Expensed Item
Receipts
100.00 3
10.00 4
AP Tax
Recoverable
10.00 2
Accounts
Payable
3 100.00
4 10.00
Tax Accrual at Invoice Receipt
Goods Receipt:
Entries created for received
item cost (1) but not for tax
Voucher Confirmation:
Entries created for item
cost (2) and tax (3)
Expensed
Purchases
100.00 1
Expensed
Item Receipts
100.00 2
Expensed
Item Receipts
1 100.00
Accounts
Payable
2 100.00
3 10.00
AP Tax
Recoverable
10.00 3
Processing GTM
Returned Items
When you return items, the system clears the item cost and the tax from
the accounts updated by the original receipt and the voucher, if you
processed the return after paying the supplier invoice.
Non-Recoverable Tax
You cannot offset a non-recoverable purchase tax amount against sales
tax payable. Usually, such taxes are already included in the item cost.
Purchasing transactions back-calculate the tax from the item amount,
assuming you set up the supplier and tax rate records to support this. The
following section illustrates the GL entries if taxes were not included.
Inventory Items
Figure 13.11 shows the GL entries for purchases of inventory items. The
tax point determines whether the update to AP Tax Recoverable occurs at
goods receipt or invoice receipt. Inventory items are items you purchase
to use in manufacturing or to sell to customers.
369
370
User Guide — Master Data
Fig. 13.11
GL Entries for
Inventory Item
(Standard Cost,
Non-Recoverable
Tax)
GL Entries for Inventory Item
(Standard Cost, Non-Recoverable Tax)
Tax Accrual at Goods Receipt
Goods Receipt:
Entries created for received
item cost (1) and tax (2)
Voucher Confirmation:
Entries created for item
cost (3) and tax (4)
Inventory
100.00 1
Purchase
Purchase
Order Receipts Price Variance
1 100.00 10.00 2
2 10.00
Purchase
Order Receipts
100.00 3
10.00 4
Accounts
Payable
3 100.00
4 10.00
Tax Accrual at Invoice Receipt
Goods Receipt:
Entries created for received
item cost (1) but not for tax
Voucher Confirmation:
Entries created for item
cost (2) and tax (3)
Inventory
100.00 1
Purchase
Order Receipts
100.00 2
Purchase
Order Receipts
1 100.00
Accounts
Payable
2 100.00
3 10.00
Inventory
10.00 3
Variances
Three kinds of variances occur during the purchasing/accounts payable
cycle: purchase price variance, AP usage variance, and AP rate variance.
Purchase Price Variances. Purchase price variance occurs when an
inventory item’s PO cost does not match its GL cost. This variance
does not occur for memo items, which have no standard cost.
Figure 13.12 shows the GL entries for purchase price variance. The
tax point determines whether the update to AP Tax Recoverable
occurs at goods receipt or invoice receipt.
Processing GTM
371
Fig. 13.12
GL Entries for Purchase Price Variance
(Standard Cost, Non-Recoverable Tax)
Tax Accrual at Goods Receipt
Goods Receipt:
Entries created for received
item cost (1), variance (2),
and tax on item cost +
variance (3)
Voucher Confirmation:
Entries created for item
cost (4), variance (5), and
tax (6)
Inventory
100.00 1
Purchase
Purchase
Order Receipts Price Variance
1 100.00 25.00 2
25.00 12.50 3
2
12.50
3
Purchase
Order Receipts
100.00 4
25.00 5
12.50 6
Accounts
Payable
4 100.00
5 25.00
6 12.50
Tax Accrual at Invoice Receipt
Goods Receipt:
Entries created for received
item cost (1) and variance
(2) but not for tax
Voucher Confirmation:
Entries created for item
cost (3), variance (4), and
tax on item cost + variance
(5)
Inventory
100.00 1
Purchase
Order Receipts
100.00 3
25.00 4
Purchase
Purchase
Order Receipts Price Variance
1 100.00 25.00 2
25.00
2
Purchase
Accounts
Price Variance
Payable
3 100.00 12.50 5
4 25.00
5 12.50
AP Rate and Usage Variances. AP rate variance occurs when an
item’s invoice cost does not match its PO cost. AP usage variance
occurs when an item’s invoice quantity does not match its PO
quantity and you close the receiver line in the voucher.
Figure 13.13 and Figure 13.14 show GL entries for inventory items.
Entries for memo items update Expensed Item Receipts instead of
Purchase Order Receipts, and Expensed Purchases instead of
Inventory. In addition, for memo items, an option in Accounts
Payable Control (28.24) allows variances to update Expensed Item
Receipts instead of the variance accounts.
GL Entries for
Purchase Price
Variance (Standard
Cost, NonRecoverable Tax)
372
User Guide — Master Data
Fig. 13.13
GL Entries for AP
Usage Variance
(Standard Cost,
Non-Recoverable
Tax)
GL Entries for AP Usage Variance
(Standard Cost, Non-Recoverable Tax)
Tax Accrual at Goods Receipt
Goods Receipt:
Entries created for received
item cost (1) and tax (2)
Voucher Confirmation:
Entries created for item
cost (3), variance (4), tax
on item cost (5), and tax on
variance (6)
Inventory
100.00 1
Purchase
Order Receipts
100.00 3
10.00 5
Purchase
Purchase
Order Receipts Price Variance
1 100.00 10.00 2
2 10.00
Accounts
AP Usage
Payable
Variance
3 100.00 40.00 4
4.00 6
40.00
4
10.00
5
4.00
6
Tax Accrual at Invoice Receipt
Goods Receipt:
Entries created for received
item cost (1) but not tax
Voucher Confirmation:
Entries created for item
cost (2), variance (3), tax
on item cost (4), and tax on
variance (5)
Inventory
100.00 1
Purchase
Order Receipts
100.00 2
AP Usage
Variance
40.00 3
4.00 5
Purchase
Order Receipts
1 100.00
Accounts
Payable
2 100.00
40.00
3
10.00
4
4.00
5
Inventory
10.00 4
Processing GTM
373
Fig. 13.14
GL Entries for AP
Rate Variance
(Standard Cost,
Non-Recoverable
Tax)
GL Entries for AP Rate Variance
(Standard Cost, Non-Recoverable Tax)
Tax Accrual at Goods Receipt
Goods Receipt:
Entries created for received
item cost (1) and tax (2)
Voucher Confirmation:
Entries created for item
cost (3), variance (4), tax
on item cost (5), and tax on
variance (6)
Inventory
100.00 1
Purchase
Order Receipts
100.00 3
10.00 5
Purchase
Purchase
Order Receipts Price Variance
1 100.00 10.00 2
2 10.00
Accounts
Payable
3 100.00
4 30.00
5 10.00
3.00
6
AP Rate
Variance
30.00 4
3.00 6
Tax Accrual at Invoice Receipt
Goods Receipt:
Entries created for received
item cost (1) but not tax
Voucher Confirmation:
Entries created for item
cost (2), variance (3), tax
on item cost (4), and tax on
item cost + variance (5)
Inventory
100.00 1
Purchase
Order Receipts
100.00 2
AP Rate
Variance
30.00 3
3.00 5
Purchase
Order Receipts
1 100.00
Accounts
Payable
2 100.00
30.00
3
10.00
4
3.00
5
Inventory
10.00 4
374
User Guide — Master Data
Memo Items
Memo items are non-inventory items such as office supplies. By
definition, such items have no standard cost. Figure 13.15 shows GL
entries for memo items. The tax point determines whether the update to
AP Tax Recoverable occurs at goods receipt or invoice receipt.
Fig. 13.15
GL Entries for
Memo Item
(Standard Cost,
Non-Recoverable
Tax)
GL Entries for Memo Item
(Non-Recoverable Tax)
Tax Accrual at Goods Receipt
Goods Receipt:
Entries created for received
item cost (1) and tax (2)
Expensed
Purchases
100.00 1
10.00 2
Voucher Confirmation:
Entries created for item
cost (3) and tax (4)
Expensed Item
Receipts
100.00 3
10.00 4
Expensed
Item Receipts
1 100.00
10.00
2
Accounts
Payable
3 100.00
4 10.00
Tax Accrual at Invoice Receipt
Goods Receipt:
Entries created for received
item cost (1) but not for tax
Voucher Confirmation:
Entries created for item
cost (2) and tax (3)
Expensed
Purchases
100.00 1
Expensed
Item Receipts
100.00 2
Expensed
Item Receipts
1 100.00
Accounts
Payable
2 100.00
3 10.00
Expensed
Purchases
10.00 3
Processing GTM
375
Returned Items
When you return items, the system clears the item cost and the tax from
the accounts updated by the original receipt and the voucher, if you
processed the return after paying the supplier invoice.
Average Cost
This section shows tax accruals for a simple purchase order and voucher,
first for recoverable taxes, then for non-recoverable taxes.
For average costing, the system re-averages item costs at both receipt and
voucher confirmation. If the tax point is goods receipt, the cost basis for
re-averaging calculations includes tax at both receipt and voucher
confirmation. However, if the tax point is invoice receipt, the cost basis
includes tax only at voucher confirmation.
Recoverable Tax
Most European countries have a sales tax system that allows recovery of
tax on purchases. A recoverable purchase tax amount is one that you are
allowed to offset against sales tax payable. Such tax amounts are tracked
separately in the GL. For Global Tax Management, they update the AP
Tax account for the tax rate. For recoverable taxes, the tax point is
normally invoice receipt. However, as a comparison, the following
examples show the entries for both tax points.
Inventory Items
Figure 13.16 shows the GL entries for purchases of inventory items. The
tax point determines whether the update to AP Tax Recoverable occurs at
goods receipt or invoice receipt. Inventory items are items you purchase
to use in manufacturing or to sell to customers.
¶ To review the
entries for
standard cost, see
“Standard Cost”
on page 363.
376
User Guide — Master Data
Fig. 13.16
GL Entries for
Inventory Item
(Average Cost,
Recoverable Tax)
GL Entries for Inventory Item
(Average Cost, Recoverable Tax)
Tax Accrual at Goods Receipt
Goods Receipt:
Entries created for received
item cost (1) and tax (2)
Voucher Confirmation:
Entries created for item
cost (3) and tax (4)
Inventory
100.00 1
Purchase
Order Receipts
1 100.00
2 10.00
Purchase
Order Receipts
100.00 3
10.00 4
AP Tax
Recoverable
10.00 2
Accounts
Payable
3 100.00
4 10.00
Tax Accrual at Invoice Receipt
Goods Receipt:
Entries created for received
item cost (1) but not for tax
Voucher Confirmation:
Entries created for item
cost (2) and tax (3)
Inventory
100.00 1
Purchase
Order Receipts
100.00 2
Purchase
Order Receipts
1 100.00
Accounts
Payable
2 100.00
3 10.00
AP Tax
Recoverable
10.00 3
Variances
Two kinds of variances occur during the purchasing/accounts payable
cycle: AP usage variance and AP rate variance.
AP Rate and Usage Variances. AP rate variance occurs when an
item’s invoice cost does not match its PO cost. AP usage variance
occurs when an item’s invoice quantity does not match its PO
quantity and you close the receiver line in the voucher.
Figure 13.17 and Figure 13.18 show GL entries for inventory items.
Entries for memo items update Expensed Item Receipts instead of
Purchase Order Receipts, and Expensed Purchases instead of
Processing GTM
377
Inventory. In addition, for memo items, an option in Accounts
Payable Control (28.24) allows variances to update Expensed Item
Receipts instead of the variance accounts.
Fig. 13.17
GL Entries for AP
Usage Variance
(Average Cost,
Recoverable Tax)
GL Entries for AP Usage Variance
(Average Cost, Recoverable Tax)
Tax Accrual at Goods Receipt
Goods Receipt:
Entries created for received
item cost (1) and tax (2)
Voucher Confirmation:
Entries created for item
cost (3), variance (4), tax
on item cost (5), and tax on
variance (6)
Inventory
100.00 1
Purchase
Order Receipts
1 100.00
2 10.00
Purchase
Order Receipts
100.00 3
10.00 5
AP Usage
Variance
40.00 4
AP Tax
Recoverable
10.00 2
Accounts
Payable
3 100.00
40.00
4
10.00
5
4.00
6
AP Tax
Recoverable
4.00 6
Tax Accrual at Invoice Receipt
Goods Receipt:
Entries created for received
item cost (1) but not tax
Voucher Confirmation:
Entries created for item
cost (2), variance (3), tax
on item cost (4), and tax on
variance (5)
Inventory
100.00 1
Purchase
Order Receipts
100.00 2
AP Usage
Variance
40.00 3
Purchase
Order Receipts
1 100.00
Accounts
Payable
2 100.00
40.00
3
10.00
4
4.00
5
AP Tax
Recoverable
10.00 4
4.00 5
378
User Guide — Master Data
Fig. 13.18
GL Entries for AP
Rate Variance
(Average Cost,
Recoverable Tax)
GL Entries for AP Rate Variance
(Average Cost, Recoverable Tax)
Tax Accrual at Goods Receipt
Goods Receipt:
Entries created for received
item cost (1) and tax (2)
Voucher Confirmation:
Entries created for item
cost (3), variance (4), tax
on item cost (5), and tax on
variance (6)
Inventory
100.00 1
Purchase
Order Receipts
1 100.00
2 10.00
Purchase
Order Receipts
100.00 3
10.00 4
AP Rate
Variance
30.00 5
AP Tax
Recoverable
10.00 2
Accounts
Payable
3 100.00
30.00
4
10.00
5
3.00
6
AP Tax
Recoverable
3.00 6
Tax Accrual at Invoice Receipt
Goods Receipt:
Entries created for received
item cost (1) but not tax
Voucher Confirmation:
Entries created for item
cost (2), variance (3), tax
on item cost (4), and tax on
variance (5)
Inventory
100.00 1
Purchase
Order Receipts
100.00 2
AP Rate
Variance
30.00 3
Purchase
Order Receipts
1 100.00
Accounts
Payable
2 100.00
30.00
3
10.00
4
3.00
5
AP Tax
Recoverable
10.00 4
3.00 5
Processing GTM
379
Memo Items
Memo items are non-inventory items such as office supplies. Figure 13.19
shows GL entries for memo items. The tax point determines whether the
update to AP Tax Recoverable occurs at goods receipt or invoice receipt.
Fig. 13.19
GL Entries for
Memo Item
(Average Cost,
Recoverable Tax)
GL Entries for Memo Item
(Recoverable Tax)
Tax Accrual at Goods Receipt
Goods Receipt:
Entries created for received
item cost (1) and tax (2)
Voucher Confirmation:
Entries created for item
cost (3) and tax (4)
Expensed
Purchases
100.00 1
Expensed
Item Receipts
1 100.00
2 10.00
Expensed Item
Receipts
100.00 3
10.00 4
AP Tax
Recoverable
10.00 2
Accounts
Payable
3 100.00
4 10.00
Tax Accrual at Invoice Receipt
Goods Receipt:
Entries created for received
item cost (1) but not for tax
Voucher Confirmation:
Entries created for item
cost (2) and tax (3)
Expensed
Purchases
100.00 1
Expensed
Item Receipts
100.00 2
Expensed
Item Receipts
1 100.00
Accounts
Payable
2 100.00
3 10.00
AP Tax
Recoverable
10.00 3
380
User Guide — Master Data
Returned Items
When you return items, the system clears the item cost and the tax from
the accounts updated by the original receipt and the voucher, if you
processed the return after paying the supplier invoice.
Non-Recoverable Tax
You cannot offset a non-recoverable purchase tax amount against sales
tax payable. Usually, such taxes are already included in the item cost.
Purchasing transactions then back-calculate the tax from the item amount,
assuming you set up the supplier and tax rate records to support this. The
following section illustrates the GL entries if taxes were not included.
Inventory Items
Figure 13.20 shows the GL entries for purchases of inventory items. The
tax point determines whether the update to AP Tax Recoverable occurs at
goods receipt or invoice receipt. Inventory items are items you purchase
to use in manufacturing or to sell to customers.
Processing GTM
381
Fig. 13.20
GL Entries for
Inventory Item
(Average Cost,
Non-Recoverable
Tax)
GL Entries for Inventory Item
(Average Cost, Non-Recoverable Tax)
Tax Accrual at Goods Receipt
Goods Receipt:
Entries created for received
item cost (1) and tax (2)
Voucher Confirmation:
Entries created for item
cost (3) and tax (4)
Inventory
100.00 1
Purchase
Order Receipts
1 100.00
2 10.00
Purchase
Order Receipts
100.00 3
10.00 4
Inventory
10.00 2
Accounts
Payable
3 100.00
4 10.00
Tax Accrual at Invoice Receipt
Goods Receipt:
Entries created for received
item cost (1) but not for tax
Voucher Confirmation:
Entries created for item
cost (2) and tax (3)
Inventory
100.00 1
Purchase
Order Receipts
100.00 2
Purchase
Order Receipts
1 100.00
Accounts
Payable
2 100.00
3 10.00
Inventory
10.00 3
Variances
Two kinds of variances occur during the purchasing/accounts payable
cycle: AP usage variance and AP rate variance.
AP Rate and Usage Variances. AP rate variance occurs when an
item’s invoice cost does not match its PO cost. AP usage variance
occurs when an item’s invoice quantity does not match its PO
quantity and you close the receiver line in the voucher.
Figure 13.21 and Figure 13.22 show GL entries for inventory items.
Entries for memo items update Expensed Item Receipts instead of
Purchase Order Receipts, and Expensed Purchases instead of
382
User Guide — Master Data
Inventory. In addition, for memo items, an option in Accounts
Payable Control (28.24) allows variances to update Expensed Item
Receipts instead of the variance accounts.
Fig. 13.21
GL Entries for AP
Usage Variance
(Average Cost,
Non-Recoverable
Tax)
GL Entries for AP Usage Variance
(Average Cost, Non-Recoverable Tax)
Tax Accrual at Goods Receipt
Goods Receipt:
Entries created for received
item cost (1) and tax (2)
Voucher Confirmation:
Entries created for item
cost (3), variance (4), tax
on item cost (5), and tax on
variance (6)
Inventory
100.00 1
10.00 2
Purchase
Order Receipts
100.00 3
10.00 5
Purchase
Order Receipts
1 100.00
2 10.00
Accounts
AP Usage
Payable
Variance
3 100.00 40.00 4
4.00 6
40.00
4
10.00
5
4.00
6
Tax Accrual at Invoice Receipt
Goods Receipt:
Entries created for received
item cost (1) but not tax
Voucher Confirmation:
Entries created for item
cost (2), variance (3), tax
on item cost (4), and tax on
variance (5)
Inventory
100.00 1
Purchase
Order Receipts
100.00 2
AP Usage
Variance
40.00 3
4.00 5
Purchase
Order Receipts
1 100.00
Accounts
Payable
2 100.00
40.00
3
10.00
4
4.00
5
Inventory
10.00 4
Processing GTM
383
Fig. 13.22
GL Entries for AP
Rate Variance
(Average Cost,
Non-Recoverable
Tax)
GL Entries for AP Rate Variance
(Average Cost, Non-Recoverable Tax)
Tax Accrual at Goods Receipt
Goods Receipt:
Entries created for received
item cost (1) and tax (2)
Voucher Confirmation:
Entries created for item
cost (3), variance (4), tax
on item cost (5), and tax on
variance (6)
Inventory
100.00 1
10.00 2
Purchase
Order Receipts
100.00 3
10.00 5
Purchase
Order Receipts
1 100.00
2 10.00
Accounts
Payable
3 100.00
4 30.00
5 10.00
3.00
6
AP Rate
Variance
30.00 4
3.00 6
Tax Accrual at Invoice Receipt
Goods Receipt:
Entries created for received
item cost (1) but not tax
Voucher Confirmation:
Entries created for item
cost (2), variance (3), tax
on item cost (4), and tax on
item cost + variance (5)
Inventory
100.00 1
Purchase
Order Receipts
100.00 2
AP Rate
Variance
30.00 3
3.00 5
Purchase
Order Receipts
1 100.00
Accounts
Payable
2 100.00
30.00
3
10.00
4
3.00
5
Inventory
10.00 4
384
User Guide — Master Data
Memo Items
Memo items are non-inventory items such as office supplies. Figure 13.23
shows GL entries for memo items. The tax point determines whether the
update to AP Tax Recoverable occurs at goods receipt or invoice receipt.
Fig. 13.23
GL Entries for
Memo Item
(Average Cost,
Non-Recoverable
Tax)
GL Entries for Memo Item
(Non-Recoverable Tax)
Tax Accrual at Goods Receipt
Goods Receipt:
Entries created for received
item cost (1) and tax (2)
Expensed
Purchases
100.00 1
10.00 2
Voucher Confirmation:
Entries created for item
cost (3) and tax (4)
Expensed Item
Receipts
100.00 3
10.00 4
Expensed
Item Receipts
1 100.00
10.00
2
Accounts
Payable
3 100.00
4 10.00
Tax Accrual at Invoice Receipt
Goods Receipt:
Entries created for received
item cost (1) but not for tax
Voucher Confirmation:
Entries created for item
cost (2) and tax (3)
Expensed
Purchases
100.00 1
Expensed
Item Receipts
100.00 2
Expensed
Item Receipts
1 100.00
Accounts
Payable
2 100.00
3 10.00
Expensed
Purchases
10.00 3
Processing GTM
Returned Items
When you return items, the system clears the item cost and the tax from
the accounts updated by the original receipt and the voucher, if you
processed the return after paying the supplier invoice.
Reporting
Printing Tax Information on Documents
To print tax detail information on documents such as sales orders, two
fields must be Yes:
• Print Tax Detail on Reports in Global Tax Management Control
(2.13.24)
• Print Trailer in the document print program
Tax Reports
Tax reports are located in the Tax History Menu (2.13.15):
• Tax Detail by Transaction Inquiry (2.13.15.2)
• Tax Detail by Transaction Report (2.13.15.3)
• EC Sales Listing (2.13.15.8)
• VAT Registration Number Report (2.13.15.9)
• AR Tax by Transaction Report (2.13.15.13)
• AR Tax by Tax Rate Report (2.13.15.14)
• AP Tax by Transaction Report (2.13.15.16)
• AP Tax by Tax Rate Report (2.13.15.17)
Note These reports do not necessarily satisfy local tax laws. You often
must write custom reports.
385
386
User Guide — Master Data
Fixing Common Tax Problems
Table 13.4 describes common tax processing problems and possible
causes.
Table 13.4
Common Tax
Processing
Problems
Problem
Possible Cause
Warning: No tax environment found, using GTM could not find a tax environment for
default.
the ship-from/ship-to tax zone
combination, so it inserted the error code
from Global Tax Management Control
(2.13.24).
GTM can also select the wrong
environment if the tax zone was wrong in
the address records for your company, the
customer, or the supplier.
Error: Tax rate does not exist.
a) No tax rate exists for the tax type, item
or trailer charge tax class, item or
transaction tax usage, and/or transaction
tax date.
b) If the system finds a tax class or tax
usage specific rate for an item or trailer
charge, it expects to find one for all
applicable tax types.
The transaction has the right tax
environment but the wrong tax type.
The tax environment has the wrong tax
type.
Tax was calculated incorrectly.
Field settings in your transaction must be
consistent with corresponding settings for
the tax rate. For example, for tax to be
reverse-calculated, Tax In must be Yes in
both the transaction line item frame and the
tax rate record.
Occasionally, the system calculates tax
correctly but they do not match the value
on a printed document.
Index
Symbols
~reports 183
~screens 183
~taxes 184
Numerics
1.1.1 40
1.1.13 36
1.1.18 34, 36
1.2.1 27
1.2.5 27
1.2.9 27
1.2.13 27
1.2.17 27
1.4.1 14
1.4.3 100, 124
1.4.5 14, 18
1.4.7 14
1.4.9 14
1.4.16 14
1.4.17 14
1.4.18 14, 22
1.5.9 18
1.5.12 17
1.8.1 54
1.8.7 56
1.8.19 57
1.8.20 59
1.9.1.1 110
1.9.1.3 111
1.9.1.5 115
1.9.1.7 117
1.9.1.9 118, 121
1.9.2.1 119
1.9.2.4 104
1.9.2.8 131
1.9.2.13 119
1.9.2.16 105, 132
1.9.6.1 105, 108, 133
1.9.6.2 131
1.9.6.13 134
1.9.7.1 105, 119, 121, 135
1.9.7.3 106, 136
1.9.7.4 106, 137, 139
1.9.7.5 106, 138
1.9.7.13 138
1.9.9.1 131
1.9.9.6 108
1.9.11 131
1.9.13 120, 139
1.9.14 121, 139
1.9.24 108
1.10.1.24 51
1.10.2.5 94
1.10.2.6 92
1.22.1 166
1.22.4 152
1.22.13 167
1.22.16.1 174
1.22.16.4 175
1.22.16.7 175
1.22.16.9 175
1.22.16.13 177
1.22.16.16 178
1.22.19 160
1.22.22 165
1.22.23 162
1.22.24 146
2.1.1 187, 188
2.1.7 191
2.1.9.1 37, 192
2.1.9.5 192
2.1.9.6 192
2.1.13 186
2.3.1 192, 199
2.3.13 192
388
User Guide — Master Data
2.5.1 185
2.5.16 186
2.11 211
2.12 183, 341
2.13.1.1 321
2.13.1.2 321
2.13.1.3 321
2.13.1.5 322
2.13.1.6 322
2.13.1.7 322
2.13.1.9 322
2.13.1.13 329
2.13.1.17 323
2.13.1.18 323
2.13.1.19 323
2.13.1.22 328
2.13.1.23 328
2.13.3.1 194
2.13.3.14 319
2.13.3.15 319
2.13.5.1 326, 327
2.13.13.1 334
2.13.13.5 338
2.13.24 327, 339
2.14.1 194
2.15.1 227
2.15.4 237
2.15.7 253
2.15.13 230
2.15.16 231
2.15.19 231
2.15.24 225
2.16.1 196
2.17.1 197
2.19.1 200
2.20.1 207
2.20.4 208
2.20.7 209
2.20.10 209
2.21.1 198
2.21.2 199
2.21.3 199
2.22.1.16 267
2.22.1.19 267
2.22.1.22 267
2.22.3 270
2.22.11 276
2.22.13 278
2.22.19 279
2.22.20 281
3.1.5 298
3.3 302
3.4.1 289
3.4.2 289
3.4.3 289
3.4.4 289
3.6.1 298
3.6.2 298
3.6.3 18, 298
3.6.5 299
3.6.6 299
3.6.8 299
3.6.9 300
3.6.13 300
3.6.14 300
3.6.15 300
3.6.16 301
3.6.18 301
3.6.20 301
3.7 291
3.8 291
3.9 290
3.10 290
3.11 290
3.12 290
3.13 296
3.14 296, 297
3.15 297
3.16.2 305
3.16.4 305
3.16.6 306
3.16.7 307
3.16.8 306
3.16.12 307
3.16.13 306
3.16.15 306, 307
3.16.18 307
3.16.21 304, 307
3.16.23 304, 306
3.17 302
3.18 302
3.19 302
3.21 293
3.21.1 293
3.21.2 293
3.21.13 293
3.21.14 293
3.21.16 293, 294
3.21.23 294
3.22 294
3.22.1 294
3.22.2 294
3.22.3 294
3.22.4 295
Index
3.23 35
3.24 18, 286
5.13.1 205
5.24 98, 205
7.1.11 80
13.5 100
13.13.3 107
13.13.22 107
14.22 107
15.5 100
15.22 107
19.1.13 100
19.1.22 107
2.1.9.2 (02.02.09.02) 37
2.1.9.3 (02.01.09.03) 37
36.2.17 115
36.2.21.1 225
36.13.2 108
36.14.1 108
36.14.3 108
A
ABC class codes 18, 295
ABC Status Report/Update 18
absorbed taxes 351
accounts
inventory 27
logistics 222
product line 25
purchasing 27
sales 27
work order 27
accounts payable (AP)
tax account 348
Accounts Payable Control
tax variances 366
accrual
logistics charges 215
price list 62, 73
action status
sales order repricing 82
activating
compliance 147
Intrastat 268
additive discounts 51
Address Code Change 211
addresses 180–211
address relationships 181
banks 198
bill-to 184
carriers 197
company 183
GTM 341
customer 186
declarants and agents 267
employee 193
entity 183
Intrastat 272
list type 182
merging 212
printing on forms 184
salesperson 185
ship-to 184
site
GTM 341
supplier 192
tax reporting 184
advanced repetitive
compliance effect 148, 169
transactions
inventory attributes 150, 154
agent
selecting for Intrastat print 280
aggregate taxes 344
allocate single lot 19
Allocated Inventory Inquiry 302
alternate
product line accounts 27
amount type
accrual 62
credit terms 62
discount % 61
discount amt 61
freight list 62
freight terms 62
list price 61
list/discount table pricing 92
markup 61
net price 61
Analysis Code Copy 59
Analysis Code Detail Build 57
Analysis Code Detail Inquiry 58
Analysis Code Detail Maintenance 58
Analysis Code Link Maintenance 56
Analysis Code Maintenance 54
Analysis Code Report 54
Analysis Code Selection Maintenance 55
Analysis Code Where-Used Inquiry 58
analysis codes 52–59
Automatic AC Regen 51
automatic build 57
building 57
child 56
combining into groups 56
389
390
User Guide — Master Data
conditions 55
copying 59
customer conditions 55
item conditions 55
linking 56
parent codes 56
planning 50
rules 57
setting up 52
AP Tax by Tax Rate Report 385
AP Tax by Transaction Report 385
Apportion Method field 229
apportioning logistics charges 215
approval
group for PCC 116
product change order 114, 133
Approval Browse 131
AR Tax by Tax Rate Report 385
AR Tax by Transaction Report 385
archive/delete
Intrastat records 282
assay% 151
changing 159
definition 153
attributes. See inventory attributes
authority codes 174
auto lot numbering 164, 167
effects of 167
gaps in sequence of 167
lot groups 168, 169
automatic
analysis code regeneration 51
locations 36
lot numbers 19
average cost
non-recoverable tax 380
purchase variances 376
recoverable tax 375
tax accrual for memo items 379
tax accrual for returned items 380
tax calculation 375
tax for inventory items 375
average interval 19
B
Backflush Transaction
automatic lot numbers 169
banks
addresses 198
company address 183
defining accounts 199
supplier 198
base date 201
base days
base date and 204
in inflationary environments 204
batch numbers
assigning to work orders 158
benefits 145
concept 157
effects of using 157
example 157
work flow 158
Batchload Transfer With Lot/Serial Change 289
best pricing 48–88
analysis codes 52
calculating 65
combining discounts 63
configured items 64
control defaults 51
discount types 61
planning 49
price lists 69
reports 77
repricing 80
Sales Order Maintenance 84
Blanket Order Maintenance 239
Blanket Order Release to PO 239
break categories 49, 59, 64
Break Category field 59
Build PO From Requisition 239
building
analysis codes 57
lot master records 165
Bulk Tag Create 305
burden
item cost category 22
C
capped taxes 347
Carrier Maintenance 197
cascading discounts 51
category
break 59
CIM interface
inventory transfer 289
classes
freight 208
tax 321
Closed AR Delete/Archive
temporary addresses 187
closing
PCO to PCO 122
PCR/PCO 139
Index
codes
vs master comments 17
combinable discounts 63
commissions 185
Commodity Code Maintenance 270
commodity codes 270
associating with a country 272
Company Address Maintenance 183
GTM requirements 341
Intrastat addresses 272
company addresses
1099 tax reporting 184
banks 183
converting tax info 341
country code field 272
purchase order 183
setting up for Intrastat 272
taxes 184
compliance 144–178
automatic lot numbers 167
Compliance Control 146
controlled substances 173
inventory attributes 149
lot control features 161
setting up 146
work order batch control 149
Compliance Control 146
Compliance Active field 147
component issue control
benefits 145
restricting to BOM 172
compound interest
credit limit calculation 191
configured items
pricing 64, 71
control program
Compliance 146
Global Tax Management 339
Intrastat 268
Inventory 286
Logistics Accounting 225
Pricing 51
Controlled Authority Maintenance 174
Controlled Customer Maintenance 175
Controlled Item Maintenance 175
Controlled Site Maintenance 175
controlled substances
benefits 146
interaction with core QAD Enterprise Application
modules 173
work flow 173
conversion
PCR to PCO 123
cooperative marketing 50
co-products/by-products
compliance 147
modifying receipts 147
copying
analysis codes 59
PCOs from PCRs/PCOs 122
PCOs to PCR/PCO 122
price lists
best prices 75
list/discount table 94
tax rates 338
cost data 14
Cost Element Maintenance
logistics charges 236
Country Code Browse 194
Country Code Maintenance 194, 267
Country Code Report 194
country codes
alternate 195
DEA country 195
defining for compliance 174
EC country 195
for company address 272
for customers and suppliers 273
GATT country 195
global tax management (GTM) 317
groups 195
NAFTA country 195
name 195
setting up 194
type 195
Country of Dest/Disp field 268
county codes
GTM 317
credit limit
adjusting 191
calculating 191
checking in sales order repricing 82
methods of calculating 191
update 191
credit terms 200
adjusting entries not calculated 205
base date 201
base days 204
interest 201
price list 62
proximo 201
purchasing transactions 205
sales transactions 205
two levels 200
391
392
User Guide — Master Data
credit terms interest 203, 204
default 204
Credit Terms Maintenance 200, 204
proximo terms 202
currency
price lists 69
Current Surplus Inventory Report 299
Customer Credit Limit Adjustment 191
Customer Item Maintenance 23
Customer Maintenance 187, 188
Intrastat country codes 273
Customer Orders by Price List Inquiry 79
Customer Ref is Customer Item field 23
Customer Ship-to Maintenance 186
Customer/Supplier Bank Browse 199
Customer/Supplier Bank Maintenance 198
Customer/Supplier Bank Report 199
customers 186
analysis codes regeneration 51
banks 198
bill-to 186
country codes 273
credit data 189
default GTM tax data 342
freight data 190
reserved locations for 192
ship-to 186
sold-to 186
Cycle Count Results Entry 296, 297
Cycle Count Results Report 297
Cycle Count Worksheet Print 296
cycle counting 41, 296
initial counts 296
interval 19
recounts 297
results report 297
delete/archive
Intrastat records 282
inventory tags 304
lot masters 162
Delivery Transit Time Maintenance 196
Detail Allocation Inventory Inquiry 192
Detail Allocation Inventory Report 192, 298
Detail Approval Maintenance 134
Device History Record Report 301
discount tables 88
requiring 98
discount types
accrual 62
credit terms 62
discount % 61
discount amt 61
freight list 62
freight terms 62
list price 61
markup 61
net price 61
discounted taxes 349
discounts 51
additive example 67
base 63
base-combinable 63
cascading example 67
combinable 63
combination type 51
exclusive 63
pricing 80
quantity 81
sequence order 66
volume 51, 81
volume discounts 51
distribution group 119
D
date
PCO effective 137
pricing effective 51
reference 269
SO reference 269
declarant
selecting for Intrastat print 280
Declarant Branch ID field 270
declarations
printing Intrastat 279
reprinting 281
selecting for final print 280
default
inventory status 154
E
EC Sales Listing 348, 385
ECO. See engineering change order (ECO)
effective dates
setting for PCOs 137
e-mail
during PCC routing 116
Employee Maintenance 194
employees 193
Enable PCC Formula Maintenance 107
Enable PCC Item Spec Maintenance 107
Enable PCC Routing Maintenance 107
Enable PCC Structure Maintenance 107
engineering change order (ECO)
printing 107
Index
replaced by PCC module 100
turning off functionality 107
entities
general ledger (GL) 30
Site Maintenance 30
environments
tax 324
error codes
GTM environment 327
GTM tax zone 320
EU. See European Union (EU)
European Community (EC) 194
EC process work 336
EC sales list 336, 348
European Union (EU)
Country Code Maintenance 195
Intrastat reporting 263
exemptions 344
expire date
changing 159
defined 153
inventory 151
expired
inventory
management 161
transactions 171
exploded nodes
analysis codes 57
export
PCR/PCO 139
Export Control Classification Numbers 173
F
factors 51
fixed interest (credit limit calculation) 191
fixed prices
sales orders 81
Flow Indicator Maintenance 267
formats
VAT registration 343
Formula Maintenance 100
formulas
and assay% 153
and grade 153
freezing inventory balances 305
freight charges 206–211
freight class 208
freight lists 207
freight terms 210
freight zones 208
logistics 250
Freight Charges Maintenance 209
Freight Class Maintenance 209
Freight List Maintenance 207
freight lists
price list 62
freight terms 210
price list 62
Freight Terms Maintenance
logistics charges 245
Freight Zone Maintenance 208
G
general ledger (GL)
accrued tax at receipt 348
AP tax account 348
cost categories 22
GTM effects 362
tax accounts 331
General License Maintenance 177
general licenses
defining 177
Generalized Codes Maintenance
county codes 317
province codes 317
state codes 317
geographical area 50
Global Tax Management (GTM)
addresses 184
calculating taxes
custom methods 345
standard methods 345
concepts 313
correcting amounts 361
GL effects 362
implementing 315
limitations 313
logistics charges 233
partial item amounts 345
processing taxes 353
rounding methods 323
sample scenario 314
setup
addresses 341
control program 339
country codes 194
customer tax data 342
customers 342
GL accounts 331
item tax class 343
tax bases 329
tax classes 321
tax environments 324
tax rates 332
393
394
User Guide — Master Data
tax types 320
tax usages 321
tax zones 317
tax calculation logic 354
tax data windows 356
tax exemptions 344
tax methods 345
troubleshooting 386
viewing tax amounts 359
Global Tax Management Control 339
country code 317
Tax Environment field 327
GMP. See U.S. FDA Good Manufacturing Practices
grade 151
changing 159
defined 153
Group Maintenance 110
adding users 111
groups
PCC 110
adding users 112
approval 116
replacing users 113, 114
product change control (PCC)
distribution 119
GTM. See Global Tax Management (GTM)
H
Harmonized Tariff Codes 173
Health Industry Numbers 173
I
Implementation (PCO) 138
import
PCR/PCO 139
Inbound Account Maintenance 230
Incorporation (PCO) 106, 138
Incorporation Planning Report 106, 136
Incorporation Selection 106, 137, 139
Individual License Maintenance 178
individual licenses
defining 178
initializing PCOs 108
inquiries
Intrastat 281
memory considerations 295
workfiles and 295
Intrastat 263–283
audit trail information 283
data for orders 274
delete/archive records 282
features 264
inquiries and reports 281
manual update of records 278
order maintenance
example 274
printing declarations 279
qualitative information 283
quantitative information 283
region code 272
setting up 266
addresses for declarants and agents 267
codes 266
commodity codes 270
company addresses 272
country codes 273
Intrastat item data 271
item net weight 273
Intrastat Control 268
Intrastat Declaration Print 279
Intrastat Declaration Reprint 281
Intrastat Inquiry 281
Intrastat Inquiry by Invoice 281
Intrastat Inquiry by Order 282
Intrastat Inquiry by Voucher 281
Intrastat Item field
changing to Yes 276
Intrastat Maintenance 274, 278
Intrastat Net Weight Minimum field 269
Intrastat Net Weight Unit of Measure field 269
inventory 285–302
accurate balances 41
availability 39
checking availability 302
data 14, 18
detail records 287
impact of PCO 136
issues
restrictions 39
location 34
negative balances 41
nettable 39
not available 39
overissue 41
picking 286
sites 28
status codes 39
total 288
transaction effective date 269, 270
transactions 41
updating balances 307
Inventory Account Maintenance 27
inventory attributes 150
changing 159
Index
compliance 145, 149
field security 159
search order 156
status 151
Inventory Balance Freeze 305
Inventory Balance Update 304, 307
inventory codes
ABC Class 18
allocate single lot 19
automatic lot numbers 19
average interval 19
cycle count interval 19
location 19
location type 19
lot/serial control 18
shelf life 19
site 18
Inventory Control 286
ABC tolerances 296
cycle counting 295
location search order 35
Site 18
Inventory Detail by Item Browse 302
Inventory Detail by Location 299
Inventory Detail by Site Browse 302
Inventory Detail Report 299
inventory reports
Current Surplus Inventory Report 299
Detail Allocation Inventory Report 298
Inventory Detail by Location 299
Inventory Detail Report 299
Inventory Valuation as of by Loc 301
Inventory Valuation as of Date 300
Inventory Valuation by Location 300
Inventory Valuation Report 300
Item ABC Status Report/Update 298
Projected Surplus Inventory 300
Reorder Report 298
Stock Status Report 298
inventory status
blank 155
changing 154, 159
compliance effect 151
PO Receipt Status 151
WO Receipt Status 151
Inventory Status Code Maintenance 40
inventory transactions 288
expired 171
issues 290, 291
receipts 290
shipments 291
Inventory Valuation as of by Location 301
Inventory Valuation as of Date 300
Inventory Valuation by Location 300
Inventory Valuation Report 300
Inventory Variance Report 307
invoice date, Intrastat 270
Invoice Post
Intrastat records created 268
issues 290
inventory transactions 290
Issues–Return to Supplier 291
Issues–Unplanned 291
Item ABC Status Report/Update 298
Item Data Maintenance 100, 124
Item Intrastat Data Maintenance 271
item inventory data 18
Item Inventory Data Maintenance 18
auto lot numbering 167
Cycle Count Interval field 296
Item Master Comments Report 17
Item Master Copy
auto lot numbering 167
Item Master Maintenance 14
auto lot numbers 167
Cycle Count Interval field 296
logistics costs 237
lot groups 168
Price Break Cat field 60
Item Revision History Inquiry 108
Item Specification Maintenance 100
items 13–23
ABC classification 18
alternate unit of measure 16
analysis codes regeneration 51
and generalized codes 15
cost data 22
customer items 23
data 13
general data 14
GL cost 22
groups 16
in multiple sites 14
Intrastat setup 271
inventory data 18
logistics costs 237
net weight for Intrastat 273
numbering 15
numbers as indexes 15
PCR/PCO update of 124
planning 20
price break categories 49, 59
price default 22
Pur/MFG code 21
395
396
User Guide — Master Data
supplier items 23
types 16
unit of measure 16
Item-Site Cost Maintenance 22
L
la_do_ship_id 227
la_so_ship_id 227
life cycle of a PCR/PCO 103
linking
analysis codes 53, 56
List Price price list 74
list type (address) 182
list/discount table pricing 88–98
Location Maintenance 34, 35, 36
locations 34–41
and picklists 35
automatic 36
naming conventions 35
overview 34
permanent/temporary 35
reserved 37, 192
single item 36
types 36
Log Charge Pending Voucher Maint 253
logistics accounting 213–261
apportioning charges 215
charge codes 227
inbound accrual 235
outbound accrual 245
PO receipts 243
setting up 222
shipments 249
tax calculation 233
vouchering charges 254
Logistics Accounting Control 225
Logistics Charge Code Maintenance 227
logistics charges
defining 227
terms of trade 237
Lot Actual Bill Inquiry 294
batch number display 159
lot control
benefits 145
building lot master records 165
compliance features 161
database level 163
deciding on level 164
effects of turning off 161
item level 163
Item Master Maintenance 18
levels 147, 161
order level 163
work flow 162
Lot Control Level field 147
Lot Group Maintenance 167
lot groups
assigning to items 168
creating 167
Lot Master Build 165
Lot Master Delete/Archive 162
Lot Master Maintenance 166
expired inventory transaction 172
lot master records
building 165
modifying 166
lot numbers
assigned prior to activating Compliance 162
auto lot numbering 161, 167
compliance 147
expired inventory 171
Lot Level Control field 154
multiple-database 161
reusing 161
supplier 161, 171
Lot Transactions by Date Browse 294
Lot Transactions by Date Inquiry
batch number display 159
Lot Transactions by Tran Inquiry 294
Lot Where-Used Inquiry 295
batch number display 159
Lot/Serial Number History Menu 294
luxury taxes 347
M
Maintain Users in Groups 111
adding users 112
removing users 114
replacing users 113
manual price lists 86
master
comments
copying text into PCO 123
vs codes 17
material requirements planning (MRP)
item planning data 20
memo items
Intrastat 270
tax accrual 374
Menu Security Maintenance
PCO update access 140
minimum price 51
Mode of Transport field 270
Mode of Transport Maintenance 267
Index
Move Transaction
automatic lot numbers 169
Multi-Lot Inven. Detail Update 159
multiple databases
site codes 29
sites 32
N
NAFTA 195
National Drug Codes 173
Nature of Transaction Maintenance 267
net weight
item data for Intrastat 273
nodes
analysis codes 57
non-recoverable tax 369
notification
PCC approvals 115
Number Range Maintenance 225
Number Range Management (NRM)
logistics accounting 224
numbers
auto lot 161
items 15
PCR/PCO 108
O
OR logic 53, 56
Order Intrastat Data Maintenance 276
Outbound Accrual Account Maintenance 231
Outbound Expense Account Maintenance 231
overissues 41
P
PCC Control 108
PCC. See product change control (PCC)
PCO Maintenance 119–131
Formula Data Maintenance
Copy Formula into PCO 128
Copy Where Used into PCO 129
PCR/PCO Detail Maintenance–Formulas 129
Replace Formula Component 129
header 120
Item Data Maintenance 124
Add, Modify, Delete PCO Item Data 124
Direct Item Master Access 125
Item Specification Maintenance
Add/Edit/Deactivate Item Specification 130
Copy Item Spec From Quality Module 129
PCO/PCR Function Maintenance
Change PCO Number 122
Close PCO to PCO 122
397
Copy PCO from PCR/PCO 122
Copy PCO to PCR/PCO 122
Process Data Maintenance 129
Routing Data Maintenance
Add/Edit/Deactivate Routing 128
Add/Edit/Deactivate Routing (Rate Based) 128
Copy Routing to PCR/PCO 128
Section Menu 121
Structure Data Maintenance 125
Copy Product Structures into PCO 125
Copy Where Used into PCO 126
Product Structure detail 126
Replace Product Structure Component 126
Text Data Maintenance 123
Add, Modify, Delete PCO Text Data 123
Copy Text from Master Comments 123
Trailer Maintenance 130
PCO Status Browse 131
PCO. See product change order (PCO)
PCR Maintenance 119
PCO/PCR Function Maintenance
Close PCR to PCO 123
Convert PCR to PCO 123
PCR. See product change request (PCR)
PCR/PCO Approval 105, 108, 133
PCR/PCO Close 121, 139
PCR/PCO Detail Inquiry 131
PCR/PCO Import/Export 120, 139
PCR/PCO Type Maintenance 118, 121
pending vouchers 217
updating 253
vouchering 254
permanent locations 35
physical inventory 303–307
creating and printing tags 305
deleting/archiving old tags 304
freezing inventory balances 305
reviewing results 307
Tag Recount Entry 307
Updating Inventory Balances 307
picking logic 286
inventory 286
options 287
planning
data 14, 20
PO Fiscal Receiving 241
PO Receipt 205
PO Reference Date Logic field 269
PO Shipper Maintenance 241
PO Shipper Receipt
logistics charges 243
Port Maintenance 267
398
User Guide — Master Data
Port of Transhipment field 270
Preference Criteria Codes 173
Price by Line Due Date field 98
Price List Copy (1.10.1.8) 75
Price List Copy (1.10.2.5) 94
Price List Generation by Item 92
Price List Inquiry 74
Price List Maintenance (1.10.1.1) 69
Price List Maintenance (1.10.2.1) 88
Price List Report 74
price lists
Combination Type field 70
copying 75
creating 61
Disc Sequence field 72
incremental 63
List Price 74
manual 86
quantity break type 70
requiring 98
unit of measure 69
Price Lists by Customer Inquiry 74
Price Lists by Item Inquiry 75
pricing
analysis codes 52
assigning lower net 66
best pricing 48
break categories 49, 59
calculating best 66
effective date 51, 52
inquiries 78
list/discount table 88
promotional discount 50
tables 88
Pricing Control 51
Pricing What-If Inquiry 78
Print PCR/PCO 131
printing
cycle count worksheets 296
ECO 107
Intrastat declarations 279
tax information 385
VAT registration numbers 340
processes
PCR/PCO update of 129
product change control (PCC)
auto numbering 108
security 108
setting up 106
user IDs 107
product change order (PCO)
adding, modifying, and deleting text data 123
approval 105, 133
auto numbering of 120
changing numbers 122
closing 139
closing PCO to PCO 122
copying from PCR/PCO 122
copying to PCR/PCO 122
data affected by 100
database 120
distribution 135
effective dates 102, 137
evaluating impact on inventory 136
ID 120
implementation 106, 138
importing and exporting 139
incorporating into production 138
incorporation 106
initializing 108
item data maintenance 124
item/site data not maintained by 101
life cycle 103, 104
master comment 123
multi-database installations and 120
overview 101
prefixes for numbers 109
printers and batch IDs 108
process data maintenance 129
product structures in 125
release 135
release and distribution 105
reopening 130
rerouting 134
revision levels 125
routing for approval 105, 132
security issues 140
text data maintenance 123
trailer maintenance 130
types of data in 119
viewing data 131
product change request (PCR)
approval 104
life cycle 103
routing for approval 104, 132
types of data in 119
product definition 5, 11
Product Line Maintenance 27
product lines 24–28
accounts 25
alternate accounts 27
defining 24
Product Structure Maintenance 100
product structures
Index
maintaining in PCR/PCO 125
restricting component issues to 172
Projected Surplus Inventory 300
promotions prefix
pricing 52
province codes 317
GTM 317
proximo terms 201
use of 201
ways to set up 202
pt_um 16
Pur/Mfg code 21
Purchase Order Cost Update 241
Purchase Order Maintenance
logistics accounting 239
Purchase Order Receipts
attributes 154
auto lot numbering 169
logistic charges 243
Purchase Order Returns 245
purchase orders 150
compliance 148
single lot per receipt 148
terms of trade 239
purchase price variance 370
purchase receivers
and Intrastat 268
Purchasing Account Maintenance 27
Purchasing Control 205
pricing fields 98
Q
quality management
PCC control of item specifications 129
quantity break types 70
quotes. See sales quotes
R
rates
GTM tax 332
Reason Codes Maintenance
severity lists 115
receipts
inventory 290
status 151
receipts status
defined 153
Receipts–Backward Exploded 290
Receipts–Return to Stock 290
Receipts–Sales Order Return 290
Receipts–Unplanned 290
recoverable taxes 347, 363
account 331
region code
for Intrastat declarations 272
Region Maintenance 267
Regional Value Content 173
registration
VAT 343
Release and Distribution 105, 119, 121, 135
Reorder Report 298
repetitive
receipts
compliance 148
single lot per receipt 148
transactions
inventory attributes 150, 154
Repetitive Labor Transaction
auto lot numbering 169
reports
Intrastat 281
tax 385
Reprice field 84
repricing
sales orders and quotes 80
reprinting
Intrastat declarations 281
Reserved Location Browse 37
Reserved Location Maintenance 37, 192
Reserved Location Report 37
reserved locations 37
creating 192
inventory status 38
primary 37
restricting component issues 172
retained tax account 331
retained taxes 350
returned items
tax accrual 375
reverse-calculated taxes 351
revision levels
PCC 125
Rounding Method Browse 323
Rounding Method Maintenance 323
Rounding Method Report 323
rounding methods
global tax management (GTM) 323
thresholds 324
unit 324
Route PCO for Approval 105, 132
Route PCR for Approval 104
Routing Slip Copy 117
Routing Slip Maintenance 115
details 116
399
400
User Guide — Master Data
S
Sales Account Maintenance 27
Sales Order Control
accounts 205
pricing fields 98
Sales Order Maintenance
Global Tax Management (GTM) 357
Intrastat data 274
logistics accounting 247
pricing fields 86
repricing 84
Transaction Tax Detail frame 359
View/Edit Tax Details 359
Sales Order Manual Allocations
allocate single lot 19
Sales Order Price Inquiry 80, 84
Sales Order Pricing Report 85
Sales Order Repricing 80
sales orders
customer address 186
Display SO Discounts as 52
price lists. See best pricing
Price SO by Line 52
repricing 80
SO Default Price Date 52
SO Factor Rounding 52
tax adjustments 352
Sales Quote Price Inquiry 84
sales quotes
customer address 186
Display QO Discounts as 52
Price QO by Line 51
QO Default Price Date 51
QO Factor Rounding 51
repricing 80
sales tax
absorbed account 331
account 331
Salesperson Maintenance 185
Salesperson Payments Report 186
salespersons
commissions 185
territory codes and 185
Scheduled Order Maintenance 239
security
PCR/PCO 108
Product Change Control module 140
sequences
discount 66
GTM tax types 327
setting up
country codes 194
Intrastat
addresses for declarants and agents 267
PCC module 107
severity level 117
severity list 115
shelf life 19
ship-to addresses
temporary 187
Ship-To Maintenance
Intrastat country codes 273
simple interest (credit limit calculation) 191
single item locations 36
single lot
per PO receipt 148
per receipts 154, 161
Site Maintenance 30, 36
site security
compliance 144
Site Security Maintenance
and compliance 144
sites 28–34
address records 341
multiple databases 29
overview 28
setting up 29
uses of 28
SO Reference Date Logic field 269
standard cost
GTM taxes 363
inventory items 363
non-recoverable tax 369
recoverable tax 363
tax for returned items 375
taxes for inventory items 369
taxes for memo items 368
taxes for returned items 369
variances 364
state codes 317
GTM 317
Statistical Procedure Maintenance 267
statistical value
calculating Intrastat 283
status
inventory 39, 151
PCR/PCO 131
Stock Availability Browse 302
Stock Journal 301
Stock Status Report 298
substitute items
restricting issues to 172
sums-into relationships 319
sums-into zone 318
Index
Supplier Item Maintenance 23
Supplier Maintenance 192
bank account window 199
banks 199
Intrastat country codes 273
Supplier Remit-to Maintenance 192
suppliers 192
banks 198
country codes 273
lot numbers 161, 171
matching blank in vouchering 226
terms of trade 238
T
Tag Count Entry 306
Tag Delete/Archive 304, 306
Tag Inquiry 306
Tag Print 306
Tag Recount Entry 307
Tag Report 306
Tag Void Status Update 307
tax accrual 370
Tax Base Maintenance 329
tax bases 329
Tax Class Browse 322
Tax Class Maintenance 322
Tax Class Report 322
tax classes 321
Tax Detail by Transaction Inquiry 385
Tax Detail by Transaction Report 385
Tax Environment Maintenance 326, 327
tax environments 324
examples 325
selection criteria 355
setting up 326
tax exemptions
GTM 344
Tax Rate Copy/Update 338
Tax Rate Maintenance 334
tax rates 332
copying 338
selecting 355
setting up 333
tax reporting
1099-MISC 184
addresses 184
aggregate tax 344
by exemption 344
tax transaction types, logistics charges 233
Tax Type Inquiry 321
Tax Type Maintenance 321
Tax Type Report 321
tax types 320
Tax Usage Maintenance 322
tax usages 321
Tax Zone Inquiry 319
Tax Zone Maintenance 319
Tax Zone Report 319
tax zones 317
error codes 339
hierarchies 317, 318
sums-into 318
taxes
absorbed 351
accrued 337
capped 347
company address 184
correcting 361
discounted 349
luxury 347
processing 353
recoverable 347, 363
reporting 385
reports 385
retained 350
reverse-calculated 351
rounding methods 323
tax-on-tax 349
troubleshooting 386
viewing amounts 359
tax-on-tax 329
temporary locations 35
terms
credit 200
delivery 267
freight 210
trade 237
Terms of Delivery Maintenance 267
Terms of Trade Maintenance 237
Trailer Code Maintenance 205, 328
trailer codes
defaults 205
tax status 328
taxable 205
Trailer Tax Detail Browse 328
Trailer Tax Report 328
Transaction by Item Inquiry 293
Transaction Detail Inquiry 293
batch numbers 159
Transaction History Menu 293
transaction types
expired inventory 171
inventory 291
Transactions Accounting Report 293, 294
401
402
User Guide — Master Data
Transactions by Item Report 293
Transactions by Order Report 293
Transactions Delete/Archive 294
Transfer With Lot/Serial Change 289
Transfer–Multi Item 289
transfers
inventory 289
Transfer–Single Item 289
triangulation
Intrastat 273
troubleshooting
common GTM problems 386
type
inventory transactions 291
location 36
PCR/PCO 118
tax 320
variable overhead 22
VAT Registration Number Report 385
VAT. See Value Added Tax (VAT)
Void/Zero Count Unused Tags 307
volume discounts 51
voucher date
Intrastat 269
Voucher Maintenance
Intrastat effect 276
logistics accounting 254
vouchers
pending 217, 253
U
Unallocated Inventory Inquiry 302
Uncounted Tag Report/Update 306, 307
unit of measure 16
acceptable values 16
alternates 16
usages
tax 321
Use Intrastat field 268
User Maintenance
PCC groups 107
users
adding to PCC groups 111
W
Work Order Account Maintenance 27
Work Order Attribute Maintenance 149
Work Order Batch Inquiry
batch number display 159
Work Order Bill Maintenance
allocate single lot 19
restricting component issue 172
Work Order Maintenance
inventory attributes 149
Work Order Receipt
attributes 154
auto lot numbering 169
work orders
and component issues 172
compliance 148
inventory attributes 149
single lot per receipt 148
V
Value Added Tax (VAT)
registration formats 343
registration numbers
printing 340
Z
Zero Balance Delete/Archive 35
zones
freight 208
GTM 317