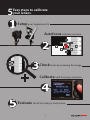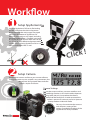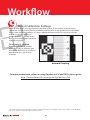
1
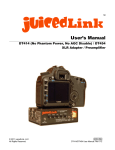
Us
e
rG
ui
de
Contents
OVERVIEW
PROBLEM. SOLUTION. FEATURE. BENEFIT
4
5 EASY STEPS TO CALIBRATE YOUR LENSES 5
WORKFLOW
1. SETUP SPYDERLENSCAL
6
2. SETUP CAMERA6
3. DISTANCE SETTING
7
4. SHOOTING ENVIRONMENT 7
5. TEST LENS ACCURACY
8
6. REVIEW TEST IMAGE
8
7. FOCUS CHECK9
8. AUTOFOCUS CORRECTION
9
9. RETEST CALIBRATION SETTINGS
10
3
Overview
Problem
+/–
Photographers have enjoyed the benefit
of autofocus for 25 years now and most
professional DSLR cameras use through-thelens optical autofocusing sensors. Autofocus
is a great convenience, but many still struggle
with its accuracy and repeatability. The main
reason for this is the variances due to the
manufacturer’s tolerances within the lens and the camera body itself. These tolerances can impair
accurate focus performance and leave you with an image that is clearly out-of-focus.
Solution
Datacolor SpyderLensCal provides a fast and reliable method to measure and
adjust the focus performance of your camera and lens combinations. Many
newer models of popular DSLR cameras have a lens micro-adjustment
feature to calibrate the autofocus and to store the custom settings on
the DLSR body. SpyderLensCal was designed to aid in correcting the
autofocus by providing a reference test system for the adjustments.
You can check the autofocus on any camera and lens combination! To calibrate and store custom autofocus
settings you need a camera that supports autofocus adjustments. The supported cameras
as of Feb 20th, 2011 are:
• Canon® (50D, 7D, 5DMkII, 1DMkIII, 1DMkIV, 1DsMkIII, 1DIV)
• Nikon® (D7000, D300, D300s, D700, D3, D3s, D3x)
• Sony® (A900, A850)
• Olympus® (E-30, E-620, E-5)
• Pentax® (K20D, K7D)
Feature
SpyderLensCal provides photographers with a fast, reliable method of measuring the autofocus
performance on camera and lens combinations. It allows photographers to obtain razor-sharp
focusing, using modern DSLR autofocus micro-adjustment. The SpyderLensCal device is affordably
priced, compact, lightweight and durable, with integrated spirit level and tripod mount.
Benefit
SpyderLensCal allows photographers to easily calibrate their interchangeable lenses and recent DSLR
bodies. There is no need to ship lenses and bodies back to the manufacturer any longer, if you have the
tools to do it yourself.
Performing a lens calibration on each of your key autofocus lenses can improve the number of usable
shots from a day’s shooting. And with a rugged, portable device such as SpyderLensCal, photographers
can carry the calibration solution in a photo bag and test and re-calibrate the autofocus
in any location.
4
5
Easy steps to calibrate
your lenses.
1
2
3
4
1
5
2
3
4
5
Setup your SypderLensCal
1
Autofocus and take a picture.
12
21
3
34
2
45
3
54
Check focus by reviewing the image.
Calibrate with focusing correction.
5
Evaluate the AF by taking a 2nd picture.
5
Workflow
1 6
2
3
Setup SpyderLensCal
7
8
9
6
10
7
8
9
Open up SpyderLensCal from its flat locking
position and place the ruler in the correct
orientation with the main target. The tripod
mount on the bottom of SpyderLensCal
allows for mounting on any tripod, including
portable tripods. There is a bubble spirit level
on SpyderLensCal’s base to allow users to level
the tripod for most effective alignment with the
camera. Simply placing SpyderLensCal on a desk,
table, or shelf works fine as well.
4
1
5
2
3
!
k
c
i
l
C
Setup Camera
Decide which camera and lenses you want to calibrate.
Setting the camera up on a tripod is very convenient, but
not required. Using tripods does make the
process simpler and easier.
4
5
10
Camera Settings
Be sure the camera and lens are set to autofocus and
the stabilizing function is off. Use the widest Aperture
setting (often 4.0 or 2.8) to produce the clearest
example of the focal plane. In order to control the
camera’s aperture it’s necessary to be in Aperture
Priority mode or in Manual mode.
You may also maximize the contrast
and sharpness setting of the
camera, to make the readings of the
SpyderLensCal easily readable.
6
1 6
2
3
7
8
4 9
5 10
Distance Setting
Each camera lens combination is different and there’s no universal distance
between camera and SpyderLensCal to do the autofocus correction. For
example: Canon’s recommendation is a minimum distance of 50 times of the focal
length but this is not practical for every lens. However, we recommend a distance
of 5 - 10 times of the focal length, or place SpyderLensCal at the distance you use the
lens most frequently.
For zoom lenses, use the longest focal length. That way, you achieve a more shallow depth
of field and you have a more detailed view of the lines on the ruler.
Make sure, that SpyderLensCal and your camera are parallel positioned and are at
the same height.
Optimal Distance = Distance Frequently Used / Focal Length x 5~10
e.g.35mm x 5~10 = 17.5~35 cm
1 6
2
3
7
8
4 9
5 10
Shooting Environment
Choose a location with appropriate lighting for your
autofocus calibration. Not too dark, not too much
uncontrolled light directly behind the camera. Light from
any other angle in front of the target location, or more
than one, should be fine. Setting it up as a studio shoot is
excellent, but not really necessary.
7
7
3 8
Workfl
ow
4 9
5 10
Test Lens
Accuracy
Take one or more shots of the
target, aiming the camera at the
small bullseye at the right edge
of the vertical target.
This will minimize any error
caused by not having the target
exactly perpendicular to the
axis of the lens. If your camera
highlights the focus point it has
chosen, that will confirm that the target
plane has been selected as the intended
focal plane.
6
7
8
9
Review Test Image
Select your target shot on the camera’s LCD screen. Zoom in on the section of the ruler adjacent to
the target. At the camera’s maximum zoom examine the markings and numbers on the ruler to see
which one is sharpest. That mark represents the center of focus, as defined by your camera and lens
using their auto¬focus system.
Recommendation
As the size of the camera LCD screen is limited,
transfer the test image to your computer and
review it full screen on your display/monitor.
10
8
6
7
8
9
6
10
7
8
9
Focus Check
If your camera lens combination is calibrated correctly, then the line at “0” should be in sharp focus.
If the picture isn’t sharp at “0”, your camera lens combination is off!
Check the ruler and see
whether the front or rear
section is sharper. If the
lines behind the “0” mark
is sharper then the lens is
“back focusing”, if the front is
sharper then the lens is
“front focusing”.
Back Focusing
Front Focusing
Autofocus Correction
To calibrate the “back or front focus” issue, enter the autofocus correction menu on your camera and
select adjust by lens.
Calibration Settings
The numbers on the SpyderLensCal ruler indicates precisely how many centimeter the camera is front
or back focusing, which give possibility to correct the focusing by steps in millimeter on your camera.
10
If you have a front
focusing issue,
then go forward
in small steps and
vice versa for the
back focusing
calibration.
9
7
Workfl
ow
8
9
Retest Calibration Settings
Retest to determine if your adjustment was the ideal amount. If not, increase or decrease your
adjustment until the sharpest zone is centered on the zero mark on the SpyderLensCal ruler. Before
taking a new shot using autofocus, it is always good to de-focus the lens by hand, it ensures the
autofocus is actually working, as
sometimes when it’s already almost
focused, the camera would not do the
auto focusing again.
10
Recalibrate As Needed
Repeat for other lenses and then
recheck annually, or whenever your
lenses have seen hard use or extreme
temperatures, or as you acquire
new ones!
Accurate Focusing
For more product info, videos on using SpyderLensCal and FAQs, please go to:
http://w w w.datacolor.com/goto/SpyderLensCal
©2011 Datacolor. Datacolor® and Spyder® are registered trademarks of Datacolor. All rights reserved. Canon®, Nikon®, Sony®, Olympus®,
Pentax®, are registered trademarks of their respective owners.
10
Notes
11