1
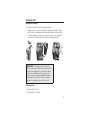
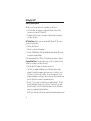
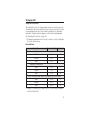
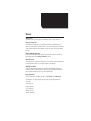
AQ150
User Guide
Adjustable Scent System
Original Instructions
Updated Feb. 03, 2015
Table of Contents
Welcome to AirQ™ ............................................................................................................... 3
Safety Precautions .............................................................................................................. 6
Controls and Display ........................................................................................................... 8
Setting Up AirQ ................................................................................................................... 9
Equipment and Accessories ........................................................................................... 9
Getting Started ............................................................................................................... 9
Removing the Cover ................................................................................................... 9
Removing the Battery Insulator ................................................................................ 10
Connecting to Power ................................................................................................ 10
Inserting the Cartridge .............................................................................................. 11
Setting the Clock ...................................................................................................... 11
Selecting Operating Mode ........................................................................................ 12
24/7 Mode Setup ...................................................................................................... 12
Program Mode Setup ............................................................................................... 12
Replacing the Cover and Inserting the Director Attachment .................................... 14
Setting the Scent Control ......................................................................................... 15
Room Size Chart ....................................................................................................... 15
Room Placement Considerations ............................................................................. 16
Adjusting the Scent Level ......................................................................................... 16
Scent Cycles ............................................................................................................. 16
Troubleshooting ................................................................................................................. 17
Frequently Asked Questions ............................................................................................. 18
Care and Maintenance ...................................................................................................... 23
Specifications .................................................................................................................... 24
Welcome to AirQ™
Welcome to a new world of air freshening. You have purchased the most advanced
air-freshening and scenting technology available anywhere. AirQ™ employs recently
patented indoor air quality technology with proven success in a wide range of
commercial locations.
Now this revolutionary technology is available for your home or office. AirQ is
engineered to provide a significantly better scent effect than the most expensive
scented candles, aerosols, plug-ins and sticks in a bottle. Many of these products
have good scents, but the delivery systems have safety and performance
deficiencies. AirQ is the very first home air freshener to offer several features
you will never do without again.
• AirQ can be controlled. It is the only air freshener the user can adjust for different
room sizes and scent-strength preference.
• AirQ is the first fully automatic air freshener that allows the user to preprogram
operating times.
• AirQ is also an eco-friendly air freshener. It uses no heat. Unlike candles, it produces no sooty hydrocarbons; unlike many aerosols, oil burners, candles and
plug-ins, it produces no harmful volatile organic compounds (VOCs).
AirQ’s technology evenly distributes fragrance throughout a space. Most systems
burn fragrance oil (scented candles, oil burners) or evaporate it using heat and
alcohol (aerosols, plug-ins, wicks and sticks). AirQ does not. AirQ delivers 100% of
the perfumer’s creation without any change. What does this mean for you?
Very simply, the best air-freshening experience you can get.
Importantly, AirQ scents are formulated with the highest quality fragrance ingredients, no phthalates and none of the many chemicals restricted by the workplace
inhalation standards of the Occupational Safety and Health Administration (OSHA).
3
Welcome to AirQ™
The AirQ™ User Guide is easy to read with simple instructions. We urge you to read
it carefully and completely.
Don’t like reading manuals? Please review the separate Quick Start Guide included
with the AirQ.
AirQ Applications and Uses:
AirQ is used to improve indoor air by erasing odors and freshening the air with a
pleasant scent. This is accomplished by introducing an ultra-low quantity of odor
neutralizers and fragrance ingredients to blend into the air. AirQ’s tiny droplets,
100 times smaller than an aerosol droplet, are extremely light, so they float easily
into the air and disperse throughout a space to create an even scent effect.
There are two basic applications for AirQ: ambient scenting and odor control.
The inherent technology addresses both at the same time.
1. Ambient Scenting
Ambient Scenting is the use of a scent to create a mood or ambience. Even if your
home has no particular odor issue, you may simply wish to make the area smell
a certain way to create an ambience or image of the space that reflects you and
complements or enhances the décor. AirQ offers a variety of choices in scents to
help you achieve this.
2. Odor Control
Odor Control is the use of AirQ to inhibit our ability to detect a bad odor and to
replace the bad odor with an appealing aroma. This is a typical use of conventional
air fresheners.
Older homes often have that “Victorian” smell that suggests it is musty and not
clean. A very light use of AirQ™ can solve this problem.
Pet odors are a major problem for the pet owners and their guests. If you live with
and love a pet, its odor is often not an issue. For your guests, the experience can
be very different. Cat urine, for example, can be locked into wood floors or located
4
Welcome to AirQ™
in spaces that are impossible to reach and clean. AirQ can erase these odors and
replace them with a fresh and clean scent.
Many people use scented candles to deal with odors. The result is usually unsatisfactory and temporary. A candle fragrance may be pleasing before it is lit, but once
lit, the waxy and sooty by-products of burning fragrance oil combine with the bad
odors you are trying to remove and create a third smell, which can be even more
unpleasant than what you are attempting to eliminate.
AirQ can deal with virtually all household odors from a child’s room, bathroom or
kitchen to a basement.
5
Safety Precautions
AirQ Appliance Precautions
• Must be used only with the supplied and approved Power Supply.
• DO NOT position AirQ within the reach of young children or pets.
• Unit will not operate properly if positioned sideways or upside down. AirQ must
not be tilted or turned upside down when fragrance cartridge is inside. Tilting the
AirQ will cause the fragrance to spill.
• NEVER put your nose to the output of AirQ. Within 12 inches of the output, the
fragrance is highly concentrated. The improper inhalation of high concentrations of
fragrance may cause irritation including watery eyes, headache, cough and upper
respiratory discomfort.
• DO NOT position AirQ so that the output is directed at a surface closer than
12 inches. Use the Director attachment to help avoid this.
• Exercise care while changing cartridges when AirQ™ is placed on furniture or
surfaces that may be harmed by contact with the liquid fragrance.
• Do not immerse in or place near water, sink or bathtub.
• Unplug before cleaning.
• Be sure that the unit is placed on a stable surface, far from any flame, source of
sparks or ignition, heat source, or electrical equipment.
• The product must only be supplied at safety extra low voltage corresponding to
the marking on the appliance.
• This appliance is not intended for use by persons (including children) with reduced
physical, sensory or mental capabilities, or lack of experience and knowledge, unless they have been given supervision or instruction concerning use of the appliance by a person responsible for their safety.
• Children should be supervised to ensure that they do not play with the appliance.
6
Safety Precautions
AirQ Cartridge Precautions
READ THE SAFETY INFORMATION SHEET ENCLOSED WITH EACH CARTRIDGE.
SPILLS: KEEP THE LID ON TO AVOID DRIPS AND SPILLS on furniture, carpets
and fabrics. If there is a drip or spill, blot immediately with a damp cloth and then
wash with soap and water. For carpets and fabric, blot up a small spill or place
dry towels on a larger spill. Allow the towels to absorb as much liquid as possible.
Switch damp towels for dry towels until no more liquid can be absorbed from the
spill. Cover the remaining portion of the spill with baking soda and allow it to set for
3 minutes before vacuuming. Repeat this process up to two more times if needed.
If the smell of perfume persists, professional cleaning may be required. Spills on
wood or other porous and painted surfaces must be cleaned immediately with soap
and water to avoid severe damage.
While AirQ formulations do not contain ingredients deemed harmful to the skin, if
there is skin contact, wash with soap and water. If there is contact with the eyes,
irrigate the eye with fresh water for 5 minutes. If there is any eye irritation, consult a
physician immediately
Take care to NOT drop a cartridge. It may crack, causing fragrance to spill.
Call Prolitec Product Safety and Support toll-free at 1-866-387-4333 or
visit www.airq.com.
For online safety instructions, visit www.prolitec.com/manuals/manuals.htm
7
Controls and Display
Power Button
Cartridge Vent
Set Button
Adjust Buttons
LCD Screen
Fragrance
Cartridge
Settings
Dial
8
Locking
Tab
Setting Up AirQ™
Equipment and Accessories
Remove AirQ™ from the container. Included:
1. AirQ Cube
2. Power Supply (includes worldplug assortment, not shown)
1
3. Director Attachment
4. Fragrance Cartridge (sold separately)
2
3
4
Getting Started
Removing the Cover
The cover of the cube is removable as shown below.
To remove cover, locate release tab at bottom of the unit, press in, and lift cover up
and off with other hand. Power must be turned off when removing and replacing
AirQ cover.
9
Setting Up AirQ™
Removing the Battery Insulator
Remove the yellow battery insulator tab at bottom of appliance.
Connecting to Power
1. Connect the power cord to the underside of the appliance.
2. Attach appropriate, country-specific plug to power block.
3. Plug the power block into an AC outlet within reach of the location you have
chosen for AirQ.
10
Setting Up AirQ™
Inserting the Cartridge
1. Ensure power switch is off before inserting cartridge.
2. Cartridge: remove screw-top cap, bottom red plug (save for future storage)
and foil seal. Insert cartridge, pressing firmly until cartridge sits in place (Fig. 1).
3. To activate cartridge: using a tissue or paper towel, press in the stem in the
center of the top output chimney; the stem should spring back (Fig. 2).
Fig. 1
Fig. 2
IMPORTANT: Power must be turned off before the
AirQ cover is removed or replaced to prevent pressure
build-up in the cartridge. Also, power must be turned
off before moving AirQ around to prevent pressure
build-up. Pressure could prevent fragrance from properly pluming. In the event this should occur, simply
reactivate the cartridge as shown in Fig. 2 above.
Setting the Clock
1. Turn the dial to Set Clock.
2. Adjust using the +/– buttons.
11
Setting Up AirQ™
Selecting Operating Mode
With the cover off, decide which mode of operation you want to use.
1. 24/7 mode allows for continuous scenting at the intensity level you select.
It requires you to turn AirQ™ ON and OFF.
2. Program mode allows for up to 3 programs of start/stop time for everyday or
each day of the week.
24/7 Mode Setup: (In this mode, you must turn AirQ ON and OFF. This mode is
good for 24-hour operation.
1. Turn the dial to Run 24/7.
2. Place the cover back on the appliance.
3. Press the POWER button. A blue light will illuminate indicating the AirQ system
is ready and scenting will begin.
4. Set desired intensity level (1-50) for 24/7 operation by pressing the +/- buttons.
Program Mode Setup: (This option allows you to set up to 3 programs of start/
stop time for everyday or each day of the week.)
1. Turn the dial to Set Program. The Program icon comes on.
2. The “Mon” icon will blink, indicating you are selecting Monday for setting
program. If you want to program a specific day, use the +/- buttons to scroll
to the day or scroll to the end for all days. You can set maximum of 3 on/off
programs individually for each day or same for every day. After selecting the day,
press the Set button to advance to programming options.
3. Now the “1” icon is turned on to indicate you are setting program 1. The Rate
(intensity) digits blink to prompt you to set the rate. You may set to any value
between 1 and 50, or set to 0 to disable the program. Press the Set button to
advance to programming Start and End times.
NOTE: If you set the rate to 0, then the current and subsequent programs are all
12
Setting Up AirQ™
disabled. For example, if the rate for program 2 is 0, then program 2 and 3 are
disabled.
4. If you set a non-zero rate, then the Rate digit changes to “S” to indicate start
time. The hour digit should blink to prompt you to set the start hour. Use the
+/- buttons to set the hour (make note of AM or PM). Then press the Set button
to advance and set the minute. Press the Set button to advance to program the
end time.
5. The rate digit now changes to “E” to indicate you are setting the end time. Use
the +/- buttons to set the end time. Press the Set button to advance to the next
program.
6. Program icon 2 should now turn on. Use the +/- and Set buttons to set the start
and end times for program 2 (if needed) and then for program 3 (if needed).
Note that if you need only 1 or 2 programs for the day, you simply disable the
subsequent programs by setting their rates to 0.
7. After setting the programs, turn the dial to Run Program and your AirQ will be
ready to go.
HINT: To set same programs for Monday to Friday, you may set the
programs for everyday first and then disable Saturday and Sunday.
You may review the programs by doing the same as in programming.
Just beware not to accidentally set the everyday programs as this will
also set and change the programs of all the days.
IMPORTANT: For scent level settings 1-49, AirQ will cycle off for a
period of seven minutes between scenting cycles. Scent cycles will
vary in length based on intensity settings. This is normal and does
not mean the machine is malfunctioning. Setting 50 is always on and
has no seven minute off cycle.
13
Setting Up AirQ™
Replacing the Cover and Inserting the Director Attachment
1. Replace cover, pressing down gently to allow
the control buttons to line up with the holes in
the cover until the reassuring click is felt and
heard. Improper alignment can result in one
or more buttons being depressed by the cover.
2. Insert the Director Attachment and adjust to
direct the AirQ™ output away from any nearby
surfaces less than 12 inches away. (See
“Room Placement Considerations” on
page 15.) Use of the Director Attachment
also dampens the normal noise from the
output.
14
Setting Up AirQ™
Setting the Scent Control
This feature allows you to select the appropriate amount of scent for the room size.
It is important to start at a low setting to avoid too strong of a scent level. If needed,
you can gradually increase the scent level until it is just right for you. Remember;
always allow 15 minutes between changes in scent level before adjusting again.
(See “Adjusting the Scent Level” on page 15.)
1. Determine the approximate size of the room you wish to scent by consulting the
Room Size Chart as shown.
Room Size Chart
Room Type
Room Size (feet)
Starting Level
Small
3x3
1
Medium
4x5
3
Large
5x8
6
Small
4x4
5
Medium
6x8
8
Large
8x8
10
Closets
Bathrooms & Storage areas
Offices, Conference rooms, Lobbies, Hotel rooms, Spa & Fitness rooms
Small
9 x 10
14
Medium
12 x 15
20
Large
20 x 18
25
2. Using the +/– buttons just to the right of the LCD, set the scent level indicated
by the Room Size Chart
15
Setting Up AirQ™
Room Placement Considerations
Place AirQ™ in a desired location that cannot be easily accessed by young children
or pets. The top of a shelf or cabinet is a good location. An extra-long power cord is
provided to make this easy.
Use the Director Attachment to direct the AirQ output away from any nearby
surfaces less than 12 inches away.
Do not place AirQ near an open window if the air is blowing out. Be mindful of air
flow in the area to be scented and position AirQ so that the natural air currents do
not stop the flow of AirQ scent into the space. Lighting a match, blowing it out and
then watching the flow direction of the smoke can be helpful in determining this.
Exercise care while changing cartridges when AirQ is placed on furniture or
surfaces that may be harmed by contact with the liquid fragrance.
Adjusting the Scent Level
Take the time to get the scent level just right. If you followed the Room Size Chart,
you have set AirQ to the low end of the range for your room size. If after at least 15
minutes the scent is not detectable, move up the setting by 10%. For example, if
your start setting was 20, increase it by 10% to 22. Keep increasing until you and
others can just detect the scent when you enter the space. It is best to leave the
room each time the scent level is adjusted and allow about 15 minutes for your
nose and the scent level to adjust.
Scent Cycles
The AirQ scent-intensity levels are designed through the use of on and off duty
cycles. A higher scent intensity setting will cause the unit to cycle on for longer
periods of time. A lower scent intensity setting will cause the unit to cycle on for a
shorter period of time. For all settings, there will be a cycle off period.
16
Troubleshooting
The scent in the room is too strong or too weak.
If the scent is too weak, first make sure that AirQ is not positioned near an open
window or door so that all its scent is blowing out of the room. Reposition AirQ as
far away as possible from open windows or doors.
Adjust Fragrance Release Rate using the +/– buttons. In general, adjustments
should be made in 10% increments. So if the original setting is 20, 10% is 2.
Move it up or down by 2. With settings less than 10, move up or down by 1.
Whenever changing a setting, allow at least 15 minutes to rebalance before
checking the scent level again.
If you cannot detect the scent, check to make sure the cartridge is not empty.
The appliance is not turning ON.
Make sure the power cord is properly plugged in to both the AirQ™ and the
electrical outlet (plugged in at both ends).
Make sure the Dial is set to 24/7 or you have programmed AirQ for automatic
operation and set the Dial to Program.
Make sure the cover is firmly in place.
Make sure the appliance is placed on a flat surface. There is a safety button on the
bottom of the AirQ that disengages the pump should AirQ be tipped over or not on
a level flat surface.
Press the POWER button to illuminate the blue light. Once the cover is replaced
over the AirQ, the appliance should turn on.
If the blue light does not illuminate, turn the scent control up to 50 and turn it on
again. Place a finger on the appliance. If you cannot detect the slight vibration of the
internal compressor, maintenance may be required. Call Prolitec Product Safety and
Support toll-free at 1-866-387-4333 or go to www.airq.com.
17
Troubleshooting
With AirQ operating in a bookshelf, the output is directed straight up to the
next shelf.
Insert the Director Attachment provided with AirQ to direct the output forward and
away from the bookshelf.
AirQ makes too much noise.
AirQ is designed to a very low noise specification. Inserting the Director Attachment
should reduce any AirQ noise even further. If the problem persists, make sure the
cartridge is firmly in place by removing it and putting it back in, sliding down until a
firm click is felt. If the problem persists, call Prolitec Product Safety and Support tollfree at 1-866-387-4333 or go to www.airq.com.
Frequently Asked Questions
How does AirQ work?
AirQ uses a recently patented technology to convert liquid fragrance compounds
into tiny droplets less than 1/50th the diameter of a human hair. By comparison, an
aerosol droplet is 100 times bigger and 1,000,000 times heavier. AirQ droplets
present 100 times more surface area to the air they are treating, which means much
less fragrance is used to create the scent effect. AirQ’s tiny droplets are extremely
light, so they float easily into the air and disperse throughout a space to create a
consistent scent effect.
What size room will AirQ handle?
AirQ is fully adjustable for different size rooms. AirQ is effective in living areas up to
1,000 square feet (20 feet x 50 feet) as well smaller spaces like bedrooms and very
small spaces such as bathrooms and closets.
Where can I place AirQ™?
Do you want to conceal it or display it? You can place AirQ just about anywhere in
a room that is not within reach of young children or pets and where power can be
accessed with the power cord provided. You can place it in a bookshelf, on a
shelf with the stereo equipment, hidden on the floor behind a chair, sofa or floor
lamp — anywhere there is some space for air to circulate and where AirQ’s output
18
Frequently Asked Questions
is pointed away from surfaces less than 12 inches away. Avoid placing AirQ near a
window that is sometimes opened.
Do I need to adjust AirQ?
Yes! AirQ is a powerful machine. The scent control setting is very important. AirQ
can handle very small and very large rooms. If set too high for room size, it can
cause discomfort for some people. Adjusting is simple. Take the time to do it right.
How do I adjust AirQ?
With the power cord plugged in you can adjust AirQ up and down using the +/–
buttons just to the right of the LCD screen. You can see the setting level
(1 to 50) on the right side of the LCD. ALWAYS START WITH THE RECOMMENDED
SETTING and adjust upward in small steps.
How strong should I make the scent?
Less is more. AirQ allows you to erase odors and use only a small amount of
scent. Unlike all other air fresheners, AirQ is adjustable. Use this important feature.
Always start on the lowest settings for the size of the space, then adjust upward in
small steps.
I hear the unit running, but there is no scent or plume.
1. Ensure power switch is off before inserting cartridge.
2. Cartridge: remove caps (save for future storage) and foil seal. Insert cartridge,
pressing firmly until cartridge sits in place.
3. To activate cartridge: using a tissue or paper towel, press in the stem in the
center of the top output chimney; the stem should spring back.
My AirQ™ does not run for several minutes at a time. Is this normal?
The AirQ scent intensity levels are designed through the use of on and off duty
cycles. Therefore, a higher scent intensity setting will cause the unit to cycle on for
longer periods of time. A lower scent intensity setting will cause the unit to cycle on
for a shorter period of time. For all settings, there will be a cycle off period.
19
Frequently Asked Questions
IMPORTANT
ALWAYS ALLOW AT LEAST 15 MINUTES TO ASSESS the scent
strength after starting or adjusting. It is best to assess strength when
you first enter the room from another room.
Household odors, can AirQ™ help with these?
YES! Pet odors, cooking smells, bathroom odors, and old house smells — most
odors can be completely erased by AirQ. Each fragrance contains a patented
component specifically aimed at odors. This feature allows you to eliminate odors
without having to make the scent too strong. This is a major advantage over
aerosols and plug-ins that must douse an odor with too much fragrance.
How about safety? Is AirQ safe to use with children and pets?
Used as directed, AirQ is the safest air freshener available. Of course, it is
important to read the Consumer Safety Information Sheet enclosed with each
cartridge. Store cartridges out of the reach of young children.
I have always used candles to create a scent in my home.
How is AirQ different?
AirQ safely creates a beautiful non-waxy scent and is adjustable to serve a much
larger space than a candle. An open flame requires adult supervision and produces
black soot that can be inhaled and leaves deposits on surfaces. AirQ leaves
no deposits.
How does AirQ differ from aerosol room fresheners?
The more expensive aerosols can produce a very pleasant scent, but only for a
few minutes, and in very high concentrations just in the area sprayed. AirQ is what
is known as a “continuous action” air freshener. AirQ is always on and delivers an
evenly distributed scent throughout the room.
20
Frequently Asked Questions
Is AirQ™ eco-friendly?
YES! AirQ is the most eco-friendly air freshener on the market. Unlike candles, AirQ
produces no black soot or residual hydrocarbons. Unlike aerosols, AirQ
uses no propellants and produces no harmful volatile organic compounds or VOCs.
Unlike many air fresheners, AirQ uses no ethanol or similar solvents to enhance the
evaporation of fragrance chemicals.
I only want to scent the room at certain times. Do I have to turn it on and
off every time?
AirQ has a tiny on-board computer for fully automatic operations. You can set the
time to start and the time to stop each day. See “Programming” on page 11.
How long does a cartridge last?
In a large room operating for 24 hours a day at a high setting, a cartridge will last about
30 days. At lower levels and operating for fewer hours per day, the cartridge will last
proportionately longer. Also note that different fragrances consume at different rates.
Why does a new cartridge arrive looking “less than full?”
Space is required in the cartridge for AirQ to properly nebulize the liquid inside.
If I want a different scent, can I switch cartridges?
Yes, simply remove the cartridge and replace it with another. When not in use,
remember to replace the cap on the cartridge openings so the fragrance doesn’t
drip, evaporate or change while out of the AirQ. Store upright in a cool, dry space
and take care to wipe off any liquid on the outside of the cartridge before storage.
Will AirQ leave deposits on furniture or carpeting?
AirQ will not leave deposits provided you do not direct the output at a surface closer
than 12 inches. You should use the Director Attachment to direct the output away
when you place AirQ underneath something, such as in a bookshelf.
21
Frequently Asked Questions
IMPORTANT
Always keep the caps on cartridges that are stored outside of the AirQ™.
If you have misplaced the caps from the cartridge being removed from
AirQ, you can use the caps from the new cartridge being inserted.
What happens if AirQ is knocked over? Will it continue to function?
Should AirQ be tipped or knocked over to a position other than upright and level, a
sensor switch on the bottom of the appliance prevents AirQ from functioning until
the unit is placed back into its correct, upright position. It is important to note that
while the cartridges are designed to be leak-proof, a small amount of fragrance
could spill from the appliance and cause damage if the appliance is knocked over.
It is important to wipe or blot up any spill as quickly as possible.
I’d like to take my AirQ with me when I travel to scent where I’m visiting.
Are there any precautions?
The AirQ was designed to be small enough for travel and there are some precautions to take when doing so:
1. Always remove the cartridge from the appliance taking care to re-cap, re-plug
and place in a sealed zip-top bag for travel. As the induction, or foil seal has
been removed for its initial use, there may be slight leakage from the cartridge
cap due to change in air pressure when traveling by plane. Placing the cartridge
in a zip-top bag is strongly recommended to avoid leakage on the contents in the
luggage.
2. Consult current TSA restrictions for carry on liquids for planes. It is likely the
AirQ cartridge will need to be checked in your luggage and not allowed in your
carry on items.
3. Upon arrival at your destination, take care to “re-activate” your cartridge as
shown in the set-up guide on page 10 before turning the AirQ on.
22
Frequently Asked Questions
Will AirQ fragrances stain surfaces or fabric if there is a spill?
Yes, all air care fragrances will stain wood, stone and all fabrics. The best solution is
avoidance by replacing the caps on cartridges after removing them and keeping the
caps on all cartridges when not in use.
How do I clean up a drip?
If there is a drip, blot it as quickly as possible and then clean with soap and water.
See page 6, “AirQ Cartridge Precautions,” for more detail.
Care and Maintenance
Care:
• AirQ™ is an electronic appliance with a built-in computer.
• AirQ must not be tilted or turned upside down when fragrance cartridge is inside.
Otherwise there will be a spill.
• Do not place or store AirQ or its cartridges in extreme heat (more than 130˚ F) or in
freezing temperatures.
• Do not drop AirQ on the floor. Do not drop it in or position it near water.
• Do not paint or otherwise try to alter the color of the outer cover.
• When shipping, pack in the original box, then place in an outer cardboard box.
• Always keep the lids on cartridges when stored outside of the AirQ.
• Caution: do not position directly under lights or other heat sources up to and over
100 degrees. Damage to the housing may occur.
Routine Maintenance:
• When you change a cartridge, wipe off the inside and outside surfaces with
a damp cloth that contains a small amount of a detergent-based cleaner.
Then wipe again with a clean, damp cloth. Unplug the AirQ before cleaning it.
• When wiping down, do not plug up the air intake or output with cloth or other particles.
23
Specifications
Dimensions: AirQ Appliance 133 x 139 x 140 mm
Weight: 1.41 kg (full); 3.1 lbs (full)
Power Supply: Rated input: 100 – 240 VAC, 50 – 60Hz 0.4A
Rated output: 15VDC 1 A
Battery — Lithium 3V, #CR2032
Approvals: FCC part 15, CE & RoHS Compliant, UL/CUL Power Supply
Working Temperature: 0˚ to 40˚ C
Working Humidity: 85% or less
Liquid Capacity: 90 ml cartridges
Performance: Up to 1,000 square feet, 1 air change per hour
Cartridge Life: 30 to 60 days, depending on usage
24
Warranty
What Is Covered
This warranty covers any defect in materials or workmanship, with the exceptions stated below.
How Long Coverage Lasts
This warranty runs for 90 days labor, one (1) year parts from the date of the original purchase. If a
defect arises, and a valid claim is received by Prolitec, Inc. after the first ninety (90) days of the Warranty
Period, a shipping and handling charge will apply to any repair or exchange of the product undertaken
by Prolitec.
Extend Your Warranty at No Charge
Register your AirQ online within 30 days of purchase and the warranty is extended to a full one-year
parts and labor warranty. Go to www.airq.com/warranty to sign up.
What Is Not Covered
This warranty does not cover damage caused by misuse or use other than as intended and described in
the product instruction manual, or loss or damage to batteries or removable parts.
What Prolitec, Inc. Will Do
Prolitec, Inc. warrants this product against defects in materials and workmanship. When repair is
not practical, Prolitec, Inc. will have the option to replace the defective product with a fully warranted,
factory-reconditioned product that is the same or has similar functionality.
How to Obtain Service
For Prolitec Product Safety and Support, call toll-free at 1-866-387-4333 or visit www.airq.com.
This warranty gives you specific legal rights, and you may have other legal rights that vary from
state to state.
© 2009 Prolitec, Inc.
Prolitec, Incorporated
1235 W. Canal Street
Milwaukee, WI 53233
www.airq.com/warranty