1
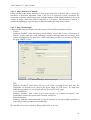
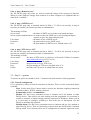
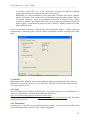
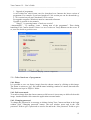
User’s Guide of Programme
Your Camera
version: 3.2
© All Rights Reserved
2004-2009 Twoja Kamera
Your Camera 3.2 – User’s Guide
————————————————————————————————————
CONTENTS
1. The usefulness ........................................................................................................................ 3
2. The Architecture of Your Camera.......................................................................................... 3
3. System requirements .............................................................................................................. 3
4. The technical parameters........................................................................................................ 4
5. The installation, running, configuration “step by step”.......................................................... 4
5.1. Step 1. - connecting of the cameras ................................................................................ 5
5.2. Step 2. - installation ........................................................................................................ 5
5.3. Step 3. - running ............................................................................................................. 5
5.4. Step 4. - configuration of cameras.................................................................................. 7
5.4.1. A page „Camera” ................................................................................................ 8
5.4.2. A page „Detection of motion” .......................................................................... 10
5.4.3. A page „Notification” ....................................................................................... 10
5.4.4. A page „Remote access” ................................................................................... 11
5.4.5. A page „SMTP Server”..................................................................................... 11
5.4.6. A page „FTP Server-AVI” ................................................................................ 11
5.5. Step 5. - options ........................................................................................................... 11
5.5.1. General configuration ....................................................................................... 11
5.5.2. Help ................................................................................................................... 12
5.5.3. Information........................................................................................................ 12
5.6. Other functions of programme .................................................................................... 13
5.6.1. Photo ................................................................................................................. 13
5.6.2. Full screen mode ............................................................................................... 13
5.6.3. Changing password ........................................................................................... 13
5.6.4. Watching films from an archive........................................................................ 14
5.6.5. Web Camera function ....................................................................................... 14
5.7. Closing the application ................................................................................................ 15
6. Watching the images from cameras by Internet on the computer........................................ 15
6.1. Login/remote access and watching cameras using WWW browsers. ......................... 15
6.2. Remote access and watching cameras using Your Camera Client programme. ...... 16
7. Security................................................................................................................................. 17
2
Your Camera 3.2 – User’s Guide
————————————————————————————————————
1. The usefulness
Your Camera is a video security system, designed for monitoring of structures, according to
the principle: “wherever I’m, I always know what’s going on”. This program makes possible
watching of live pictures in mobile phones (JAVA) and in computers, Pocket PC/Palm
(WWW) over Internet. If motion is detected then Your Camera can send you e-mail
notification or record and send a film to FTP server.
It can be run on popular, freely available computer hardware and interact with Internet
cameras or with professional cameras used in monitoring systems, too. An easy installation
and service – these are the features, which make Your Camera the system for everyone.
It is designed for small facilities requiring the installation of a few cameras like detached
houses, holiday houses, flats, small firms, places of a special supervision, structures which are
difficult to reach or may be a supplement of just existing, big monitoring systems.
It may be supervision of, for example:
- farmyard of house in our absence
- children at home
- children in school, waiting for parents
- store room of firm
2. The Architecture of Your Camera.
Your Camera consists of the following elements:
Cameras Server – it’s the computer on which Your Camera programme is installed and to
which the cameras are connected. The programme records the images from cameras (in the
form of AVI-files), detects the motion, sends the notifications and makes what the
configuration enables.
Camera – it’s a camera connected to the computer, for instance by USB or TV card.
Remote computer – it’s a computer used to watch the images from cameras via Internet and
on which user receives the e-mail messages with notifications of detected motion.
3. System requirements
Cameras Server
• PC computer with minimum: procesor Intel® Pentium® II, 450 MHz (recommended:
Intel® Pentium® IV, 2.4 MHz)
• Operating system: Windows 98 SE, ME, 2000 or XP (recommended: XP)
• RAM: min. 128 MB
• Hard Disk: 10 MB free space for programme and over 1 GB free space for AVI films.
• Graphics card with DirectX driver, mode: 800x600x24 or better
• DirectX 9.0
• Internet with public IP address.
3
Your Camera 3.2 – User’s Guide
————————————————————————————————————
Camera
Any camera, designed to work under Windows operating system and delivered with WDM
drivers or DirectX drivers. It can be for instance:
• an Internet camera connected by USB,
• a professional camera of a monitoring system with a composite video output,
connected by USB converter,
• a professional camera of a monitoring system with a composite video output,
connected by a special PC card, designed for monitoring,
• a camera with a composite video output connected by a PC card of type Frame Graber
like a popular TV tuners, some DVR cards,
• a digital camera connected by FireWire.
Remote computer
• PC computer
• Operating system: Windows 98 SE, ME, 2000 or XP
• Hard Disk : 2 MB free space
• DirectX 9.0 or later
• WWW browser, working HTML 4 or later with Cookies and Java script (for
instance: Internet Explorer 4, Netscape 4).
Mobile phone
Mobile phone with JAVA with MIDP in version at least 1.0.
4. The technical parameters
Number of cameras
Maximum resolution of a camera
Number of parallel cameras on the server side
Refresh rate on the server side
Recording speed of images on the server side
Number of watched cameras on the WWW side
Refresh rate of watched images on the WWW side
Refresh rate of watched images on the remote
computer with Your Camera Client programme
1-16
720x576
1-16
1-25 frame /sec./camera
1-25 frame/sec./camera
1-4
1-999 sec between frame.
1-25 frame/sec./camera
REMARK: Refresh rate and recording speed depend on software configuration, computer
power and Internet connection speed.
5. The installation, running, configuration “step by step”.
This chapter will lead us “step by step” through the actions which are necessary to run Your
Camera.
4
Your Camera 3.2 – User’s Guide
————————————————————————————————————
5.1. Step 1. - connecting of the cameras
Without cameras Your Camera programme is useless. Thus, the first step which is necessary
to do is connecting them according to the instruction provided with the cameras.
If the camera is correctly installed in Windows and supports WDM or DirectX drivers
(almost every multimedia device supports them) then Your Camera will interact with it.
Here are several examples of connecting the cameras:
• an Internet camera by USB (USB 2.0 is recommended),
• an analog camera, with a composite video output, connected by USB converter (USB
2.0 is recommended),
• an analog camera, with a composite video output, connected by DVR card,
• an analog camera, with a composite video output, connected by composite video input
of TV card,
• a digital camera connected by FireWire.
5.2. Step 2. - installation
After we have installed the cameras in Windows we can start the installation programme
“YourCamera-installation.exe”. The programme can be downloaded from the Internet on the
site: www.twojakamera.pl/ang. It will lead us safely across the installation process. It is
recommended to accept all suggested options pressing the “Next” button and finish the
installation correctly.
An important moment is giving the name of the folder in which Your Camera programme will
be installed. You can give your own folder name. It’s very important to create the folder on a
disk with a lot of a free space because images from cameras will be recorded there
(recommended is 1 GB of free space at least).
We should remember the folder name, because it will be necessary in a minute. To end the
installation we have to do one more action, it is to place in our folder the file (the key) which
we have received by e-mail as an attachment. After then the installation is finished.
5.3. Step 3. - running
As a result of installation Your Camera is placed in Windows menu “Start” and on the
desktop as an icon. So now, we can run the program by clicking a right position in the “Start”
menu or by clicking twice an icon on a desktop. Then, the login window will appear on the
screen.
The e-mail with the key we have received contains also unique user’s name and initial
password. We log into the application with the given name and password.
The same user’s name and password shall be used to browse cameras images using WWW
pages.
After we have entered the application correctly, the main window of Your Camera will
appear.
When we run the application it is visible at Window’s “Task Bar” and close to “Clock” at
right, down screen corner at the “Notification area”. When we press “minimize of
application” button then application will be visible at “Notification area”. Double-click on
icon of programme at “Notification area” cause application to visible again.
5
Your Camera 3.2 – User’s Guide
————————————————————————————————————
Picture 4. Notification area
Background color of icon informs about the state of programme:
gray - programme active
green - motion is detected at any cameras
Picture.2 The login window
Picture 3. The main window of the programme.
6
Your Camera 3.2 – User’s Guide
————————————————————————————————————
5.4. Step 4. - configuration of cameras
We configure each camera separately. To do this we push the right mouse’s button on the
image from the chosen camera. Then, the popup menu will appear from which we choose the
option “Configuration of camera”.
Picture 5. The menu of the camera
Configuration of the camera amounts to fixing the parameters placed on the pages of the
configuration window and then clicking “OK” or “Apply” button. The difference between
these buttons lies in the fact that “OK” button additionally causes the configuration window to
be closed.
However clicking the “Cancel” button causes the inserted changes not to be approved.
Not all the pages must be filled out. Everything depends of what functionality of Your
Camera we want to get. The example functions and pages which are required to fill out are
presented in the table bellow.
TABLE 1
FUNCTIONALITY OF
YOUR CKAMERA
AND
THE REQUIRED
CONFIGURATION
PARAMETERS
PAGE
Camera
Detection of a
motion
FIELD
Camera
Format
Max fps
Compression
Recording
Fps
Level of
sensitivity
Watchin
g the
images
from
cameras
Recording
the
images
from
cameras
continuous
mode
Recordin
g the
images
from
cameras
triggered
mode
+
+
+
+
+
+
O
+
+
+
+
+
O
+
+
+
Notification
E
m
a
i
l
M
o
b
i
l
e
V
o
i
c
e
F
T
P
B
e
e
p
+
+
+
+
+
+
+
+
+
+
+
+
+
+
+
+
+
+
O
+
+
+
Watching Watching
on
on
WWW
mobile
phone
+
+
+
+
+
+
+
7
Your Camera 3.2 – User’s Guide
————————————————————————————————————
Notification
WWW
SMTP server
FTP server –
AVI
OPTIONS
General
configuration
Emailenabled
Emailaddress
CellphoneEnabled
mobile no
Voice
FTP –
enabled
Beep
Enabled
All fields
All fields
+
+
+
+
+
+
+
+
+
+
FIELD
Connection
mode to
Internet,
ports
+
+
+
+
+
„+” – required to get an intended functionality
„o”
– optional (you can insert a value, but it is not required)
empty – giving value to the field is not required to get an intended functionality
5.4.1. A page „Camera”
This is the most important page. It makes possible to activate camera and to record the images
from cameras to the disk.
To activate camera:
- mark the “Active” field
- choose one of the drivers in the “Camera” field
- choose one of the formats in the “Format” field
We can end the configuration now. In this way we will get a minimal functionality permitting
only to watch the images from cameras on the computer (cameras server).
Picture 6. The page „Camera”
8
Your Camera 3.2 – User’s Guide
————————————————————————————————————
The meanings of the fields:
Camera driver– we choose a Windows driver for a camera. The camera must have been
installed earlier. From the list we choose the driver of type WDM or DirectX
only. It is impossible to choose the same driver to configure two different
cameras.
Format –
we choose the format of video data recorded to the computer. This format
determines the quality of watched and recorded image. Format RGB
320x240 24 bits is recommended.
Max fpsdefines the maximum speed of camera frames processing. This parameter
should equal 25 to achieve the best quality of images. But if our computer
works slowly (it may manifest in interrupted image, breaks between
consecutive frames) or we connect several cameras, it is possible to give
value equal 1 to the parameter. It may improve performance of a system. But
it is necessary to take into account that in this way we degenerate the quality
of camera processing and thus the quality of recorded images and motion
detection.
Configuration
TV devices-
fields of this data group we set only when TV device is selected as an
“Camera driver”. Then it is possible watching pictures from devices
connected to input: composite video or Svideo.
Recording –
it is possible to record data in two modes: continuous and triggered.
• The continuous recording guarantees to record images from cameras in
the form of AVI films in the ten-minute sequences (every sequence in a
separate AVI file). All the cameras record films in the same folder named
“Filmy”.
• The triggered recording is a recording mode used in the professional
monitoring systems. It is also called “recording with pre-alarm”. It means
that the recording will start only when the motion is detected. If you
choose this mode then after every detection of a motion two five-second
AVI films will be recorded. One of them will include the images
preceding detection of motion and the second one the images following
it.
The quality of the recorded film depends on: format, fps, and compression.
Better quality involves more disk space (needed to wrote the film). For
instance, a film with the properties: RGB 320x240 24 bits, fps=5, 10-minutes
long has size of 691 MB when not compressed and about 25 MB when
compressed using MPEG-4 codec.
Fps –
this parameter (frames per second) specifies a number of frames per second
that we want to record in a film. System will try to record with the given
value of Fps but it may turn out that it is impossible when our computer is
“too slow” or when we will have too many cameras connected. Value 25
frames/sec. gives the best quality. Recommended value of Fps is less or
equal 5 frames/sec.
Compression - enables to decrease the size of AVI-files at the cost of quality. Recording
with compression uses MPEG-4 codek.
REMARK: Not every video format will be suitable for codek. In such a
situation film will be recorded without compression
9
Your Camera 3.2 – User’s Guide
————————————————————————————————————
5.4.2. A page „Detection of motion”
Filling out this page makes possible to activate the detection of motion and to control the
sensitivity of detection algorithm. With a low level of sensitivity system recognizes the
occurrence of motion when a larger part of image changes. With a high sensitivity even small
change of image causes that system recognizes it as a motion. The detection of motion is
signaled by lighting up a green square on status bar under the image from camera
5.4.3. A page „Notification”
Filling out this page specifies the way the system will notify the detection of motion.
- E-mail
Marking “Enabled” field and giving e-mail address causes that in case of detection of
motion, system sends an e-mail including a suitable announcement and an image from
camera as attachment. To make this e-mail notification possible it is necessary to fill out
the page “SMTP” server”
Picture 7. The Page „Detection of motion”
-
-
-
FTP
Marking “Enabled” field causes the two AVI films (recorded before and after the
appearance of motion) to be sent to the given folder on FTP server. To make this
notification possible it is necessary to fill out “Server FTP-AVI” page.
Voice notification
Marking „Enabled” field causes Your Camera speaks e.g. “camera one motion” over
loudspeaker connected to sound card if motion is detected
Beep notification
Marking “Enabled” field causes that in case of detection of motion computer produces a
sound (beep) that you can hear on loudspeaker.
We can add a short text to email by filing out the field “Your text”.
10
Your Camera 3.2 – User’s Guide
————————————————————————————————————
5.4.4. A page „Remote access”
We fill out this page only when we want to watch the images from cameras via Internet.
When we want watch the images from cameras on a other computer or a cellphone then we
mark field “Available”.
5.4.5. A page „SMTP Server”
We fill out this page only in situation shown in Table 1. To fill it out correctly, it may be
necessary to contact your internet provider or administrator.
The meaning of fields:
Server name
- the name of SMTP server used to send email messages
Server requires authentication - we mark it when our SMTP server (for sending messages)
requires to give user name and password
User Name
- the name of user of SMTP server
Password
- the password to access SMTP server
Port
- the port number of SMTP server. Default value is 25.
5.4.6. A page „FTP Server-AVI”
We fill out this page only in situation shown in Table 1. To fill it out correctly it may be
necessary to contact your internet provider or administrator.
The meaning of fields:
Server name –
the name of FTP server, to which we will send AVI films, for instance
www.mikrosoft.com or 123.23.24.214
User Name–
the name of user on FTP server
Password –
the password to access FTP server
Port –
the port number of FTP server. Default value is 21.
Folder–
the folder on FTP server in which films are stored.
5.5. Step 5. - options
To choose an option we should to click “!” button in the main window of the programme.
5.5.1. General configuration
1. It is possible to choose a kind of connection to Internet. There are four connection modes
available:
- None. In this mode Your Camera doesn’t execute any functions requiring connection
to Internet, that is: WWW, sending e-mail etc.
- Permanently (LAN) – recommended. .
- Modem. We don’t have permanent access to Internet and it by modem or other
DialUp device. Then before you start working with the programme it is necessary to
connect a computer to Internet using a dial-up connection in Windows. Before you do
it, it’s necessary to configure a DialUp so that in the case of interruption of it the
DialUp is automatically resumed.
- Modem alarm. We don’t have permanent access to Internet and get it by modem or
other Dial-Up device. Then it is necessary to choose from the list the name of modem
link up which Your Camera will be use if configuration of cameras require an access
11
Your Camera 3.2 – User’s Guide
————————————————————————————————————
to Internet (e-mail, FTP ect.). In this mode after executing any function requiring
connecting to Internet the connection will be disconnected.
REMARK: If we have permanent (LAN) connection to Internet and choose “Modem
alarm” mode them Your Camera uses a permanent connection and it doesn’t link up
by modem. However, when the permanent connection is lacking Your Camera
connects by modem and continues this link up even when the permanent connection
appears again. A disconnection will not ensue if before a DialUp attempt any other
modem DialUp exists.
State of connection to Internet is indicated in main programme window . When connecting
with Internet is found the globe is shows. When programme connects to Internet the globe
flash.
Picture 8. The page „General configuration”
2. Autostart
Marking this field “Enabled” causes that programme will start automatically after restart of
Windows. It is specially useful e.g. if we don’t have UPS and we want Your Camera to stay
active after the power cut
5.5.2. Help
The user instruction is available in PDF format. “You need a free copy of Acrobat Reader” to
browse the instruction. It can be downloaded from WWW site:
http://www.adobe.com/products/acrobat/readstep2.html.
We encourage to visit WWW site: http://www.twojakamera.pl/ang/faq.html with frequently
asked questions (FAQ).
5.5.3. Information
On this page it is possible to get information about: product, version, license, IP address and
also to download latest version of Your Camera programme.
12
Your Camera 3.2 – User’s Guide
————————————————————————————————————
1. Upgrade of programme
A user which has valid license can free download over Internet the latest version of
programme. For example: if you have bought a 2.5.0.0 version you can free download e.g.
2.7.0.0 version but you can’t download 3.0.0.0 version.
For upgrade computer (Windows) must be connected to Internet.
Upgrade is possible in two manner:
- “Singly” - by pressing button “Check new version”
“Automatically” – by marking “Auto – during start of the programme”. Then during
launching Your Camera checks if there is a new version on Twoja Kamera on the server. If
so, user can decide to get this or not.
Picture 9. The page „General configuration”
5.6. Other functions of programme
5.6.1. Photo
It is possible to save one frame (image) from the chosen camera by clicking on this image.
The frame is written as “jpg” file with the name including: number of camera, date and time.
The photos are kept in “Zdjecia” folder.
5.6.2. Full screen mode
To watch an image from the chosen camera on full screen it is necessary to doble-click on this
image. Another double-click returns the application to normal mode..
5.6.3. Changing password
To change the password it is necessary to initiate closing Your Camera and then in the login
window click “Changing password” button. The next window opens and in the “Old
password” field we give a password we used so far and in the “New password” fields we give
13
Your Camera 3.2 – User’s Guide
————————————————————————————————————
twice the same new password. After clicking “OK” button password will be changed. This
process can last a little. It can require a connection to Internet, too.
Picture 10. Changing password
5.6.4. Watching films from an archive
With Your Camera programme it is possible to watch films written to disk. A right mouse
button initiates the popup menu. When you choose “Camera from archive” option you will be
able to select one of the AVI files (containing films). Other options: “Start”, “Stop”, “Pause”
you use to control watching..
To watch films it is possible to use other specialized programs, as e.g. Windows Media
Player.
The name of AVI file includes: number of camera, date, beginning of the recording time.
5.6.5. Web Camera function
Thanks to this property you can place pictures from your cameras on your WWW site.
Watching the cameras will not generate intensive transfer on your WWW server. Server
WWW doesn't need high transfer limitation. Transfer of pictures does takes place directly
between computer with WWW browser and computer with connected cameras (cameras
server). For this reason cameras server must have permanent IP address.
To activate this function it is enough to setup Your Camera for watching cameras via Internet
(see chapter 6).
Method of placing on WWW site.
1. You put the following line of HTML code on WWW site on which you want to watch
camera.:
<iframe src ="kam1.html" width="320" height="240" frameborder="0" scrolling="no"></iframe>
Parameters width and height you set depending on dimension of the picture.
14
Your Camera 3.2 – User’s Guide
————————————————————————————————————
2. You create kam1.html file which includes:
<!DOCTYPE HTML PUBLIC "-//W3C//DTD HTML 4.01 Transitional//EN">
<html>
<head>
<title>Camera 1</title>
<meta http-equiv="content-type" content="text/html; charset=ISO-8859-2">
<meta HTTP-EQUIV="Refresh" content="3">
<meta HTTP-EQUIV="Pragma" content="no-cache">
<meta HTTP-EQUIV="Cache-Control" content="no-cache">
</head>
<body>
<img src="http://81.81.81.81:80/1x320x240x50.jpg" alt="Camera 1 - unreachable ">
</body>
</html>
Line
<meta HTTP-EQUIV="Refresh" content="3">
determines the refresh rate of image.
Value 3 means that image will be refreshed every 3 seconds.
Line
<img src="http://81.81.81.81:80/1x320x240x50.jpg" alt="Camera 1 - unreachable ">
determines address and format of the image.
81.81.81.81 – IP address of cameras server.
80 – port of cameras server
1 – number of camera
320 – width of image in pixsels
240 – height of image in pixsels
50 – quality. Acceptable values: 1 – 99. 99 means the best quality.
You set parameters appropriately
3. You upload such prepared files on your WWW server.
5.7. Closing the application
To close the system we click the window closure symbol “X” (in the top right corner). Then
the logout window will open. After giving a user name and a password the programme will
close. The logout prevents from interrupting the monitoring by the wrong persons.
6. Watching the images from cameras by Internet on the computer
6.1. Login/remote access and watching cameras using WWW browsers.
The images from camera can be available via Internet if you: have marked “Enabled
computer” on “Remote access” page of configuration of camera and have chosen the mode of
connection to Internet.
To watch the images from cameras it is necessary to have an internet browser installed on the
computer (e.g. Internet Explorer or Netscape in version 4.0 or later or anotther serving HTML
format in version 4.0 or later with Cookies and Java script).
15
Your Camera 3.2 – User’s Guide
————————————————————————————————————
We run it, enter the site: www.twojakamera.pl/ang. In login window we enter IP
address and port and click “Go” button.
Address IP is address of cameras server which we can read in main configuration of Your
Camera programme on page “Information”. Port is communication port on page “Main
configuration”.
We can watch images from 4 cameras. Each of them is refreshed with the maximum
frequency fixed in the programme during configuration of camera. The speed of refreshing
can be lower than declared, among other things because of “too slow connection to Internet”.
To watch image from one camera only we click on this image. To return (and watch images
from 4 cameras) we click “Back” in Internet browser.
On WWW site we can change the quality of watched pictures. To achieve that we change
parameters visible at the bottom of the site. After setting a new value press button “OK”
The meaning of the fields:
Resolution
- acceptable values: 40x30 - 720x576
Quality
- compression level. Acceptable values: 1 – 99. The better quality the worse
compression
Sec. between - determines the number of seconds between refreshing pictures.
frames
Acceptable values: 1 – 999.
We improve quality by increasing value of parameters: resolution and quality. The better
quality the larger quantity of data must be sent via Internet. If our connection speed to Internet
is too slow and the value of ‘Sec. between frames’ parameter is too small then it is possible
that we will not see the picture on WWW site. So, if the frames from camera are displayed
irregularly then we should increase the value of parameter ‘Sec. between frames’ until we get
smooth frame changes.
Actual refresh rate can be lower than declared because of too slow connection to Internet.
It is possible watching live pictures on others devices like Pocket PC with installed WWW
browser.
6.2.
Remote access and watching cameras using Your Camera Client
programme.
Your Camera Client is a programme which makes possible watching live pictures.
To download and install the programme we run Internet browser and enter the site:
www.twojakamera.pl/ang and click “Download” in menu.
After installing we run the programme and write login like in Your Camera programme. But
before we run the programme we should connect to Internet. If the login process and
connection to Cameras Server (computer with ran Your Camera programme) succeeds we
will watch live pictures.
16
Your Camera 3.2 – User’s Guide
————————————————————————————————————
7. Security.
What is necessary to remember if we want to watch images from cameras safely:
1. Don’t disclose user name and password to the incorrect persons.
2. Limit an access of the incorrect persons to the computer on which we watch the
images from cameras in Internet.
3. Don’t make the cellphone (on which we watch the images from cameras) available to
the incorrect persons.
17