1
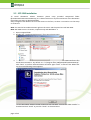
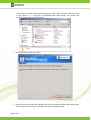
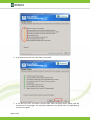
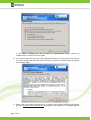
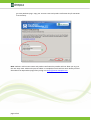
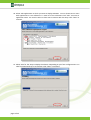
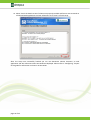
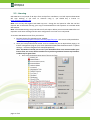
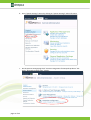
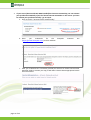
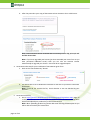
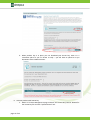
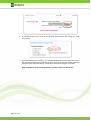
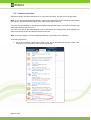
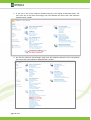
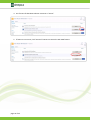
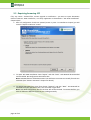
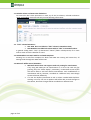
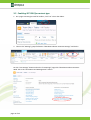
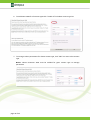
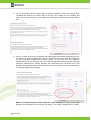
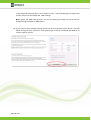
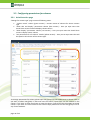
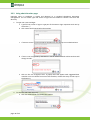
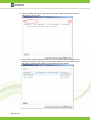
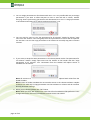
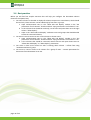
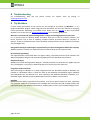
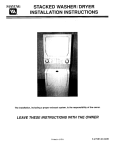
Datapolis.com ltd., ul. Wiktorska 63, 02-2587 Warsaw, Poland tel. (+48) 022 398 37 45; fax. (+48) 022 398 37 93, [email protected] USER GUIDE SharePoint Column Protector 2010 v 2.0.5.62 This guide was updated on 4-Mar-13 SharePoint Column Protector 2010 v 2.0.5.62 ............................................................................1 Thank you for using SharePoint Column Protector 2010! .............................................................2 1 Installation requirements.................................................................................................3 1.1 Server.....................................................................................................................3 2 Setup ............................................................................................................................3 2.1 Migrating From MOSS 2007 .......................................................................................3 2.1.1 Remarks for migrating SharePoint with SharePoint Column Protector ..........................3 2.2 SCP 2010 Installation ................................................................................................4 2.3 Licensing ............................................................................................................... 11 2.4 Feature activation .................................................................................................. 17 2.5 Repairing/removing SCP .......................................................................................... 20 3 Configuring .................................................................................................................. 21 3.1 Limitations ............................................................................................................ 22 3.2 Enabling SCP 2010 for content type .......................................................................... 24 3.3 Configuring permissions for columns......................................................................... 29 3.3.1 Administration page............................................................................................ 29 3.3.2 Using administration page.................................................................................... 30 3.3.3 List permission inheritance................................................................................... 33 3.4 Best practices ........................................................................................................ 34 4 Troubleshooting ........................................................................................................... 35 5 Try Workbox ................................................................................................................ 35 SharePoint Column Protector was originally a part of a larger solution (Workbox) designed for managing business processes and document flows on SharePoint. We encourage you to learn more about Workbox. Product Home Page: Workbox Interactive tutorial: Tutorial Free 30 day trial: Download Thank you for using SharePoint Column Protector 2010! We hope that you will find our product useful. If you have any comments or questions please contact us by channels mentioned in troubleshooting sections. We will gladly help you with any issues you may encounter. Please take time to read the following user guide, which will help you to use all features of our product. This user guide is divided into 3 sections: Setup – information how to install SCP 2010, buy license and activate it and activate SCP 2010 feature on the portal farm Configuring – describes the concept of SCP 2010 administration pages and explains how to assign permissions to columns. Also contains list of limitations of SCP 2010 Troubleshooting – information what to do in case something goes wrong. Users migrating from MOSS 2007/WSS 3.0 to SharePoint Server 2010/SharePoint Foundation 2010 should read chapter 2.1 “Migrating from MOSS 2007”. page 2 of 35 1 Installation requirements 1.1 Server Windows 2008/Windows 2008 R2 SharePoint Foundation 2010/SharePoint Server 2010 .NET Framework 3.5 2 Setup 2.1 Migrating From MOSS 2007 Migration from MOSS 2007 to SharePoint Server 2010 (or WSS 3.0 to SharePoint Foundation 2010) can be performed in either of two ways: “In-place” and “Database attach”. More information about the process can be found on Microsoft pages: http://www.microsoft.com/downloads/en/details.aspx?FamilyID=fd2172e1-f9a745ce-ae5c-26714fd751f5 http://technet.microsoft.com/pl-pl/library/cc287900(en-us).aspx SharePoint Column Protector can be migrated using both methods, there is however a number of issues which require special attention when choosing the migration method. 2.1.1 Remarks for migrating SharePoint with SharePoint Column Protector Migration Stage Preparing for Migration SharePoint Migration After SharePoint Migration page 3 of 35 “In-Place” Migration 1. Uninstalling SharePoint Column Protector from the old environment before migration required. Leaving SharePoint Column Protector installed may cause problems when installing its upgrade after migration. According to Microsoft’s procedures. 1. Install SharePoint Column Protector 2010 on the target environment. 2. Perform post-migration tests to determine whether all functionalities work correctly on the new environment. “Database Attach” Migration 1. Before performing migration, SharePoint Column Protector 2010 has to be installed on the target environment. According to Microsoft’s procedures. 1. Perform post-migration tests to determine whether all functionalities work correctly on the new environment. 2.2 SCP 2010 Installation To install SharePoint Column Protector please unzip provided compressed folder (SharePointColumnProtector2010.zip) to a chosen location on any front-end server of the SharePoint farm where you want to deploy SCP 2010. Setup configures SCP 2010 on all front-end servers in the farm, so there is no need to run the setup on all servers. Note: You need to have administration rights to the server and the portal to install SCP 2010. Note: SCP 2010 since 2.0.5 version, cooperate only with WorkBox 2.3. 1. Open unzipped folder. 2. Double click “InstallationPackage.exe” file to start the extractor 3. When extractor is started click “Next” and then select place where SCP 2010 installation files should be extracted to. By default it is “C:\Program Files (x86)\Datapolis\SCP 2010 Setup”. Click “Next” to confirm selected location and then again “Next” to extract files. When files are extracted following screen appears To start SharePoint Column installer make sure that checkbox “Launch SCP 2010 Installer” is checked and click “Finish” or just click “Finish” to close extractor. page 4 of 35 If you want to start SCP 2010 installer manually go to the location where file were extracted to (By default it is “C:\Program Files\Datapolis\SCP 2010 Setup”) and double click “setup.exe” file to start the setup wizard: 4. On the welcome screen click “Next” 5. During this step SCP 2010 will diagnose and check all required configurations. Please wait, until all checks are processed – all yellow icons should change to green. page 5 of 35 6. If all requirements are met, click “Next” to proceed. 7. If you see any errors, you need to correct them. After correcting errors, please close the wizard and run setup again. For help with installation errors please refer to troubleshooting section of this guide. page 6 of 35 If SCP 2010 is installed you will be taken to repair/remove screen. Please see “Repair/remove” section of this user guide. 8. You need to accept the End User License Agreement (EULA) to use SCP 2010 and continue the setup. Please read the EULA and if you accept it check the checkbox under agreement text and click “Next” 9. Please enter your product verification key. If you don’t have product verification key please go to the https://partner.datapolis.com and register. After registration is completed please page 7 of 35 go to My Products page. Copy your account name and product verification key for SCP 2010 in to the setup. Note: Without valid account name and product verification key installer will not allow you to go to the next step. Data visible on the picture above is a sample data and it will not work. Please you valid data taken from My Products page after you log in to https://partner.datapolis.com. page 8 of 35 10. Select web applications to which you want to deploy SCP 2010. You can choose one or more web applications or site collections. To view list of site collections click “Plus” icon next to application name. You need to select at least one to continue with the setup. Click “Next” to continue. 11. Please wait for the setup to deploy the solution. Depending on your farm configuration it can take from 30 seconds up to 15 minutes. Click “Next” to continue. page 9 of 35 12. Please check the details to see if solution was properly installed and feature was activated on all selected web applications and site collections. Click “Close” to finish setup. After the setup was successfully finished you can use SharePoint Column Protector on web application and site collections where SCP 2010 was deployed. Please refer to “Configuring” chapter of this guide for information on how to use SCP 2010. page 10 of 35 2.3 Licensing SCP 2010 has a trial period of 30 days. After 30 days from installation, trial will expire and SCP 2010 will stop working. If you want to continue using it, you should buy a license on https://partner.datapolis.com. Note: You can buy and register SCP 2010 any time – during the trial period or after the trial has expired. We recommend licensing your copy of SCP 2010 before trial expiration to avoid SCP 2010 deactivation. Note: All SCP 2010 settings are preserved even if trial expires. When you activate SCP 2010 after trial expiration it will start working with the same configuration as on last run in trial period. To activate SCP 2010 on server farm you need to: 1. Purchase license for SCP 2010 on our website https://partner.datapolis.com/en/customer/pages/buy.aspx . You can use a link provided on the license management page. 2. Once you have purchased the license and it is available for you on My Products page g o to license management page on your server (SharePoint 2010 Central Administration -> System Settings -> License management for Datapolis products) Note: SCP 2010 is licensed per server in your SharePoint farm. You cannot transfer your license from one server farm to another once you have generated License Key based on Product Key for given farm. a. Go to central administration page of the server farm page 11 of 35 b. Go to “System settings” section by clicking on “System Settings” tab on left menu c. On the System Settings page click “License management for Datapolis products” link under “Datapolis Configuration” header. page 12 of 35 3. If your server (the one with SCP 2010 installed) has internet connectivity you can activate your product automatically. If you don’t have internet connection on the server you have to activate your product manually – go to step 4. a. Click on the link “Activate license automatically” b. Enter you credentials for the Datapolis (https://partner.datapolis.com) and click validate. customer site c. After you credentials are successfully verified you will have to choose license which should be used to activate you copy of SCP 2010. Please choose appropriate license and click activate. page 13 of 35 d. After this procedure your copy of SharePoint Column Protector has a valid license. Note: If the automatic license activation was successful you can skip point 4,5 and 6 of this instruction. Note: If you have upgraded your license (you have extended your server farm so you have purchased additional server) then you can also use Activate License Automatically to upgrade your license – there will be an upgrade option. 4. Generate Product Key for your installation of SCP 2010 on given farm. a. Click on the “Get Product Key” button. b. You will receive a file to download. Download it and save on your disk in convenient localization. Note: If you do not receive the file, check whether it was not blocked by your browser. 5. Generate license key a. Go to https://partner.datapolis.com/en/customer/pages/myproducts.aspx page on a computer with internet access. Expand SharePoint Column Protector 2010 product section and upload your product key in the licenses section. Note: When uploading product key please add some meaning full description so you will be able to localize your license later. page 14 of 35 b. When product key is in place you can download your license key. Save it in a convenient place so you can locate it easily – you will have to upload it on you SharePoint Central Administration. 6. Activate product with license key a. Return to License Management page and click “Set License Key” button. Browse for the license key file and click “Upload license” link. page 15 of 35 b. If provided license key is valid for this product license status will change to “Valid License Key”. c. If provided license key is invalid – for example product key used to generate license key was generated from another server farm or trial has expired, license status will change to “Not valid License Key” and product status will change to “not valid”. Note: SCP 2010 is not protecting columns if product status is “Not valid”. page 16 of 35 2.4 Feature activation SharePoint Column Protector 2010 feature is active after the setup, and you can use it right away. Note: If you reinstall SCP 2010 using “Repair” option in the setup wizard, the all feature states will be maintained – activated features will be active, deactivated will be inactive. If feature was deactivated or the setup was unable to activate the feature, you need to activate SCP 2010 feature before you can use it. If you don’t see link to SCP 2010 administration on SharePoint list settings menu, then probably you need to activate it for the site collection that hosts this list. Note: To activate feature you need “Manage Web Site” permissions on site collection. To activate the feature: 1. Go to site collection administration page. If you are on site collection top site, choose “Site settings” from “Site actions” menu on the top left side. page 17 of 35 2. If you are on one of site collection subsites then go to site setting as described above, and then click “Go to top level site settings” link in the bottom left corner with “Site Collection Administration” header 3. On the site collection “Site Settings” page click “Site collection features” link in the bottom left corner with “Site Collection Administration” header. page 18 of 35 4. See if status of SharePoint Column Protector is “Active”. 5. If feature is not active, click “Activate” button to activate the SCP 2010 feature. page 19 of 35 2.5 Repairing/removing SCP If by any reason - deleted files, version upgrade or malfunction - you want to repair SharePoint Column Protector 2010 installation, run Setup application as described in “SCP 2010 Installation” chapter above. 1. After all configuration checks are passed (screen in point 5 in installation chapter) you will come to “Repair or Remove” screen 2. To repair SCP 2010 installation chose “Repair” and click “Next”. SCP 2010 will be uninstalled and reinstalled. No configuration data will be lost. Note: SCP 2010 feature will be deactivated. You will have to activate it manually for each site collection (see “Feature activation” chapter for details). 3. To remove SCP 2010 from your farm choose “Remove” and click “Next”. SCP 2010 will be removed from your SharePoint farm. You can install it again later. Note: SCP 2010 configuration files for each list will not be removed. To remove the files, you have to delete the XML file from every list catalog manually. page 20 of 35 3 Configuring SharePoint Column Protector 2010 is configured for each list or document library separately. SCP 2010 provides two types of permissions: “Allow display” and “Allow edit and display”. “Allow display” permission allows specified users to view data in a defined list column. Columns (including attachments) where user has only “Allow display” permission are read only on Edit Item form and are invisible on Add new Item form. “Allow edit and display” permission allows specified users to view data in a defined list column on Display Item form and list views, as well as to add and change data on Add New Item and Edit Item forms. If user has neither of these two permissions, then he/she is not allowed to view the column on both item forms and list views. If user has both “Allow display” and “Allow edit and display” permissions to the same column, then the user effectively has “Allow edit and display” permission to this column. Permissions are effective for: SharePoint item forms (“New”, ”Edit”, ”Display”), SharePoint list views, SharePoint alerts (newly created as well as those existing before the product installation), SharePoint list item attachments, Data exported from SharePoint to Microsoft Office Excel and Microsoft Office Access, Microsoft Office Access with SharePoint communication and synchronization, SharePoint lists Web Services. This means that SharePoint Column Protector 2010 fully secures and gives you a greater degree of control over your list-stored data. More information about configuring SharePoint Column Protector 2010 you can find on the product Web site: http://www.datapolis.com/en/scppro.html page 21 of 35 3.1 Limitations 1. SCP 2010 works only with Web Parts with full toolbar. SharePoint Column Protector protects only these list view Web Parts which have Toolbar Type set to “Full Toolbar”. Due to SharePoint API’s limitation, current version of SCP 2010 does not support list view Web Parts that have summary toolbar or no toolbar. Remember to enable full toolbar on list view Web Parts for the list you want to protect. 2. SCP 2010 does not work with Data View Web Parts. 3. SCP 2010 does not protect metadata in documents opened with external applications (e.g. Microsoft Office Word). 4. SCP 2010 does not work with Wiki libraries. 5. SCP 2010 does not support RSS feeds. 6. SCP does not work for search results. Search uses standard SharePoint security mechanisms and SCP settings do not affect search results. 7. SCP supports only standard SharePoint elements. Third-party and custom-built forms, Web Parts, controls and other elements most likely won’t be affected by SCP permissions (e.g. InfoPath forms, all elements modified from SharePoint Designer). 8. To configure SCP 2010 user must have “Manage List” permission for the list. User must be granted “Manage List” permissions for the list to be able to use SCP Administration pages. Note: If the list is inheriting permissions from its parent site, user needs “Enumerate Permissions” for the site. 9. SharePoint Column Protector 2010 shows all columns to users with Manage List permissions. SharePoint Column Protector shows all columns to users with Manage List permissions for given list. In other words, SCP 2010 is transparent to these users and column permission settings do not apply to them. This is the default setting which can be changed in the SharePoint Column Protector 2010 settings page. 10. SharePoint Column Protector 2010 does not synchronize its permission settings with list permissions. If you change list permissions, it will not influence SharePoint Column Protector permissions. Using SCP it is possible to assign column permissions to a user for a list to which the user has no access. However, SCP permissions will not grant the user access to the list. page 22 of 35 11. Calendar Views and Gantt View limitations. For users who don’t have permission to view any of the list columns, Calendar and Gantt views are disabled. Such users will only see the following information: 12. “Title” column limitations: SCP 2010 does not hide the “Title” column in Datasheet view; SCP 2010 does not hide link to item with its “Title” in SharePoint alerts. In general: hiding item’s “Title” (or document’s ”Name”) field is a bad practice, for in most cases it works as item’s identifier for users. 13. SCP 2010 does not work with list and web templates. Creating list or web from template on which SCP 2010 was running will cause that, all settings made through SCP 2010 will be reset. 14. Microsoft Office Access limitations: Microsoft Access does not support read-only setting for attachments. If by using SCP 2010 you set attachments on a list to be read only (by granting only the “Allow display” permission), in Microsoft Access he/she still will be able to add and remove attachments. Such modifications to attachments will be, however, cancelled on a different level, even though Access still shows differently. If a user has his/hers permission to edit a column revoked while he/she is working in Access, the user is question will still be able to make changes in the column, but those changes will be cancelled on a different level. page 23 of 35 3.2 Enabling SCP 2010 for content type 1. On a page containing list with full toolbar, click “List” tab on the ribbon. 2. Then in the “Settings” group find button “SharePoint Column Protector Settings” and click it. Or click “List Settings” button and on the “List Settings” page click “SharePoint Column Protector 2010” link in the “Permissions and Management” section. page 24 of 35 3. On main SharePoint Column Protector 2010 page you can choose which content types use SCP 2010 to manage column permissions. 4. If SCP 2010 is disabled for given content type, then its status is “Off”. 5. To enable SCP 2010 for this content type click “Enable” link for this content type. page 25 of 35 6. To enable SCP 2010 for all content types click “Enable all” link above content type list. 7. To manage column permissions for chosen content type, click “Edit” icon next to this content type. Notice: Column Protector 2010 must be enabled for given content type to manage permissions page 26 of 35 8. You can disable SCP 2010 for content type, by clicking “Disable link” next to the content type. To disable SCP 2010 for all content types on this list, click “Disable all” link. Disabling SCP 2010 will not reset settings – if you enable SCP 2010 again, all permission settings will be kept 9. You can at what level of user permissions SCP 2010 column permissions should be ignored. If you want that columns visibility which was set in SharePoint Column Protector is applied to all users (including administrators) choose “None”. If you want that Site Collection Administrators can see whole list and omit in this was SCP 2010 security settings chose Site Collection Administrators. Setting Manage Lists permissions level will allow users with Manage Lists permissions level to this particular list to see its whole content and ignoring in this was SCP 2010 security settings. Note: To manage SharePoint Column Protector 2010 settings user must at least have Manage Lists permission level for the list and setting “SCP 2010 settings levels” to “None” page 27 of 35 or Site Collection Administrator” has no impact on this – users with Manage Lists permission level for this list can still modify SCP 2010 settings. Note: Ignore SCP 2010 settings level is set per list. Setting one option on one list will not change setting this option on different list. 10. If you want to reset SCP 2010 settings for this list click “Reset permissions” button – this will delete settings for each column for each content type on this list and disable SCP 2010 for all content types on this list. page 28 of 35 3.3 Configuring permissions for columns 3.3.1 Administration page “Settings for content type” page consists of following items: “Column name” column (green section) – contains names of columns for chosen content type “Allow edit and display” permissions column (blue section) – here you input users that should have access to edit and display chosen column “Allow display” permissions column (red section) – here you input users that should have access to display chosen column “Set permissions for all columns” header (yellow section) – here you can input users that will be copied to all columns of the content type. To manage permissions for column, please input user/group into the textbox next to column name. If you want to allow user/group to edit and view the column, input them into the textbox in first column. If you want to allow user/group to view the column, input them into the textbox in second column. If you want to restrict access to the column simply make sure that the user/group is not in any of two textboxes. page 29 of 35 3.3.2 Using administration page Inputting users to textboxes is simple and identical as in standard SharePoint permission management. You can either type user name or login into the textbox or choose a user from the directory. 1. To type user name and login: a. Type full user name or login or type part of the name or login. Separate each user by semicolon “;” b. Click name check button below the textbox. c. If name is correct and recognized by SharePoint it will change to an underlined text. d. If user is not recognized by SharePoint it will be underlined with red line and text will change to italic. e. Click on the not recognized user. A popup menu will appear with suggested best matches. You can choose from one of the matches, remove the entry or look it up in the directory. 2. To choose a user from directory: a. Click the address book icon below the textbox page 30 of 35 b. A popup window will appear. Type part of the name or login of the user you want to add and click “Search” icon. c. In the results window choose the user you want to add by double clicking it or by clicking and pressing “Add” button. You can select multiple users and repeat search and selection multiple times. When you are finished click “OK” button. page 31 of 35 3. You can assign permissions to all authenticated users. It is a very comfortable way to manage permissions if you want to allow everyone to view or view and edit a column, without worrying about synchronizing permissions with SharePoint list or site. To assign permissions to all authenticated users click “Add all authenticated users” icon. 4. You can copy list users to the “Set permissions for all columns” header by clicking “Copy users from list” button. Users and groups that have permissions to this list will be copied to the text box. You can then copy permissions to all columns or manually copy users to chosen columns. 5. If you want to setup the same permissions to all columns please use the “Set permissions for all columns” header. Simply input users into the textbox in the header and click “Copy permissions to all columns” icon. Permissions from the textbox will replace entries in textboxes for all columns. Note: All entries in the column textboxes will be deleted and replaced with values from the header textbox. Note: Entries in header textboxes do not override entries in the column textboxes. Header textboxes are used only to copy permissions into the textboxes in columns and do not affect directly permission settings. 6. When you are finished please click “OK” button Note: When you click “OK” button user name check for all textboxes will be performed. Your changes will not be saved until all textboxes contain correct user names. page 32 of 35 3.3.3 List permission inheritance When SCP 2010 is enabled for content type for the first time or when SCP 2010 is enabled after SCP 2010 reset for this list, users and user groups from SharePoint list are copied to “Allow edit and display” permission for each column. This way, by default all users with permission to the list have normal access to all columns. If new users are added to list or site, you can copy them to the columns by clicking “Copy users from list” button. Note: Users will be copied to header column. You can then copy them to all columns using “Copy permissions to all columns” button (Point 4 in chapter List permission inheritance). Note: If you want to make sure that all users that have permission to the list can access given column, give permission to all authenticated users (Point 3 in chapter List permission inheritance). page 33 of 35 3.4 Best practices Below you will find few sample scenarios that will help you configure the SharePoint Column Protector the optimal way: 1. You want all users to be able to display all columns except one or two columns, which should be read only. These columns can be edited only by few users or groups. a. Input authenticated users in the “Allow edit and display” textbox in the “Set permissions for all columns” header and click “Copy permissions to all columns” icon. b. In the columns that should be read only, cut the users and paste them in to the right column “Allow display”. c. Input in the “Allow edit and display” textboxes users and groups that should be able to edit the restricted columns. 2. You want to restrict access to one or few columns to chosen users. a. Input authenticated users in the “Allow edit and display” textbox in the “Set permissions for all columns” header and click “Copy permissions to all columns” icon. b. It the columns that should be restricted remove entries and input chosen users to “Allow edit and display” or “Allow display” permissions 3. You want to have strict control on who is viewing which column – refrain from using “Authenticated users” group. 4. You want to restrict access to all columns for a group of users – remove permissions for these users from SharePoint list or site. page 34 of 35 4 Troubleshooting For troubleshooting help and tips please contact our support team by mailing us [email protected]. 5 Try Workbox If static column permissions for list columns are not enough for you please try Workbox – it is a graphical Workflow designer which integrates with SharePoint and one of its features is managing column permissions depending on workflow state. Please visit our web site to learn more about workbox. You can also visit our demonstration web site to see workbox guided tour. Workbox is an advanced platform designed for creating and managing business processes It is a practical tool for defining simple documents flow such as flow of invoices, absences, sick leaves, business trips as well as modeling complex business processes based on company’s IT systems. Thanks to implementation of state workflow model processes may be modeled in extremely easy and legible way. Designed for managers and analysts responsible for processes management within the company Workbox has been created as a simple tool easy to understand by the non-technical staff. No need of programming The implementation of processes does not require coding. The whole process may be created in the dedicated graphical designer and automatically deployed on the SharePoint environment. Graphical Designer Workbox has a web based graphical designer. Created processes are presented in a legible and vivid way. The Designer is very easy to understand and to use. See more at our demo site. Integration with SharePoint Great advantage of Workbox is its deep integration with the SharePoint platform. Workbox was created as a SharePoint add in. It does not have its own database and workflow engine. Workbox uses SharePoint lists and libraries as a data repository and Windows Workflow Foundation as a workflow engine. Workbox works on MOSS 2007 as well as on WSS 3.0 environment. Flexibility Workbox has the ability to extend its functionality. As it has an open architecture, other companies may program additional functionalities (for example data connectors for ERP or CRM systems) and implement them in the Workbox environment, enabling users to use it from workflow designer level. page 35 of 35