1
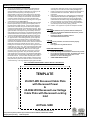
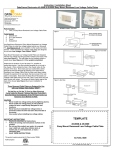
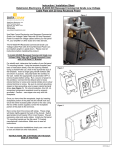
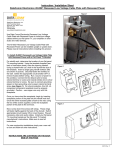
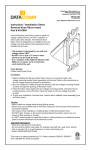
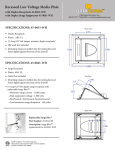
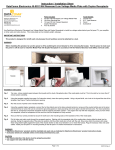
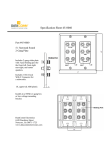
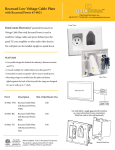
Instruction / Installation Sheet DataComm Electronics 45-0022-WH Recessed Pro-Power Kit with Locking Inlet Figure 1 – Front View DataComm Electronics, Inc. 6349 Peachtree Street Norcross, GA 30071-1725 888.223.7977 770.662.8205 www.datacommelectronics.com Parts Included: 1. 2. 3. 45-0021-WH Recessed Low Voltage Cable Plate with Recessed Power Recessed Low Voltage Cable Plate with Recessed Locking Inlet 6 Ft. 14/2 with Ground Extension Cord Use the Recessed Low Voltage Cable Plate with Recessed Locking Inlet to install power and low voltage cables behind your flat panel TV, amplifier or other audio and video devices to your equipment room or at the location of your head end equipment. IMPORTANT INSTRUCTIONS: Use the local electrical code approved installation when installing this product. The electrical parts in this kit are designed to be used only as a kit and none of these electrical parts are designed to be used individually. This product is not designed to be part of your home or a commercial building’s electrical wiring system. This installation is only energized (electrically active) when the supplied 6 ft. cord is plugged into the recessed locking inlet located on the recessed low voltage cable plate and the locking end of the 6 ft. cord is plugged into either your surge protector or wall receptacle. If you are not familiar with home wiring systems, please call a qualified electrician to install this product. Figure 2 – Back View Installation Instructions for New Construction: Simply use a new nail on box and follow all other instructions described in the retrofit portion of the instruction sheet. Installation Instructions for Retrofit Only: 1. 2. 3. Select the location of your flat panel TV mounting bracket. Now select the location for both the 45-0021WH Recessed Low Voltage Cable Plate with Recessed Power and the Recessed Low Voltage Cable Plate with Recessed Locking Inlet. Both the Recessed Low Voltage Cable Plate with Recessed Power and the Recessed Low Voltage Cable Plate with Recessed Locking Inlet are designed to be mounted between two studs (see Figure 1). Using the template supplied (see back of instruction sheet), trace the openings needed for both recessed cable plates. Using a drywall knife cut a hole in the drywall the size of the template. Remember that the Pro-Power kit is not part of your home’s electrical wiring system. Before installing the single gang retrofit workboxes (see Figure 2), pull a piece of 12/2 or 14/2 with ground UL approved building wire from one opening to the other opening to connect the recessed cable plate with recessed power to the recessed cable plate with recessed locking inlet. Make sure the piece of wire is long enough to allow for easy installation of the receptacles. Insert a single gang retrofit workbox (see Figure 2). Securely fasten the workbox to the wall. Figure 3 Figure 4 3/22/10 Rev. 8 Installation Instructions 45-0022-WH (continued): 4. 5. 6. To connect the receptacle on the Recessed Cable Plate with Recessed Power to the piece of 12/2 or 14/2 with ground UL approved building wire that you pulled from one opening in the drywall to the second opening in the drywall, strip off approximately 3 inches of the outer jacket of the UL approved building wire. Be careful not to cut the jacket of the inner wires. Connect the hot line (black) wire to the brass colored terminal screw and neutral (white) wire to the silver colored terminal screw. Be sure to connect the bare grounding wire to the green colored terminal screw (see Figure 3). Once you have wired the Recessed Cable Plate with Recessed Power receptacle, begin by inserting the receptacle portion of the plate into the retrofit work box. Once the entire recessed plate is flush to the wall, using the two white screws supplied, screw the receptacle portion of the plate to the work box. Next, screw down the screws with wings. The wings will fasten tightly against the back of the drywall. Plug all necessary video and audio cables through the opening on the Recessed Cable Plate with Recessed Power and down the wall to the opening you cut out for the Recessed Cable Plate with Recessed Locking Inlet. To connect the Recessed Cable Plate with Locking Inlet to the UL approved 12/2 or 14/2 building wire with ground, fully back out the brass and silver terminal clamps. Insert building wire conductors into the proper wire well. Insert the hot line (black) wire into the wire well with the brass screw, insert the neutral line (white) wire into the wire well with the silver screw. Once the building wire is inserted into the proper wire well, tighten terminal screws firmly to 10-12 in.-lbs. Then connect the grounding solid copper wire to the green grounding screw located on the end of the locking inlet (see Figure 4). Make sure the solid copper grounding wire is securely fastened onto the green grounding screw and properly grounded. Plug all necessary video and audio cables through the opening on the Recessed Cable Plate with Locking Inlet. Insert the locking inlet portion of the plate into the retrofit work box. Once the entire recessed plate is flush to the wall, using the two white screws supplied, screw the locking inlet portion of the plate to the work box. Next, screw down the screws with wings. The wings will fasten tightly against the back of the drywall. Make sure to keep your UL approved building wire away from the video and audio cables (see Figure 2). 7. Install your flat panel TV mounting bracket per the flat panel TV bracket manufacturer’s instructions. Make sure to read all instructions. 8. Now plug your flat panel TV or TV/Projector into the Recessed Cable Plate with Recessed Power (see Figure 1). Then plug the female end of the supplied 6 ft. cord into the Recessed Cable Plate with Recessed Locking Inlet (see Figure 2) and male end into either your surge protector or wall receptacle. 9. For shock protection, both the UR, UL recognized receptacle and inlet components must be properly grounded. 10. Caution – use copper wire only with this receptacle and inlet. WARNING DataComm Electronics’ products shall be installed and used only as indicated in DataComm Electronics’ product instruction sheets. Instruction sheets are available online at www.datacommelectronics.com. CAUTION For shock protection, this device must be properly grounded. Use copper wire only with this device. IMPORTANT INSTRUCTIONS Read and understand all instructions. Follow all warnings and instructions marked on the product. Do not use this product near water, for example near a bath tub, wash bowl, kitchen sink, laundry tub, in a wet basement, or near a swimming pool. SAVE THESE INSTRUCTIONS. ONLY LICENSED PROFESSIONALS SHOULD INSTALL THIS PRODUCT 4-11/16” 3-3/4” TEMPLATE 45-0021-WH Recessed Cable Plate with Recessed Power & 45-0022-WH Recessed Low Voltage Cable Plate with Recessed Locking Inlet ACTUAL SIZE CUT ALONG DOTTED LINE This product is patent protected by U.S. Patent numbers D553475, D554475 and 7390964. Multiple patents pending. RoHS Compliant. 3/22/10 Rev. 8