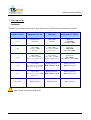
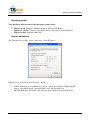
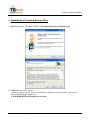
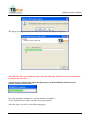
1
Guide of quick installation
User Guide
Terminal
Service Plus
Terminal Service Plus product range is the greatest offering of the world market today! It is a
powerful and the easiest way to publish any of your Windows application on a LAN or a WAN.
Features
Benefits
5, 10, 20 or Unlimited concurrent users
Adding “server technology” to an
existing XP, VISTA, 2003 SBS system
Enable to print document wherever you
are
The easiest and secure solution for
remote access to your applications
Without the Microsoft Remote Desktop
background
Per user or per group of users, using a
amazing Drag & Drop wizard
Up to 10 servers for a wide deployment
scalability
A nice looking alternative shell to
Microsoft Remote Desktop
Universal Printer
USB stick access client
Application Publishing
Application control
Load balancing and failover
TSplus user remote Task Bar
TSplus for XP: after installation of TSplus for XP onto Windows XP, you will get a fully featured
and powerful “server” with unbelievable freedom to remotely access and control your application
publishing requirements.
TSplus for VISTA: delivering the same capabilities for VISTA (Professional and Ultimate), this
solution is less powerful as XP because VISTA is a resource crunchy system.
TSplus for 2003 SBS servers: If you already own a Microsoft 2003 SBS server, no more need to
purchase an other server to run 5 remote accesses or more. Just install TSplus.
This document is the TSplus editor property
1/1
Guide of quick installation
1. Pre-requisites
Hardware
Terminal Service Plus could work on your PC and here is the minimal recommended hardware.
Number of users
Equipment for XP
2003 SBS
Equipment for VISTA
3-5
512 MB, DDR 2
ONE CPU
1 GB, DDR 2
ONE CPU
Dual core
2 GB, DDR 3
One CPU 2 GHZ
10
1 GB, DDR3
One CPU 2 GHZ
Dual core
2 GB, DDR3
One CPU 2.5 GHZ
Dual Core
Quad core
4 GB, DDR3
One CPU 2 GHZ
20
2 GB, DDR3
One CPU 2.5 GHZ
Dual Core or Quad Core
4 Go, DDR 3
Two CPUs 2.5 GHZ
Dual Core/ Quad Core
Quad Core
4 Go, DDR 3
Two CPUs 2.5 to 2.9 GHZ
4 Go, DDR 3
Two CPUs 2.5 to 2.9 GHZ
Dual Core or Quad Core
Farm of 2 servers
50
With 25 users each
Farm of 2 servers
With 25 users each
100
4 Go, DDR 3
Two CPUs 2.5 to 2.9 GHZ
Quad Core
With 25 users each
Farm of 4 servers
With 25 users each
Over 100
Farm of servers
Farm of servers
Farm of servers
Your system must be installed on C:\
This document is the TSplus editor property
2/2
Farm of 4 servers
Guide of quick installation
Operating system
Your hardware must use one of the operating systems below:
•
•
•
TSplus for XP: Windows XP Professional or Windows XP Home.
TSplus for VISTA: Windows Vista Professional, Corporate or Ultimate Edition
TSplus for SBS: Windows 2003 SBS
Network parameters
The Terminal Service Plus “server” must have a fixed IP address
Remote access (from Wide Area Network – WAN)
•
•
A DSL connection is recommended as well as a public fixed address. Without fix IP
address, you should install a dynamic DNS service like DynDNS.org.
The TCP RDP port (by default 3389) must be opened both ways on your firewall.
This document is the TSplus editor property
3/3
Guide of quick installation
2. Installation of Terminal Service Plus
1. Run Setup-TSplus-XP-2003-VISTA.exe and then follow the installation steps.
2. Click on I agree to the license.
A message appears then to ask you to confirm the Terminal Service Plus files creation on C:
The installation path is mandatory :
C:\PROGRAM FILES\Terminal Service Plus
This document is the TSplus editor property
4/4
Guide of quick installation
The progress bar appears then and allows you to follow the progress of process.
Once this first file copy installation step ended, the following window asks you to confirm the
starting of the next step.
A progress bar is displayed to point out the progress of the installation of the universal
printer Terminal Service Plus.
Once the installation terminated, a window informs you about it.
To use Terminal Service Plus, you must start again your PC.
After the reboot, you will see the following pop-up
This document is the TSplus editor property
5/5
Guide of quick installation
The trial periods delivers a full product for 15 days and 5 concurrent users.
If you wish to extend the number of users, or for any question, please send us a mail using our
web site: http://terminalserviceplus.com
This document is the TSplus editor property
6/6
Guide of quick installation
3. Custimization and parameters settings
The Terminal Service Plus server is now ready to go.
However, you can customize all of the system parameters with a powerful administrator tool.
1. Click on the icon of
created on your Desktop.
All users can open a remote session
Specify if users must be members of the Remote Desktop Users group or not. By default, everyone
can open a session.
Password Control
Specify if users must have a password or not.
Using Windows Shell
Select an alternate shell (recommended) or restaure Windows default one.
This document is the TSplus editor property
7/7
Guide of quick installation
Administration tools
•
•
•
•
•
Task Manager: to monitor process and user sessions
Users & Groups Management: to create new users and new groups
Local policies: to modify the server policies
Windows services: to check the server services
Server properties: to enter the server in a domain
System information
•
•
•
Check license: to verify the current license settings
Verify the installation: to check the system settings
Event log: to review the system logs
Changing the server name will disable the license and it is will required asking for a new
one.
This document is the TSplus editor property
8/8
Guide of quick installation
Service and Web server
•
•
•
•
Start service: to start or re-start the Terminal Service for XP service
Stop Service: to stop the Terminal Service for XP service
Setting up the Web Server: to specify the web server parameters
Activate the Web server: to start the Web Server
This document is the TSplus editor property
9/9
Guide of quick installation
Server Optimization options
•
•
•
Create a connection log file: to create/review a detailed connection log file
Activate Server Optimizations: to automatically improve your server performances
Restore default system services: to roll-back optimization settings
This document is the TSplus editor property
10/10
Guide of quick installation
Server Global settings
•
Change RDP port: Default number is 3389 and you can choose a different one
•
Default global client parameters: to specify once the connection client programs
parameters.
•
Edit AppControl.ini: to review/change any of the server application control settings
This document is the TSplus editor property
11/11
Guide of quick installation
•
Change seamless client color: to change the color used for seamless application publishing
The Seamless Client is based one transparency color selected by the Administrator. As the Remote
Desktop background color is paint with the selected transparent color, the Microsoft Remote
Desktop is not displayed anymore and the user will just see his published applications.
Installation default is NO TRANSPARANCY. You must choose one color to be able to use a
Seamless Client. Also, if you publish a full Destop, the transparency will not be used to avoid a
situation where a transparent Remote Desktop is displayed over le local Desktop. To avoid display
issues we recommend to select a color which is not used by your application fonts. We offer you
the choice between 3 transparency colors: Pink, Green and Blue. Warning: Off course, the server
and the connection clients must use the same color.
•
Load balancing/Failover settings: to specify loadbalancing/Failover parameters
The system enables to use up to 10 servers with load balancing and the have one backup server to
be used as failover equipment. This a very powerful and advanced capability to be used when a
large number of users will be deployed.
This document is the TSplus editor property
12/12
Guide of quick installation
Client connection Generators
•
•
•
Seamless Client: to seamlessly run applications (no Remote Desktop background)
RDP client: to run application within a Remote Desktop background
USB client with serialization: to run application from a USB key
This document is the TSplus editor property
13/13
Guide of quick installation
Connection client generators
Remote Desktop Client
Seamless Client
When using the USB drive generator, the connection program is adding a check of the serial
number of the USB drive.
The program allows changing the icon and the connection client program name.
Server Address: Enter the IP address of the server to which the client must be connected.
Port Number: Enter the server port number
Domain name: Enter a domain name if any
User and Password: If you enter a user/password, the client program will not ask to retype it at
each session. If you type *SSO as user name, the client program will just ask once the
logon/password and will save this information on the user’s workstation. To reset this
logon/password saving, you must create a shortcut and add –reset on switch at the end of the target
field.
This document is the TSplus editor property
14/14
Guide of quick installation
Advanced printing option: Universal Printer
The Terminal Service Plus Universal Printer offers you a great capability: to print documents from
any PCs. When selecting this printer, the document to print is automatically converted into a PDF
format file. This PDF file is automatically pushed to the local Acrobat Reader of the user
workstation.
You can choose from 4 printing options:
Acrobat Reader preview: the document will be pushed and the local Acrobat Reader will
be open with the generated PDF file. The user can print it, or save a copy on his local disk
drive
Print on the user default printer: the document will be automatically pushed to the default
user printer.
Select a local printer: The Acrobat Reader printer select dialog will be displayed when the
PDF file transfer is completed.
Streaming mode on the default printer: for large documents, the PDF file is spited into 2
pages per 2 pages transfer / print process.
If Acrobat Reader is not installed but another PDF Reader exists (FoxIT for example) the
document will always open by this other reader with a local preview.
The Seamless client is compatible with any PC with XP, 2003 or Vista and Windows 95/98, NT
and 2000 are not supported.
The RDP and USB is compatible with any Windows platform. It is why it must be used in any
deployment where old PC could be used to open a session.
This document is the TSplus editor property
15/15
Guide of quick installation
4. Application publishing
You will add / modify / delete applications using the AdminTool.
1. Notepad and Calc are published as examples.
2. After declaring a new application, we recommend to use the Test it button to check that the
application is correctly started.
3. For each new application, you can specify if this application must start maximized,
minimized or hidden. You can also tell the system to apply this application to all users.
4. You must click on the button Save and Exit to store any modification.
At
installation,
the
default
settings
is
:
Any user will see the
Microsoft Remote Desktop
complete
The TSplus TaskBar publishes all shortcuts copied in the Desktop folder of the user.
When selecting TSplus TaskBar, you can request to automatically copy any of the
shortcuts available in the All Users Desktop folder and/or, to automatically create shortcuts
from applications assigned to the users with Application Control.
This document is the TSplus editor property
16/16
Guide of quick installation
5. Application control
Application control is one other great and amazing capability of Terminal Service Plus. Assigning
applications to users or groups of users is just a matter of Drag & Drop (option 1):
Select one application and drop it to the user, or to the group, that will have a remote access to this
application.
To remove an application from one user or from one group, just select it and press DELETE key.
1. If one user has Microsoft Remote Desktop, then he always will see a standard Desktop.
2. If one user has TSplus TaskBar and do not have the Microsoft Remote Desktop application
enabled, then he always will see the Longhorn or the Menu-on-Top taskbar.
3. If one user has neither Microsoft Remote Desktop, neither TSplus TaskBar but one or
several applications manually declared, then this user will have access to these
applications only, and these applications will be started when he opens his session.
4. You must click on the button Save and Exit to store any modification.
Option 2: You can also use a classical wizard to assign applications ‘per USER’
Option 3: You can also use a classical wizard to assign applications ‘per GROUPS’
These 2 options are very useful when a large number of users, or groups, are displayed on the
server. It can be maximized and in such case, it display nearly 100 users/groups within the screen.
This document is the TSplus editor property
17/17
Guide of quick installation
Other comments:
•
If no application is assigned to one user, he will see the Microsoft Remote Desktop which
will display the shortcuts of he Desktop folder.
•
If one user has several allocations plus the Microsoft Remote Desktop, he will see a remote
desktop.
•
If a user has several applications plus the TSplus TaskBar, he will see the TaskBar which
displays the shortcuts of his Desktop folder.
•
It is also possible to assign one specific application to one specific user of a Domain. To do
so, just edit the AppControl.ini file and type the user name (JohnD for example) in the
“users=” field of the application paragraph.
•
Finally, if you want to start a script when the session open, you must mane it LOGON.BAT
or LOGON.CMD and copy this script:
In the Application Data folder of All Users if this script applies to all users,
In the Application Data of the user if this script applies to this user.
This document is the TSplus editor property
18/18
Guide of quick installation
Firewalls: Please remember that in most cases connection trouble are due to a firewall rule on the
server side, on the network, or on the client side.
This document is the TSplus editor property
19/19
Guide of quick installation
6. Deploying the client connection programs
To deploy the client connection program:
1. Send by mail the generated .exe connection client and ask your user to copy it on their user
desktop. This program can also be used from USB keys.
2. Double-click the icon of the program.
In the following example, the «LongHorn» taskbar is seamlessly displayed on the right part of
local user screen; all shortcuts icons of the user desktop folder are displayed in the user taskbar.
To change the style of the taskbar, click on Mini Menu
above the clock. Then the Taskbar will appears
in the top middle place of the screen.
Depending on the parameters used when generating the client connection program, the user will
have access to local printers, local disk drives, COM ports and Universal Printer.
This document is the TSplus editor property
20/20
Guide of quick installation
7. ANNEXE: Frequently asked questions
Everything is installed but some users do not succeed to open a session.
You probably have a firewall on the user session that block the RDP port (default is 3389). Disable
the firewall to check this point.
It work on my LAN but not from a remote site.
The WAN connection must be redirected to the TSplus server (NAT –Network Address
Translation) or you are using a DSL line with a dynamic Internet address which changes every two
days. If you are not familiar with such issues, we recommend you to contact the technician in
charge of your router equipment to fix it for you. The NAT is done using the router administrator
tool and if you do not have a fix WAN IP address you should setup a DynDns.org like service
provider.
Performances from one site are not as good as other ones.
For a remote connections, the PING delay counts as much than the network bandwidth. It is
possible that some of your connections have to pass several relays before joining the remote DSL
equipment. Every transit postpones the transmission by some milliseconds.
What are the default settings when I install TSplus?
• The default settings are : No transparency color selected for the Seamless Client: The
Administrator must select one color (blue, green or pink) before getting a nice Application
Seamless access.
• The full Remote Desktop is display by default to any user that have nothing assigned by the
administrator. If you want a user (or a group) to start one application when opening a
session, you must assign this application to this user or to this group.
• Any user printing on the Universal Printer, if nothing was specified in the Client Access
generation, it will automatically open the generated PDF print with the local PDF Reader.
• The Trial license is set for 5 users and includes a trial Universal Printer (15 days)
I have a Windows 2003 Server with existing TSE licenses?
In that case, TSplus works also! You will add Seamless application display, Application Control,
Universal Printer and load balancing on your TSE server at a much lower price than Citrix!
Should I have to uninstall before running a TSplus Update patch?
No, do not uninstall TSplus. The patch are made to protect your existing parameters and settings.
Just run it but make sure that no one is connected when you will install any TSplus Update
program.
This document is the TSplus editor property
21/21