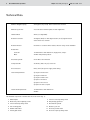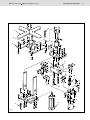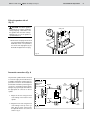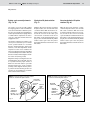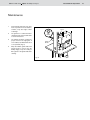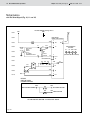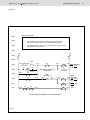
1
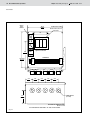
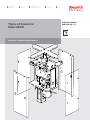
Electric Drives
and Controls
Hydraulics
Linear Motion and
Assembly Technologies
TSplus Lift-Rotate Unit
Model HD2/E
Installation, Operation and Maintenance
Pneumatics
Service
Publication Number:
8981 500 278 7/09
2
Bosch Rexroth Corporation
TSplus Assembly Conveyors
8981 500 278 7/09
Table of Contents
Important Safety Information..........................................................3
Introduction........................................................................................4
Application and Function ...............................................................5
Technical Data...................................................................................6
Sequence of Operation...................................................................8
Installation...........................................................................................8
Mounting the equipment to the transport line...................8
Filling the gearbox with oil......................................................9
Pneumatic connections..........................................................9
Electrical Connections...................................................................10
Adjustments.....................................................................................11
Mechanical adjustments.......................................................11
Pneumatic adjustments.........................................................12
Adjustments (cont’d)
End cushion adjustments.....................................................12
Start push-button...................................................................12
Rotate speed control.............................................................12
Rotate cycle cam adjustments............................................13
Clockwise lift plate rotation..................................................13
Counterclockwise lift plate rotation...................................13
Operating Instructions...................................................................14
Maintenance ...................................................................................15
Schematics .......................................................................16, 17, 18
Module Warranty
Liability
BOSCH REXROTH CORPORATION warrants to the original purchaser the modules manufactured by us to be free from defects in materials
and workmanship under normal use and service. Our obligation under
this warranty shall be limited to the repair or exchange of any part or
parts which may thus prove defective under normal use and service
within one (1) year from date of installation by the original purchaser.
THIS WARRANTY IS EXPRESSLY IN LIEU OF ALL OTHER WARRANTIES EXPRESSED OR IMPLIED, INCLUDING THE WARRANTY
OF MERCHANTABILITY OR FITNESS FOR USE, AND WE NEITHER
MAKE NOR AUTHORIZE ANY OTHER PERSON TO MAKE FOR US,
ANY WARRANTY IN CONNECTION WITH THE SALE.
In no event can the manufacturer accept warranty claims or liability claims
for damages resulting from improper use or misuse of the equipment or
as a result of changes made to the equipment other than those authorized
by the manufacturer. The manufacturer will accept no claim in which nonoriginal spare parts have been used.
This warranty shall not apply to the modules or any part thereof that has
been subject to accident, negligence, alteration, disassembly, abuse,
or misuse after delivery by us. The term “Original Purchaser”, as used
in this warranty, shall be deemed to mean the customer to whom the
modules were originally sold.
Our obligation under this warranty is limited to the modules only, and
excludes wear items, such as belts, etc., and we may not be responsible
for system concept, design, engineering, or function beyond this.
Environmental Protection
Always dispose of worn, damaged or obsolete parts in a responsible manner. Some components, such as gearboxes, contain lubricating oil which
can pollute the environment. It is the user’s responsibility to dispose of all
hazardous material within the components following all local, state and
federal guidelines.
All rights are held by ROBERT BOSCH GMBH and BOSCH REXROTH
CORPORATION, also regarding patent claims. We retain all powers of
disposition, such as for copying and/or for passing-on to third parties. We
reserve the right to make technical changes at any time without
notice. Errors and omissions excepted.
© 2009,
Bosch Rexroth Corporation
8981 500 278 7/09 TSplus Assembly Conveyors
Bosch Rexroth Corporation
3
Important Safety Information!
I M P ORTANT: This manual must
be reviewed with all equipment
operators as part of your operator
training program!
SAFETY FIRST!
Important safety information is
contained throughout this manual to
alert you to potentially dangerous situations
and help prevent accidental injury and
property damage.
WARNING!
Please read all assembly, and maintenance instructions carefully before beginning set-up of the components in this
document. Where appropriate, warning
symbols
have been included in this
publication to alert you of potential or
impending danger.
•
Be sure to read and observe all safety
warnings in this document as well as
those attached to the individual modules. Failure to do so could result in
potential risks to your health and safety
as well as those around you.
The safety warning symbol above has been
included to warn you of hazards that can
hurt or kill you and others, and/or cause
serious damage to the equipment and
other property. In addition, the following
safety alert words are used:
•
Covers and guards have been designed to eliminate pinch points and
exposure to moving chains and gears.
DO NOT operate the conveyor or any
of the other components in the system
with the guards removed. Serious
injury may result!
DANGER!
Means t hat you or ot hers will
be seriously or fatally injured if
instructions are not followed.
•
All set-up maintenance and repair work
should be performed only by properly
trained, qualified personnel. All operators must be properly trained in the use
of this equipment.
•
A qualified electrician must make all
electrical connections when wiring the
components installed in the TSplus
system. Be sure to follow all local,
state and federal regulations when
installing electrical devices of any type.
The customer assumes responsibility
for the control system, and must provide an EMERGENCY-OFF SWITCH
or switches for all workstation operators to meet all applicable industry and
OSHA requirements. In general, emergency-off switches must be present
at easily accessible locations for all
operators of the installed TSplus
conveyor system.
WARNING!
Means t hat you or ot hers may
be seriously or fatally injured if
instructions are not followed.
CAUTION!
Means t hat you or ot hers may
be injured if instructions are not
followed.
Material Hazards:
Some components, such as gearboxes,
contain lubricants or other materials that can
represent a potential health hazard if handled, stored, or disposed of improperly.
Please contact Bosch for copies of the
Material Safety Data Sheets (MSDS) for the
lubricating oil used in gearboxes and other
potentially hazardous materials.
Review All Safety Information:
Please review the safety information
included on this page and throughout this
manual with all installers, operators, and
maintenance personnel of this equipment.
SAVE THESE INSTRUCTIONS
•
All power supplies must be LOCKED
OUT before beginning maintenance or
repair work of any type on the conveyor
system. Proper LOCK OUT procedures
include the identification of the locked
out power supply with a tag to prevent
the accidental restoration of power.
•
TSplus pneumatic components are
designed to operate in a range of 4–6
Bar (58–87 psi). It is the users responsibility to install a filtered, regulated
air supply to limit the pressure to that
recommended by the manufacturer.
Before beginning any maintenance or
repair, bleed off the pressure lines to
all components to prevent unexpected
or accidental movement of a system
component which could result in
personal injury.
•
TSplus drives, returns and conveyor
sections, lift-rotate units and components are designed to transport Bosch Rexroth WT2, WT2/A, WT2/A-H
workpiece pallets. Proper usage is
defined as the transport and positioning of parts and assemblies via the
workpiece pallet and fixture during the
assembly process. In no instances
should the pallet payload, the downward force applied to the pallet, or
the total load carrying capacity of the
entire system be exceeded. Exceeding published specifications will result
in premature wear or system failure
and may cause damage to the motor,
gearbox, roller chain, seals and other
components.
•
CAUTION! Do not operate or work
near mechanical equipment when
wearing loose clothing. Moving components such as roller chain, drive belts,
drive shafts and pallets can snag long
belts, scarves, ties and other loose
fitting garments, pull the worker into
the equipment and cause serious, or in
extreme cases, life threatening injury.
•
CAUTION! Operators having long hair
must wear appropriate head protection
(hair nets, hats, and hair caps) to minimize the risk associated with working
near moving machinery. Hanging hair
can get caught in moving components
such as roller chain, drive belts, drive
shafts and pallets, pull the worker into
the equipment and cause serious, or in
extreme cases, life threatening injury.
WARNING!
Employees must be instructed in safety requirements. Refer to Rexroth document 3842527147 (2008.02), “Instructing Employees on Safety” for an overview
of the dangers, instructions and references to regulations and standards for employees who operate, maintain, repair or who work on or near Rexroth conveyor
transport systems. A pdf of this multi-language document can be downloaded at:
BoschRexroth-US.com/BRLCatalogs by clicking on “Manuals and Product Updates”
4
Bosch Rexroth Corporation
TSplus Assembly Conveyors
8981 500 278 7/09
Introduction
Like all Rexroth flexible assembly systems,
TSplus is constructed solely from standardized modules that are precisely matched to
each other. One important benefit of this
modular design is that you can interlink
manual and automatic work stations freely,
making TSplus suitable for virtually any assembly task. Another is that you can easily
expand a TSplus installation: Use TSplus
alone as a closed system, or as a subinstallation in a higher-order materials-handling, manufacturing or assembly system.
About this manual
The manual is divided into the following
sections to make it easier to use:
• Application and Function
Gives general information about the
TSplus Lift-Rotate unit.
• Technical Data
Provides important technical specifications on the Lift-Rotate unit.
• Sequence of Operation
Provides information on the recommended sequence of operation for
both.
•
Installation
Supplies step-by-step instructions for
the installation of the lift-rotate unit into
a TSplus conveyor line.
• Electrical Connections
Provides detailed information on
required electrical connections for
clockwise and counterclockwise pallet
plate rotation.
• Adjustments
Reviews the required set-up adjustments that must be made to the LiftRotate unit prior to operation.
• Operating Instructions
Basic guide lines to follow for safe operation of the conveyor and lift rotate
unit.
• Maintenance
Provides information on proper preventive maintenance.
• Schematics
Detailed electrical schematics for the
Lift-Rotate Unit.
IMPORTANT: Please read the
entire manual carefully to familiarize
yourself with the equipment before
attempting any of the procedures
described.
8981 500 278 7/09 TSplus Assembly Conveyors
Bosch Rexroth Corporation
5
Application and Function
The lift-rotate module is designed to
change the horizontal orientation of the
workpiece pallet on the transfer line by
rotating the workpiece pallet 90º or 180°.
This module will function with pallet sizes
from (160 mm x 160 mm) to (480 mm x 480
mm). However, if the workpiece pallet is not
square, rotation must be limited to 180º by
the host controller.
Each lift-rotate module consists of two
components; the lift-rotate unit and the
control enclosure. The lift rotate unit performs the rotational positioning function. It
uses a parallel shaft indexer driven by a DC
gearmotor for variable speed control of rotation. The lift-unit mounts to the underside
T-slots of the conveyor section.
The control enclosure contains the motor
drive assembly and terminal strip for all wiring connections. It may be mounted to the
T-slots in the side of the belt section or leg
sets near the lift-rotate unit. The controller
contains the logic to complete one 90°
rotate cycle. An external signal must be
provided by a host controller to initiate the
rotate cycle; 180° rotation can be obtained
by cycling the module twice. The lift and
lower movements of the lift-rotate module
are also controlled by the host controller.
Speed control of the lift and lower operation is provided by flow controls and endcushion adjustments on the pneumatic
cylinder. Speed control of the rotate cycle
is provided by an adjustable potentiometer
located on the motor drive controller inside
the control enclosure.
Stop gates and proximity switches must
be supplied separately to provide for pallet
pre-stop, stop, and pallet present sensing. In addition a double-acting detented
pneumatic valve will be required to control
the lift/lower cylinder.
In operation, the lift plate on the lift-rotate
unit contacts the workpiece and positions
itself into the corners of the workpiece
pallet’s frame. Lift action is provided by a
pneumatic cylinder with the capability to lift
up to 30 kilograms or about 66 pounds.
The lift-rotate unit has a 90mm nonadjustable stoke which in operation lifts
the workpiece pallet 68mm above the
system’s
transport height. This nonadjustable stoke ensures that the rotating
workpiece pallet will clear any other modules or components which are attached to
the transfer line near the lift-rotate unit.
As with other modules, the lift-rotate unit
uses proximity switches which signal the
status of the device. One proximity switch
indicates when the module is in the lift
position while another indicates when it
is lowered. In addition, a third proximity
switch senses the position of a flag on
the shaft of the rotate unit. This switch
indicates each 90º increment of workpiece
pallet rotation.
The rotational movement is supplied by a
direct current gearmotor and cam indexer.
Rotation speed and the direction of rotation must be selected at the time of installation. The lift-rotate unit is not designed
for force absorption, or programmable bidirectional operation. However, a special
bi-directional unit is available as a modified
standard option.
NOTE: All proximity switches are included for lift-rotate operation. A separate proximity switch and stop gate are
required to detect “Pallet Present” This
stop gate and proximity switch typically
attach to the conveyor side rail.
6
Bosch Rexroth Corporation
TSplus Assembly Conveyors
8981 500 278 7/09
Technical Data
Maximum Weight Capacity:
30 kilograms (66 pounds). Note: Load must be centered.
Minimum Cycle Time:
4 seconds at the maximum pallet size and weight limits.
Lift Above Belt:
68 mm, (not adjustable).
Rotation Increments:
90 degrees (fixed). For 180 degree rotation, two (2) signals must be
sent from the host controller.
Rotation Direction:
Clockwise or counterclockwise rotation, direction set by user at installation.
Rotate Drive:
Controller
110 VAC/60Hz or 230 VAC/50 Hz, single phase, 2 amps.
Motor
90 VDC with planetary reducer.
Pneumatic Cylinder:
50 mm Bore x 90 mm Stroke
Compressed Air:
4 to 8 bars, (58 to 116 psi) of clean air.
Air Connections:
8 mm, (5/16") dia. push-lock type plastic tubing.
Host I/O Requirements:
(1) output for Rotate Start
(1) output for Pallet Lift
(1) output for Pallet Lower
(1) input for Lift Raised
(1) input for Lift Lowered
(1) input for Rotate Complete
Host Power Requirements:
110 VAC/60Hz or 230 VAC/50 Hz
24 VDC
The individual components of the lift-rotate unit are as follows (Fig. 1):
1. Pallet lift plate
7. Lift Unit Lowered proximity switch
2. Rotate unit position adjusting screws
8. DC planetary gearmotor
3. Lift Unit Raised proximity switch
9. Pneumatic lift cylinder
4. Line mounting plate
10. Rotation cycle cam
5. Parallel shaft indexer
11. Rotate Cycle limit switch
6. Lift unit guide shafts
12. Rotate Complete proximity switch
8981 500 278 7/09 TSplus Assembly Conveyors
Bosch Rexroth Corporation
3
1
2
14
4
6
5
10
12
11
13
8
7
Fig. 1
9
7
8
Bosch Rexroth Corporation
TSplus Assembly Conveyors
8981 500 278 7/09
Sequence of Operation
The recommended sequence of operation for a lift-rotate unit is described below.
For 90° rotation
1. Ensure the “Rotate Complete”
proximity switch is activated. This
indicates the lift-rotate unit is in the
“Home” position.
2. Ensure the “Lift Lowered” proximity
switch is activated. This indicates the
lift-rotate unit is lowered and ready
to load a pallet.
3. Release a pallet from the pre-stop
and wait for the “Pallet Present”
above lift unit proximity switch (customer supplied) to activate.
4. Lift the pallet by actuating the lift cylinder. The pneumatic solenoid valve
(Fig. 4) is customer supplied.
5. Wait for the “Lift Raised” proximity
switch to activate. This indicates the
pallet is raised.
6. Start the rotate cycle by sending a
0.3 second start signal from your
controller to enable relay CR1 (Rotate Start) in the lift-rotate unit control
enclosure.
7. Wait for the “Rotate Complete” proximity switch to activate, indicating the
unit has stopped rotation.
8. Lower the pallet by actuating the lift
cylinder.
9. Wait for the “Lift Lowered” proximity
switch to activate, indicating the unit
has returned to lowered position.
10. Cycle complete.
For 180° rotation
For 180° rotation, repeat steps 6 & 7 in the
above sequence. Note that the planetary
gearmotor will rotate 360° for each 90°
rotation of the pallet lift plate.
Installation
Mounting the equipment to the transport line
1 Mount the lift-rotate unit to the bottom
T-Slots of the TSplus conveyor section using the T-bolts supplied with
the mounting plate. (Fig. 2).
2 Mount the control enclosure to the
outside T-slot of the TSplus conveyor
section using the T-bolts supplied
with the enclosure. Position the enclosure within 1.5 meters (59”) of the
lift-rotate unit to allow interconnection
of the control cables.
Fig. 2
8981 500 278 7/09 TSplus Assembly Conveyors
Bosch Rexroth Corporation
Filling the gearbox with oil
(Fig. 3)
CAUTION! The indexer gearbox
is shipped dry to prevent oil leakage
during shipping. Remember to fill
the gearbox with oil before start-up.
Damage may occur to the gearbox if
operated without oil.
VENT PLUG
OIL
LEVEL
SIGHT
GLASS
1. Remove the vent plug from the oil fill
hole in the indexer. Fill the indexer with
Mobil Gear 63 oil or an equivalent to
the center of the sight glass (Fig. 3).
Reinstall and tighten the vent plug.
Fig. 3
Pneumatic connections (Fig. 4)
The pneumatic cylinder must be connected
to a clean air supply. A solenoid valve (not
included) is required for operation. All compressed air connectors are included with
the lift-rotate unit and are pushlock-type air
connectors. Cut the 8 mm (5/16”) plastic
tubing to the proper length and insert into
the appropriate air connector on the air
cylinder.
Pneumatic
Solenoid
Valve
(not included)
END
CUSHION
ADJUST
ø8 mm
1
2
2
LOWER
PORT
P
1 Adjust the lift rate using the flow
control fitting on the bottom of the
cylinder.
E
ø8 mm
END
CUSHION
ADJUST
1
2 Adjust the lower rate using the flow
control fitting on the top of the cylinder. End of stroke cushions may
be adjusted with the set screws as
shown in Fig. 4.
LIFT
PORT
Fig. 4
9
10
Bosch Rexroth Corporation
TSplus Assembly Conveyors
8981 500 278 7/09
Electrical Connections
CAUTION!
LOCK OUT ALL
POWER SUPPLIES before making
any connections in the control enclosure. All electrical connections must be
made by a qualified electrician!
Connecting the lift-rotate unit to the
control enclosure (Fig. 12)
Two (2) connections must be made from
the rotate unit to terminal strip in the rotate
control enclosure. Three (3) additional
connections must be made from the host
control system to the terminal strip in the
rotate control enclosure. All other proximity
sensors may be wired directly to the host
control system.
Connection 1: Limit switch
1. Common lead to terminal strip
1281
2. Normal closed lead to terminal
strip 1320
3. Lead 3 not used
4. Lead 4 not used
For clockwise lift plate rotation
1. Black lead to terminal strip A+
2. White lead to terminal strip A/F
3. Green-Yellow lead to Gnd in the
control enclosure case.
For counterclockwise lift plate rotation
1. White lead to terminal strip A+
2. Black lead to terminal strip A/F
3. Green-Yellow lead to Gnd in the
control enclosure case.
Connection 3:
Connect 3 leads of a 110 VAC/60Hz
or 230 VAC/50Hz, 2 A power supply
to operate the 90 VDC rotate motor
as follows:
1. 110 VAC/60 Hz or 230 VAC/50 Hz
to terminal strip 1030
2. Common to terminal strip 1031
3. GND to gnd in the control enclosure case
Connection 4:
Connection 2: 90 VDC Rotate Motor
The rotate motor electrical connection at A+ and A/F determines the
rotational direction of the gearmotor, e.g. clockwise rotation of the
motor will result in counterclockwise rotation of the pallet lift plate.
Follow the procedure below which
is appropriate for your application.
Connect 2 leads of a +24 VDC,
100 mA power supply for the motor
controller and limit switch.
1. +24 VDC to terminal strip 1280
2. DC common lead to terminal strip
1282
Connection 5:
Supply a dry contact that will “jumper”
terminal strip 1280 and 1281. Terminal
strip 1280 is the +24 VDC and 1281
is the start signal inside the rotate
controller.
Proceed to the adjustments on page 11.
8981 500 278 7/09 TSplus Assembly Conveyors
Bosch Rexroth Corporation
Adjustments
After the module installation is complete,
set-up adjustments must be made to the
lift-rotate unit. Temporarily remove the
safety guards and perform the following
mechanical, pneumatic and switch adjustments.
LIFT
PLATE
CAUTION! Several pinch point
hazards are present when the guards
are removed. Immediately replace all
guards after the adjustments have been
performed. All guards must be in place
during normal operation.
All adjustments are made after the lift-rotate
unit has been connected to the electrical
and air supplies. A start button is provided
in the control enclosure to aid in making
the adjustments. Refer to Fig. 12 for the
position of the start button.
Mechanical adjustments
(Fig. 5)
Loosen the cap screws, (Fig 5) and position the lift-rotate unit so that the lift plate is
centered and square with the inside of the
belt section. Check to be sure that the conveyor section profiles do not interfere with
the vertical movement of the lift plate.
CAP
SCREWS
Fig. 5
11
12
Bosch Rexroth Corporation
TSplus Assembly Conveyors
8981 500 278 7/09
Adjustments
Start push-button
Switch adjustments (Fig. 6)
Cycle the air cylinder to raise and lower the
lift plate. Check and adjust the lift speed
by turning the flow controls in the top and
bottom port of the cylinder (see page 9
Fig. 4). The bottom port controls the lift and
the top port controls the lowering of the
cylinder. Turn the screw clockwise to slow
down cylinder travel or counterclockwise to
speed it up. Adjust both the up and down
travel speed to best suit your application.
Adjust the three (3) proximity switches
mounted on the unit so that there is 0.5 mm
gap (Fig. 6) between the end of the switch
and switch exciter. Adjust the lift raised and
lift lowered switches by loosening the jam
nuts on the switch body. Adjust the rotate
complete switch by loosening the phillips
head screws on the switch clamp. Reposition the switch by sliding it in or out of the
clamp; then retighten the clamp screws.
mm
Pneumatic cylinder
adjustments
NOTE: The end cushions are preset
and usually require no adjustment.
Adjust the end cushions only if a softer
or harder stop is required at the end of
the cylinder stroke.
Using a hex key wrench adjust the end
cushions at the top and bottom of the lift
cylinder, (next to the flow controls). Turn
the valve clockwise to give the cylinder
a softer stop, or counterclockwise for a
harder stop.
0.5
End cushion adjustments
ROTATE
COMPLETE
PROXIMITY
SWITCH
CAUTION! Before using the
START feature, raise the lift plate by
supplying air to the lift port of the air
cylinder (see page 9, Fig. 4 ). Pressing the START push-button with the
lift-plate in the lowered position will
damage the rotate mechanism.
Raise the lift plate and push the start button
(Fig. 12) to manually rotate the unit. When
the button is pushed, the controller causes
the pallet plate to make one 90° rotation.
This will be one 360° rotation of the rotate
cycle cam. The start push-button can also
be used to drive the rotate unit to its home
position if the rotate unit is interrupted during the rotate part of its sequence. Rotate
speed should be as slow as possible to
provide maximum module life.
Fig. 6
Rotate speed control
Turn the rotate speed control P1 in the
electrical enclosure to its center of rotation. Push the start button to check
rotational speed. If required, the speed
can be changed by turning the control P1
clockwise to speed up rotation of the lift
plate or counterclockwise to slow it down.
Experiment with the speed control and
set it to fit your application. Do not set the
speed control so fast that the payload on
the pallet shifts as the pallet rotates. Rotate
speed should be as slow as possible to
provide maximum module life
8981 500 278 7/09 TSplus Assembly Conveyors
Bosch Rexroth Corporation
13
Adjustments
Rotate cycle cam adjustments
(Fig. 7 & 8)
Clockwise lift-plate rotation
(Fig. 7)
Counterclockwise lift-plate
rotation (Fig. 8)
The rotation cycle cam is used to adjust
the stopping position of the unit. When the
rotate home limit switch rolls back up onto
the cam, the unit will stop. Depending on
rotation speed and load, a varying amount
of “dwell” will be required for the unit to
come to a stop after the limit switch has
engaged the cam.
With the drive motor wired for clockwise
lift-plate rotation, the cam lobe will rotate
counterclockwise. With the Rotate Complete proximity switch in the on position,
loosen the set screw in the rotate cycle
cam and turn it until the Rotate Home
limit switch is just starting the dwell cycle
(Fig. 7). The unit will automatically initiate
another rotate cycle if the cam passes
beyond the dwell area of the Rotate Home
limit switch.
With the drive motor wired for counterclockwise lift-plate rotation, the cam lobe
will rotate clockwise. With the Rotate
Complete proximity switch in the on position, loosen the set screw in the rotate
cycle cam and turn it until the Rotate Home
limit switch is just starting the dwell cycle
(Fig. 8). The unit will automatically initiate
another rotate cycle if the cam passes
beyond the dwell area of the Rotate Home
limit switch.
The amount of dwell on the rotation cycle
cam is pre-set at the factory for a nominal
“home” position based on a clockwise
direction, full-speed rotation, and no load.
However, some final adjustment will be
required once the unit is installed. The
amount of adjustment will vary depending
on the load and speed of rotation. Also, the
direction of rotation will change the orientation of the cam (see Fig. 7 & 8).
Adjust the cam by loosening the set-screw
and rotating the cam on the shaft. The cam
is in position with the proper amount of
dwell once the unit’s rotation cycle ends
with the exciter for the “rotate complete”
proximity switch aligned with the proximity switch. See the following sections for
specifics on cam orientation for clockwise
and counterclockwise rotation.
ION
Fig. 7
T
TA
PROXIMITY
SWITCH
“ON” POSITION
L
EL
DW
ROTATION
CYCLE CAM
ROTATE
COMPLETE
PROXIMITY
SWITCH
“ON” POSITION
Fig. 8
ROTATION
START OF
DWELL
ROTATE
HOME
LIMIT
SWITCH
START OF
DWELL
DWELL
RO
ROTATE
COMPLETE
ROTATION
CYCLE CAM
N
IO
NOTE: Clockwise cam lobe rotation results
in counterclockwise lift-plate rotation.
ROTATION
ROTA
T
NOTE: Counterclockwise cam lobe rotation
results in clockwise lift plate rotation.
ROTATE HOME
LIMIT SWITCH
14
Bosch Rexroth Corporation
TSplus Assembly Conveyors
8981 500 278 7/09
Operating Instructions
The TSplus conveyor is designed to transport Bosch WT2 workpiece pallets or WT2
workpiece pallet frames with integrated
fixtures built into the pallet design. Since
the conveyor is modular in design and part
of a larger operating assembly system, it
is the responsibility of the integrator or
end user to provide a control system and
WARNING!
• Use a qualified technician who is familiar with the control
system during the initial start-up.
• In case of control system failure, DO NOT attempt to
catch or in any way prevent a pallet from falling from the
end of the conveyor. Use the emergency stop switch to
halt conveyor movement!
• KEEP HANDS CLEAR of moving conveyors and pallets.
Pallet accumulation creates a crush hazard between
pallets, stop gates, and guide rails. A crush and pinch
hazard exists between Lift-Position Units, Lift-Transfer
Units, and Lift-Rotate Units. Assembly operations should
be performed ONLY when the workpiece pallet has
come to a complete stop.
• DO NOT perform pressing operations on a workpiece
pallet without the use of a Lift-Position Unit.
• DO NOT operate the conveyor or any other components
in the system with the guards removed. It is the operator’s responsibility to make sure that all guards, covers,
and other safety equipment is in place before the system
is put into operation.
operating procedures. For your safety,
please observe the following guidelines
when operating the conveyor:
CAUTION!
• Do not operate or work near mechanical equipment when
wearing loose clothing. Moving components such as roller
chain, drive belts, drive shafts and pallets can snag long
belts, scarves, ties and other loose fitting garments, pull the
worker into the equipment and cause serious, or in extreme
cases, life threatening injury.
• Operators having long hair must wear appropriate head protection (hair nets, hats, and hair caps)
to minimize the risk associated with working near moving
machinery. Hanging hair can get caught in moving components such as roller chain, drive belts, drive shafts and pallets, pull the worker into the equipment and cause serious,
or in extreme cases, life threatening injury.
8981 500 278 7/09 TSplus Assembly Conveyors
Bosch Rexroth Corporation
Maintenance
1 Inspect the lift-rotate unit every 1000
hours of operation for loose fasteners,
oil leaks, or any other signs of wear
or damage.
VENT
PLUG
2 The gearmotor is sealed and lubricated for the life of the unit and needs
no other maintenance.
OIL
LEVEL
3 The indexer should be checked for
proper oil level in the sight glass. If
oil is needed, use Mobil Gear 63 oil
or an equivalent (Fig. 9).
SIGHT
GLASS
4 Wipe the indexer guide shafts with
mineral spirits to remove any dirt
buildup. Apply a very thin coating of
EP-0 grease to the guide shafts after
cleaning.
Fig. 9
15
16
Bosch Rexroth Corporation
TSplus Assembly Conveyors
8981 500 278 7/09
Schematics
+24 VDC Start Signal (Fig. 10, 11 and 12)
GND
1031
DART DRIVE
MODEL #IM-125D-0293
01-02
FU1
01-03
01-04
AC NEUTRAL
01-01
120 VAC 50/60HZ 2A Single Phase
1030
1286
1
1287
3
A/F
4
2.0A
A+
MOTOR
0.95A
1/12 HP
01-05
8981010998
90VDC
83RPM
47 in lb
30:1 RATIO
CONTINUOUS DUTY
01-06
FU2
A+
2 +
1 –
SSR1
1.0A
5
NOT CONNECTED
01-07
5
1291
01-08
RED
ORG
CR1 1290
9
9
1
8
CR2
1
CR2
WHT
01-09
CR1
AC
2
1031
POTENTIOMETER
SETTINGS
C.L. I.R. MAX MIN
+A
1288
R1
25 Ohm
50 WATT
A/F
AC
01-10
–A/ –F
+F
1289
9
1292
6
1293
7
1294
8
12
SPEED
P1 - 5k
(PRESET DO NOT ADJUST)
P3
INHIBIT
HI
W
LO
OPTIONAL
HOME LIMIT SWITCH
CUSTOMER INTERLOCK
3000
HOME POSITION COMMON
CR2
11
CR2
11
3001
7
3
3002
NOT HOME POSITION
HOME POSITION
LIFT AND ROTATE CONTROL +24 VDC START SIGNAL
Fig. 10
8981 500 278 7/09 TSplus Assembly Conveyors
Bosch Rexroth Corporation
Schematics
RELAY LOGIC SEQUENCE
02-01
1)
Start signal enables CR1 and rotation begins. LS1 is activated (open).
02-02
2)
After 10 degrees of rotation LS1 is de-activated (closed). CR2
and CR3 are enabled and CR1 is disabled, Rotation continues
02-03
3)
After 360 degrees of rotation LS1 is activated (open). CR2 and CR3
are disabled and rotation stops.
02-04
02-07
START
1280 JUMPER 3003
CR3
1281
12
PC-1
02-08
02-09
1282
DC COM
02-06
1280
+24VDC
02-05
PC
OUT
CR1
1280
8
PC-2
8
HOME
LIMIT SWITCH
12
1281
LS1-1
LS1-2
1320
14
12
CR1 1284 CR3
12
4
9
1285
1
LIFT AND ROTATE CONTROL +24 VDC START SIGNAL
Fig. 11
01-07, 01-08
02-09, 02-12
2.2 mfd 50V
3
1280
1282 BEGIN ROTATION
13
+ C1
02-11
02-12
CR1
14
NOTE: ROTATE START PULSE
ON TIME 250NS
SUPPLIED BY
CUSTOMER
CR3
02-10
1283
4
+
3
CR2
CR3
SSR1
1282
13
02-07, 02-1002-12
4
4
BEGIN
ROTATION
01-07, 01-08
02-19, 01-14
1282
01-04
17
18
Bosch Rexroth Corporation
TSplus Assembly Conveyors
8981 500 278 7/09
Schematics
ROTATE
SPEED
CONTROL
SUBPLATE LAYOUT
10.75"
276mm
Dart board mounted on
stand-offs
R1
P1
CR1
CR2 CR3
START
2.0"
51mm
2.0"
51mm
2.0"
51mm
2.0"
51mm
FU-1
A/F
3003
3002
3001
3000
2160
2160
2140
2140
2120
2104
2110
2110
2105
2105
1282
1280
1340
1340
1320
1320
SPARE
SPARE
1281
SPARE
1031
SPARE
1030
TERMINALS
FU-2
10.75mm
273 mm
START PUSHBUTTON
SSR1
SPARE
SPARE
A+
8.0"
203mm
2.0"
51mm
CORD GRIPS
(5 PLCS)
4.0"
101mm
ENCLOSURE MODIFICATIONS
TO 12 X 12 X 6
Fig. 12
LIFT AND ROTATE CONTROL +24 VDC START SIGNAL
8981 500 278 7/09 TSplus Assembly Conveyors
Application Notes
Bosch Rexroth Corporation
19
20 Bosch Rexroth Corporation
Bosch Rexroth Corporation
Linear Motion and
Assembly Technologies
816 E. Third Street
Buchanan, MI 49107
Telephone 269-695-0151
Facsimile 269-695-5353
www.boschrexroth-us.com
TSplus Assembly Conveyors
8981 500 278 7/09
8981 500 278 07/09
Printed in U.S.A