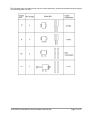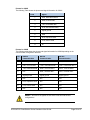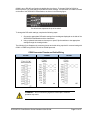
1
XPR2/XPC2 PowerStation Series
Hardware User Guide
Parker Hannifin
Electromechanical Automation - NA
5500 Business Park Drive
Rohnert Park, CA 94928
July 2011
Part #: 88-026522-01A
Autoryzowany dystrybutor Parker:
53- 012 Wrocław
ul. Wyścigowa 38
tel. 71 364 72 82
fax 71 364 72 83
w w w.arapneumatik.pl
TABLE OF CONTENTS
Copyright and Trademark Notice .................................................................................................................... 4
Product Warranty Information ......................................................................................................................... 4
Technical Assistance ...................................................................................................................................... 4
Introduction ....................................................................................................................................................... 5
Using this Manual .................................................................................................................................... 5
ISO Symbols ............................................................................................................................................. 5
Hardware Versions .................................................................................................................................. 6
Downloading Applications and Projects .............................................................................................. 6
Installation ......................................................................................................................................................... 7
Selecting a Location ........................................................................................................................................ 7
Underwriters Laboratories UL508 Approval ....................................................................................... 7
Environmental Guidelines ...................................................................................................................... 7
Electrical Grounding Guidelines ........................................................................................................... 7
Temperature and Humidity Guidelines ................................................................................................ 8
Enclosure Guidelines .............................................................................................................................. 9
Radiated Emissions Guidelines ............................................................................................................ 9
UL Hazardous Location Class I, Division 2 Guidelines ................................................................. 10
Preparing for Installation ............................................................................................................................... 11
Creating a Cutout .................................................................................................................................. 11
Installing the PowerStation............................................................................................................................ 12
Non-Display XPR200/XPC200 PowerStation Mounting Procedures ........................................... 12
6” XPR2/XPC2 PowerStation Mounting Procedures ...................................................................... 13
8” XPR2/XPC2 PowerStation Mounting Procedures ...................................................................... 14
10” XPR2/XPC2 PowerStation Mounting Procedures .................................................................... 15
15” XPR2/XPC2 PowerStation Mounting Procedures .................................................................... 16
Installing an Optional AC Power Supply ....................................................................................................... 18
Preparing a Location for the AC Power Supply ............................................................................... 18
Startup .............................................................................................................................................................. 19
PowerStation Connectors ............................................................................................................................. 19
Serial Ports ............................................................................................................................................. 19
Keyboard and Mouse ............................................................................................................................ 22
Ethernet Port .......................................................................................................................................... 22
CompactFlash ........................................................................................................................................ 22
Starting the PowerStation ............................................................................................................................. 23
Using FlashBack to Recover Xpress Images on XPR2 PowerStations ...................................... 24
Using FlashBack to Recover WinCE Images on XPC2 PowerStations ...................................... 25
Recovering Windows XP images on XPC2 PowerStations ........................................................... 26
Using the BIOS Utility .................................................................................................................................... 33
Using the BIOS Utility ........................................................................................................................... 33
Maintenance .................................................................................................................................................... 34
Maintaining the Touchscreen ........................................................................................................................ 34
Cleaning the Touchscreen ................................................................................................................... 34
Calibrating the Touchscreen ............................................................................................................... 34
Replacing the CompactFlash ........................................................................................................................ 36
XPR2/XPC2 PowerStation Series Hardware User Guide
Page 2 of 47
Internal Maintenance ..................................................................................................................................... 37
Electrostatic Discharge (ESD) Precautions ........................................................................................... 37
Removing the PowerStation from an Enclosure .............................................................................. 37
Closing the PowerStation .................................................................................................................... 39
Replacing the Fuse ............................................................................................................................... 39
Resolving Problems ...................................................................................................................................... 40
The PowerStation Documentation and Utilities CD ...................................................................................... 40
Appendix A: PowerStation Specifications ................................................................................................... 41
Physical Specifications .................................................................................................................................. 41
Display Specifications ................................................................................................................................... 42
Environmental Specifications ........................................................................................................................ 44
Electrical Specifications ................................................................................................................................ 45
EMC Testing Specifications .......................................................................................................................... 46
Touchscreen Chemical Resistance............................................................................................................... 47
XPR2/XPC2 PowerStation Series Hardware User Guide
Page 3 of 47
Copyright and Trademark Notice
Copyright © 2011 by Parker Hannifin. All rights reserved. No part of this publication may be reproduced,
transmitted, transcribed, or stored in a retrieval system, in any form or by any means, mechanical,
photocopying, recording or otherwise, without the prior written consent of Parker Hannifin Corporation.
While every precaution has been taken in the preparation of this manual, Parker Hannifin Corporation
and the author assume no responsibility for errors or omissions. Neither is any liability assumed for
damages resulting from the use of the information contained herein. All product and company names
are trademarks of their respective companies and licenses.
Product Warranty Information
Parker Hannifin provides top quality products through rigid testing and the highest quality control
standards. Should a problem occur with your hardware, Parker’s standard product warranty covers
these items for 24 months from the date of shipment from the factory. Exceptions appear below:
•
PowerStation CCFL backlight bulbs have a 90-day warranty.
•
For all displays, image retention (burn-in) is not covered by warranty.
•
Software revisions that occur within 60 days after purchase are available under warranty upon
request. Please review Parker’s Software License Agreement for additional software warranty
information.
Technical Assistance
The Product Technical Support department welcomes any questions that might arise as you develop or
run your applications. We offer complimentary support for all customers, including end users, original
equipment manufacturers (OEM), system integrators or distributors.
If you have a question about the PowerStation, be sure to complete the following steps:
•
Check any release notes that may have shipped with the unit. These notes provide important
information about the PowerStation.
•
Consult the documentation and other printed materials included with the PowerStation.
Or, for direct technical assistance contact Parker using the following information:
Parker Hannifin
EMN Division
5500 Business Park Drive
Rohnert Park, CA 94928
Telephone: (800) 358-9070 or (707) 584-7558
Fax: (707) 584-3793
Email: [email protected]
Internet: http://www.parkermotion.com
XPR2/XPC2 PowerStation Series Hardware User Guide
Page 4 of 47
INTRODUCTION
Thank you for purchasing an XPR2/XPC2 PowerStation. This family of products is a robust, embedded PC’s
that are designed to be used as a dedicated industrial operator interface.
The XPR2 PowerStation is available in five display configurations: no display, 6”, 8”, 10”, and 15”. It has an
all-in-one PC board with Serial, Ethernet, and USB ports that is specifically designed to support Parker’s
Interact Xpress HMI software. The XPC2 consists of the same hardware as the XPR2, but available with
Windows CE or XP Pro operating systems and without the Interact Xpress HMI software.
Mechanically, the XPR2/XPC2 PowerStation is designed to fit previous model XPR/XPC PowerStation
mounting cutouts and can be used as a direct, drop-in replacement while maintaining the same touchscreen
functionality and NEMA Type 4X or Type 12 sealing.
Using this Manual
This manual is designed to help you set up and use the XPR2/XPC2 PowerStation. The manual lists the
PowerStation’s specifications and describes its replacement and optional components. It also explains how to
install the unit, how to maintain the unit in good condition, and how to solve common problems that may occur in
operation.
This manual is divided into the following chapters:
Introduction: Presents an overview of this manual, the other documentation and software provided with the
XPR2/XPC2 PowerStation, and the steps necessary to get the PowerStation up and running. This chapter also
describes Parker’s customer support services.
Installation: Explains how to select an installation location, prepare for installation, and finally install the
XPR2/XPC2 PowerStation.
Startup: Describes the ports available to connect the unit to other devices and to a power source. Also
described are steps to startup the PowerStation and methods to recover the operating system and/or the
Xpress HMI to the CompactFlash memory card.
Maintenance: Explains how to maintain the XPR2/XPC2 PowerStation, including the touchscreen, replacing
the CompactFlash, and performing internal maintenance.
Appendix A — PowerStation Specifications: Describes the XPR2/XPC2 PowerStation’s specifications.
ISO Symbols
Symbol
Meaning
This symbol is the International Standards Organization (ISO) symbol for
Caution (ISO 3864 No. B.3.1). This symbol denotes information that could
affect operation of the PowerStation if the information is not properly
followed.
This symbol is the ISO symbol for Caution - risk of electrical shock (ISO
3864 No. B.3.6). This symbol denotes information that could cause
personal injury from electrical shock or damage to equipment if the
information is not properly followed.
XPR2/XPC2 PowerStation Series Hardware User Guide
Page 5 of 47
Hardware Versions
The XPR2 supports a Windows CE operating system and Interact Xpress HMI software.
The XPC2 is available with optional operating systems such as Windows CE, Windows XP Pro, Windows
Embedded Standard, etc. and no Parker HMI software included.
There are three display native resolutions offered with the XPR2/XPC2 PowerStation:
•
XPR2/XPC200X, no display, 1024x768 (XGA) analog output
•
XPR2/XPC206Q, TFT, 320x240 (QVGA)
•
XPR2/XPC206V, TFT, 640x480 (VGA)
•
XPR2/XPC208T, TFT, 640x480 (VGA)
•
XPR2/XPC210T, TFT, 640x480 (VGA)
•
XPR2/XPC215T, TFT, 1024x768 (XGA)
Each PowerStation is also shipped with a utilities CD containing this manual, drawings and CAD models of each
size unit, applicable drivers and backup copies of available software.
Downloading Applications and Projects
The XPR2 PowerStation with Interact Xpress HMI can be used as a runtime-only system, which means that
applications and projects can be created on a development PC and the Interact Xpress HMI application can be
downloaded to the PowerStation. In addition, applications using the Interact Xpress HMI software can created
or changed directly on the XPR2 unit itself or remotely from anywhere via an Internet browser.
Refer to the Interact Xpress HMI User Guide for information about how to develop projects, download them to
the XPR2 PowerStation and remote access via a network.
XPR2/XPC2 PowerStation Series Hardware User Guide
Page 6 of 47
INSTALLATION
Selecting a Location
The first step when installing the XPR2/XPC2 PowerStation is to select an appropriate location. This is the most
important aspect of the installation process because the location affects unit performance, ease of use and
life-expectancy. This section provides guidelines to follow when selecting a location.
Underwriters Laboratories UL508 Approval
In order to obtain Underwriters Laboratories (UL508) certification for the PowerStation installation, the
installation must meet the following criteria:
•
The PowerStation is suitable for mounting on the flat surface of a Type 4X Indoor Use Only or Type
12 enclosure.
•
Power to the device must be provided by a Class 2 power source. For convenience, Parker has an
AC input, model P1X-PWRAC Class 2, 24Vdc power supply available for purchase to provide
power to any of the XPR2/XPC2 PowerStation sizes.
Environmental Guidelines
In general, select a location that limits the PowerStation’s exposure to adverse conditions such as dust, oil,
moisture, condensation, and corrosive vapors.
The XPR2/XPC2 PowerStation’s touchscreen/faceplate assembly is designed to meet the NEMA Type 4X
Indoor Use Only or Type 12 rating. Mount the PowerStation in an enclosure that also supports this rating if it is
a requirement for the installation.
The touchscreen/faceplate is resistant to a variety of chemicals. Please refer to Appendix A, Touchscreen
Chemical Resistance for a complete list.
Electrical Grounding Guidelines
To minimize unwanted electrical interference, select a location away from machinery that produces intense
electrical noise (arc welders, for example). If you cannot avoid electrical noise, isolate input power to the unit
and separate all data communication cables from AC power lines.
Important — Use the PowerStation ground stud located on the rear of the
enclosure to connect the unit to a suitable ground reference, such as earth
ground or building steel. A short (less than 8”), heavy copper braid or <10awg
copper wire from the ground stud to chassis earth ground will provide a good
EMI path to ground. This ensures the unit is in compliance with immunity and
emissions requirements necessary for proper operation.
XPR2/XPC2 PowerStation Series Hardware User Guide
Page 7 of 47
Temperature and Humidity Guidelines
You can safely operate the XPR2/XPC2 PowerStation within the temperature range specified in Environmental
Specifications in Appendix A. However, when using a protective enclosure, remember that the temperature
within an enclosure is generally higher than the external temperature. Read the following guidelines to fully
understand temperature implications.
•
Limit the PowerStation’s exposure to adverse conditions, such as dust, oil, moisture, and corrosive
vapors in order to minimize maintenance and repair costs.
•
Choose an area for the PowerStation that is free from moisture or condensing humidity.
The XPR2/XPC2 PowerStation models will thermally dissipate no more than the following:
•
XPR2/XPC200, dissipates approximately 5.0 watts
•
XPR2/XPC206, dissipates approximately 5.8 watts
•
XPR2/XPC208, dissipates approximately 7.8 watts
•
XPR2/XPC210, dissipates approximately 8.0 watts
•
XPR2/XPC215, dissipates approximately 25.5 watts
Heat builds up rapidly in enclosed environments, compromising the performance and life span of electrical
equipment. If the PowerStation is operating inside an enclosure at temperature levels above its rated ambient
temperature, you must cool the enclosure.
XPR2/XPC2 PowerStation’s have been tested for use in 50oC ambient, still air locations. This means that when
installed, the ambient air surrounding the backside of the PowerStation is not expected to exceed 50oC. An
example of this type of installation would be a PowerStation mounted in a small, sealed industrial enclosure.
The most commonly overlooked aspect of this type of installation is that heat generated by the device becomes
trapped inside the enclosure and increases the ambient temperature surrounding the PowerStation. This
increase in temperature can sometimes exceed an additional 10oC or more.
Although the thermal dynamics are not always linear, a temperature rise of 105oF would imply that the
environment outside the sealed enclosure could not exceed 40oC (104oF), or the PowerStation would surpass
its maximum operating temperature.
Do not mount a PowerStation into a sealed enclosure and ignore the fact that with the 50oC rating of the
product, the sealed enclosure can operate in a 50oC ambient environment without considering the affects of the
internal heat buildup.
Since elevated operating temperatures can have an adverse affect on the life of electronics, it is wise to
consider the internal thermal rise. Passive venting for thermal convection, internal air circulation fans, filtered
exhaust fans with filtered inlets, air conditioners, and other products are available in the market to assist in
reducing the heat buildup in the industrial enclosure.
There are many attractive NEMA Type 12, dust-tight fan/filter assemblies available today which allow the filter
to be inexpensively replaced or cleaned as part of a periodic maintenance schedule. Or in some cases, simply
increasing the size of the enclosure, and thus the outside surface area for example can have a significant,
positive effect on the installation’s thermal response.
XPR2/XPC2 PowerStation Series Hardware User Guide
Page 8 of 47
Points to consider when performing a site review are:
1. What is the expected maximum outside ambient temperature that the industrial enclosure will
experience?
2. Are there additional heat-generating components inside the enclosure?
3. What is the size of the enclosure? Larger enclosures dissipate more thermal energy than smaller ones.
4. In what kind of environment will the enclosure be installed - clean, water-tight, or dust-tight? Can the
enclosure be convection cooled or is active cooling required?
In summary, it is a wise investment to thermally plan the installation by anticipating, and eliminating, the heat
build up inside a sealed enclosure. Not only will this extend the life of the electronics, but it will also reduce
costly equipment downtime.
Enclosure Guidelines
Select an enclosure that is large enough to allow free airflow in and around the XPR2/XPC2 PowerStation.
You should allow a minimum of 2 inches between the inside of the enclosure and the top, bottom, sides, and
back of the PowerStation. Make sure that the surface of the enclosure on which the PowerStation is mounted is
flat and free of raised or depressed areas.
Refer to the XPR2/XPC2 Utilities, Drivers & Documentation CD (Part Number KA-026518-xx) that came with
the PowerStation for dimensional drawings.
Important — The XPR2/XPC2 PowerStation’s touchscreen/faceplate
assembly is designed to meet the Type 4X Indoor Use Only or Type 12 rating.
If required, mount the PowerStation in an enclosure that supports this rating.
Radiated Emissions Guidelines
This PowerStation has been tested to comply with international electromagnetic susceptibility and emission
standards. To reduce the affects of EMI, ensure that there is a good earth connection to the PowerStation,
which can be accomplished by utilizing the grounding stud located on the rear chassis of the product. This
connection must be made with the shortest possible (<8” in length), heavy gage copper wire (<10awg) or
braided cable. Although EMI grounding cannot be easily measured directly in the field, low-resistance (<0.5
ohms) DC continuity should, at a minimum, be verified with an ohmmeter for proper safety grounding. In
addition, all communication cables should be shielded and grounded on only one end.
XPR2/XPC2 PowerStation Series Hardware User Guide
Page 9 of 47
UL Hazardous Location Class I, Division 2 Guidelines
If you purchased a UL Class I, Division 2 compliant XPR2/XPC2 PowerStation, you must comply with these
statements in order to maintain a safe operating environment:
•
This equipment is suitable for use in Class I, Division 2, Groups A, B, C and D or Non-Hazardous
Locations Only. Temperature rating T4A.
•
The input and output (I/O) wiring must be in accordance with Class I, Division 2 wiring methods and
in accordance with the authority having jurisdiction.
•
Make sure that the XPR2/XPC2 PowerStation’s “ON/OFF” switch is secured in the “ON” position
using the supplied bracket.
•
All field wiring terminals must be marked to indicate to use copper wire with 60°C or 60/75°C wire
insulation and the terminal tightening torque of 7.0 lb-in. (0.79 N-m).
Warning – Explosion Hazard
•
•
•
•
•
Substitution of components may impair suitability for Class I, Division 2.
Do not disconnect equipment unless power has been switched off or the
area is known to be non-hazardous.
Do not connect or disconnect cables unless the power has been switched
off, or the area is known to be non-hazardous.
Class I, Division 2 approval requires nonincendive field wiring for Class I,
Groups A, B, C, and D hazardous locations only.
Class I, Division 2 approval requires power switch restraints in hazardous
environments.
Setting Up the PowerStation for Use in a Hazardous Environment
PowerStations ordered with the Class 1, Division 2 Hazardous Location option ship with a bracket for
locking the power switch in the “On” position. This bracket must be installed in order to be compliant
with Class 1, Division 2 guidelines in a hazardous environment since it prevents unintentional or
accidental switching of power to the unit. Affix the bracket to power switch using the screw provided.
Power Switch bracket
clamps switch to the
“ON” power position.
XPR2/XPC2 PowerStation Series Hardware User Guide
Page 10 of 47
Preparing for Installation
Once a suitable mounting location has been selected, a mounting cutout must be created for all models except
the remote configuration, which uses four built-in flanges or a DIN rail mounting clamp for direct attachment to a
mounting surface.
If the XPR2/XPC2 PowerStation is intended to be connected to AC power, and a Parker optional AC Power
Supply P1X-PWRAC was purchased, a mounting location for the Power Supply must also be considered.
Procedures for preparing a location for installing and mounting the Parker P1X-PWRAC Power Supply are
included with the unit.
Note that the XPR2/XPC2 PowerStation will fit into the existing cutouts created for older XPR/XPC, PA and PA2
PowerStations and they can use the existing DC power source.
Creating a Cutout
Be sure to follow the cutout diagrams in the dimensional drawings precisely. This ensures that the PowerStation
is properly sealed in its enclosure. The dimensional and mounting cutout drawings can be found on the
XPR2/XPC2 Utilities, Drivers & Documentation CD (Part Number KA-026518-xx) shipped with the unit.
1) To ensure a proper mounting seal, maintain proper surface flatness and cutout edge quality.
The cutout dimensions for the XPR2/XPC2 PowerStation are shown in the following table:
XPR2/XPC2 Model
Cutout Height
Cutout Width
XPR2/XPC200
N/A
N/A
XPR2/XPC206
4.50”
6.20”
XPR2/XPC208
6.08”
8.67”
XPR2/XPC210
9.95”
12.60”
XPR2/XPC215
12.40”
15.90”
2) Debur the edges of the cutout area, removing dirt and debris that might come in contact with the
unit and compromise the water-tight seal.
XPR2/XPC2 PowerStation Series Hardware User Guide
Page 11 of 47
Installing the PowerStation
Once the location for the PowerStation has been prepared, you are ready to install the unit. To do so, you need
to mount the PowerStation to your enclosure using the supplied mounting clamps. The mounting clamps secure
to the PowerStation using a sliding mechanism where the “feet” of the clamp slide into slots in the
PowerStation’s chassis and screws provide pressure to compress the seal gasket around the perimeter of the
PowerStation.
There are three styles of clamps used to mount the PowerStation to the enclosure depending on the display
size; 6”, 8”, 10” or 15”. To mount the PowerStation properly, refer to the instructions below that correspond with
the proper display size.
Non-Display XPR200/XPC200 PowerStation Mounting Procedures
To install an XPR200/XPC200 non display PowerStation, there are two options: mounting to a panel via the four
mounting ears provided or via the DIN rail adapter provided in the accessory ship kit included with the unit. To
mount the unit using the four mounting ears, complete the instructions below:
1) Drill four 5/32” (0.156”) mounting holes according to the XPR2/XPC2 mounting drawing supplied on
the XPR2/XPC2 Utilities, Drivers & Documentation CD supplied with unit and shown here for
reference:
2) Mount the non display unit using the four mounting ears and four supplied #6-32 screws and #6-32
nuts.
XPR2/XPC2 PowerStation Series Hardware User Guide
Page 12 of 47
6” XPR2/XPC2 PowerStation Mounting Procedures
To install a 6” PowerStation, complete the instructions below:
1) Create a rectangular cutout in the user’s enclosure according to the 6” XPR2/XPC2 mounting
drawing located on the XPR2/XPC2 Utilities, Drivers & Documentation CD supplied with unit.
2) Slide the PowerStation into the cutout from the front side of the enclosure.
3) Assemble the 4 mounting clamps with their screws as shown:
4) Attach the 4 mounting clamps, with their screws, to the back of the unit in the slots provided. Place
2 clamps at the top and bottom:
Slide clamps into
slots – 4 locations
5) Insert the clamp into the wide end of the slot and slide it to the thin end.
6) Tighten each of the mounting screws against the front of the enclosure.
7) Torque the screws until the gasket is compressed by 50%.
Caution — Do not over-tighten the screw/clamp assembly or you may
damage the PowerStation. However, under-tightening may not guarantee a
Type 4X Indoor Use Only or Type 12 rating.
8) Tighten the screws in a crosswise sequence to ensure a good seal and prevent damage.
Note that properly tightening the clamps may not result in a gasket seal that is totally depressed by the
bezel and flush with the enclosure. Since a proper Type 4X Indoor Use Only or Type 12 rating requires
a 50% compression of the gasket, you may see a small gap between the bezel and the enclosure.
XPR2/XPC2 PowerStation Series Hardware User Guide
Page 13 of 47
8” XPR2/XPC2 PowerStation Mounting Procedures
To install an 8” PowerStation, complete the instructions below:
1) Create a rectangular cutout in the user’s enclosure according to the 8” XPR2/XPC2 mounting
drawing located on the XPR2/XPC2 Utilities, Drivers & Documentation CD supplied with unit.
2) Slide the PowerStation into the cutout from the front side of the enclosure.
3) Assemble the 4 mounting clamps with their screws as shown:
4) Attach the 4 mounting clamps, with their screws, to the back of the unit in the slots provided. Place
2 clamps at the top and bottom:
Slide clamps into
slots – 4 locations
5) Insert the clamp into the wide end of the slot and slide it to the thin end.
6) Tighten each of the mounting screws against the front of the enclosure.
7) Torque the screws until the gasket is compressed by 50%.
Caution — Do not over-tighten the screw/clamp assembly or you may
damage the PowerStation. However, under-tightening may not guarantee a
Type 4X Indoor Use Only or Type 12 rating.
8) Tighten the screws in a crosswise sequence to ensure a good seal and prevent damage.
Note that properly tightening the clamps may not result in a gasket seal that is totally depressed by the
bezel and flush with the enclosure. Since a proper Type 4X Indoor Use Only or Type 12 rating requires
a 50% compression of the gasket, you may see a small gap between the bezel and the enclosure.
XPR2/XPC2 PowerStation Series Hardware User Guide
Page 14 of 47
10” XPR2/XPC2 PowerStation Mounting Procedures
To install a 10” PowerStation, complete the instructions below:
1) Create a rectangular cutout in the user’s enclosure according to the 10” XPR2/XPC2 mounting
drawing supplied on the XPR2/XPC2 Utilities, Drivers & Documentation CD supplied with unit.
2) Slide the PowerStation into the cutout from the front side of the enclosure.
3) Assemble the 6 mounting clamps with their screws as shown:
4) Attach the 6 mounting clamps, with their screws, to the back of the unit in the slots provided. Place
2 clamps at the top and bottom, and 1 on each side:
Slide clamps into
slots – 6 locations
5) Insert the clamp into the wide end of the slot and slide it to the thin end.
6) Tighten each of the mounting screws against the front of the enclosure.
7) Torque the screws until the gasket is compressed by 50%.
Caution — Do not over-tighten the screw/clamp assembly or you may
damage the PowerStation. However, under-tightening may not guarantee a
Type 4X Indoor Use Only or Type 12 rating.
8) Tighten the screws in a crosswise sequence to ensure a good seal and prevent damage.
Note that properly tightening the clamps may not result in a gasket seal that is totally depressed by the
bezel and flush with the enclosure. Since a proper Type 4X Indoor Use Only or Type 12 rating requires
a 50% compression of the gasket, you may see a small gap between the bezel and the enclosure.
XPR2/XPC2 PowerStation Series Hardware User Guide
Page 15 of 47
15” XPR2/XPC2 PowerStation Mounting Procedures
To install a 15” PowerStation, complete the instructions below:
1) Create a rectangular cutout in the user’s enclosure according to the 15” XPR2/XPC2 mounting
drawing located on the XPR2/XPC2 Utilities, Drivers & Documentation CD supplied with unit.
2) Slide the PowerStation into the cutout from the front side of the enclosure.
3) Assemble the 8 mounting clamps with their screws and locking nuts as shown (do not tighten the
locking nut until Step 7:
Locking Nut Location
4) Insert the clamp into the wide end of the slot and slide it to the thin end as shown in the following
figure:
Slide clamps into
slots – 8 locations
5) Tighten each of the mounting screws against the front of the enclosure.
6) Torque the screws to 7 in/lbs in a crosswise sequence to ensure a good seal and prevent damage.
Caution — Do not over-tighten the screw/clamp assembly or you may
damage the PowerStation. However, under-tightening may not guarantee a
NEMA Type 4X Indoor Use Only or Type 12 rating.
7) Adjust the locking nut so that it is firmly against the surface of the clamp to prevent loosening.
Note that properly tightening the clamps may not result in a gasket seal that is totally depressed by the bezel
and flush with the enclosure. Since a proper NEMA 4/4x seal requires a 50% compression of the gasket, you
may see a small gap between the bezel and the enclosure.
XPR2/XPC2 PowerStation Series Hardware User Guide
Page 16 of 47
The following chart summarizes the various clamp quantities, styles and tightness torques require
for mounting each unit size.
XPR2/XPC2 PowerStation Series Hardware User Guide
Page 17 of 47
Installing an Optional AC Power Supply
All XPR2/XPC2 PowerStation models support 24 volt input DC power. The XPR2/XPC206 PowerStation
models can support either 12 or 24 Vdc input power. In either case, you can operate any XPR2/XPC2
PowerStation with AC power by using an optional PX1-PWRAC Power Supply available from Parker. Use this
section only if you intend to operate the XPR2/XPC2 PowerStation using AC power.
Caution — Do not apply AC line input power directly to the unit or damage
may occur.
Preparing a Location for the AC Power Supply
Be sure to select a location that provides protection from dust, oil, moisture, and corrosive vapors. If your
enclosure is large enough, you can mount the Power Supply in the enclosure with the unit.
If you purchased Parker’s optional AC Power Supply, P1X-PWRAC and mounting kit BKT-1000, follow the
mounting instructions that came with the mounting kit to prepare your location for the power supply. Optionally,
the BKT-1000 can be used to mount the P1X-PWRAC to the back of the XPR2/XPC2 10” and 15” models.
XPR2/XPC2 PowerStation Series Hardware User Guide
Page 18 of 47
STARTUP
This chapter discusses the following topics:
•
•
•
•
PowerStation Connectors
Starting the XPR2/XPC2 PowerStation
Using the CompactFlash Card
Using the BIOS Utility
The XPR2/XPC2 PowerStation is shipped with a Utilities, Drivers & Documentation CD (Part Number
KA-026518-xx). This CD contains all of the dimensional drawings, CAD models and available device drivers.
PowerStation Connectors
All XPR2/XPC2 PowerStations have the following connectors located on the rear of the enclosure:
•
•
•
•
•
•
•
•
1 RS-232 serial port
1 configurable RS-232, RS-422, RS-485 serial port
2 USB ports for the keyboard and mouse
1 Ethernet port
1 Audio Output connector
1 Compact Flash connector
Power switch
1 ground stud
Serial Ports
The XPR2/XPC2 PowerStation has two serial ports that you can use to communicate with external devices at
baud rates of up to 115K baud.
The COM1 port supports RS-232, while COM2 supports configurable RS-232, RS-422, and RS-485
communication standards.
The communication standard you select for COM2 depends upon the distance between the XPR2/XPC2
PowerStation and the controller, as well as the communication standards that the controller supports. Use a
standard DB9 connector for attaching to this port.
Note — When using RS-232 communications, the length of the serial cable
should not exceed 50 feet (15 meters).
RS-422 and RS-485 communications offer greater noise immunity than RS-232. These standards increase the
maximum cable length to 4,000 feet (1,200 meters).
RS-422 communications are full-duplex (send and receive simultaneously), while RS-485 communications are
half-duplex (send or receive).
For either configuration, be careful not to connect any wires to unused connector pins. Information on the
specific connection required for the Interact Xpress drivers you will use is located in the Help file associated with
the driver.
XPR2/XPC2 PowerStation Series Hardware User Guide
Page 19 of 47
Pinouts for COM1
The following Table shows the pinouts and signal information for COM1.
Pin#
Signal
1
DCD, data carrier detect
2
RXD, received data
3
TXD, transmitted data
4
DTR, data terminal ready
5
Signal ground
6
DSR
7
RTS, request to send
8
CTS, clear to send
9
RI
Pinouts for COM2
The following table shows the pinouts and signal information for COM2 depending on the
communication configuration selected:
Pin
#
RS-232
Communication
RS-422
Communication
RS-485
Communication
1
N/C
TXD-, transmitted data -
TXD-, transmitted data -
2
RXD, received data
TXD+, transmitted data +
TXD+, transmitted data +
3
TXD, transmitted data
RXD+, received data +
RXD+, received data +
4
N/C
RXD-, received data -
RXD-, received data -
5
Signal ground
Signal ground
Signal ground
6
N/C
N/C
N/C
7
RTS, request to send
N/C
N/C
8
CTS, clear to send
N/C
N/C
9
N/C
N/C
N/C
Note — RTS and CTS signals are not active in RS-422 and RS-425
configurations.
XPR2/XPC2 PowerStation Series Hardware User Guide
Page 20 of 47
COM2 is set to RS-485 configuration by default from the factory. To change COM2 to RS-232 or
RS-422 protocol, you must change the COM2 DIP switch settings. The DIP switch for COM2 is located
on the side of the XPR2/XPC2 PowerStation, as shown in the following figure:
The white boxes represent the tip of the switch.
To change the DIP switch settings, complete the following steps:
1. Choose the appropriate DIP switch settings from the diagram displayed on the side of the
XPR2/XPC2 PowerStation and the chart above.
2. Using a pointed instrument such as a pen or pencil, flip the switches to the appropriate
settings through the viewing window.
The following figure illustrates the connector pinouts and cable wiring required for communicating with
COM1 or COM2 using RS-232, RS-422 or RS-485 protocols.
COM Connector Pinouts and Cable Wiring
RS-232
RS-422
RS-485
Caution — Do not connect any signals to unused pins. Uncertain
operation may result.
XPR2/XPC2 PowerStation Series Hardware User Guide
Page 21 of 47
RS-485 Directional Control
Many third party communication drivers use the RTS signal to switch between transceiver receive and
transmit mode. Conversely, some drivers expect the line directional control to be automatic. The
XPR2/XPC2 PowerStation has an RS-485 transceiver circuit with an automatic direction control feature
that will automatically switch between receive and transmit modes. Normally the transceiver is waiting
to receive data, but it will switch to transmit mode as soon as it senses data on the TxD pin of the UART
and switch back to receive mode when data transmission is complete. This feature is optimized for
baud rates of 9600 and greater.
Transferring Files from a PC to the XPR2/XPC2 PowerStation
You can transfer files from a PC to the XPR2/XPC2 PowerStation in one of three ways—via an Ethernet
connection, from a CompactFlash card, or by Serial Transfer. For Serial Transfer, you will need a null
modem cable. To construct a null modem cable, refer to the following diagram:
Keyboard and Mouse
The XPR2/XPC2 PowerStation allows you to use a USB keyboard and USB mouse in addition to the
touchscreen.
Ethernet Port
The XPR2/XPC2 PowerStation has an Ethernet RJ45 port with an Intel 82551ER 10/100 Mbps base-T
controller that allows you to connect the PowerStation to a Local Area Network.
CompactFlash
The XPR2/XPC2 PowerStation comes with a CompactFlash (CF) card. This card is used as a removable drive
that is recognized as drive C: and provides non-volatile memory storage. CompactFlash cards are well-suited
for rugged environments where the PowerStation may vibrate or shake. Although the card is removable, it is
used as an IDE drive, which means you cannot remove it while the PowerStation is powered on.
Note that the XPR2/XPC2 PowerStation supports Type 1 or Type 2 CompactFlash cards.
We recommend that you purchase at least one additional card to serve as a backup for your primary
CompactFlash card. It is also useful to own several cards to store different projects. You can purchase
additional cards through Parker.
Caution — Do not remove or insert the CompactFlash card while power is
applied to the unit or data on the card could be corrupted.
XPR2/XPC2 PowerStation Series Hardware User Guide
Page 22 of 47
Starting the PowerStation
Once the XPR2/XPC2 PowerStation has been mounted, connect power to the unit. It is important that you have
previously reviewed the installation guidelines and Agency requirements described in this manual.
Caution — Do not apply AC power directly to the unit or damage may
occur.
1. Ensure the power ON/OFF switch is in the OFF position.
2. Connect the power input connector to a DC voltage source. Input voltage to the unit should be
within the range specified in the Electrical Specifications located in Appendix A of this manual.
3. Turn the XPR2/XPC2 PowerStation ON.
4. After several moments, the Xpress HMI demo application should start (what if an XPC2?).
XPR2 PowerStations containing Interact Xpress HMI software are now ready for the user to download a custom
Xpress application or project. Please refer to the Interact Xpress User Guide that shipped with the Xpress
Manager for information regarding:
•
•
•
•
•
The Xpress Manager
Using the Shell interface
The Design Environment
Using Tools and working with Graphics
Sending projects from the development environment to the runtime unit.
This Interact Xpress User Guide will provide information on using the Shell interface to transfer the user’s
custom application to the XPR2 unit. Note that the XPR2 is shipped from the factory with Interact Xpress HMI
software and a demo application already installed. Once the custom application or project has been developed
on a PC or laptop computer, there are two ways to download it to the XPR2 PowerStation; Ethernet or directly to
the CompactFlash card using a card reader.
XPC2 units will boot directly into the operating system depending on the model purchased. Users can install the
Windows applications of their choosing.
Autoryzowany dystrybutor Parker:
53- 012 Wrocław
ul. Wyścigowa 38
tel. 71 364 72 82
fax 71 364 72 83
w w w.arapneumatik.pl
XPR2/XPC2 PowerStation Series Hardware User Guide
Page 23 of 47
Using FlashBack to Recover Xpress Images on XPR2 PowerStations
On the XPR2/XPC2 Utilities, Drivers & Documentation CD (Part Number KA-026518-xx), a link is provided to
Flashback Utilities that will enable you to restore or replace the Microsoft CE operating system and Xpress HMI
software onto a CompactFlash card. Use the XPR2 FlashBack Utilities when:
1) A new version of the Xpress HMI software becomes available
2) The user wishes to create a bootable image on a new CompactFlash card as a backup
3) The factory supplied CompactFlash card becomes corrupted or unusable
Before you run the FlashBack Utility, the user must have the following items:
•
•
Either a personal computer with a native or an external CompactFlash reader/writer available or a
laptop containing a CompactFlash reader/writer, and an optical drive.
The XPR2/XPC2 Utilities, Drivers & Documentation CD (Part Number KA-026518-xx) supplied with
unit.
Complete the following steps:
1) Insert the XPR2 CompactFlash card into the CompactFlash
card reader/writer.
2) Insert the XPR2/XPC2 Utilities, Drivers & Documentation CD
into the PC optical drive. If the menu screen doesn’t appear
after a few moments, double-click “Autorun.exe” from the
optical drive root directory.
3) After the Main Menu screen loads, select the “Utilities” tab
from the menu.
4) Select the “XPR2 w/Xpress FlashBack Procedure” button.
5) Follow the instructions to download the latest XPR2
FlashBack Utility to your PC, and then unzip and Run the utility.
6) Using the drop-down arrow select the destination drive letter of the CompactFlash card.
7) Press the “Restore Flash” button.
8) When the restore process finishes, use the Interact Xpress Manager to transfer your custom Interact
Xpress project to the CompactFlash.
9) Once completed, the CompactFlash card can be removed and reinserted into the XPR2 PowerStation.
Note — Be careful to not select the XPC2 Flashback utility as an attempt to
recover an XPR2 image since an XPC2 does not contain Interact Xpress HMI
software.
XPR2/XPC2 PowerStation Series Hardware User Guide
Page 24 of 47
Using FlashBack to Recover WinCE Images on XPC2 PowerStations
On the XPR2/XPC2 Utilities, Drivers & Documentation CD (Part Number KA-026518-xx), you will find
Flashback Utilities that will enable you to restore or replace the Microsoft Windows CE operating system onto a
CompactFlash card. Use the XPC2 FlashBack Utilities when:
1) The user wishes to create a bootable image on a new CompactFlash card as a backup
2) The factory supplied CompactFlash card becomes corrupted or unusable
Before you run the XPRC2 FlashBack Utility, the user must have the following items:
•
•
Either a personal computer with a native or an external CompactFlash reader/writer available or a
laptop containing a CompactFlash reader/writer, and an optical drive.
The XPR2/XPC2 Utilities, Drivers & Documentation CD (Part Number KA-026518-xx) supplied with
unit.
Complete the following steps:
1) Insert the XPC2 CompactFlash card into the CompactFlash
card reader/writer.
2) Insert the Interact XPR2/XPC2 Utilities, Drivers &
Documentation CD into the PC optical drive. If the menu screen
doesn’t appear after a few moments, double-click
“Autorun.exe” from the optical drive root directory.
3) After the Main Menu screen loads, select the “Utilities” tab
from the menu.
4) Select the “XPC2 w/Win CE FlashBack Procedure”
button.
5) Follow the instructions to download the latest XPR2
FlashBack Utility to your PC, and then unzip and Run the utility.
6) Using the drop-down arrow select the destination drive letter of the CompactFlash card.
7) Press the “Restore Flash” button.
8) Once completed, the CompactFlash card can be removed and reinserted into the XPC2 PowerStation.
Note — Be careful to not select the XPR2 Flashback utility as an attempt to
recover an XPRC2 image since an XPC2 does not contain the hardware
security key information to allow the Interact Xpress HMI software to function.
XPR2/XPC2 PowerStation Series Hardware User Guide
Page 25 of 47
Recovering Windows XP images on XPC2 PowerStations
This section describes the steps required to recover a preconfigured Microsoft Windows XP operating system
created to specifically run on an XPC2 PowerStation, onto a CompactFlash card. Use this procedure when:
1) The user wishes to create a bootable Microsoft Windows XP image on a new CompactFlash card as a
backup
2) The factory supplied CompactFlash card becomes corrupted or unusable
The method of restoring the Windows operating system to a CompactFlash card involves using Acronis True
Image OEM to copy the recovery image from a Parker USB flash drive to the CompactFlash card. The process
begins with downloading the Acronis recovery image from the Parker website to a Parker USB flash drive and
then using Acronis software to restore the image to a target CompactFlash card located within the
PowerStation.
The downloaded recovery image is a large, single file in the form of 91-xxxxx-xx RevX.tib. The Parker USB flash
drive is configured with the licensed Acronis True Image OEM software preinstalled and can be used to accept
one or multiple downloaded 91-xxxxx-xx RevX.tib recovery images configured specifically for the target
hardware. Parker has adopted this technique to recover Microsoft Windows operating system images such as
Windows XP, Windows Embedded Standard, Windows 7 and future operating systems to PowerStation
embedded flash storage.
The following items are required to recover the Windows XP operating system:
• A PC or laptop with a USB port and an active internet connection to obtain the 91-xxxxx-xx RevX.tib
recovery image (show link here?).
• A Parker USB Flash drive factory preconfigured with Acronis recovery software (Parker Model Number
xxx-xxxxx)
• An XPC2 PowerStation with a valid Microsoft Windows XP License label affixed to the enclosure.
• A Parker 8GB CompactFlash card (Parker Model Number FLH-8192) supplied with the XPC2 unit.
• The XPR2/XPC2 Utilities, Drivers & Documentation CD (Part Number KA-026518-xx) supplied with the
PowerStation containing the required video drivers.
• A USB mouse and keyboard
Complete the following steps:
1) Insert the Parker USB Flash drive with the factory configured Acronis recovery software into a PC or
laptop computer.
2) Using the web link on the XPR2/XPC2 Utilities, Drivers & Documentation CD, download the
preconfigured Microsoft Windows XP operating system 91-xxxxx-xx RevX.tib file to the Parker USB Flash
drive. (Provide a link here?) The 91-xxxxx-xx RevX.tib file is a compressed image of the complete Microsoft
Windows XP operating system specifically configured to run on XPC2 PowerStations.
3) When the download is complete, remove the Parker USB drive from the PC or laptop. While the target
XPC2 is unpowered, insert the USB drive into one of the two USB ports.
4) Connect a USB mouse to the remaining USB port.
5) Insert a blank or corrupted CompactFlash card into the XPC2 PowerStation.
6) Apply power to the XPC2.
XPR2/XPC2 PowerStation Series Hardware User Guide
Page 26 of 47
7) Acronis True Image OEM recovery software will begin to load and requires approximately 3 minutes
to fully boot from the USB Flash drive. Initially, the message “Starting Acronis loader…” will be displayed
at the beginning of boot process. Be patient while Acronis installs and the screen flashes a couple times
while the software loads. Recovering the operating system image to the target Compact Flash card will
require the following steps:
a. Once the Acronis True Image OEM environment is loaded and running, the following “Home”
screen will be displayed. Click on the “Manage and Restore” selection as shown:
b. To load the 91-xxxxx-xx RevX.tib file recovery image, click the “Browse for backup..” button.
There may a slight delay before the browser window appears.
XPR2/XPC2 PowerStation Series Hardware User Guide
Page 27 of 47
c.
In the “Browse for Location” window, locate and select the 91-xxxxx-xx RevX.tib recovery image file
that was downloaded and copied to the Parker USB drive in Step 2 above. Note that this image file
will be located on the “Removable Drive”. After selecting the file, click the “OK” button.
d. Now, carefully select the 91-xxxxx-xx RevX.tib file image to be restored by clicking the box next to
the image file selected in the previous step. There may be multiple images if the USB drive has
been used previously.
e. Next, click the “Restore” button located on the menu bar:
XPR2/XPC2 PowerStation Series Hardware User Guide
Page 28 of 47
f.
Select the Restoration Method, “Restore whole disks and partitions” and then click the “Next”
button:
g. Now, select the items to be restored (be sure to select all items) and then click “Next”:
XPR2/XPC2 PowerStation Series Hardware User Guide
Page 29 of 47
h. Select the target drive to be restored to, and then click “Next”:
i.
If the target drive is not blank and has any prior data on it, then the following message will appear.
Click “OK”.
j.
On the “Options” screen, no Additional settings are required, click “Next”.
XPR2/XPC2 PowerStation Series Hardware User Guide
Page 30 of 47
k.
On the “Summary” screen, click “Proceed” to recover the selected image to the target drive.
Important! — After this point in the process, any data residing on the
target recovery drive will be overwritten.
l.
Progress bars will appear as the recovery image is copied to the target drive. This process will
require 5-6 minutes to complete depending on the size of recovery image to be restored.
m. Once the “Restore operation succeeded.” message appears, click “OK”.
n. Click the red “X” button in the extreme upper right corner of the screen to close Acronis. The
PowerStation will automatically reboot. Ignore any error or warning messages that may appear.
Note — During the reboot and at the moment of the reset beep, remove the
USB drive from the system to prevent the Acronis Recovery software from
executing again.
8) The removed Parker USB Flash drive can be used to restore additional XPC’s or retained for future
PowerStation CompactFlash card or hard drive recoveries. Attach a USB keyboard to the remaining USB
port.
9) After the reboot, Microsoft Windows XP will require several minutes to load for the first time. Follow the
Windows XP Setup Wizard localization and licensing steps. When prompted, carefully enter the 25
character Product Key from the Windows XP Pro for Embedded Systems License Certificate located on the
XPC2 backshell. When prompted, click “Finish” to complete the Setup Wizard. After a brief pause, the
system will reboot and then Windows XP will reload.
XPR2/XPC2 PowerStation Series Hardware User Guide
Page 31 of 47
10) Depending on the XPC2 display resolution, the system must next be updated with the proper video
driver. These drivers have been specially optimized to work with the variety XPC2 displays. Refer to the
following table to select the correct Video Driver Install File:
XPC2 Model
XPC200
XPC206
XPC208
XPC210
XPC215
Display Resolution
1024 x768
640 x 480
640 x 480
640 x 480
1024 x768
Video Driver Install File
Install Display Driver – Headless (00) .bat
Install Display Driver – VGA (6, 8, 10 inch) Driver.bat
Install Display Driver – VGA (6, 8, 10 inch) Driver.bat
Install Display Driver – VGA (6, 8, 10 inch) Driver.bat
Install Display Driver ‐ XGA (15 inch) Driver.bat
To install the video driver:
a. Using the Windows File Explorer, locate the C:\Parker\Drivers\Display Driver directory. Here,
you will find the three “Install Display Driver – xxxxxx.bat” installation programs. Based on
the chart above, double-click on the appropriate installation program based on the display
resolution of the target XPC2.
b. Allow the system a couple of minutes to install the driver. The display may flash a few times
during the installation process.
Once the proper video driver has been installed, the XPC is ready for use. The user can install third party
applications and custom configure the unit for specific use.
XPR2/XPC2 PowerStation Series Hardware User Guide
Page 32 of 47
Using the BIOS Utility
This section discusses how to use the BIOS utility on the PowerStation. There are three instances in which you
may need to use the BIOS utility program:
1. You wish to configure the serial port IRQ and base addresses.
2. You have an external device attached to the USB port such as an external USB drive, floppy drive,
CD drive or hard drive and you wish to configure the boot order.
3. You would like to change the operation of the splash screen during boot.
Using the BIOS Utility
Entering Setup
Before changing any of the BIOS settings, shut down the system and connect a keyboard to the
PowerStation.
1. Turn on the PowerStation.
2. Press the “F1” key while the system splash screen displays to enter the BIOS setup utility.
When the BIOS utility is displayed, press a corresponding letter key or use the arrow keys to navigate
through the menu. The following options are available:
•
Motherboard Device Configuration
Allows configuration of serial port IRQ and addresses.
•
Miscellaneous Configuration
Allows you to display a splash screen and/or a summary screen. The timeout field sets the time for
how long the screen is displayed. The time is in milliseconds and goes from 0 to 65535. Enter a
timeout interval and press the Enter/Return key.
•
Boot Order
Identifies the order in which devices are sequentially checked for a bootable image. The options
are: Floppy Disk, Hard Drive, CD-ROM Drive and USB Floppy Disk. Use the arrow keys to select
the order number and then press “Enter” to cycle through the options.
•
Load Defaults
Loads the default BIOS settings.
•
Save Values Without Exit
Saves the current BIOS settings without exiting the utility.
•
Exit Without Save
Exits the BIOS utility without saving any changes made.
•
Save Values and Exit
Exits the BIOS utility after saving any changes made.
XPR2/XPC2 PowerStation Series Hardware User Guide
Page 33 of 47
MAINTENANCE
The PowerStation has been designed to provide years of trouble-free operation even in the
harshest environments. However, occasionally you need to perform routine maintenance on some
of the PowerStation’s components.
Maintaining the Touchscreen
This section discusses the basic maintenance of your PowerStation’s touchscreen, including:
•
Cleaning the Touchscreen
•
Calibrating the Touchscreen
Cleaning the Touchscreen
Occasionally, you may need to clean the monitor’s screen. Clean the screen using warm, soapy water and a
cloth. You can also use any non-abrasive cleaner. Refer to Appendix A, Touchscreen Chemical Resistance,
for a list of substances the front surface of the PowerStation can resist with no visible effect.
Do not use any harsh material or powder, such as steel wool or abrasive cleansers, to clean the screen surface.
The surface is sensitive to scraping, sharp blows, or punctures. Therefore, keep screwdrivers or other sharp
objects away from the screen surface.
Caution — Do not clean the unit while it is powered on and Interact Xpress
is active. Turn off the unit before cleaning it in order to avoid inadvertently
activating the touchscreen.
Calibrating the Touchscreen
Calibrating the touchscreen ensures that finger touch inputs are aligned controls located on the display. The
monitor’s touchscreen is calibrated before leaving Parker however, you may need to recalibrate the
touchscreen in certain circumstances, such as:
•
Moving a CompactFlash card between XPR2/XPC2 PowerStations
•
After re-imaging the CompactFlash card
•
When you replace the touchscreen
•
Whenever the cursor does not follow the location where you touch the screen
XPR2/XPC2 PowerStation Series Hardware User Guide
Page 34 of 47
Calibrating the Touchscreen on an XPR2 PowerStation with Interact Xpress
The Interact Xpress software comes with a calibration utility located in the Shell. To calibrate the
touchscreen, complete the following steps:
1. From the Interact Xpress Shell main page, select the “Settings” button. The Settings page is
displayed.
2. From the Settings page, select the “Calibrate Touchscreen” button. A prompt is displayed
asking if you are sure you want to calibrate the touchscreen.
3. Click “OK” from the upper, right-hand corner of the dialog box to initiate the calibration routine.
Follow the directions on the screen, using your finger to touch on the screen as directed.
Calibrating the Touchscreen on an XPC2 PowerStation without Interact Xpress
To calibrate the touchscreen on a Windows CE PowerStation without Interact Xpress, complete the
following steps:
1. Select “Start”Æ “Programs”Æ “TSHARC Calibration”.
2. Select “Calibrate”.
3. Click the center of where the arrows are pointing. The Calibration screen appears.
4. Touch the target where it appears on the screen, hold your finger there momentarily, and then
release. The screen guides you through the Touch - Hold - Release process.
5. Repeat the process three more times in the other three corners of the screen. A test screen
appears.
6. Move your finger across the monitor. The target should move with your finger. If so, the
calibration was successful.
7. Select “Accept”.
Calibrating the Touchscreen on an XPC2 PowerStation with Windows XP
To calibrate the Hampshire touchscreen driver on a Windows XP Pro or Windows Embedded Standard
2009 operating system, complete the following steps:
1. Select “Start” Æ “All Programs” Æ “Hampshire TSHARC Control Panel”. You may also
select the “Calibrate Touchscreen” on the desktop. The Hampshire TSHARC Control Panel
appears.
2. Follow the on screen instructions for selecting which monitor to calibrate.
3. Select the Calibration tab.
4. Click the center of the area where the arrows are pointing. The Calibration screen appears.
5. Touch the target where it appears on the screen and hold your finger there until prompted to
release. The screen guides you through the Touch - Hold - Release process.
6. Repeat the process three more times in the other three corners of the screen. A Test screen
appears.
7. Move your finger across the monitor. The target should move with your finger. If so, the
calibration was successful.
8. Select “Accept”.
9. On the control panel, click the “Apply” button and then select “OK”.
XPR2/XPC2 PowerStation Series Hardware User Guide
Page 35 of 47
Replacing the CompactFlash
At some point, you will probably need to remove the CompactFlash card from the XPR2/XPC2 PowerStation
flash socket for one reason or another. To do so, complete the following steps:
1. Turn off the XPR2/XPC2 PowerStation.
Caution — The PowerStation must be turned off when inserting or
removing the CompactFlash card to avoid corrupting data.
2. Locate the ejector next to the CompactFlash socket as shown in the following figure:
3. Push the ejector button two times, once to extend the button, then again to pop out the
CompactFlash card.
4. Remove the CompactFlash card.
5. Carefully insert the new card, align the arrow on the card with the arrow on the XPR2/XPC2
label.
6. Push the CompactFlash card into the slot until the card is securely seated in the socket. Do not
force!
Caution — The CompactFlash card has an arrow near one edge that
aligns with a matching arrow on the label of the XPR2/XPC2 PowerStation.
Insert the CompactFlash card so that the arrows line up and the card seats
properly. Do not force the CompactFlash card while inserting it into the unit.
XPR2/XPC2 PowerStation Series Hardware User Guide
Page 36 of 47
Internal Maintenance
Before doing any internal maintenance, be sure to read and understand the procedures in this section to
prevent injury to yourself and/or damage to the PowerStation.
Electrostatic Discharge (ESD) Precautions
The PowerStation contains internal components that are sensitive to damaging electrostatic discharges (ESD).
Before you open the system, be sure to follow these simple precautions to protect the PowerStation from ESD
damage.
•
Always turn off power to the PowerStation before opening. Do not touch any internal components while
the system is on.
•
Disconnect power before performing any internal maintenance or troubleshooting.
•
Only handle PowerStation internal components in an ESD-safe location, using appropriate grounding
methods.
•
Wear a grounding wrist strap for continuous protection.
•
Be particularly careful not to touch the components on the printed circuit boards.
•
Keep any PowerStation component in its anti-static packaging when it is not installed in the unit.
Warning — Dangerous voltages exist inside the XPR/XPC enclosure. Do
not attempt to service the unit when power is applied.
Removing the PowerStation from an Enclosure
To remove the PowerStation from its enclosure, follow the steps below.
Warning – Explosion Hazard! — In UL Hazardous Location
environments and installations, DO NOT connect or disconnect cables unless
the power has been switched off and the area is known to be safe.
1. Turn off the power to the unit.
2. Disconnect the following cables:
•
•
•
•
Input Power cable
Ground cable
any communication cables
any keyboard and mouse cables
3. Take off the clamps.
4. Place the PowerStation face down on a static dissipative mat, in a location free from dirt and
moisture and protected against static discharge.
XPR2/XPC2 PowerStation Series Hardware User Guide
Page 37 of 47
Once the PowerStation has been removed from its enclosure, it can be opened. Follow the steps below.
1. Remove the CompactFlash card from its slot by pressing the eject button on the side of the
PowerStation once to extend the button, and then again to eject the card.
2. Press in the eject button to return it to its retracted position.
3. Remove the backshell screws on the XPR2/XPC2 PowerStation, similar to the figure shown below.
4. Carefully lift the backshell straight off to expose the unit internals.
You are now ready to perform any internal maintenance necessary.
Important:
When you lift the backshell off of the unit, one or both of the
USB ground springs may slide off of the internal backshell tabs. Simply
replace one or both by clipping them back onto the tabs, refer to the following
figure.
XPR2/XPC2 PowerStation Series Hardware User Guide
Page 38 of 47
Closing the PowerStation
1. Ensure that the CompactFlash card is not inserted in the motherboard and carefully replace the
backshell on the PowerStation.
2. Remount the PowerStation in the enclosure; refer to Installing the PowerStation.
3. Reconnect the following cables:
•
•
•
•
Power Input cable
Ground cable
any communication cables
any keyboard and mouse cables
4. Turn on the PowerStation
Replacing the Fuse
The XPR2/XPC2 PowerStation has a protective fuse that you can replace by opening up the back cover. An
ohm meter is required to see whether the fuse is still operational. The required replacement fuse is listed below.
•
Use a Littelfuse Nano SMF Slow Blow Type fuse. The part number is R452 002.
Caution— Using a fuse of a different rating can cause damage to the unit
or fire to occur.
To replace the fuse, complete the following steps:
1. Remove the PowerStation from its enclosure discussed in Removing the PowerStation from the
Enclosure.
2. Remove the back enclosure.
3. Locate the fuse on the board according to the picture below.
4. Using an ohmmeter, check continuity to see if the fuse is blown.
5. If necessary, insert a new fuse into the fuse holder and reassemble the unit.
XPR2/XPC2 PowerStation Series Hardware User Guide
Page 39 of 47
Resolving Problems
This section provides some basic troubleshooting steps to help you identify and correct problems you may have
with the XPR2/XPC2 PowerStation. Each problem is described and followed with one or more possible
solutions. Begin with the first solution and continue until you have solved the problem or tried all of the solutions.
If the problem persists, look through the other problems listed in this section to determine if additional symptoms
exist that might require action. If you cannot solve the problem, or if you encounter a problem that is not
documented in this section, contact your Parker equipment supplier or the Parker Product Technical Assistance
contacts listed on page 4.
The PowerStation Documentation and Utilities CD
The XPR2/XPC2 PowerStation is shipped with the XPR2 XPR2/XPC2 Utilities, Drivers & Documentation CD
(Part Number KA-026518-xx). This CD contains dimensional drawings, CAD models, user documentation and
operating system drivers.
XPR2/XPC2 PowerStation Series Hardware User Guide
Page 40 of 47
APPENDIX A: POWERSTATION SPECIFICATIONS
This appendix outlines important specifications for the XPR2/XPC2 PowerStation. It is a good idea to familiarize
yourself with the specifications before operating your unit.
Physical Specifications
Physical specifications include the XPR2/XPC2 PowerStation’s CPU, memory specifications, display types,
storage capacity, and other physical characteristics. These specifications are shown in the following table:
Physical Specifications
Category
Specification
CPU
• AMD LX800 CPU, 500MHz
• 256KB L1 & L2 Cache
Memory
• Up to 1 GB DDR SDRAM Maximum
• 400 MHz, PC 3200
• 200-pin SODIMM Socket
BIOS
• Insyde XpressROM
Storage
• 256MB - 8G CompactFlash card
• Supports Type 1 and 2 CompactFlash cards
I/O Ports
• Two 9-pin serial ports (16550 compatible)
•
1 RS232
• 1 RS232/422/485 (configurable)
• One RJ45 Ethernet connector;
Intel 82551ER 10/100 Base-T
controller
• Two USB 2.0 ports
Dimensions
HxWxD
XPR200:
XPR206:
XPR208:
XPR210:
XPR215:
5.3”H x 6.1”W x 2.5”D
6.0”H x 7.4”W x 3.0”D
7.6”H x 10.2”W x 2.2”D
11.0”H x 13.8”W x 3.2”D
13.3”H x 16.8”W x 4.6”D
Weight
XPR200:
XPR206:
XPR208:
XPR210:
XPR215:
1.9 lbs / 0.85 kgs
2.6 lbs / 1.16 kgs
4.1 lbs / 1.86 kgs
8.4 lbs / 3.81kgs
13.8 lbs / 6.26 kgs
Keyboard
• USB keyboard only
Mouse
• USB mouse only
Touchscreen
• Analog Resistive
Audible
• Piezoelectric Beeper
• AC97 stereo output, 0.125” mini plug
XPR2/XPC2 PowerStation Series Hardware User Guide
Page 41 of 47
Display Specifications
Display specifications include the type of display, size, resolution, and other display properties. These
specifications are shown in the following tables.
XPR2/XPC206Q/V 6” Display Specifications
Property
XPR206Q
Description
XPR206V/XPC206V
Description
Type
Active Color TFT
Active Color TFT
Display Size (Diagonal)
5.7"
5.7"
Resolution
QVGA (320 x 240)
VGA (640 x 480)
Brightness
470 NITS
350 NITS
Bulb Life (CCFL)
75,000 hours
75,000 hours
Viewing Angle:
Left/Right
Up/Down
70o/70o
70o/50o
80o/80o
80o/70o
XPR2/XPC208T 8” Display Specifications
Property
XPR2/XPC208T Description
Type
Active Color TFT
Display Size (Diagonal)
7.5”
Resolution
VGA (640 x 480)
Brightness
400 NITS
Bulb Life (CCFL & LED)
50,000 hours
Viewing Angle:
Left/Right
Up/Down
CCFL Backlights
70o/70o
60o/65o
LED Backlights
80o/80o
80o/80o
Note— XPR2/XPC208 models shipped prior to January 1, 2012 likely
contain CCFL backlights. Models after that date will have LED backlights.
XPR2/XPC2 PowerStation Series Hardware User Guide
Page 42 of 47
XPR2/XPC210T 10” Display Specifications
Property
XPR2/XPC210T Description
Type
Active Color TFT
Display Size (Diagonal)
10.4"
Resolution
VGA (640 x 480)
Brightness
200 NITS
Bulb Life
50,000 hours
Viewing Angle:
Left/Right
Up/Down
70o/70o
50o/60o
XPR2/XPC215T 15” Display Specifications
Property
XPR2/XPC215T Description
Type
Active Color TFT
Display Size (Diagonal)
15.0"
Resolution
XGA (1024 x 768) scaled to VGA (640 x 480)
Brightness
250 NITS
Bulb Life
40,000 hours
Viewing Angle:
Left/Right
Up/Down
80o/80o
80o/60o
XPR2/XPC2 PowerStation Series Hardware User Guide
Page 43 of 47
Environmental Specifications
Even though the XPR2/XPC2 PowerStation is built to withstand harsh environments, limit the PowerStation’s
exposure to adverse conditions such as dust, oil, moisture, and corrosive vapors to minimize maintenance and
repair costs.
Remember that the temperature within a protective enclosure is generally higher than the external temperature.
Thus, if the XPR2/XPC2 PowerStation is operating inside an enclosure at temperature levels above its rated
ambient temperature, you must cool the enclosure. The PowerStation conforms to the environmental
specifications listed in the following table:
Environmental Specifications Table
Category
Specifications
Operating Temperature
32 to 122oF (0 to 50oC)
Ambient (air temperature outside of backshell)
Storage Temperature
-22 to 176oF (-30 to 80oC)
Relative Humidity
0% to 95% non-condensing
Shock Rating
10g peak; 11ms (operating)
30g peak; 11ms (non-operating)
Operating Vibration
5-500Hz: 0.5 grms random
Environmental Design
Tested for UL NEMA Type 4X Indoor Use Only or
NEMA Type 12 Environment
Note— This family of PowerStations is rated NEMA Type 4X Indoor Use
Only or Type 12 only if it is installed in a NEMA 4X or Type 12 rated enclosure.
XPR2/XPC2 PowerStation Series Hardware User Guide
Page 44 of 47
Electrical Specifications
The XPR2/XPC2 PowerStation’s power supply automatically detects the input voltage level and adjusts
accordingly within its range of operation. However, always use reliable sources of power, and isolate all
communication cables from AC power lines to enhance noise immunity.
If possible, locate the XPR2/XPC2 PowerStation away from machinery that produces intense electrical noise
(arc welders, etc.). Otherwise, isolate the input power to the PowerStation from the equipment generating
electrical noise. Refer to the Electrical Grounding Guidelines section for further information.
The XPR2/XPC2 PowerStation’s electrical specifications appear in the following table:
Electrical Specifications Table
Category
Specifications
Input voltage
XPR200/XPC200:
XPR206/XPC206:
12/24 Vdc @ 18W
(Range: min 11 VDC, 28 VDC max)
XPR208/XPC208:
XPR210/XPC210:
XPR215/XPC215:
24 Vdc @ 22W
(Range: min 18 VDC, 28 VDC max)
Fuse
Littelfuse Nano SMF Slow Blow Type fuse, part
number R454 002.
Heat Dissipation
XPR200/XPC200:
XPR206/XPC206:
XPR208/XPC208:
XPR210/XPC210:
XPR215/XPC215:
5.0 watts maximum
5.8 watts maximum
7.8 watts maximum
8.0 watts maximum
15 watts maximum
Caution — Do not apply AC power, such as 115Vac line voltage, directly
to the unit or damage will occur.
XPR2/XPC2 PowerStation Series Hardware User Guide
Page 45 of 47
EMC Testing Specifications
The XPR2/XPC2 PowerStation conforms to the testing specifications listed in the following table. The
equipment conforms to the protection requirements of Council Directive 2004/108/EC on the approximation of
the laws of the Member States relating to Electromagnetic Compatibility when installed, operated and
maintained as intended. It also conforms to the requirements of Council Directive 2006/95/EC (Low Voltage
Directive) when installed, operated and maintained as intended. An EC Declaration of Conformity is available
and can be provided by Parker when requested.
European Community Specifications
Test
Specification
Harmonic Current Limits
EN61000-3-2
(2006)
Fluctuations and Flicker
EN61000-3-3
(1995 including A1:2001 + A2:2005)
Electrostatic Discharge
EN61000-4-2
(1995 including A1:1998 + A2:2001)
Radiated Electromagnetic Field Immunity
EN61000-4-3
(1995 including A1:2002)
Fast Transient/Burst Susceptibility
EN61000-4-4
(2004)
Fast Surge Immunity
EN61000-4-5
(1995 including A1:2001)
Radio Frequency Common Mode Immunity
EN61000-4-6
(1996 including A1:2001)
Power Frequency Magnetic Field Immunity
EN61000-4-8
(1993 including A1:2001)
Voltage Dips and Interrupts Immunity
EN61000-4-11
(1994 including A1:2000)
Radiated & Conducted Emissions
Group 1, Class A
(EN55011:2007 including A2:2007)
EN61000-6-4
Information Technology Equipment –
Safety – Part 1
(2001 First Edition)
EN60950-1
Mechanical Testing Specifications
Test
Specification
Operating vibration
0.5 grms/MIL-STD-810F 514.3
Mechanical shock
IEC-68-2-27/MIL-STD-810 516.3
Non-operational vibration
1.0 grms/MIL-STD-810F 514.3
XPR2/XPC2 PowerStation Series Hardware User Guide
Page 46 of 47
Touchscreen Chemical Resistance
The touchscreen of the XPR2/XPC2 PowerStation is resistant to the chemicals listed the following table.
Touchscreen Chemical Resistance
Acetone
Sulfuric Acid 10%
Motor oil
MEK
Hydrochloric Acid 10%
Gasoline
Toluene
Acetic Acid 10%
Machine oil
Methylene Chloride
Phosphoric Acid
Salad oil
Isopropyl Alcohol
Sodium Hydroxide 10%
Silicone
Xylene
Carbon Tetrachloride
Silicone grease G31
Hexane
Potassium Hydroxide
Kerosene
Butyl Cellosolve
Ammonia Water 10%
Gas oil
Cyclohexanone
Sodium Chloride 26%
Silicone oil
Trichloroethylene
Zinc Chloride 81%
Engine oil
Ethanol
Cottonseed Oil
Cleanser
Methanol
Glycerin
Nitric Acid 10%
Grease
Note — Sustained exposure to automotive brake fluid or Gunk® brand
degreaser can cause damage to monitor materials.
In addition, all XPR2/XPC2 PowerStation front panel surfaces are resistive to the following chemicals:
Faceplate Chemical Resistance
Commercial glass cleaners
Silicone based lubricant
Motor oil
Alcohol (ethyl, methyl)
Ammonia (10% dilute solution)
Automatic transmission fluid
Diesel fuel
Hydraulic fluid
Gasoline (leaded, unleaded)
Autoryzowany dystrybutor Parker:
53- 012 Wrocław
ul. Wyścigowa 38
tel. 71 364 72 82
fax 71 364 72 83
w w w.arapneumatik.pl