1
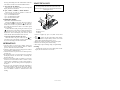
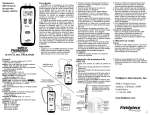
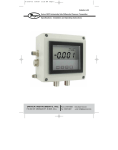
OPERATING INSTRUCTIONS
DUAL INPUT DIFFERENTIAL
MANOMETER
886
886U USB & DC Power
886WE Wireless
886UWE USB & DC Power & Wireless
886W Wireless
886UW USB & DC Power & Wireless
INTRODUCTION
The meter is a portable standalone dual port manometer.
The meter is capable of taking gas pressure as well as
static pressure. The meter comes in a rugged rubber boot.
The meter also has a zero adjust and a hold button to hold
the currently displayed reading. The auto-power-off function conserves battery life, but can be disabled if desired.
The meter will allow you to take gas pressure up to
±60” of Wc. The meter will take differential pressure
readings and display the difference between P1 and P2 at
all times in the lower right corner of the LCD. The meter
also has four different measurement scales including
inches of water column, millimeters of water column,
mbar and psi. Static pressure is possible with the resolution
to 0.01” of Wc. Special purpose static pressure instruments
are on the market with better accuracy and temperature
compensation but they typically cost many times more
than the meter.
WARNING
Before every use, check to be sure the meter and its
tubing are free from breaks or blockage. While using
the meter, if you suspect gas is leaking, or if you can
smell gas, close off the gas supply and ventilate the
occupied space. Identify and repair the source of the
leak before continuing with the test.
In the interest of safety, this instrument should only
be used by trained, competent professionals who know
the hazard and consider the risk of working on and
with industrial equipment.
The meter does not measure water pressure; under
these conditions they will fail. Do not exceed 5 psi
input pressure.
WARNING
Avoids gauging to the ignitability and the caustic gas,
otherwise the gas sensor can damage.
FEDERAL COMMUNICATIONS
COMMISSION
This device complies with Part 15 of the FCC Rules.
Operation is subject to the following two conditions:(1) this device may not cause harmful interference, and (2) this device must accept any interference
received, including interference that may cause undesired operation.
NOTE
(886W/886UW/886WE/886UWE)
This equipment has been tested and found to comply
with the limits for a Class B digital device, pursuant
to Part 15 of the FCC Rules. These limits are designed
to provide reasonable protection. This equipment
generates, uses and can radiated radio frequency energy and, if not installed and used in accordance with
the instructions, may cause harmful interference to
radio communications. However, there is no guarantee that interference will not occur in a particular installation If this equipment does cause harmful inter-
ference to radio or television reception, which can be
determined by turning the equipment off and on, the
user is encouraged to try to correct the interference by
one or more of the following measures:
- Reorient or relocate the receiving antenna.
- Increase the separation between the equipment and
receiver.
- Connect the equipment into an outlet on a circuit
different from that to which the receiver is connected.
- Consult the dealer or an experienced radio/TV technician for help.
Pressure
Pressure Ports: Tube connectors for 4mm
Units of Measure: inWc, mmWc, mbar, psi
Resolution: 0.01 inch Wc
Accuracy: ±1.5% FS
Measurement Range:
inWc: 0.00 to ± 60.00
mmWc: 0.0 to ± 1500.0
mbar: 0.00 to ± 150.00
psi: 0.0000 to ± 2.0000
OPERATING INSTRUCTIONS
1. “ ” Button
Shielded interface cables must be used in order to
comply with emission limits.
Changes or modifications not expressly approved by
the party responsible for compliance could void the
user‘s authority to operate the equipment.
WIRELESS NOTE
Wireless receiver must keep a distance at least 40cm
from the meter and meter to meter distance
must be at least 30cm.
SPECIFICATIONS
ELECTRICAL
Temperature
2. “APO” Button
Press the “APO” button to trigger on or off APO(auto
power off) function and the “APO” annunciator is displayed. (It will auto power off when no operation for 15
mins).
3. “ ” Button
Press “ ” button to trigger on the backlight function,
press the “ ” button again to cancel the backlight function. The backlight will switch-off automatically after
30 seconds.
4. “HOLD” Button
Temperature coefficient: 0.1 x (specified accuracy) per °C
Accuracy: Stated accuracy at 23°C ± 5°C (18°C to 28°C):
±1.5% FS
GENERAL
Display: 5 digit liquid crystal display (LCD).
Overload: “----.-” or “OL” is display.
Battery: 1.5V x 4 PCS (SIZE AAA) UM-4 R03.
Battery Life: 200 hours with low battery indicator on
display.
Low Battery: Symbol is displayed.
Auto-Off power: 15 minutes.
Dimensions: 171mm (H) x 83mm (W) x 40mm (D)
Weight: Approximately 230g including batteries.
Operating environment: 32ºF (0°C) to 122ºF (50°C)
Compatible Media: Dry, non-corrosive gases.
Wire Communication Protocol:
19200 baud rate. (886U/886UW/886UWE)
Back Side: (886U/886UW/886UWE) 1
1. USB Port
2. DC power JACK(12V)
When the power is off, press “ ” button to turn on
the meter. In the MAX/MIN record mode can not power
off, must exit MAX/MIN recording mode then power
off.
2
Wireless Features:
Frequency range: 910~920MHz(886W/886UW)
868.1~868.5MHz(886WE/886UWE)
Low current consumption less than 1mA
The transmitting distance can reach 25M without magnetic
interference.
Press the “HOLD” button to enter the data hold mode,
the “HOLD” annunciator is displayed at the center-left
of display. When data hold mode is selected, the manometer meter held the present readings and stops all
further measurements. Press the “HOLD” button again
to cancel data hold mode, causing manometer meter to
resume taking measurements.
5. “ZERO” Button
ZERO button just before taking the pressure readings,
while at ambient pressure. This will zero both P1 and
P2.
6. “MAX/MIN” Button
Press “MIN/MAX” button to enter the MIN/MAX
recording mode and REC shows on the display. The
beeper emits a tone when a new minimum or maximum
measurement is recorded. Press the “MIN/MAX” button
again to cycle through the current readings:
MAX: The highest measurement recorded.
MIN: The lowest measurement recorded.
MAX-MIN: The difference of the highest and the
lowest measurement.
AVG: The average values of the measurements.
Pressing “MIN/MAX” button over two seconds to
exit the function. In this mode, press “HOLD” button to
stop recording, all values are frozen, press “HOLD”
button again to restart recording. In this mode, the APO
function and other buttons are disabled, excluding
“HOLD” a Back-light buttons.
Pressing and holding down the “MAX/MIN” button for
more than 2 seconds to exit the MAX/MIN function.
7. “P2” and “P1-P2” Button
Press the “P2” or “P1-P2” button you can change the
display between P2 and P1-P2.
8. “psi”, “inWc”, “mmWc”, “mbar” Button:
Press the “psi” or “inWc” or “mmWc” or “mbar” button you can change pressure unit.
1 psi = 27.67990500784 inWc.
1 psi = 703.0698934059 mmWc.
1 psi = 68.94756718687 mbar.
MAINTENANCE
WARNING
To avoid possible electrical shock, disconnect the
thermocouple connectors from the thermometer before
removing the cover.
Installing and Replacing Battery
9. WIRELESS MODE:
(886W/886UW/886WE/886UWE)
Pressing the “ ” key for more than two seconds to
start wireless function. Pressing the “ ” key again for
another two seconds to stop wireless function. The wireless mode will shut down if there is no wireless signal
for two minutes.
To SET CH/ID to 00,00, pressing the “mbar” key and
“ ” power key for more than 4 seconds with the meter
powered down. The meter will set channel and ID to
00,00 status. The second display will show 00, which
means that the channel and ID has been set to 00.
To check the channel and ID of the meter:
When the meter is off, press “APO” key and “ ” for
4 seconds, LCD’s main display will show channel number, the second display will show ID number.
OPERATION
1. Zero the meter by pressing the “ZERO” button just
before taking the pressure readings, while at ambient
pressure. This will zero both P1 and P2.
2. Connect a single hose to get the gauge pressure relative
to the ambient or ZERO pressure.
3. Connect both hoses if you want to see relative pressure,
P1 minus P2.
4. By pressing the “P2” or “P1-P2” button you can change
the display between P2 and P1-P2 is constantly displayed in the LCD.
5. Press the unit button makes it possible to switch between the four measurements scales of inches of water
column (inWc), millimeters of water column (mmWc),
mbar, and psi. The scale being viewed is displayed on
the LCD.
6. If you are in an environment where the temperature is
noticeably changing while you are taking your reading,
it is advised that you disconnect the meter from the
hoses and ZERO it relative to ambient before each
reading.
A. Screw
B. Battery Cover
C. Battery
1. Power is supplied by 4pcs 1.5V (SIZE AAA) UM-4
R03.
2. The “ ” appears on the LCD display when replacement is needed. To replace battery remove screw from
back of meter and lift off the battery cover.
3. Remove the battery from battery contacts and replace.
4. When not use for long time remove battery.
5. Don’t keep in place with high Temp, or high humidity.
Cleaning
Periodically wipe the case with a damp cloth and detergent, do not use abrasives or solvents.
Ver.1.4 02/01/10