1
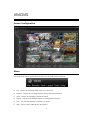
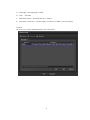
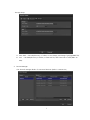
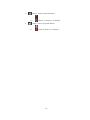
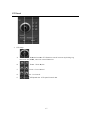
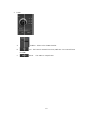
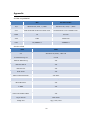
CMS User Manual
Revision 1.0
Content
VMCMS ...................................................................................................................................................................................3
Screen Configuration ....................................................................................................................................................3
Menu ...................................................................................................................................................................................3
File ...............................................................................................................................................................................4
Remote ................................................................................................................................................................... 10
View ......................................................................................................................................................................... 10
Layout ..................................................................................................................................................................... 10
Tool .......................................................................................................................................................................... 11
Help.......................................................................................................................................................................... 12
Tool Bar ........................................................................................................................................................................... 12
Setup Tool Bar ..................................................................................................................................................... 12
Remote Tool Bar................................................................................................................................................. 12
Tools ........................................................................................................................................................................ 12
Control Panel ................................................................................................................................................................ 14
Device List ............................................................................................................................................................. 15
PTZ Panel ............................................................................................................................................................... 17
Screen Tab Panel ......................................................................................................................................................... 19
Tab Menu .............................................................................................................................................................. 19
Live Monitoring ................................................................................................................................................... 21
E-Map ...................................................................................................................................................................... 23
Events Status Panel .................................................................................................................................................... 26
Motion .................................................................................................................................................................... 26
Sensor ..................................................................................................................................................................... 27
Video Loss ............................................................................................................................................................. 27
Log Panel ........................................................................................................................................................................ 27
Appendix ......................................................................................................................................................................... 28
2
VMCMS
Screen Configuration
Menu
Can setup and control each feature and function in detail menu like below
A. File : Can Set and manage CMS, Device List and Log
B. Remote : Can Set and manage Remote Setup and Remote Search.
C. View : Can Set and manage Tool Bar & Panel.
D. Layout : Can Set and manage Layout of Screen(Screen Division)
E.
Tool : Can Set and manage Tool Menu of Setup.
F.
Help : Show current CMS Version and Status.
3
File
A. System Setup : Can Set and manage Language, OSD, User Information, and etc in
Dialog Window.
B. Device Manager : Can Set and Manage Devices(Add/Edit/Delete) to connect with CMS.
C. Log Viewer : Can Set and Manage Log View.
D. Exit : Exit.
1.
System Setup
-
Option
4
A. Language – Set Language in DVRs.
B. OSD – Set OSD.
C. Date/Time Setup – Set Date/Time & it’s Format.
D. Automatic Connection – Set Automatic Connection of CMS to Devices (DVRs).
-
Account
Set Account of Users (Add/Edit/Delete) and information.
5
A. Accout Add – Can Add User.
a.
User Information – Set User ID/Password.
b. User Authority – Set each user’s Authority for each function like above.
B. User Edit – Can Edit User .
a.
User Information – Edit User ID/Password.
b. User Authority – Edit each user’s Authority for each function like above.
C. User Edit – Can Delete User.
6
- Storage Setup
A. Save Path – Set Path(directory or folder) to save Image, and Image Type(Jpg/BMP file).
B. AVI – Set Path(directory or folder) to save AVI file, and Time Limit to save.(Max. 99
Min)
2.
Device Manager
Can Set and manage details of connected Devices (DVRs in remote site)
7
A. Group –Add Group.
B. Group Edit – Edit Group.
C. Group Delete – Delete Group.
D. Device Add – Add Devices.
a.
Group Name – Set Device Name to manage in each group.
8
b. Device Information – Set Device Name/Model Name/IP Address/Port/Dual Stream.
c.
Device Account – Set Device’s (DVR) registered ID/Password.
E.
Device Edit – Edit Device information like below.
F.
Delete Device – Delete Device. In <Delete>, warning message like below will be
shown to confirm.
3.
Log View
Set and Manage System Log View. (Refer to Manual’s System Log).
4.
Exit
Exit VMCMS.
9
Remote
Can connect setup Remote Devices(DVRs) and Set <Remote Setup> and <Remote Search> in
each SW .
A.
Remote Setup : Run <Remote Setup> SW(Window).
B.
Remote Search : Run <Remote Search> SW(Window).
View
Can Set each <Tool Bar> and <Panel> to be shown or not in CMS main Screen.
A. Tool Bar : Make each <Tool Bar> viewed or not.
B. Panel : Make each <Panel> viewed or not.
Layout
Can Set and manage Layout of Screen(Screen Division).
Layout – Set Layout of Sreen.(Max. 64 Division)
10
Tool
1.
Save Jpeg
A. JPEG Save : Set directory(folder) to save Jpeg file.
B. Jpeg Save As: Set other directory(folder) to save Jpeg file.
2.
3.
AVI Save
A.
Avi Save : Set directory(folder) to save AVI file.
B.
AVI Save As: Set other directory(folder) to save AVI file.
Print
A.
Quick Print : Print quickly wanted CH image in default Printer.
B.
Print… : Show connected printers and print Image in wanted Printer.
11
Help
Show VMCMS Version and Copy right like below.
Tool Bar
A
○
B
○
C
○
A. Setup
B. Remote Setup/Search
C. Tools
Setup Tool Bar
Can run and set System Setup Menu.
Remote Tool Bar
Can Run and set <Remote Setup> & <Remote Search> SW.
A.
Remote Search : Run <Remote Search> SW.
B.
Remote Setup : Run <Remote Setup> SW.
Tools
Can run and setup major functions in CMS by just clicking each Tool Icon
12
A. JPEG Save : Save JPEG Image.
B. AVI Save : Save AVI Image.
C. Quick Print : Print quickly wanted CH image in default Printer.
D. Mute : Mute Audio.
E.
Dual Audio(Microphone/Speaker) : Re Request Dual-Audio to DVR, and blinking till
DVR accept that signal. When connected, users can use Microphone.
13
Control Panel
A. Device List –Show and Manage connected Devices (Camera/Sensor/Alarm) in Panel
List.
B. PTZ – Run PTZ control Panel.
14
Device List
“Drag & Drop”
Live Monitoring
Just Drag & Drop the Connected Devices to Live Screen to Monitor and View
A.
Connect : Connect registered Device to CMS.
B.
Disconnect : Disconnect Devices.
C.
Add : Add Device to CMS.
D.
Delete : Delete Device in CMS.
E.
Edit : Delete Device in CMS.
F.
List : Shows all connected Devices in the list like below.
a.
Site: Show Connected Sites in Folder Icon
b.
Device : Show Connected Devices in Device Icon (Just Drag & Drop
the Connected Devices to Live Screen to Monitor while connection)
c.
Camera : Show Connected Cameras in Camera Icon (Just Drag &
Drop the Connected each Camera to wanted Live Screen position to
Monitor while connection).
i.
Camera : In Events, it is blinking.
15
d.
Sensor : Show connected Sensor
ii.
e.
Sensor : In Events, it is blinking..
Alarm : Show connected Alarms
iii.
Alarm: In Events, it is blinking.
16
PTZ Panel
1.
PTZ Setup
A.
Dire
ection Button
ns: PTZ direcction control buttons. Byy clicking Jog
Button
n in the midd
dle, users can control Diirection.
B.
Zoo
om : Zoom In
n/Out..
C.
Focu
us : Focus Co
ontrol.
D.
Iris : Iris Control..
PTZ
Z Speed Bar : PTZ speed Control Barr.
E.
.
17
2.
Preset
A.
Possition : Select & Set Presset Number.
B.
Set : Set Preset in
i wanted Directions, an
nd save it as wanted Preset
Numbe
er.
C.
ove to setup
p Preset
Move : Can mo
18
Screen Tab Panel
A.
Delete : Delete Tab.
B.
Add : Add Tab.
When adding Tab, Dialog Box will be shown <Live/E-Map>.
** In Each Tab, users can Set and Manage new Live & E-Map for wanted Device Group.
a.
Name – Set new Tab Name.
b. Type – Set and Manage Live or E-Map Tab.
Tab Menu
1.
Live Tab Menu
By clicking right button of mouse in <Live Tab>, menu below will be shown.
A. Rename – Rename Tab Name.
B. Initialize Tab – Initialize Tab Setup Values.
2.
E-Map Tab Menu
By clicking right button of mouse in <Live Tab>, menu below will be shown.
19
-
In <Live Monitoring>, quick menu will be shown.
A. Edit Mode – Edit Tab.
B. Float – Separate(Float) current <Live Monitoring> Tab
In clicking this, <Float> mode return to Fixed Tab.
C. Rename – Rename Current Tab Name.
In <Edit>, quick menu will be shown
A. Edit Exit – End Edit Mode and return to normal model.
B. Change Base Image – Change E-Map background Image.
C. Initialize Tab – Initialize E-Map Setup Values.
D. Float Mode – Float – Separate(Float) current <Live Monitoring> Tab
In clicking this, <Float> mode return to Fixed Tab..
E.
Rename – Rename Current Tab Name.
20
Liv
ve Monitorring
Vid
deo OSD(Iccon)
A. Camera Name – Showss Camera Na
ame(Title).
B.
Motio
on Detection
n – Shown when
w
Motion
n is detected
d.
C.
Dual Streaming – When Reco
ording FPS is transmitted in Remote
e, DSR(Dual
Streaming) is shown. (R
Refer to Dual Streaming Record/Nettwork)
D.
PTZ
E.
Audio
o – Show Au
udio Status
F.
– Show PTZ
Z Camera(Co
onnected)
Time – Show Current Time
Con
ntext Menu
u
Can
n Set and Ma
anage Menu
u by clicking the right bu
utton of mo
ouse.
A. Delete curre
ent Live Vide
eo in wanted
d CH.
B. Freeze Vide
eo.
21
Screen Division
Set and Manage Screen Division.
Layout - 1x1, 2x2, 3x3, 4x4, 5x5, 6x6, 8x8 , Full Screen
Each button has a menu on the right side, you can go directly to the selected page layout.
22
E-M
Map
Edit Mode
In <Edit
<
Mode>
>, users can set (Add/De
elete/Move) Camera/Sen
nsor/Alarm Icons in each
h
Background Image(Blue Print).
1.
Icon Positio
oning
j
Drag & Drop, users move each icon to anyy position.
By just
I.
osition Pop--Up Camera((Video).
Camera – Po
c see Dialo
og Box below
w)
( By cliccking Icon or Pop-Up Video, users can
23
n Setup – Se
et Icon Imag
ge/Size.
A. Icon
B. Rottation – Set Rotation of Icon.
C. Text Setup – Se
et Icon’s font and size.
D. Event Pop-Up – Set Events for Pop-up Video.
E.
II.
Pop
p-up Size – Set
S Pop-Up window Size
e.
Sensor
(By click
king Icon, ussers can see Dialog Box below. )
A. Icon Se
etup – Set Iccon Image/Size.
24
B. Text Se
etup – Set Iccon’s font an
nd size.
III.
Alarm
(By click
king Icon, ussers can see Dialog Box below. )
A. Icon Se
etup – Set Iccon Image/Size.
B. Text Se
etup – Set Iccon’s font an
nd size.
2.
Delete Icon
By clicking Icon or Pop-Up, users can
c see Dialo
og Box below
w.
A. Edit – Run
R
<Edit Mode>.
B. Delete – Delete Icon.
Icons in Monitoring Mo
ode
1.
2.
Came
era – In Even
nts
iss blinking
F Pop-Up Video
Fix
V
B double-clicking Icon, users can Fix
By
F Icon be shown alwayss.
25
Context Me
enu
B clicking right
By
r
button of mouse, user
u
can run Context Me
enu for quick setup of each
e
icon.
A. Pop-Up
p Size – Set Pop-Up Video Window Size.
B. Pop-Up
p Fix – Fix Po
op-up Video
o(shown always).
a.
Sensor – In Events
b.
Alarm - – In Eve
ents
b
is blinking.
iss blinking
Events Stattus Pane
el
In Event
E
Status Panel, userss can check and manage
e all Events at
a a glance.
Byy clicking <Evvent View> or <Float> button, userrs can separa
ate this Pana
al.
A. Time – Set Time Fo
ormat.
B. Device – Set Device
e List Formatt.
C. Type – Set Events Type
T
to be shown.
s
Motion
It iss activated in
n motion detection.
Che
eck in each CH.
C
26
Sensor
It iss activated in
n Sensor dettection.
Che
eck in each CH.
C
Video Loss
It iss activated in
n Video Losss detection.
Che
eck in each CH.
C
Log Panel
Che
eck and Man
nage all Logss while runn
ning CMS.
By clicking
c
<Eve
ent View> or
o <Float> button,
b
users can separatte this Panall
A. Time
– Set Time Forma
at.
B. Type
– Set Log Type to
o shown and
d manage.
27
Appendix
SYSTEM REQUIREMENT
Min
Recommended
O/S
Windows XP, Vista, 7 / MAC
Windows XP, Vista, 7 / MAC
CPU
Intel Pentium4 Dualcore 1.8GHz Over
Intel Pentium Core i5 2.8GHz Over
RAM
1G
3G Over
VGA
64M
512M Over
LAN
10/100Base-T
1000Base-T
SPECIFICATION
Item
SPEC
OS
Windows XP,Vista,7 / Mac OS
Live Monitoring CH
64 CH
Remote Monitoring
Yes
Remote Search
Yes
Remote PTZ
Yes
Dual-Audio
Yes
Max Connectible Sites
256 Sites
Resolution
Min:1024*768 /Max: ~
Multi Monitors
Yes
E-MAP
Yes
E-MAP PIP
16CH
Real-Time EVENT VIEW
Yes
Log & Events
Max 3000
Image Out
Jpg / AVI / Print
28