1
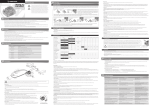
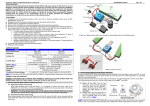
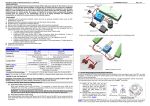
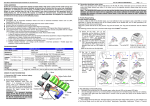
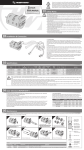
User Manual of Multifunction LCD Program Box Thanks for purchasing the Multifunction Program Box for ESC (Electronic Speed Controller). Please read this manual carefully before using it. 【FEATURE AND FUNCTION】 The Multifunction Program Box is the equipment for setting brushless speed controllers; it works in the following 3 ways: 1. Works as an individual equipment to set the ESC, the option of each programmable item is displayed on its own LCD screen; 2. Works as an USB adapter to link the ESC with PC to update the ESC firmware or set the programmable item by the USB Link Software on PC. 3. Works as a Lipo battery voltmeter to measure the voltage of the whole battery pack and each cell. HW-SM805ENG-20130119 5. 6. 7. 8. Page 1 of 2 “Batt” Port: Provide power supply when an OPTO ESC (that is: ESC without built-in BEC---Battery Elimination Circuit) is connect to the program box. “ESC” Port: Connect the ESC to program box from this port. “USB” Port: Connect the program box to PC and also provide working voltage to the program box (If the USB port is connected, then the power supply at “Batt” port is unnecessary). “BATTERY CHECK”: Connect to the balance charging connectors of the battery. Note 1: Please pay attention to the polarity of the connectors. Note 2: The space between pins is 2.54mm, so the “BATTERY CHECK” port is compatible with XH, EH and HP/PQ connectors. But Thunder Power battery uses different types of connectors so an adapter as below is needed. 【SPECIFICATION】 1. 2. 3. Size: 90mm * 51mm * 17mm Weight: 65g Power supply: DC 4.5V to 12.6V 【COMPARED WITH THE 2 IN 1 LCD PROGRAM BOX】 1. 2. The Multifunction Program Box uses new MCU (microprocessor) with more memories (2 times than the previous 2 IN 1 Program Box), so only one firmware can be compatible with all speed controllers. The Multifunction Program Box has new function for Lipo battery voltage checking. 【FUNCTION OF EACH BUTTON AND PORT】 1. 2. 3. 4. “ITEM” Button: Change the programmable items and profiles circularly; Exit the customized option setting process; Enter the option setting process. “VALUE” Button: Change the options of each programmable item circularly; Edit the option of each customized parameter circularly; “R/P” Button: Enter or return to the profiles selection menu. “OK”: Button: Save the settings into the ESC; Enter the customized option setting process. 【3 WORKING WAYS】 1. Works as individual equipment to set the ESC without PC 1.1 Step A: Connect ESC to program box correctly according to the different type of the ESC a) ESC has built-in BEC and the program port is multiplexed with Rx wire: Disconnect the Rx wire from receiver and then plug it into the “ESC” port on the program box. b) ESC has built-in BEC and the separated program port (that is: the program port is NOT multiplexed with Rx wire): Use a program wire to connect the program box to the ESC at its program port. Most of new ESC for RC cars uses this method to get rid of the trouble of disconnecting the Rx wire from receiver. 2 types of program wires are available. User Manual of Multifunction LCD Program Box c) HW-SM805ENG-20130119 ESC hasn’t built-in BEC (That is: OPTO type ESC): If the program port is multiplexed with Rx wire, disconnect the Rx wire from receiver and then plug it into the “ESC” port on the program box. If the program port is not multiplexed with Rx wire, use a program wire to connect the program box to the ESC at its program port. And an additional battery pack (4.8V to 12.6V) is needed to power the LCD program box via the “Batt” port. 3. 1.2 Step B: Connect ESC to battery and switch it on. LCD program box shows the initial screen , press any button on the LCD program box to communicate with the ESC, the screen shows after several seconds, LCD shows the current profile name , , and then st the 1 programmable item is displayed. Press “ITEM” and “VALUE” buttons to select the options, press “OK” button to save the settings. a) Reset the ESC by the LCD program box When the connection between ESC and LCD program box is successfully established, press “ITEM” button for several times till the “Load Default Settings” is displayed, press “OK” button, then all programmable items in the current profile are reset to factory-preset options. b) Change profiles of the ESC Usually there are 3 profiles for different tracks/conditions are stored in the ESC (Note: XERUN-120A-V3 and V3.1 ESC has 10 profiles), for example, “Modified” profile, “Stock-10.5T” profile etc. It is very convenient for user to select the suitable profiles in different tracks/conditions. Press “R/P” button to display the current profile name, and then press “VALUE” button to change to next profile. If there are some programmable options need to be changed in the profile, please press “ITEM” button to enter the edit mode. The profile name can be changed by the USB Link Software on PC. 2. Works as USB adapter to connect ESC to PC Connect the ESC, LCD program box and PC according to the picture. Run the USB Link Page 2 of 2 Software. And then connect ESC to battery and turn it on, the USB Link Software will try to communicate with the ESC. After the connection is established, user can easily set the ESC or update its firmware on the PC. Works as Lipo battery voltmeter a) Battery: 2-8S Lipo/Li-Lon/Li-Fe b) Precision: ±0.1V c) Usage: Plug the balance charge connector of the battery pack into the “BATTERY CHECK” port (Please make sure that the negative pole points to the “-” symbol on the program box), and then LCD shows the firmware, the voltage of the whole battery and each cell. Note: When checking the voltage, please supply the LCD program box only from the balance charge connector. Don’t supply LCD program box from Batt or USB port. 【UPDATE THE FIRMWARE OF LCD PROGRAM BOX】 Sometimes the firmware of LCD program box should be updated because the functions of ESC are improved continuously. Connect the LCD program box with PC through USB port, run Hobbywing USB Link Software, select “Device” “Multifunction LCD Program Box”, at the “Firmware Upgrade” module, choose the new firmware you want to use, and then click “Upgrade” button. Please detail instructions, please browse the manufacturer’s website. The detail information of the LCD Program Box: http://www.hobbywing.com/product_show.asp?id=215 The detail information of the USB Link Software: http://www.hobbywing.com/product_show.asp?id=218