1
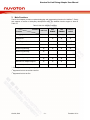
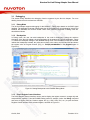
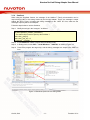
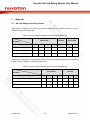
Nuvoton Nu-Link Debug Adapter User Manual Nuvoton Nu-Link Debug Adapter User Manual The information described in this document is the exclusive intellectual property of Nuvoton Technology Corporation and shall not be reproduced without permission from Nuvoton. Nuvoton is providing this document only for reference purposes of NuMicro microcontroller based system design. Nuvoton assumes no responsibility for errors or omissions. All data and specifications are subject to change without notice. For additional information or questions, please contact: Nuvoton Technology Corporation. www.nuvoton.com Oct 28, 2014 - Revision V1.01 Nuvoton Nu-Link Debug Adapter User Manual Table of Contents 1 2 3 INTRODUCTION .............................................................................................................................. 3 HARDWARE SPECIFICATIONS ..................................................................................................... 4 2.1 Nu-Link-Pro ........................................................................................................................... 4 2.2 Nu-Link .................................................................................................................................. 5 2.3 Nu-Link-Me ............................................................................................................................ 5 2.4 Nu-Link-Me (On-board Version) ............................................................................................ 6 2.5 Nu-Link Adapter Hardware Specifications ............................................................................ 6 MAIN FUNCTIONS .......................................................................................................................... 8 3.1 Debugging ............................................................................................................................. 9 3.1.1 3.1.2 3.1.3 3.1.4 3.2 Programming ....................................................................................................................... 12 3.2.1 3.2.2 3.2.3 4 Debug Mode ..................................................................................................................... 9 Breakpoints ...................................................................................................................... 9 Direct Register Control Interface ...................................................................................... 9 Semihost ........................................................................................................................ 11 Online Programming....................................................................................................... 12 Offline Programming....................................................................................................... 12 Software Serial Number (SN) ......................................................................................... 13 3.3 Wide Voltage Programming ................................................................................................ 14 3.4 Installing the Nu-Link Adapter Driver................................................................................... 14 INSTALLATION AND SETUP ........................................................................................................ 15 4.1 Connecting to the Nu-Link Adapter ..................................................................................... 15 4.2 Software Setup .................................................................................................................... 16 4.2.1 4.2.2 4.2.3 4.2.4 ICP Tool ......................................................................................................................... 16 Keil RVMDK ................................................................................................................... 19 IAR EWARM................................................................................................................... 22 CooCox CoIDE ............................................................................................................... 25 5 +APPENDIX ................................................................................................................................... 27 5.1 Nu-Link Adapter Operating Current..................................................................................... 27 6 REVISION HISTORY ..................................................................................................................... 28 Oct 28, 2014 -2- Revision V1.01 Nuvoton Nu-Link Debug Adapter User Manual 1 Introduction Nuvoton’s Nu-Link Debug Adapter is an USB debugger and programmer based on the SWD (Serial Wire Debug) signal interface and can be applied to the development of Nuvoton NuMicro™ Family chips. As shown in Table 2-1, there are three types of the Nu-Link Debug Adapter in accordance with different specifications, including Nu-Link-Pro, Nu-Link, and Nu-Link-Me. The three types are called “Nu-Link Adapter” in general if no specific conditions are mentioned. The Nu-Link Adapter supports ICP (In-Circuit Programming) based on the SWD (Serial Wire Debug) signal interface. The user can employ the NuMicro™ ICP Programming Tool to update chip firmware for mass production. The Nu-Link Adapter also supports the third-party development tools, such as Keil RVMDK, IAR EWARM, and CooCox CoIDE. For simplicity and clarity, parts of specific terms in this user manual are contracted or abbreviated, as listed in the following table. Short Name Full Name Nu-Link Adapter Nuvoton Nu-Link Debug Adapter NuMicro™ Family Nuvoton NuMicro™ Family ICP Tool Nuvoton NuMicro™ ICP Programming Tool Keil RVMDK Keil ARM RealView Microcontroller Development Kit (MDK-ARM® ) IAR EWARM IAR Embedded Workbench for ARM CooCox CoIDE CooCox Integrated Development Environment SWD Serial Wire Debug ICP In-Circuit Programming Oct 28, 2014 -3- Revision V1.01 Nuvoton Nu-Link Debug Adapter User Manual 2 Hardware Specifications The Nu-Link Adapter provides an USB connector and a SWD signal interface for connecting to the target chip. The user can connect the Nu-Link Adapter to an USB port of a PC to debug and program target chips through the development software tools. As shown in Table 2-1, there are three specifications for the Nu-Link Adapter, in which debugging, Online/Offline Programming, and SWD I/O voltage settings may be supported depending on the specifications (refer to the +Appendix for details). Table 2-1 Nu-Link Adapter Function Comparison Nu-Link-Pro Nu-Link Nu-Link-Me Debugging ✔ ✔ ✔ Online Programming ✔ ✔ ✔ Offline Programming ✔ ✔ Multi SWD I/O Voltage ✔ Type Function SWD I/O Voltage Support 2.1 1.8V, 2.5V, 3.3V, 5.0V 5.0V 3.3V (default), 5.0V (3.3V for On-board version only) Nu-Link-Pro The Nu-Link-Pro is a full-functional debugger and programmer with debugging, online/offline programming, and SWD I/O voltage setting functions. As shown in Figure 2-1, the Nu-Link-Pro includes an USB port that can be connected to a computer host, a set of Status LEDs, an offline programming button, a SWD port that can be connected to a target chip for debugging and programming (the voltage level of the SWD port can be adjusted through software as 1.8V, 2.5V, 3.3V, or 5.0V), a set of SWD I/O voltage LEDs and SWD Power Output LEDs. Offline Programming Button SWD Power Output LED SWD USB SWD I/O Voltage LED (1.8V / 2.5V / 3.3V / 5.0V) Status LED (ICE / ICP / Red / Green) Figure 2-1 Nu-Link-Pro Configuration Oct 28, 2014 -4- Revision V1.01 Nuvoton Nu-Link Debug Adapter User Manual 2.2 Nu-Link The Nu-Link is a basic debugger and programmer with debugging and online/offline programming functions. As shown in Figure 2-2, the Nu-Link includes an USB port that can be connected to a computer host, a set of Status LEDs, an offline programming button, and a SWD port that can be connected to a target chip for debugging and programming (the default voltage of the SWD port as 5.0V). Offline Programming Button SWD USB Green Red ICP ICE Status LED Figure 2-2 Nu-Link Configuration 2.3 Nu-Link-Me The Nu-Link-Me is a simple debugger and programmer with debugging and online programming functions, which is only shipped with the NuTiny-SDK kits and can be used stand-alone for developing the customized NuMicro™ Family system. As shown in Figure 2-3, the Nu-Link-Me includes an USB port that can be connected to a computer host, a set of Status LEDs, a Power Switch to switch the voltage of Nu-Link-Me between 3.3V and 5.0V (the default as 3.3V), a SWD port that can be connected to a target chip for debugging and programming (whose voltage is adjustable with the NuLink-Me). A Cortex Debug port is provided in parts of the version only for connecting to Keil’s MCBNUC1XX board. The pins of the Cortex Debug port conform to those of the SWD port, except the pin order. Cortex Debug Power Switch (5.0V / 3.3V) SWD USB Status LED (ICE / ICP / Red / Green) Figure 2-3 Nu-Link-Me Configuration Oct 28, 2014 -5- Revision V1.01 Nuvoton Nu-Link Debug Adapter User Manual 2.4 Nu-Link-Me (On-board Version) The main functions of the Nu-Link-Me on-board version, including debugging and online programming, are the same as those of the Nu-Link-Me. The Nu-Link-Me on-board version is provided with all NuMicro™ Family series. The user does not need to prepare s debugger when using a learning board. The Nu-Link-Me on-board version includes an USB port that can be connected to a computer host, a set of Status LEDs, and a SWD port connected to the chip on the learning board (default) for debugging and programming (external connection is not supported). The SWD port voltage is always 3.3V. The learning boards that support the Nu-Link-Me on-board version are listed below: Nu-LB-NUC140 Nu-LB-M051 Nu-LB-Mini51 2.5 Nu-Link Adapter Hardware Specifications The Nu-Link Adapter hardware comparison is shown in Table 2-2. Table 2-2 Nu-Link Adapter Hardware Comparison Device Description Nu-Link-Pro Nu-Link Nu-Link-Me Nu-Link-Me on-board ver. USB Connected to an USB port of a PC to use the Nu-Link Adapter or download offline programming firmware ✔ ✔ ✔ ✔ SWD Connected to the target chip for debugging and programming ✔ ✔ ✔ Status LED Display the operation status of the NuLink Adapter ✔ ✔ ✔ Offline Programming Button Click this button to proceed with offline programming ✔ ✔ SWD Power Output LED Display the power output status of SWD VCC pins ✔ SWD I/O Voltage LED Display the SWD VCC and I/O voltage ✔ Power Switch Power switch between the power output of the Nu-Link-Me power (e.g. between the SWD VCC and I/O pins) ✔* Able to connect to Keil’s MCBNUC1XX board for debugging and programming ✔* Cortex Debug ✔ 1 1 1 * Only supported in parts of the version. Oct 28, 2014 -6- Revision V1.01 Nuvoton Nu-Link Debug Adapter User Manual Table 2-3 SWD I/O Voltage LEDs and SWD Power Output LEDs Status List Target System Power SWD Power Output LED SWD port I/O and VCC voltage as 1.8V - On On - - - SWD port I/O and VCC voltage as 2.5V - On On On - - SWD port I/O and VCC voltage as 3.3V - On On On On - SWD port I/O and VCC voltage as 5.0V - On On On On On SWD port I/O voltage as 1.8V ✔(1.8V) - On - - - SWD port I/O voltage as 2.5V ✔(2.5V) - On On - - SWD port I/O voltage as 3.3V ✔(3.3V) - On On On - SWD port I/O voltage as 5.0V ✔(5.0V) - On On On On Power Status SWD I/O Voltage LED 1.8V 2.5V 3.3V 5.0V Table 2-4 Status LEDs Difference List Status LED Nu-Link Adapter Operation Status ICE ICP Red Green Boot Flash×3 Flash×3 Flash×3 Flash×3 One Nu-Link Adapter selected to connect Flash×4 Flash×4 Flash×4 On ICE Online (Not connected with a target chip) On Any - - ICE Online (Connected with a target chip) On Any - On ICE Online (Failed to connect with a target chip) On Any Flash On - On - Flash Slowly Offline Programming Completed On - - - Offline Programming Completed (Auto mode) On On - - Offline Programming Failed On Flash - - During Offline Programming Oct 28, 2014 -7- Revision V1.01 Nuvoton Nu-Link Debug Adapter User Manual 3 Main Functions The Nu-Link Adapter provides complete debugging and programming functions for NuMicro™ Family and supports a number of third-party development tools. The detailed function support is listed in Table 3-1. Table 3-1Nu-Link Adapter Functions Software Keil RVMDK IAR EWARM CooCox CoIDE Debugging ✔ ✔ ✔ Breakpoints ✔ ✔ ✔ Direct Register Control Interface ✔ ✔ Semihost ✔ ✔ ✔ ✔ ✔ ✔ ✔ ✔ ✔ ✔ ✔ ✔ ✔ ✔ Function ICP Tool ✔ Online Programming 2 Offline Programming* ✔ Software Serial Number ✔ Wide Voltage Programming* 3 Multi Nu-Link Adapter Support Nu-Link Adapter Driver Installation ✔ *1 1 * Core registers view is supported; peripherals view is not supported. 2 * Supported for Nu-Link and Nu-Link-Pro. 3 * Supported for Nu-Link-Pro. Oct 28, 2014 -8- Revision V1.01 Nuvoton Nu-Link Debug Adapter User Manual 3.1 Debugging This section briefly describes the debugging function supported by the Nu-Link Adapter. For more details, please refer to the related user manuals. 3.1.1 Debug Mode The Nu-Link Adapter supports debugging for the NuMicro™ Family chips based on the SWD signal interface. The third-party tools that support using the Nu-Link Adapter for chip debugging include Keil RVMDK, IAR EWARM, and CooCox CoIDE. Some more functions supported in Debug mode are described as follows. 3.1.2 Breakpoints In Debug mode, the user can add breakpoints in the code for debugging. During the real-time simulation of the Nu-Link Adapter, the chip simulation will be stopped at a specific breakpoint. Figure 3-1 shows the breakpoint settings in Keil RVMDK Debug mode. The red labels on lines 052 and 059 indicate the breakpoints inserted; the yellow arrow refers to the code to be executed next and shows the register value of Program Counter (PC) (i.e. “R15(PC)=0x00000D04” in the Registers pane in Figure 3-1). Figure 3-1 Setting Breakpoints in Keil RVMDK Debug Mode 3.1.3 Direct Register Control Interface The Direct Register Control Interface can be used to display the register content in a target chip and manipulate the registers. Take Keil RVMDK Debug mode for example, invoke the Debug command and select a register from the “function register list” (e.g. ADC, CAN, CLK, etc.) to open the Direct Register Control Interface of the selected register, as shown in Figure 3-2. Oct 28, 2014 -9- Revision V1.01 Nuvoton Nu-Link Debug Adapter User Manual Figure 3-2 Direct Register Interface Control Related Options in Keil RVMDK Debug Mode The Direct Register Control Interface for CLK is shown in the left part of Figure 3-3, where the left column shows the register name, and the right column shows the register value. The Direct Register Control Interface for PWRCON is shown in the right part of the Figure 3-3, where the left column shows the function name, and the right column shows the function value. Detailed Operation: Double-clicking a “register value” will open the register control details, as shown in the right part of Figure 3-3. The “register value” or “control value” can be modified directly. The Nu-Link Adapter will then modify the content of the target chip. Figure 3-3 Direct Register Control Interface in Keil RVMDK Debug Mode Oct 28, 2014 - 10 - Revision V1.01 Nuvoton Nu-Link Debug Adapter User Manual 3.1.4 Semihost When using the Semihost function, the message of the NuMicro™ Family microcontroller can be output through UART to the debug window by the Nu-Link Adapter. That is, the message is output without the GPIO. Figure 3-4 shows the debug messages in the “UART #1” form, which are the messages output by the Nu-Link Adapter. Follow the steps below to use the Semihost. Step 1: Modify the strings in the “retarget.c” as follows. #define DEBUG_ENABLE_SEMIHOST // Add this line #if defined(DEBUG_ENABLE_SEMIHOST) /* The static buffer is used to speed up the semihost */ static char g_buf[16]; static char g_buf_len = 0; # if defined(__ICCARM__) Step 2: Invoke Rebuild to rebuild a project and enter Debug mode. Step 3: In Debug mode, invoke View → Serial Windows → UART #1, as shown in Figure 3-4. Step 4: Press F5 to program the target chip, and the debug messages are output to the UART #1 form. Figure 3-4 Semihost Options in Keil Debug Mode Oct 28, 2014 - 11 - Revision V1.01 Nuvoton Nu-Link Debug Adapter User Manual 3.2 Programming This section will briefly describe the programming function supported by the Nu-Link Adapter. For more details, please refer to the related user manuals. 3.2.1 Online Programming Online Programming means that the Nu-Link Adapter can download the firmware of the NuMicro™ Family single chip to the target chip through software programs, as shown in Figure 3-5. NuMicro™ Family ICP Tool Program SWD USB NuMicro™ Family Target Board Nu-Link Adapter Computer Figure 3-5 Online Programming Flow Diagram 3.2.2 Offline Programming Offline Programming means that the Nu-Link Adapter can update the firmware of the NuMicro™ Family single chip directly without accessing software programs (as shown in Figure 3-6). Offline programming is useful for mass production since the original code or firmware file does not need to be delivered and only the Nu-Link Adapter is needed for mass production. In addition, the Nu-Link Adapter supports “Limited Offline Programming,” which can effectively control the authorized number of the firmware. For details, please refer to the ICP Tool User Manual. Oct 28, 2014 - 12 - Revision V1.01 Nuvoton Nu-Link Debug Adapter User Manual Create APROM, LDROM and DataFlash firmware of Binary or HEX format files. NuMicro™ Family ICP Tool Load Firmware Offline Program SWD USB NuMicro™ Family Target Board Nu-Link Adapter Computer Figure 3-6 Offline Programming Flow Diagram 3.2.3 Software Serial Number (SN) The Software Serial Number (SN) function provided by the ICP Tool enables users to specify the value in the “Increase SN from” and “Write address in flash” fields for the target chip during online/offline programming. Take the NUC140VE3CN chip for example, the user can specify a set of “Increased Serial Number (SN)” and “Write Address” to any of APROM, LDROM, and Data Flash, and the written Serial Number (SN) will be automatically incremented (as shown in Figure 3-7). Chip 1 Chip 2 LDROM LDROM Reserved Reserved Data Flash Data Flash 0x00100FFF 0x00100000 0x0001FFFF DFBADR[31:0] 0x00014000 0x174A0000 +1 APROM 0x174A0001 APROM 0x00000000 Figure 3-7 Software Serial Number (SN) Settings Oct 28, 2014 - 13 - Revision V1.01 Nuvoton Nu-Link Debug Adapter User Manual 3.3 Wide Voltage Programming The Nu-Link-Pro supports the wide voltage programming function, by which the development software tool can adjust the SWD port voltage as 1.8V, 2.5V, 3.3V, or 5.0V. As shown in Figure 4-2, the pins that can be controlled include VCC, ICE_DAT, ICE_CLK, and /RESET. Also, as shown in Figure 2-1, the Nu-Link-Pro provides a set of SWD I/O Voltage LEDs and SWD Power Output LEDs for checking the SWD port voltage. Refer to Table 2-3 for more details about the LED status, 3.4 Installing the Nu-Link Adapter Driver The Nu-Link Adapter supports a variety of functions and third-party software tools (e.g. Keil RVMDK and IAR EWARM). After the software programs are installed, the drivers are also required. You can use the following links: Nu-Link Adapter Driver for Keil RVMDK and Nu-Link Adapter Driver for IAR EWARM to install the latest version. For details about software setup, please refer to section 4.2. Oct 28, 2014 - 14 - Revision V1.01 Nuvoton Nu-Link Debug Adapter User Manual 4 Installation and Setup This chapter introduces how to connect the Nu-Link Adapter to a computer, and how to set the thirdparty tool to use the Nu-Link Adapter as a debugger and a programmer. 4.1 Connecting to the Nu-Link Adapter As shown in Figure 4-1, the Nu-Link Adapter is a bridge between an USB and the SWD interface, by which software tools can debug and program the target chip through an USB. The user can plug the Nu-Link Adapter into an USB port of a PC directly or connect using the USB connector. Through a SWD port, the Nu-Link Adapter can supply power (1.8V, 2.5V, 3.3V, or 5.0V) to a target circuit board. The maximum is 5V/500mA. Refer to Table 2-1 for detailed specifications. SWD USB NuMicro™ Family Target Board Nu-Link Adapter Computer Figure 4-1 Nu-Link Adapter Connection Diagram SWD Connector: The SWD connector, which can be applied to all of the NuMicro™ development tools and evaluation boards, is a 100 mil (2×5) female header, as shown in the left of Figure 4-2. Cortex Debug Connector: The Cortex Debug connector, which can be applied to Keil’s MCBNUC1XX board, is a 50 mil (2×5) male header, as shown in the right of Figure 4-2. SWD Cortex Debug VCC NC VCC ICE_DAT ICE_DAT NC VSS(GND) ICE_CLK VSS(GND) NC ICE_CLK /RESET NC NC NC VSS(GND) NC NC /RESET 100 mil (Female header) 50 mil (Male header) Figure 4-2 SWD and Cortex Debug Connector Pin Diagrams Oct 28, 2014 - 15 - Revision V1.01 Nuvoton Nu-Link Debug Adapter User Manual 4.2 Software Setup This section briefly describes required software settings for connecting to the Nu-Link Adapter. For detailed software operation, refer to the related user manuals. 4.2.1 ICP Tool Step 1: Download and install Nuvoton NuMicro™ ICP Programming Tool. Step 2: Open the ICP Tool, specify the UI language and target chip, and then click Continue, as shown in Figure 4-3. Figure 4-3 Startup Screen of ICP Tool Step 3: In the ICP Tool window, the connection status is shown as “Disconnected” since the ICP tool has not been connected with the Nu-Link Adapter, as shown in Figure 4-4. Figure 4-4 ICP Tool Main Window Oct 28, 2014 - 16 - Revision V1.01 Nuvoton Nu-Link Debug Adapter User Manual Step 4: Click Option in the Program section of the ICP Tool Window to open the Program Option form, as shown in Figure 4-5. Step 5: In the Nu-Link Pro IO Voltage section, specify the power voltage of the SWD port for the target chip, and then click OK. To use the offline programming function, the Offline Programming mode option needs to be selected, as shown in Figure 4-5. Figure 4-5 ICP Tool Programming Options Step 6: Return to the ICP Tool window, and then click the Connect button. Go to Step 5 if more than two Nu-Link Adapters are connected with the host. Go to Step 6 if only one Nu-Link Adapter is connected with the host. Step 7: If two Nu-Link Adapters have been connected with the computer, a message appears and asks to select one from the two adapters. Clicking OK will connect the selected adapter with the host, as shown in Figure 4-6. When a Nu-Link Adapter is selected for connection, the Status LED starts blinking. For the blinking details, refer to the Status LED description of the “Select a Nu-Link Adapter to connect with the host” in Table 2-4. Figure 4-6 Select One Nu-Link Adapter Oct 28, 2014 - 17 - Revision V1.01 Nuvoton Nu-Link Debug Adapter User Manual Step 8a: After the Connect button is clicked, the ICP Tool will be connected with the Nu-Link Adapter, and a SWD port will be detected. Figure 4-7 shows that the ICP Tool has been connected with the Nu-Link Adapter and a target chip is detected. At this time, the user can start programming the target chip. Figure 4-7 Nu-Link Adapter Connected with a Target Chip Detected Step 8b: Figure 4-8 shows that the ICP Tool has been connected with the Nu-Link Adapter with no target chip detected. The ICP tool will continue detecting the target chip until the Stop Check button is clicked. At this time, the user cannot program any chip, but can use the offline programming to save the offline programming information in the Nu-Link Adapter. Figure 4-8 Nu-Link Adapter Connected with No Target Chip Detected Step 9: Click the Disconnect button if programming is not needed (as shown in Figure 4-7). Or click the Stop Check button to disconnect the ICP Tool with the Nu-Link Adapter and leave the Nu-Link Adapter unused (as shown in Figure 4-8). As such, the Nu-Link Adapter can be connected with another tool. Oct 28, 2014 - 18 - Revision V1.01 Nuvoton Nu-Link Debug Adapter User Manual 4.2.2 Keil RVMDK Step 1: Install Keil RVMDK. Before setting the Nu-Link Adapter, make sure the Nu-Link Adapter Driver for Keil RVMDK has been downloaded and installed such that the Keil RVMDK can recognize the Nu-Link Adapter. Step 2: Open the Keil RVMDK and open the project to be set. Debugger Settings: Step 3: Invoke Project → Options for Target → Output, and enable the Debug Information option, as shown in Figure 4-9. Figure 4-9 Enable Debug Information for Keil RVMDK Step 4: Invoke Project → Options for Target → Debug, and make sure the Use:「Nuvoton NuLink M0 Debugger option is checked, as shown in Figure 4-10. Figure 4-10 Keil RVMDK Debugger Selection Oct 28, 2014 - 19 - Revision V1.01 Nuvoton Nu-Link Debug Adapter User Manual Step: 5: Click the Settings button to open the Debug form, as shown in Figure 4-11. Refer to Table 4-1 for each setting description. The setting options shown in the Debug form may vary depending on the type of the Nu-Link Adapter used. Nu-Link Pro Nu-Link & Nu-Link-Me Figure 4-11 Nu-Link Adapter Parameter Settings Table 4-1 Debugger Function Settings Description Debug Function Description Driver Version Display the Nu-Link Adapter driver version in the host Chip Type Specify the Target chip type Reset Select Auto detect to reset the target chip IO Voltage Specify the SWD port I/O voltage for the target chip; options include 1.8V, 2.5V, 3.3V, and 5V Programmer Settings: Step 6: Invoke Project → Options for Target → Utilities, select “Nuvoton Nu-Link M0 Debugger” when the Use Target Driver for Flash Programming option is enabled, and then select the Update Target before Debugging option, as shown in Figure 4-12. Oct 28, 2014 - 20 - Revision V1.01 Nuvoton Nu-Link Debug Adapter User Manual Figure 4-12 Keil RVMDK Programmer Selection Step 7: Click the Settings button to open the Flash Download form, as shown in Figure 4-13 where the user can specify the options before or after programming with the Nu-Link Adapter. Figure 4-13 Nu-Link Adapter Programming Settings Oct 28, 2014 - 21 - Revision V1.01 Nuvoton Nu-Link Debug Adapter User Manual 4.2.3 IAR EWARM Step 1: Install IAR EWARM. Make sure that Nu-Link Adapter Driver for IAR EWARM has been downloaded and installed before setting the Nu-Link Adapter such that the IAR EWARM can recognize the Nu-Link Adapter. Step 2: Open IAR EWARM, and open the project to be set. Step 3: In the Target tab of the General Options page (through invoking Project → Options), click the button in the right of the Device option (make sure the Device option is enabled), and select “Nuvoton → Nuvoton NUC100 series” as the target chip (NUC100 series is this case), as shown in Figure 4-14. Figure 4-14 IAR EWARM Target Chip Selection Debugger and Programmer Settings: Step 4: In the Setup tab of the Debugger page, select Third-Party Driver as the driver, as shown in Figure 4-15. Figure 4-15 Set IAR EWARM as Third-Party Driver for Debugger & Programmer Oct 28, 2014 - 22 - Revision V1.01 Nuvoton Nu-Link Debug Adapter User Manual Step: 5: In the Download tab of the Debugger page, make sure that the Use flash loader(s) option is selected, as shown in Figure 4-16. Figure 4-16 IAR EWARM Programming Settings Step: 6: In the Download tab of the Debugger page, select the Override default .board file option if you want the firmware to be downloaded to APROM or LDROM, and then specify the NUC100_APROM.board or NUC100_LDROM.board file (NUC100 series is used in this case). If no file is founded, specify the following path “$TOOLKIT_DIR$\config\flashloader\ Nuvoton\”, as shown in Figure 4-17. Figure 4-17 Select.board File for IAR EWARM Oct 28, 2014 - 23 - Revision V1.01 Nuvoton Nu-Link Debug Adapter User Manual Driver Plugin File Settings: Step 7: In the Third-Party Driver page, specify the path of the IAR debugger driver plugin “C:\Program Files\Nuvoton Tools\Nu-Link_IAR\Nu-Link_IAR.dll”, as shown in Figure 4-18. Figure 4-18 Set the Path of the IAR EWARM Debugger Driver Plugin Step 8: Click OK to save the settings and return to the IAR EWARM main window. Step 9: Invoke Nu-Link to open the Nu-Link form, select SWD as the Port, and specify the Nu-LinkPro I/O Voltage in the Target power control section (3.3V in this case), as shown in Figure 4-19. Figure 4-19 Specify the Port and Target I/O Voltage Oct 28, 2014 - 24 - Revision V1.01 Nuvoton Nu-Link Debug Adapter User Manual 4.2.4 CooCox CoIDE Step 1: Install CooCox CoIDE, which does not require any driver installation. Step 2: Open CooCox CoIDE and open the project to be set. Please also refer to the CoIDE Quick Start. Debugger Settings: Step 3: In the Debugger tab of the Debug Configurations form (through invoking Debug → Debug Configurations), select “Nu-Link” as the Adapter, select “SWD” as the Port, and click Apply to save the settings, as shown in Figure 4-20. Figure 4-20 Specify the Debugger Options for CooCox CoIDE Programmer Settings: Step 4: In the Download tab of the Debug Configurations form (through invoking Debug → Debug Configurations), select the Auto Download Before Debugging or Verify After Download option to proceed with a specific programming, and set the Programming Algorithm path as ”C:\CooCox\CoIDE\flash\NUC1xx_128.elf”, as shown in Figure 4-21. Oct 28, 2014 - 25 - Revision V1.01 Nuvoton Nu-Link Debug Adapter User Manual Figure 4-21 CooCox CoIDE Programming Settings Step: 5: To ensure the firmware will be downloaded to APROM or LDROM, select NUC1xx_128.elf or NUC1xx_LDROM.elf file (NUC100 series is used in this case) as shown in Figure 4-22; “32, 64, or 128” in the file name means the capacity of APROM. If no specific file is founded, specify the following path “C:\CooCox\CoIDE\flash\”. Figure 4-22 Set the Programming Algorithm File for CooCox CoIDE Step 6: At last, click Apply to save the settings, as shown in Figure 4-21. Oct 28, 2014 - 26 - Revision V1.01 Nuvoton Nu-Link Debug Adapter User Manual 5 5.1 +Appendix Nu-Link Adapter Operating Current When power is supplied via an USB during online programming, the operating current of Nu-Link Adapter is shown in the table below. . Table 5-1 Nu-Link Adapter Operating Current (Online Programming) Type Nu-Link-Pro Parameter SWD I/O Mode Settings Nu-Link Nu-Link-Me 5.0V 3.3V 2.5V 1.8V - 5.0V 3.3V USB Input Voltage (V) 5.0 5.0 5.0 5.0 5.0 5.0 5.0 USB Input Current (mA) 101 92 88 84 110 74 60 SWD I/O Voltage (V) 5.06 3.34 2.54 1.83 4.77 4.79 3.37 When power is supplied from a target board (SWD VCC pin) during offline programming, the operating current of Nu-Link Adapter is shown in the table below. Table 5-2 Nu-Link Adapter Operating Current (Offline Programming) Type Nu-Link-Pro Parameter Power Supplied from a Target Board Nu-Link 5.0V 3.3V 2.5V 1.8V 5.0V 3.3V 2.5V Power Supplied via an USB Off Off Off Off Off Off Off SWD VCC Input Voltage (V) 5.00 3.30 2.50 1.80 5.00 3.30 2.50 64 86 117 171 100 77 62 SWD VCC Input Current (mA) Oct 28, 2014 - 27 - Revision V1.01 Nuvoton Nu-Link Debug Adapter User Manual 6 Revision History Revision Description V1.00 Date Preliminary version. 2012/07/16 1. Update section 3.1.3 Direct Register Control Interface & 3.1.4 Semihost. 2. Revise section 4.2.1 ICP Tool step number error. V1.01 2014/10/28 Important Notice Nuvoton Products are neither intended nor warranted for usage in systems or equipment, any malfunction or failure of which may cause loss of human life, bodily injury or severe property damage. Such applications are deemed, “Insecure Usage”. Insecure usage includes, but is not limited to: equipment for surgical implementation, atomic energy control instruments, airplane or spaceship instruments, the control or operation of dynamic, brake or safety systems designed for vehicular use, traffic signal instruments, all types of safety devices, and other applications intended to support or sustain life. All Insecure Usage shall be made at customer’s risk, and in the event that third parties lay claims to Nuvoton as a result of customer’s Insecure Usage, customer shall indemnify the damages and liabilities thus incurred by Nuvoton. Oct 28, 2014 - 28 - Revision V1.01