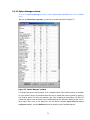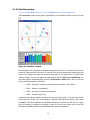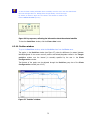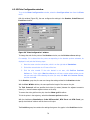
1
PC-CDU User’s Manual Reflects PC-CDU Version 2.1.10 MS (Build: April 1, 2002) Last Updated: August 6, 2002 Copyright Topcon Positioning Systems, Inc 2002 All rights reserved INTRODUCTION / TERMS AND CONDITIONS Thank you for purchasing your Topcon receiver. The materials available in this Manual (the "Manual") have been prepared by Topcon Positioning Systems, Inc. (“TPS”) for owners of Topcon products. It is designed to assist owners with the use of PC-CDU software (which may be used with the Topcon receiver) and its use is subject to these terms and conditions (the “Terms and Conditions”). PLEASE READ THESE TERMS AND CONDITIONS CAREFULLY. PROFESSIONAL USE. Topcon receivers are designed to be used by a professional. The user is required to be a professional surveyor or have a good knowledge of surveying, in order to understand the user and safety instructions before operating, inspecting or adjusting. Always wear the required protectors (safety shoes, helmet, etc.) when operating the receiver. COPYRIGHT. All information contained in this Manual is the intellectual property of, and copyrighted material of TPS. All rights are reserved. One may not use, access, copy, store, display, create derivative works of, sell, modify, publish, distribute, or allow any third party access to, any graphics, content, information or data in this Manual without the express written consent of TPS and may only use such information for the care and operation of your Receiver. The information and data in this Manual are a valuable asset of TPS and are developed by the expenditure of considerable work, time and money, and are the result of original selection, coordination and arrangement of TPS. TRADEMARKS. Topcon® is a registered trademark of Topcon Corporation. Windows® is a registered trademark of Microsoft Corporation. WinZip® is a registered trademark of Nico Mak Computing, Inc. Product and company names mentioned herein may be trademarks of their respective owners. DISCLAIMER OF WARRANTY: EXCEPT FOR ANY WARRANTIES IN A WARRANTY CARD ACCOMPANYING THE RECEIVER, THIS MANUAL AND THE RECEIVER ARE PROVIDED “AS-IS.” THERE ARE NO OTHER WARRANTIES. TPS DISCLAIMS ANY IMPLIED WARRANTY OF MERCHANTABILITY OR FITNESS FOR ANY PARTICULAR USE OR PURPOSE. TPS AND ITS DISTRIBUTORS SHALL NOT BE LIABLE FOR TECHNICAL OR EDITORIAL ERRORS OR OMISSIONS CONTAINED HEREIN; NOR FOR INCIDENTAL OR CONSEQUENTIAL DAMAGES RESULTING FROM THE FURNISHING, PERFORMANCE OR USE OF THIS MATERIAL, THE SOFTWARE OR THE RECEIVER. SUCH DISCLAIMED DAMAGES INCLUDE BUT ARE NOT LIMITED TO LOSS OF TIME, LOSS OR DESTRUCTION OF DATA, LOSS OF PROFIT, SAVINGS OR REVENUE, OR LOSS OF THE PRODUCT’S USE. IN ADDITION TPS IS NOT RESPONSIBLE OR LIABLE FOR DAMAGES OR COSTS INCURRED IN CONNECTION WITH OBTAINING SUBSTITUTE PRODUCTS OR SOFTWARE, CLAIMS BY OTHERS, INCONVENIENCE, OR ANY OTHER COSTS. IN ANY EVENT, TPS SHALL HAVE NO LIABILITY FOR DAMAGES OR OTHERWISE TO YOU OR ANY OTHER PERSON OR ENTITY IN EXCESS OF THE PURCHASE PRICE FOR THE RECEIVER. LICENSE AGREEMENT. Use of the PC-CDU Software and any other computer programs or software supplied by TPS or downloaded from a TPS website (the “Software”) in connection with a Topcon receiver constitutes acceptance of these Terms and Conditions in this Manual and an agreement to abide by these Terms and Conditions. The user is granted a personal, non-exclusive, non-transferable license to use such Software under the terms stated herein and in any case only with a single receiver or single computer. You may make one (1) backup copy of the Software. Otherwise, the Software may not be copied or reproduced. You may not assign or transfer the Software or this license without the express written consent of TPS. This license is effective until terminated. You may terminate the license at any time by destroying the Software and Manual. TPS may terminate the license if you fail to comply with any of the Terms or Conditions. You agree to destroy the Software and manual upon termination of your use of the receiver. All ownership, copyright and other intellectual property rights in and to the Software belong to TPS. If these license terms are not acceptable, return any unused Software and manual. CONFIDENTIALITY. This Manual, its contents and the Software (collectively, the “Confidential Information”) are the confidential and proprietary information of TPS. You agree to treat Confidential Information of TPS with a degree of care no less stringent that the degree of care you would use in safeguarding your own most valuable trade secrets. Nothing in this paragraph shall restrict you from disclosing Confidential Information to your employees as may be necessary or appropriate to operate or care for the receiver. Such employees must also keep the Confidential Information confidential. In the event you become legally compelled to disclose any of the Confidential Information, you shall give TPS immediate notice so that it may seek a protective order or other appropriate remedy. ii WEBSITE; OTHER STATEMENTS. No statement contained at the TPS website (or any other website) or in any other advertisements or TPS literature or made by an employee or independent contractor of TPS modifies these Terms and Conditions (including the Software license, warranty and limitation of liability). SAFETY. Improper use of a Topcon receiver can lead to injury to persons or property and/or malfunction of the product. The receiver should only be repaired by authorized TPS warranty service centers. Users should review and heed the safety warnings in the manual accompanying the receiver. MISCELLANEOUS. The above Terms and Conditions may be amended, modified, superseded, or canceled, at any time by TPS. The above Terms and Conditions will be governed by, and construed in accordance with, the laws of the State of California, without reference to conflict of laws. iii Contents PC-CDU SOFTWARE ........................................................................................................................1 PC-CDU’s purposes and functions...............................................................................................1 Typographic conventions...........................................................................................................2 Terminology and notation..........................................................................................................3 What information can be found in this document? .......................................................................4 System requirements ................................................................................................................4 Full- and limited-functionality versions of PC-CDU........................................................................4 Technical Support .....................................................................................................................5 2. SETTING UP PC-CDU .......................................................................................................................6 2.1. Installing PC-CDU .....................................................................................................................6 2.2. Removing PC-CDU ....................................................................................................................8 3. STARTING PC-CDU .........................................................................................................................9 3.1. How to start up PC-CDU ............................................................................................................9 3.1.1. Direct Mode..................................................................................................................... 10 3.1.2. ‘Internet Server’ Mode ...................................................................................................... 11 3.1.3. ‘Internet Client’ Mode ....................................................................................................... 13 3.2. How to close PC-CDU.............................................................................................................. 14 4. LEARNING PC-CDU IN DETAIL .......................................................................................................... 16 4.1. Main window.......................................................................................................................... 16 4.1.1. Geo tab........................................................................................................................... 18 4.1.2. XYZ tab ........................................................................................................................... 20 4.1.3. Target tab ....................................................................................................................... 20 4.2. The Main window’s menu ........................................................................................................ 21 4.2.1. ‘File Manager’ window ...................................................................................................... 21 4.2.1.1. Download files........................................................................................................... 22 4.2.1.2. The ‘Current log file’ tab............................................................................................. 25 4.2.1.3. ‘Download path’ tab ................................................................................................... 27 4.2.2. ‘Real-Time Logging’ dialog window .................................................................................... 27 4.2.2.1. ‘Single file’ tab........................................................................................................... 28 4.2.2.2. ‘Multiple files’ tab....................................................................................................... 29 4.2.3. ‘Manual Mode’ window...................................................................................................... 33 4.2.4. ‘Receiver Configuration’ window ........................................................................................ 34 4.2.4.1. General..................................................................................................................... 35 4.2.4.2. MINTER .................................................................................................................... 39 4.2.4.3. Positioning ................................................................................................................ 42 4.2.4.4. Base......................................................................................................................... 47 4.2.4.5. Rover ....................................................................................................................... 50 4.2.4.6. Ports ........................................................................................................................ 54 4.2.4.7. Events ...................................................................................................................... 57 4.2.4.8. Advanced.................................................................................................................. 59 4.2.5. Site Configuration window ................................................................................................ 66 4.2.6. Target Position window .................................................................................................... 66 4.2.7. RFM96 Configuration window ............................................................................................ 67 4.2.8. Initialize file system.......................................................................................................... 69 4.2.9. Clear NVRAM ................................................................................................................... 70 4.2.10. Reset receiver .............................................................................................................. 70 4.2.11. Option Manager window................................................................................................ 71 4.2.12. Scatter window............................................................................................................. 72 4.2.13. Satellites window .......................................................................................................... 74 4.2.14. Position window............................................................................................................ 75 4.2.15. Plots Configuration window............................................................................................ 76 4.2.16. About PC-CDU .............................................................................................................. 77 1. 1.1. 1.2. 1.3. 1.4. 1.5. 1.6. 1.7. iv APPENDIX A. PC-CDU SCRIPTS .................................................................................................................. 79 Introduction to PC-CDU scripts .......................................................................................................... 79 Variables ......................................................................................................................................... 80 PC-CDU commands........................................................................................................................... 80 Receiver commands.......................................................................................................................... 82 Running scripts from Windows Explorer.............................................................................................. 83 APPENDIX B. OUTPUT PERIOD SETUP WIZARD ................................................................................................ 84 APPENDIX C. CHANNEL NAVIGATION STATUS CODES ......................................................................................... 87 v List of Figures Figure 1. Dialog box “E nter Net wor k P asswo r d” ................................................................................6 Figure 2. Dialog box “File Download” .......................................................................................................7 Figure 3. Select a destination for the archive pccdu_ms.zip ..........................................................................7 Figure 4. Copying data from the website to your computer’s disk drive.......................................................8 Figure 5. “Connection Parameters” dialog .............................................................................................. 10 Figure 6. “Connection Parameters” window in Internet Server mode ........................................................ 12 Figure 7. “Connection Parameters” window in I nt er ne t C l ie nt mo de ................................................... 14 Figure 8. “Chat” window....................................................................................................................... 14 Figure 9. Main window ......................................................................................................................... 16 Figure 10. “Geo” tab ............................................................................................................................ 18 Figure 11. “XYZ” tab ............................................................................................................................ 20 Figure 12. “Target” tab ........................................................................................................................ 20 Figure 13. The Main window’s menu...................................................................................................... 21 Figure 14. “Download files” tab ............................................................................................................. 22 Figure 15. Message notifying that a file with the same name already exists .............................................. 23 Figure 16. Message notifying that a problem occurred while retrieving the current block of data from the receiver........................................................................................................................................ 23 Figure 17. “Current log file” tab............................................................................................................. 25 Figure 18. “Site Configuration” dialog box .............................................................................................. 26 Figure 19. “Download path” tab ............................................................................................................ 27 Figure 20. “Real-Time Logging” dialog window ....................................................................................... 28 Figure 21. “Multiple files” tab ................................................................................................................ 29 Figure 22. Generation of multiple files ................................................................................................... 30 Figure 23. “Overwrite existing files?” warning........................................................................................ 31 Figure 24. “Converter to RINEX Setup” window ...................................................................................... 32 Figure 25. “Manual Mode” window ........................................................................................................ 33 Figure 26. “General” tab....................................................................................................................... 35 Figure 27. “MINTER” tab ...................................................................................................................... 39 Figure 28. “Positioning” tab .................................................................................................................. 42 Figure 29. “<DATUM ID> Datum Parameters” window ........................................................................... 43 Figure 30. “GP S ” ta b......................................................................................................................... 45 Figure 31. “GLONASS” tab .................................................................................................................... 45 Figure 32. “WAAS” tab ......................................................................................................................... 46 Figure 33. “Base” tab ........................................................................................................................... 47 Figure 34. “Rover” tab.......................................................................................................................... 50 Figure 35. “Ports” tab........................................................................................................................... 54 Figure 36. “Parallel” subtab .................................................................................................................. 56 Figure 37. “Modem” subtab .................................................................................................................. 56 Figure 38. “Events” tab ........................................................................................................................ 57 Figure 39. “Advanced” subtab ............................................................................................................... 59 Figure 40. “Multipath Reduction” tab ..................................................................................................... 60 Figure 41. “Loops Management” subtab................................................................................................. 61 Figure 42. “External Frequency” subtab ................................................................................................. 62 Figure 43. “Raw Data Management” subtab ........................................................................................... 64 Figure 44. “Options” subtab.................................................................................................................. 66 Figure 45. “Target Position” window ...................................................................................................... 66 Figure 46. RFM96 item ......................................................................................................................... 67 Figure 47. “Connect” tab ...................................................................................................................... 67 Figure 48. Operations the user should take in Power cycle mode ............................................................. 68 Figure 49. “Configuration” tab. PDL configuration settings ....................................................................... 68 Figure 50. “Configuration” tab. Recommended settings. .......................................................................... 69 Figure 51. “Initialize File System?” warning ............................................................................................ 69 vi Figure Figure Figure Figure Figure Figure Figure Figure Figure Figure Figure Figure Figure 52. 53. 54. 55. 56. 57. 58. 59. 60. 61. 62. 63. 64. “Reset receiver?” warning ..................................................................................................... 70 “Option Manager” window .................................................................................................... 71 “Scatter” window ................................................................................................................. 72 “Satellites” window............................................................................................................... 74 Pop-up menu, reflecting the information about the selected satellite......................................... 75 “Position” window ................................................................................................................ 75 “Plots Configuration” window ................................................................................................ 76 “About PC-CDU” window....................................................................................................... 77 Wizard’s 1st window............................................................................................................. 84 Wizard’s 2nd window............................................................................................................ 85 Wizard’s 3rd window ............................................................................................................ 85 Wizard’s 4th window ............................................................................................................ 86 Wizard’s 5th window ............................................................................................................ 86 vii List of abbreviations, acronyms and other notation used in this manual ARP – Antenna Reference Point CMR – A format used to transmit differential corrections and related data from the Base receiver to the Rover receiver in DGPS and RTK applications C/A – Coarse Acquisition code DGPS – Differential GPS DLL – Delay Lock Loop DNS – Domain Name System GUI – Graphical User Interface IP – Internet protocol LO – Local Oscillator MINTER – Minimum INTERface. A dedicated user interface designed for TPS receivers NS – Navigation Satellite P – Precise code PC – Personal Computer PLL – (Carrier) Phase Lock Loop PLLC – (Carrier) Phase Lock Loop Control PS – Pseudorandom Sequence Receiver – Satellite Navigation User Receiver developed and manufactured by TPS RMS – Root-mean-square RNSS – Radio Navigational Satellite System RTCM – (Radio Technical Commission for Maritime Services). This format is used to transmit differential corrections and related data from the Base receiver to the Rover receiver in DGPS and RTK applications RTK – Real-time kinematic SW – software VCO – Voltage Control Oscillator viii 1. PC-CDU software 1.1. PC-CDU’s purposes and functions PC-CDU is a windows application for controlling radio navigation receivers developed and manufactured by the Topcon Positioning Systems company. The most current version of PC-CDU MS (as of 2.1.10, April 1, 2002) provides the following functions: • Connects a PC to a TPS receiver via the computer’s serial or parallel ports (Direct Con- nection Mode). • Configures a TPS receiver as an “Internet Server”. To do this, the user must run PCCDU in Internet Server Mode. • Connects a PC to a TPS receiver that has been configured and is being run in Server Mode via the Internet. In this case the user must run his/her PC-CDU in Internet Client Mode. • Keeps track of the total number and the status of all visible satellites. • Displays the receiver’s current position and time in real time. • Controls the recording of raw data measurements into the receiver’s internal memory. • Downloads collected raw data measurements (log files) from the receiver’s internal memory onto the computer’s disk drives. • Records, in real time, the receiver’s raw data measurements on the computer’s disk in JPS and RINEX formats (using the executable file jps2rin.exe). • Displays, in real time, the graph of the receiver’s current position and the satellite sky plot. • Allows displaying and programming the receiver’s main settings (such as Data Re- cording Interval, Position Computation Mode, etc.). • Allows display of the current receiver options and loading of Option Authorization Files. 1 1.2. Typographic conventions Table 1 specifies all typographic conventions used in this manual. Table 1. Document conventions Example Description Clock offset This format is used in definitions or when it is necessary to emphasize that the marked term is technical jargon. Select from the F i l e … menu Titles of dialog windows/boxes, names of menu options and other GUI components. Press CTRL+V This format is used to specify keys and key combinations. Type the string 194.85.135.59. This format is used to enter various string information (e.g., file and directory names) as well as user commands. This format is used to describe the sequence of To clear the NVRAM: steps that the user must take. 1. Select the option C l e a r N V R A M from the T o o l s menu… The user is recommended to take note of the Note… given information. These hints and tips will help the user learn the Some good hints… program faster. The user is warned about possible errors. Caution! By no means use… 2 1.3. Terminology and notation Table 2 shows what terminology and notation are used for standard Windows GUI components in this manual. Table 2. Тerms used in this manual to describe standard Windows GUI components GUI component Term Button Edit box or indicator Selected checkbox Unselected checkbox Selected radio button Unselected radio button Progress bar Status bar Spin button File List box Drop-down list box Menu Tab Control 3 1.4. What information can be found in this document? This document provides all information necessary for the user to comprehensively learn PC-CDU before installing and using this software. In Chapter 2, the reader will find detailed instructions about how to install PC-CDU on a PC. Chapter 3 explains how to launch the program. Chapter 4, which is intended as a user’s reference manual, focuses on the particular functions this program features. The appendixes provide supplementary information about PC-CDU: Appendix A. PC-CDU Scripts introduces readers to the scripts and describes how to use them. Appendix B. Output Period Setup Wizard presents the windows, which are used to adjust the periods of generating raw data and position. Appendix C. Channel Navigation status codes shows the list of all available satellite navigation status codes. 1.5. System requirements Check that you have the following required (or recommended) items before installing and using PCCDU. • PC-compatible with Intel® Pentium® 100 MHz or faster. • 5 Мbyte free disk space. • 16 Мbyte RAM or more (32 Мbyte recommended). • 32-bit operating system such as MS Windows 95/98/Me/NT/2000. • Color monitor at 640x480 screen resolution. • Internet Server/Client applications require that your computer has an internet connection. If run on a Windows NT/2000 computer, PC-CDU does not allow connection to the receiver via the computer’s parallel ports. 1.6. Full- and limited-functionality versions of PC-CDU PC-CDU exists in two implementations: the full-functionality version called PC-CDU MS, and the reduced-functionality version called PC-CDU Lite. Differences between PC-CDU MS and PC-CDU Lite are listed in Table 3. 4 Table 3. Differences between PC-CDU MS and PC-CDU Lite Function PC-CDU MS PC-CDU Lite Connect to a receiver via the Internet Yes No Yes No Yes No Record data on a PC’s disk drive in real time (“Real-Time Data Logging”) Graphical presentation of the receiver’s current position & the satellite sky plot Each version of PC-CDU MS has a limited lifetime as a full-functionality tool. After the current version of PC-CDU MS expires, its extended functions (see Table 2) are automatically disabled so that PC-CDU MS “turns into” PC-CDU Lite. 1.7. Technical Support Occasionally, PC-CDU users encounter problems during installation or use of the program. Should you have any problems with PC-CDU, please contact TPS Customer Support. Please be ready to provide TPS Customer Support with the following information: • Did you try to fix the problem(s) on your own based on the troubleshooting tips available in the manual? • System/hardware specifications of the computer on which you are running (installing) your PC-CDU. • ASCII file with a complete list of the receiver options/receiver parameters enabled in your receiver. For how to obtain a text file listing all receiver options and parameters, please refer to 4.2.16. To get in contact with TPS Customer Support, please use the following e-mail addresses: [email protected] or [email protected]. 5 2. Setting up PC-CDU 2.1. Installing PC-CDU There is no special installer for the current version of PC-CDU. This tool is a ready-to-run executable. To install PC-CDU on you computer, take the following steps: 1. Visit the TPS section (http://www.topcongps.com/) of the Topcon website page. Click on the S o f t w a r e link in the top-left corner of the window. Next, select the S o f t w a r e D o w n l o a d s link. Finally, click on the link Click here to download pccdu_ms.zip to start data downloading. To download PC-CDU Lite, select the U t i l i t i e s link on the S o f t w a r e C e n t e r page. 2. You will see the dialog box E n t e r N e t w o r k P a s s w o r d appears on the screen. You are prompted to enter a username and password. After you type in this information, press OK (Figure 1). Figure 1. Dialog box “E n t e r N e t w o r k P a s s w o r d ” PC-CDU Lite is a freely available software. Thus, when you install PC-CDU Lite, the E n t e r N e t w o r k P a s s w o r d prompt will not appear on the screen. 6 3. The File Download dialog box will be opened. To continue the download process, press Save (Figure 2). Figure 2. Dialog box “File Download” 4. Use the dialog window Save As to specify the desired destination (disk drive/folder) for the archive pccdu_ms.zip (Figure 3). Figure 3. Select a destination for the archive pccdu_ms.zip 7 5. Wait while the archive is being downloaded onto your system (Figure 4). Figure 4. Copying data from the website to your computer’s disk drive. 6. Create a folder on your local disk drive1. 7. Unpack the archive into this folder with WinZip® or another appropriate software. You will see the following files appear in the folder: 2.2. • Executable file Pccdu.exe; • Auxiliary binary file lptaccess.vxd. Removing PC-CDU The simplest way to remove PC-CDU from a system is to delete the whole directory2 that was created when installing PC-CDU and in which Pccdu.exe and other PC-CDU related files reside. Also, do not forget to delete the PC-CDU shortcut, if available. 1 It is recommended to use C:\Program Files\TPS\PC-CDU 2 Assuming this directory is not used for storing any other (i.e., PC-CDU-unrelated) data. 8 3. Starting PC-CDU 3.1. How to start up PC-CDU PC-CDU can be launched, as any other windows program, in one of the following ways: WAY # 1. Double-click on PC-CDU’s shortcut on the desktop (if it has been created). WAY # 2. In Windows Explorer go to the directory where Pccdu.exe resides and double-click on the corresponding icon. WAY # 3. Press the S t a r t button in the bottom-left corner of your computer’s screen and select R u n from the pull-up menu. In the O p e n bo x specifies the full path to Pccdu.exe. Press O K . After you first run PC-CDU, you will see the file pccdu.ini appear in the directory from which the executable has been launched. In this .INI file PC-CDU will store all its settings. If you want to have more than one copy of PC-CDU, each one with its own unique settings, you will need to keep these copies in different directories. Running different copies of PC-CDU from different directories will allow you to maintain unique setting for each of the copies. Once PC-CDU is launched, the C o n n e c t i o n P a r a m e t e r s window will appear (Figure 5). In this window the user first selects the desired connection mode: • Direct • Internet Client • Internet Server 9 Figure 5. “Connection Parameters” dialog 3.1.1. Direct Mode This mode is used when it is required to connect a computer and a TPS receiver directly, (i.e., using the computer’s serial or parallel port and an appropriate cable) (see Figure 5). To connect your computer to the receiver in Direct mode: 1. Select from the P o r t list box the serial (COM1, COM2, ...) or parallel (LPT1, ...) port that you want to use for the connection. 2. From the B a u d R a t e list box, select the desired baud rate. The checkbox I n f r a r e d p o r t is selected when you want to use an infra-red adaptor to establish a connection between your computer and receiver over an infrared data-link. Connection via an infrared port will be available only if the following conditions are met: • An appropriate external infrared adaptor is connected to the selected serial port on the computer side. • Your receiver supports the infrared port hardware-wise. • The I n f r a r e d P o r t option is enabled in your receiver. 10 3. Select the R T S / C T S h a n d s h a k i n g checkbox (optionally). It is strongly recommended that you select the RTS/CTS checkbox as this makes data exchange between the receiver and computer more reliable. Prior to selecting this option, make sure that: • RTS/CTS handshaking is supported both at the computer and at the receiver. • The cable used allows RTS/CTS handshaking. 4. Press C o n n e c t. Along with the above listed options, the user may need to adjust some of the settings in the P r o g r a m S e t t i n g s panel. This panel includes the following three options: • Passive mode • Manual mode only • R e s t o r e t h e r e c e i v e r ’ s o r i g i n a l baud rate o n D i s c o n n e c t In P a s s i v e m o d e PC-CDU is not allowed to change any receiver parameters. Note that in this mode PC-CDU will display in the main window only those satellites whose elevation angles are larger than the elevation mask specified by the parameter T e r m i n a l E l e v a t i o n M a s k (see 4.2.4.1). Once P a s s i v e m o d e is off, PC-CDU will automatically force T e r m i n a l E l e v a t i o n M a s k to -90º. Therefore the user will be able to view in PC-CDU’s main window (see 4.1) all of the satellites that are being tracked. It is important to remember that this setting (-90º) will be effective as long as the main window remains open. Note however that the original value of T e r m i n a l E l e v a t i o n M a s k will not be lost in this case; once the main window is closed, PCCDU will automatically restore the original mask. If M a n u a l m o d e o n l y is on, PC-CDU will perform as an input/output terminal, which allows the user to send commands to and receive information from the receiver. If the user has selected the checkbox R e s t o r e t h e r e c e i v e r ’ s o r i g i n a l b a u d r a t e o n D i s c o n n e c t, PC-CDU will determine and save the receiver’s original baud rate and then restore this setting automatically on disconnecting the receiver (by pressing the D i s c o n n e c t menu item). 3.1.2. ‘Internet Server’ Mode When running PC-CDU in I n t e r n e t S e r v e r mode, the user can configure a TPS receiver3 to perform as a PC-CDU server. Remote receivers (PC-CDU clients) can then access this PC-CDUserver via the Internet4. The parameters P o r t , B a u d ra t e , I n f r a r e d p o r t , R T S / C T S h a n d s h a k i n g , P a s s i v e m o d e and M a n u a l m o d e serve the same purposes as in D i r e c t mode (see 3.1.1). The other 3 It is assumed that the receiver is connected to your computer directly. 4 This version allows a TPS receiver configured as PC-CDU-server to be accessed by only one remote receiver (PC-CDU-client) at a time. 11 group of parameters, I n t e r n e t S e t t i n g s , are intended for the user to tune PC-CDU for Internet connection: T C P p o r t, P a s s w o r d , L o g s e r v e r e v e n t s , D i s p l a y d a t a o n s e r v e r and D N S l o o k u p . Special attention should be given to setting T C P p o r t for PC-CDU servers5. Make sure that the selected TCP port does not coincide with any one of the reserved port numbers. The default TCP port number is 8000. The edit box P a s s w o r d is used to protect the PC-CDU server from unauthorized access. The user can enter in this edit box up to 128 alphanumeric characters. If the user has selected the checkbox L o g s e r v e r e v e n t s , there will be created a text log file (pccdu_server.log) in PC-CDU’s working directory. This file will contain all the information that has been collected during the communication session between the PC-CDU server and PC-CDU client. New information will be added to the file after another client connects to the PC-CDU server. If the user wants to view the satellite information and the antenna’s current position in the main windows, he/she must select the D i s p l a y d a t a o n s e r v e r checkbox. Otherwise no information will be displayed in the window. If the checkbox D N S l o o k u p is selected, the file pccdu_server.log will contain the IP and DNS addresses. Figure 6. shows an example of the C o n n e c t i o n P a r a m e t e r s dialog window in I n t e r n e t S e r v e r mode. Figure 6. “Connection Parameters” window in Internet Server mode In this example a four-character password and the default TCP port number are used. 5 According to TCP specifications, TCP port number can be up to 64К. Although the user can formally enter a port number N, which is greater or equal to 64К, the software will implicitly force it to N mod 64К. 12 After the C o n n e c t button is pressed, the dialog windows C h a t and M a i n will be displayed. The C h a t window allows an operator running PC-CDU C l i e n t to communicate with his/her counterpart who runs the corresponding remote receiver with PC-CDU Server. In addition, this dialog window displays information about the server’s current status. 3.1.3. ‘Internet Client’ Mode The user selects I n t e r n e t C l i e n t mode when it is required to access a remote receiver that is directly connected with and controlled by a computer on which PC-CDU Server is being run (the obvious pre-condition is that both computers must have access to the Internet.). After a connection to the remote receiver is established, the user can control this receiver exactly in the same manner as if the user’s computer were directly connected to the receiver, specifically: send commands to the remote receiver, download log files from the receiver’s memory, etc. In order to be able to connect to the remote receiver, the user first needs to configure his/her computer as a PC-CDU Client capable of working with the corresponding PC-CDU Server. The user is required to know the following information about the PC-CDU Server: • IP or DNS address; • TCP port number; • password (if necessary). Figure 7. shows an example of the C o n n e c t i o n P a r a m e t e r s dialog window with the following settings: • PC-CDU Server’s IP address: 194.85.135.59; • TCP port number: 8000; • Password is not used. In the H o s t n a m e edit box the user can enter either the server’s IP address (it is 194.85.135.59 in the given example) or its DNS address (it is pab.topconps.com in this case). 13 Figure 7. “Connection Parameters” window in I n te rn e t Clie n t m o d e After all necessary settings have been entered into this window, press C o n n e c t. You will see PCCDU open the main window and the C h a t w i n d o w . The C h a t window allows the operator running PC-CDU-Server on one end to exchange messages with the operator running PC-CDU-Client on the other end (Figure 8). Messages sent from the client to the server are preceded by the character “>”. Messages sent by the server to the client begin with the character “<”. The last received message is topmost in the list. Figure 8. “Chat” window 3.2. How to close PC-CDU To disconnect from the receiver, select the D i s c o n n e c t option from the F ile menu. Alternatively, you can use the keys CTRL+D to close the connection. Pressing the D i s c o n n e c t button will result in: • Turning off R T S / C T S h a n d s h a k i n g ; • Resetting the receiver parameter /par/out/elm/cur/term to its original value. Only if the checkbox P a s s i v e m o d e has not been deselected; 14 • Resetting the baud rate to 115200, if the receiver’s original baud rate exceeded 115200; • Restoring the original baud rate (i.e., that the receiver had before running PC-CDU), only if the option Restore the receiver’s original baud rate o n D i s c o n n e c t has been selected. To quit PC-CDU, select E x i t from the F ile menu. Alternatively, you can close the program by pressing the keys CTRL+X. If the receiver has not been disconnected by the time the program is terminated, the connection will be automatically broken before PC-CDU is closed. It is strongly recommended to close the connection with the receiver and close PC-CDU prior to switching the receiver OFF and disconnecting the cable. 15 4. Learning PC-CDU in detail 4.1. Main window After PC-CDU has established a connection between the computer and receiver, the main window will be opened (see Figure 9). The main window consists of two panels, the G P S S a t e l l i t e s panel on the left and G L O N A S S S a t e l l i t e s on the right, which are separated by the G e o | X Y Z | T a r g e t box. The panels display the basic tracking information (parameters) for the locked satellites. These tracking parameters are described in table 4. The G e o | X Y Z | T a r g e t box represents the antenna’s current position (if available) and the time-frequency parameters. Figure 9. Main window 16 Table 4. Tracking parameters displayed in the GPS Satellites and GLONASS Satellites panels Parameter # Description GPS SV PRN. If the character “*” is shown next to PRN in the column, this means that almanac data are unavailable for the corresponding satellite. Sn GLONASS SV Orbital Slot Number. If the character “*” is shown next to Sn in the column, this means that almanac data are unavailable for the corresponding satellite. Fn EL GLONASS SV Frequency Number. Elevation angle in degrees. The signs “+” and “-“ immediately following the elevation angles indicate that the corresponding satellites are either ascending and descending, respectively. If a satellite is at maximum elevation, it is marked with “^”. AZ Azimuth in degrees. CA Signal-to-noise ratio (C/N0) in the C/A channel [dB*Hz]. P1 Signal-to-noise ratio (C/N0) in the P1 channel [dB*Hz]. P2 Signal-to-noise ratio (C/N0) in the P2 channel [dB*Hz]. TC Time elapsed since the last loss-of-lock in the C/A channel for the corresponding satellite. This time is given in minutes or, if the symbol “:” is specified in the column, in seconds. SS Satellite navigation status. For a complete description of the satellite navigation status structure, see Appendix C. If a satellite is not used in position computation, its SS flag will be set to “-“. Otherwise “+” will be displayed. Note that “??” will be displayed anywhere in the panels where the corresponding parameters are unavailable. The user can sort data in a column in descending (ascending) order by clicking on the column’s title. 17 4.1.1. Geo tab The G e o tab shows the receiver’s antenna’s current position and the time-frequency parameters describing the behavior of the receiver’s local oscillator (Figure 10): Figure 10. “Geo” tab • Geodetic coordinates6 - Lat – latitude; Lon – longitude; Alt – ellipsoidal height. • Vel – (magnitude of the) velocity (m/s). • RMS Pos – rms position error7 (m). • RMS Vel – rms velocity error8 (m/s). • PDOP – Position dilution of precision. • Solution type: • ♦ Standalone ♦ Code differential ♦ RTK float ♦ RTK fixed L Q – This field reflects the status of the received differential messages and contains the following information: ♦ Data link quality in percentage. ♦ Time (in seconds) elapsed since the last received message. ♦ Total number of received correct messages. ♦ Total number of received corrupt messages. 6 These geodetic coordinates are computed in WGS 84 regardless of the current value of the /par/pos/datum/cur parameter. For more details on this parameter, see the GRIL Reference manual. 7 More precisely, this is the square root of the trace of the position error covariance matrix. 8 More precisely, this is the square root of the trace of the velocity error covariance matrix. 18 If the receiver is not (for some reason) receiving differential corrections or if none of the ports has been configured to receive differential corrections, the field L Q will either be empty or it will look like this: 100%(999,0000,0000). Currently the values for this field are obtained from the [MS] message. • R e c e i v e r t i m e shows the receiver’s current time within day. This value is taken from the message [~~]. For more information about [~~], see the GRIL Reference Manual. Currently the message [~~] reports the time within day in the GPS time scale only. • R e c e i v e r d a t e shows the receiver’s current date as specified in the corresponding [RD] message. • C l o c k o f f s e t describes the time derivative of (Tr – Trr), where Tr designates the receiver time, Trr designates the receiver reference time. For more information about Tr and Trr, see the GRIL Reference Manual. This parameter is obtained from the [DO] message and is expressed in parts per million (ppm). • O s c . o f f s e t is derived from the message [OO] and it is expressed in ppm. The parameter describes the difference between the VCO’s nominal and quiescent frequencies. • T r a c k i n g t i m e is the time elapsed since the last complete loss-of-lock event in the receiver’s C/A channels as specified in the corresponding [TT] message. 19 4.1.2. XYZ tab The X Y Z tab, which is shown in Figure 11, is similar to the G e o tab except for the fact that the position of the receiver’s antenna is displayed in Cartesian coordinates here. Figure 11. “XYZ” tab 4.1.3. Target tab The T a r g e t tab (Figure 12) is used to display various navigational information, specifically: Figure 12. “Target” tab • Lat, Lon –latitude/longitude of the target or of the receiver’s antenna. • ETT, NTT – ‘Easting-to-target’ and ‘Northing-to-target’ in the local system with the origin at the receiver. • DTT – ‘Distance-to-target’ (in meters). • CTT – ‘Course-to-target’. The rest of the parameters have been described above (see the G e o and X Y Z tabs). To set the target coordinates equal to the current receiver coordinates, doubleclick on either L a t or L o n field. 20 To reset the timer in the bottom-right corner of the Main Window to 00:00:00, double-click somewhere in the hour:min:second area. 4.2. The Main window’s menu The user can access any one of PC-CDU’s dialog windows by selecting the corresponding item from the main window’s menu (Figure 13). Some of the menu items have shortcut keys. For example, the user can select the S i t e item (from the C o n f i g u r a t i o n menu) with the keys CTRL+I. Figure 13. The Main window’s menu The following sections will describe all available menu items and the corresponding dialog windows in detail. 4.2.1. ‘File Manager’ window To open the F i l e M a n a g e r dialog window, select the F i l e M a n a g e r item from the F ile menu, or press the keys CTRL+F. The F i l e M a n a g e r dialog window has three tabs: • Download files • Current log files • Download path 21 4.2.1.1. Download files This dialog window (Figure 14) allows one to delete log files from the receiver memory, or download them into a computer. Figure 14. “Download files” tab Before downloading the desired log file(s) onto your computer, select the folder on the PC where you want the file(s) to be stored. To do this, use the D o w n l o a d p a t h tab. Once the destination has been specified, go to the D o w n l o a d f i l e s tab, highlight the file(s) that you want to download onto the computer, and press D o w n l o a d . You will see the following color download status indicators in the course of downloading the data (see Figure 14): • The green circle ( ) indicates the file(s) that have been successfully downloaded. • The red circle ( ) marks the file that is being downloaded. • The blue circle ( ) indicates the file(s) in the queue for downloading. The user can interrupt the download by pressing the S t o p button. Files in the destination folder will have the same names and extensions as the original receiver log files. Before downloading the current log file in the destination folder, PC-CDU will check if there already exists a file with the same name in this folder. If such a file is found there, the user will be prompted to select either A p p e n d or O v e r w r i t e . In the first case the log file downloaded will be appended to the existing file. In the second case the existing file will be overwritten (Figure 15). 22 Figure 15. Message notifying that a file with the same name already exists Care should be taken when selecting A p p e n d . This option is normally used only if the downloading process has for some reason been interrupted and you want it to be resumed. The warning ‘Last warning: Waiting for the 1st block’ appearing in the status bar while downloading a log file (Figure 16) indicates that PC-CDU cannot for some reason retrieve the next block of data from the receiver. The field R e t r ie s shows how many attempts to retrieve this block of data have been made so far. Figure 16. Message notifying that a problem occurred while retrieving the current block of data from the receiver If such a problem occurs, you may need to try a higher baud rate and/or a smaller block size. Usually, the larger the block size the more efficient the data transfer. On the other hand, if the connection between the computer and receiver is not reliable enough, reducing the block size can often help to exclude or at least minimize communication errors. Receiver data can also be transferred to the computer via the parallel port, which normally allows a fifteen to twenty-fold reduction in the data transfer time as compared to the serial ports. There are 23 however three (3) limitations due to which one will not be able to use the parallel ports for data transfer even if such ports are available both in the receiver and the computer. The first limitation is the requirement that the computer runs under Windows 95, 98 or МЕ. The second limitation is that your computer’s parallel port must be configured as ECP or ECP+EPP. The third limitation is that the option P a r a l l e l P o r t must have been enabled in the receiver. Selecting the E x c l u s i v e m o d e checkbox will allow one to increase considerably the data transfer speed, especially if 115200 or a higher baud rate has been set. Note however that using this option will disable most of the processes running inside the receiver (including the satellite tracking process) in order to ensure the highest possible file transfer speed. One more note about downloading the receiver log files onto the computer. If the E x c l u s i v e m o d e checkbox is not selected, one can start downloading the current log file without closing it first. The downloading process will stop at the moment when EOF is reached in the log file. However the receiver will continue to write new data to the log file after that. This method has two drawbacks. First, the download progress indicator can occasionally display values exceeding 100%. Second, the last record can be corrupt in the downloaded file. If E x c l u s i v e m o d e is on, it is impossible to start downloading the current log file without closing it first. In other words, if the E x c l u s i v e m o d e checkbox has been checked and one wants to start downloading the current log file, PC-CDU will automatically close the log-file after the download is finished. Use the Delete button to erase unnecessary log-files in the receiver memory. To delete a group of log files, click on any one of them, then hold down the [CTRL] key and select the rest of the files, and finally press the D e l e t e button. To delete a group of adjacent log files, click on the first of them, then hold down the [SHIFT] key and click on the last of the files, and finally press the D e l e t e button. Log files that have inadvertently been deleted from the receiver memory can be restored with the command set,/par/dev/blk/a/removed,on. One can send this command to the receiver from the M a n u a l M o d e dialog window. The user is able to recover deleted files only if he/she has not recorded any new files in the receiver memory since these files were removed. Otherwise, it cannot be guaranteed that the deleted files can be successfully restored. With the R e f r e s h button the user can reload the list of the receiver log files. Press E x i t to close the F i l e M a n a g e r tab. 24 4.2.1.2. The ‘Current log file’ tab In this tab the user can delete existing and create new receiver log files (Figure 17). Figure 17. “Current log file” tab To create (open) a new log file take these steps: 1. Enter the desired filename in the F i l e n a m e edit box, or select a file from the file list displayed in this window. In the latter case, just double-click on the corresponding filename. 2. Specify the desired data recording interval (i.e., “data update interval”) in the R e c o r d i n g i n t e r v a l edit box. 3. Set the desired E l e v a t i o n m a s k. 4. Click the S i t e p a r a m e t e r s button. The S i t e C o n f i g u r a t i o n dialog box will appear (Figure 18). Specify the desired S i t e N a m e and then select the correct A n t e n n a S t a t u s from the corresponding list box. Set the A n t e n n a H e i g h t parameter and select/deselect the S l a n t checkbox depending on whether you have specified the slant or vertical antenna height. Set the correct A n t e n n a T y p e. Press O K . 25 Figure 18. “Site Configuration” dialog box After the O K button is pressed, the S i t e p a r a m e t e r s dialog box will be closed and the parameters that have been specified in the box will be copied to PCCDU.ini. If one then presses the S t a r t button in the F i l e M a n a g e r dialog window, these settings will be enabled and inserted into the newly created (current) log file. On the other hand, if one needs to update the site information for the current log file, it will be sufficient to press the S e n d t o r e c e i v e r button to send the new site settings (site name, antenna status, antenna height, etc.) directly to both the receiver/log-file and PCCDU.ini. 5. Press S t a r t. A new log file will be created9 and the receiver will start recording data into the file. If you set a recording interval that is not supported by the receiver, PC-CDU will launch a utility called O u t p u t P e r i o d S e t u p W i z a r d . For more information on the Wizard, see Appendix B. Output Period Setup Wizard. To stop data recording and close the file, press the S t o p button. To keep track of the data recording process, see how the log-file size varies in time. The field T o t a l m e m o r y shows the total amount of space in bytes (in the receiver) available for data. The field F r e e m e m o r y displays how much space in the receiver is free for storing data. The buttons Delete , R e f r e s h and E x i t serve the same purposes as in the D o w n l o a d f i l e s t a b (see 4.2.1.1). 9 According to the GRIL terminology, this file is referred to as “current log-file”. 26 4.2.1.3. ‘Download path’ tab In this tab one selects the destination folder for the files downloaded (Figure 19). Figure 19. “Download path” tab Note that the window’s right panel is for reference only. One will be prevented from doing any operations on the files in the corresponding directory. If the user has not explicitly selected a destination folder for the files downloaded, these files will be stored based on the last specified download path. 4.2.2. ‘Real-Time Logging’ dialog window The term real-time logging means recording receiver data into a PC in real time mode. To open the R e a l - T i m e L o g g i n g dialog window, select R e a l - T i m e L o g g i n g from the F i l e menu or press the keys CTRL+R. The R e a l - T i m e L o g g i n g dialog boxes (see Figure 20 and Figure 21) are, structurally, similar to the Main window. For a description of the GUI components that are identical for the R e a l T i m e L o g g i n g and Main windows, refer to 4.1. Below we will focus on the components specific to the R e a l - T i m e L o g g i n g dialog boxes. Note the three tabs in the top-left corner of the window: S i n g l e f i l e , M u l t i p l e f i l e s and S e l e c t o u t p u t p a t h . For information on the S e l e c t o u t p u t p a t h tab, refer to 4.2.1.3. Before we getting down to the other two tabs, consider the parameters displayed in the middle of the Real-Time Logging window, between the G P S S a t e l l i t e s and G L O N A S S S a t e l l i t e s tables. The E l a p s e d t i m e field shows the time elapsed since the current log file was opened. Every time a new log file is created, this timer is reset to 00:00:00. The R e c e i v e d field shows the log-file size in bytes. This parameter will vary as new data are recorded into the file. After pressing the S t o p button, one will see the log-file’s final size in the field. 27 The S t a r t button allows the user to start recording data into the file. After starting the data recording the name on the button will change to S t o p . Pressing the S t o p button will close the file. If one sets a recording interval that is not supported by the receiver, PC-CDU launches a utility called O u t p u t P e r i o d S e t u p W i z a r d . For more information on the Wizard, see Appendix B. Output Period Setup Wizard. Press E x i t to quit the R e a l - T i m e L o g g i n g dialog window. The value of R e c o r d i n g i n t e r v a l specified in the Real-Time Logging window applies only to this mode. The E l e v a t i o n m a s k edit box is associated with the receiver parameter /par/out/elm/cur/term. 4.2.2.1. ‘Single file’ tab Figure 20. “Real-Time Logging” dialog window In this mode (Figure 20) PC-CDU will record receiver data into one specific file on the host computer. In the S a v e t o edit box enter the name of the file where the receiver data are to be logged. By default the name of a JPS file created in real-time logging mode will coincide with the site name from the S i t e C o n f i g u r a t i o n dialog box. 28 4.2.2.2. ‘Multiple files’ tab This function, “real-time logging of multiple log files”, is intended to automate the process of realtime downloading of the receiver data to JPS files according to the specified time schedule. In this mode PC-CDU will automatically open/close JPS files in regular time intervals (Figure 21). A new JPS file will be opened immediately after the previous file is closed. Figure 21. “Multiple files” tab The filename convention settings “Prefix” and “Numbering” determine how the JPS files created will be named. As the name of the setting implies, P r e f i x determines the prefix part of the filename. By default, PC-CDU will use the site name specified in the S i t e C o n f i g u r a t i o n dialog window as the filename prefix. The N u m b e r i n g edit box allows you to select the desired file numbering scheme: • If the option Date & Time is selected, the numeric part of the filename will look as follows: YDDDHHMM, where Y – last digit of the year [0-9], DDD – day of the year [1-366], HH – hours in the receiver time scale [00-23], MM – minutes in the receiver time scale [00-59]. The date and time used for the filename will correspond to the first epoch recorded into the file. • If the option Ascending Count is selected, the numeric part of the filename will vary between 0000 and 2147483647. 29 If the option Ascending Count has been chosen, the parameter S t a r t C o u n t w i l l b e enabled. In this edit box one can enter the starting state of the JPS file count, (i.e., the numeric part of the name of the JPS file created first). This count will be incremented as new JPS files are opened. N e w f i l e e v e r y is associated with a pair of components, an edit box and a drop-down list box. Use the list box to select the desired time unit (day, hour or minute). Use the edit box to specify the interval (in the selected time unit) in which the current JPS file will be closed and the next one will be opened. Note that this interval must be an integer10. Also note that some of the multiple files created may be shorter (in terms of their duration in time) than it is specified in the corresponding edit box. To understand better how multiple files are opened and closed in multiple file mode, let’s consider the “artificial” time scale with the origin at 0h00m00s 11 ) as shown in the figure below. This time scale is divided into intervals equal to the period as specified by N e w f i l e e v e r y fields. The first of the multiple JPS files will be opened immediately after the S t a r t button is pressed. The first file will be closed and the second one opened as the 2nd interval starts, for example, at t=2n (see the figure below), etc. Time duration of the second and all the following multiple files (maybe except the last one) will be exactly equal to the selected file period. To stop the multiple file data logging, press the S t o p button. Note that the last file, too, can be shorter than is specified in N e w f i l e e v e r y. Figure 22. Generation of multiple files If the user wants PC-CDU to overwrite the existing files whose names coincide with the names of the newly created files, select the O v e r w r i t e e x i s t i n g f i l e s checkbox before starting realtime logging. 10 Whatever time unit is selected. 11 That is, at the beginning of the day when multiple file logging is started by pressing the Start button. 30 Example. Assume that the Ascending Count and Overwrite existing files options have been selected. If one then presses the S t a r t button, PC-CDU will display a prompt as shown below. Figure 23. “Overwrite existing files?” warning In this example the destination folder is “E:\c-s-db\ses”, the filename prefix is “Site”. Press Y e s (Figure 23) to accept the prompt’s default answer. If you press N o , you will return to the real-time logging window. There you will need first to uncheck the Overwrite existing files checkbox and then press the S t a r t button to start data logging. In this case the numeric parts of the names of the JPS files recorded will be incremented starting from the first unused value, not necessarily from 0000. If the A u t o c o n v e r t t o R I N E X checkbox is selected, PC-CDU will automatically convert all newly created JPS files to RINEX. Note that this conversion is performed “on the move”. If you want to use the A u t o c o n v e r t t o R I N E X function, make sure that the executable file jps2rin.exe is available on your computer. The S e t u p c o n v e r t e r button, which is located immediately below the A u t o c o n v e r t t o R I N E X checkbox, allows you to set up the jps2rin.exe converter. Pressing this button will open the dialog window C o n v e r t e r t o R I N E X S e t u p (Figure 24). 31 Figure 24. “Converter to RINEX Setup” window The information specified in the P r o p e r t i e s panel will be put in the header of the corresponding RINEX observation file: • R u n b y – name of the person or agency launching the jps2rin.exe converter. • O b s e r v e r – name of the person who collected the data. • A g e n c y – name of the agency responsible for collecting the data. • A n t e n n a # - antenna number to be copied in the RINEX observation file. • A n t e n n a t y p e – antenna type to be copied in the RINEX observation file. • C o m m e n t – comment line(s). • M a r k e r n a m e – name of the antenna marker. • M a r k e r n u m b e r – number of the antenna marker. In the A p p l i c a t i o n edit box, the full path to jps2rin.exe must be entered. Use the button B ro w s e to select the desired filename path instead of typing it. Use the checkbox E x c l u d e G P S (E x c l u d e G L O N A S S ) to exclude from the resulting RINEX files all raw data measurements/ephemeris data corresponding to GPS (GLONASS). Use the checkbox E x c l u d e L 1 (E x c l u d e L 2) to exclude from the resulting RINEX files all L1 (L2) raw data measurements. The checkbox D e l e t e s o u r c e J P S f i l e s a f t e r s u c c e s s f u l c o n v e r s i o n means exactly what its name implies. In the A d d i t i o n a l o p t i o n s edit box you can enter any of the switches available for the windows console application jps2rin.exe. For more information about the switches, refer to the F r e e S o f t w a r e section at http://www.topcongps.com/software/utilities.html. 32 In real-time data logging mode it is recommended that the checkbox RTS/CTS h a n d s h a k i n g be selected and the baud rate be set to 115200 or higher. Unlike downloading the recorded log-files from the receiver memory onto the computer, real-time data logging does not use any error detection/correction protocol in the course of the data transfer. As a result, some of the messages in the created JPS files may be corrupt (due to the serial port overrun or similar problems)12. 4.2.3. ‘Manual Mode’ window To go to the M a n u a l M o d e window, select the M a n u a l M o d e i t e m from the Fi l e menu or press the keys CTRL+M. This window (Figure 25) allows direct control of the receiver by using GRIL commands. In manual mode PC-CDU serves as a terminal communicating with the receiver, (i.e., it allows one to send various receiver commands and get responses to these commands). For a complete list of commands supported by TPS receivers, refer to the GRIL Reference manual. This document is available for download from the TPS website. Figure 25. “Manual Mode” window We recommend that you do not send any commands to the receiver from the M a n u a l M o d e window before you familiarize yourself with the GRIL Reference manual and acquire good knowledge of the receiver parameters. 12 More precisely, some of the transferred bytes may be lost on the computer end. 33 At the top of the M a n u a l m o d e window there is the command line box in which one can type a (new) command line. Alternatively, one can press to open the combo-box’s list and select one of the previously used command lines. Note that there may be stored up to twenty (20) command lines in the list. Once the desired command line is typed (or selected), press the S e n d c o m m a n d button in the bottom-left corner of the M a n u a l M o d e window or just click the E n t e r key on your keyboard. The receiver’s responses will be displayed in the receiver replies window located under the command line box. Use the S t o p a l l m e s s a g e s button to stop outputting any messages to the current terminal13. With the C l e a r w in d o w button one can clear the receiver replies window. Press E x i t to close the M a n u a l M o d e window. The D i s c o n n e c t button allows the user to disconnect the PC from the receiver. Note however the difference between the D i s c o n n e c t button you press in the M a n u a l M o d e window and the same named item you select from the F i l e menu. If you press D i s c o n n e c t in the M a n u a l M o d e window, PC-CDU will neither automatically disable RTS/CTS handshaking nor restore the receiver port’s original baud rate (regardless of whether the R e s t o r e t h e r e c e i v e r ’ s o r i g i n a l baud rate o n D i s c o n n e c t option has been selected). In other words, if one wants to restore the receiver port’s original baud rate, it can be achieved either by selecting the C o n n e c t item from the F ile menu or through the M a n u a l M o d e window. In the second case, make sure that the command used to change the receiver port’s baud rate is executed immediately before clicking the D i s c o n n e c t button. The S t a r t l o g g i n g button allows the user to copy to a text file all information that has been displayed in the receiver replies window during the session. With the L o a d S c rip t button one can load into the receiver the desired script file. Use E d i t S c r i p t if editing of the script file is needed. For more information about scripts, see Appendix A. PC-CDU Scripts. 4.2.4. ‘Receiver Configuration’ window To go to the Receiver Configuration window, select Receiver from the C o n f i g u r a t i o n menu, or alternatively press the keys CTRL+V. If one selects the Receiver option from the Configuration menu while holding down the Shift key, the Main window will remain open. You will see a dialog window comprising eight tabs. Each tab has an A p p l y button. Pressing this button instructs PC-CDU to accept the settings made in the tab without closing the window. Note however that each A p p l y button serves only “its own” tab and cannot affect the other tabs’ settings. 13 After the button is pressed, PC-CDU will send an appropriate dm command to the receiver. 34 Press R e f r e s h to update the currently displayed window with the new or original settings. The O K button, unlike the individual A p p l y buttons, allows you to accept the selected settings for all eight tabs at a time. In addition pressing O K will close the R e c e i v e r C o n f i g u r a t i o n window. Use the E x i t button to close the R e c e i v e r C o n f i g u r a t i o n w i n d o w without accepting the settings you have made since A p p l y was pressed last. Pressing S a v e will open the S a v e s e t u p t o a s c r i p t window. In this window you can save the current receiver settings to a script file. Script files normally have the extension .jpc. Later you can load the desired script file to the receiver, thus enabling several necessary receiver settings with a single operation. The button S e t a l l p a r a m e t e r s t o d e f a u l t s does exactly what its name implies. 4.2.4.1. General Figure 26. shows the R e c e i v e r C o n f i g u r a t i o n w i n d o w ’ s G e n e r a l tab. Figure 26. “General” tab In the T e r m i n a l E l e v a t i o n M a s k edit box the user enters the minimum elevation (i.e., the elevation mask angle) for the satellites whose data will be output to the current terminal. This setting relates to the receiver parameter /par/out/elm/cur/term. The radio buttons I n t e r n a l, E x t e r n a l and A u t o from the A n t e n n a group are used to select the desired antenna type. These buttons are associated with the receiver parameter /par/ant/inp. Table 5 shows what antenna type settings are allowed for different receiver models and board types. 35 Table 5. Allowed antenna type settings Receiver model Receiver board Default Allowed values Any JPS_3, Eurocard External Internal, External Any JPS_4, JPS_4_2 External OEM JGG20 Not available Not available OEM, LEGACY-H HE_GG, HE_GD Not available Not available HIPER HE_GG, HE_GD Auto E_GGD, HE_GG, HE_GD Not available OEM, Legacy-E, ODYSSEY-E Internal, External, Auto Internal, External, Auto Not available Note that such receiver models as HiPer, Regency with JPS_4 board and Odyssey with JPS_4 board are capable of automatically detecting an external antenna only at receiver start-up time. Therefore if one wants to switch from the internal antenna to an external one while in a u t o , he/she will have to power the receiver off and then back on. The Regency and Odyssey receivers using JPS_4_2 are capable of automatically detecting an external antenna without switching the receiver off and back on. Antenna Status • The indicator C u r r e n t I n p u t shows what antenna type is actually being used by the receiver: int – the internal antenna is being used. ext – an external antenna is being used. This flag relates to the receiver parameter /par/ant/curinp. • The indicator E x t . D C S t a t u s shows if the external antenna draws any dc: off – the external antenna draws no dc normal – the external antenna draws normal dc overload – the external antenna draws higher dc then expected This indicator is associated with the receiver parameter /par/ant/dc. The indicator B o a r d t e m p e r a t u r e shows the receiver board’s current temperature. This indicator is associated with the receiver parameter /par/dev/thermo/out. 36 Power management Power • Use the drop-down list box Power/M o d e t o select the desired power source for the receiver: Auto – receiver will automatically select the power source Mix – receiver will automatically detect and start consuming power from the source with the highest voltage Battery A – receiver will consume power from battery A Battery B – receiver will consume power from battery B External – an external power supply will be used. This setting is associated with the receiver parameter /par/pwr/mode. • The indicator C u r r e n t M o d e shows what power source is being used at the moment. This setting is associated with the receiver parameter /par/pwr/curmode. Charger • Use the drop-down list box Charger/M o d e to select the battery charging mode: Off – receiver will not charge the batteries Charge A – receiver will charge only battery A Charge B – receiver will charge only battery B Auto – receiver will automatically detect and charge the detected batteries. This setting is associated with the receiver parameter /par/pwr/charge/bat. • Use the S p e e d list box to set the desired speed of battery charge cycle. You can select between Normal and Fast dc levels. The corresponding receiver parameter is /par/pwr/charge/speed. • The flag C u r r e n t M o d e shows which of the batteries, a, b or none (off) is being charged at the moment. The corresponding receiver parameter is /par/pwr/charge/curbat. Voltages • The indicator E x t e r n a l shows the external power supply’s voltage. The corresponding receiver parameter is /par/pwr/ext. • The indicator O n B o a r d shows what is the actual voltage drawn by the receiver board. The corresponding receiver parameter is /par/pwr/board. • The indicators B a t t e r y A and B a t t e r y B show the voltage on batteries A and B, respectively. The corresponding receiver parameters are /par/pwr/bat/a and /par/pwr/bat/b. • The indicator C h a r g e r shows the charger’s output voltage during battery charging. The corresponding receiver parameter is /par/pwr/charger. 37 Power output modes • The checkbox P o r t s A , B allows you to turn power on and off for ports A and B. The corresponding receiver parameter is /par/pwr/out/ab. • With the checkbox P o r t C you can turn power on and off on port C. The corresponding receiver parameter is /par/pwr/out/c. The two above-described parameters are applicable to the Odyssey receiver only. • The list box P o r t s governs power output on serial ports: ♦ On – the power board will feed all available serial ports via the corresponding pins when the receiver is turned on. If the receiver is turned off, there will not be any power on the ports. ♦ Off – power, for all available serial ports, will be absent even if the receiver is turned on. ♦ Always –all serial ports will be powered even if the receiver is powered off. The P o r t s list box is associated with the receiver parameter /par/pwr/ports. • With the S l o t s list box the user governs power output on the internal slots: ♦ On – means that all slots are powered if the receiver is turned on. ♦ Off – means that internal slots will not be powered even if the receiver is turned on. ♦ Always – means that internal slots will be powered even if the receiver is turned off. The list box is associated with the receiver parameter /par/pwr/slots. Turn on/off Slots • Select the S l o t 2, S l o t 3 and S l o t 4 checkboxes to enable the corresponding internal slots. These checkboxes correspond to the receiver parameters /par/pwr/switch and /par/pwr/switch/N. The first parameter allows you to enable all slots simultaneously. The second parameter allows you to enable only one slot at a time. Here N is the slot number (2, 3, 4). The list boxes P o r t s , S l o t s and the T u r n o n / o f f S l o t s group box, are applicable to the HiPer and Odyssey-E receivers only. If the checkbox E n a b l e L o w P o w e r M o d e is selected, the receiver’s processor will go into low power consumption mode. The corresponding receiver parameter is /par/lpm. 38 4.2.4.2. MINTER In this tab (see Figure 27) the user can set up receiver parameters related to MINTER (MINimum INTERface). Figure 27. “MINTER” tab The recording time interval specified in the R e c o r d i n g i n t e r v a l edit box will be used when receiver files are opened and logged via MINTER, (i.e., by pressing the FN button). This setting is used not only when logging a single log-file but also when logging receiver data in AFRM mode. The corresponding receiver parameter is /par/log/sc/period. Note that this parameter cannot exceed 86400 seconds. If an incorrect recording interval is set (the R e c o r d i n g i n t e r v a l edit box), PCCDU will run a utility called O u t p u t P e r i o d S e t u p W i z a r d . For more information on the Wizard, see Appendix B. Output Period Setup Wizard. E l e v a t i o n m a s k f o r L o g f i l e specifies the minimum elevation angle for the satellites whose data will be put in the receiver files logged via Minter, (i.e., by pressing FN). The corresponding receiver parameter is /par/out/elm/cur/log. F i l e n a m e p r e f i x specifies what prefix will be added to the names of the receiver files created via Minter, (i.e., by pressing FN). The prefix can be up to 20 characters long. Default is log. The corresponding receiver parameter is /par/cmd/create/prefix. If the new receiver data are to be appended to an existing log-file, enter the desired filename in the A l w a y s a p p e n d t o t h e f i l e edit box. The setting can be up to twenty characters long. The corresponding receiver parameter is /par/button/file. 39 Files Creation mode • Two operation modes are possible for FN button. If the L o g f i l e radio button has been selected, pressing FN will result in closing the current log-file or, if data logging has been off, opening a new log-file. If A F R M has been selected, pressing FN will enable this mode, if it has been disabled, and vice versa. The associated receiver parameter is /par/button/rot. Automatic File Rotation Mode (AFRM) parameters • P e r i o d specifies the time duration of each of the multiple log-files created in AFRM mode. The corresponding receiver parameter is /par/log/rot/sc/period. • P h a s e specifies the “phase” (i.e., constant time shift) of the multiple log-files created in AFRM mode. The corresponding receiver parameter is /par/log/rot/sc/phase. • Use the edit box F i l e s ( t o t a l ) to specify how many multiple log-files must be created in AFRM until this mode automatically turns off. The corresponding receiver parameter is /par/log/rot/sc/cout. Zero means that an unlimited number of log-files will be created. • From F i l e s ( r e m a i n ) you can see how many log-files are left for the receiver to create in AFRM. The associated receiver parameter is /par/log/rot/count. • If the checkbox A u t o m a t i c a l l y r e m o v e o l d f i l e s is selected, the receiver will start, should there be no free space left in the receiver memory, overwriting the least recent files14. The corresponding receiver parameter is /par/log/rot/rmold. FN key mode • These two radio buttons are used to program how the receiver will react to clicking FN (i.e., keeping the button depressed for less than one (1) second). In L E D b l i n k m o d e s w i t c h mode, clicking FN will toggle between the Minter’s standard and extended information modes. (For more details, see the MINTER User’s manual). In O c c u p a t i o n m o d e s w i t c h mode you click FN to get the receiver to insert into the corresponding log-file a message indicating that the occupation type has been changed from static to kinematic, or vice versa. The corresponding receiver parameter is /par/button/action. Initial data collection dynamic mode • These radio buttons specify the starting occupation type descriptor15 that will be inserted at the beginning of each receiver files logged via the MINTER. You select S t a t i c and K i n e m a t i c to specify that the corresponding log-file will start with a static and kinematic occupation, respectively. The associated receiver parameter is /par/button/dyn. Data recording auto-start 14 In other words, existing files will be overwritten based on the first in, first out (FIFO) principle. 15 This event message is called _DYM. 40 The user can program how the receiver will behave in the event of a power failure. The corresponding receiver parameter is /par/button/auto. Depending on which of the three radio buttons has been selected, the receiver will behave as follows: Table 6. How Data recording auto-start works Scenario “Off” “On” “Always” Receiver will resume data Before a power failure occurred, receiver data were being logged to the file with the name specified in “A l w a y s a p p e n d t o t h e Data logging will not resume Receiver will resume data log- automatically after the power ging (to the same file) after the logging (to the same file) is restored. power is restored. after the power is restored. file” Before a power failure occurred, receiver data were being recorded in a defaultnamed file (i.e., the string “A l w a y s a p p e n d t o t h e Data logging will not resume automatically after the power is restored. A new log-file will be opened A new log-file will be opened after the power is restored and after the power is restored the receiver will start recording and the receiver will start data in this file recording data in this file After the power is restored a f i l e ” was empty) Before a power failure occurred, the string A l w a y s A file with this name will not A file with this name will not be a p p e n d t o t h e f i l e had a be opened and data logging opened and data logging will file with this name will be non-empty value but data will not be started after the not be started after the power is opened and data logging will logging hadn’t been started power is restored. restored. be started yet Before a power failure occurred, the string A l w a y s Data logging will not be a p p e n d t o t h e f i l e was started after the power is empty and data logging was restored. After the power is restored, Data logging will not be started a new (default-named) log- after the power is restored. file will be opened and data logging will be started. off Also, if the option A l w a y s is selected, your receiver will automatically start logging data (to a newly created or an existing file) in the following three cases: 1. After switching the receiver ON with the Minter (I) button. 2. After executing the R e s e t r e c e i v e r command (the corresponding receiver parameter is /par/reset) 3. After waking the receiver from sleep mode16. 16 Recall the parameter /par/sleep causes a receiver go into sleep mode. 41 4.2.4.3. Positioning Figure 28. shows the Positioning tab. Figure 28. “Positioning” tab Positioning Mode • These four radio buttons are included in the Positioning tab only for user convenience. They “mirror” the same named buttons from the Rover tab. For more information about this radio button group, see 4.2.4.5. The receiver parameter associated with these radio buttons is /par/pos/mode/cur. Enable Solutions • These four checkboxes are included in the Positioning tab only for user convenience. They “mirror” the same named checkboxes from the Rover tab. If the S t a n d a l o n e checkbox has been checked and the rover receiver is being run in differential mode, the receiver will report its current standalone position instead of the DGPS (or RTK) position if the latter is unavailable in the current epoch. The corresponding receiver parameter is /par/pos/mode/sp. • Note that the checkboxes D G P S , R T K F l o a t a n d R T K F i x e d are always grayed out in this version of PC-CDU. Positioning Masks • In the E l e v a t i o n m a s k edit box you specify the elevation mask angle for the satellites used in position computation. The corresponding receiver parameter is /par/pos/elm. 42 • In the P D O P m a s k edit box you specify the threshold value of PDOP that disables position computation. If PDOP exceeds this mask during a period of time, the receiver’s position will not be computed over the corresponding epochs. The associated receiver parameter is /par/pos/pdop. RAIM Enabled • If the R A I M E n a b l e d checkbox is selected, the receiver automatically will detect and reject measurement outliers. The corresponding receiver parameter is /par/pos/raim/mode. • The drop-down list box A l a r m is associated with the receiver parameter /par/pos/raim/al/mode. • The Alarm limit edit box relates to the receiver parameter /par/pos/raim/al/manual. From the drop-down list box C u r r e n t D a t u m you select the datum used in position computation. This setting is associated with the receiver parameter /par/pos/datum/cur. Pressing the D a t u m Parameters button will open the < D a t u m ID> Datum P a r a m e t e r s w i n d o w (Figure 29). In this window one cannot only view the ellipsoid and transformation parameters of the datums selectable from the C u r r e n t D a t u m list box but also edit the transformation parameters for USER and P90. In addition the ellipsoid parameters of USER can be edited in this window. Figure 29. “<DATUM ID> Datum Parameters” window Positioning System • Select the checkboxes G P S a n d G L O N A S S if it is desired that the corresponding satellite constellations to be used in position computation. These checkmarks are associated with the receiver parameter /par/pos/sys. Note, however, that the selected satellite constellation will indeed be used in position computation only if the corresponding Satellites used in pos. checkbox from the Satellite management panel is selected as well. 43 Measurements Used • This radio button group shows what code measurements will be used to compute the receiver’s standalone position. The corresponding receiver parameter is /par/pos/sp/meas. For a single-frequency receiver, the radio buttons P / L 1 , P / L 2 and I o n o F r e e will be gray. If the checkbox I o n o - C o r r e c t i o n is selected, the receiver will correct the pseudoranges for ionosphere (based on the model defined in ICD-GPS-200, Revision C) before using them in position computation. The corresponding receiver parameter is /par/pos/sp/iono. Note that if both I o n o F r e e and I o n o - C o r r e c t i o n are selected, the first overrides the second. If the checkbox T r o p o - C o r r e c t i o n is selected, the pseudoranges will be corrected for troposphere before being used in position computation. The corresponding receiver parameter is /par/pos/sp/tropo. Note that the above mentioned receiver parameters, /par/pos/sp/meas, /par/pos/sp/iono and /par/pos/sp/tropo, apply only to absolute position computation. Satellite management Satellites tracked • The checkboxes G P S and G L O N A S S are used to allow tracking of GPS and GLONASS satellites, respectively. The G P S checkbox is associated with the receiver parameter /par/lock/gps/sat. The G L O N A S S checkbox relates to /par/lock/glo/fcn. Satellites used in pos. • Use the checkboxes G P S and G L O N A S S to specify what satellite systems (only GPS, only GLONASS, or both) will be used in position computation. The G P S checkbox is associated with the receiver parameter /par/pos/gps/sat. The G L O N A S S checkbox corresponds to /par/pos/glo/sat. GPS | GLONASS | WAAS Use these tabs to explicitly specify which of the GPS, GLONASS and WAAS satellites are enabled for tracking and position computation. The first tab, as its name implies, deals with the GPS satellites (Figure 30). 44 Figure 30. “ G P S ” t a b The tab displays three columns, p r n , l o c k and u s e , which are described in Table 7. Table 7. Description of data displayed in the GPS tab. Notation prn Meaning GPS satellites’ pseudo random numbers Checkmarks in this column indicate that the corresponding satellites are enabled for tracking. In Figure lock 30, GPS satellite PRN 8 is disabled for tracking. Checkmarks in this column indicate that the corresponding satellites are enabled for position computa- use tion. In Figure 30, GPS satellite PRN 4 is disabled for position computation A GPS satellite’s system number is identical to its PRN number. Use the buttons A l l t o l o c k and A l l t o u s e to select all GPS satellites at one time. Use the buttons N o n e t o L o c k and N o n e t o u s e to deselect all GPS satellites at one time. The second tab, as its name implies, deals with the GLONASS satellites (Figure 31). Figure 31. “GLONASS” tab Satellite Numbering • For user convenience, GLONASS satellites can be displayed ordered either by their F r e q u e n c y C h a n n e l N u m b e r or by the S l o t N u m b e r. 45 The tab displays three columns, f c n / s a t, l o c k and u s e , which are described in Table 8. Table 8. Description of data displayed in the GLONASS tab Notation Meaning GLONASS satellites’ frequency channel numbers, if the F r e q u e n c y C h a n n e l N u m b e r checkbox is fcn/sat selected. GLONASS satellites’ slot numbers, if the S l o t N u m b e r checkbox is checked. lock Enable GLONASS satellites for tracking. use Use this GLONASS satellite for position computation. Use the buttons A l l t o l o c k and A l l t o u s e to select all GLONASS satellites at one time. Use the buttons N o n e t o l o c k and N o n e t o u s e to deselect all GLONASS satellites at one time. The third tab, as its name implies, deals with the WAAS/EGNOS satellites (Figure 32). Figure 32. “WAAS” tab A WAAS-enabled TPS receiver allows simultaneous tracking of two WAAS satellites. Either of the WAAS satellites is allocated its own channel. Below it will be shown how to set up Channel 1 (Channel 2 is handled in the same manner). The checkbox C h a n n e l 1 , if selected, allows you to specify necessary settings for the desired WAAS satellite. • One uses the spin-boxes S e t W A A S and a s G P S to associate the selected WAAS PRN (120-13817) with an appropriate GPS PRN (1-32). It is recommended to select for this purpose one of the GPS PRNs that are not used in the current GPS constellation. At writing this manual, the unused GPS PRNs are: 12, 16, 19 and 32. The spin-boxes correspond to the receiver parameter /par/waas/1/sat. • The spin-box I n t e r p r e t m e s s a g e # 0 a s m e s s a g e : # disables message 0. The corresponding receiver parameter is /par/waas/1/instead0. 17 WAAS satellites with PRNs 122 and 134. EGNOS satellites with PRNs 120 and 131. 46 • The radio button group U s e I o n o C o r r e c t i o n s allows the user to set the desired ionosphere correction mode. The radio buttons are associated with the receiver parameter /par/waas/1/ion. ♦ N e v e r – ignore any iono corrections received from the WAAS satellite(s). ♦ I f e x i s t – all acquired satellites will be used in position computation, (i.e., even the satellites whose WAAS Iono Corrections are unavailable). ♦ O n l y – only satellites whose WAAS Iono Corrections are available will be used in position computation. Note that this is the default option for the radio button group. To make WAAS Channel 2 settings, use the same receiver parameters but replacing “1” with “2” (e.g., /par/waas/2/sat for /par/waas/1/sat). If the checkbox E n a b le o u tp u t o f “ tru e ” W AAS P R N n u m b e rs is selected, the WAAS satellites will have their true WAAS PRNs (not “GPS associated”) in the corresponding ‘Satellite Indices’ messages. The receiver parameter relating to this checkbox is /par/waas/numb. 4.2.4.4. Base With the B a s e tab, the user can configure the receiver for use as a reference station (Figure 33). Figure 33. “Base” tab 47 Base Station Coordinates (Antenna Phase Center) Note that the reference geodetic coordinates specified in this tab will relate to the antenna L1 phase center. There are three ways to enter the geodetic coordinates of the base antenna’s L1 phase center: (1) Type in the precise latitude/longitude and ell. height manually (use the L a t, L o n and Alt edit boxes). (2) Use the absolute coordinates averaged over the specified time interval (with the A v e r a g e d and A v g . S p a n controls. The corresponding receiver parameters are /par/ref/avg/mode and /par/ref/avg/span, respectively. (3) Use the instant absolute coordinates from the receiver (by pressing the G e t f r o m r e c e i v e r button). As the names of the radio buttons G P S / G L O a t o n e t i m e and G P S / G L O s e p a r a t e l y imply, these allow the user to specify for GPS and GLONASS either common reference coordinates or “individual” reference coordinates. In most cases it is recommended to use the same reference coordinates both for GPS and GLONASS. After the user has selected G P S / G L O s e p a r a t e l y , he/she will see the G L O N A S S tab appear on the screen too. The G P S / G L O a t o n e t i m e radio button is associated with the receiver parameter /par/ref/pos//geo. G P S / G L O s e p a r a t e l y corresponds to the receiver parameters /par/ref/pos/gps/geo for GPS and /par/ref/pos/glo/geo for GLONASS. Pressing the D a t u m Parameters button will open the < D a t u m ID> Datum P a r a m e t e r s w i n d o w . In this window you can not only view the ellipsoid and transformation parameters of the datums selectable from the C u r r e n t D a t u m list box but also edit the transformation parameters for USER and P90. In addition one can edit the ellipsoid parameters of USER in this window. Structurally this window is similar to that shown in Figure 29. In the E a s t, N o r t h and H e i g h t edit boxes, the user specifies the offsets from the marker to ARP. These edit boxes corresponds to the receiver parameter /par/ref/ant/offs. RTCM Settings The S t a t i o n I D edit box is associated with the receiver parameter /par/rtcm/base/stid. This parameter allows the user to assign a separate station ID to each reference station working in the area. With the M a x . n u m b e r o f S a t e l l i t e s edit box, the user specifies the maximum number of satellites allowed for use in RTCM messages types 18 through 21. A 0 means that all of the available satellites will be included in the above mentioned RTCM message types. If an RTK system has a slow modem (the baud rate is less than 9600 bps), it is recommended to restrict the number of satellites included in these messages. The limitation allows the user to reduce the amount of data sent by the base station, which helps to avoid the data link overload. If the actual number of satellites in sight exceeds the value entered in this edit box, the RTCM messages will include data only 48 from the satellites with higher elevations and the number of satellites included in the RTCM messages will not be greater than that specified in the edit box. This edit box is associated with the receiver parameter /par/rtcm/base/svm. The H e a l t h list box is intended to define the reference station status: • Good – station is operating normally. • Bad – station is not working normally. • Unknown – station health status is unknown. The corresponding GRIL parameter is /par/rtcm/base/health. With the radio buttons M e a s u r e m e n t s S e n t, the user specifies the measurement types that will be included into the RTCM message types 18 through 21. Currently, the mentioned RTCM messages always contain C/A measurements. One can also include either or both P/L1 data18 and P/L2 data18 in these messages. The checkbox CA/L 1 corresponds to the receiver parameter /par/rtcm/base/meas/ca. The checkbox P/L1 is associated with the receiver parameter /par/rtcm/base/meas/p1. The P/L2 checkbox is associated with the receiver parameter /par/rtcm/base/meas/p2. The G P S and G L O N A S S checkboxes, which are grouped together within the S y s t e m U s e d area, indicate the satellite constellations included in the RTCM message types 18, 19, 20 and 21. These checkboxes are associated with the receiver parameter /par/rtcm/base/sys. If the P s e u d o - r a n g e s m o o t h i n g checkbox is selected, the receiver will use smoothed pseudoranges in the RTCM message types 19 through 21. This checkbox corresponds to the receiver parameter /par/rtcm/base/smooth. CMR Settings The S t a t i o n I D edit box corresponds to the receiver parameter /par/cmr/base/stid. With this parameter the user can specify the base station ID, which will be included into the CMR messages transmitted by this base station. On the rover side, this ID allows easy identification of the reference station whose CMR messages are being received by the rover receiver. The list box M o t i o n characterizes the motion of the reference station: • Unknown – the motion state is undetermined. • Static – the receiver is motionless. • Kinematic – the receiver is in motion. This list box corresponds to the receiver parameter /par/cmr/base/motion. Use the S h o r t I D, CO GO and L o n g I D to include the reference station’s point feature code19 into CMR message type 2. These edit boxes are associated with the receiver parameter /par/cmr/base/desc. 18 On condition that the TPS receiver is configured as a dual-frequency unit. 19 Feature code is an alphanumeric code used to describe a survey point. 49 The radio buttons CA/L 1, P / L 1 and the checkbox P / L 2, which are grouped within the M e a s u r e m e n t s S e n t area, allow the user to specify which measurement types will be included into the corresponding CMR messages broadcasted by the reference station. The radio buttons correspond to the receiver parameter /par/cmr/base/pcode. The checkbox P / L 2 is associated with the receiver parameter /par/cmr/base/meas/p2. If the receiver is a single-frequency unit, the controls P / L 1 and P / L 2 will not be available. The spin box G L O N A S S m e s s a g e allows the user to specify which message types will be associated with GLONASS measurements. You can choose any unused message types between 3 and 7. The spin box is associated with the receiver parameter /par/cmr/base/glo/type. Click the C o n f i g u r a t i o n o f R e c e i v e r P o r t s button to go to the P o r t s tab. For a description of this tab, refer to section 4.2.4.6 of this manual. 4.2.4.5. Rover In the tab, one can configure a receiver as a rover station (see Figure 34). Figure 34. “Rover” tab The P o s i t i o n i n g M o d e radio button group permits the user to select one of the four available positioning modes. DGPS Parameters To switch a roving receiver to Multi-base mode, select the M u l t i - b a s e checkbox. In this mode, the rover is able to use differential corrections received from more than one reference station20. This checkbox is associated with the receiver parameter /par/pos/cd/mult/mode. 20 Currently, this mode allows the rover to use up to five reference stations simultaneously. 50 Correction usage If the user selects the N e a r e s t checkbox, the rover will use differential corrections transmitted by the nearest reference station. The checkbox corresponds to the receiver parameter /par/pos/cd/mult/nearest. When working in the N e a r e s t mode, make sure that the checkboxes M i x and B e s t are unchecked. The M i x checkbox allows the user to run the rover station in ‘average’ mode. The checkbox is associated with the receiver parameter /par/pos/cd/mult/mix. When the rover runs in this mode, the B e s t checkbox must be unselected. With the radio buttons C o r r e c t i o n s and P o s i t i o n s , the user specifies which of the averaging modes will be used for position computation. If both the M i x checkbox and C o r r e c t i o n s radio button are selected, the rover will be averaging differential corrections received from different reference stations. If the user selects the M i x checkbox and P o s i t i o n s radio button, the receiver will average the computed positions, not the received corrections. These radio buttons correspond to the receiver parameter /par/pos/cd/mult/mixmode. If the B e s t checkbox is selected, the receiver will use differential corrections that correspond to the most precise of the obtained position estimates. Best means that the solution has the least RMS error. The B e s t checkbox is associated with the receiver parameter /par/pos/cd/mult/best. In the C D C o r r e c t i o n s m a x . a g e edit box, the user can set the maximum age (in seconds) of the code differential corrections used for position computation. Here one can enter an integer value between 1 and 1200. The default is 30. If the age of the corrections exceeds the value specified in this edit box, the rover will compute a stand-alone position. The edit box relates to the receiver parameter /par/pos/cd/maxage. Use the I o n o C o r r e c t i o n s m a x . a g e edit box to specify the maximum age (in seconds) of the ionosphere corrections used for position computation. The corresponding receiver parameter is /par/pos/cd/iono/maxage. If you set the U s e I o n o C o r r e c t i o n s checkbox to ‘on’, the rover receiver will use in position computation both the ionosphere corrections from RTCM message type 15 and differential corrections from RTCM message types 1 and 31 (or 9 and 34). This checkbox is associated with the receiver parameter /par/pos/cd/ionofree. The list box S o u r c e serves to specify the source (port) from which the receiver will use differential corrections for position computation. This list box relates to the receiver parameter /par/pos/cd/port. The receiver uses this parameter only if M u l t i - b a s e mode is unchecked. 51 Enable Solutions The S t a n d a l o n e checkbox, if selected, will allow the receiver, running in a differential mode, to yield the absolute position in case the receiver is not able to get a differential solution position. The checkbox is associated with the receiver parameter /par/pos/mode/sp. At the present time, the checkboxes D G P S ( C o d e D i f f e r e n t i a l ) , R T K F l o a t and R T K F i x e d are unavailable and being checked at the same time demonstrating that these solution types are also enabled. RTK Parameters The R T K m o d e radio button group serves to toggle between the extrapolation and delay modes. If E x t r a p o l a t i o n is selected, the rover will extrapolate the base station's carrier phase measurements when computing the rover's current RTK position. If D e l a y is selected, the rover will not extrapolate the base station's carrier phase measurements to compute the current rover position. Instead, the RTK engine will compute either a delayed RTK position (for the epoch to which the newly received RTCM/CMR message corresponds) or the current stand-alone position (while waiting for new RTCM/CMR messages coming from the base). These radio buttons relate to the receiver parameter /par/pos/pd/mode. To define the rover dynamics, use the D y n a m i c s radio button group. The corresponding parameter is /par/pos/pd/dyn. The A m b ig u i t y F i x i n g L e v e l radio buttons govern the process of the RTK engine fixing integer ambiguities. The RTK engine uses the ambiguity fix indicator when making a decision whether to fix ambiguities or not. L o w , M e d i u m and H i g h correspond to the indicator's 95%, 99.5% and 99.9% states, respectively. The higher the specified confidence level, the longer the integer ambiguity search time. This is the price we one pays for the higher reliability of the ambiguity fixed solution. These buttons are associated with the receiver parameter /par/pos/pd/aflevel The M e a s u r e m e n t s U s e d checkbox group allows the user to select measurement types used by the rover for position computation. The checkbox CA/L 1 corresponds to the receiver parameter /par/pos/pd/meas/ca, the control P / L 1 corresponds to the receiver parameter /par/pos/pd/meas/p1, the control P / L 2 is associated with the receiver parameter /par/pos/pd/meas/p2. In the B a s e C o r r e c t i o n s p e r i o d edit box, the user can set the differential correction update interval. It should be noted here that the user must know the exact rate at which the reference station broadcasts its differential correction data. This edit box corresponds to the receiver parameter /par/pos/pd/period. The receiver will use the control B a s e C o r r e c t i o n s p e r i o d only if it runs in D e l a y mode. Also, this edit box is used to provide more reliable synchronization between the base station and rover. 52 If you set the checkbox U s e o l d r e f . c o o r d i n a t e s to ON and then launch RTK, the rover receiver immediately starts using the existing reference coordinates in place of expecting when the reference station transmits some updated reference coordinates to the rover side. The checkbox relates to the receiver parameter /par/pos/pd/ref/keep. Care should be taken when setting this parameter to ON. Imagine for a moment that the rover has changed the location and started a new RTK session with a different reference station. Should this parameter be set to ON, the rover receiver will be misusing the old reference coordinates for some time, which will most likely result in position blunders until the rover receives a first message with the correct reference coordinates. The list box S o u r c e serves to specify the source (port) from which the receiver will use differential data for position computation in RTK mode. This list box is associated with the receiver parameter /par/pos/pd/port. CMR Settings With the G L O N A S S m e s s a g e spin box the user assigns the message type for GLONASS measurements. Make sure that both the reference station and rover receiver use the same message type for GLONASS measurement data. The spin button is associated with the receiver parameter /par/cmr/rover/glo/type. Press the R e s e t R T K E n g i n e button to reset the RTK engine. It means that all of the previously obtained estimates (estimated position, variance-covariance matrix, etc.) will be thrown away and the RTK engine will then start “from scratch”. The button corresponds to the receiver parameter /par/pos/pd/reset. To access the tab allowing you to revise and edit port settings, either click the P o r t s tab, or press the C o n f i g u r a t i o n o f R e c e i v e r P o r t s button. 53 4.2.4.6. Ports With this tab the user can specify all necessary settings for serial ports A, B, C, D, parallel port and internal modem. The tab is subdivided into three subtabs (Figure 35). Figure 35. “Ports” tab Serial Use this subtab to control the settings for serial ports A, B, C and D (see Figure 35). The list box I n p u t allows the user to specify what incoming data types the corresponding port is tuned for: • None – means that the port will neglect any incoming data. • Command – the port is in command mode. In this mode the port recognizes the commands sent by the user. • Echo – the port is in echo mode. Being used in this mode the receiver port redirects all incoming data to an “output stream”. Note that “output stream” may be either a port or the current log file • RTCM – the port is in RTCM input mode. • CMR – the port is in CMR input mode. This list box corresponds to the receiver parameter /par/[port]/imode. The list box O u t p u t allows the user to specify what outgoing data types the corresponding port is tuned for: • None – the port outputs nothing. 54 • DGPS full output – the port outputs RTCM message types 1, 31. • DGPS partial output – the port sends RTCM message types 9, 34. • RTK RTCM output – the port issues RTCM message types 18, 19, 22, 3. • RTK CMR output – the port sends CMR message types 1021, 0, 1. • User Defined – the port outputs data specified by the user. It means that the user defined some arbitrary message set that will be outputted through the port. In the P e r i o d edit box the user sets the message output interval (in seconds). It is worth noting, however, that the period of RTCM messages types 22, 3 and CMR message type 1 cannot be changed with this edit box. The default period for the mentioned messages is 10 s. If one wants to vary the period, he/she should use the em command from the M a n u a l M o d e window. For more details on em refer to the GRIL manual. If one sets an incorrect message output interval (the P e r i o d edit box), PC-CDU will run a utility called O u t p u t P e r i o d S e t u p W i z a r d . For more information on the Wizard, see Appendix B. Output Period Setup Wizard. To set the baud rate for the corresponding receiver port, use the B a u d ra t e list box. The list box is associated with the receiver parameter /par/[port]/rate. The checkbox R T S / C T S enables/disables hardware handshaking for the port. The checkbox is associated with the receiver parameter /par/[port]/rtscts. In addition to described settings, port D has a unique checkbox I n f r a r e d that permits the user to configure this port as infrared device. The checkbox relates to the receiver parameter /par/[port]/ir. Use I n f r a r e d mode only if the following conditions are met: • A device you are going to connect to is compatible with the receiver infrared interface (for example, CDU-1). • Your receiver supports the infrared port hardware-wise. • The option Infrared Port is enabled in your receiver. 21 This message type has been developed by TPS to overcome some limitations existing in the original CMR protocol. 55 Parallel These settings are similar to ones in the S e r i a l tab except for the fact that the settings design to control parallel port (Figure 36). Figure 36. “Parallel” subtab Modem Should one have an internal modem installed, use the controls in this subtab (Figure 37). Figure 37. “Modem” subtab Internal Modem I n p u t , O u t p u t and P e r i o d are similar in their purposes to the analogous settings in the S e r i a l and P a r a l l e l subtabs. The T y p e list box allows the user to set operation modes (Receiving or Transmitting). The M o d e list box intends to specify the method used to transmit data: • Off – internal modem is turned off. • FHSS – internal modem uses frequency-hopping spread spectrum technique. • DSS – internal modem uses direct-sequence spread spectrum technique. These list boxes are associated with the receiver parameter /par/dev/modem/a/type. With the A n t e n n a radio buttons, the user sets the antenna type the modem uses. I n t stands for an internal antenna. E x t stands for an external antenna. The radio buttons correspond to the receiver parameter /par/dev/modem/a/ant. The user can set power transmitting mode for the internal modem using the P o w e r radio buttons. The radio buttons are associated with the receiver parameter /par/dev/modem/a/pwr. 56 4.2.4.7. Events This tab (Figure 38) is used to review and configure the 1PPS signal and Event marker settings. Figure 38. “Events” tab The checkboxes P P S A E n a b l e d and P P S B E n a b l e d correspond to the receiver parameters /par/dev/pps/a/out and /par/dev/pps/b/out, respectively. Selecting these controls, enables the receiver to generate 1PPS signals and also allows one to modify the settings related to the selected 1PPS signal. The P e r i o d edit box determines the rate of generating the 1PPS signals via the corresponding output connector pins. The edit boxes are associated with the receiver parameters /par/dev/pps/a/per/ms and /par/dev/pps/b/per/ms, respectively. The user can determine millisecond and nanosecond parts of PPS signal offsets with respect to the selected reference time grid using the O f f s e t ( m s ) edit box for millisecond part and O f f s e t ( n s ) for nanosecond part. These four edit boxes are associated with the receiver parameters /par/dev/pps/a/offs/ms, /par/dev/pps/b/offs/ms, /par/dev/pps/a/offs/ns and /par/dev/pps/b/offs/ns, respectively. With the P e r i o d o f ‘ m a r k e d ’ p u l s e s edit box, the user specifies the period of the marked 1PPS signal. These edit boxes relate to the receiver parameters /par/dev/pps/a/mper and /par/dev/pps/b/mper. Using the E d g e radio button group, the user synchronizes the edge (rising or falling) of the 1PPS signal with the specified reference time. The radio buttons are associated with the receiver parameters /par/dev/pps/a/edge and /par/dev/pps/b/edge. The R e f . T i m e radio button group allows the user to select the reference time that the 1PPS signal will be synchronized with. There are four available reference time scales: • GPS means GPS system time. 57 • GLO means GLONASS system time. • UTCus means UTC(USNO). • UTCsu means UTC(SU). These radio buttons are associated with the receiver parameters /par/dev/pps/a/time and /par/dev/pps/b/time, respectively. If the user selected the T i e d w i t h R e f . T i m e checkbox, the receiver will synchronize the 1PPS signal with the chosen reference time. Otherwise, 1PPS will be synchronized either with the receiver’s internal clock or with an external frequency (in the latter case the parameter /par/frq/input must be set to ext). In order to enable or adjust the event input function, use the controls described below. The checkboxes E v e n t A E n a b l e d and E v e n t B E n a b l e d correspond to the receiver parameters /par/dev/event/a/in and /par/dev/event/b/in, respectively. With these controls, the user enables the receiver to measure and log event times in the specified reference time with high accuracy. If the C l o c k S y n c h r o n i z a t i o n checkboxes are selected, the receiver executes a one-time synchronization of its one-millisecond cycle grid with the corresponding edge of the event signal. These checkboxes are associated with the receiver parameters /par/dev/event/a/lock and /par/dev/event/b/lock, respectively. The S t a t u s indicator shows whether the receiver clock is actually being synchronized with the event signals or not. If you see on in the field, it means the synchronization has been done successfully. These fields relate to the receiver parameters /par/dev/event/a/locked and /par/dev/event/b/locked, respectively. In some cases, however, it can be necessary to perform the synchronization again. For this purpose click the R e p e a t S y n c h r o n i z a t i o n button several times until on appears. The R i s e and F a l l radio buttons serve to measure the time of either the rising edge or falling edge of the input event signal. These radio buttons correspond to the receiver parameters /par/dev/event/a/edge and /par/dev/event/b/edge, respectively. The R e f . T i m e radio button group sets the reference time scale that the event reception time will be synchronized with. These radio buttons are associated with the receiver parameters /par/dev/event/a/time and /par/dev/event/b/time. With the T i e d w i t h R e f . T i m e checkboxes, the receiver is instructed to measure the event reception time in the selected reference time with or without consideration for the computed receiver clock offset. These checkboxes relate to the receiver parameters /par/dev/event/a/tied and /par/dev/event/b/tied, respectively. 58 4.2.4.8. Advanced The A d v a n c e d tab is composed of six subtabs, as illustrated in Figure 39. Warning! Only change these advanced settings when it is known what they mean. Unsuitable changes to these subtabs can cause the receiver to run improperly. If one is doubtful of any changes you made to these subtabs, he/she can always get the factory default settings back by pressing the S e t a l l p a r a m e t e r s t o d e f a u l t s button. For a description of these subtabs refer to the corresponding paragraphs below. Figure 39. “Advanced” subtab Anti-Interference With the A n t i - I n t e r f e r e n c e radio button group (Figure 39), the user enables mode allowing the TPS receivers to suppress the impact of narrow-band interferences. The user can assess the presence of interference based on the following information: • When the number of tracked satellites is fewer (by 2 or greater) than the number of satellites in view; • When the signal-to-noise ratio (C/N0) in the C/A channel for the satellites having elevations above 30 degrees does not exceed 40 dBHz; • When the information about interferences indicates that Jamming Suppressor detected interference signals within the specified band and also the strength of aggregate inband interference is characterized as high or hard. This information you can obtain with the command em,,jps/JI. 59 This radio button group is associated with the receiver parameter /par/ajm/mode. Multipath Reduction The checkboxes C o d e m u l t i p a t h r e d u c t i o n and C a r r i e r m u l t i p a t h r e d u c t i o n (Figure 40) are used for mitigation of the multipath phenomenon. Figure 40. “Multipath Reduction” tab When the reference station and rover station run in DGPS mode and they are not free from the impact of multipath, we recommend that you select the C o d e m u l t i p a t h r e d u c t i o n checkbox for both the reference and rover stations. This checkbox is associated with the receiver parameter /par/raw/corr/ca/code. If one uses a pair of receivers in RTK mode, select the checkbox Carrier m u l t i p a t h r e d u c t i o n for both receivers. The checkbox is associated with the receiver parameter /par/raw/corr/ca/carrier. Loops Management In this subtab the user can configure the settings that deal with the receiver capability of searching, acquiring and tracking the GNSS satellite signals (Figure 41). Care should be taken when changing the settings for this subtab. An improperly set the controls may result in receiver malfunction. Topcon recommends that users do not change these settings without good reason. For an explanation of this subtab, please see details under figure 41. 60 Figure 41. “Loops Management” subtab The P L L b a n d w i d t h edit box governs the noise bandwidth of the guiding phase lock loops. The edit box is associated with the receiver parameter /par/raw/pll/band. In this box, you can enter values between 2 and 50 Hz. With the P L L o rd e r edit box, the user can toggle guiding and common lock loop order between 2 and 3. Care should be taken when using a 2nd order PLL because this can adversely affect satellite signal tracking in some cases. The edit box relates with the receiver parameter /par/raw/pll/order. The G u i d e d l o o p b a n d w i d t h edit box governs all of the “guided” loops but the C/A DLLs. Here one can enter values between 0.1 Hz and 10 Hz. The edit box is associated with the receiver parameter /par/raw/gdl/band. The C / A c o d e g u i d e d l o o p b a n d w i d t h edit box specifies the bandwidth of the receiver’s C/A group delay lock loop. In this box, one can enter the values between 0.1 Hz and 50 Hz. The edit box relates to the receiver parameter /par/raw/cagdl/band. With the E n a b l e A d a p t i v e G u i d e d L o o p s checkbox, one enables/disables the use of adaptive guided loops. If the user selects the checkbox, the receiver will adjust the guided loops bandwidths depending on the actual strengths of the signals tracked. The weaker the signals, the narrower the bandwidths. The checkbox corresponds to the receiver parameter /par/raw/gdl/adapt. With the E n a b l e P / L 1 a n d P / L 2 t r a c k i n g checkbox the user can adjust tracking settings for the receiver. If one has either a single-frequency receiver or L1 only antenna, it is recommended to disable tracking of the P/L1 and P/L2 signals. The checkbox is associated with the receiver parameter /par/lock/pcode. The checkbox E n a b l e Co-Op tracking is associated with the receiver parameter /par/raw/clp/loops. Select the checkbox to enable mode and make the other controls in the group available for modifying. Co-Op tracking mode is used to considerably improve the tracking characteristics of TPS receivers. • When the receiver is in Co-op tracking mode, one can enable the S t a t i c M o d e checkbox. This mode allows the receiver to acquire satellites with lower signal-to-noise ratios and reduce the reacquisition time for the satellite signals after a temporary loss 61 of lock. The S t a t i c M o d e checkbox is associated with the receiver parameter /par/raw/clp/static. The receiver will take the above-described parameter into consideration only if the receiver antenna is stationary and E n a b l e C o - O p t r a c k i n g is selected. • The B a n d w i d t h o f i n d i v i d u a l P L L and B a n d w i d t h o f c o m m o n P L L edit boxes mean exactly what their names imply: ♦ B a n d w i d t h o f i n d i v i d u a l P L L is associated with the receiver parameter /par/raw/clp/indband; ♦ B a n d w i d t h o f c o m m o n P L L is associated with the receiver parameter /par/raw/clp/comband. Select the E n a b l e L 2 c o m m o n l o o p checkbox to avoid the loss of L2 phase tracking in dynamic applications due to antenna rotation around its axis. The checkbox corresponds to the receiver parameter /par/raw/clp2/loop. External Frequency The settings on this subtab (Figure 42), allow the operator to configure the use of reference frequency (it may be either high-stability external frequency or the receiver’s internal crystal oscillator). Figure 42. “External Frequency” subtab With the controls in the S o u r c e group, the user specifies the reference frequency input that the receiver will use: • Internal – means the receiver uses the internal oscillator. • External – means the receiver uses an external frequency. These radio buttons are associated with the receiver parameter /par/frq/input. 62 Switching from I n t e r n a l to E x t e r n a l and vice versa may result in a temporary loss of lock to satellites. The E x t e r n a l F r e q u e n c y S o u r c e P a r a m e t e r s controls allow the user to adjust the parameters related to external frequency mode: • With the E x t . f r e q u e n c y v a l u e edit box the user specifies nominal external frequency value. Here one can enter the values between 2 and 40 MHz. The default value is 10 MHz. The box is associated with the receiver parameter /par/frq/ext. • The field E x t . f r e q u e n c y s o u r c e s t a t u s shows whether the external frequency is being used or not: ♦ off – indicates that the receiver is using the internal crystal oscillator. ♦ wait – indicates that the receiver is waiting for the external frequency lock. More precisely, this value will be returned in the following three cases: 1. If the external frequency oscillator is disconnected; 2. If the amplitude of input signal is too low; 3. If the actual external frequency is different from that specified in the E x t . f r e q u e n c y v a l u e edit box. ♦ locked – indicates that the receiver is using the external frequency. The field is associated with the receiver parameter /par/frq/stat. • With the E x t . f r e q . s i g n a l a m p l i t u d e field the user can estimate the external frequency signal amplitude: ♦ off – indicates that the internal oscillator is actually being used; ♦ low – indicates that the external frequency signal’s amplitude is lower than needed; ♦ ok – indicates that the external frequency signal’s amplitude meets the specs. This field correspond to the receiver parameter /par/frq/amp. The O s c i l l a t o r O f f s e t R e d u c t i o n group box allows the user to govern the behavior of the internal crystal oscillator. • The O f f radio button means that the oscillator frequency offset reduction mode is turned off. • The F r e q . L o c k e d radio button means that the receiver will adjust the internal oscillator's frequency until the measured frequency offset is reduced to zero. By using the incoming satellite signals, the receiver will force the internal oscillator to generate a very stable 20 MHz frequency signal. This frequency output is available via the corresponding receiver output pin. 63 The user is able to monitor the offset reduction in the C l o c k o f f s e t field of the G E O tab. After you select F r e q . L o c k e d , one will notice that the value in C l o c k o f f s e t will have started to reduce and soon (usually in a few minutes) it will become equal to zero, while in contrast O s c . O f f s e t will not change much. • The F r e q . a n d T i m e L o c k e d radio button means that the receiver will adjust both the internal oscillator’s frequency until the measured frequency offset is reduced to zero and the internal clock until it gets fully synchronized with the specified reference time scale. Switching from F r e q . L o c k e d or F r e q . a n d T i m e L o c k e d to O f f may result in a temporary loss of lock to satellites. F r e q . L o c k e d guarantees that the receiver’s 20 MHz output will have longterm stability, not necessarily short-term stability. However, there is a way to assure that both of these characteristics will be good enough. It can be done by selecting E n a b l e C o - o p t r a c k i n g on the L o o p s M a n a g e m e n t subtab. The radio buttons are associated with the receiver parameter /par/osc/mode. Raw Data Management This subtab, which is shown in Figure 43, contains the controls for specifying the frequency at which the receiver will update raw measurement and position. Also, one may set up the controls that affect the signal processing. Figure 43. “Raw Data Management” subtab The R a w M e a s u r e m e n t U p d a t e R a t e group allows the user to determine the raw data update period. In the U p d a t e R a t e edit box, enter a value (in milliseconds) to specify the period. The box corresponds to the receiver parameter /par/pos/raw/msint. With C u r r e n t U p d a t e 64 R a t e , you can check which period is actually being used by the receiver. This field corresponds to the receiver parameter /par/raw/curmsint. The P o s i t i o n U p d a t e R a t e group allows the user to determine the receive position update period. In the U p d a t e R a t e edit box, enter a value (in milliseconds) to specify the period. The edit box is associated with the receiver parameter /par/pos/msint. With C u r r e n t U p d a t e R a t e, one can check which period is actually being used by the receiver. This field is associated with the receiver parameter /par/pos/curmsint. When opening a file, regardless of whether this operation was done from the R e a l - t i m e l o g g i n g window or the F i l e M a n a g e r window, and the recording interval has an incorrect value, PC-CDU launches a utility called O u t p u t P e r i o d S e t u p W i z a r d . For more information about the Wizard, see Appendix B. Output Period Setup Wizard. The C o d e s m o o t h i n g i n t e r v a l edit box, which is associated with the receiver parameter /par/raw/smi, specifies the interval over which pseudoranges are smoothed by using corresponding carrier phase measurements. Here you can enter values between 0 and 900 seconds. Zero designates that carrier phase measurements will not be used for smoothing pseudo-ranges. In the D o p p l e r s m o o t h i n g m e t h o d edit box, the user sets the method used for smoothing Doppler. There are three available methods: • 0 - Receiver outputs raw (unsmoothed) Doppler. Instantaneous yet rather noisy Doppler measurements. • 1 - Doppler is computed using two consecutive carrier phase measurements, Car- Phase[i] and CarPhase[i-1], where i stands for the current epoch. Such Doppler measurements are less noisy than in the first case. • 2 - Doppler is computed using only three consecutive carrier phase measurements, CarPhase[i], CarPhase[i-1] and CarPhase[i-2], where i stands for the current epoch. Doppler measurements obtained in this mode are least noisy. The edit box is associated with the receiver parameter /par/raw/dopp/smi. With N o m i n a l I o n o s m o o t h i n g i n t e r v a l edit box, the user specifies the nominal ionospheric correction smoothing interval over which raw ionospheric corrections are smoothed (assuming the receiver has been working for some time and has already obtained enough raw ionospheric corrections to perform such smoothing). This integer parameter varies between 0…900 seconds. The default value is 60. The edit box is associated with the receiver parameter /par/raw/iono/smi. With the M i n i m u m I o n o s m o o t h i n g i n t e r v a l edit box, the user specifies the minimum smoothing interval for the receiver to filter raw ionospheric corrections before they can be used in position computation. This integer parameter ranges between 0 and 900 seconds. The default value is 30 seconds. The edit box relates to the receiver parameter /par/raw/iono/minsmi. 65 Options Figure 44 shows the subtab from which the user can turn on/off the C i n d e r e l l a option. Every other Tuesday, C i n d e r e l l a enables the receiver to run as a dual-frequency GPS+GLONASS unit during 24 hours. For information on scheduling Cinderella Tuesdays, visit the Cinderella Option page on the TPS web site at http://www.topcongps.com/software/cinderella.html. These radio buttons are associated with the receiver parameter /par/opts/cind. Figure 44. “Options” subtab 4.2.5. Site Configuration window To open the S i t e Configuration dialog window, select the S i t e item from the C o n f i g u r a t i o n menu, or press the keys CTRL+I. This window serves the same purposes as the S i t e C o n f i g u r a t i o n window described in 4.2.1.2. 4.2.6. Target Position window To go to the T a r g e t P o s i t i o n window, either select the T a r g e t P o s i t i o n from the C o n f i g u r a t i o n menu, or press the keys CTRL+T. Target coordinates that the user enters here (Figure 45) will then be shown in the L a t and L o n fields of the T a r g e t tab. Pressing the G e t f r o m r e c e i v e r button will instruct PC-CDU to set the target position equal to the receiver’s current position. Figure 45. “Target Position” window 66 4.2.7. RFM96 Configuration window To open the R F M 9 6 Configuration window, select the R a d i o item from the C o n f i g u r a t i o n menu, then click RFM96, as shown in Figure 46. Figure 46. RFM96 item Figure 47 shows the tab that will appear after you click the R F M 9 6 item. Figure 47. “Connect” tab This tab allows the user to establish communication with the radio modem. Use the M o d e m c o n n e c t e d t o p o r t list box to select the receiver port that the radio modem is connected to. Normally, this is port C for the Legacy, Legacy-E, Legacy-H, Regency, HiPer, Odyssey-E and port B for the Odyssey. To set the baud rate of the modem communicating with the receiver, use the C o n n e c t t o m o d e m a t b i t r a t e list box. It is normally 38400 bps. If one wants the receiver automatically to detect the baud rate, select Auto. Next, select the method of modem connection. For most RFM96 models, you can use S e a r c h f o r m o d e m. If the radio is not found, change C o n n e c t i o n t y p e to P o w e r c y c l e and press C o n n e c t. The program will prompt the user to turn the modem OFF and then back ON (Figure 48). The program will poll the radio during its power up cycle and establish a connection. If you have an older 67 RFM96, then start with the radio's power off, use the P o w e r c y c l e type and, when prompted, connect power to the radio. Figure 48. Operations the user should take in Power cycle mode After you making any required changes, click the C o n n e c t button to activate the changes and connect to the modem with the new settings. After a connection with the modem is established, one will see a dialog window showing the radio link settings and protocol details (Figure 49). Figure 49. “Configuration” tab. PDL configuration settings In the R F C h a n n e l list box the user can choose the desired channel. Once the change has been made, press the A p p l y button to program the radio. Be very careful to let the program complete its programming cycle and then press D i s c o n n e c t . Any interruption in power can cause the radio to lose its memory map. If this happens, contact TPS support or Pacific Crest support. The settings, shown in Figure 50, are the only settings that work reliably with the RFM radio. However, if any changes were made, press the A p p l y button to confirm the changes. 68 Figure 50. “Configuration” tab. Recommended settings. Pressing the S e t d e f a u l t s button returns all radio link and serial interface settings back to their factory default values. D i g i s q u e l c h should be set to Low on the base and High on the rover. If the radio at the rover is receiving external interference, then set it to Medium or Low. 4.2.8. Initialize file system To initialize the file system in the connected receiver, select the Initialize file system item from the Tools menu. This procedure is to some extent similar to disk formatting. It results in erasing all of the files inside the receiver. After pressing I n i t i a l i z e f i l e s y s t e m, you will be prompted to confirm the command (Figure 51). In practice, you do not execute this procedure very often. Figure 51. “Initialize File System?” warning Note that the command’s execution time may be up to 10 minutes depending on the receiver’s memory size. 69 4.2.9. Clear NVRAM To clear NVRAM, select the Clear NVRAM item from the Tools menu. The receiver’s non-volatile RAM (NVRAM) keeps data required for satellites tracking, like ephemeris and receiver position. NVRAM also keeps the current receiver’s settings like active antenna input, elevation masks, recording interval and information about the receiver’s internal file system. Clearing NVRAM may help you solve existing problems with satellite tracking. After clearing the NVRAM, your receiver will require some time to collect the new ephemerides and complete almanacs (around 15 minutes). Clearing the NVRAM sets all receiver parameters back to their factory default values. Care should be taken that after clearing the NVRAM these parameters are set correctly. PC-CDU will prompt you to check these settings by opening the R e c e i v e r C o n f i g u r a t i o n dialog window. In addition, the NVRAM is used to keep information about the receiver file system. Note that after clearing the NVRAM the receiver's FN LED will flash yellow for a few seconds indicating that the receiver is scanning/checking the file system. 4.2.10. Reset receiver To reset the receiver, select the Reset receiver item from the Tools menu. This operation is similar to computer resetting. It will not clear the receiver's NVRAM. When clicking the R e s e t r e c e i v e r option, one will be prompted to confirm this command (Figure 52). Figure 52. “Reset receiver?” warning After the command is executed, PC-CDU disconnects itself from the receiver and then opens the C o n n e c t i o n P a r a m e t e r s dialog box prompting you to set necessary parameters to connect to the receiver again. 70 4.2.11. Option Manager window To go to the O p t i o n M a n a g e r window, select the R e c e i v e r o p t i o n s item from the T o o l s menu. After you click R e c e i v e r o p t i o n s, you will see a window that looks like Figure 53. Figure 53. “Option Manager” window This window serves two main purposes. First, it indicates which of the receiver options are available for your receiver. Second, this window allows the user to update the receiver options by loading a new receiver option file (with the extension .jpo). After pressing the Load button, PC-CDU will prompt the user to enter the name of the corresponding .jpo file. When the loading of the new receiver option file is over (in the status bar, one will see the comment Option loaded. You need to configure the receiver.), click the R e f r e s h button to refresh the list of available options. 71 4.2.12. Scatter window To go to the S c a t t e r window, select the S c a t t e r item from the P l o t s menu. This is a useful graphic feature allowing you to monitor the behavior/quality of the receiver trajectory/position (Figure 54). Figure 54. “Scatter” window The window is divided into the scatter plot and an augmented status bar. The plot displays the current receiver position relative to the position specified in the T a r g e t p o s i t i o n window. The most current receiver position is shown by a red point. Status bar contains the following information: • average latitude, longitude and ellipsoidal height of the receiver’s position over the entire set of obtained position estimates; • horizontal position RMS error; • vertical position RMS error; • total position RMS error, (i.e., the square root of the trace of the position error covariance matrix); • horizontal velocity RMS error; 72 • vertical velocity RMS error; • total velocity RMS error, the square root of the trace of the velocity error covariance matrix; • the number of the position estimates for each of the four solution types (in percent) and their total as well; • the maximum and average Easting to Target and Northing to Target in the local system with the origin at the receiver. Use the C l e a r a l l p o i n t s button to erase all plotted points in the window. When you press the button F i t a l l p o i n t s , PC-CDU will automatically change the scale of the S c a t t e r plot allowing you to view all positions, starting from the time PC-CDU established the connection to the receiver. After you press T a r g e t t o a v e r a g e, PC-CDU sets the target position equal to the average receiver’s position. If this window is closed, the positions displayed in the S c a t t e r plot and information in the status bar will not be discarded (unless the receiver is disconnected), thus when the window is reopen later, it will include both the current position information and data, beginning from the time you turned on PC-CDU. 73 4.2.13. Satellites window To go to the S a t e l l i t e s window, select the S a t e l l i t e s item from the P l o t s menu. The S a t e l l i t e s window shows graphic representation of the satellite positions in the sky (Figure 55). Figure 55. “Satellites” window Each concentric circle represents the elevation angle above the horizon. The outermost circle corresponds to 0 degrees above the horizon. The center of the sky plot represents 90 degrees above the horizon. The dotted circle shows the elevation mask angle. In the figure above, the mask angle equals 5 degrees. The user can adjust the mask angle through the E l e v a t i o n M a s k F o r m window which appears immediately after pressing the E l e v a t i o n m a s k button. Also, the user can see four DOP characteristics, specifically: • GDOP – Geometric (3 position coordinates plus clock offset in the solution); • PDOP – Position (3 coordinates); • HDOP – Horizontal (2 horizontal coordinates); • VDOP – Vertical (height only). A dynamically changing histogram shows the signal-to-noise ratio (C/N0) in the C/A channel. Each vertical bar has a unique color and designates a satellite’s PRN (GPS and WAAS) or slot number (GLONASS). Note that GPS/WAAS and GLONASS satellites are marked with G# and R#, respectively. By selecting or clearing the checkbox for each SV, the user can specify which of the GPS, GLONASS and WAAS satellites are enabled/disabled for position computation. 74 To view the basic tracking information about a satellite, move the cursor onto the desired satellite’s icon and right-click on it. Holding down the right button, one will see a popup window, as shown in Figure 56. The values in the window are similar to the values in M a i n w i n d o w (see 4.1). Figure 56. Pop-up menu, reflecting the information about the selected satellite To clear the S a t e l l i t e s window, click the C l e a r d a t a button 4.2.14. Position window To go to the P o s i t i o n window, select the P o s i t i o n item from the P l o t s menu. The graphs, in the P o s i t i o n window (see Figure 57), show the difference (in meters) between latitude/longitude of the current receiver position and latitude/longitude entered in the T a r g e t p o s i t i o n window over the interval (in seconds) specified by the user in the P l o t s C o n f i g u r a t i o n window. The features of the graphs can be adjusted through the P o s i t i o n group box of the P l o t s C o n f i g u r a t i o n window (see 4.2.15). Figure 57. “Position” window 75 4.2.15. Plots Configuration window To go to the Plots C o n f i g u r a t i o n window, select the C o n f i g u r a t i o n item from the P l o t s menu. With this window (Figure 58), the user configures the settings in the S c a t t e r, S a t e l l i t e s and P o s i t i o n windows. Figure 58. “Plots Configuration” window To change the color for the points of the S c a t t e r window, use the P o i n t s c o l o r s settings. For example, if it is desired that the points corresponding to the absolute position estimates, be displayed in red, take the following steps: 1. Move the cursor onto the colored box, which is on the right side of Standalone. 2. Click either mouse button in a fill area of the box. 3. Click the color wanted. If the color desired is not seen, click D e f i n e C u s t o m C o l o r s > > . To the right of B a s i c c o l o r s you will see a custom palette where you can mix your own color. After selecting the color you want, click A d d t o C u s t o m C o l o r s , and then click O K . In the S c a t t e r group box, the user can change the settings related to the S c a t t e r window. With the P l o t W i d t h edit box, the user specifies the length of the axes on the plot. The T i c k I n t e r v a l edit box specifies the tick size (in meters) between the adjacent concentric circles (i.e., interval between adjacent values on the axis). To remove the circle grid from the plot, clear the S h o w g r i d checkbox. To link the points in the trajectory, select the C o n n e c t p o i n t s checkbox. With the checkboxes S t a n d a l o n e, C o d e D i f f e r e n t i a l, R T K f l o a t and R T K f i x e d , you specify what kinds of solutions will be shown on this plot. The P o s i t i o n group box contains the settings that govern the graphs in the P o s i t i o n window. 76 The edit box T i m e i n t e r v a l specifies the length of the x axis (in seconds). The M a x . d e v i a t i o n edit box specifies the length of the y axis (in meters). To turn off the grid, clear the S h o w g r i d checkbox. The T i m e s t e p edit box specifies the time (in seconds) between adjacent vertical gridlines. The D e v i a t i o n s t e p edit box sets the distance (in meters) between adjacent horizontal gridlines. The V a l u e s t o k e e p edit box determines the size of a circular buffer used to store the positions of the receiver’s antenna. The default value is 3600. When the buffer is full, the new values overwrite the oldest. This circular buffer is used with the aim of saving the computer memory consumption when the graphs have been being monitored for a long time (continuously during several hours, days, etc.). To commit any changes that you have made without closing the window, click A p p l y . 4.2.16. About PC-CDU To access the A b o u t P C - C D U window, either select the A b o u t i t e m from the H e l p menu, or press the keys CTRL+U. The A b o u t P C - C D U window shows software version information and, after establishing connection, information about the receiver (Figure 59). Figure 59. “About PC-CDU” window 77 PC-CDU retrieves the receiver ID and firmware version only if the connection to the receiver is established through the C o n n e c t i o n p a r a m e t e r s window. Should one receiver be replaced with another improperly (i.e., without using the disconnect and connect commands), the A b o u t P C - C D U window will not reflect the parameters/status of the newly connected receiver correctly. Bear in mind that Receiver ID is not the same as the receiver serial number printed on the receiver’s body. The S a v e t o f i l e button permits the user to write the current receiver parameters and options into an ASCII file. This file helps technicians discover the source of the problem and then remedy it. Before contacting TPS Customer Support about any problems with PC-CDU, receiver, etc., please do the following: 1. Run PC-CDU. 2. Establish the connection between PC-CDU and the receiver. 3. Click H e l p , and then click A b o u t, or alternatively press CTRL+U. 4. Click S a v e t o f i l e . Specify the name of the text file. Click S a v e. The file will be saved onto the selected computer’s disk. 5. Send the file containing the logs, along with a note describing the problem you have encountered, to TPS Customer Support using either the [email protected] or [email protected] e-mail address. 78 Appendix A. PC-CDU Scripts Introduction to PC-CDU scripts Script is a plain text file each line of which is either a receiver command, or a PC-CDU command, or a comment. It can be created and edited with a text editor, (e.g., Notepad). You can also edit an existing script in the M a n u a l M o d e window. To create a new script or edit an existing one in M a n u a l M o d e , follow these steps: Create script Edit script 1. Press the button Edit script 1. Press the button Edit script 2. Enter the name of a new script (the field File 2. Select the desired script name in the list of available name) scripts 3. Press the button Open 3.Press the button Open 4. Type your script 4. Make necessary changes in the script 5. Press the button Save script 5. Press the button Save script 6. Finally, press the button Close editor It is recommended to save scripts using the extension .jpc. To run a script through the command line of the M a n u a l M o d e window: First, enter the script name with the character '@', which is followed by the script name. Next, specify necessary script arguments, if required. Finally, press the S e n d c o m m a n d button. Script arguments should be delimited by either spaces or commas. If some of the arguments in the command line contain separators (spaces and/or commas), put such arguments into double quotes ("), (e.g.: @myscript “This is one argument” these are 4 arguments). Alternatively, instead of typing the script name, you may use the L o a d s c rip t button, which allows you to select the required script from the S c r i p t f i l e window. For easy access to scripts, it is recommended to keep them all in one directory, (e.g., in PC-CDU’s working directory). After PC-CDU starts script execution, it will read the file line by line carrying out the following operations, if necessary: 79 • skipping empty and comment lines; • replacing variables with their specific values; • echoing non-empty lines to the screen (if echo is enabled); • interpreting PC-CDU internal commands, and; • sending commands to the receiver and (optionally) waiting for receiver replies. To abort the script execution, click the S t o p s c r i p t button. Variables Variables are special character sequences that are substituted for some specific values22 while running the script. Currently PC-CDU supports the following variables: @1, @2, … @9, and @0. The first nine of these variables initially contain the values of the script's command line arguments. With the command @default, you can assign the default values to these variables unless the corresponding arguments have already been specified through the script command line. Also, you may use the @set command to change the variables' values. The variable @0, which is read-only, has a special purpose. Initially it contains the script name specified in the command line. In the course of script execution, it will either contain the last of the receiver's positive acknowledgements (i.e., the most recent of the RExxx replies), or remain empty. After getting RExxx from the receiver, PC-CDU will search the received sequence for the last of the '%' symbols it contains. PC-CDU does not assign to the variable @0 the entire RExxx reply, but only the characters following immediately after the last '%' symbol (until the end of this sequence is found). Leading and trailing spaces are trimmed. With the @set command, you can assign the value of @0 to other variables. Any line beginning with '#' (hash) is considered a comment and is ignored by PCCDU script interpreter. PC-CDU commands Any line starting with the '@' character is interpreted as a PC-CDU command with optional arguments separated by commas or spaces. In table below, you will find the description of supported commands. Table 9. List of PC-CDU commands Command :<label name> call 22 Arguments <script name> [<arguments>] Description Specifies a label. Label names should not contain spaces or commas. See the goto command for how to use labels. Calls another script. The maximum number of recursive calls is 200. specified by the user and stored by PC-CDU 80 clear default variable name (@1…@9) followed by its default value Clears the manual mode window removing from it both the issued commands and receiver replies. Defines the default values for those of the script arguments that were not explicitly specified in the command line. For example, @default @1 a disconnect echo on off any character sequence exit goto <label name> send <bytes to send> set 1) rate <new baud rate> 2) rtscts [on,off] 3) <variable> <value> sets the variable @1 to "a" unless this argument is already defined in the command line. Stops script execution, disconnects PC-CDU from the receiver and closes the manual mode window. This is the same as pressing the 'Disconnect' button. Turns echo on and off, or displays its arguments. If echo is turned on, PC-CDU will be displaying all nonempty lines entered in the script, specifically, PC-CDU commands, receiver commands and the corresponding reply messages. If echo is turned off, PC-CDU will be displaying only replay messages preceding them with the ‘>’ character. PC-CDU will not show @echo off and @echo on commands. Default is ‘on’. Stops script execution, disconnects PC-CDU from the receiver and exists PC-CDU. Jumps to the line following immediately after @:<label name> If PC-CDU can't find such a label in the script, this command is just ignored and PC_CDU continues with the script. Sends the argument to the receiver as is, without making any substitutions. This string may contain escape sequences in a C-like style to represent non-printable characters: Sequence Value Character \a 0x07 BEL \b 0x08 BS \f 0x0C FF \n 0x0A LF \r 0x0D CR \t 0x09 HT \v 0x0B VT \\ 0x5C Backslash \" 0x22 Double quote \O any O - octal character code \xH any H - hexadecimal character code With this command, you can send any bytes to the receiver. Example: @send "#OFF#\r\n" With these commands, you can handle both serial ports' parameters and PC-CDU's internal variables. Example 1: Suppose you have a script with the commands …. @set @1 "a text" @echo @1 …. When the script interpreter reaches the two commands, you will get the following reply: 81 >a text Example 2: Assign the current terminal's baud rate to @2: %%print,/par/cur/term/rate @set @2 @0 sleep integer number of milliseconds PC-CDU interrupts script execution for specified time interval. stop Stops script execution. stoponerrors on Enables/disables PC-CDU' stop-on-error option. This indicates off whether PC-CDU will stop script execution after getting an ERxxx message from the receiver. Default is 'on'. timeout integer value in milliseconds, If a receiver command starts with a '%' symbol, PC-CDU will default is 5000 wait for the receiver to reply within the specified 'timeout' interval. If a reply is received during this time, it will be saved to the variable @0. If no reply is received over the timeout interval, or if after receiving a few bytes PC-CDU gets no more data for 100+ milliseconds, or if PC-CDU keeps receiving "continuous data" for more than 100 milliseconds, @0 will be undefined (however, script execution will continue). In this you may need to adjust the timeout interval to be sure that the variable @0 contains correct information. Receiver commands Using scripts one can specify receiver commands’ arguments either explicitly or through variables. When you use variables for this purpose, these will be substituted by PC-CDU for some specific values before sending the corresponding command to the receiver. If the user sends a receiver command that starts with '%' (command label), PC-CDU will wait for the receiver to reply and, if a reply is received, it will save the reply to the variable @0. Currently the character '@' is used in GRIL commands only to delimit the command checksum. It should not cause any problems since PC-CDU automatically adds a checksum for every command sent to the receiver. PC-CDU does not interpret receiver commands. Therefore, if one uses receiver commands that change the baud rate and/or handshaking for the current receiver port (that is the port to which PC-CDU is connected), you should either use appropriate @set commands immediately after them, as shown below: %%set,/par/cur/term/rtscts,off (this governs the receiver port) @set rtscts,off (this governs the computer port) %%set,/par/cur/term/rate,9600 (this governs the receiver port) @set rate,9600 (this governs the computer port), or specify such receiver commands at the end of the script, immediately before @disconnect or @exit. Otherwise, PC-CDU may be locked up waiting for the receiver to reply. Below will be found some examples illustrating various applications of scripts. The following script serves the purpose described in the article “Using the Coast Guard Beacon for Differential Corrections”. @default @1,c %%set,dev/ser/@1/imode,rtcm 82 %%set,dev/ser/@1/rate,9600 %%set,/par/pos/mode/cur,cd %%em,,/msg/nmea/GGA:1 @exit After these lines are saved to a file (e.g., beacon.jpc), you then can type in the command line: @beacon and press E n t e r to instruct the receiver to input RTCM corrections from serial port C and output NMEA messages to the current terminal. If one wants to use serial port B for inputting corrections, type @beacon b and press E n t e r. The following example illustrates how the goto command and labels are used in scripts intended for work with different receiver models. %/par/rcv/model%print,/par/rcv/model @goto Is@0 @echo Unknown receiver model. @stop @:IsOdyssey @echo Receiver is Odyssey! @goto end @:IsLegacy @echo Receiver is Legacy! @goto end @:IsEurocard @echo Receiver is Eurocard! @:end @stop Running scripts from Windows Explorer Files with the extension .jpc are automatically associated with PC-CDU. It means that you can launch PC-CDU (specifically in M a n u a l m o d e ) by clicking on a script in the file/directory tree. It can be achieved with the use of Windows Explorer, My Computer or some other Windows file manager. After the C o n n e c t i o n P a r a m e t e r s dialog box pops up, you press the C o n n e c t button to open PC-CDU’s M a n u a l M o d e window. Note, however, that the script you selected will not start automatically so that you should type the name of desired script in the command line or select the script through the L o a d s c rip t button. After exiting manual mode, you can continue working with PC-CDU in the usual way. 83 Appendix B. Output Period Setup Wizard T h e O u t p u t P e r i o d S e t u p W i z a r d is a feature that helps the user select and set the correct values for generating raw data and updating the receiver position. PC-CDU will open this Wizard only if you try to specify an incorrect recording interval. Once the Wizard is run, follow the onscreen instructions to adjust the typed values. The following five figures, which are given here just for the user’s convenience, show how the Output Period Setup Wizard windows look. These windows are listed in order of appearance. Figure 60. Wizard’s 1st window 84 Figure 61. Wizard’s 2nd window Figure 62. Wizard’s 3rd window 85 Figure 63. Wizard’s 4th window Figure 64. Wizard’s 5th window 86 Appendix C. Channel Navigation Status Codes Code Meaning 00 C/A data used for position computation 01 P1 data used for position computation 02 P2 data used for position computation 03 Ionosphere-free combination used for position computation 04 Measurements are not available 05 Ephemeris is not available 06 Unhealthy SV [as follows from operational (=ephemeris) SV health] 07 08 09 10 11 12 13 14 15 Time-Frequency parameters from the ephemeris data set may be wrong Initial conditions (position and velocity vectors) from the ephemeris data set may be wrong Almanac SV health indicator is not available for this satellite Unhealthy SV [as follows from the almanac SV health indicator] “Alert” flag (from the word “HOW”) is set 2 2 2 1 URA indicates the absence of accuracy prediction for this SV 1 This SV is excluded from position computation by the user SV with this frequency channel number is excluded from position computation by the user This SV is excluded from solution since its system number is unknown 16 This SV has elevation lower than the specified mask angle 17 Reserved 18 Ephemeris data is too old 19 This SV does not belong to the constellation the user has selected 20 2 2 2 Differential data from Base Station are not available for given satellite (this field is meaningful only when receiver runs in DGPS) 21 Reserved 22 Wrong measurements have been detected by RAIM 23 SNR below specified minimum level 24, 25 Reserved 26 Reserved 27 DLL is not settled 28 Ionospheric corrections are not received from base 29 Coarse code outlier has been detected 87 30 Reserved 31 SV is not used in RTK processing. It is similar to code 20 but is used specifically for RTK. 32-50 The same as 30 51 Reserved 52 C/A slot is used in RTK processing 53 P L1 slot is used in RTK processing 54 P L2 slot is used in RTK processing 55 P L1 & P L2 measurements are used in RTK processing 56-62 63 C/A & P L2 measurements are used in RTK processing Reserved 1 GPS only 2 GLONASS only Codes 0-3 and 45-62 will show for the given satellite which raw data measurements have been used in position computation. The rest codes will indicate why this satellite has been excluded from position computation. 88