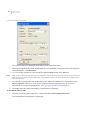
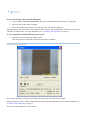
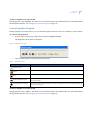
1
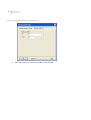
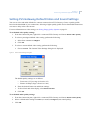
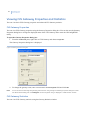
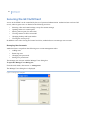
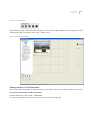
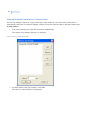
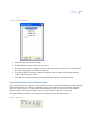
GE MultiClient for the PC
User Manual
GE imagination at work
Copyright
Copyright © 2005, GE Security B.V. All rights reserved.
This document may not be copied or otherwise reproduced, in whole or in part, except as
specifically permitted under US and international copyright law, without the prior written
consent from GE.
Document number/revision: xxxx_GB (July 2005).
Disclaimer
THE INFORMATION IN THIS DOCUMENT IS SUBJECT TO CHANGE WITHOUT NOTICE. GE
ASSUMES NO RESPONSIBILITY FOR INACCURACIES OR OMISSIONS AND SPECIFICALLY
DISCLAIMS ANY LIABILITIES, LOSSES, OR RISKS, PERSONAL OR OTHERWISE, INCURRED AS A
CONSEQUENCE, DIRECTLY OR INDIRECTLY, OF THE USE OR APPLICATION OF ANY OF THE
CONTENTS OF THIS DOCUMENT. FOR THE LATEST DOCUMENTATION, CONTACT YOUR LOCAL
SUPPLIER OR VISIT US ONLINE AT WWW.GESECURITY.NET.
This publication may contain examples of screen captures and reports used in daily
operations. Examples may include fictitious names of individuals and companies. Any
similarity to names and addresses of actual businesses or persons is entirely coincidental.
Trademarks and patents
GE and the GE monogram are registered trademarks of General Electric.
Digia Client product and logo are registered trademarks of GE Security.
Other trade names used in this document may be trademarks or registered trademarks of
the manufacturers or vendors of the respective products.
Software license agreement
GE software supplied with GE products is proprietary and furnished under license and can
be used or copied only in accordance with the license terms.
THE ENCLOSED PROGRAM IS FURNISHED SUBJECT TO THE TERMS AND CONDITIONS OF THIS
AGREEMENT. RETENTION OF THE PROGRAM FOR MORE THAN 30 DAYS, OPENING OF THE
SEALED WRAPPER, IF ANY, SURROUNDING THE PROGRAM, OR USE OF THE PROGRAM IN ANY
MANNER WILL BE CONSIDERED ACCEPTANCE OF THE AGREEMENT TERMS. IF THESE TERMS
ARE NOT ACCEPTABLE, RETURN THE UNUSED PROGRAM AND ANY ACCOMPANYING
DOCUMENTATION TO GE FOR A FULL REFUND OF THE LICENSE FEE PAID. (FOR INFORMATION
REGARDING THE RETURN OF PROGRAMS ENCODED OR INCORPORATED WITHIN
EQUIPMENT, CONTACT THE NEAREST GE SALES OFFICE.)
Intended use
Regulatory
Use this product only for the purpose it was designed for; refer to the data sheet and user
documentation. For the latest product information, contact your local supplier or visit us
online at www.gesecurity.net.
iii
Table of Contents
Table of Contents . . . . . . . . . . . . . . . . . . . . . . . . . . . . . . . . . . . . . . . . . . . . . . . . . . . . . . . . . . . . . . . . . . . .iii
Chapter 1.
GE Security MultiClient Application Setup . . . . . . . . . . . . . . . . . . . . . . . . . . . . . . . . . 1
Minimum System Requirements . . . . . . . . . . . . . . . . . . . . . . . . . . . . . . . . . . . . . . . . . . . . . . . . . . . . . . . . . . . . . . . . . . 2
GE MultiClient Installation . . . . . . . . . . . . . . . . . . . . . . . . . . . . . . . . . . . . . . . . . . . . . . . . . . . . . . . . . . . . . . . . . . . . . . . . 3
Logging in to the GE MultiClient . . . . . . . . . . . . . . . . . . . . . . . . . . . . . . . . . . . . . . . . . . . . . . . . . . . . . . . . . . . . . . . . . . . . . . .3
Enabling Camera Monitoring . . . . . . . . . . . . . . . . . . . . . . . . . . . . . . . . . . . . . . . . . . . . . . . . . . . . . . . . . . . . . . . . . . . . . 5
Connecting to an FVS Gateway . . . . . . . . . . . . . . . . . . . . . . . . . . . . . . . . . . . . . . . . . . . . . . . . . . . . . . . . . . . . . . . . . . . . . . .5
Setting FVS Gateway Default Video and Sound Settings . . . . . . . . . . . . . . . . . . . . . . . . . . . . . . . . . . . . . . . . . . . . 11
Viewing FVS Gateway Properties and Statistics . . . . . . . . . . . . . . . . . . . . . . . . . . . . . . . . . . . . . . . . . . . . . . . . . . . . 12
FVS Gateway Properties. . . . . . . . . . . . . . . . . . . . . . . . . . . . . . . . . . . . . . . . . . . . . . . . . . . . . . . . . . . . . . . . . . . . . . . . . . . . 12
FVS Gateway Statistics . . . . . . . . . . . . . . . . . . . . . . . . . . . . . . . . . . . . . . . . . . . . . . . . . . . . . . . . . . . . . . . . . . . . . . . . . . . . . 12
Securing the GE MultiClient. . . . . . . . . . . . . . . . . . . . . . . . . . . . . . . . . . . . . . . . . . . . . . . . . . . . . . . . . . . . . . . . . . . . . . 14
Chapter 2.
Viewing Video . . . . . . . . . . . . . . . . . . . . . . . . . . . . . . . . . . . . . . . . . . . . . . . . . . . . . . . . . 19
Viewing Live Video Streams. . . . . . . . . . . . . . . . . . . . . . . . . . . . . . . . . . . . . . . . . . . . . . . . . . . . . . . . . . . . . . . . . . . . . . 21
Adjusting Camera Settings . . . . . . . . . . . . . . . . . . . . . . . . . . . . . . . . . . . . . . . . . . . . . . . . . . . . . . . . . . . . . . . . . . . . . . . . . 23
Viewing Recorded Video. . . . . . . . . . . . . . . . . . . . . . . . . . . . . . . . . . . . . . . . . . . . . . . . . . . . . . . . . . . . . . . . . . . . . . . . . 28
Playing Video Stored on an FVS Gateway . . . . . . . . . . . . . . . . . . . . . . . . . . . . . . . . . . . . . . . . . . . . . . . . . . . . . . . . . . . 28
Playing Video Stored on Your PC . . . . . . . . . . . . . . . . . . . . . . . . . . . . . . . . . . . . . . . . . . . . . . . . . . . . . . . . . . . . . . . . . . . . 29
Controlling Video Playback . . . . . . . . . . . . . . . . . . . . . . . . . . . . . . . . . . . . . . . . . . . . . . . . . . . . . . . . . . . . . . . . . . . . . . . . . 33
Adjusting Camera Pane Placement . . . . . . . . . . . . . . . . . . . . . . . . . . . . . . . . . . . . . . . . . . . . . . . . . . . . . . . . . . . . . . . 34
Viewing Multiple Cameras in a Camera Pane . . . . . . . . . . . . . . . . . . . . . . . . . . . . . . . . . . . . . . . . . . . . . . . . . . . . . . . . 36
Using the Desktop to See Different Views. . . . . . . . . . . . . . . . . . . . . . . . . . . . . . . . . . . . . . . . . . . . . . . . . . . . . . . . . . . . 37
Using Workspaces . . . . . . . . . . . . . . . . . . . . . . . . . . . . . . . . . . . . . . . . . . . . . . . . . . . . . . . . . . . . . . . . . . . . . . . . . . . . . . 39
Saving and Opening a Workspace . . . . . . . . . . . . . . . . . . . . . . . . . . . . . . . . . . . . . . . . . . . . . . . . . . . . . . . . . . . . . . . . . . 39
Chapter 3.
Advanced Settings . . . . . . . . . . . . . . . . . . . . . . . . . . . . . . . . . . . . . . . . . . . . . . . . . . . . . 41
Setting Viewing Options . . . . . . . . . . . . . . . . . . . . . . . . . . . . . . . . . . . . . . . . . . . . . . . . . . . . . . . . . . . . . . . . . . . . . . . . . 41
Setting Proxy Server Properties . . . . . . . . . . . . . . . . . . . . . . . . . . . . . . . . . . . . . . . . . . . . . . . . . . . . . . . . . . . . . . . . . . . . . 42
Setting Event Notification Properties . . . . . . . . . . . . . . . . . . . . . . . . . . . . . . . . . . . . . . . . . . . . . . . . . . . . . . . . . . . . . . . . 42
Setting Snapshot Properties . . . . . . . . . . . . . . . . . . . . . . . . . . . . . . . . . . . . . . . . . . . . . . . . . . . . . . . . . . . . . . . . . . . . . . . . 43
Setting Time Format Properties . . . . . . . . . . . . . . . . . . . . . . . . . . . . . . . . . . . . . . . . . . . . . . . . . . . . . . . . . . . . . . . . . . . . . 44
Viewing Stream Info . . . . . . . . . . . . . . . . . . . . . . . . . . . . . . . . . . . . . . . . . . . . . . . . . . . . . . . . . . . . . . . . . . . . . . . . . . . . 46
Exporting Records to Self-Playable Format. . . . . . . . . . . . . . . . . . . . . . . . . . . . . . . . . . . . . . . . . . . . . . . . . . . . . . . . 47
Viewing Security Devices on Maps . . . . . . . . . . . . . . . . . . . . . . . . . . . . . . . . . . . . . . . . . . . . . . . . . . . . . . . . . . . . . . . 48
Using Input Sensors . . . . . . . . . . . . . . . . . . . . . . . . . . . . . . . . . . . . . . . . . . . . . . . . . . . . . . . . . . . . . . . . . . . . . . . . . . . . 50
Using Activators. . . . . . . . . . . . . . . . . . . . . . . . . . . . . . . . . . . . . . . . . . . . . . . . . . . . . . . . . . . . . . . . . . . . . . . . . . . . . . . . 52
Setting Image Quality Options . . . . . . . . . . . . . . . . . . . . . . . . . . . . . . . . . . . . . . . . . . . . . . . . . . . . . . . . . . . . . . . . . . . 53
iv
GE MultiClient
User Manual
Chapter 1 GE Security MultiClient
Application Setup
The GE MultiClient application (GEMC) enables you to monitor security cameras from your PC. By
connecting with the FVS Gateway, the GEMC enables you to control up to 16 cameras simultaneously,
monitor events in real-time, either when they happen or live, choose between different quality modes in
viewing or recording, and enjoy full DVR capabilities on all video channels.
The following figure illustrates the GE Security operational diagram.
Figure 1. GE Security Operational Diagram
You can connect your PC to an FVS Gateway through a LAN, WAN, or Wi-Fi network, analog and broadband
phone lines, and all cellular protocols.
2
GE MultiClient
User Manual
Minimum System Requirements
To access an FVS Gateway via a PC, you need the following:
•
•
•
•
•
Note:
Windows 2000/XP
Pentium 3, with a 1 GHz processor or higher
256 MB of RAM
10 MB of hard disk space for the installation (not including the space required for the video
downloaded from the gateway)
A video card and monitor that support a of resolution 1024 x 768 or higher
To use the map feature, it is recommended to have two monitors and supporting video cards.
Chapter 1
GE Security MultiClient Application Setup
3
GE MultiClient Installation
The GE MultiClient application (GEMC) runs directly from a PC. Before you use the application, you must
install the software on the PC. The setup program is located on the installation CD, but it is recommended that
you download the latest version at ftp://www.servision.net/Support/GeneralElectric.
To install the GE MultiClient application on the PC
1. Start the setup program in one of the following ways:
•
•
Note:
Insert the installation disc into the CD drive of your PC. The setup program starts automatically.
Double-click the downloaded setup file, Setup-MultiClient-GE-0.0.X.X.exe. The setup program is
displayed.
f a Microsoft Windows Security Warning dialog box is displayed, click Run.
2. On the Welcome screen, click Next.
3. On the License Agreement screen, accept the license terms and click Next.
4. On the Destination Folder screen, select the installation folder by performing one of the following:
•
•
To accept the default folder (C:\Program Files\GeneralElectric\GEMultiClient\), click Next.
To install to a different folder, click Change, enter the new folder, then click Next.
5. On the Installation screen, review the installation options, then click Install.
6. After the installation process is completed, click Finish.
An application icon is placed on your desktop.
If you selected to launch the program, continue with the following section to log in.
Logging in to the GE MultiClient
To access the GEMC, you can log in as an authorized user (full access) or a guest (limited access). The
differences in access rights are described in Securing the GE MultiClient on page 14. The first time you log in,
you must create a user ID.
To log in to the GEMC
1. Start the program by double-clicking the desktop icon or by running GEMultiClient.exe from the
installation folder.
The Log In dialog box is displayed.
4
GE MultiClient
User Manual
Figure 2. Log In Dialog Box
2. Enter a user name and password and click OK, or for limited access, click Guest.
If no user name and password has been created yet, you are prompted to create a new user ID and
password.
3. To create a new user name and password, perform the following:
a. Confirm the request to create a new user ID. The Add User dialog box (Figure 12 on page 14) is
displayed.
b. Enter a user name, password, and password confirmation.
c. Click OK.
The name of the user is displayed in the title bar of the GEMC main window.
Note:
In this document, all tasks are described from the main window, assuming that a successful log in has been
accomplished.
Chapter 1
GE Security MultiClient Application Setup
5
Enabling Camera Monitoring
To monitor the cameras that are attached to an FVS Gateway, you must connect to an FVS Gateway. You can
connect to as many FVS Gateways as exist in your network security system, and you can subsequently
disconnect from connected FVS Gateways. GEMC automatically remembers the last gateway to which your
PC was connected.
Connecting to an FVS Gateway
You connect to an FVS Gateway by configuring basic connection properties in the New Gateway dialog box.
You can configure advanced connection properties by using the Advanced Settings dialog box, as described in
Configuring Advanced Connection Properties on page 7.
To open the New Gateway dialog box
From the main menu, choose Gateway => Connect.
The New Gateway dialog box is displayed.
Figure 3. New Gateway Dialog Box
Configuring Basic Connection Properties
1. Open the New Gateway dialog box (Figure 3).
2. Select from the following connection types:
•
•
Regular: connect to an IP, proxy server, or host name.
Dial-up: connect via a modem to an FVS Gateway modem.
3. In the Gateway Address section, enter the IP address (or host name) and the port (default 9988) of the
FVS Gateway to which you want to connect, or to connect to a gateway that was previously connected,
select it from the IP drop-down box.
Note:
If you don’t know the information on the FVS Gateways in your network, click Find Gateway to use the auto find
feature. For more information, see To find all FVS Gateways in the network on page 6.
6
GE MultiClient
User Manual
The IP and port information entered will be saved for future connection attempts.
4. If the FVS Gateway is running version 2.X.X of the software, select SVGateway 2.X.X.
5. Enter the user name and password for the FVS Gateway. The user name and password are configured
using the GEConfigHTML utility.
6. To save the entered user name and password for subsequent connections, select Save user name and
password.
7. Click Connect. The FVS Gateway selected is displayed in the Connection pane on the left side of the
main window.
Figure 4. Connection Pane
After successfully connecting, you can expand the FVS Gateway to display all the devices connected to it. The
following table describes the connected devices:
Table 1.
Device
Connected Devices
Description
video device (in this example, a Pan\Tilt\Zoom camera and an entertainment feed)
an audio device
sensors (raise, fall, and both)
To remove a FVS Gateway
•
•
In the Connection pane, right-click the FVS Gateway to disconnect and choose Remove.
The FVS Gateway is removed.
To remove all connected FVS Gateways
•
•
Note:
From the main menu, choose Gateway => Remove all.
All connected FVS Gateways are removed.
To locate the IP address of the FVS Gateways in your network, you can use the auto find feature.
To find all FVS Gateways in the network
1. Open the New Gateway dialog box (Figure 3).
2. Click Find Gateway.
Chapter 1
GE Security MultiClient Application Setup
7
The Find Gateway dialog box is displayed, showing a list of all FVS Gateways in the network.
Figure 5. Find Gateway Dialog Box
3. To connect to an FVS Gateway, select it and click Select. The gateway details are entered in the New
Gateway dialog box.
Note:
You can access the GEConfigHTML gateway administration utility through the Find Gateway dialog box. Select the
desired FVS Gateway and click Configure. The GEConfigHTML utility is displayed in a Web browser window.
Configuring Advanced Connection Properties
You can set the following advanced gateway options:
Table 2.
Advanced gateway options
Option
Description
Dial-up settings
Settings used for dialing into the FVS Gateway
Proxy settings
Settings used to define a proxy server
Backup Address settings
Settings used to configure a second IP address
You set advanced gateway connection properties with the Advanced Settings dialog box.
To open the Advanced Settings dialog box
1. Open the New Gateway dialog box (as described in To open the New Gateway dialog box on page 5)
and click Advanced.
The Advanced Settings dialog box—Dial-up settings tab is displayed.
8
GE MultiClient
User Manual
Figure 6. Advanced Settings Dialog Box—Dial-up Settings Tab
2. To enter dial-up settings, perform the following:
a. Select an available device from the Connect using drop-down list.
b. Type the phone number to dial.
c. Select an authentication method:
•
•
Use the gateway user name and password
Use a different user name and password. For this method, enter the user name and password.
d. Click OK.
3. To enter proxy settings, perform the following:
a. Select the Proxy tab. The Advanced Settings Dialog Box—Proxy tab is displayed.
Chapter 1
GE Security MultiClient Application Setup
9
Figure 7. Advanced Settings Dialog Box—Proxy Tab
b. Select a proxy option:
•
•
To use the default proxy server, select Use default proxy. The default proxy server is configured
in the Proxy tab of the Options dialog box. For more information, see Setting Proxy Server
Properties on page 42.
To use a custom proxy, select Use custom proxy and enter the IP and port of the proxy.
c. Click OK.
4. To enter backup address settings, perform the following:
a. Select the Backup Address tab. The Advanced Settings Dialog Box—Backup Address tab is
displayed.
10
GE MultiClient
User Manual
Figure 8. Advanced Settings Dialog Box—Backup Address Tab
b. Enter the IP and port of the backup address, and click OK.
Chapter 1
GE Security MultiClient Application Setup
11
Setting FVS Gateway Default Video and Sound Settings
You can set video and audio defaults for cameras connected to an FVS Gateway. Choose a quality profile
based on the bandwidth of your connections. Selecting a higher quality profile for low bandwidth connections
can cause a delay in the video stream.
For more information on video settings, see Setting Image Quality Options on page 53.
To set default video quality settings
1. From the Connection pane, right-click a connected FVS Gateway and choose Default Video Quality.
2. To select a preassigned default video setting, perform the following:
a. Select from 1 Lowest to 8 Highest.
b. Click OK.
3. To select a custom default video setting, perform the following:
a. Choose Custom. The Custom Video Settings dialog box is displayed.
Figure 9. Custom Video Settings Dialog Box
The default quality settings are as follows:
•
•
Frame rate: 15 Fps (range is from 0 to 25)
Bitrate: 60 Kbps (range is from 5 to 1024)
b. Enter the desired frame rate and bitrate settings.
c. To force black and white display, select Black and white.
d. Click OK.
To set default audio quality settings
1. From the Connection pane, right-click a connected FVS Gateway and choose Default Audio Quality.
2. Select a default audio setting from Mute (no sound) to 6 Highest (best sound quality).
3. Click OK.
12
GE MultiClient
User Manual
Viewing FVS Gateway Properties and Statistics
You can view basic FVS Gateway properties and advanced FVS Gateway statistics.
FVS Gateway Properties
You can view FVS Gateway properties using the Gateway Properties dialog box. You can also use the Gateway
Properties dialog box to change the displayed name of the FVS Gateway and to enter the GEConfigHTML
utility.
To open the Gateway Properties dialog box
1. From the Connection pane, right-click an FVS Gateway and choose Properties.
The Gateway Properties dialog box is displayed.
Figure 10. Gateway Properties Dialog Box
2. To change the gateway name, enter a new name in the Description field and click OK.
Note:
You can access the GEConfigHTML gateway administration utility through the Gateway Properties dialog box. Select
the desired FVS Gateway and click Configure. The GEConfigHTML utility is displayed in a Web browser window.
FVS Gateway Statistics
You can view FVS Gateway statistics using the Gateway Statistics window.
Chapter 1
GE Security MultiClient Application Setup
13
To view FVS Gateway statistics
From the Connection pane, right-click an FVS Gateway and choose Statistics. The Gateway Statistics window
is displayed.
Figure 11. Gateway Statistics Window
14
GE MultiClient
User Manual
Securing the GE MultiClient
Access to the GEMC can be controlled by the use of password authentication. Authorized user can have full
access, whereas guest users are limited to the following activities:
•
•
•
•
•
•
Selecting video and sound settings (except for custom settings)
Opening cameras in camera panes
Moving camera (pan, tilt, and zoom)
Viewing cameras in full screen mode
Changing desktop and layout modes
Viewing the security map
In addition to all video viewing and control activities, authorized users can manage user accounts.
Managing User Accounts
Authorized users can perform the following user account management tasks:
•
•
•
•
Adding users
Removing users
Changing user passwords
Setting user permissions
You manage user accounts with the Manage Users dialog box.
To open the Manage Users dialog box
From the main menu, choose User => Management.
The Manage Users dialog box is displayed.
Figure 12. Manage Users Dialog Box
Chapter 1
GE Security MultiClient Application Setup
To add new users
1. Open the Manage Users dialog box (Figure 12 on page 14) and click Add.
The Add User dialog box is displayed.
Figure 13. Add User Dialog Box
2. Enter a new user name and password
3. Confirm the password and click OK.
The new user name is listed in the Manage Users dialog box.
To remove a user
1. Open the Manage Users dialog box (Figure 12 on page 14).
2. Select the user to remove and click Remove.
The user name is removed from the Manage Users dialog box.
To change a user password
1. Open the Manage Users dialog box (Figure 12 on page 14).
2. Select the user whose password is to be changed and click Password.
The Change Password dialog box is displayed.
15
16
GE MultiClient
User Manual
Figure 14. Change Password Dialog Box
3. Enter the new password.
4. Confirm the new password and click OK.
To set user permissions
1. Open the Manage Users dialog box (Figure 12 on page 14).
2. Select the user whose permissions are to be changed and click Permissions.
The User Permissions dialog box for the selected user is displayed.
Figure 15. User Permissions Dialog Box
Chapter 1
GE Security MultiClient Application Setup
3. Select or clear the desired permissions, then click OK.
17
18
GE MultiClient
User Manual
Chapter 2
Viewing Video
19
Chapter 2 Viewing Video
You can use the GE MultiClient application to display and control all the cameras on any connected FVS
Gateway. You can display up to 16 cameras simultaneously in a single view, view events, and play back
recorded video. You can control the video display (pan, tilt, and zoom) and the video and audio quality of a
camera.
All activities are performed using the GE MultiClient (GEMC) main window. The main window is displayed
in the following figure.
Figure 16. Main Window
Main menu
Connection
pane
Desktop
area
Camera
pane
Input Sensors
panel
Activators
panel
Display Layout
Desktops panel
Status area
The following table describes the GEMC main window areas:
Table 3.
GEMC main window areas
Main Window Area
Description
Main menu
enables the activation of GEMC functions
Connection pane
displays the FVS Gateways connected to the GEMC
Desktop area
displays the camera panes
Camera pane
displays video from a single camera
Input sensor area
enables the use (and displays the status) of event triggering devices (such as input sensors)
For more information, see Using Input Sensors on page 50.
20
Table 3.
GE MultiClient
User Manual
GEMC main window areas
Main Window Area
Activator area
Description
enables the use (and displays the status) of activators.
For more information, see Using Activators on page 52.
Display Layout panel
enables the use (and displays the status) of display layout modes
For more information, see Adjusting Camera Pane Placement on page 34.
Desktop mode area
enables the use (and displays the status) of desktop modes
For more information, see Using the Desktop to See Different Views on page 37.
Status area
displays the status of a selected active camera pane
Chapter 2
Viewing Video
21
Viewing Live Video Streams
You view video live video streams in a camera pane in the main window viewing area. GE MultiClient can
display up to sixteen sources simultaneously.
To view video
From the connection pane, drag a camera icon
to a camera pane. (You may need to expand the FVS
Gateway to display the connected cameras.) The video is displayed in the selected camera pane.
The following figure illustrates video displayed in a camera pane.
Figure 17. Video Displayed in a Camera Pane
Motion
detection
status
Stop
button
Camera
name
Video
display
area
Time
display
area
Status
bar
The camera pane contains the following parts:
Table 4.
Camera Pane parts
Camera Pane Part
Descriptions
Camera name
shows the name of the camera
Motion detection status
flashes when the camera detects motion
Stop button
enables you to stop the video display in this camera pane
Video display area
shows the video being played
Time display area
shows the time associated with the displayed video
Status bar
shows the current camera action
22
GE MultiClient
User Manual
You can drag the same camera or a different camera to as many camera panes as are displayed in the viewing
area. You can also move a camera from one pane to another by dragging it to the desired location.
When you pass the cursor over an active camera pane, the video type, gateway name and camera name are
displayed.
You can adjust camera settings such as location, brightness, and contrast. For more information, see Adjusting
Camera Settings on page 23.
To pause playback
To pause playback, double-click the video display. To restart, double-click again. The video display resumes at
the current time.
You can save a snapshot of a video stream that is currently playing.
To save a snapshot of a video stream
During playback, press <Space>. The frame is saved in JPG format in the default folder. For more information
about snapshot defaults, see Setting Proxy Server Properties on page 42.
Chapter 2
Viewing Video
23
Adjusting Camera Settings
You can use the GEMC application to control a camera’s pan, tilt, and zoom functions. You can also set preset
locations and adjust the image quality.
Controlling Pan, Tilt, and Zoom Functions
You can control a camera by moving it directly from your PC. You can adjust the pan (left to right), tilt (up to
down), and zoom (in to out) functions according to your camera’s capabilities. In addition, you can set preset
locations so you can move the camera view to there quickly and easily.
To move a camera
1. From an active camera pane, right-click and choose Camera Control.
The Camera Control panel is displayed.
Figure 18. Camera Control Panel
2. To pan or tilt, click the appropriate arrow. The camera moves in the direction selected.
Table 5.
Camera direction controls
Camera Control
Description
Pan left
Pan right
Tilt up
Tilt down
24
GE MultiClient
User Manual
You can set the speed and step for PTZ functions. For more information, see Setting the Speed for PTZ
Actions on page 24.
3. To zoom in or out, click
Note:
or
. The camera view zooms in or out according to your selection.
Your camera may be limited to support either tilt/pan action or zoom action but not both. For information on your
camera’s features, see the camera documentation or contact a GE Security representative.
Setting the Speed for PTZ Actions
Every camera has a different default speed (how quickly the camera moves from one point to another) and step
(the distance the camera moves with each click). You can set the speed and step for your camera’s movement.
This can help you view desired locations easier.
To set PTZ speed
1. Open the Camera Control panel (as described in To move a camera on page 23) and click PTZ Speed.
The PTZ Speed Configuration dialog box is displayed.
Figure 19. PTZ Speed Configuration Dialog Box
2. Slide the markers to the desired speed for each pan, tilt, and zoom movements. To increase speed, slide
the marker to the right.
3. Click OK.
Preset Camera Locations
You may want to repeatedly view activity in the same camera location (for example, for a frequently entered
security area). You can create preset camera locations that enable you to quickly move a camera to view these
locations. You can also loop the viewing of the preset locations to enable you to view the preset locations in a
set order.
Note:
If an event notification is received during the viewing of a preset tour, the event notification will be viewed in place of the
preset tour.
Chapter 2
Viewing Video
25
You can link a sensor event trigger with a camera action. For example, when a sensor event is triggered, a
camera can be configured (using the GEConfigHTML utility) to record video at one of the preset locations.
To set and view preset camera locations
1. Open the Camera Control panel (Figure 18 on page 23).
2. To create a preset location, perform the following:
a. Use the Camera action controls to set the camera to the desired location and zoom setting, as
described in To move a camera on page 23.
3. Select a preset location setting from the drop-down list and click Set.
4. To move the camera to a preset location, select the preset location from the drop-down list and click Go
To.
To view preset locations in a specific order
1. After you have created preset locations (as described in To set and view preset camera locations on
page 25), click Preset Tour.
The Preset Tour dialog box is displayed.
Figure 20. Preset Tour Dialog Box
2. From the Available list, select the desired preset locations to include in the tour, and click Add.
26
Note:
GE MultiClient
User Manual
You can change the order of viewing by using the Up and Down buttons to change the order in which the preset
locations appear in the In the tour list.
3. Set the time interval (minimum of 5 seconds) to view for each preset location.
4. Click Start.
The defined preset tour is displayed in the active camera pane.
To stop the display of the preset tour
Open the Preset tour dialog box (Figure 20 on page 25) and click Stop.
Adjusting Video Quality
You can adjust the image and sound properties of a video stream. By default, the camera assumes the default
settings defined for the FVS Gateway. For more information on the default settings, see Setting FVS Gateway
Default Video and Sound Settings on page 11.
Adjusting Image Properties
You can adjust the image quality, brightness, and contrast settings.
To adjust image quality
1. From an active camera pane, right-click and choose Video Quality.
2. From the pop-up menu, perform one of the following:
•
•
Choose a defined quality level, from 1 Lowest to 8 Highest. The default is 5.
Choose Custom Quality to set the frame rate and bitrate properties.
For more information on image quality options, see Setting Image Quality Options on page 53.
To adjust brightness and contrast settings
1. From an active camera pane, right-click and choose Picture Parameters.
The Picture Parameters dialog box is displayed.
Figure 21. Picture Parameters Dialog Box
2. Adjust the settings and click OK.
Adjusting Sound Properties
For cameras with audio capabilities, you can listen to the audio at the same time as you are viewing the video.
Note:
Enabling audio is performed using the GEConfigHTML utility.
Chapter 2
Viewing Video
27
To adjust audio settings
From an active camera pane, right-click, choose Audio Quality, and select a sound quality setting from Mute
(no sound) to 6 Highest.
28
GE MultiClient
User Manual
Viewing Recorded Video
You can play back video that is stored on the FVS Gateway or downloaded to your PC. Video can be recorded
for playback in any of the following situations:
•
•
•
Note:
A camera is configured to record all the time.
A camera is configured to record events.
A video file is uploaded to an FVS Gateway or downloaded to a PC.
To enable recording, the camera must be configured using the GEConfigHTML utility.
Playing Video Stored on an FVS Gateway
You can view video stored on an FVS Gateway by event or by time.
Viewing Recorded Video by Event
You can view recorded video by events in the same way as you view live video. For more information on how
events are triggered, see Setting Proxy Server Properties on page 42.
To view recorded video by event
From the connection pane, drag an event icon
to a camera pane.
During playback, you can control certain functions such as pause, fast forward, and rewind. You can also take
snapshots of video frames. For more information, see Controlling Video Playback on page 33.
Viewing Recorded Video by Time
If the camera whose video you want to view is configured to always record video streams, you can view
recorded video by time.
To view recorded video by time
1. From the connection pane, right-click a camera and choose Play Record by Time.
The Play Record by Time dialog box is displayed.
Chapter 2
Viewing Video
29
Figure 22. Play Record by Time Dialog Box
The current date is indicated by a red circle.
2. Select a start time and date and an end time and date (or choose a start time and duration), then click
OK.
3. Click a camera pane in which to play the video.
The video playback begins.
During playback, you can control certain functions such as pause, fast forward, and rewind. You can also take
snapshots of video frames. For more information, see Controlling Video Playback on page 33.
Playing Video Stored on Your PC
You can use the GEMC application to view video that is stored on your PC. This video may have been
downloaded from an FVS Gateway or you may have received a downloaded file via an email message.
In some cases, the video is in SVR format, in which case you can play it only by using the GEMC application.
In other cases, SVR video can be exported into a self-playable format that enables viewing on any PC.
Downloading Video from an FVS Gateway
You can download video from an FVS Gateway by event or by time.
To download a recorded event
1. From the Connection pane, right-click an event and choose Download Event.
The Download Event dialog box is displayed.
30
GE MultiClient
User Manual
Figure 23. Download Event Dialog Box
The event properties are displayed in the upper portion of the dialog box.
2. Enter a path and file name for the downloaded file or click Browse to navigate to the desired location.
The default path is ..\My Documents.
3. To view a longer segment of video, change the Start and End settings in the Time box.
Note:
When a camera always records video, you can change the viewing segment to include more than the recorded ‘event.’
If the camera ia configured only to record events, this extended recording time is limited to the time configured in the
GEConfigHTML utility.
4. To enable the viewing of the downloaded file on PCs where GE MultiClient is not installed, select
Make self-playable. The file is saved in EXE format and can be played from any PC. For more
information on viewing self-playable files, see Playing Downloaded Video on page 31.
5. Click OK. After successful downloading, a confirmation is displayed.
To download video by time
1. From the Connection pane, right-click a camera and choose Download Record by Time.
The Download Record dialog box is displayed.
Chapter 2
Viewing Video
31
Figure 24. Download Record Dialog Box
2. Enter the start time, duration, and date of the video to download.
3. Enter a path and file name for the downloaded file or click Browse to navigate to the desired location.
By default, the file is saved in the ..\My Documents folder in SVR format named “GatewayName Date
Time.svr”.
4. To enable the viewing of the downloaded file on PCs where GE MultiClient is not installed, select
Make self-playable. The file is saved in EXE format and can be played from any PC.
5. Click OK. After successful downloading, a confirmation is displayed.
Playing Downloaded Video
You can play back downloaded video in the GE MultiClient or, if the file was saved in “self-playable” format,
you can view it from any PC.
32
GE MultiClient
User Manual
To view downloaded video from GE MultiClient
1. Choose Tools => Play Downloaded Video. The Microsoft Windows Open dialog box is displayed.
2. Select the file to play and click Open.
3. Select the camera pane in which to display the video. The video is displayed.
During playback, you can control certain functions such as pause, fast forward, and rewind. You can also take
snapshots of video frames. For more information, see Controlling Video Playback on page 33.
To view self-playable downloaded video from any PC
1. Navigate to the saved file and double-click it.
The video stream is displayed in the GE Security Player window.
Figure 25. GE Security Player Window
The record information is displayed in the Record info section of the GE Security player.
During playback, you can control certain functions such as pause and fast forward. For more information, see
Controlling Video Playback on page 33.
You can also take snapshots of video frames.
Chapter 2
Viewing Video
33
To take a snapshot of a video stream
During playback, click Snapshot. The frame is saved in JPG format in the default folder. For more information
about snapshot defaults, see Setting Proxy Server Properties on page 42.
Controlling Video Playback
During playback of recorded video, you can control the playback and you can save snapshots of video frames.
To control video playback
1. From an active camera pane, right-click and choose Playback Control.
The Playback Control panel is displayed.
Figure 26. Playback Control Panel
2. Control video playback using the following controls:
Table 6.
Playback functions
Playback Function
Description
Segment slider
Slide the control to quickly reach a desired section of the playback.
Pause
Click to pause playback.
Play
Click to start playback.
Reduce Playback Speed
Click to reduce the speed at which the video is played. Each click reduces speed by 2X (2X,
4X, 8X, 16X, 32X).
Increase Playback Speed
Click to increase the speed at which the video is played. Each click increases speed by 2X
(2X, 4X, 8X, 16X, 32X).
To take a snapshot of a video stream
During playback, press <Space>. The frame is saved in JPG format in the default folder. For more information
about snapshot defaults, see Setting Proxy Server Properties on page 42.
34
GE MultiClient
User Manual
Adjusting Camera Pane Placement
You can adjust the following properties of the camera pane:
•
•
the size of the camera pane
the amount of camera panes displayed
These properties are referred to as camera pane placement properties. You can also choose to view the camera
panes in full screen mode. For more information, see Viewing Cameras in Full Screen Mode on page 35.
You can configure the placement of camera panes within the viewing area. The fewer camera panes that are
displayed, the greater the size available for viewing single cameras. So, if you set sixteen panes, each pane will
be smaller then if you set four.
Camera panes come in the following sizes:
•
•
•
Quarter SIF
SIF
VGA
You can set the image quality for these sizes. For more information, see Setting Image Quality Options on
page 53.
You can choose from the following defined placement setting:
Table 7.
Camera Placement Settings
Placement Setting
Enables You to View
16 QSIF
up to 16 videos in quarter-SIF camera panels
1 SIF + 12 QSIF
1 video in a SIF camera panel and 12 videos in quarter-SIF camera panels
2 SIF + 8 QSIF
2 videos in SIF camera panels and 8 videos in quarter-SIF camera panels
4 SIF
1 video in a SIF camera panel and 12 videos in quarter-SIF camera panels
VGA
1 video in a VGA camera panel
To set camera placement
Perform one of the following:
•
•
From the menu, choose View and select the desired placement.
From the Display Layout panel (Figure 27), select the desired placement.
The current selection is indicated in the Display Layout panel.
Chapter 2
Viewing Video
35
Figure 27. Display Layout Panel
The placement setting is reflected in the viewing area. The following figure illustrates video displayed in a SIF
camera pane of the viewing area with a 2 SIF + 8 QSIF setting.
Figure 28. Camera Placement Settings
Viewing Cameras in Full Screen Mode
You can view the camera panes in full screen mode, so the camera panes are stretched to fill the entire screen.
To view the camera panes in full screen mode
From the main menu, choose View => Full screen.
To return to normal mode, click the mouse, or press any key on the keyboard.
36
GE MultiClient
User Manual
Viewing Multiple Cameras in a Camera Pane
You can loop multiple cameras in a single camera pane. This enables you to use the same camera pane to
automatically switch the view between multiple cameras for a preset amount of time in the same camera pane.
To loop cameras
1. In an active camera pane, right-click and choose Camera Loop.
The Camera Loop Settings dialog box is displayed.
Figure 29. Camera Loop Settings Dialog Box
2. To add a camera to the loop sequence, click Add.
The Choose Camera dialog box is displayed.
Chapter 2
Viewing Video
37
Figure 30. Choose Camera Dialog Box
3. Select the camera to add and click OK.
4. To add additional cameras, repeat step 2 and step 3.
5. To set the amount of time to display each video, enter the amount of seconds to view in the Interval
box. This setting applies to all cameras in the loop.
6. To adjust the order in which the cameras are displayed, select a camera and click Up to display it
earlier or Down to display it later.
7. Click OK. The camera pane display will loop through the cameras as you have selected.
Using the Desktop to See Different Views
Camera and FVS Gateway settings are saved in a desktop. You can create alternate desktops to enable different
defined configurations. For example, a nighttime watch may have different viewing needs than a daytime
watch. Or, you may want to view more than sixteen cameras in a loop. You can save up to four different
desktops, and you can loop between them, just as you loop between cameras in a camera pane.
The default desktop is number 1, as indicated in the Desktops panel on the main window.
Figure 31. Desktops Panel
38
GE MultiClient
User Manual
To switch to a different desktop view
In the Desktop panel, select the desired desktop.
To loop between desktop views
1. In the Desktops panel, select the box under the desired desktop views.
2. Click Loop
. The Desktop Loop Interval dialog box is displayed.
Figure 32. Desktop Loop Interval Dialog Box
3. Enter the time (in seconds) to display each desktop view, then click OK.
Chapter 2
Viewing Video
39
Using Workspaces
You can save your FVS Gateway connection, desktop, and camera settings in a workspace. You can use
workspaces to do the following:
•
•
save different workspaces for different needs, such as a security manager and a watch person or a
workspace for recurring events with different security needs
send a workspace via email so you can monitor activity from an off-site location.
Saving and Opening a Workspace
You can save a workspace or send it to another user via email. Saved workspaces include the FVS Gateway
connection and camera information. Workspaces are saved on your PC in WSP file format.
To save a workspace
1. From the main window, choose File => Save Workspace (or Save Workspace As).
The Windows Save (or Save As) dialog box is displayed.
Figure 33. Save Dialog Box
2. Navigate to the folder where you want to save the workspace file. By default, WSP files are saved in
the ..\My Documents folder.
3. Enter the workspace file name and click Save.
To open a workspace
1. From the main window, choose File => Open Workspace.
The Windows Open dialog box is displayed.
40
GE MultiClient
User Manual
Figure 34. Open Dialog Box
2. Select the workspace file to open, and click Open. The selected workspace replaces the current
workspace in the main window.
To send a workspace via email
1. From the main menu, choose File => Send to mail recipient.
A new mail message is opened in your default mail program with the workspace file included as an
attachment.
2. Enter the recipient information and send the message as usual.
The recipient can save the attached workspace file and open it as described in Saving and Opening a
Workspace on page 39.
Chapter 3
Advanced Settings
Chapter 3 Advanced Settings
This section discusses advanced settings you can use to customize the GE MultiClient (GEMC).
You can customize the following settings:
Setting Viewing Options
Exporting Records to Self-Playable Format
Viewing Security Devices on Maps
Using Input Sensors
Using Activators
Setting Image Quality Options
Setting Viewing Options
You can set the following viewing options:
• Setting Proxy Server Properties
Set the default proxy server settings
• Setting Proxy Server Properties
Set the audio and visual notifications triggered by the occurrence of events
• Setting Proxy Server Properties
Set the options for taking snapshots
• Setting Proxy Server Properties
Set the format in which time is displayed
You set viewing options with the viewing Options dialog box.
41
42
GE MultiClient
User Manual
To open the viewing Options dialog box
1. From the main screen, choose Tools => Options.
The Options dialog box is displayed.
Figure 35. Options Dialog Box—Proxy Tab
Setting Proxy Server Properties
You can change the IP and port of the default proxy server.
To set viewing proxy options
1. Open the Options dialog box (Figure 35 on page 42).
2. Enter an IP address and port, and click OK.
Setting Event Notification Properties
An event is triggered when some kind of defined activity is sensed by a camera or a sensor. For example, a
video motion detection (VMD) event is triggered when motion is detected and a sensor detection event is
triggered when a contact is made or broken.
Note:
The activities that trigger events are configured in the GEConfigHTML utility.
A motion detection event lasts for as long as the motion is detected. Depending on the camera configuration,
the event (and the recording thereof) can extend for a short period of time after movement has stopped.
Chapter 3
Advanced Settings
43
Event Notification Behavior
Within the GEMC, you can receive the following notification behaviors when an event is triggered:
•
Sound notification
When an event occurs, a sound is played. The sound played is configured using the GEConfigHTML
utility.
•
Video pop-up
When an event occurs, the video stream from the camera linked to the sensor is displayed in an
available camera pane.
To set event actions
1. Open the Options dialog box (Figure 35 on page 42).
2. Select the Events tab.
Figure 36. Options Dialog Box—Events Tab
3. Set the sound and video notifications for video motion detection (VMD) and sensor events by selecting
or clearing your choices.
4. Click OK.
Setting Snapshot Properties
You can save snapshots of video to your hard drive by pressing the <Space> key during playback. Snapshots
are saved in JPG format. Use the Snapshot tab to set options.
44
GE MultiClient
User Manual
To set snapshot options
1. Open the Options dialog box (Figure 35 on page 42).
2. Select the Snapshot tab.
Figure 37. Options Dialog Box—Snapshot Tab
3. To enable the taking of snapshots, perform the following:
a. Select Enable snapshot.
b. Enter the path to the folder in which to store snapshots.
4. To set the quality of snapshots, move the slider as desired. Snapshot files can range from
approximately 5 Kb to 150 Kb.
5. To freeze the video stream after a snapshot is saved, select Freeze stream after snapshot.
6. Click OK.
Setting Time Format Properties
You can select the format in which time is presented in the camera pane from the following options:
Table 8.
Time formats
Format
Description
Example
Long time format
Mmm DD YYYY HH:MM:SS
Dec 15 2005 15:15:30
Short time format
HH:MM:SS
15:15:30
Chapter 3
Advanced Settings
To set time presentation options
1. Open the Options dialog box (Figure 35 on page 42).
2. Select the Time Format tab.
Figure 38. Options Dialog Box—Time Presentation Tab
3. Select the desired format for time presentation and click OK.
45
46
GE MultiClient
User Manual
Viewing Stream Info
You can view the properties of a video stream.
To view stream info
1. From an active camera pane, right-click and choose Stream Info.
The Stream Info dialog box is displayed.
Figure 39. Stream Info Dialog Box
2. To close the dialog box, click Close.
Chapter 3
Advanced Settings
47
Exporting Records to Self-Playable Format
You can transform saved video files (SVR format) into a format that can be viewed on any PC.
To make video files self-playable
1. From the main menu, choose Tools => Convert Downloaded Video.
The Convert Downloaded Video dialog box is displayed.
Figure 40. Convert Downloaded Video Dialog Box
2. In the Source box, enter (or browse to select) the SVR file to transform.
3. In the Save as box, enter (or browse to select) the name of the transformed file. The transformed file
will be created with an EXE file suffix.
4. Click OK.
For information on viewing transformed files, see Playing Downloaded Video on page 31.
48
GE MultiClient
User Manual
Viewing Security Devices on Maps
You can use the GEMC Maps feature to “see” the location of cameras when an event is created. To use
maps, you import a map of your facility and drag camera and sensor icons on to the map. When an event is
detected, the icon will flash and another visual indicator will be displayed enabling you to see in which
zone the event took place.
You use the Map window to import maps and to create mappings.
Note:
For best results, it is recommended that you use the maps function with two computer monitors. For more information,
see “System Requirements” on page 2.
To import a map of your facility
1. From the main window, choose Tools => Show/Hide Maps.
The Map window is displayed.
Figure 41. Map Window
Rooms
area
Map
area
Camera
area
2. Click Add Map.
The Add Map dialog box is displayed.
Figure 42. Add Map Dialog Box
3. Enter a map name.
Chapter 3
Advanced Settings
4. Click
49
to browse to the graphic file (JPG, BMP, or other) of the map to add and click Open.
The added room is listed in the Rooms area.
To place cameras on map
1. From the Rooms area, double-click an imported map.
The imported map is displayed in the Map area.
2. From the Cameras area, drag cameras to their appropriate location on the map.
The following figure illustrates a map with cameras and sensors in place.
Figure 43. Map Window Displaying Cameras and Sensors
Once you have cameras located on a map, you can view the video stream or see on which camera an event has
been created.
In the Maps area, double-click a camera to display its video stream.
Note:
If you are not using two monitors, you will need to close the Map window to see the video stream.
When an event is generated, the camera is colored red, and the video is displayed in the active camera pane.
50
GE MultiClient
User Manual
Using Input Sensors
You can use input sensors to keep tabs on areas of interest. When a linked camera or sensor event is triggered,
the input sensor flashes to signal the event. You can then see the event immediately.
To link an input sensor to a camera or event
1. In the Input Sensors area, click an input sensor.
The Event Sources dialog box is displayed.
Figure 44. Event Sources Dialog Box
2. Select a connected camera or sensor to link to the selected input sensor and click OK. You may have to
expand the FVS Gateway to display all connected devices.
The selected input sensor changes color to indicate its status:
•
Steady green
No events have been triggered
•
Flashing red/blue
Motion is currently occurring
•
Steady blue
Motion was detected
To view an event linked to an input sensor
1. Click a “triggered” input sensor.
Chapter 3
Advanced Settings
51
2. The Sensor Info dialog box is displayed showing details of the sensor and the last event.
Figure 45. Sensor Info Dialog Box
3. To view the last event, click Play Last Event and select the camera pane in which to view the event.
4. To unlink the input sensor, click Remove.
To change an input sensors link source
1. From the Sensor Info dialog box (Figure 45 on page 51), click Reassign.
The Event Sources dialog box is displayed.
2. Link the sensor as described in To link an input sensor to a camera or event on page 50.
52
GE MultiClient
User Manual
Using Activators
You can use the GEMC to operate an output activator that is connected to the FVS Gateway. For example,
when an event is triggered, you can open or close a gate, turn on lights, reset an alarm, etc.
Note:
Before using activators, they must be configured in the GEConfigHTML utility.
To link an activator to an action
1. In the Activators area, click an activator button.
The Event Sources dialog box (Figure 44 on page 50) is displayed.
2. From the displayed gateways, select an activator to link to the selected activator sensor and click OK.
You may have to expand the FVS Gateway to display all connected devices.
When an activator has been linked, its button turns green.
To activate an activator
Double-click the activator button.
To deactivate an activator sensor
Right-click the activator button and choose Deactivate.
To change an input sensors link source
1. Right-click the activator button and choose Activator Info.
2. The Sensor Info dialog box is displayed (Figure 45 on page 51).
3. Click Reassign.
The Event Sources dialog box is displayed.
4. Link the activator as described in To link an activator to an action on page 52.
Chapter 3
Advanced Settings
53
Setting Image Quality Options
You can set the default image quality per FVS Gateway and adjust the image quality of each camera separately.
You can choose from predefined quality profiles, or you can set a custom quality level.
The following settings define image quality:
•
Bit rate (measured in kbps)
The amount of detail (pixels) compressed into each frame. Lowering this setting will decrease
the frame quality but increase the amount of frames that can be displayed without skipping.
This can increase the smoothness of the displayed image and can be particularly useful for low
capacity connections (such as non-broadband connections).
•
Frame rate (measured in fps)
The number of frames displayed per second.
The following table describes the predefined quality profiles:
Table 9.
Predefined quality profiles
Quality
Profile
QSIF (16 viewing panes) 160x120
SIF (4 viewing panes) 320x240
VGA (Single viewing pane) 640x480
Bit rate kbps
Frame rate fps
Bit rate kbps
Frame rate fps
Bit rate kbps
Frame rate fps
1
5
4
20
4
80
4
2
9
4
36
4
144
4
3
12
5
48
5
192
5
4
16
7
64
7
256
7
5
24
10
96
10
384
10
6
32
15
128
15
512
15
7
48
20
192
20
768
20
8
64
25
256
25
1024
25
For the lowest bandwidth channels, you can set the camera to display grayscale.
54
GE MultiClient
User Manual