1
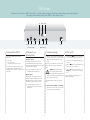
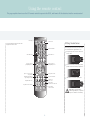
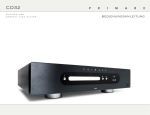
Primare CD31 User Guide Copyright and acknowledgments Copyright © 2004-2006 Primare Systems AB. All rights reserved. Primare Systems AB Renvägen 1 SE-352 45 Växjö Sweden http://www.primare.net Issue: CD31/2 The information in this guide is believed to be correct as of the date of publication. However, our policy is one of continuous development and so the information is subject to change without notice, and does not represent a commitment on the part of Primare Systems AB. Primare is a trademark of Primare Systems AB. This guide was produced by Human-Computer Interface Ltd, http://www.interface.co.uk Safety compliance This product has been designed to meet the IEC 60065 international electrical safety standard. CAUTION ATTENTION RISK OF ELECTRIC SHOCK DO NOT OPEN RISQUE DE CHOC ELECTRIQUE NE PAS OUVRIR CAUTION: To reduce the risk of electrical shock do not remove cover (or back). No user serviceable parts inside. Refer servicing to qualified service personnel. WARNING: To reduce the risk of fire or electrical shock, do not expose this apparatus to rain or moisture. CAUTION: In Canada and the USA, to prevent electric shock, match the wide blade of the plug to the wide slot in the socket and insert the plug fully into the socket. The lightning flash with an arrowhead symbol within an equilateral triangle, is intended to alert the user to the presence of uninsulated 'dangerous voltage' within the product's enclosure that may be of sufficient magnitude to constitute a risk of electric shock to persons. The exclamation point within an equilateral triangle is intended to alert the user to the presence of important operating and maintenance (servicing) instructions in the literature accompanying the product. Important safety instructions This product is designed and manufactured to meet strict quality and safety standards. However, you should be aware of the following installation and operation precautions. 1. Take heed of warnings and instructions You should read all the safety and operating instructions before operating this appliance. Retain this handbook for future reference and adhere to all warnings in the handbook or on the appliance. 6. Climate The appliance has been designed for use in moderate climates. 12. Power lines Locate any outdoor antenna/aerial away from power lines. 7. Racks and stands Only use a rack or stand that is recommended for use with audio equipment. If the equipment is on a portable rack it should be moved with great care, to avoid overturning the combination. 13. Non-use periods If the unit has a stand-by function, a small amount of current will continue to flow into the equipment in this mode. Unplug the power cord of the appliance from the outlet if left unused for a long period of time. 8. Cleaning Unplug the unit from the mains supply before cleaning. 2. Water and moisture The presence of electricity near water can be dangerous. Do not use the appliance near water – for example next to a bathtub, washbowl, kitchen sink, in a wet basement or near a swimming pool, etc. The case should normally only require a wipe with a soft, damp, lint-free cloth. Do not use paint thinners or other chemical solvents for cleaning. We do not advise the use of furniture cleaning sprays or polishes as they can cause indelible white marks if the unit is subsequently wiped with a damp cloth. 3. Object or liquid entry Take care that objects do not fall and liquids are not spilled into the enclosure through any openings. Liquid-filled objects such as vases should not be placed on the equipment. 9. Power sources Only connect the appliance to a power supply of the type described in the operating instructions or as marked on the appliance. 4. Ventilation Do not place the equipment on a bed, sofa, rug or similar soft surface, or in an enclosed bookcase or cabinet, since ventilation may be impeded. We recommend a minimum distance of 50mm around the sides and top of the appliance to provide adequate ventilation. This is a Class 1 device and must be earthed. 10. Power-cord protection Power supply cords should be routed so that they are not likely to be walked on or pinched by items placed upon or against them, paying particular attention to cords and plugs, and the point where they exit from the appliance. 5. Heat Locate the appliance away from naked flames or heat producing equipment such as radiators, stoves or other appliances (including other amplifiers) that produce heat. 11. Grounding Ensure that the grounding means of the appliance is not defeated. ii 14. Abnormal smell If an abnormal smell or smoke is detected from the appliance, turn the power off immediately and unplug the unit from the wall outlet. Contact your dealer immediately. 15. Servicing You should not attempt to service the appliance beyond that described in this handbook. All other servicing should be referred to qualified service personnel. 16. Damage requiring service The appliance should be serviced by qualified service personnel when: A. the power-supply cord or the plug has been damaged, or B. objects have fallen, or liquid has spilled into the appliance, or C. the appliance has been exposed to rain, or D. the appliance does not appear to operate normally or exhibits a marked change in performance, or E. the appliance has been dropped or the enclosure damaged. Welcome Welcome to the Primare CD31! Your CD31 is a high-quality compact disc player with analogue and digital outputs. This page shows how to set up your CD31 in four simple steps: IR Data RS232 ANALOG OUTPUTS R DIGITAL OUTPUTS L XLR (R) RCA XLR (L) Analogue outputs 1 Unpack the CD31 Your CD31 is supplied with the following components: • • • Mains cable. C22 remote control. Two batteries for the remote control. If any of these items are missing please contact your supplier. We recommend you retain the packaging in case you need to transport the unit at a later date. 2 Connect to a preamplifier 3 Connect power 4 Play a CD • • Hold down the */å button on the front panel, or on the remote control, to open the tray. • Place the CD in the tray with the label facing upwards. • Press the */å button on the front panel or the remote control to close the tray. • Press the > button on the front panel, or the >/= button on the remote control to play the disc. Analogue outputs The analogue output provides for both the recommended balanced XLR outputs and the conventional unbalanced RCA for connection with an appropriate stereo amplifier. • Power SPDIF TOSlink AES/EBU Digital outputs Plug one end of the mains cable supplied with the CD31 into the power connector on the back panel, and connect the other end to a wall socket. If this cable is not suitable for your power outlets please contact your supplier for an alternative cable. Digital outputs Alternatively the CD31 Compact Disc Player provides one SPDIF, one TOSlink, and one AES/ EBU digital output for connection to a digital preamplifier or digital surround processor. The standby indicator will light up on the front panel. • Connect the appropriate outputs to your preamplifier using a suitable cable. WARNING: Always disconnect the CD31 from the mains power before connecting or disconnecting any cables. • Connect the appropriate output to your preamplifier or surround processor using a suitable cable. Switch on the CD31, using the switch under the left-hand edge of the housing. To switch on from standby or to standby • Pressing O on the front panel or on the remote control, will change the standby mode. For more information about playing a CD, see Using the CD31, page 2. Using the CD31 This page explains how to operate your CD31, with an explanation of the function of each of the front panel controls. Repeat Previous Next Front panel controls Playing a disc Repeat To insert a disc Repeats a track, or the entire disc. • Previous [ Restarts the current track, or steps to the previous track. • • Next ] Steps to the next track. Play > Plays or pauses the disc. Standby O Switches the CD31 to standby, or switches it on from standby. Open/Close Play Standby To stop play • Press the */å button on the front panel or the remote control. To pause a CD Hold down the */å button on the front panel, or on the remote control, to open the tray. • Place the CD in the tray with the label facing upwards. Press the > button on the front panel or the >/= button on the remote control. The front panel shows: Press the */å button on the front panel or the remote control to close the tray. PAUSE You can then resume play by pressing the > button on the front panel or the >/= button on the remote control. The front panel display shows that a CD is placed in the tray. The CD31 is now ready to play. Open/Close */å Opens or closes the CD tray, and also stops the disc. Display CD Locating a position on the disc You can step between tracks to locate a particular track on the disc, or you can scan forwards or backwards to locate a position within a track. To step between tracks • Press the [ or ] buttons on the front panel or the remote control. The front panel display shows the number of the track as you step. When you release the button the current track starts playing from the beginning. To play a disc • Press the > button on the front panel, or the >/= button on the remote control. • Alternatively press one of the buttons 1-9 and, if required, +10 on the remote control to start playing a specific track. To scan through the disc • Press the ¯ button once to reverse scanning or the ˘ button once to start forward scanning. You can use the button on the front panel or the remote control. You can increase the scanning by pressing the ¯ button (reverse) or the ˘ button (forward) again. There are four different scan speeds. For example: To play track 16; press the +10 button followed by the 6 button. To play track 22; press the +10 button twice, followed by the 2 button. As you scan the disc, the front panel display shows the current track and the position within the track. 11 0:04 • While a disc is playing the front panel display shows the current track number and the elapsed time of the current track. Press the > button on the front panel, or the >/= button on the remote control to start playing from the position you have located. Using the remote control This page explains how to use the C22 remote control to operate the CD31, and how to fit the batteries into the remote control. Dim display Switch on/off You can operate all the functions of the CD31 using the C22 remote control: Enter track number Clear number entry Fitting the batteries Before using the remote control you need to insert the two AAA batteries supplied with the C22. • Gently slide open the cover on the back of the remote control: • Insert the two batteries, observing the polarity printed on the bottom of battery compartment: • Slide back the cover until it clips into place: Enter number >10 Decrease volume of preamplifier/processor Increase volume of preamplifier/processor Open or close the CD tray, or stop the disc Play or pause the disc Restart the current track, or step to the previous track Step to the next track Forward scan Reverse scan Display option Repeat a section of the disc Repeat the track or disc Program a selection of tracks Play a random selection of tracks Note: Replace only with alkaline batteries type AAA, LR03, or equivalent. Dispose of old batteries considerately. Programming the CD31 This chapter explains how to use the more advanced features of the CD31 Compact Disc Player which you can access from the remote control. Changing the front panel display Repeating playback You can change the front panel time display to show elapsed time for the current track, remaining time for the current track, or remaining time for the entire disc. • To repeat the current track The front panel shows REPEAT TRK: 1 R_TRK To change the time display • Press the DISP button on the remote control. The display switches between the following four options: Elapsed time for the current track To repeat the entire disc • 1 1:04 RT Elapsed time for the entire disc ALL 8:10 Remaining time for the entire disc 1 R_DSC To repeat a specific section of a disc (Repeat A-B) During this operation the disc has to be running. • • • 1 R_A • Press the DIM button on the remote control. There are three levels of illumination and blank. Press the DIM button again to restore the normal display. Press the TOP button on the remote control at the start of the section you want to repeat. Playing a random selection of tracks The CD31 Compact Disc Player allows you to program a selection of tracks on the current disc. You can then play just the tracks you have selected. • You can step through your selection with the [ or ] buttons. To program a selection of tracks • Press the MEM button on the remote control while the disc is stopped. The front panel display shows PGM SEQ. • Select with buttons 1-9 and, if required, the +10 button. As you select tracks the front panel display shows the number of the track you are programming and the number of the step in the program, the duration of the track. 10 P-01 The front panel display shows REPEAT A: ALL 18:14 RT To dim the front panel display Press the H button on the front panel, or the Repeat button on the remote control twice. The front panel shows REPEAT DSC: 11 0:44 Remaining time for the current track Press the H button on the front panel, or the Repeat button on the remote control. Programming a selection of tracks Press the TOP button again at the end of the section you want to repeat. The front panel display shows AB: 1 R_AB The compact disc player will then automatically return to the start of the section you have marked and play back repeatedly. To turn off repeat • Press the TOP button again. The REPEAT AB symbol in the front panel display will be cleared. To play the selection you have programmed • Press the >/= button on the remote control. The currently played track always flashes in the tracklist on the front panel display. • Press the */å button on the remote control to stop the CD. • Press the MEM button for a new selection or press the MEM button twice and the compact disc player reverts to normal playing mode. Press the MODE button on the remote control. The front panel display will show RND SEQ: 1RND SEQ • Press the >/= button on the remote control. The compact disc player selects random tracks from your CD. • Press the */å button on the remote control to stop the CD. • Press the MODE button on the remote control and the compact disc player will revert to normal playing mode. Additional information Technical specification Features Analogue output RS232 IR input Every component of the CD31, from the CD transport to the audio output stage, has been designed to achieve the highest possible audio performance. Unbalanced: 2.0 VRMS The RS232 connector allows your dealer to upgrade the firmware on your CD31, or control the CD31 as part of a multi-room system. Do not connect anything to this socket unless instructed by your dealer. The CD31 is controlled by an infra-red remote control pointed at the front panel. The Primare CD31 Compact Disc Player uses a precision crystal clock oscillator, and a Burr-Brown DIR1703 for jitter correction, giving excellent audio performance. Precision digital to analogue conversion Digital to analogue conversion is performed by four 24 bit/96kHz Burr-Brown PCM1704 D/A converters of the highest selection, K-grade! Interpolation filtering is carried out by the excellent DF1704. The circuits are capable of true 24 bit input data and 96kHz sampling rate. The DACs are configured in a truly balanced configuration where each DAC uses its own current to voltage converter stage, finished in a single ended output stage with an active current source, instead of the more common use of passive resistors. In addition to providing the recommended balanced XLR audio outputs, the CD31 also includes unbalanced RCA for analogue audio output. For digital outputs there is a selection of three options, RCA 75Ω (SPDIF), optical TOSlink, and the professional XLR 110Ω (AES/EBU). Balanced: 4.0 VRMS Output Impedance: 100Ω The CD31 can also be controlled by using the IRinput on the back panel. Digital outputs • Switch off the CD31 using the main switch at Coaxial: (SPDIF) 75Ω • Hold down the ] button at the front and then the back panel. switch on again by using the main switch. Optical output: TOSlink connector The standby indicator lamp will blink three times. AES/EBU: 110Ω For security reasons this setting disappears every time the CD31 player is switched off by using the main switch. To reactivate the IR-input at the back panel the above described procedure has to be repeated. PCM Sample Rate: 44.1kHz General D/A Converter: 4 x Burr-Brown 1704 K grade Frequency Response: 20 Hz – 20 kHz (-0.5dB) Signal to Noise Ratio: 105 dB Harmonic Distortion: >0.01% (20 Hz – 20 kHz) Power Consumption Operating: 34 W Power Consumption Standby: 16 W Dimensions: 430 x 385 x 100 mm Weight: 10.5 kg Color Option Black, Titanium No compromise power supply for the highest possible performance The Primare CD31 Compact Disc Player uses eight separate isolated power supplies for the digital, analogue circuits, and transport mechanism, for maximum isolation. For the analogue part, discrete and ultrafast regulation, placed very close to the analogue stage, is used. The result is an extremely high signal to noise ratio, allowing you to take full advantage of the dynamic range possible with CD. Primare Systems AB, Renvägen 1, SE-352 45 Växjö, Sweden. http://www.primare.net