1
A Practical Agent Programming Language
User Guide
Version 1.0
Contents
1
2
Introduction
3
1.1
Software requirements . . . . . . . . . . . . . . . . . . . . . . . . . . . . . . . . . . . .
3
1.2
Getting 2APL Software . . . . . . . . . . . . . . . . . . . . . . . . . . . . . . . . . . . .
3
1.3
Getting started . . . . . . . . . . . . . . . . . . . . . . . . . . . . . . . . . . . . . . . . .
4
1.4
Execution Monitoring Tools . . . . . . . . . . . . . . . . . . . . . . . . . . . . . . . . .
8
2APL Eclipse Plug-in Editor
10
2.1
Requirements . . . . . . . . . . . . . . . . . . . . . . . . . . . . . . . . . . . . . . . . .
10
2.2
Getting Software and Installation . . . . . . . . . . . . . . . . . . . . . . . . . . . . . . .
10
2.3
Getting Started with the Editor . . . . . . . . . . . . . . . . . . . . . . . . . . . . . . . .
11
2.3.1
3
Creating and Editing a New 2APL Project based on existing Multi-Agent Program
Files . . . . . . . . . . . . . . . . . . . . . . . . . . . . . . . . . . . . . . . . . .
11
2.3.2
Creating and Editing a New 2APL Project from Scratch . . . . . . . . . . . . . .
12
2.3.3
Editing Existing 2APL Projects . . . . . . . . . . . . . . . . . . . . . . . . . . .
13
2.4
Syntax coloring . . . . . . . . . . . . . . . . . . . . . . . . . . . . . . . . . . . . . . . .
13
2.5
Run the project from Eclipse . . . . . . . . . . . . . . . . . . . . . . . . . . . . . . . . .
14
The 2APL Language
18
3.1
Multi-agent system specification . . . . . . . . . . . . . . . . . . . . . . . . . . . . . . .
18
3.2
Beliefs and goals . . . . . . . . . . . . . . . . . . . . . . . . . . . . . . . . . . . . . . .
22
3.3
Basic actions . . . . . . . . . . . . . . . . . . . . . . . . . . . . . . . . . . . . . . . . .
22
1
CONTENTS
4
CONTENTS
3.4
Plans . . . . . . . . . . . . . . . . . . . . . . . . . . . . . . . . . . . . . . . . . . . . . .
25
3.5
Reasoning rules . . . . . . . . . . . . . . . . . . . . . . . . . . . . . . . . . . . . . . . .
26
3.6
The deliberation cycle . . . . . . . . . . . . . . . . . . . . . . . . . . . . . . . . . . . . .
30
3.7
Including files . . . . . . . . . . . . . . . . . . . . . . . . . . . . . . . . . . . . . . . . .
30
3.8
Modules in 2APL . . . . . . . . . . . . . . . . . . . . . . . . . . . . . . . . . . . . . . .
30
3.8.1
Operations on Modules . . . . . . . . . . . . . . . . . . . . . . . . . . . . . . . .
31
3.8.2
An Example of a Modular 2APL Multi-Agent Program . . . . . . . . . . . . . . .
33
2APL Environments
38
4.1
38
Using the blockworld environment . . . . . . . . . . . . . . . . . . . . . . . . . . . . . .
2
1
Introduction
The 2APL Platform and its corresponding Eclipse plug-in editor were developed to support the implementation and execution of multi-agent systems programmed in the 2APL programming language [3, 4, 5].
2APL (A Practical Agent Programming Language, pronounced double-a-p-l), is a BDI-based modular
agent-oriented programming language that supports an effective integration of declarative programming
constructs such as belief and goals, and imperative (style) programming constructs such as events and
plans. The 2APL platform provides a graphical interface through which a user can load, run, and monitor
the execution of 2APL multi-agent programs using several tools, such as a state tracer, a log window, and
a message monitor, and allows for different execution modes. The platform allows communication among
agents and can run on several machines connected in a network. Agents hosted on different 2APL platforms can communicate with each other. In order to facilitate the implementation of 2APL multi-agent
programs, a 2APL editor plug-in for Eclipse has been developed. Using this editor it is possible to load,
run, and monitor 2APL multi-agent programs directly from Eclipse.
In this user guide, we first explain how the 2APL software can be downloaded, installed, executed, and
used. Different tools for supporting the development of multi-agent programs, such as monitoring tools,
are explained in detail. Section 2 presents the details of an Eclipse plug-in editor that is developed for
writing 2APL multi-agent programs. Section 3 gives an overview of the syntax and intuitive meaning of
2APL programming constructs in two steps. We first explain the main idea of 2APL and present its basic
programming constructs. Then, we explain the idea of modules in 2APL and present the module related
programming constructs. Various examples are provided to illustrate the use of this programming language.
Finally, section 4 explains how environments can be shared by different agents and how such environments
can be developed and used in the 2APL framework.
1.1
Software requirements
The 2APL platform has been tested on Windows 2000 and Windows XP, as well as Mac OS X, Linux and
Unix (Solaris). In order to run the 2APL platform, one needs to have at least Java Runtime Environment
(JRE) 6 or Java Developers Kit (JDK) 6 installed on the computer.
1.2
Getting 2APL Software
In order to use the 2APL Platform and/or its corresponding editor follow the next steps:
3
1.3. GETTING STARTED
CHAPTER 1. INTRODUCTION
1. Go to the 2APL webpage using the following URL:
http : //apapl.sourceforge.net/
and select the Downloads option.
2. There are three download options available. One can download only the 2APL platform without the
2APL Eclipse plug-in editor, only the 2APL Eclipse plug-in editor without the 2APL platform, or
the full package consisting of the 2APL platform, the 2APL Eclipse plug-in editor, and Eclipse itself.
• The 2APL platform, without its corresponding Eclipse plug-in editor, can be downloaded by
selecting the option 2APL Platform. This option allows loading, running, and monitoring
2APL multi-agent programs.
• The 2APL Eclipse plug-in editor, without the 2APL platform, can be downloaded by selecting
the option 2APL Eclipse Plug-in Editor. This editor supports writing and editing
2APL multi-agent programs by recognizing and highlighting the 2APL syntax. For this option,
the Eclipse software should be downloaded from its official website. Eclipse can be configured
to start the 2APL platform, load a 2APL multi-agent program into it, and run the program
(see section 2 for further instruction). To run a 2APL multi-agent program, the 2APL platform
(previous item) should be downloaded.
• The full integrated package can be downloaded by selecting the option 2APL Full Package:
2APL Platform, Eclipse Plug-in Editor, and Eclipse.
3. Extract the contents of the downloaded document into a directory. In the following, we assume that
this directory is named 2APL.
The downloaded 2APL platform is an archive, called 2APL.zip, containing the file 2apl.jar and two
directories lib and examples. The file 2apl.jar includes all the class files of the 2APL Platform, the
lib directory contains all necessary files to run the 2APL platform (e.g., the class files of JIProlog1 ), and
the examples directory contains some multi-agent systems programmed in 2APL.
The example directory includes a multi-agent system program, called harry and sally. This example
is about two agents, harry and sally, who are located in the so-called blockworld environment.
The blockworld environment is a n × n grid, which can contain agents, bombs, and dustbins in which
bombs can be thrown away. Sally is responsible for searching bombs and notifying Harry when she
finds one. Harry is responsible for cleaning up the blockworld by picking up the bomb and throwing
it in a dustbin. Chapter 3 will elaborate on this example in more detail. In the sequel, we will use this
example to explain the 2APL programming language and its platform. The file blockworld.jar is
the implementation of the blockworld environment. The details of the blockworld environment will be
explained in chapter 4. In the example directory, there are more examples of 2APL multi-agent programs.
Each example is explained in a readme document that is included in the directory of the example.
1.3
Getting started
In this section we will explain how the 2APL platform can be started and show the basics of loading,
running and monitoring the execution of 2APL MAS-programs. The development of 2APL multi-agent
programs is supported by an editor which is an Eclipse plug-in. This editor in explained in detailed in
section 2.
The 2APL platform can be started in:
1 JIProlog is a Java based Prolog reasoning engine that is used by the individual 2APL agents to represent and reason about their
beliefs
4
1.3. GETTING STARTED
CHAPTER 1. INTRODUCTION
Figure 1.1: The window with 2APL configuration options.
Windows by double clicking the file 2apl.jar, or alternatively, typing java -jar 2apl.jar in a
command prompt window at the 2APL directory
Mac OS by double clicking the file 2apl.jar
Linux/Unix by typing java -jar 2apl.jar to a prompt in the 2APL directory
On every operating system, the 2APL platform can be invoked from the command prompt. For help the
following command can run java -jar 2apl.jar -help. Here is the output:
$ java -jar 2apl.jar -help
2APL (A Practical Agent Programming Language) Interpreter
Usage: java -jar 2apl.jar [-nogui] [-nojade] [-help] [<path to MAS file>]
Options:
-nogui
-nojade
-help
do not open graphical user interface; start the MAS immediately
skip JADE configuration and run in standalone mode
print this message
As illustrated in figure 1.1, one needs to select a configuration option when starting 2APL without arguments. The first option allows the use of 2APL platform in a stand-alone mode and the last two options start
2APL on top of the Jade [2] platform. The last two options are useful when one wants to run a multi-agent
program (in a distributed manner) on different machines. In this user guide, we focus on the stand-alone
run mode of the 2APL platform.
When selecting the stand-alone run mode, the first screen that appears is the main user interface (see
Fig. 1.2). Here the user can load, run, and monitor the execution of multi-agent systems programmed in
2APL.
To load an example multi-agent system, one should perform the following steps:
1. Select from the menu file → open, or alternatively the open button located on the toolbar, and
an open file dialog appears.
2. Browse to the directory 2APL\examples\harry and sally and select the file named harrysally.mas.
The file with the .mas extension specifies the multi-agent system by indicating which agents should be
created, which .2apl files initialize the agents, which environments they can access and which .jar
5
1.3. GETTING STARTED
CHAPTER 1. INTRODUCTION
Figure 1.2: The main 2APL user interface.
files contain the environments. In this case, two agents harry and sally will be created that act in the
blockworld environment. The agents are initialized by harry.2apl and sally.2apl, respectively.
The environment is implemented by blockworld.jar.
After the file has been loaded, the main 2APL user interface as well as the interface of the blockworld
appears2 . These two interfaces are depicted in figure 1.3. On the left there is the 2APL user interface, and
on the right the interface of blockword. The left panel of the 2APL user interface allows to toggle between
the multi-agent system tab Multi-Agent System and the tabs related to the different agents located
within this multi-agent system (in this case harry and sally). The right panel shows different tabs,
depending on whether a specific agent or the multi-agent system has been selected in the left panel. In case
of selecting the multi-agent system tab Multi-Agent System, one can only see the Messages tab in
the right panel, showing the messages that are exchanged between the agents when they are executed.
In case an individual agent has been selected in the left panel, one can select different tabs in the right panel
to observe various state ingredients of the selected 2APL agent. In this example, and as illustrated in figure
1.4, the Overview tab of the agent harry is selected. This tab enables the user to observe the mental
state (beliefs, goals, and plans) of the agent harry. One can also select the Belief updates tab to see
the specification of belief update actions that the agent can perform, the PG rules tab to see the agent’s
rules that specify how and by which plans the agent can realise its goals, the PC rules tab to view the
agent’s rules that specify how the received events and messages should be handled, the PR rules tab
to view the agent’s rules that specify how the agent can repair its failed plans, the Warnings tab to see
system warnings, the State Tracer tab to monitor the subsequent mental states of the agent harry when it
is executed, and the Log tab to observe the agent’s execution log. For other examples, the set of tabs for
an individual agent can be different depending on the programming constructs that are used in the source
file of the agent.
2 The blockworld environment is implemented as a user interface that presents a grid. Please note that an environment does not
necessarily generate a user interface.
6
1.3. GETTING STARTED
CHAPTER 1. INTRODUCTION
Figure 1.3: The main 2APL user interface loaded with harry and sally multi-agent program (left),
and the blockworld user interface (right).
Figure 1.4: The main 2APL user interface when selecting agent harry in the left panel.
7
1.4. EXECUTION MONITORING TOOLS
CHAPTER 1. INTRODUCTION
A 2APL program can be executed in different modes by means of the buttons on the toolbar, which can
also be accessed through the file and run menu items. The meaning of these buttons is shown below.
execute agent(s) in continuous mode
execute agent(s) for one deliberation cycle
load a mas file
close mas file
reload mas file
execute agent(s) in step-by-step mode
pause execution of agent(s)
apply abovementioned operations to all agents
apply abovementioned operations to the selected agent
send a message to an agent.
Alternatively, one may load and start the multi-agent system directly from the command line. One can also
start the interpreter without a graphic user interface. To see the help on the available options execute java
-jar 2apl.jar -help in the command line prompt.
1.4
Execution Monitoring Tools
In this section we present the tools that can be used in the 2APL platform to monitor the execution of
individual agents. There are three monitoring tools: Auto-update Overview, State Tracer, and
Log. These tools, which can be accessed through the Debug toolbar button of the 2APL platform, are
activated by default. The tools can be deactivated to improve the execution performance of the 2APL
platform. The activation of the tools generates specific information and presents them in the corresponding
tabs. The tabs can be used in the right panel of the 2APL main user interface when an individual agent is
selected in the left panel of the user interface.
The Overview tab consists of three panels called Beliefbase, Goalbase, and Planbase. When
this tab is active, the beliefs, goals, and plans of the current state of the selected agent are presented in
the Beliefbase, Goalbase, and Planbase panels, respectively. Figure 1.4 illustrates the use of the
Overview tab which presents the beliefs, goals, and plans of agent harry from its initial state directly
after loading the multi-agent program. Executing the multi-agent program will present updated information
about the agent harry.
The State Tracer tab is a temporal version of the Overview tab and stores the beliefs, goals, and
plans of all agents during execution. Because an execution generates a trace of agents’ states (beliefs,
goals, and plans), the tools and its corresponding tab are called state tracer. This tool allows a user
to execute a multi-agent program for a while, pause the execution, and browse through the execution
of each agent. With the buttons in the upper part of the tab one can navigate through the state trace.
The user can select how many states (one, two, or three) to show on one screen and whether to show
the beliefs, plans, goals, and log with the menu on the lower part of the tab. Figure 1.5 illustrates the
use of the state trace tool for monitoring the execution of the harry agent. This tab shows the execution of the multi-agent program at states 8, 9, and 10. It also shows that harry has performed action
@blockworld(associateWith(robot0),_,0) in state 8 of the execution.
8
1.4. EXECUTION MONITORING TOOLS
CHAPTER 1. INTRODUCTION
Figure 1.5: The State Traces tab shows the execution trace of agent harry.
Figure 1.6: The Log tab presents information about deliberation steps of agent harry.
Finally, the Log tool presents information about the deliberation steps of individual agents. As illustrated
in Figure 1.6, the Log tab indicates whether harry has executed an action, processed an internal event,
a message, or an external event. The user can browse through this window to see which deliberation
steps have been preformed. Each of the logging options can be disabled by deselecting it in the menuitem
"Debugging.
9
2APL Eclipse Plug-in Editor
2
The 2APL editor is an Eclipse Xtext based plugin that supports the editing of 2APL multi-agent programs.
In this section we will describe how to install, configure and use this editor.
2.1
Requirements
A basic understanding of the 2APL platform, as described in previous section, is required. In order to run
the 2APL editor the latest version of Eclipse Xtext is required.
2.2
Getting Software and Installation
One can download the 2APL Full Package that contains the 2APL platform, the Eclipse plugin editor,
and the Eclipse Xtext version all configured and installed (286 MB), or alternatively download all the
packages separately and configure them by hand.
In order to use the total package:
1. Download the full package from the 2APL homepage using the following URL:
http://apapl.sourceforge.net/
and follow the Downloads option.
2. Extract the files into a directory. In the following, we assume that this directory is named D:\2APL
3. Run the 2APL Eclipse Editor shortcut located in the directory and select the workspace in
the same directory (i.e., D:\2APL\workspace) as illustrated in Figure 2.1.
To manually install the 2APL editor the next procedure should be followed:
1. Download the Eclipse Xtext Galileo 0.7.2 version from its homepage using the following URL:
10
2.3. GETTING STARTED WITH THE EDITOR
CHAPTER 2. 2APL ECLIPSE PLUG-IN EDITOR
Figure 2.1: Selecting the workspace for 2APL.
http://www.eclipse.org/Xtext/download/
Note that the new versions of Xtext may not work and that version 0.7.2 must be downloaded from
the repository of older versions that is available from the same link.
2. Extract the contents of the file into a directory. In the sequel, we assume that this directory is named
eclipse.
3. Download the Eclipse plugin files from the 2APL website using the following URL:
http://apapl.sourceforge.net/wordpress
and follow the Downloads option and select 2APL Eclipse Plug-in Editor.
4. Extract the files to the Eclipse plugin directory named eclipse\plugins.
5. Download an XML plugin for Eclipse using the following URL:
http://sourceforge.net/projects/editorxml/files/Rinzo
6. Extract the files to the Eclipse plugin directory named eclipse\plugins.
7. Run the Eclipse with eclipse.exe and select the workspace in the 2apl directory (i.e., D:\2APL\workspace)
as illustrated in Figure 2.1.
2.3
Getting Started with the Editor
A 2APL multi-agent program, which we will call a 2APL project, consists of one .mas file and one or
more .2apl files. After starting the Eclipse editor the user can 1) create a new 2APL project based on
existing multi-agent program files (i.e., .mas and .2apl files), 2) create a new 2APL project from scratch
(i.e., without .mas and .2apl files), and 3) load and edit an existing 2APL project.
2.3.1
Creating and Editing a New 2APL Project based on existing Multi-Agent
Program Files
This option can be used if a multi-agent program already exists. The multi-agent program is assumed to
be developed with another editor. One can develop the multi-agent program further with the 2APL Eclipse
editor.
11
2.3. GETTING STARTED WITH THE EDITOR
CHAPTER 2. 2APL ECLIPSE PLUG-IN EDITOR
1. To create a new empty project without any files, select the menu File -> new -> Project.
In the Wizard window, select General -> Project, press Next, give the project a name, and
press Finish. The new empty project will appear in the left panel of the Eclipse window.
2. Select the created project and right click the mouse and choose Import. Select in the Select
Wizard the option General -> File System and click Next.
3. Use Browse and select the directory in which the already written multi-agent program files are
located.
4. One can now select the files to import and click Finish. The files are now available in the project
in the left panel of the editor.
2.3.2
Creating and Editing a New 2APL Project from Scratch
In order to create a new 2APL project from scratch (i.e., without assuming an existing multi-agent program), we first have to create a 2APL project followed by creating a multi-agent program. The following
steps should be taken.
1. Follow the File -> New -> Project... of the Eclipse user interface. Choose APAPL
project by following the item Xtext in the select wizard and press Next. These steps are
illustrated in Figure 2.2.
Figure 2.2: Create a new 2APL project.
2. Give the project a name (e.g. push-up), as illustrated in Figure 2.3(left).
3. Open the created project by double click the push-up item in the left panel of the Eclipse window.
This opens the push-up project consisting of the pushup.mas and agent.2apl files. These
files can be opened and edited by clicking on the files agent.2apl or pushup.mas. Figure 2.3
(right) illustrates the opened file agent in the 2APL editor which can now be edited.
4. New agent programs (i.e., .2apl files) can be added to this project by selecting the push-up
project, left click mouse, and follow New -> File menu item. Enter a file name with .2apl
extension. This operation is illustrated in Figure 2.4. The new file is now available in the Eclipse
project.
12
2.4. SYNTAX COLORING
CHAPTER 2. 2APL ECLIPSE PLUG-IN EDITOR
Figure 2.3: Giving a name to a new project (left), and Editing 2APL files (right).
Figure 2.4: Adding new files to a project.
2.3.3
Editing Existing 2APL Projects
Existing 2APL projects, e.g., the multi-agent program harry and sally in the 2APL\examples\harry
and sally1 , can be loaded and edited using the import wizard. For importing an existing project, the existing projects should be located in the workspace directory of Eclipse. Once the projects are located in this
directory, one can choose File -> import. A selection window will appear. Select item General
-> Existing Projects into Workspace, press Next, browse from directory containing the
project files, and press Finish. The project will appear in the right panel. These steps are illustrated in
Figure 2.5.
2.4
Syntax coloring
To change to colors in the 2APL editor go to the Preferences page, under the menu Window, and
then select Xtext Languages, APAPL, Syntax Coloring. Here one can change the colors for
1 For
unix systems, path representations should be modified accordingly.
13
2.5. RUN THE PROJECT FROM ECLIPSE
CHAPTER 2. 2APL ECLIPSE PLUG-IN EDITOR
some rules. One can also restore the color settings, back to black as default, by clicking the Restore
Defaults button. This is illustrated in Figure 2.6.
2.5
Run the project from Eclipse
To run the 2APL platform from Eclipse follow the next steps.
1. Open the External Tools Configurations as illustrated in Figure 2.7.
2. In the External Tools Configurations window, right click program and select new. This is illustrated in the Figure 2.8.
3. In the configurations window, set the following values.
(a) Name: a name for the run configuration (e.g. 2APL with GUI)
(b) Location: the full path to the java.exe
(e.g. C:\Program Files\Java\jdk1.6.0_04\bin\java.exe).
(c) Working Directory: the path to the 2APL directory where 2apl.jar is located
(e.g. D:\apapl).
(d) Arguments: -jar 2apl.jar -nojade "${project_loc}"
These steps are illustrated in Figure 2.9. Note that the required paths are correctly entered. It is also
important to note that the behavior of the run configuration can be modified by changing the Arguments. Add the option -nogui after -nojade to disable the 2APL GUI. Or leave the -nojade
option out of the Arguments to get a choice to enable the jade platform.
4. Select the multi-agent system file with the .mas extension to run. Choose the run configuration
that is just created as illustrated in Figure 2.10. The 2APL platform will start running the selected
multi-agent program.
14
2.5. RUN THE PROJECT FROM ECLIPSE
CHAPTER 2. 2APL ECLIPSE PLUG-IN EDITOR
Figure 2.5: Editing existing project.
15
2.5. RUN THE PROJECT FROM ECLIPSE
CHAPTER 2. 2APL ECLIPSE PLUG-IN EDITOR
Figure 2.6: Modifying the color of 2APL syntax in the editor.
Figure 2.7: The first step to run 2APL from Eclipse.
Figure 2.8: The second step to run 2APL from Eclipse.
16
2.5. RUN THE PROJECT FROM ECLIPSE
CHAPTER 2. 2APL ECLIPSE PLUG-IN EDITOR
Figure 2.9: Creating a direct 2APL Run item in Eclipse.
Figure 2.10: Running 2APL from Eclipse.
17
3
The 2APL Language
In this section, we first explain the main idea of 2APL and present its basic programming constructs. Then,
we explain the idea of modules in 2APL and present the module related programming constructs.
3.1
Multi-agent system specification
2APL is a multi-agent programming language that provides programming constructs to specify both multiagent systems and individual agents. The configuration of a multi-agent system is specified in XML format
using the tag apaplmas. The specification is included in a file with the .mas extension. Within this tag,
agents and the environments in which the agents operate are specified. The environment tags are optional
since multi-agent systems may consist of only individual agents without any external environment. An
example of a multi-agent system configuration is illustrated in Figure 3.1.
<apaplmas>
<environment name="blockworld" file="blockworld.jar">
<parameter key="gridWidth" value="18" />
<parameter key="gridHeight" value="18" />
<parameter key="entities" value="2" />
</environment>
<agent name="harry" file="harry.2apl" />
<agent name="sally" file="sally.2apl" />
</apaplmas>
Figure 3.1: The specification of the harry and sally multi-agent system system.
The individual agents are specified using the tag agent with two mandatory attributes: name and file.
The name will be used to identify the agent in the multi-agent system and the file (with .2apl extension)
is used to define the initial state of the agent (see below for the syntax of .2apl files). In addition, one can
use the tag beliefs within the tag agent in order to extend the agent’s beliefs with additional facts. For
example, the following is the specification of the agent harry from the above multi-agent configuration,
extended with some additional beliefs stored in the file friends.pl. We assume this file contains the
identity of agents who are friends of harry.
18
3.1. MULTI-AGENT SYSTEM SPECIFICATION
CHAPTER 3. THE 2APL LANGUAGE
<agent name="harry" file="harry.2apl" />
<beliefs file="friends.pl" shadow="true"/>
</agent>
This option is specially useful for creating various, but different, agents from one and the same .2apl
file. These agents differ from each other with respect to the additional facts. The beliefs tag has an
mandatory attribute file referring to a Prolog file with a .pl extension. The tag beliefs can use an
optional shadow attribute with values true or false. The first value causes the additional beliefs to
be visible in the 2APL user interface, while the second value hides the additional beliefs from the user
interface. The tag beliefs is not used in the harry and sally example.
The environments are specified using the tag environment which has two mandatory attributes: name
and file. The first attribute defines the name of the environment (used by agents to perform their actions) and the second attribute defines a jar-file that implements the environment (see section 4 for how an
implemented environment can be used). The environments can be initialized with specific parameters, depending on their implementations, using the tag parameters each with two mandatory attributes: key
and value. In the harry and sally example, the parameters determine the size of the blockworld
environment and the number of agents expected to appear in that environment.
The 2APL programming language for individual agents supports the integration of declarative concepts
such as belief and goals with imperative style programming such as events and plans. This section presents
the complete syntax of 2APL (the file with .2apl extension), which is specified using the EBNF notation. This specification includes the module related programming constructs generated by the nonterminal
hmoduleactioni and its related production rules. We first explain the non-module programming constructs,
and then explain the module related programming constructs. In this specification, as illustrated below, we
use hatomi to denote a Prolog like atomic formula starting with lowercase letter, hAtomi to denote a Prolog like atomic formula starting with a capital letter, hidenti to denote a string and hV ari to denote a string
starting with a capital letter. We use hground_atomi to denote a grounded atomic formula.
hAP AP Li
=
|
|
|
|
|
|
|
hincludesi
=
hincludei
=
hbelief updatesi
=
hbelief updatei
=
hbelief updatenamei =
hbelief si
=
hbelief i
=
|
hgoalsi
=
hgoali
=
hplansi
=
hplani
=
|
|
{"include:" [hincludesi]
"beliefupdates:" [hbelief updatesi]
"beliefs:" [hbelief si]
"goals:" [hgoalsi]
"plans:" [hplansi]
"pgrules:" [hpgrulesi]
"pcrules:" [hpcrulesi]
"prrules:" [hprrulesi]}*;
hincludei { "," hincludei } ";";
hidenti (".2apl" | ".pl" );
hbelief updatei+;
"{" [hbelqueriesi] "}" hbelief updatenamei "{" hliteralconji "}";
hupperatomi;
hbelief i+;
hground_atomi"."
hatomi ":-" hliteralsi ".";
hgoali {"," hgoali} ".";
hground_atomi {"and" hground_atomi};
{ hplani ";" };
hbactioni
hif plani
hwhileplani
19
3.1. MULTI-AGENT SYSTEM SPECIFICATION
|
=
|
|
|
|
|
|
|
|
|
|
|
hdirectbelief updatei =
hsendactioni
=
|
hexternalactioni
=
habstractactioni
=
htesti
=
|
|
|
|
hadoptgoali
=
|
hdropgoali
=
|
|
hcreateactioni
=
hreleaseactioni
=
hmoduleactioni
=
hmactioni
=
|
|
|
|
|
hsequenceplani
=
hif plani
=
hwhileplani
=
hscopeplani
=
hatomicplani
=
hpgrulesi
=
hpgrulei
=
hpcrulesi
=
hpcrulei
=
hprrulesi
=
hprrulei
=
hplanvari
=
|
|
|
hscopeplanvari
=
hseqplanvari
=
hbactioni
CHAPTER 3. THE 2APL LANGUAGE
hatomicplani
"skip"
hbelief updatenamei
hdirectbelief updatei;
hsendactioni
hexternalactioni
habstractactioni
htesti
hadoptgoali
hdropgoali
hcreateactioni
hreleaseactioni
hmoduleactioni;
("+" | "-" ) hground_atomi ;
"send(" hivi "," hivi "," hatomi ")"
"send(" hivi "," hivi "," hivi "," hivi "," hatomi ")";
"@" hidenti "(" hatomi "," hvari ")";
hatomi;
"B(" hbelqueryi ")"
"G(" hgoalqueryi ")"
htesti "&&" htesti
"(" htesti ")";
"(" hbelqueryi ")";
"adopta(" hgoalvari ")"
"adoptz(" hgoalvari ")";
"dropgoal(" hgoalvari ")"
"dropsubgoals(" hgoalvari ")"
"dropsupergoals(" hgoalvari ")";
"create(" hidenti "," hidenti ")";
"release(" hidenti ")";
hidenti "." hmactioni;
"execute(" htesti ")"
"updateBB(" hliterali ")"
hadoptgoali
hdropgoali
"B(" hliterali ")"
"G(" hliterali ")";
{ hplani ";" };
"if" htesti ["then"] hscopeplani ["else" hscopeplani];
"while" htesti ["do"] hscopeplani;
hplani | "{" hsequenceplani "}";
"[" hplani "]";
hpgrulei+;
[hgoalqueryi] "<-" hbelqueryi "|" hscopeplani;
hpcrulei+;
hatomi "<-" hbelqueryi "|" hscopeplani;
hprrulei+;
hseqplanvari "<-" hbelqueryi "|" hscopeplanvari;
hplani
hvari
"if" htesti ["then"] hscopeplanvari ["else" hscopeplanvari]
"while" htesti ["do"] hscopeplanvari
hplanvari | "{" hseqplanvari "}";
{ hplanvari ";" };
20
3.1. MULTI-AGENT SYSTEM SPECIFICATION
hliteralsi
hliterali
hliteralconji
hbelqueriesi
hbelqueryi
hgoalqueryi
hivi
hgroundatomi
hgroundparsi
hgroundpari
hupperatomi
hatomi
hinf ixatomi
hparsi
hpari
hartexpsi
hartexpi
hvari
hidenti
hnumi
=
=
|
|
|
=
|
|
|
=
=
|
|
|
|
=
|
|
|
|
=
=
=
=
|
|
=
=
=
=
=
|
|
|
=
=
|
|
=
=
=
CHAPTER 3. THE 2APL LANGUAGE
hliterali {"," hliterali};
hatomi
hinf ixatomi
"not" hatomi
"not" hinf ixatomi;
"true"
hliteralconji "and" hliteralconji
"(" hliteralconji ")";
hliterali
hbelqueryi { "," hbelqueryi };
"true"
hbelqueryi "and" hbelqueryi
hbelqueryi "or" hbelqueryi
"(" hbelqueryi ")"
hliterali;
"true"
hgoalqueryi "and" hgoalqueryi
hgoalqueryi "or" hgoalqueryi
"(" hgoalqueryi ")"
hatomi;
hidenti | hvari;
hidenti "(" hgroundparsi ")";
hgroundpari {"," hgroundpari};
hidenti | hnumi | "_" | hatomi
"[" [hgroundparsi] "]"
"[" hgroundparsi "|" hvari "]";
hvari "(" [hparsi] ")";
hidenti "(" [hparsi] ")";
hpari ("=" | ">" | "<" | "<=" | ">=" | "=>" | "=<") hpari;
hpari {"," hpari};
hvari | hnumi | "_" | hatomi
hpari("+" | "-" | "*" | "/") hpari
"[" [hparsi] "]"
"[" (hartexpsi | hparsi) "|" hvari "]";
hartexpi {"," hartexpi};
hvari | hnumi
hartexpi("+" | "-" | "*" | "/") hartexpi
"(" hartexpi ")";
"A".."Z" {"a".."z" | "A".."Z" | "0".."9" | "_"};
"a".."z" {"a".."z" | "A".."Z" | "0".."9" | "_"};
("0".."9")+;
An individual 2APL agent may be composed of various ingredients that specify different aspects of the
agency. A 2APL agent can be programmed by implementing the initial state of those ingredients. The state
of some of these ingredients will change during the agent’s execution while the state of other ingredients
remains the same during the execution of the agent. In the rest of this section, we will discuss each
ingredient and give examples to illustrate them.
21
3.2. BELIEFS AND GOALS
3.2
CHAPTER 3. THE 2APL LANGUAGE
Beliefs and goals
A 2APL agent may have beliefs and goals which change during the agent’s execution. The beliefs of an
agent is implemented in its belief base, which contains information about its surrounding world including
other agents. The implementation of the initial belief base starts with the keyword ’beliefs:’ followed
by one or more belief expressions of the form hbelief i. Note that a hbelief i expression is treated as a Prolog fact or rule such that the belief base of a 2APL agent becomes a Prolog program. One can use arbitrary
Prolog programs to represent an agent’s belief base, but this should be done with care as dynamics constructs of Prolog such as assert and retract may interact with belief update actions, resulting in undesirable
behavior. All facts are assumed to be grounded. The code fragment below illustrates the implementation of
the initial belief base of harry which represents his information about its blockworld environment. In
particular, harry believes that it starts working at location (0, 1), and that the blockworld environment
is clean if there are no bombs anymore and the agent is not carrying a bomb.
beliefs:
start(0,1).
clean( blockworld ) :- not bomb(X,Y) , not carry(bomb).
The goals of a 2APL agent are implemented by its goal base, which consists of formulas each of which
denotes a situation the agent wants to realize (not necessary all at once). The implementation of the initial
goal base starts with the keyword ’goals:’ followed by a list of goal expressions of the form hgoali.
Each goal expression is a conjunction of ground atoms. Note that the separated goals in the goal base are
separated by a comma. Ground atoms are treated as Prolog facts. Note that having a single conjunctive
goal, say ’a and b’, is different than having two separate goals ’a , b’. In the latter case, the agent
wants to achieve two desirable situations independently of each other. The code fragment below is the
implementation of the initial goal base of harry which indicates that he wants to achieve a desirable
situation in which the blockworld is clean.
goals:
clean( blockworld ).
The beliefs and goals of agents are related to each other. In fact, if an agent believes a certain fact, then
the agent should not pursue that fact as a goal. This means that if an agent modifies its belief base, then its
goal base may be modified as well.
3.3
Basic actions
In order to achieve its goals, a 2APL agent needs to act. Basic actions specify the capabilities that an agent
has to achieve its desirable situation. The basic actions will constitute an agent’s plan, as we will see in
the next subsection. In 2APL, six types of basic actions are distinguished: actions to update the belief
base, communication actions, external actions to be performed in an agent’s environment, abstract actions,
actions to test the belief and goal bases, and actions to manage the dynamics of goals.
22
3.3. BASIC ACTIONS
CHAPTER 3. THE 2APL LANGUAGE
Belief Update Action
A belief update action updates the belief base of an agent when executed. Beliefs can be updated in
two ways: directly or using a belief update action. A direct belief update action hdirectbelief updatei
will add or remove the belief directly without requiring a pre- or post-condition. A belief update action
hbelief updatei is an expression of the predicate argument form, where the predicate starts with a capital
letter. Such an action is specified in terms of pre- and post-conditions. An agent can execute a belief update
action if the pre-condition of the action is derivable from its belief base. The pre-condition is a formula
consisting of literals composed by disjunction and conjunction operators. The execution of a belief update
action modifies the belief base in such a way that after the execution the post-condition of the action is
derivable from the belief base. The post-condition of a belief update action is a list of literals. The update
of the belief base by such an action removes the atom of the negative literals from the belief base and adds
the positive literals to the belief base. The specification of the belief update actions starts with the keyword
’beliefupdates:’ followed by the specifications of a set of belief update actions.
The code below shows how to add respectively remove the beliefs available and status(busy).
Notice that beliefs can be both constants and predicates.
+available;
-status(busy);
The code fragment below shows an example of the specification of the belief update actions of harry.
In this example, the specification of the PickUp() action indicates that this belief update action can be
performed if the agent does not already carry a bomb (i.e., the agent can carry only one bomb) and that after
performing this action the agent will carry a bomb. Note that the agent cannot perform two PickUp()
action consecutively. Note the use of variables in the specification of RemoveBomb(X,Y); it requires
that an agent can remove a bomb if it is the same location as the bomb. Note also that variables in the
post-conditions are bounded since otherwise the facts in the belief base will not be grounded.
beliefupdates:
{ bomb(X,Y) }
{ true }
{ carry( bomb ) }
{ not carry( bomb ) }
RemoveBomb(X,Y)
AddBomb(X,Y)
Drop( )
PickUp( )
{
{
{
{
not bomb(X,Y) }
bomb(X,Y) }
not carry( bomb ) }
carry( bomb ) }
Communication Action
A communication action passes a message to another agent. A communication action hsendactioni
can have either three or five parameters. In the last case, the communication action is the expression
send(Receiver, Performative, Language, Ontology, Content) where Receiver is
a name referring to the receiving agent, Performative is a speech act name (e.g. inform, request, etc.),
Language is the name of the language used to represent the content of the message, Ontology is
the name of the ontology used in the content of the message, and Content is an expression representing the content of the message. It is often the case that agents assume a certain language and ontology
such that it is not necessary to pass them as parameters of their communication actions. The second version of the communication action is therefore the expression send(Receiver, Performative,
Content). It should be noted that the 2APL interpreter is built on the JADE platform. For this reason,
the name of the receiving agent can be a local name or a full JADE name. A full jade name has the form
localname@host:port/JADE where localname is the name as used by 2APL, host is the name
23
3.3. BASIC ACTIONS
CHAPTER 3. THE 2APL LANGUAGE
of the host running the agent’s container and port is the port number where the agent’s container, should
listen to (see [2] for more information on JADE standards). The following is an example of a communication action by which sally informs harry about a bomb location.
send( harry, inform, La, On, bombAt( X1, Y1 ) );
External Action
An external action is supposed to change the external environment in which the agents operate. The effects
of external actions are assumed to be determined by the environment and might not be known to the agents
beforehand. The agent thus decides to perform an external action and the external environment determines
the effect of the action. The agent can come to know the effects of an external action by performing a sense
action, defined as an external action, or by means of events generated by the environment. An external
action hexternalactioni is an expression of the form @env(Action,ReturnVal). The parameter
env is the name of the agent’s environment as specified in the MAS-file and Action is the action the
agent wants to perform in the environment. The parameter ReturnVal is a list of values, possibly an
empty list, returned by the corresponding method. An example of the implementation of an external action
is @blockworld( enter( X, Y, blue ), _ ). This action causes an agent to enter the blockworld environment at position (X,Y). The appearance color of the agent will be blue. The execution of
this action causes the agent to appear in blue at position (X,Y) in the blockworld environment. An empty
list is returned.
Abstract Action
An abstract action is an abstraction mechanism allowing the encapsulation of a plan by a single action. An
abstract action will be instantiated with a concrete plan when the action is executed. The instantiation of
a plan with an abstract action is specified through special rules called PC-rule, which stands for procedure
rules (see section 3.5 for a description of PC-rules). In fact, the general idea of an abstract action is similar
to a procedure in imperative programming languages while the PC-rules function as procedure definitions.
Like a procedure call, an abstract action habstractactioni is an expression of the predicate argument form
starting with a lowercase letter.
Belief and Goal Test Actions
A belief test action is to test whether a belief expression is derivable from an agent’s belief base, i.e., it tests
whether the agent has a certain belief. A belief test action is an expression of the predicate argument form
given as an argument to the predicate B(). Such a test may generate a substitution for the variables that are
used as arguments in the belief expression. A belief test action is basically a (Prolog) query to the belief
base which can be used in a plan to 1) instantiate a variable in rest of the plan, or 2) block the execution
of the plan (if the test fails). For example, let the belief base of harry contains the fact start(0,1).
The belief test action B(start(X,Y)) succeeds resulting in the substitution [X/0 , Y/1]. If there
are more than one substitutions possible, then the substitution that is resulted from unifying the query term
with the first term in the belief base is taken.
A goal test action is to test whether a formula is derivable from the goal base, i.e., whether the agent has
a certain goal from which the formula is derivable. A goal test action is an expression of the predicate
argument form given as an argument to the predicate G(). For example, if an agent has a goal p(a) and
24
3.4. PLANS
CHAPTER 3. THE 2APL LANGUAGE
q(b), then the goal test action G(p(X)) succeeds resulting in the substitution [X/a]. Like a belief test
action, this action can be used to instantiate a variable with a value, or to block the execution of the rest of
a plan.
The belief and goal test actions can be combined forming complex test actions. For example, B(start(X,Y))
&& G(pos(V,W)) tests the agent’s start and desired positions.
Goal Dynamics Actions
The adopt goal and drop goal actions are used to adopt and drop a goal to and from the agent’s goal
base, respectively. The adopt goal action hadoptgoali can have two different forms: adopta(φ) and
adoptz(φ). These two actions can be used to add the goal φ (a conjunction of literals) to the begin and
to the end of an agent’s goal base, respectively. Note that the programmer has to ensure that the variables in
φ are instantiated before these actions are executed since the goal base should always be grounded. Finally,
the drop goal action hdropgoali can have three different forms: dropgoal(φ), dropsubgoals(φ),
and dropsupergoals(φ). These actions can be used to drop from an agent’s goal base, respectively,
exactly the goal φ, all goals that are subgoals of φ, and all goals that have φ as a subgoal. For example, let
an agent have the goal p(a) and q(b). Then, the action dropgoal(p(a)) or dropgoal(p(a)
and q(b) and r(c)) will not remove the goal p(a) and q(b) from the goal base, but the action
dropgoal(p(a) and q(b)) does remove the goal. Also, the actions dropsubgoal(p(a) and
q(b) and r(c))) dropsupergoal(p(a) will remove the goal p(a) and q(b) from the goal
base.
3.4
Plans
In order to reach its goals, a 2APL agent adopts plans. A plan consists of basic actions composed by process
operators. In particular, basic actions can be composed by means of the sequence operator, conditional
choice operators, conditional iteration operator, and an unary operator to identify (region of) plans that
should be executed atomically, i.e., the actions should not be interleaved with the actions of other plans of
the agent.
The sequence operator ; follows every plan, just like in imperative programming, e.g., goto( X, Y);
@blockworld( pickup( ), _ ); is a sequence plan consisting of an abstract action followed by
an external action. A sequence plan π1 ; π2 ; indicates that the first plan π1 should be performed before the
second plan π2 .
The conditional choice operator generates the plan hif plani, which is an expression of the form if φ π1
else π2 . The following is an example of such a plan:
if B(A > X)
{
@blockworld( west(), L );
goto( X, Y );
}
else if B(A < X)
{
@blockworld( east(), L );
goto( X, Y );
}
25
3.5. REASONING RULES
CHAPTER 3. THE 2APL LANGUAGE
The condition of such an expression (i.e., φ) is evaluated with respect to an agent’s belief base or goal base
possibly resulting a substitution. The scope of application of the substitution is limited to the body of this
hif plani expression. This expression can thus be interpreted as to perform the if-part of the plan (i.e., π1 )
when the agent believes φ, otherwise the agent performs the else-part of the plan (i.e., π2 ).
If the base to evaluate is not specified in the test query, the belief base will be queried automatically. For
example, testing whether a variable equals a certain number can be done as follows:
if (Num = 10)
{
goto( X, Y);
}
The conditional iteration operator generates the plan hwhileplani which is an expression of the form
while φ π. The condition φ should also be evaluated with respect to an agent’s belief base. Like the
conditional choice operator, the scope of application for a possible substitution is limited to the body of
this hwhileplani expression. This iteration expression is then interpreted as to perform the plan π in the
body of the while loop as long as the agent believes φ.
The last unary operator generates the plan hatomicplani which is an expression of the form [π]. This plan
is interpreted as an atomic plan, which should be executed at once (atomically) ensuring that the execution
of π is not interleaved with the execution of the actions of other plans of the same agent. Note that an agent
can have different plans at the same time.
The initial plans of a 2APL agent are implemented by its plan base. The implementation of the initial plan
base starts with the keyword ’plans:’ followed by a list of plans (plans are followed by a semicolon).
The following code fragment illustrates the implementation of the initial plan base of harry, which first
tests where he believes to enter, then associate a robot body to get an appearance in the environment, and
finally enters the blockworld at the believed position. The exact meaning of the external actions that
could be performed in the blockworld is explained in chapter 4. As explained in the next section, during
execution of the agent, the plan base will be filled with plans by means of reasoning rules.
plans:
B(start(X, Y));
@blockworld(associateWith(robot0),_,0);
@blockworld(enter(X, Y, blue),_,0);
3.5
Reasoning rules
The 2APL programming language provides constructs to implement practical reasoning rules that can be
used to implement the generation of plans. In particular, three types of practical reasoning rules are used:
planning goal rules, procedural rules, and plan repair rules. In the following subsections, we explain these
three types of rules.
Planning Goal Rules (PG rules)
A planning goal rule can specifies that an agent should generate a plan if it has certain goals and beliefs.
The specification of a planning goal rule hpgrulei consists of three entries: the head of the rule, the
26
3.5. REASONING RULES
CHAPTER 3. THE 2APL LANGUAGE
condition of the rule, and the body of the rule. The head and the condition of a planning goal rule are query
expressions used to test if the agent has a certain goal and belief, respectively. The body of the rule is a
plan in which variables may occur. These variables can be bound by the variables that occur in the goal and
belief expressions. A planning goal rule of an agent can be applied when the goal and belief expressions (in
the head and the condition of the rule) are derivable from the agent’s goal and the belief bases, respectively.
The application of a planning goal rule involves an instantiation of variables that occur in the head and
condition of the rule as they are queried from the goal and belief bases. The resulted substitution will
be applied to the generated plan to instantiate its variables. The planning goal rules are preceded by the
keyword ’pgrules:’ and have the following form:
hqueryi? "< −" hqueryi "|" hplani
Note that the head of the rule is optional which means that the agent can generate a plan only based on its
belief condition. The code fragment below is an example of a planning goal rule of harry indicating that
a plan to achieve the goal clean(blockworld) can be generated if the agent believes there is a bomb
at position (X,Y). Note that goto(X,Y) is an abstract action the execution of which replaces a plan for
going to position (X,Y). After performing this plan, harry performs a pickup action in the blockworld,
modifying his beliefs such that he now believes he carries a bomb, modifying his beliefs that there was a
bomb at (X,Y), going to position (0,0), where the bomb should be dropped in a dustbin, perform the
drop action in the blockworld, and finally modifying his beliefs that he does not carry a bomb anymore.
pgrules:
clean( blockworld ) <- bomb( X, Y ) |
{
goto( X, Y );
@blockworld( pickup( ), _ );
PickUp( );
-bomb( X, Y );
goto( 0, 0 );
@blockworld( drop( ), _ );
Drop( );
}
Procedural Rules (PC rules)
Procedural rules generate plans as a response to 1) the reception of messages sent by other agents, 2) events
generated by the external environment, and 3) the execution of abstract actions. Like planning goal rules,
the specification of procedural rules consist of three entries. The only difference is that the head of the
procedural rules is an atom hatomi (predicate-argument expression), rather than a query hqueryi, which
represents either a message, an event, or an abstract action. A message and an event are represented by
atoms with the special predicates message and event, respectively. An abstract action is represented by
any predicate name starting with a lowercase letter. Note that like planning goal rules, a procedural rule
has a belief condition indicating when a message (or received event or abstract action) should cause the
generation of a plan. Thus, a procedural rule can be applied if the agent has received a message (or an event
or if the agent executes an abstract action) and the belief query of the rule is derivable from its belief base.
The instantiation of variables and the application of the resulting substitutions to the plan variables are the
same as with planning goal rules. The procedural rules are preceded by the keyword ’pcrules:’ and
have the following form:
hatomi "< −" hqueryi "|" hplani
27
3.5. REASONING RULES
CHAPTER 3. THE 2APL LANGUAGE
The code fragment below shows an example of procedural call rules that is used for implementing harry.
This rule indicates that if harry receives a message from sally informing him that there is a bomb at
position (X,Y), then his beliefs will be updates with this new fact and goal to clean the blockworld is
adopted, if he does not believe that there is already a bomb at a position (A,B). Otherwise, he updates his
beliefs with the the received information without adopting the goal. This is because harry is assumed to
this goal as long as he believes there is a bomb somewhere.
pcrules:
message( sally, inform, La, On, bombAt( X, Y ) ) <- true |
{
if B( not bomb( A, B ) )
{ +bomb( X, Y );
adoptz( clean( blockworld ) );
}
else
{ +bomb( X, Y );
}
}
Another example of a procedural rule is illustrated below. This rule is used by harry by including the file
person.2apl (see section 3.7 about include files). This rule indicates that the execution of the abstract
action goto(X,Y) causes this action to be replaced with the plan from the body of the rule. This plan
implements a movement toward position (X,Y) by moving one square at a time. Note the use of recursion
in this PC-rule.
pcrules:
goto( X, Y ) <- true |
{
@blockworld( sensePosition(), POS );
B(POS = [A,B]);
if (A > X)
{
@blockworld( west(), L );
goto( X, Y );
}
else if (A < X)
{
@blockworld( east(), L );
goto( X, Y );
}
else if (B > Y)
{
@blockworld( north(), L );
goto( X, Y );
}
else if (B < Y)
{
@blockworld( south(), L );
goto( X, Y );
}
}
28
3.5. REASONING RULES
CHAPTER 3. THE 2APL LANGUAGE
Plan Repair Rules (PR rules)
The execution of an agent’s plan fails if the execution of the first action of the plan fails. To repair such
a plan, 2APL provides so-called plan repair rules. Like other practical reasoning rules, a plan repair rule
consists of three entries: two abstract plans and one belief query expression. We have used the term abstract
plan since such plans include a variable that can be instantiated with a plan. A plan repair rule starts with
an action (the execution of which is failed) followed by a plan variable. A plan repair rule indicates that if
the execution of the first action of the agent’s plan fails and the agent has a certain belief, then the failed
plan should be replaced by another plan. The plan repair rules are preceded by the keyword ’prrules:’
and have the following form:
hplanvari "< −" hqueryi "|" hplanvari
A plan repair rule of an agent can thus be applied if:
1. the execution of one of its plan fails,
2. the failed plan can be matched with the abstract plan in the head of the rule, and
3. the belief query expression is derivable from the agent’s belief base.
The satisfaction of these three conditions results in a substitution that binds the variable that occur in the
abstract plan in the body of the rule. Note that one of these variables is a plan variable which will be
instantiated with the the plan without its first action. The resulted substitutions will be applied to the
second abstract plan (the body of the rule) resulting a new (repaired) plan. The code fragment below shows
an example of a plan repair rule of harry. This rule is used for the situation in which the execution of a
plan that starts with the external action @blockworld( pickup(), _ ); fails. Such an action fails
in case there is no bomb to be picked up (e.g., when it is removed by another agent). The rule states that
the plan should be replaced by another plan consisting of an external action to sense its current position
after which it removes the bomb from its current position. Note that in this case the rest of the original plan
denoted by REST is dropped, as it is not used anymore within the rule.
prrules:
@blockworld( pickup(), _ ); REST; <- true |
{
@blockworld( sensePosition(), POS );
B(POS = [X,Y]);
RemoveBomb( X, Y );
}
The execution of a plan fails if the execution of its first action fails. When the execution of an action
fails depends on the type of action. The execution of: (1) a belief update action fails if the action is not
specified, (2) an abstract action if there is no applicable procedural rule, (3) an external (Java) action if the
environment succeeds, possibly after retrying within the specified time-out limit, (4) a belief test action if
the belief expression is not derivable from the belief base, (5) a test goal action if the goal expression is
not derivable from the goal base, and (6) an atomic plan section if one of its actions fails. The execution
of all other actions will always be successful. When the execution of an action fails, then the execution of
the whole plan is stopped. The failed action will not be removed from the failed plan such that it can be
repaired by a PR-rule.
29
3.6. THE DELIBERATION CYCLE
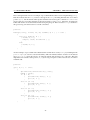
3.6
CHAPTER 3. THE 2APL LANGUAGE
The deliberation cycle
The beliefs, goals, plans and reasoning rules form the mental states of the 2APL agent. What the agent
should do with these mental attitudes is defined by means of the deliberation cycle. The deliberation
cycle states which step the agent should perform next, e.g. execute an action or apply a reasoning rule.
The deliberation cycle can thus be viewed as the interpreter of the agent program, as it determines which
deliberation steps should be performed in which order. 2APL provides the deliberation cycle as illustrated
in figure 3.2. The 2APL deliberation cycle can be changed by editing and recompiling the codes of the
2APL interpreter. However, we plan to extend the platform such that the deliberation cycle can be modified
through parameters.
Start
Sleep until external
events or messages
arrive
Apply all PG rules
No
Execute first action
of all plans
Process
External Events
Yes
Rules Applied,
Plans Executed,
Events or Messages
Processed?
Process
Internal Events
Remove Reached Goals
Process Messages
Figure 3.2: The deliberation cycle of a 2APL agent.
3.7
Including files
In a multi agent system it can happen that there are more instances of one agent type. Although these agents
are almost the same, they might have slightly different beliefs, goals, plans or rules. 2APL introduces an
encapsulation mechanism to include agent files into other agent files. One can include another file with
the ’include: filename;’ command. The resulting agent will be a union of the two (or more)
files. In our example, for instance, both harry and sally are capable of moving to a certain location
in the blockworld. That is to say, they have the same PC-rule goto(X,Y). This rule is specified in
a file person.2apl which is included by both harry and sally. An included file can also include
files. This makes it possible to specify specific information shared by agents in a separate file that can be
included by all agents with that role.
3.8
Modules in 2APL
Modularity is an essential principle in structured programming in general and in agent programming in
particular. In 2APL modularization is considered as a mechanism to structure an individual agent’s program
30
3.8. MODULES IN 2APL
CHAPTER 3. THE 2APL LANGUAGE
in separate modules. Each module encapsulates cognitive components such as beliefs, goals, plans, and
reasoning rules. In practice, a 2APL module is used to specify a specific functionality that can be used
to handle specific situations or tasks. In programming terminology, a 2APL module is a (cognitive) data
structure specifying an agent’s (cognitive) state. The execution of an individual 2APL agent program,
which is supposed to modify the state of the agent program, is then realized by the deliberation process, as
explained in previous section.
A 2APL multi-agent program consists of a set of module specifications each with a unique name. Initially,
a subset of these module specifications is identified as specifying the initial state of individual agents.
The execution of a multi-agent program is then the instantiation of this subset of module specifications
followed by performing a deliberation process on each module instance. In this way, an instance of a
module specification forms the initial state of an individual agent. It should be emphasized that a module
instance specifies the cognitive state of an agent while the agent itself is the deliberation process working
on the cognitive state. It is important to notice that this module version of 2APL is perfectly in line with
the non-module version of 2APL if one uses one module specification per agent, i.e., each agent is initially
specified by one module specification (i.e., file with .2apl extension) and no additional modules is created
at run-time.
When using modules in 2APL, a programmer can perform a wide range of operations on modules. These
module-related operations enable a programmer to directly and explicitly control when and how modules
are used. 2APL provides a set of programming constructs that can be used by an agent programmer to
perform module operations. Module in 2APL can be used to implement a variety of agent concepts such
as agent role and agent profile. In fact, a module can be used as a mechanism to specify a role that can be
enacted by an agent during its execution. Modules can also be used to implement agents that can represent
and reason about other agents.
3.8.1
Operations on Modules
In the following subsections, we explain 2APL operations that can be performed on modules.
Creating and Releasing Module Instances
The first module-related action is create(s,m) , which can be used to create an instance of the module
specification named s . The name that is assigned to the created module instance is given by the second
argument m . The creating module instance (also called the owner of the created module instance or simply
the owner) can use this name to perform further operations on the created module instance (also called the
owned module instance). One module specification can be instantiated more than once by one or more
module instances. In such a case, the creating module instance should assign a unique name to each
created module instance. A module instance with identifier m can be released by its owner by means of the
release(m) action. The released module instance m will be removed/lost.
Executing Module Instances
A module instance m can be executed by its owner through the execute(m,t) action. The execution of
a module instance, performed by its owner, has two effects: 1) it suspends the execution of the owner
module instance, and 2) it starts the execution of the owned module instance. The execution of the owner
module instance will be resumed as soon as the execution of the owned module instance is terminated. In
a sense, an agent that executes an owned module instance, stops deliberating on its current cognitive state
31
3.8. MODULES IN 2APL
CHAPTER 3. THE 2APL LANGUAGE
and starts deliberating on a new cognitive state. The termination of the owned module instance is based
on the mandatory condition t (i.e., the second argument of the execute action). This condition is of the
form htesti and consists of beliefs and goal tests performed on the beliefs and goals of the owned module
instance. As soon as this condition holds, the execution of the owned module instance terminates and the
execution control is given back to the owner module instance. This test is performed at each deliberation
cycle, i.e., at each deliberation cycle performed on the owned module instance it is checked if the module
instance satisfies the condition. Note that the owner cannot force the owned module instance’s execution
to stop because its own execution has been suspended.
Testing and Updating Module Instances
The owner of a module instance can query and update the internals of the instance. In particular, the owner
can test/query whether certain beliefs and goals are entailed by the beliefs and goals of its owned module
instance m through actions m.B(ϕ) and m.G(ϕ), where ϕ is a literal. Also, the beliefs of a module
instance m can be updated by means of the action m.updateBB(ϕ), where ϕ is a literal. Finally, goals
can be added and removed from the goals of a module instance m by means of the action m.hadoptgoaliand
m.hdropgoali, respectively.
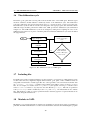
A
B
create(s,m)
m.updateBB(bel)
m.execute(test)
B |= test
m.B(bel);
m.G(goal)
release(m)
Figure 3.3: A typical life cycle of a module.
A typical life cycle of a module in terms of these operations is illustrated in Figure 3.3, which proceeds as
follows. A module instance A can create a new module instance B from a specification file. The module
instance A can modify B’s internal state using update actions. In this case, A updates the beliefs of B with
literal bel . The module instance A can transfer the execution control to the module instance B by the
execute action. The execution of B continues until the state B satisfies the stopping condition stop . The
execution control is then returned back to the module instance A. When A is active again, it can query B’s
internal state by the testing its beliefs or goals and release (remove) it.
32
3.8. MODULES IN 2APL
3.8.2
CHAPTER 3. THE 2APL LANGUAGE
An Example of a Modular 2APL Multi-Agent Program
The following example is provided to illustrate the idea of module-related constructs and their use to
implement an agent’s role. Suppose we need to build a multi-agent system in which one single manager
and three workers cooperate to collect bombs in an environment called gridworld. The manager coordinates
the activities of the three workers by asking them either to play the explorer role to detect the bombs in
the gridworld environment or to play the carrier role to carry the detected bombs to a safe depot and store
them.
For this example, which can be implemented as the multi-agent program illustrated in Figure 3.4, the
manager module (i.e., manager.2apl) specifies the initial state of the manager agent with the name
m (the implementation of the manager module is presented in Figure 3.5). Note that only one manager
agent will be initialized and created (line 7). Moreover, the worker module (worker.2apl; see Figure
3.6) specifies the initial state of three worker agents. The names of the worker agents in the implemented
multi-agent system are w1, w2, and w3 (lines 8 tot 10). As we will see later in this section, the explorer
and carrier roles will be played by the worker agents at runtime.
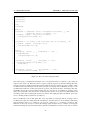
1
2
3
4
5
<apaplmas>
<environment name="blockworld" file="blockworld.jar">
<parameter key="gridWidth" value="18"/>
<parameter key="gridHeight" value="18"/>
</environment>
6
7
8
9
10
11
<agent name="m" file="manager.2apl"/>
<agent name="w1" file="worker.2apl"/>
<agent name="w2" file="worker.2apl"/>
<agent name="w3" file="worker.2apl"/>
</apaplmas>
Figure 3.4: The multi-agent program of the running example.
The manager module can be implemented as in Figure 3.5. The belief updates, beliefs, goals, and reasoning
rules should be read as before. The two PG-rules (lines 21 and 27) are used to assign specific roles to the
worker agents. In particular, the first PG-rule covers the following situation. If the manager believes there
is a bomb at a certain position for which no agent is asked to carry it and there is a worker agent without
any role assignment, then the manager sends a message to the worker agent asking the worker to carry
the bomb, i.e., the manager asks the worker agent to play the carrier role. After sending the message, the
manager updates its administration with the fact that there is a role assigned to the worker. The second
PG-rule asks a worker that has no role assignment to explore a bomb if the manager has no information
about bombs.
The three PC-rules (lines 33-43) are used to process the incoming messages. The messages are expected
to be received from the worker agents who play the carrier or explorer roles. In particular, the first PC-rule
(line 33) handles messages from explorer agents who have found bombs in the environment. In such cases,
the manager registers the information about the found bombs and unregister the worker agents from their
explorer role such that they can be asked for playing another role. The second and third PC-rules (line 38
and 43) handle the messages from carrier agents. The second rule covers the situation that the carrier has
successfully carried the bomb to a safe depot and the third rule covers the case that the role could not be
played successfully. In this example, we assume actions like picking up a bomb or dropping a bomb can
fail.
33
3.8. MODULES IN 2APL
12
13
14
15
CHAPTER 3. THE 2APL LANGUAGE
beliefs:
worker(w1).
worker(w2).
worker(w3).
16
17
18
goals:
haveBomb.
19
20
21
22
23
24
25
pgrules:
haveBomb <- bomb(POS) and not assigned(carrier(POS), _) and
worker(W) and not assigned(_, W) |
{ send(W, request, play(carrier, POS));
+assigned(carrier(POS), W);
}
26
27
28
29
30
haveBomb <- not bomb(_) and worker(W) and not assigned( _, W) |
{ send(W, request, play(explorer));
+assigned(explorer, W);
}
31
32
33
34
35
36
pcrules:
message(A, inform, _, _, bomb(POS)) <- true
{ SetBomb(POS);
-assigned(explorer, A);
}
|
37
38
39
40
41
message(A, inform, _, _, done(POS)) <- true |
{ RemoveAssigned(carrier(POS), A);
-bomb(POS);
}
42
43
44
message(A, inform, _, _, failed(POS)) <- true |
{ -assigned(carrier(POS), A); }
Figure 3.5: The code of the manager module.
The worker agent, as implemented in Figure 3.6, is an agent that waits for requests to play either the
explorer or the carrier role. When it receives a request to play the explorer role from the manager (line 66),
it creates an explorer module instance and executes it (line 68-69). Note that the stopping condition of this
module instance is the belief that a bomb has been found at a certain position. When the execution of the
module instance halts, the worker agent sends the position of the detected bomb to the manager (line 70),
and finally releases the explorer module instance (line 71). Note the use of variables for passing position
values. It is important to note that for the worker agent the creation of an explorer module instance and
executing it is the same as playing the explorer role. The worker agent plays this role until the goal of the
role (i.e., finding bombs) is believed to be achieved.
The second PC-rule of the worker agent (line 74) is responsible for carrying bombs by creating a carrier
module instance (line 76), adding the bomb information to its beliefs (line 77), and executing it until either
it has found the bombs (done condition) or an error has occurred (error condition); see line 78. The
final lines of this code (79-87) is to inform the manager agent about the success or failure of carrying the
bomb and releasing the carrier module instance after this communication. In other words, this second rule
34
3.8. MODULES IN 2APL
CHAPTER 3. THE 2APL LANGUAGE
indicates when the worker agent should play the carrier role.
The PG-rule of the worker agent is to allow the agent to explore the gridworld environment by moving to
arbitrary positions. The abstract move action gotoRandomPos(15,15) is defined by means of a PC-rule in
the included moving.2apl file.
45
46
include:
moving.2apl;
47
48
49
beliefs:
manager(m).
50
51
52
53
54
plans:
B(is( X, int( random( 15 ) ) ));
B(is( Y, int( random( 15 ) ) ));
@blockworld( enter( X, Y, blue ), _ );
55
56
pgrules:
57
58
59
60
61
62
63
/* Wander around */
<- true |
{
if B(prob(0.05))
gotoRandomPos(15,15);
}
64
65
66
67
68
69
70
71
72
pcrules:
message(A, request, _, _, play(explorer)) <- manager(A) |
{
create(explorer, myexp);
myexp.execute(B(bomb(POS)));
send(A, inform, bomb(POS));
release(myexp);
}
73
74
75
76
77
78
79
80
81
82
83
84
85
86
87
88
message(A, request, _, _, play(carrier, POS)) <- manager(A) |
{
create(carrier, mycar);
mycar.updateBB(bomb(POS));
mycar.execute(B(done or error));
if mycar.B( done )
{
send(A, inform, done(POS));
}
else
{
send(A, inform, failed(POS));
}
release(mycar);
}
Figure 3.6: The code of the worker module.
35
3.8. MODULES IN 2APL
CHAPTER 3. THE 2APL LANGUAGE
The explorer module (i.e., the implementation of the explorer role), as implemented in Figure 3.7, has
the goal to find bombs (line 101). In order to achieve this goal, it proceeds to a random location in the
gridworld, performs a sense bomb action there and, if successful, adds the position of the detected bomb
to its own local beliefs (line 115). Note that this belief information satisfies the stopping condition of the
module instance (see line 69) since the goal foundBomb is achieved as soon as bomb(POS) is added to
its beliefs (line 97).
89
90
include:
moving.2apl;
91
92
93
94
beliefupdates:
{ at(OLDPOS) }
{ true }
UpdatePosition(POS)
UpdatePosition(POS)
{ not at(OLDPOS), at(POS) }
{ at(POS) }
95
96
97
98
beliefs:
foundBomb :- bomb(_).
prob(P) :- is(X, rand), X < P.
99
100
101
goals:
foundBomb.
102
103
104
105
106
107
108
pgrules:
/* Wander around */
foundBomb <- prob(0.05) |
{
gotoRandomPos(15,15);
}
109
110
111
112
113
114
115
116
117
foundBomb <- true |
{
@blockworld( senseBombs(), BOMBS );
if B( BOMBS = default,X1,Y1 | REST ) then
{
+bomb(X1,Y1);
}
}
Figure 3.7: The code of the explorer module.
Finally, the carrier module (i.e., the implementation of the carrier role) as implemented in Figure 3.8 has
a goal to store a bomb (line 127). If the agent is at the same position as the bomb, then the goal can
be achieved by picking up the bomb, storing it in the depot, and removing that bomb from its own local
beliefs (lines 136-144). Note that the removal of the bomb by the direct belief update action -bomb(POS)
will imply that the job of carrying and storing the bomb is done (see line 124), which in turn satisfies the
stopping condition of the carrier module instance (see line 78). However, if the agent is not at the bomb’s
position, then it will try to modify its position. If the new position is again not the same as the bomb’s
position, then it will adopt a goal to be at that position. This is done by the first PG-rule (lines 130-134).
The third and fourth PG-rules (lines 146 and 149) are to drop the carrying bomb at the safe location (i.e.,
trap position). The final PR-rules (lines 155 and 156) are for the case that the pickup and drop actions fail.
In these cases, the beliefs is updated with an error message which will satisfy the stopping condition of the
carrier module instance (see line 78). It is also important to note that it is up to the gridworld programmer
36
3.8. MODULES IN 2APL
CHAPTER 3. THE 2APL LANGUAGE
to determine when the execution of a gridworld action fails.
118
119
include:
moving.2apl;
120
121
122
123
124
beliefs:
trap(0,0).
bombStored :- not bomb(_), not carrying_bomb.
done :- bombStored.
125
126
127
goals:
bombStored.
128
129
130
131
132
133
134
pgrules:
bombStored <- bomb(POS) and not carrying_bomb and not at(POS) |
{ updatePosition();
if B(bomb(POS) and not at(POS))
adopta(at(POS));
}
135
136
137
138
139
140
141
142
143
144
bombStored <- bomb(POS) and not carrying_bomb and at(POS) |
{
updatePosition();
if B(at(POS))
{
@blockworld( pickup(), _ );
+carrying_bomb;
-bomb(POS);
}
}
145
146
147
bombStored <- carrying_bomb and trap(TRAPPOS) and not at(TRAPPOS) |
{ adopta(at(TRAPPOS)); }
148
149
150
151
152
bombStored <- carrying_bomb and trap(TRAPPOS) and at(TRAPPOS) |
{ @blockworld( drop(), _ );
-carrying_bomb;
}
153
154
155
156
prrules:
@blockworld(pickup(), _); REST; <- true
@blockworld(drop(), _); REST;
<- true
|
|
{ +error; }
{ +error; }
Figure 3.8: The code of the carrier module.
The file moving.2apl contains codes for implementing the movement of the working agents.
37
4
2APL Environments
2APL agents can interact with environments in two ways: 1. performing external actions which might
yield a return-value (e.g. sensing action), and 2. getting external events from the environment.
4.1
Using the blockworld environment
The blockworld consists of a n × n world where agents can move in four directions (north, south,
east and west). The world can contain bombs, stones, and dustbins. Agents can pickup and drop bombs.
When a bomb is dropped in a dustbin, the bomb is destroyed. Figure 4.1 shows an example instance of the
blockworld with one agent located in it. One can add and delete bombs, walls (stones), and dustbins.
When a bomb is added within the sensing range of an agent a bombAt event is sent to this agent. One
can also select an agent by clicking the agent. When an agent is selected, the information about its actions
and events is shown in the panel on the right. One can change some settings like the size of the world, and
sensing range of the agent via the properties menu. The world can be saved and loaded via the world
menu. An agent can perform the following actions in the blockworld.
Figure 4.1: An example instance of the blockworld with one agent located in it.
38
4.1. USING THE BLOCKWORLD ENVIRONMENT
action name:
parameter(s):
return value(s):
fails if :
CHAPTER 4. 2APL ENVIRONMENTS
enter
X - X position
Y - Y position
C - A constant representing a color.
none
agent has already entered
the position is outside the world
the position is occupied by another agent
@blockworld( enter(5,5,red), R)
example:
description:
Tries to inserts an agent in the blockworld at a given position (X, Y). The options for the color
are: army, blue, gray, green, orange, pink, purple, red (the color which will also be selected for invalid
constants), teal, and yellow.
action name:
sensePosition
parameter(s):
none
return value(s): [X,Y]
example:
@blockworld( sensePosition(), R)
description:
Senses the position of the agent within the blockworld. If the agent is not in the blockworld
there will be no substitution for the return value, otherwise it will be the coordinates of the agent at
[X,Y].
action name:
parameter(s):
return value(s):
fails if:
north
none
none
the position is outside the world
the position is occupied by another agent
@blockworld( north(), R)
example:
description:
Tries to move the agent through the blockworld to the position above (Y − 1) the current position.
action name:
parameter(s):
return value(s):
fails if:
south
none
none
the position is outside the world
the position is occupied by another agent
@blockworld( south(), R)
example:
description:
Tries to move the agent through the blockworld to the position above (Y + 1) the current position.
action name:
parameter(s):
return value(s):
fails if:
east
none
none
the position is outside the world
the position is occupied by another agent
@blockworld( east(), R)
example:
description:
Tries to move the agent through the blockworld to the position above (X + 1) the current position.
39
4.1. USING THE BLOCKWORLD ENVIRONMENT
action name:
parameter(s):
return value(s):
fails if:
CHAPTER 4. 2APL ENVIRONMENTS
west
none
none
the position is outside the world
the position is occupied by another agent
@blockworld( west(), R)
example:
description:
Tries to move the agent through the blockworld to the position above (X − 1) the current position.
action name:
senseBombs
parameter(s):
none
return value(s): [ [default, X1, Y1], [default, X2, Y2], ...]
example:
@blockworld( senseBombs(), R)
description:
Gives a list of all bombs in the sense range. The first element of the sublist (each bomb description) is
always ’default’, the second is the X position and the third the Y position.
action name:
senseAllBombs
parameter(s):
none
return value(s): [ [default, X1, Y1], [default, X2, Y2], ...]
example:
@blockworld( senseAllBombs(), R)
description:
Gives a list of all bombs, also the ones outside the sense range. The first element of the sublist (each
bomb description) is always ’default’, the second is the X position and the third the Y position.
action name:
parameter(s):
return value(s):
fails if:
pickup
none
none
the agent already carries a bomb
there is no bomb to pickup
@blockworld( pickup(), R)
example:
description:
Tries to pickup a bomb.
action name:
parameter(s):
return value(s):
fails if:
drop
none
none
the agent doesn’t carry a bomb
there is already a bomb in the position
The agent tries to drop the bomb it carries.
action name:
senseAgent
parameter(s):
none
return value(s): [ [A1, X1, Y1], [A2, X2, Y2], ... ]
example:
@blockworld( senseAgent(), R)
description:
Gives a list of all agents in the sense range. The first element of the sublist (each agent description) is
the name (A) of the agent, the second is the X position and the third the Y position.
40
4.1. USING THE BLOCKWORLD ENVIRONMENT
CHAPTER 4. 2APL ENVIRONMENTS
action name:
senseAllAgent
parameter(s):
none
return value(s): [ [A1, X1, Y1], [A2, X2, Y2], ... ]
example:
@blockworld( senseAllAgent(), R)
description:
Gives a list of all the agents independent of the sense range.
action name:
senseStones
parameter(s):
none
return value(s): [ [default, X1, Y1], [default, X2, Y2], ...]
example:
@blockworld( senseStones(), R)
description:
Gives a list of all stones in the sense range. The first element of the sublist (each stone description) is
always ’default’, the second is the X position and the third the Y position.
action name:
senseAllStones
parameter(s):
none
return value(s): [ [default, X1, Y1], [default, X2, Y2], ...]
example:
@blockworld( senseAllStones(), R)
description:
Gives a list of all stones, also the ones outside the sense range. The first element of the sublist (each
stone description) is always ’default’, the second is the X position and the third the Y position.
action name:
senseTraps
parameter(s):
none
return value(s): [ [default, X1, Y1], [default, X2, Y2], ...]
example:
@blockworld( senseTraps(), R)
description:
Gives a list of all dustbins in the sense range. The first element of the sublist (each dustbin description)
is always ’default’, the second is the X position and the third the Y position.
action name:
senseAllTraps
parameter(s):
none
return value(s): [ [default, X1, Y1], [default, X2, Y2], ...]
example:
@blockworld( senseAllTraps(), R)
description:
Gives a list of all dustbins, also the ones outside the sense range. The first element of the sublist (each
dustbin description) is always ’default’, the second is the X position and the third the Y position.
action name:
getSenseRange
parameter(s):
none
return value(s): [SenseRange]
example:
@blockworld( getSenseRange(),R)
description:
Returns the sense-range of the agent.
action name:
getWorldSize
parameter(s):
none
return value(s): [Width, Height]
example:
@blockworld( getWorldSize(), R)
description:
Returns the size of the blockworld, the first parameter is the width and the second the height.
41
Bibliography
[1] T. Behrens, J. Dix, K. Hindriks, M. Dastani, R. Bordini, J. Hübner, P. A., and L. Braubach. An interface
for agent-environment interaction. In The Eighth International Workshop on Programming Multi-agent
Systems (ProMAS 2010), 2010.
[2] F. Bellifemine, F. Bergenti, G. Caire, and A. Poggi. Jade - a java agent development framework. In
R. H. Bordini, M. Dastani, J. Dix, and A. El Fallah Seghrouchni, editors, Multi-Agent Programming:
Languages, Platforms and Applications, chapter 5. Springer-Verlag, 2005.
[3] M. Dastani. 2APL: a practical agent programming language. Autonomous Agents and Multi-Agent
Systems, 16(3):214–248, 2008.
[4] M. Dastani. Handbook of Research on Emerging Rule-Based Languages and Technologies: Open Solutions and Approaches, chapter Modular Rule-Based Programming in 2APL. Number 1 in Information
Science Reference. IGI, Hershey, PA, USA, 2009.
[5] M. Dastani and B. Steunebrink. Operational semantics for BDI modules in multi-agent programming.
In Proceedings of the tenth International Workshop on Computational Logic in Multi-Agent Systems
(CLIMA-X), 2009.
42