1
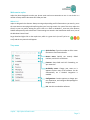
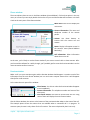
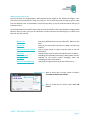
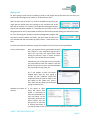
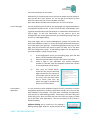
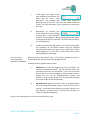
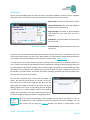
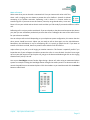
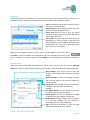
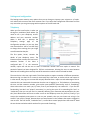
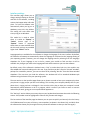
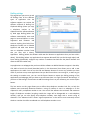
ucplus – User Guide
Version 2.4
Contents
Welcome to ucplus .................................................................................................................................. 3
Where is it? ......................................................................................................................................... 3
Tray menu ............................................................................................................................................... 3
Phone window ........................................................................................................................................ 4
Preview window ...................................................................................................................................... 4
What would you like to do? ................................................................................................................. 5
Making calls ............................................................................................................................................ 6
Call Control............................................................................................................................................ 10
More call control ............................................................................................................................... 11
Address books and contacts .................................................................................................................. 12
Storing contact details when on a call ................................................................................................ 13
Adding contact details from the Call History window ......................................................................... 13
Call History ............................................................................................................................................ 13
Presence ............................................................................................................................................... 14
Messaging ............................................................................................................................................. 15
Select Peer ........................................................................................................................................ 16
Message History ................................................................................................................................ 16
Settings and configuration ..................................................................................................................... 17
Telephony ......................................................................................................................................... 17
Interface settings ............................................................................................................................... 18
Dialling settings ................................................................................................................................. 19
Events settings .................................................................................................................................. 20
Integration settings ........................................................................................................................... 21
Versions & Log settings ...................................................................................................................... 22
_____________________________________________________________________________________
ucplus – http://plus-software.com/
Page 2
Welcome to ucplus
ucplus has been designed to make your phone easier and more convenient to use. It can do this in a
number of ways and this document will show you how.
Where is it?
ucplus is designed to be discrete. Always running and providing useful information as you need it, yet at
the same time not annoying and interfering when you’re trying to work. So, most of the time, ucplus sits
silently in your tray menu, waiting for you to click on it. Note: In Windows 7, some tray icons become
hidden and expressly have to be shown. These settings are stored in the ‘Notification Area Icons’ part of
the Windows Control Panel.
So go ahead and right-click on the ucplus icon, which is a green circle (or red if you’re on
a call) and the tray menu should appear.
Tray menu
Quick dial box: Type the number to dial or enter
the name to find contact details.
Recent menu: Quickly see recently dialed
numbers, and click to redial them.
Features: Setup DND and Call Forwarding on
your extension.
Availability menu: Change your status as it
appears to other users of the software. Can be
automatically set if Outlook integration is
enabled.
Configuration: Contains options to change your
user experience, and configure CRM packages to
integrate with.
Exit: Use this to unload the software.
_____________________________________________________________________________________
ucplus – http://plus-software.com/
Page 3
Phone window
The most obvious place to start is the Phone window (pictured below). Click on that option in the tray
menu, or in future you can simply double click on the tray icon and the window will be shown. Let’s have
a look at the main parts of the Phone window:
Main menu: Click here to display the
main menu.
Contact information: The name and
telephone number of the remote
person.
Actions: Use these buttons to
interact with the current call and
contact.
Notes: Display information stored in
the contact’s notes (Shared Address
Book only).
Call information: Other information
about the current call.
At the start, you’re likely to use the Phone window if you want to control calls or show contacts. After
you’ve used the software for a while, though, you’ll probably prefer to use the Preview window it can be
more convenient and less intrusive.
Preview window
Make a call in to your extension again and the Preview window should appear. It contains much of the
information from the main Phone window, but in a much more compact format. Plus it will disappear
shortly after a call connects.
Let’s review the main parts of the window:
Close button: Use this to make the Preview window disappear
more immediately.
Contact information: The telephone number and name of the
other party.
Call control actions: Use these to interact with the call. Using
some of these will display the main Phone window.
Like the Phone window, the actions at the bottom of the preview window adapt to the state of the call.
The example picture shows the actions that are available when a connected call is in progress. To
conserve space, the text is only shown for the first action. The rest are depicted by their icons only.
_____________________________________________________________________________________
ucplus – http://plus-software.com/
Page 4
What would you like to do?
Are you still with us? Congratulations. Many people just go straight to the software and figure it out
from there. But you know what? They’re missing out. This is where we show you how to get the most
from the software. Plus, it’s presented in a topic-by-topic way, so you can read the sections that you’re
interested in first.
So what would you like to know? Have a look at the choices below. They are presented in a logical order
based on the tray menu. They are not necessarily in order with the most interesting first, so feel free to
skip over any that look dull:
Making calls
Call Control
Address books and contacts
Call History
Presence window
Messaging
Settings and configuration
How many different ways can you make calls? Which are the
best?
How can you control calls from your PC? What is the best way
to work?
How to assign names to callers and how best to use this
information.
Taking a look at your call history and what you can do with it.
Publishing your availability and seeing if other people are free
Chatting via the built-in instant messaging client and
reviewing previous conversations.
How do you configure ucplus to get the most out of it?
Want to know how to assign names to callers?
Read Address books and contacts.
Want to know how to control calls? Read Call
control.
_____________________________________________________________________________________
ucplus – http://plus-software.com/
Page 5
Making calls
So, we’re going to look at ways of making it easier to call people. But at the same time, we don’t just
want to use technology for the sake of it. So where do we start?
Well, the best way to do this is to look at the different ways that you
might get the number that you’re going to call, and then look at the
best way to call them. For instance, you might be browsing the internet
and see the telephone number of a company who you’d like to call. In this instance, the most natural
thing would be to click on the number to dial them. We call that internet dialling (more about this later).
Or if you are using your company’s Contacts Management program and
you have a contact’s details on screen, you don’t want to have to lift
your handset and dial the number by hand. There’s a much easier way
now.
So when you make calls, where do you get the numbers from? Let’s look at some possibilities:
From a piece of paper
Well, you might as well lift your handset and dial
the number on your telephone keypad. But if
that’s the case then you should think about
storing the person’s name in ucplus and then
next time, you can find them more easily.
Alternatively, you could right click on the ucplus
tray icon and then enter the number in the text
box at the top. You can even use the backspace
key if you type it wrong. Easy, eh?
Or, if you happen to have the Phone
window open, then just start typing a
number on your keyboard. ucplus will
understand that you want to make a call
and switch to the “Make call” screen.
Press the Enter key when you’ve finished
typing to make the call.
Someone you spoke to If you spoke to them
recently
using the phone that
ucplus is connected to
then the call should be in
your call history. At the
main menu, press the call
history button and you
will get a list of your calls
in reverse date order. If
you see the caller in this list, then click on their telephone number to make a
_____________________________________________________________________________________
ucplus – http://plus-software.com/
Page 6
call to them directly from this screen.
Alternatively, if the person was one of the last ten people that you spoke to,
then they will be in your “Recent” list. You can get to the Recent list from
either the ucplus tray icon or from the Make call screen.
Note: these Recent numbers are stored on your PC not on the server.
From a web page
You can configure ucplus to search your web pages (for supported browsers)
for telephone numbers to dial. It won’t find all of them, unfortunately, but it
is good at phone directory searches because it is optimized to understand this
kind of page. To turn this functionality on, you need to go to the
Configuration main menu option and then go into Dialling settings. Here you
can turn on “Web Page Dialling”.
Some web pages, such as Contact Management systems may contain text
boxes with telephone numbers in. These work slightly differently because we
can’t make these into hyperlinks. To add dialling support to this type of web
page, then you will need to tell ucplus to search for them. This is also done
from the Configuration screen. To add dialling support for the application,
you need to follow a couple of simple steps:
i)
ii)
iii)
iv)
From another
application
In the Configuration screen, on the Dialling page, press the Add
button. This will load the Dialling wizard.
Select the Internet Explorer option, then choose Text boxes.
Locate a page in your application that contains telephone
numbers in a text box. Enter the telephone number that is shown
in your application into the wizard.
Then press the Detect button.
ucplus will then scan all open web
pages and find the first instance of
your number (you can only do one
at a time). Press the Save button
and in future (next time you
refresh the page) it will add a Dial
button next to the text box.
It is very common to store telephone numbers on a PC, particularly in contact
management applications. However, applications actually vary a lot as to how
these numbers are presented. This gives quite a challenge for applications
such as ucplus to make dialling possible. Fortunately, we’ve been doing this
kind of thing for a while and we’ve put some nice tools into ucplus to allow
you to dial from other applications. The first and easiest of all of them is
Clipboard dialling.
Clipboard dialling can be turned on in the Settings ->
Dialling settings page. When on, ucplus will keep an eye
_____________________________________________________________________________________
ucplus – http://plus-software.com/
Page 7
on the clipboard and if you copy something to it that looks like a telephone
number then a bubble will appear from the tray icon that asks you if you want
to call the number.
When using this method of dialling, you may want to help ucplus know what
is a valid number by entering a minimum and maximum length and possibly a
prefix that numbers must start with. This can be done in the Dialling settings
page.
If you regularly dial from a certain application then there may be a quicker
way to dial. This involves a detection phase where ucplus learns your
application, and is called Application dialling. To try it out, go to the Dialling
page in the Configuration.
At this screen then press the Add button and you can try to detect your
application. The way that you do this is as follows:
i)
Select the “Any other type of Windows application” option, then
press Next.
ii)
On the next page, click and
hold the mouse down on
the crosshair next to the
word “Detect” as in the
screenshot above.
iii)
Drag the mouse (without
releasing the button) over
the text box in your
application when a number
is stored.
iv)
Release the mouse button when the mouse
cursor is above the textbox. (This obviously
means that you need to get ucplus and your
application side-by-side to achieve this). If the
crosshair icon changes to a check then it is
likely that ucplus can add dialling support to this box.
v)
When you have finished then press the Next button and then
press the Close button to save the settings. Then press Save in the
main configuration page too.
Next, close and reopen your application window to see if it has worked. The
results will depend on what type of application it is. You will either see one of
three possibilities:
_____________________________________________________________________________________
ucplus – http://plus-software.com/
Page 8
From your own inhouse developed
application or database.
i)
A dial button will appear to the
right hand side of the text box. This
means that you have a “.Net
application”. (You probably saw a check when doing the
detection also). If this is the case, then you should proceed to
“Detect” the other text boxes in your application to make them
work also.
ii)
Alternatively, try hovering your
mouse above the text box (making
sure that there is a valid telephone
number in it). All being well, a Dial and Hangup button will appear
to the right hand side of the text box. This means that you have a
non-.Net application.
iii)
If neither of these two things happen, then the text box probably
isn’t supported, so you should consider using the Clipboard
method instead. Note: you might also be trying it with an webbased application, if so then have a look at the earlier section
under dialling from a web page.
We have to get a little “techie” here, so if you don’t develop your own inhouse applications, then feel free to skip straight past this.
So what kind of an application do you have?
i)
Web-based: If so, then we suggest that you put “Anchors” <A>
around any telephone numbers. The href should be “Dial: 123”
and replace 123 with your real number. If you want to put Dial
buttons next to your input textboxes or under buttons, then we
suggest that you use the window.OpenURL function and
construct a string containing “dial: 123” as a parameter (changing
the number to the correct one obviously).
ii)
Non-web based: When you want to make an outbound phone
call (ie by putting a Dial button next to a text box) then do so by
running or shelling the PhoneHelper.exe program (found in the
same directory as ucplus) with a command line parameter of
“Dial(123)” (without the quotes).
So, that’s it for dialling options. Unless you can think of any more…
_____________________________________________________________________________________
ucplus – http://plus-software.com/
Page 9
Call Control
By now, you will probably have seen the Call screen in the Phone window a number of times. It appears
when you make or receive a call. Let’s take a moment to review the items on the screen.
Main menu: Click here to view the main menu.
Contact information: The name and telephone
number of the remote person.
Page left/right: Use these to switch between
calls when you have more than one call in
progress.
Call actions: Use these buttons to interact with
the current call.
Call information: Other information about the
current call.
As you can see, the Phone window allows you to interact with the current call in a number of ways. One
of the most common ways is to click on the “New contact” or “Show contact” button to add a new name
or to view the current caller’s details. This is covered in a later section, Address books.
It is also common to use this screen to perform a transfer of the current call to another extension or
user. To do this you must be connected to the call (as opposed to it being on Hold or Ringing). When you
are connected then the Actions list looks like the above example. To transfer a call you do NOT press the
Hold button. The Hold button has a different purpose (more about his later). Instead you either press
the Consult or Transfer button. You choose the button according to whether you want to speak to the
other person (Consult) or not (Transfer).
You are then presented with a screen like the Make call
screen, but with the word Consult or Transfer at the top.
Your call is not on hold at this stage yet, but when you are
ready, type the number to transfer to (or choose one of the
dialling options) and if you are Consulting then the original
call will be put on Hold pending transfer (the pending
transfer bit is important). If you are transferring then the call
will be put straight through (remember to say goodbye first).
When you have finished talking to your colleague, you can either click Cancel to return to
the original call or click Complete to transfer the original call to your colleague. You can
also transfer calls by using the Presence window. This feature is covered later in that
section.
_____________________________________________________________________________________
ucplus – http://plus-software.com/
Page 10
More call control
We’ve seen what you can do with a connected call. Can you interact with other calls? Yes,
when a call is ringing, you can choose to answer the call or Deflect it (transfer it without
answering it) to another extension. Deflecting a call is done in a manner similar to
transferring calls. If you want to use this feature, then why not go ahead and try it out now.
Phone in from your mobile and see how it works and then you’ll be ready if you need to deflect a call for
real.
Deflecting calls is not just used to avoid work. If you are already on the phone and someone else phones
you, then you can use Deflect productively to move the call to a colleague who can tell the caller to wait
for you to become available.
You can also put calls on hold. Depending on your telephone system configuration, this means that the
other person should hear music. When you are ready to talk to them again, use the Unhold button.
Remember, the Hold button is not for transferring calls. It is purely to pause the call. If you want to
transfer a call that is on hold, then first you will have to take the call off hold first.
ucplus allows you to pick up a call ringing on another extension. This feature is especially useful if you
know that one of your colleagues is unable to answer the call or is not at his desk. You don’t have to get
up from your desk anymore to pick up the call, just go to the Presence Window right click on the ringing
extension and “pick up” the call.
You can use Send Digits to enter further digits during a phone call, when using an automated phone
system for example. Clicking the Send Digits button changes the Actions panel to an alternate view of a
numeric keypad like on a conventional phone. Click the numbers as you need them and click the Actions
button to switch back.
_____________________________________________________________________________________
ucplus – http://plus-software.com/
Page 11
Address books and contacts
The Address book window is accessed from the Address
book item on the main menu or tray menu icon. It
provides access to a company-shared address book.
Unless you’re the first person to use the software at
your company, then there are probably some entries
already in there. Go ahead and have a look. Don’t worry
about filling in any of the boxes, just press the Search
button at the top and see if there are any entries
already there. If you see an entry click on the contact
name, it should display the contact details including the
call history.
If there is no contact, we’ll add one now. At the top of the
window, press the New Contact button. This will present
you with a blank Contact window. Enter a name, company
and phone number in the relevant boxes. All of the boxes
from the Contact window, including the Notes box at the
bottom, can be searched. You can also interact with some of
the boxes to make a call, send an email, etc.
You may be wondering what the “Type” box is for at the top
of the page. This is used to change the format of the Contact
window. Different “types” have different templates. Pick the
one that best represents the contact entry that you are
creating. When you’re finished press the Save button and
we’ll search for your new entry.
Back at the main Address book window, enter search
criteria to find your entry. Most of the time, you can find
the results that you want by entering text in the search
box and pressing Go. However, if you get too many
results back, you may want to consider further restricting
your search by using the Advanced section. Names and
telephone numbers area searched using the original
Search box, but in the Advanced section you can filter by
address fields such as town or postal code (Where) other
fields (What) and the specific database where you think
the contact might be currently stored (Source). Press the
Search button and after a short delay you’ll be presented
with a list of results. From this screen you can click on the telephone number of a contact to dial them,
or click on their name to edit or view their contact details.
_____________________________________________________________________________________
ucplus – http://plus-software.com/
Page 12
Storing contact details when on a call
If you’ve made or received an external call
using the Phone window yet, you’ve probably
noticed that when ucplus doesn’t know who
the other party is that you’re speaking to, then
it will show a town or location name instead.
It does this in an effort to be helpful, but if you
really want to help yourself, then you’ll add a
name to the contact for future use.
How do you do this? You press the “New
contact” button on the right hand side of the screen. (You already knew this, didn’t you?)
You can then store the caller’s details for future use.
Adding contact details from the Call History window
You may find it easier to add a contact’s name and
other details after the call has ended. This is fine,
you can concentrate better this way. To do this, go
into your Call History and click on where the name would appear (it will be a location name in brackets
instead). When you do this, the Create contact window will appear like before.
It’s a good idea to have a look in your Call History, from time to time, and enter caller’s details in this
way. That way, when you’re looking for someone’s number, you will be able to find it.
Call History
Once you’ve used ucplus for a while you will come
to rely on the Call History. It’s a great way to find
the telephone number of someone who you spoke
to recently. The Call History window is accessed
from the Call History item on the Main menu or
from the tray icon menu. As well as reviewing
recent activity you can dial someone from here by
clicking on their telephone number and you can
access their contact record here by clicking on their
name (we saw this in the Address Book section).
It’s good practice to store the names of people
when you speak to them, especially if you’re likely
to speak to them again.
By default, the Call History screen returns the fifty most recent calls. The next fifty can be accessed by
pressing the page right button in the bottom right of the window. Call history can be filtered using the
_____________________________________________________________________________________
ucplus – http://plus-software.com/
Page 13
criteria: “Direction” (Inbound or outbound), “Answered” (Answered or Not answered), “External calls”
(External or Internal), Time and Duration of the call. Also, to aid readability you can hide and show
individual days from your history by pressing the expand/collapse button to the left of the date.
Presence
In its most basic form, the Presence window provides a quick
way to check the availability of your colleagues. The Presence
window is accessible from the tray menu. When you first install
ucplus, then the Presence window should contain a list of all
the extensions, unless your administrator has chosen a
different arrangement.
If you right click on one of the entries in the Presence list, then
a context menu should appear. Assuming that you are not
already on a call, then the menu should contain the Make call
item. By choosing this action, you can dial the extension
directly.
If you had been on a call already, then the choices would have been Consult and Transfer in place of
Make call. This is appropriate because, if you are already on a call, then the expectation is that you are
clicking on the extension with a view to transferring the call to them.
What other actions can you perform? Well, if you see an extension that is flashing red
then it means that the extension has a call ringing at it (you might be able to hear the
phone if it’s nearby). Click on the extension and the context menu will include an
option to Pickup the ringing call. The other colours that you might see are on the
Presence list are solid red, which means that the extension is engaged on a call, and
fluttering yellow, which means that there is an held call at the extension; solid grey
means the extension is offline.
If you want to personalize your Presence window to include just the contacts that you need, then you
can do this in the Presence settings page under the Settings menu (in the Phone window). The other
styles that you can choose, instead of extensions, are Users or custom. The user list is for hotdesk
oriented sites. These are sites where staff moves around and hence the list is oriented toward who is
available and where they are, rather than which extension is available. In user mode, the Users are
shown as coloured “chess pawns” instead.
The “Users” view will also update the “State” field of the user based on the status of any devices that
the user has logged in with (for example; PC client, mobile client), so the user will show as red if they are
either busy on the deskphone or mobile phone.
_____________________________________________________________________________________
ucplus – http://plus-software.com/
Page 14
Clicking the Send Message option on the context menu will open the integrated chat window. Then you
can send instant messages directly to that user or extension. Full information on messaging can be
found in the Messaging chapter. You can also right-click on an extension and select the Call History
option to see their Call History. You need to have a security policy with sufficient rights to do so but you
can use their Call History as easily as your own with all the functionality intact.
The Presence window also allows you to see your colleagues
ucplus Mobile current location (“Location Update Frequency”
must be turned on the Mobile client). Your colleagues location
will be reported as a text description of their geographical
location back to the ucplus server (ucplus server requires internet
access for this feature). The geo-location of colleagues mobile
device is made visible to you via the location field in the Presence
screen or by clicking on “Show on map” option which will open
the web browser to show the user’s approximate location in
Google maps.
Messaging
Sometimes, calling a colleague isn’t an option but you really need to get in touch with them, perhaps
they are on an important call so you don’t want to interrupt but have important relevant information.
That’s where Messaging steps in to help out. You can use the integrated chat window to communicate
with them without tying up their line or having to interrupt a connected call.
To start a conversation, open the Presence window, then right-click on the extension or user you want
to send a message to and click the Send Message option on the pop up context menu.
Conversation: All of the previous messages in the
conversation are displayed here in chronological
order. Just click on any hyperlinks to follow them.
To box: Names/numbers of the message recipients
are typed here or you can use the button at the
end of the box to add them (see Select Peer).
Multiple recipients should be separated with semicolons (;).
Rich text: Select the input text to modify then
select an option from this pop up menu to apply
an effect or select an option and then type.
Text input: Type your text here and press Enter to
send your message. Hyperlinks can be typed or
pasted and are formatted automatically
_____________________________________________________________________________________
ucplus – http://plus-software.com/
Page 15
Select Peer
If you click the button at the end of the To box to add recipients, you’ll see the Select Peer screen. It lists
the different users, extensions and supported devices connected to the telephony system.
Type: Select which type of peer to display from All,
Extension, All devices or User.
Search button: If you change the search text, click
the Search button to update the list.
Search text: Enter the text to filter the search
results by. To show every peer of the selected type
just leave this box blank.
Peer results: The peers that have been found are
displayed here. Select the peer to add and click
OK; multiple peers can be added simultaneously by
holding down the Control key and clicking each
peer in turn, then clicking OK.
When you have added a recipient, if their name or number appears in the To box with a
line under it, the chat window has recognized it and your messages will be sent to this
user or extension. If a name/number has a line through it, the chat window cannot deliver messages to
it.
Message History
When you need to refer back to conversations you’ve had in the past, you can view the Message
History. It’s similar to the Call History except you can go back to the conversation and read every word.
New message: Click here to open a new chat
window; you’ll need to add all recipients manually
though.
Delete message: Click on the message to delete,
then click this button. This cannot be undone so
use with caution.
Search text: Enter the text to search for within the
messages. Leave this blank to show every
message.
List display options: Use the options in this menu
to control what is displayed and how.
Search button: Click this to update the message
list below when you change the search text.
Conversations: Click on a conversation to display it
in a new chat window. You can continue a
conversation once it’s been reopened.
Page: Use the arrow buttons or type the page
number you want to view into the box.
_____________________________________________________________________________________
ucplus – http://plus-software.com/
Page 16
Settings and configuration
The Settings menu contains many options that you can change to improve your enjoyment of ucplus.
Let’s take a look at some of the more common ones. If you select the Configuration menu item from the
tray menu then you are given a page with an options on the left hand side.
Telephony
When you first install ucplus, it takes you
through an installation phase where you
need to tell it your telephony server’s
address and your extension number.
When it does this, it presents the
Telephony settings page of the
Configuration window, so you may have
seen these before. You’re not that likely
to change these settings, but you might
as well know what they do.
The first option, Server, contains the
details of your telephony server. The
Extension option contains the local user’s
extension number. If the client is
configured with "?" as the extension
number, ucplus will ask the user to enter his extension number each time ucplus is started. This
particular feature has been designed for TS/Citrix environments, allowing the user to roam between
desks but still enabling them to easily control the extension number at their selected hot desk.
The next choice is the User Login mode. This allows ucplus to support a number of different operations.
Most users log in to their PC as a name (or username) that is the same, or similar to their own name. Or
in other words, they log in as a name that uniquely identifies them. ucplus can take advantage of this to
associate this user name with the extension that the user is logging in as. This behaviour, of associating
the user and the extension number, gives ucplus some powerful functionality such as “hotdesking”
where other others can reach you, by name, even if you temporarily use another PC. If you like this
functionality, but don’t use “unique” usernames (i.e. you log into your PC as something like “user” or
“technician”) then you can still use it by manually declaring your username and password on the User
tab. (Your administrator will have to create a user on the telephony server for you first). Finally, if you
want to be completely anonymous as a user on your network, then you can choose not to log in. Be
careful if you use this, though, because there are some features in the software that require a logged in
user to work. The final choice, “method of use”, is useful when several people share the same PC. Read
the two choices and select which one best fits your mode of working.
_____________________________________________________________________________________
ucplus – http://plus-software.com/
Page 17
Interface settings
The Interface page allows you to
change settings relating to the look
and feel of the software, including
actions that happen when calls take
place. To have the software start
automatically when you log on to
Windows, put a tick in the tickbox.
The setting will take effect next
time you log on to Windows.
The mode list is used to select
when it is either an “Express” or
“Fusion” Licence type. If an
“Express” license is requested
when there are none available then
the client will pick up any available
higher level “Fusion” license.
Language packs are available for the software to change the language of the user interface. By default,
the software will attempt to automatically select the language to use based on the language setting of
your operating system. However, you can change the language used by selecting from the Language
dropdown list. If your language is not in the list, contact your reseller to find out when it will be
available. Any changes you make to the language will take effect next time you start the software.
By default, many of the software’s windows have a “skin” to make them look nice. Your reseller may
have added their custom branding to the skin too. If you find that you don’t like the “skinned” windows,
perhaps for accessibility reasons, you can turn them off by selecting “No skin” from the Phone window
dropdown. The next time you load the software, the windows will all be standard Windows-style
windows using the theme from your operating system.
The next section on the Interface page allows you to choose a sound to have your computer play when
your phone is ringing and/or you have a call waiting. This can help you to uniquely identify that it is your
phone that is ringing and not a colleague’s. You can also tick the box to have your computer’s sound
automatically muted whenever a call is in progress, which is useful if you listen to music or Internet
radio while you work, giving you a more professional appearance.
The “Hot keys” section allows you to setup keys on your keyboard and associate them with the following
actions: Call (number must be highlighted in order to dial), Answer and Hangup.
The last section of the Interface page has buttons you can press to quickly and securely clear the history
of all CRM contacts from your call history, recent numbers (as shown in the Recent list), and which hints
the software has shown you (clearing hint history allows the software to show you the hints again).
_____________________________________________________________________________________
ucplus – http://plus-software.com/
Page 18
Dialling settings
This page allows you to turn on and
off dialling from all the different
types of application that the
software supports. As a review, the
different methods of dialling are:
Clipboard dialling (where you copy
a telephone number to the
clipboard and the software detects
it), Web page dialling (where the
software automatically scans web
pages in Internet Explorer or other
supported web browsers and
converts anything that looks like a
telephone number into a clickable
hyperlink and adds new buttons
next to telephone number fields
that you have told it about),
Application dialling (where the software adds new Dial buttons to applications that you have told it
about), TAPI dialling (where any application that supports Microsoft TAPI can dial through ucplus) and
Focus dialling (dynamically recognize any numbers in textboxs that looks like the phone numbers and
allows to dial that number out).
Any applications or webpages that you have told the software to add Dial buttons to appear in the table,
click Add to launch the wizard (described earlier in this document) that allows you to add a new
application to the table. You can use the Edit and Remove buttons to correct any mistakes you have
made. If you have set up some applications that you dial from and are now moving PC, or want to give
the settings to another user, you can use the Export button to export the dialling settings of the
applications and webpages that you have set up and save them in a single file named “dial.settings”. If
you have a “dial.settings” file and want to add the settings from it to your software, you use the Import
button.
The last section on this page allows you to define what telephone numbers look like, to help the
software more accurately determine whether a string of numbers it sees in a webpage or on the
clipboard is really a telephone number or not. You can tell the software the minimum and maximum
length of telephone numbers (anything outside the range will be disregarded as a real telephone
number), and you can also specify that telephone numbers must begin with a certain string of
characters. The “Advanced rules” allows “regular expressions” to be used to more accurately control
whether a number should be considered as a valid telephone number or not.
_____________________________________________________________________________________
ucplus – http://plus-software.com/
Page 19
Events settings
You can make the software either
show the Phone window or pop the
contact when certain events
happen. Just select the relevant
action from the relevant dropdown
list: On ringing, On answer, or On
outbound. You can also turn on or
off the unobtrusive Preview window
for all calls and messaging by ticking
or clearing the box.
Integration to Microsoft Lync allows
you to update your Microsoft® Lync
state when you are on a call using
your handset. By ticking the box
your Microsoft® Lync status will
change to “On a Call” when your
extension is on a call. Note: Your Microsoft® Lync status will only change when your PC is powered on
and ucplus is running.
The software can also be configured to run one or more custom executable on selected events. To
configure this, press the Add button and configure the following information: The Event list is used to
select the event on which to run the program/application. The Direction list is used to select when it is
either an incoming or an outgoing call. The Calls lists can be used to restrict events for internal/external
or both.The Program box allows you to select which executable to run. This box should be left blank to
load an internet browser.
The Parameters box allows you to either choose the “command
line arguments” for the program, or in the case of a browser,
the URL to load. When using a URL, make sure that you include
the URI scheme (ie HTTP://). Then you can include in the
Parameters any number of values from the call. For instance, to
output the caller’s telephone number you can include
%Call\CallerContact\Tel%. To use the telephone number of the
remote party (as opposed to the caller, who may be the local
user), you can use the syntax %Call\Contact\Tel%, or you can
use %Call\Contact\DisplayTel% to get the formatted number.
To help testing, you can use the word Message Box in the Program entry, if you want to show a message
box with the translated Parameter output.
Finally a “custom” button can be added to the preview window allowing a user to control application
popping in the same way as for standard integrated applications.
_____________________________________________________________________________________
ucplus – http://plus-software.com/
Page 20
Integration settings
The Integration pages allow you
to see and modify the
databases that you have set up
integration with. Integration
means the database will be
searched when calls happen to
convert telephone numbers
into names; and the database
will be searchable manually
from the Address Book window;
and contacts that are found in
the database can be “popped”.
To make a new integration,
click the (Add new) item, select
the type of database from the
dropdown list, and click Set (the
first time you enter this screen
you may have to wait a few seconds as the software scans to find out what integrations are available).
To modify an existing database that you have set up, click its name in the list. You can also click its name
and then click Delete if you no longer want integration to that database.
For applications like Outlook, the software attempts to find and use default settings that will “just work”
for you, so you won’t need to do anything more. For more complicated databases, the software will do
as much as it can for you, but you may need to help it by for example entering your password, or telling
it where the database files are, etc.
The Integration test area allows you to test the settings you have entered by entering a telephone
number and seeing if the software can find it. If the number is found, you can click the Show contact
button to make sure that “popping” works.
When you are done, click Save. The new integration will be available immediately.
_____________________________________________________________________________________
ucplus – http://plus-software.com/
Page 21
Versions & Log settings
The chances are you will never need to look at
these pages but it is best you know what they
are for, just in case.
Most software these days consists of several
small programs and libraries that form a whole
and ucplus is no different. The Versions page
lists the version used for each component part
that makes up ucplus. This information can be
used to track down any rogue element that
perhaps hasn’t updated correctly or to provide
clues to a problem’s cause. Should something
like that happen you could click the Copy to
clipboard button and then paste the info
straight into a document or email.
The Log page performs a similar function in that it
displays information that is useful in the event of a
problem.
The Devices list shows the devices that are being
used; this could include hardware and any apps
that you have integrated with ucplus.
The panel below shows the Log entries. By default,
logging is turned off but you can turn it on by
ticking the Turn on logging tick box. Once enabled,
the log keeps a record of what ucplus attempts to
do and whether it was successful or not. This
information can be very useful when troubleshooting an issue; click the Copy to clipboard button and
paste the info into a document.
_____________________________________________________________________________________
ucplus – http://plus-software.com/
Page 22