1
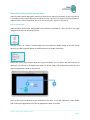
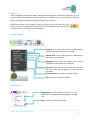
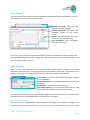
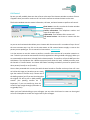
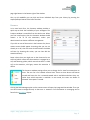
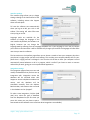
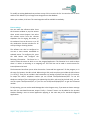
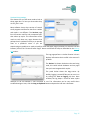
ucplus for Mac – User Guide
Version 2.4
Contents
Welcome to ucplus for Mac Desktop Client ............................................................................................. 3
How to Install ucplus ........................................................................................................................... 3
Where is it? ......................................................................................................................................... 4
The Dock menu ....................................................................................................................................... 4
The menu bar .......................................................................................................................................... 4
Phone window ........................................................................................................................................ 5
Preview window ...................................................................................................................................... 5
What would you like to do? ................................................................................................................. 5
Making calls ............................................................................................................................................ 6
Call Control.............................................................................................................................................. 8
More call control ................................................................................................................................. 9
Address books and contacts .................................................................................................................... 9
Storing contact details when on a call ................................................................................................ 10
Call History ............................................................................................................................................ 10
Presence ............................................................................................................................................... 11
Messaging ............................................................................................................................................. 12
Message History .................................................................................................................................... 12
Settings and configuration ..................................................................................................................... 13
Telephony settings ............................................................................................................................ 13
Interface settings ............................................................................................................................... 14
Integration settings ........................................................................................................................... 14
Events settings .................................................................................................................................. 15
Versions & Log settings ...................................................................................................................... 16
_____________________________________________________________________________________
ucplus – http://plus-software.com/
Page 2
Welcome to ucplus for Mac Desktop Client
ucplus for Mac has been designed to make your phone easier and more convenient to use. It can do this
in a number of ways and this document will show you how. But first, let’s dispense with the formalities.
ucplus for Mac is a bit of a mouthful, isn’t it? So let’s simply call it “ucplus” from now on.
How to Install ucplus
ucplus software can be either downloaded from a website or provided on a CD in the form of a single
.dmg file which will look something like this:
You then "insert," or "mount," the disk image onto the machine by double-clicking on the file. Having
done this, the disk image will appear as another device in the Finder (see below).
Double-click on the ucplus device. Now you’ve got two options, you can either drag the file across to
desktop or just move it to the Applications folder. To do this simply click and hold the ucplus icon and
drop it on Applications folder or the Desktop.
That’s it you’ve just installed the ucplus software on your Mac. To run the application, simply double
click on the ucplus Application icon from the Applications folder or Desktop.
_____________________________________________________________________________________
ucplus – http://plus-software.com/
Page 3
Where is it?
ucplus is designed to be discrete. Always running and providing useful information as you need it, yet at
the same time not annoying and interfering when you’re trying to work. So, most of the time ucplus sits
silently in your desktop dock or menu bar waiting for you to click on it.
So go ahead and click on the ucplus icon, which is a green circle (or red if you’re on a call)
and the tray menu should appear. PLEASE NOTE: the application must be connected to
the ucplus server – see Settings and Configuration.
The Dock menu
Presence: Click to open the Presence window and see
availability and call status of your colleagues.
Address book: Click to open the built-in address book
and access to your contacts.
Messaging: Click to open the message history and to
send new chat message to your colleagues.
Call history: Click to access the call history and see your
fifty most recent calls, arranged in reverse date and
time order.
Phone window: Click to open the Phone window
Quit: Use this to unload the software.
The menu bar
Configuration: Contains options to change your user
experience, and configure CRM packages to integrate
with.
Quit: Use this to unload the software.
_____________________________________________________________________________________
ucplus – http://plus-software.com/
Page 4
Phone window
The most obvious place to start is the Phone window (pictured below). Click on that option in the tray
menu and let’s have a look at the main parts of it:
Minimize and close: These will make
the phone window disappear.
Contact information: The name and
telephone number of the remote
person.
Actions: Use these buttons to interact
with the current call and contact
Call information: Other information
about the current call.
At the start, you’re likely to use the Phone window if you want to control calls or show contacts. After
you’ve used the software for a while, though, you’ll probably prefer to use the Preview window it can be
more convenient and less intrusive.
Preview window
Make a call to your extension and the Preview window should appear. It contains much of the
information about the call in a compact format. Plus it will disappear shortly after a call connects (To redisplay it, simply click once on the green circle).Let’s review the main parts of the window:
Close button: Use this to make the Preview window disappear
more immediately.
Contact information: The telephone number and name of the
other party.
Call duration: Time duration of the current call.
Call control actions: Use these to interact with the call. Using
some of these will display the main Presence window.
The actions at the bottom of the Preview window adapt to the state of the call. The example picture
shows the actions that are available when a connected call is in progress.
What would you like to do?
Are you still with us? Congratulations. Many people just go straight to the software and figure it out
from there. But you know what? They’re missing out. This is where we show you how to get the most
_____________________________________________________________________________________
ucplus – http://plus-software.com/
Page 5
from the software. Plus, it’s presented in a topic-by-topic way, so you can read the sections that you’re
interested in first.
So what would you like to know? Have a look at the choices below. They are presented in a logical order
based on the tray menu. They are not necessarily in order with the most interesting first, so feel free to
skip over any that look dull:
Making calls
Call Control
Address books and contacts
Call History
Presence window
Messaging
Settings and configuration
How many different ways can you make calls? Which are the
best?
How can you control calls from your Mac? What is the best way
to work?
How to assign names to callers and how best to use this
information.
Taking a look at your call history and what you can do with it.
Publishing your availability and seeing if other people are free.
Chatting via the built-in instant messaging client and reviewing
previous conversations.
How do you configure ucplus to get the most out of it?
Making calls
So, we’re going to look at ways of making it easier to call people. But at the same time, we don’t just
want to use technology for the sake of it. So where do we start?
Well, the best way to do this is to look at the different ways that you might get the number that you’re
going to call, and then look at the best way to call them. For instance, you might be browsing the
internet and see the telephone number of a company who you’d like to call. In this instance, the most
natural thing would be to click on the number to dial them. We call that internet dialling.
Or if you are using your OS X Contacts (Apple Address Book) and you have a contact’s details on screen,
you don’t want to have to lift your handset and dial the number by hand. There’s a much easier way
now. So when you make calls, where do you get the numbers from? Let’s look at some possibilities:
_____________________________________________________________________________________
ucplus – http://plus-software.com/
Page 6
From a piece of
paper
Well, you might as well lift your handset and dial the number on your telephone
keypad. But if that’s the case then you should think about storing the person’s name in
ucplus and then next time, you can find them more easily.
Alternatively, you could double-click
the green circle in the top right
corner of the main menu bar and
enter the number in the “Make call”
box. You can even use the backspace
key if you type it wrong. Hit enter or
click on the “Call” button to make a
call.
Clipboard
dialling
From a web
page
When running, ucplus will monitor
the clipboard and if you copy
something ucplus thinks is a
telephone number, then ucplus will auto
populate it and display a tiny clipboard
next to the top green icon, showing that
it is ready to make a call. Double-click on
the icon and hit enter or click on the
“Call” button to dial the number.
You can configure ucplus to
search your web pages (Safari
only) for telephone numbers to
dial. It won’t find all of them,
unfortunately, but it is good at
phone
directory
searches
because it is optimized to
understand this kind of page.
To turn this functionality on,
you need to install the Safari
plug-in (The first time you will
open a web browser after
installing the ucplus, you will be
asked
to
install
SafariPhoneExtension 1.0, click
on “Yes”) you can then enable or disable this feature by a click on a telephone button.
Click on the hyperlink e.g. 0800500005 to dial the number.
_____________________________________________________________________________________
ucplus – http://plus-software.com/
Page 7
Call Control
By now, you will probably have seen the call area at the top of the Presence window a number of times.
It appears when you make or receive a call. Let’s take a moment to review the items on the area.
The Preview window contains contact information, call state, and some buttons to perform call control.
Close button: Use this to make the Preview window
disappear more immediately.
Contact information: The telephone number and
name of the other party.
Call duration: Time duration of the current call.
Call control actions: Use these to interact with the
call.
As you can see Preview window allows you to interact with the current call in a number of ways. One of
the most common ways is to click on the new contact or Edit contact button to apply a name to the
person you are speaking to. This is covered in a later section, Address books.
It is also common to use this screen to perform a transfer of the current call to another extension or
user. To do this you must be connected to the call (as opposed to it being on Hold or Ringing). When you
are connected then the Actions list looks like the above example. To transfer a call you do NOT press the
Hold button. The Hold button has a different purpose (more about his later). Instead you either press
the Consult or Transfer button. You choose the button according to whether you want to speak to the
other person (Consult) or not (Transfer).
You are then presented with a screen, but with the word consult or Transfer at the top. Your call is not
on hold at this stage yet, but when you are ready,
type the number to transfer to (or choose one of
the dialling options) and if you are Consulting then
the original call will be put on Hold pending
transfer (the pending transfer bit is
important). If you are transferring then the
call will be put straight through (remember to
say goodbye first).
When you have finished talking to your colleague, you can either click Cancel to return to the original
call or click Complete to transfer the original call to your colleague.
_____________________________________________________________________________________
ucplus – http://plus-software.com/
Page 8
More call control
We’ve seen what you can do with a connected call. Can you
interact with other calls? Yes, when a call is ringing, you can choose
to answer the call or Deflect it (transfer it without answering it) to
another extension. Deflecting a call is done a manner similar to
transferring calls. If you want to use this feature, then why not go
ahead and try it out now. Phone in from your mobile and see how it works and then you’ll be ready if
you need to deflect a call for real.
Deflecting calls is not just used to avoid work. If you are already on the phone and someone else phones
you, then you can use Deflect productively to move the call to a colleague who can tell the caller to wait
for you to become available.
You can also put calls on hold. Depending on your telephone system configuration, this means that the
other person should hear music. When you are ready to talk to them again, use the Unhold button.
Remember, the Hold button is not for transferring calls. It is purely to pause the call. If you want to
transfer a call that is on hold, then first you will have to take the call off hold first.
Address books and contacts
The Address book window is accessed from the Address
book item on the dock menu icon. It provides access to a
company-shared address book. Unless you’re the first
person to use the software at your company, then there
are probably some entries already in there. Go ahead and
have a look. Don’t worry about filling in any of the boxes,
just press the Search button at the top and see if there
are any entries already there.
No, none in there? No problem, we’ll add one now. If you
did see some entries, we’ll discuss the results page
shortly. But first, we’re going to add another entry. At the
top of the window, press the New Contact button. This
will present you with a blank Contact window. Enter a name, company and phone number in the
relevant boxes. All of the boxes from the Contact window, including the Notes box at the bottom, can be
searched. You can also interact with some of the boxes to make a call, send an email, etc. When you’re
finished press the Save button and we’ll search for your new entry.
If you have enabled the OS X Contacts (Apple Address Book) integration in ucplus, you can search
through Contacts right inside the Apple Address Book and access the search results just as easily as the
ucplus Shared Address Book.
_____________________________________________________________________________________
ucplus – http://plus-software.com/
Page 9
Back at the main Address book window; enter search
criteria to find your entry. Most of the time, you can find
the results that you want by entering text in the search
box and pressing “Search”.
Press the Search button and after a short delay you’ll be
presented with a list of results. From this screen you can
click over the contact and then “Dial” the telephone
number, email to it or click “Show contact” to edit or
view their details.
Storing contact details when on a call
If you’ve made or received an external call using the
Preview window, you’ve probably noticed that when
ucplus doesn’t know who the other party is that you’re
speaking to, then it will show a town or location name
instead. It does this in an effort to be helpful, but if you
really want to help yourself, then you’ll add a name to the contact for future use.
How do you do this? You press the ‘New contact’ button on the right hand side of the Preview window.
(You already knew this, didn’t you?) You can then store the caller’s
details for future use. If you have enabled the OS X Contacts (Apple
Address Book) integration in ucplus, you will have a choice of saving the
new contact details in OS X Contacts or the ucplus shared address book.
Call History
Once you’ve used ucplus for a while you will come to
rely on the Call History. It’s a great way to find the
telephone number of someone who you spoke to
recently. The Call History window is accessed from the
Call History item on the dock menu. As well as reviewing
recent activity you can dial someone from the list by
clicking on their telephone number and you can access
their contacts record here by clicking on their name (we
saw this in the Address Book section). It’s good practice
to store the names of people when you speak to them,
especially if you’re likely to speak to them again.
By default, the Call History screen returns the 50 most
recent calls. The next 50 can be accessed by pressing the
_____________________________________________________________________________________
ucplus – http://plus-software.com/
Page 10
page right button in the bottom right of the window.
Also, to aid readability you can hide and show individual days from your history by pressing the
expand/collapse button to the left of the date.
Presence
In its most basic form, the Presence window provides a
quick way to check the availability of your colleagues. The
Presence window is accessible from the dock menu. When
you first install ucplus, then the Presence window should
contain a list of all the extensions, unless your
administrator has chosen a different arrangement.
If you click on one of the entries in the Presence list, then a
context menu should appear. Assuming that you are not
already on a call, then the menu should contain the Make
call item. By choosing this action, you can then dial the
extension directly.
Some colours that you might see on the Presence list are
solid red, which means that the extension is engaged on a
call, and fluttering yellow, which means that there is a held
call at the extension; solid grey means the extension is
offline.
The Presence window settings allow you to change the list view from extensions to
users. The user list is for hotdesk oriented sites. These are sites where staff moves
around and hence the list is oriented toward who is available and where they are,
rather than which extension is available. In user mode, the Users are shown as
coloured “chess pawns” instead.
Clicking the Send Message option on the context menu will open the integrated chat window. Then you
can send instant messages directly to that user or extension. Full information on messaging can be
found in the Messaging chapter.
_____________________________________________________________________________________
ucplus – http://plus-software.com/
Page 11
Messaging
Sometimes, calling a colleague isn’t an option but you really need to get in touch with them, perhaps
they are on an important call so you don’t want to interrupt but have important relevant information.
That’s where Messaging steps in to help out. You can use the integrated chat window to communicate
with them without tying up their line or having to interrupt a connected call.
To start a conversation, open the Presence window, then right-click on the extension or user you want
to send a message to and click the Send Message option on the pop up context menu.
Conversation: All of the previous messages in the
conversation are displayed here in chronological
order. Just click on any hyperlinks to follow them.
To box: Names/numbers of the message recipients
are typed here or you can use the button at the
end of the box to add them (see Select Peer).
Multiple recipients should be separated with semicolons (;).
Text input: Type your text here and press Enter to
send your message. Hyperlinks can be typed or
pasted and are formatted automatically
Message History
When you need to refer back to conversations you’ve had in the past, you can view the Message
History. It’s similar to the Call History except you can go back to the conversation and read every word.
New message: Click here to open a new chat
window; you’ll need to add all recipients manually
though.
Search text: Enter the text to search for within the
messages. Leave this blank to show every
message.
Delete message: Click on the message to delete,
and then click this button. This cannot be undone
so use with caution.
Conversations: Click on a conversation to display it
in a new chat window. You can continue a
conversation once it’s been reopened.
Page: Use the arrow buttons or type the page
number you want to view into the box.
_____________________________________________________________________________________
ucplus – http://plus-software.com/
Page 12
Settings and configuration
The Settings menu contains many options that you can change to improve your enjoyment of ucplus.
Let’s take a look at some of the more common ones. If you select Preferences from the ucplus top menu
bar then you are given a page with with options on the left hand side.
Telephony settings
When you first install ucplus, it takes you
through an installation phase where you
need to tell it your telephone server’s
address and your extension number.
When it does this, it presents the
Telephony settings page of the
Configuration window, so you may whave
seen these before. You’re not likely to
change these settings, but you might as
well know what they do.
The first option, Server, contains the
details of your telephony server. The
Extension option contains the local user’s
extension number.
The next choice is the User mode. This allows ucplus to support a number of different operations. Most
users log in to their Mac as a name (or username) that is the same, or similar to their own name. Or in
other words, they log in as a name that uniquely identifies them. ucplus can take advantage of this to
associate this user name with the extension that the user is logging in as. This behavior, of associating
the user and the extension number, gives ucplus some powerful functionality such as “hot-desking”
where other others can reach you, by name, even if you temporarily use another Mac. If you like this
functionality, but don’t use “unique” usernames (i.e. you log into your Mac as something like “user” or
“technician”) then you can still use it by manually declaring your username and password on the User
tab. (Your administrator will have to create a user on the telephony server for you first). Finally, if you
want to be completely anonymous as a user on your network, then you can choose not to log in. Be
careful if you use this, though, because there are some features in the software that require a logged in
user to work.
_____________________________________________________________________________________
ucplus – http://plus-software.com/
Page 13
Interface settings
The Interface page allows you to change
settings relating to the look and feel of the
software, including actions that happen
when calls take place.
To have the software start automatically
when you log on to IOS, put a tick in the
tickbox. The setting will take effect next
time you log on to IOS.
Language packs are available for the
software to change the language of the
user interface. By default, the software is in
English, however you can change the
language used by selecting from the Language dropdown list. If your language is not in the list, contact
your reseller to find out when it will be available. Any changes you make to the language will take effect
next time you start the software.
The last section on the Interface page allows you to choose a sound to have your computer play when
your phone is ringing and/or you have a call waiting. This can help you to uniquely identify that it is your
phone that is ringing and not a colleague’s. You can also tick the box to have your computer’s sound
automatically muted whenever a call is in progress, which is useful if you listen to music or Internet
radio while you work, giving you a more professional appearance.
Integration settings
The Integration pages allow you to see and
modify the databases that you have set up
integration with. Integration means the
database will be searched when calls
happen to convert telephone numbers into
names; and the database will be
searchable manually from the Address
Book window; and contacts that are found
in the database can be “popped”.
To make a new integration, click the (Add
new) item, select the type of database
from the dropdown list (the first time you
enter this screen you may have to wait a
few seconds as the software scans to find out what integrations are available).
_____________________________________________________________________________________
ucplus – http://plus-software.com/
Page 14
To modify an existing database that you have set up, click its name in the list. You can also click its name
and then click Delete if you no longer want integration to that database.
When you are done, click Save. The new integration will be available immediately.
Events settings
You can make the software either show
the Presence window or pop the contact
when certain events happen. Just select
the relevant action from the relevant
dropdown list: On ringing, On answer, or
On outbound. You can also turn on or off
the unobtrusive Preview window for all
calls by ticking or clearing the box.
The software can also be configured to
run one or more custom executable on
selected events. To configure this, press
the Add button and configure the
following information: The Event list is
used to select the event on which to run the program/application. The Direction list is used to select
when it is either an incoming or an outgoing call. The Calls lists can be used to restrict events for
internal/external or both.
The Parameters box allows you to either choose the “command line arguments” for the program, or in
the case of a browser, the URL to load. When using a URL, make sure that you include the URL scheme
(i.e. HTTP://). Then you can include in the Parameters any number of values from the call. For instance,
to output the caller’s telephone number you can include %Call\CallerContact\Tel%. To use the
telephone number of the remote party (as opposed to the caller, who may be the local user), you can
use the syntax %Call\Contact\Tel%, or you can use %Call\Contact\DisplayTel% to get the formatted
number.
To help testing, you can use the word Message Box in the Program entry, if you want to show a message
box with the translated Parameter output. Finally a “custom” button can be added to the preview
window allowing a user to control application popping in the same way as for standard integrated
applications.
_____________________________________________________________________________________
ucplus – http://plus-software.com/
Page 15
Versions & Log settings
The chances are you will never need to look at
these pages but it is best you know what they
are for, just in case.
Most software these days consists of several
small programs and libraries that form a whole
and ucplus is no different. The Versions page
lists the version used for each component part
that makes up ucplus. This information can be
used to track down any rogue element that
perhaps hasn’t updated correctly or to provide
clues to a problem’s cause. If you are
experiencing any problems or need to install/re-install the Safari plugin (necessary to dial from the web
browser) click on the “Re-install Safari Plugin” button and follow the steps as described in the Making
Call section.
The Log page performs a similar function in that it
displays information that is useful in the event of a
problem.
The Devices list shows the devices that are being
used; this could include hardware and any apps
that you have integrated with ucplus.
The panel below shows the Log entries. By
default, logging is turned off but you can turn it on
by ticking the Turn on logging tick box. Once
enabled, the log keeps a record of what ucplus
attempts to do and whether it was successful or not. This information can be very useful when
troubleshooting an issue; click the Copy to clipboard button and paste the info into a document.
_____________________________________________________________________________________
ucplus – http://plus-software.com/
Page 16