1
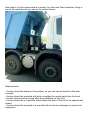
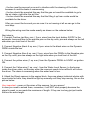
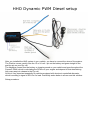
Installation manual for trucks
Attention:
Before any installation on your truck read the entire instruction carefully. If you are
unsure of anything leave the entire installation to a qualified or authorized dealer
who is familiar with the technical system and its installation.
First step when you receive your system is to check if everything is in good condition
and looks like on the following picture:
Next step is to find a space where to mount it on the truck. Most important thing is
mount the metal box as you see on the picture below:
Requirements:
- the box should be stand on this position, so you can see the brand on the door
normally.
- the box should be mounted with bolts or welded to a metal parts from the truck
- the box should not be moving after the installation on the truck
- the box should be in a position which allows the door of the box to be opened and
closed
- the box should be mounted in a way that will not cause a damage on some truck
equipment
- the box must be secured so as not to interfere with the steering of the trailer,
because it could be brake it maneuvering
- the box should be mounted this way that the gas out would be available to go to
the air intake, right after the air filter
- the box should be mounted this way that the filling it up from a side would be
available for the driver
After you mount the box and you are sure it is not moving at all we can go to the
next step:
Wiring-the wiring must be made exactly as shown on the scheme below:
Next step is:
1. Connect Positive (red 6sq. mm.) 2 pcs. wires from the truck battery 24VDC to the
automatic fuses and than to the positive pins on the dry cells, pins are always on the left
side when you look front of the cell.
2. Connect Negative (black 6 sq. mm.) 2 pcs. wires to the black wires on the Dynamic
PWM's inside the box.
3. Connect Negative (blue 6 sq. mm.) 2 pcs. wires from the PWM's to the Negative pins
on the Dry cells, pins are always on the right side when you look front of the cell.
4. Connect the yellow wires (1 sq. mm.) from the Dynamic PWM's to 24VDC on ignition
ON.
5. Connect the Yellow wire (1 sq. mm.) from the Water Level Sensor to the buzzer
inside the driver cabin, so this way when the reservoir needs to be refilled it will inform
the driver. The alarm is screaming when the water level is low.
6. Attach the Shock sensors to the engine block, there are always technical wholes with
inner tracks for bolts, they should be tight up normally until they stop moving, like on the
picture below.
Very important - never cut the wires of the sensors, for any reason!
In case you need to extend them, remember, it will NOT work properly because the
signal is weak, so we made the maximum of length. If they are too long just put inside
the box the extra length.
7. After all this, add electrolyte to the middle of the reservoir.
Electrolyte should be 10 to 15% which means 1 liter of distilled water mixed with
100- 150 grams of Potassium Hydroxide (KOH). Mix it before you add it in the
reservoir, cause it is making a lot of temperature when dissolved. Use caution when you
preparing this solution.
When using an electrolyte be very careful because KOH is harmful to human health.
After contact Immediately wash your hands with clean water to rinse completely or wash
your hands with white vinegar.
If irritation occurs immediately consult your GP or visit your nearest Emergency
Department!
Always keep the electrolyte in a cool, dry place!
Keep away from children!
Cigarette smoking and the use of any combustible material is strictly!
Remember the gas produced is highly explosive!
8. Now is time to program the Dynamic PWM's - you must follow the red instructions in
the box below.
HHO Dynamic PWM Diesel setup
After you installed the HHO system in your vehicle, you have to connect the wires of the system.
The Positive comes usually from the 12 or 24 volt + pin on the battery and goes straight to the
positive pin on your Dry cell.
The Negative comes from the battery or chassis ground on your vehicle and goes throughout the
Dynamic PWM, which is calculating the RPM's on your engine and depend on that determining
how many amps to release to the Dry cell.
All this is very important especially for vehicles equipped with electronic controlled alternator,
which is sending a signal to ECU for it's load. Practically works better in all new and old vehicles.
Setup procedure:
1. Disconnect the positive lead to the generator to the designated fuse. (turn
the fuse OFF)
2. Give contact. LED illuminates- this is a preparation mode. Let it go off (5-7
sec.)
3. Gently press both buttons ( 1 and 2) simultaneously and hold until the LED
blinks and then release the buttons.
4.The module is ready for data recording.
5. Start the engine. Wait few seconds , because it may need to warm up a little
to get to the lower possible RPM's
6. Click and hold the left button (button 1). LED lights up and goes off in few
secons(4-5 sec.) These RPM's are already stored as idle engine rated at 5
amps.
7. Gradual increase the RPM's to reach the optimal work (average work) and
keep the RPM's stable. (In this case you may need another person to hold the
gas pedal).
8. Press the right button and hold until LED lights up for 3-4 sec. and then
goes off
9. Turn the fuse ON and your HHO Generator should start working.
Lower operating range - around 5 Amperes, higher - around 20 Amperes.
10. Turn off the engine, wait 30 sec.
11. Then restart the engine, LED lights when you turn the ignition key ON (this
is a preparation mode) but the generator does not work. To start the system
On , you have to rev the engine more than the higher saved RPM's. The
generator starts to work after you pass the recorded high engine speeds. This
protection is in order - keeping the engine from a cold start in the morning.
Module work only when engine running!
The petrol version starts to work immediately when you start the engine!
That's it, your system is ready to work!
If there is some difficulties, please contact us via e-mail or phone!
If there is something you are not sure what you
doing, just leave the work and contact us for
technical support !!!
e-mail: [email protected]
phone: 00359 876 990188