1
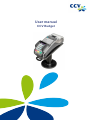
User manual
CCV Budget
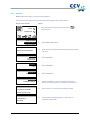
Malfunctions caused by non-compliance with the user manual are not covered by the service agreement.
The definition of service provided by CCV and the conditions that apply to this service provision are described in the
'General Terms and Conditions of CCV Holland BV, dated August 2012' and the service leaflet of the corresponding
product. These documents have already been included in the offer.
All rights reserved. No part of this publication may be reproduced, stored in computerised databases, or transmitted,
in any form or by any means, electronic, mechanical, photocopying, recording or otherwise, without the prior written
consent of CCV Holland BV.
TABLE OF CONTENTS
1
INTRODUCTION
5
1.1
1.2
The CCV Budget payment terminal
The parties that make it possible to perform transactions
5
5
2
INSTALLATION OF THE PAYMENT TERMINAL
6
2.1
2.2
Components supplied
Installation requirements
2.2.1
Installation of the payment terminal
2.2.2
Use of the card reader
2.2.3
Environmental factors
Connecting the equipment
Setting up communication
2.4.1
Getting an Internet subscription
2.4.2
Setting a static IP address
2.4.3
Setting a dynamic IP address
2.4.4
Testing the communication links
6
7
7
7
7
8
9
10
10
12
13
3
WORKING WITH THE PAYMENT TERMINAL
15
3.1
3.2
3.6
3.7
Overview of the payment terminal
Operating the payment terminal
3.2.1
Entering letters
The menu of the payment terminal
3.3.1
Symbols for menu options
Merchant password
Start-up and shutdown of the payment terminal
3.5.1
Performing an activation of the terminal
3.5.2
Performing a deactivation of the terminal
The use of payment cards
Placing a printing paper roll
15
16
17
18
18
19
20
20
20
21
21
4
PERFORMING TRANSACTIONS
22
4.1
4.4
4.5
4.6
4.7
Overview of the different types of transactions
4.1.1
Which transactions can I perform with a payment card?
Entering a tip during a transaction
Sale
4.3.1
Perform a manual credit card transaction
Cancellation
Reservation
Sale after reservation
Refund
22
22
24
25
26
27
29
30
31
5
PAYMENT CARDS
32
5.1
5.2
View settings for payment cards
Change settings for payment cards
5.2.1
Adding a payment card
5.2.2
Removing a payment card
5.2.3
Changing the registration number of a payment card
Check whether the changes for the payment cards were
implemented successfully
32
34
34
36
37
6
FINANCIAL REPORTS
40
6.1
6.2
6.3
The different types of reports
Automatically printing reports at a deactivation of the terminal
Interim printing of reports
6.3.1
Total report
6.3.2
E-journal
40
40
40
40
42
2.3
2.4
3.3
3.4
3.5
4.2
4.3
5.3
CID110A/08062013
39
3 / 56
6.4
6.5
Change settings for reports
6.4.1
Enabling the E-journal
6.4.2
Disabling the E-journal
Deleting the E-journal
44
44
46
47
7
OPTIONAL FEATURES
48
7.1
7.2
Overview of the optional features
Instruction cards for optional features
48
48
8
MAINTENANCE AND FAILURES
49
8.1
Maintenance to the payment terminal
8.1.1
Cleaning of the payment terminal
8.1.2
Cleaning of the chip card reader
8.1.3
Cleaning of the magnetic card reader
Periodic version check of the software
What to do in case of a failure?
8.3.1
Looking up the TMS Terminal ID and the payment terminal code
49
49
50
50
50
51
52
9
ACCESSORIES FOR THE PAYMENT TERMINAL
53
9.1
9.2
Ordering accessories
Ordering printing paper rolls via the payment terminal
53
53
10
GLOSSARY
54
11
CONTACT DETAILS
56
11.1
11.2
11.3
11.4
Telephone numbers CCV
Opening hours CCV
General address details CCV
Telephone numbers acquirers
56
56
56
56
8.2
8.3
CID110A/08062013
4 / 56
1
INTRODUCTION
1.1
The CCV Budget payment terminal
The VX 520 payment terminal allows you to process transactions with payment cards as well as coupons
and membership cards. The payment terminal is future-proof and meets the latest national security
requirements and the EMV standard.
The EMV standard was developed by the credit card companies Europay, Mastercard, Visa and JCB to
prevent payment card fraud. Since an EMV chip is implemented in the payment cards instead of a
magnetic strip, transactions are more secure.
1.2
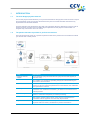
The parties that make it possible to perform transactions
This manual frequently refers to or speaks of parties involved in the performance of transactions. Below
you will find a list of these parties.
Party
Explanation
Payment terminal
supplier
You purchased a payment terminal from a payment terminal supplier (in
this case CCV).
Cashier
As a cashier, you are the one operating the payment terminal during the
performance of transactions.
Cardholder
The cardholder is the person who is charged a transaction amount for a
product or service. During the performance of a transaction, the cardholder
also operates the terminal.
Your transactions are sent to a transaction processor via an Ethernet
connection. For an Ethernet connection, you enter into a contract with an
Internet provider.
Internet provider
Transaction processor
The transaction processor forwards the received transactions to acquirers
(banks or credit card companies) for further processing.
Acquirer
The acquirer verifies with the issuer of the payment card whether the
transaction with the payment card used may be processed.
Payment card issuer
The issuer of payment cards is usually a bank or financial institution. The
payment cards are used by cardholders to perform transactions.
CID110A/08062013
5 / 56
2
INSTALLATION OF THE PAYMENT TERMINAL
2.1
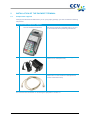
Components supplied
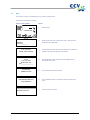
If the payment terminal was delivered to you as a plug & play package, you have received the following
components.
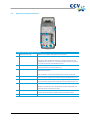
Overview of the components supplied
1
The VX 520 payment terminal
The payment terminal is operated both by you and
by the cardholder when performing transactions.
2
Power cable
The power cable is used to connect the payment
terminal to an outlet (230 volts).
3
Ethernet cable
You connect the Ethernet cable to the payment
terminal and a communication module (Ethernet
modem or Ethernet router).
You can find more information on connecting the equipment in section 2.3.
CID110A/08062013
6 / 56
2.2
Installation requirements
The Dutch Payments Association is an organisation that focuses, among other things, on the security of
electronic payments. To increase this security, the Dutch Payments Association has established
guidelines for the installation of payment terminals and the use of the card reader.
2.2.1
Installation of the payment terminal
•
•
•
•
2.2.2
Install the payment terminal in such a way that the cardholder can shield it with his or her hand
or body when entering the PIN code. To this end, comply with the following dimensions when
installing the terminal horizontally:
o Place the terminal at a height between 80 cm and 120 cm. You may only deviate from
this if a special arrangement guarantees complete protection when entering the PIN
code.
Entering the PIN code must be invisible when watching from a rise, via mirrors, cameras, or in
any other way.
During the transaction, the keyboard of the terminal must be arranged such that the cardholder
has enough privacy when entering the PIN code. This would make it (reasonably) impossible for
third parties to see the PIN code.
The payment terminal is equipped with a privacy shield. The cardholder can use this shield to
cover the keyboard when entering the PIN code. Should your payment terminal not be equipped
with a privacy shield, please contact the CCV Service Centre.
Use of the card reader
Make sure that the payment card is always visible to the cardholder. To this end, let the cardholder insert
the card into the chip card reader or swipe it through the magnetic card reader. Is this impossible for
practical reasons? Then show the cardholder how you insert the card into the chip card reader or swipe it
through the magnetic card reader.
2.2.3
Environmental factors
Environmental factors may affect the operation of the equipment. Take this into account when installing
the equipment. Your payment terminal can operate under the following environmental factors:
•
The ambient temperature is between 0 °C and 40 °C
• The relative humidity is between 5% and 90%
Avoid:
•
•
•
•
•
•
CID110A/08062013
Shocks and vibrations
Direct sunlight or objects that produce heat
Excessive heat or dust
Oil and dirt
Water or condensation
Placing the equipment near objects that produce excessive power fluctuations and/or
electromagnetic fields
7 / 56
2.3
Connecting the equipment
If the payment terminal was delivered to you as a plug & play package, you must connect it yourself.
Connect the equipment as described in the example table below.
Should the equipment be disconnected temporarily to be placed at a different location? Then also
connect the equipment as described in the table below.
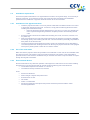
Connecting the VX 520
1
Push the tab back and
slide the cover back to
remove it.
2
Use the power cable to
connect the payment
terminal to an outlet.
CID110A/08062013
Connecting to an
outlet (230 volts)
8 / 56
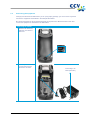
Connecting the VX 520
3
4
2.4
Use the Ethernet cable to
connect the payment
terminal to a
communication module
(Ethernet modem or
Ethernet router).
Connecting to an
Ethernet
modem/Ethernet router
Replace the cover.
Setting up communication
Your payment terminal must be able to communicate over the Internet. This is necessary to forward
transactions to an acquirer for further processing, but also to communicate with the CCV Terminal
Management System. For instance, new software can be installed on your terminal by communicating
with the Terminal Management System.
CID110A/08062013
9 / 56
2.4.1
Getting an Internet subscription
Your payment terminal is connected to a data communication link (for example, a cable or ADSL) via the
Ethernet connection. For a data communication link, you can take out a subscription from an Internet
provider. You can choose between a Dutch Payments Association-certified data communication link (Pin
over IP), or a non-certified data communication link (public Internet).
A certified data communication link offers the best guarantee of a high availability and good service.
Therefore, we recommend you opt for a certified data communication link. A current list of certified
providers of certified data communication links can be found on the website of the Dutch Payments
Association (www.betaalvereniging.nl).
Please note: would you like to have your payment terminal communicate via a non-certified data
communication link (public Internet)? Then please contact the CCV Service Centre to have the
communication set up.
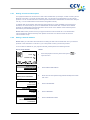
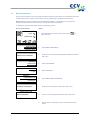
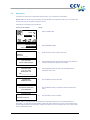
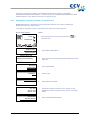
2.4.2
Setting a static IP address
Please note: you will receive the information for setting the data communication link from your Internet
provider! Is this information not known to you? Then please contact your Internet provider.
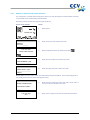
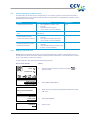
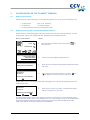
To set a static IP address for your payment terminal, please perform the following actions:
Screen of the VX 520
SALE
01.06.12
Action
1
Press the purple function key below the symbol
open the menu.
to
OTHER TRX
MAIN MENU
DISPLAY INFO
MERCHANT MENU
SERVICE MENU
2
Select MERCHANT MENU.
3
Enter the merchant password (by default 99999) and confirm
with <OK>.
4
Select CONFIGURE.
5
Select TERMINAL.
6
Select COMMUNICATION.
PROTECTED ITEM
MERCHANT PASSWORD:
_____
MERCHANT MENU
REPORTS
FUNCTIONS
CONFIGURE
CONFIGURE
TERMINAL
C-TAP
TERMINAL
COMMUNICATION
MERCHANT PASSWORD
E-JOURNAL
CID110A/08062013
10 / 56
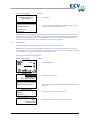
Screen of the VX 520
COMMUNICATION
SELECT MODEM
TCP/IP
TCP/IP
RESET ALL (DHCP)
STATIC IP ADDRESS
IP ADDRESS DNS1
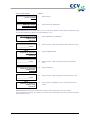
Action
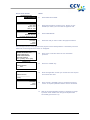
7
Select TCP/IP.
8
Select STATIC IP ADDRESS.
Please note: during the following actions, you can enter the IP address, subnet mask and gateway using
the numeric keypad and <Alpha> key (see subsection 3.3.1).
TCP/IP
TERMINAL IP ADDRESS
SUBNET MASK
GATEWAY
TERMINAL IP ADDRESS
9
Select TERMINAL IP ADDRESS.
10
Press <CORR>, enter the IP address and confirm with <OK>.
11
Select SUBNET MASK.
12
Press <CORR>, enter the subnet mask and confirm with
<OK>.
13
Select GATEWAY.
14
Press <CORR>, enter the gateway and confirm with <OK>.
15
Press <STOP> repeatedly until you are back at the home
screen.
________________0.0.0.0
TCP/IP
TERMINAL IP ADDRESS
SUBNET MASK
GATEWAY
SUBNET MASK
________________0.0.0.0
TCP/IP
TERMINAL IP ADDRESS
SUBNET MASK
GATEWAY
GATEWAY
________________0.0.0.0
TCP/IP
TERMINAL IP ADDRESS
SUBNET MASK
GATEWAY
Please note: after setting the communication, always check whether you have set the data
communication link correctly! To this end, you can test the communication links of the payment terminals
(see subsection 2.4.4).
CID110A/08062013
11 / 56
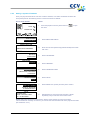
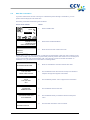
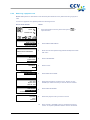
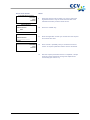
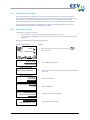
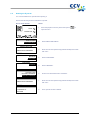
2.4.3
Setting a dynamic IP address
Does your payment terminal not work with a static IP address, but a static IP address has been set?
Then please perform the following actions to remove the static IP address:
Screen of the VX 520
SALE
01.06.12
Action
1
Press the purple function key below the icon
the menu.
to open
OTHER TRX
MAIN MENU
DISPLAY INFO
MERCHANT MENU
SERVICE MENU
2
Select MERCHANT MENU.
3
Enter the merchant password (by default 99999) and confirm
with <OK>.
4
Select CONFIGURE.
5
Select TERMINAL.
6
Select COMMUNICATION.
7
Select TCP/IP.
8
Select RESET ALL (DHCP) and then press <STOP>.
9
Wait between 10 and 30 seconds and press <STOP>
repeatedly until you are back at the home screen.
PROTECTED ITEM
MERCHANT PASSWORD:
_____
MERCHANT MENU
REPORTS
FUNCTIONS
CONFIGURE
CONFIGURE
TERMINAL
C-TAP
TERMINAL
COMMUNICATION
MERCHANT PASSWORD
E-JOURNAL
COMMUNICATION
SELECT MODEM
TCP/IP
TCP/IP
RESET ALL (DHCP)
STATIC IP ADDRESS
IP ADDRESS DNS1
TCP/IP
PLEASE WAIT
NOTE: THIS MAY TAKE
10 – 30 SECONDS
Please note: after setting the communication, always check whether you have set the data
communication link correctly! To this end, you can test the communication links of the payment terminals
(see subsection 2.4.4).
CID110A/08062013
12 / 56
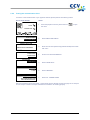
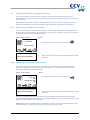
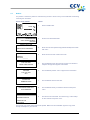
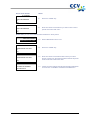
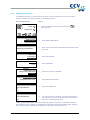
2.4.4
Testing the communication links
To test the communication links of your payment terminal, please perform the following actions:
Screen of the VX 520
SALE
01.06.12
Action
1
Press the purple function key below the icon
the menu.
to open
OTHER TRX
MAIN MENU
DISPLAY INFO
MERCHANT MENU
SERVICE MENU
2
Select MERCHANT MENU.
3
Enter the merchant password (by default 99999) and confirm
with <OK>.
4
Scroll to and select DIAGNOSIS.
5
Select COMM TEST.
6
Select TERMINAL.
7
Select ALL CONNECTIONS
PROTECTED ITEM
MERCHANT PASSWORD:
_____
MERCHANT MENU
FUNCTIONS
CONFIGURE
DIAGNOSIS
DIAGNOSIS
COMM TEST
COMM TEST
TERMINAL
C-TAP
TERMINAL
ALL CONNECTIONS
TMS CONFIGURATION
TMS CONFIG BACKUP
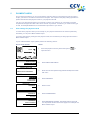
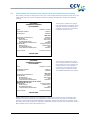
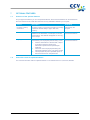
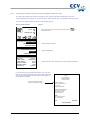
After all connections have been tested, a report will be printed. Please see the next page for an example
of such a report. Check in the report whether all connections are working properly.
CID110A/08062013
13 / 56
CCV Holland B.V.
Westervoortsedijk 55
6827AT Arnhem
COMM TEST
ALL CONNECTIONS
DATE:
01/06/2012 10:09:15
TMS TERM-ID:
IP CONFIGURATION:
TERMINAL IP ADDRESS:
SUBNET MASK:
GATEWAY:
IP ADDRESS DNS1:
IP ADDRESS DNS2:
CLS01
DYNAMIC
192.1685.214
255.255.255.0
192.168.5.1
192.168.5.1
0.0.0.0
TMS Terminal ID: Your payment
terminal is registered on the CCV
Terminal Management System under
TERMINAL
TMS INSTALLATION
194.104.96.44:15000
CONNECTION: OK - TCP/IP SESSION: OK
TMS CONFIGURATION
194.104.96.44:15001
CONNECTION: OK - TCP/IP SESSION: OK
ZONTALK SERVER
194.104.96.44:15002
CONNECTION: OK - TCP/IP SESSION: OK
C-TAP
CCV host
194.104.96.43:10000
CONNECTION: OK - TCP/IP SESSION: OK
An overview of all tested connections.
•
Result OK: the connection is working
properly
•
Result NOK: the connection is not working
Equens host
82.195.48.7:50496
CONNECTION: OK - TCP/IP SESSION: OK
CTAP Scheme 52800001
82.195.48.7:50496
CONNECTION: OK - TCP/IP SESSION: OK
CTAP Scheme 52800002
194.104.96.43:10000
CONNECTION: OK - TCP/IP SESSION: OK
REPORT END
Section 8.3 describes which actions you can perform yourself in case the payment terminal has
problems communicating.
CID110A/08062013
14 / 56
3
WORKING WITH THE PAYMENT TERMINAL
3.1
Overview of the payment terminal
1
2
3
4
6
5
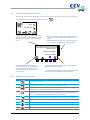
Components of the VX 520 payment terminal
1
Printer cover
Underneath this cover is the thermal printer that prints the receipts and
reports.
2
Printer knob
Pull the knob back to unlock the printer cover.
3
Screen
The messages appear on the screen while performing operations with the
payment terminal.
4
Privacy shield
The protective shield around the keyboard. Using this protective shield and
his or her hand, the cardholder can shield the keys of the terminal while
entering the PIN code.
5
Chip card reader
The cardholder can insert a payment card with EMV chip into the chip card
reader when performing the transaction (see section 3.6).
6
Magnetic card
reader
The cardholder can insert a payment card with magnetic strip into the
magnetic card reader when performing the transaction (see section 3.6).
CID110A/08062013
15 / 56
3.2
Operating the payment terminal
1
2
3
4
5
6
7
8
9
Keys of the VX 520 payment terminal
1
Grey function keys
Select menu options that appear on the screen.
2
Purple function keys
The middle function key serves as <ALPHA> key (see 3).
Above the other purple function keys, function symbols can be
displayed (see section 3.3.1). Press the purple function key below
a symbol to perform the indicated function.
3
<ALPHA> key
Press the purple <ALPHA> key to convert entered digits to letters
and punctuation (see subsection 3.2.1).
4
Numeric keys
Press the numeric keys to enter numbers. For example, to enter a
transaction amount.
The cardholder can use the numeric keys to enter a PIN code.
5
<*> key
Punctuation marks that you can enter by pressing the <ALPHA>
key have been programmed under this key (see subsection 3.2.1).
6
<#> key
Punctuation marks that you can enter by pressing the <ALPHA>
key have been programmed under this key (see subsection 3.2.1).
7
<STOP> key
Abort an action (for example, a transaction)
Return to a previous menu. By pressing <STOP> repeatedly, the
terminal returns to the home screen.
8
<CORR> key
Correct entered numbers, letters and/or punctuation marks.
Correct entered numbers, letters and/or punctuation marks.
9
<OK> key
Confirm the entered information or an action.
CID110A/08062013
16 / 56
A number of keys of the payment terminal have been provided with symbols in relief for the blind and
visually impaired.
3.2.1
Key
Symbol in relief
<5>
A full stop (.)
<STOP> key
A cross (X)
<CORR> key
A vertical bar (|)
<OK> key
A circle (O)
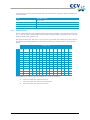
Entering letters
On the numeric keypad of your payment terminal you will only see digits. Under the numeric keys and
the <*> and <#> keys, however, letters and punctuation marks have been programmed. You can enter
these by pressing the <ALPHA> key.
First press a numeric key, then the <*> key or the <#> key and then the <ALPHA> key. Which letter or
punctuation mark appears depends on the number of times you press the <ALPHA> key (see table
below).
<ALPHA> key
1
1x
2x
3x
4x
5x
6x
Q
Z
.
q
z
1
7x
2
A
B
C
a
b
c
2
3
D
E
F
d
e
f
3
4
G
H
I
g
h
i
4
8x
9x
10x
11x
12x
13x
14x
5
J
K
L
j
k
l
5
6
M
N
O
m
n
o
6
7
P
R
S
p
r
s
7
8
T
U
V
t
u
v
8
9
W
X
Y
w
x
y
9
0
-
space
+
0
*
,
‘
“
(
)
<
>
[
]
_
{
}
~
*
#
!
?
:
;
@
=
&
/
\
%
$
|
^
#
For example, if you want to enter the word PIN, you can do so as follows:
P
Press 7 and then the <ALPHA> key once
I
Press 4 and then the <ALPHA> key three times
N
Press 6 and then the <ALPHA> key twice
CID110A/08062013
17 / 56
3.3
The menu of the payment terminal
The VX 520 payment terminal features a menu that you can use to perform actions. To open the main
menu, press the purple function key below the symbol
.
SALE
01.06.12
OTHER TRX
The screen displays up to eight lines. The
upper line (above the line) always indicates
the name of the menu you are currently
using.
Besides the lines are grey function keys (F1, F2, F3
en F4). You can use these keys to select a menu
option.
Please note: function key <F1> does not have an
active function and will not be used in practice!
MAIN MENU
DISPLAY INFO
MERCHANT MENU
SERVICE MENU
It is possible that a menu has more
menu options than can be displayed
on the screen. In this case, scroll
arrows will appear on the bottom line
of the screen.
3.3.1
Symbols to display menu options can also appear on
the bottom line of the screen.
If a menu option is displayed, you can press the purple
function key below the menu option to select it.
Symbols for menu options
Symbol
Function
Open the main menu.
This symbol indicates that the day has not yet been opened. Press the function
key below this symbol to open the day (see subsection 3.5.1).
This symbol indicates that the day has been opened. Press the function key
below this symbol to close the day (see subsection 3.5.2).
Print a copy of the receipt of the last transaction performed. This function is
available for five minutes after performing the transaction. After this time, the
copy of the receipt will be deleted from the payment terminal.
The menu options are not displayed at the same height as a function key. This
arrow indicates the function key you should press to select the menu option.
Scroll to the first line of a menu.
Scroll up one line.
Scroll down one line.
Scroll to the last line of a menu.
CID110A/08062013
18 / 56
3.4
Merchant password
Access to the merchant menu of the payment terminal is password-protected. You should also enter this
merchant password to perform some actions, such as performing the activation of the terminal.
Please note: the merchant password is set by default to 99999. To avoid abuse of your payment
terminal by third parties, we recommend you change the merchant password!
To change the merchant password, perform the following actions:
Screen of the VX 520
SALE
01.06.12
Action
1
Press the purple function key below the symbol
open the menu.
to
OTHER TRX
MAIN MENU
DISPLAY INFO
MERCHANT MENU
SERVICE MENU
2
Select MERCHANT MENU.
3
Enter the merchant password (by default 99999) and confirm
with <OK>.
4
Select CONFIGURE.
5
Select TERMINAL.
6
Select MERCHANT PASSWORD
7
Enter the current password and confirm with <OK>.
8
Enter a new five-digit password and confirm with <OK>.
9
Press <STOP> repeatedly until you are back at the home
screen.
PROTECTED ITEM
MERCHANT PASSWORD:
_____
MERCHANT MENU
REPORTS
FUNCTIONS
CONFIGURE
CONFIGURE
TERMINAL
C-TAP
TERMINAL
COMMUNICATION
MERCHANT PASSWORD
E-JOURNAL
PROTECTED ITEM
CURRENT PASSWORD:
_____
PROTECTED ITEM
NEW PASSWORD:
_____
CID110A/08062013
19 / 56
3.5
Start-up and shutdown of the payment terminal
Your payment terminal must always be connected to the power and should therefore never be
disconnected from the power outlet. The payment terminal will automatically be switched on and cannot
be switched off.
Please note: at the start of the day you should perform an activation of the terminal before you can
perform any transactions! At the end of the day you should perform a deactivation of the terminal.
3.5.1
Performing an activation of the terminal
At the start of the day you should perform activation of the terminal. This will open a new period for the
financial reports. In these reports, the transactions you perform are recorded. To perform an activation of
the terminal, please perform the following actions:
Screen of the VX 520
TERMINAL
01.06.12
Action
1
Press the purple function key below the symbol
.
DEACTIVATED
PROTECTED ITEM
MERCHANT PASSWORD:
_____
3.5.2
2
Enter the merchant password (by default 99999) and confirm
with <OK>.
Performing a deactivation of the terminal
At the end of the day you should perform a deactivation of the terminal. The period for the financial
transactions will then be closed, and the reports are printed out. To perform a deactivation of the
terminal, please perform the following actions:
Screen of the VX 520
SALE
01.06.12
Action
1
Press the purple function key below the symbol
.
OTHER TRX
PROTECTED ITEM
MERCHANT PASSWORD:
_____
2
Enter the merchant password (by default 99999) and confirm
with <OK>.
The day is concluded and the payment terminal will automatically print the financial reports. Which
reports are printed depend on the settings of your payment terminal. You can change the settings of your
payment terminal yourself (see section 6.4).
Please note: there is a possibility that the printing paper roll runs out of paper while printing the reports.
Should this happen, replace the printing paper roll and print the reports again.
CID110A/08062013
20 / 56
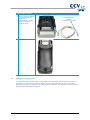
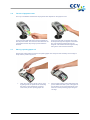
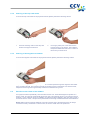
3.6
The use of payment cards
The way a cardholder should insert the payment card depends on the payment card.
A payment card with EMV chip must be inserted into
the chip card reader. The card must be inserted in the
card reader with the chip facing up and toward the
terminal.
3.7
A payment card with a magnetic strip must
be swiped through the magnetic card reader.
The card should be swiped through the
magnetic card reader with the magnetic strip
facing down and toward the terminal.
Placing a printing paper roll
Perform the actions below to place a new printing paper roll. Always do this carefully! The cut edge is
sharp and the printer may be hot.
1.
Open the cover of the printer. This is done
by pulling back the printer knob and sliding
the printer cover backwards. If present,
remove the previous printing paper roll.
CID110A/08062013
2.
Place a printing paper roll as indicated in the
picture. Make sure that a part of the paper of
the roll sticks out and close the printer cover.
Now tear off the protruding paper along the
cut edge.
21 / 56
4
PERFORMING TRANSACTIONS
4.1
Overview of the different types of transactions
The table below shows the types of transactions you can perform. For each type of transaction it is
described in which situation this should be performed.
Overview of the types of transactions
4.1.1
Sale
A cardholder pays with a payment card.
Cancellation.
Cancels a previously performed transaction.
Cash advance
A cardholder withdraws money at a point of sale.
Reservation
Reserve a certain amount for a determined period of time.
Sale after reservation
Perform a sale based on a previously performed reservation.
Refund
Refund money to the cardholder if an item is returned.
Sale referral
This is a transaction for which you enter an authorisation code that you
obtained through a telephone reservation.
Cash advance after referral
A cardholder withdraws money at a point of sale. During this
transaction, a reservation that you obtained through a telephone
authorisation code must be entered.
Card check
Check with the card issuer whether the payment card is still valid.
Extra reservation
Increase the previously reserved amount.
Which transactions can I perform with a payment card?
Your payment terminal supports multiple types of transactions. The ones you can perform depend on:
•
the payment card of the cardholder;
•
the acquirer.
Please note: contact your acquirer if you are unable to perform the transaction you want with a certain
type of payment card!
To check which transactions an acquirer allows for a payment card, you can print an acquirer parameter
report. The actions to be performed to this end are described on the next page.
CID110A/08062013
22 / 56
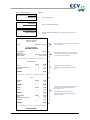
Perform the following actions to print an acquirer parameter report:
Screen of the VX 520
SALE
01.06.12
Action
1
Press the purple function key below the symbol
open the menu.
to
OTHER TRX
MAIN MENU
DISPLAY INFO
MERCHANT MENU
SERVICE MENU
2
Select MERCHANT MENU.
3
Enter the merchant password (by default 99999) and confirm
with <OK>.
MERCHANT MENU
REPORTS
FUNCTIONS
CONFIGURE
4
Select REPORTS.
REPORTS
TERMINAL
C-TAP
5
Select C-TAP.
6
Select PARAMETERS.
PARAMETERS
TERMINAL
PER ACQUIRER
BRAND RELATIONS
7
Select PER ACQUIRER.
SELECT ACQUIRER
CCV host
Equens host
AWL host
8
Select the desired transaction processor. The acquirer
parameter will now be printed.
PROTECTED ITEM
MERCHANT PASSWORD:
_____
C-TAP
FINANCIAL
PARAMETERS
STATUS
Please see the next page for an example of an acquirer parameter report.
CID110A/08062013
23 / 56
** C-TAP ACQUIRER **
PARAMETER REPORT
** CCV host **
TMS TERM-ID:
DATE:
•
PKB5
01/06/2012 10:09:45
ACQUIRER TERM-ID:
ACQUIRER ID:
ACQUIRER PARAM ID:
C-TAP IP ADDRESS:
C-TAP TCP PORT:
CONNECTION TIMEOUT:
•
The TMS Terminal ID of the payment
terminal.
The date and time on which the
report is printed
CT370054
52600007
52600007
194.104.96.42
10000
45 SEC.
BRAND NAME:
VISA
CARD BRAND PARAM ID:
00000007
MERCHANT ID:
455600707815
MCC:
3314
VOICE REFERRAL NO:
0000021206500600
ALLOWED SERVICES:
B480
CANCELLATION
REFUND
SALE AFTER RESERV.
RESERVATION
SALE
SALE REFERRAL
CANCEL LAST TRX
MAX % TIP:
20
MAX AMOUNT TIP:
10000
ACCOUNT NUMBERS
ACCOUNT LABEL:
ACC. No:
-
•
.
•
CARD NAME: name of the payment
card.
MERCHANT ID: the registration
number for the payment card.
.
•
•
•
Under ALLOWED SERVICES, you
can see which types of transactions
the acquirer allows for the payment
card.
MAX % EXTRA: the maximum
percentage of the transaction amount
a cardholder may tip.
MAX AMOUNT EXTRA: the
maximum amount a cardholder may
tip.
REPORT END
The example above shows which types of transactions the acquirer allows you to perform with the VISA
payment card (if the payment card of the cardholder supports this). With this payment card:
•
sales, cancellations, refunds, reservations, sales after reservations, and sales after referrals
may be performed. The last transaction may also be cancelled;
•
the cardholder is allowed to tip during a transaction. The tip amount in this example may not
exceed 20% of the transaction amount and not exceed € 10,000.
4.2
Entering a tip during a transaction
A tip can be added to a transaction amount. This is only possible if allowed by the acquirer. During the
performance of a transaction, the following message will appear on the display of the payment terminal.
ADD EXTRA
EXTRA?
CID110A/08062013
10,00 EUR
+OK
0,00 EUR
24 / 56
4.3
Sale
You perform a sale if a cardholder pays you with a payment card.
Performing a sale goes as follows:
Screen of the VX 520
Action
1
Select SALE.
2
Enter the amount and confirm with <OK>. Now hand the
terminal to the cardholder.
TOT 0,01 EUR
YOUR CARD PLEASE
3
The cardholder inserts the card into the chip card reader or
swipes it through the magnetic card reader.
SALE
TOT 0,01 EUR
ENTER PIN +OK
PIN _______________
4
The cardholder enters the PIN code and approves the
transaction with <OK>.
APPROVED
REMOVE CARD
5
The cardholder removes the card.
PLEASE RETURN UNIT
TO ATTENDANT
6
The cardholder hands you back the terminal. Now press
<OK>.
7
The sale was successful.
SALE
OTHER TRX
01.06.12
SALE
AMOUNT
EUR 0,00_______
SALE
TRANSACTION OK
CID110A/08062013
25 / 56
4.3.1
Perform a manual credit card transaction
You can perform a manual credit card payment. Since you enter the payment card information manually,
no card needs to be inserted during this transaction.
Performing a manual credit card payment goes as follows:
Screen of the VX 520
SALE
01.06.12
Action
1
Select SALE.
2
Enter the amount and confirm with <OK>.
3
Press the purple function key below the symbol
4
Enter the card number and confirm with <OK>.
5
Enter the expiry date and confirm with <OK>.
OTHER TRX
SALE
AMOUNT
EUR 0,00_______
TOT 0,01 EUR
YOUR CARD PLEASE
.
SALE
CARD NUMBER + [OK]
__________________
SALE
EXPIRY DATE + [OK]
__________________
(MMYY)
Please note: you may need a CVC2 code while performing the transaction. This is a three-digit code. It
can usually be found on the back of the payment card.
SALE
6
Enter the CVC2 code and confirm with <OK>. Press <OK> if
no CVC2 code is indicated on the card.
7
Press <OK> to approve the manual credit card transaction.
BRAND: NAME BRAND
VALIDATION CODE 2:
___
TOT 0,01 EUR
OK?
CID110A/08062013
26 / 56
Screen of the VX 520
PLEASE RETURN UNIT
TO ATTENDANT
Action
8
Press <OK>.
9
The manual credit card transaction was successful. Tear off
the copy of the receipt and press <OK>.
SALE
TRANSACTION OK
PRESS OK TO
CONTINUE
Please note: are you performing a transaction with a credit card without a chip (the cardholder does not
need to enter a PIN code)? In that case, two copies of the receipt are printed automatically immediately
after the transaction. One copy is for the cardholder and one copy is for your records. Make sure the
cardholder signs the copy of the receipt intended for your records for approval.
4.4
Cancellation
To cancel a previously performed transaction, you can perform a cancellation.
Please note: to cancel the previously performed transaction you will need an authorisation code. This
code is printed on the copy of the receipt of the transaction you wish to cancel. Please see the next page
for an example of a copy of the receipt with an authorisation code.
Performing a cancellation goes as follows:
Screen of the VX 520
SALE
Action
1
Select OTHER TRX.
2
Select CANCELLATION
3
Enter the merchant password (by default 99999) and confirm
with <OK>.
4
Enter the amount and confirm with <OK>.
5
Select the type of transaction you wish to cancel.
OTHER TRX
01.06.12
TRANSACTION
CANCELLATION
RESERVATION
SALE AFTER RESERV.
PROTECTED ITEM
MERCHANT PASSWORD:
_____
CANCELLATION
AMOUNT
EUR 0,00_______
CHOOSE CANCELL. TYPE
SALE
CASH ADVANCE
RESERVATION
CID110A/08062013
27 / 56
CANCELLATION
6
Enter an authorisation code and confirm with <OK>.
TOT 0,01 EUR
YOUR CARD PLEASE
7
The cardholder inserts the card into the chip card reader or
swipes it through the magnetic card reader.
CANCELLATION
TOT 0,01 EUR
OK?
8
The cardholder presses <OK> to approve the transaction.
APPROVED
REMOVE CARD
9
The cardholder removes the card.
PLEASE RETURN UNIT
TO ATTENDANT
10
The cardholder hands you back the terminal. Now press
<OK>.
11
The cancellation was successful.
AUTHORISATION CODE
________
CANCELLATION
TRANSACTION OK
Journal
CCV Holland B.V.
Westervoortsedijk 55
6827 AT Arnhem
Terminal: CT380071
Merchant: 423600707814
Period: 2166
Transaction: 00000002
MASTERCARD (A00002301)
Card: xxxxxxxxxxxx6015
Card Sequence Nr.: 00
Valid thru: 30/04/14
RESERVATION
Date: 01/06/2012 10:09
Auth. code: 425544
Total:
Authorisation code
EUR 0,01
RESERVATION
AUTHORISED
CID110A/08062013
28 / 56
4.5
Reservation
To reserve an amount for a determined period of time, you can perform a reservation.
Please note: The amount you can reserve and the duration of the period for which you can reserve the
amount may vary per acquirer and payment card!
Performing a reservation goes as follows:
Screen of the VX 520
Action
1
Select OTHER TRX.
2
Select RESERVATION.
3
Enter the amount and confirm with <OK>.
TOT 0,01 EUR
YOUR CARD PLEASE
4
The cardholder inserts the card into the chip card reader or
swipes it through the magnetic card reader.
RESERVATION
TOT 0,01 EUR
ENTER PIN +OK
PIN _______________
5
The cardholder enters the PIN code and approves the
transaction with <OK>.
APPROVED
REMOVE CARD
6
The cardholder removes the card.
PLEASE RETURN UNIT
TO ATTENDANT
7
The cardholder hands you back the terminal. Now press
<OK>.
8
The reservation was successful.
SALE
OTHER TRX
01.06.12
TRANSACTION
CANCELLATION
RESERVATION
SALE AFTER RESERV.
RESERVATION
AMOUNT
EUR 0,00_______
RESERVATION
TRANSACTION OK
Please note: to actually perform the payment at a later time based on the previously performed
reservation, you will need an authorisation code! This code is printed on the copy of the receipt that is
printed after performing the reservation. Please see section 4.4 for an example of a copy of the receipt
with an authorisation code.
CID110A/08062013
29 / 56
4.6
Sale after reservation
If you have reserved an amount of money for a determined period through a reservation, you can
perform the actual payment at a later time.
Performing a sale after reservation goes as follows:
Screen of the VX 520
SALE
Action
1
Select OTHER TRX.
2
Select SALE AFTER RESERV..
3
Enter the amount and confirm with <OK>.
OTHER TRX
01.06.12
TRANSACTION
CANCELLATION
RESERVATION
SALE AFTER RESERV.
SALE AFTER RESERV.
AMOUNT
EUR 0,00_______
Please note: to perform this transaction you will need an authorisation code! This code is printed on the
copy of the receipt of the reservation you performed previously. Please see section 4.4 for an example of
a copy of the receipt with an authorisation code. The code may consist of numbers and letters. In
subsection 3.2.1 you will find more information on entering letters.
SALE AFTER RESERV.
4
Enter an authorisation code and confirm with <OK>.
TOT 0,01 EUR
YOUR CARD PLEASE
5
The cardholder inserts the card into the chip card reader or
swipes it through the magnetic card reader.
SALE
TOT 0,01 EUR
OK?
6
The cardholder presses <OK> to approve the transaction.
APPROVED
REMOVE CARD
7
The cardholder removes the card.
PLEASE RETURN UNIT
TO ATTENDANT
8
The cardholder hands you back the terminal. Now press
<OK>.
9
The sale after reservation was successful.
AUTHORISATION CODE
________
SALE AFTER RESERV.
TRANSACTION OK
CID110A/08062013
30 / 56
4.7
Refund
You perform a refund if a product is returned and you wish to return money to the cardholder. Performing
a refund goes as follows:
Screen of the VX 520
Action
1
Select OTHER TRX.
2
Scroll to and select REFUND.
3
Enter the merchant password (by default 99999) and confirm
with <OK>.
4
Enter the amount and confirm with <OK>.
TOT 0,01 EUR
YOUR CARD PLEASE
5
The cardholder inserts the card into the chip card reader or
swipes it through the magnetic card reader.
REFUND
TOT 0,01 EUR
OK?
6
The cardholder presses <OK> to approve the transaction.
APPROVED
REMOVE CARD
7
The cardholder removes the card.
PLEASE RETURN UNIT
TO ATTENDANT
8
The cardholder hands you back the terminal. Now press
<OK>.
9
The refund was successful. Tear off the copy of the receipt
for the customer and press <OK>.
SALE
OTHER TRX
01.06.12
TRANSACTION
RESERVATION
SALE AFTER RESERV.
REFUND
PROTECTED ITEM
MERCHANT PASSWORD:
_____
REFUND
AMOUNT
EUR 0,00_______
REFUND
TRANSACTION OK
PRESS OK TO
CONTINUE
The second copy of the receipt will now be printed. Make sure the cardholder signs the copy of the
receipt and keep it for your records.
CID110A/08062013
31 / 56
5
PAYMENT CARDS
On your payment terminal, you can accept various payment cards. For each payment card you wish to
accept, you need to conclude a contract with an acquirer. The acquirer is the party making it possible to
perform transactions with payment cards on your payment terminal.
It is up to you with which acquirers you conclude a contract. For instance, you can switch to another
acquirer who charges lower fees. This can be done at any moment. To this end, you need to link a type
of card, for example MasterCard, to the transaction processor of your choice.
5.1
View settings for payment cards
To check which payment cards you can accept on your payment terminal and to which acquirers they
are linked, you can print a Brand relation report.
If you have changed any settings for the payment cards, we recommend you always print and check a
Brand relation report.
To print a Brand relation report, please perform the following actions:
Screen of the VX 520
SALE
01.06.12
Action
1
Press the purple function key below the symbol
open the menu.
to
OTHER TRX
MAIN MENU
DISPLAY INFO
MERCHANT MENU
SERVICE MENU
2
Select MERCHANT MENU.
3
Enter the merchant password (by default 99999) and confirm
with <OK>.
MERCHANT MENU
REPORTS
FUNCTIONS
CONFIGURE
4
Select REPORTS.
REPORTS
TERMINAL
C-TAP
5
Select C-TAP.
6
Select PARAMETERS.
7
Select BRAND RELATIONS. The Brand relation report will
now be printed. Please see the next page for an example of a
Brand relation report.
PROTECTED ITEM
MERCHANT PASSWORD:
_____
C-TAP
FINANCIAL
PARAMETERS
STATUS
PARAMETERS
TERMINAL
PER ACQUIRER
BRAND RELATIONS
CID110A/08062013
32 / 56
** C-TAP **
RELATION REPORT
TMS TERM-ID:
DATE:
1234567890
01/06/2012 10:09:20
APPLICATION VERSION:
09.17
TMS Terminal ID: Your payment
terminal is registered on the CCV
Terminal Management System under
Date and time on which you printed
the report.
CARD BRAND TABLE
Transaction processor CCV.
** CCV **
ACQUIRER TERM-ID:
BRAND
MERCHANT ID:
CT003298
REL.
-----------------------------------------------------------------------------Maestro
20633731
YES
VPAY
20466832
YES
VISA
1234
NO
Mastercard
1234
NO
Transaction processor Equens.
** Equens host **
ACQUIRER TERM-ID:
BRAND
MERCHANT ID:
The different types of payment cards.
Per card, the registration number (also
called Merchant ID) is indicated. You
can also see whether
the card is linked to the transaction
processor.
CT042298
REL.
-----------------------------------------------------------------------------VISA
4567
YES
Mastercard
4567
YES
** AWL NL **
The different types of payment cards.
Per card, the registration number (also
called Merchant ID) is indicated. You
can also see whether
the card is linked to the transaction
processor.
Transaction processor Atos
Worldline
ACQUIRER TERM-ID:
BRAND
MERCHANT ID:
REL.
-----------------------------------------------------------------------------Maestro
1234
NO
VPAY
1234
NO
The different types of payment cards.
Per card, the registration number (also
called Merchant ID) is indicated. You
can also see whether
the card is linked to the transaction
processor.
REPORT END
CID110A/08062013
33 / 56
5.2
Change settings for payment cards
The table below shows the various changes that you can make for payment cards and the information
you will need thereto. It also mentions the subsection which provides a comprehensive instruction for the
implementation of the change.
Change
Required information
Accepting a payment card
•
The registration number of the
acquirer
The transaction processor
(CCV, Equens or Atos Worldline)
5.2.1
No information is required to implement
this change.
5.2.2
•
Stop accepting a payment
card
5.2.1
Subsection
Accepting a payment card via
another acquirer and the
current transaction processor
•
Accepting a payment card via
another acquirer and another
transaction processor
•
•
•
The registration number of the
acquirer
The current transaction processor
(CCV, Equens or Atos Worldline)
5.2.3
The registration number of the
acquirer
The new transaction processor (CCV,
Equens or Atos Worldline)
5.2.1
Adding a payment card
Please note: to implement this change you will need the registration number of the payment card. You
should also know which transaction processor will process the transactions. Is this information not known
to you? Then please contact your acquirer!
To add a payment card, please perform the following actions:
Screen of the VX 520
Action
1
Press the purple function key below the symbol
open the menu.
2
Select MERCHANT MENU.
3
Enter the merchant password (by default 99999) and confirm
with <OK>.
MERCHANT MENU
REPORTS
FUNCTIONS
CONFIGURE
4
Select CONFIGURE.
CONFIGURE
TERMINAL
C-TAP
5
Select C-TAP.
SALE
01.06.12
to
OTHER TRX
MAIN MENU
DISPLAY INFO
MERCHANT MENU
SERVICE MENU
PROTECTED ITEM
MERCHANT PASSWORD:
_____
CID110A/08062013
34 / 56
Screen of the VX 520
CONFIGURATION
EDIT RELATIONS
Action
6
Select EDIT RELATIONS.
SELECT ACQUIRER
CCV host
Equens host
AWL NL host
7
Select the transaction processor (CCV, Equens or Atos
Worldline) to which you want to link the payment card.
EDIT RELATIONS
ADD BRAND
DELETE BRAND
CHANGE MERCHANT ID
8
Select ADD BRAND.
ADD BRAND
UnionPay
VISA
Maestro
9
Select the card you want to add to the payment terminal.
The message at action 10 only appears if the payment card is already linked to a transaction processor.
Otherwise, the message shown at action 11 will appear.
ADD BRAND
BRAND ALREADY HAS
A RELATION WITH:
NAME PROCESSOR
DISC RELATION?
NO = [STOP] / YES = [OK]
10
Press <OK> to add the card to the new transaction
processor.
11
Press the <CORR> key.
12
Enter the registration number you received from the acquirer
and confirm with <OK>.
13
Press <STOP> repeatedly until you are back at the home
screen. An acquirer parameter session will now be started.
14
After the acquirer parameter session is completed, a receipt
is printed. Check whether the change was implemented
successfully (see section 5.3).
ADD BRAND
MERCHANT ID:
____1234
ADD BRAND
MERCHANT ID:
_________________
(1234)
ADD BRAND
UnionPay
VISA
Maestro
CID110A/08062013
35 / 56
5.2.2
Removing a payment card
Please note: perform a deactivation of the terminal (see subsection 3.5.2) before removing a payment
card!
To remove a payment card, please perform the following actions:
Screen of the VX 520
SALE
Action
1
Press the purple function key below the symbol
open the menu.
to
OTHER TRX
01.06.12
MAIN MENU
DISPLAY INFO
MERCHANT MENU
SERVICE MENU
2
Select MERCHANT MENU.
3
Enter the merchant password (by default 99999) and confirm
with <OK>.
MERCHANT MENU
REPORTS
FUNCTIONS
CONFIGURE
4
Select CONFIGURE.
CONFIGURE
TERMINAL
C-TAP
5
Select C-TAP.
6
Select EDIT RELATIONS.
SELECT ACQUIRER
CCV host
Equens host
AWL NL host
7
Select the transaction processor (CCV, Equens or Atos
Worldline) to which the card you want to remove is linked.
EDIT RELATIONS
ADD BRAND
DELETE BRAND
CHANGE MERCHANT ID
8
Select DELETE BRAND.
DELETE BRAND
UnionPay
VISA
Maestro
9
Select the payment card you want to remove.
10
Press <STOP> repeatedly until you are back at the home
screen. An acquirer parameter session will now be started.
PROTECTED ITEM
MERCHANT PASSWORD:
_____
CONFIGURATION
EDIT RELATIONS
CID110A/08062013
36 / 56
If the card is removed successfully, a receipt will be printed with the message: ‘ACQUIRER
PARAMETER SESSION SUCCESSFUL’. Does the receipt say ‘ACQUIRER PARAMETER SESSION
UNSUCCESSFUL’? Then please contact the CCV Service Centre.
5.2.3
Changing the registration number of a payment card
Please note: perform a deactivation of the terminal (see subsection 3.5.2) before changing the
registration number of a payment card!
To change the registration number of a payment card, perform the following actions:
Screen of the VX 520
SALE
01.06.12
Action
1
Press the purple function key below the symbol
open the menu.
to
OTHER TRX
MAIN MENU
DISPLAY INFO
MERCHANT MENU
SERVICE MENU
2
Select MERCHANT MENU.
3
Enter the merchant password (by default 99999) and confirm
with <OK>.
MERCHANT MENU
REPORTS
FUNCTIONS
CONFIGURE
4
Select CONFIGURE.
CONFIGURE
TERMINAL
C-TAP
5
Select C-TAP.
6
Select EDIT RELATIONS.
SELECT ACQUIRER
CCV host
Equens host
AWL NL host
7
Select the transaction processor (CCV, Equens or Atos
Worldline) to which the payment card you want to change is
linked.
EDIT RELATIONS
ADD BRAND
DELETE BRAND
CHANGE MERCHANT ID
8
Select CHANGE MERCHANT ID.
PROTECTED ITEM
MERCHANT PASSWORD:
_____
CONFIGURATION
EDIT RELATIONS
CID110A/08062013
37 / 56
Screen of the VX 520
CHANGE MERCHANT ID
UnionPay
VISA
Maestro
Action
9
Select the payment card for which you want to change the
registration number. Only the cards that are linked to the
selected transaction processor will be shown.
10
Press the <CORR> key.
11
Enter the registration number you received from the acquirer
and confirm with <OK>.
12
Press <STOP> repeatedly until you are back at the home
screen. An acquirer parameter session will now be started.
13
After the acquirer parameter session is completed, a receipt
is printed. Check whether the change was implemented
successfully (see section 5.3).
MERCHANT ID
MERCHANT ID:
____1234
MERCHANT ID
MERCHANT ID:
_________________
(1234)
CHANGE MERCHANT ID
UnionPay
VISA
Maestro
CID110A/08062013
38 / 56
5.3
Check whether the changes for the payment cards were implemented successfully
After making a change for the payment cards, one of the receipts below will be printed. Check this to see
whether the payment card was added successfully or whether the registration number was changed
correctly.
* ACQUIRER *
* PARAMETER SESSION *
** SUCCEEDED **
DATE:
01/06/2012 10:09:45
ACQUIRER TERM-ID:
ACQUIRER ID:
This receipt is printed if the change
was implemented successfully. In this
example, the VISA and MasterCard
payment cards can be processed by
transaction processor CCV.
CT360341
52800009
CCV host
ACQUIRER PARAMETER ID:
CARD BRAND:
MERCHANT ID:
ALLOWED SERVICES:
CARD BRAND PARAMETER ID:
CARD BRAND:
MERCHANT ID:
ALLOWED SERVICES:
CARD BRAND PARAMETER ID:
NEXT UPDATE:
00000003
VISA (2002)
4556313520
B480
00000004
MasterCard (2003)
455600707814
B480
00000007
01/07/2012 05:22:00
REPORT END
* ACQUIRER *
* PARAMETER SESSION *
** SUCCEEDED **
DATE:
01/06/2012 10:09:45
ACQUIRER TERM-ID:
ACQUIRER ID:
CT360341
52800009
This receipt is printed if the change
was not implemented successfully. In
this example, the VISA card was not
added correctly or the registration
number was not changed correctly.
The following message will appear:
‘ALLOWED SERVICES NOT VALID’.
CCV host
ACQUIRER PARAMETER ID:
00000003
CARD BRAND:
VISA (2002)
MERCHANT ID:
4556313529
ALLOWED SERVICES:
0000
CARD BRAND PARAMETER ID:
000000004
ALLOWED SERVICES NOT VALID, CHECK
MERCHANT ID FOR VISA
CARD BRAND:
MasterCard (2003)
MERCHANT ID:
455600707814
ALLOWED SERVICES:
B480
CARD BRAND PARAMETER ID:
000000007
NEXT UPDATE:
01/07/2012 05:22:00
REPORT END
Please note: was the changing of the registration number for the payment card or the adding of the
payment card unsuccessful? The (new) registration number may not yet be known to the transaction
processor. Check with the acquirer whether the registration number has already been activated. Is this
the case? Then check whether you entered the registration number correctly. You can print and check a
Brand relation report for this (see subsection 5.1).
CID110A/08062013
39 / 56
6
FINANCIAL REPORTS
6.1
The different types of reports
Your payment terminal keeps record of the number of transactions performed during a certain period (a
day or a shift). This period starts after you perform the activation of the terminal. If you perform a
deactivation of the terminal, the period finishes. The following reports will be printed automatically.
Financial reports
6.2
E-journal
If the E-journal is printed, a copy of the receipt of each transaction
performed during a period will be printed.
Please note: this report is only printed if the E-journal feature on the
payment terminal is enabled (see subsection 6.4.1).
Total report
A total report is a report of the daily totals of all transactions you performed
during a period, per type of transaction and type of card.
Automatically printing reports at a deactivation of the terminal
If you perform a deactivation of the terminal (see subsection 3.5.2), the reports are printed automatically.
Which reports are printed depends on the settings of your payment terminal.
6.3
Interim printing of reports
Would you like to print a report before the end of a period? The following subsections describe per report
how to print them.
6.3.1
Total report
To print a total report before the end of the period, please perform the following actions:
Screen of the VX 520
SALE
01.06.12
Action
1
Press the purple function key below the symbol
open the menu.
to
OTHER TRX
MAIN MENU
DISPLAY INFO
MERCHANT MENU
SERVICE MENU
2
Select MERCHANT MENU.
3
Enter the merchant password (by default 99999) and confirm
with <OK>.
4
Select REPORTS.
5
Select TERMINAL.
PROTECTED ITEM
MERCHANT PASSWORD:
_____
MERCHANT MENU
REPORTS
FUNCTIONS
CONFIGURE
REPORTS
TERMINAL
C-TAP
CID110A/08062013
40 / 56
Screen of the VX 520
Action
TERMINAL
FINANCIAL
PARAMETERS
6
Select FINANCIAL.
FINANCIAL
E-JOURNAL
CURRENT PERIOD
7
Select CURRENT PERIOD.
CURRENT PERIOD
GENERAL REPORT
PER ACQUIRER
8
Select GENERAL REPORT. The total report will now be
printed.
CCV Holland B.V.
Westervoortsedijk 55
6827 AT Arnhem
DATE:
01/06/2012 10:09:20
The date and time on which you printed
the total report.
TOTAL REPORT
INTERIM TOTALS
TMS TERM-ID:
PERIOD ID:
PERIOD START:
PERIOD END:
CSL003
2
01/06/2012 10:01:16
STILL OPEN
The TMS Terminal ID of the payment
terminal and information on the period
to which the report relates.
=====================================
EFT TOTALS
#TRX
EUR
5
1
1
0,05
-0,01
-0,01
--------
--------
SALE:
CANCELLATION SALE:
REFUND:
TOTAL:
Overview of all transactions
performed, specified per transaction
type.
0,03
=====================================
CCV
Maestro
#TRX
SALE:
EUR
2
0,02
--------
--------
TOTAL:
0,02
VPAY
#TRX
SALE:
EUR
1
0,01
--------
--------
TOTAL:
0,01
MasterCard
#TRX
EUR
2
1
1
0,02
-0,01
-0,01
--------
--------
SALE:
CANCELLATION SALE:
REFUND:
TOTAL:
Overview of all transactions performed
that are processed by transaction
processor CCV.
The different transaction types
performed are specified per type of
payment card.
0,00
=====================================
REPORT END
CID110A/08062013
41 / 56
6.3.2
E-journal
Please note: after printing, the E-journal will be deleted!
To print the E-journal before the end of the period, please perform the following actions:
Screen of the VX 520
SALE
01.06.12
Action
1
Press the purple function key below the symbol
open the menu.
to
OTHER TRX
MAIN MENU
DISPLAY INFO
MERCHANT MENU
SERVICE MENU
2
Select MERCHANT MENU.
3
Enter the merchant password (by default 99999) and confirm
with <OK>.
4
Select REPORTS.
REPORTS
TERMINAL
C-TAP
5
Select TERMINAL.
TERMINAL
FINANCIAL
PARAMETERS
6
Select FINANCIAL.
FINANCIAL
E-JOURNAL
CURRENT PERIOD
7
Select E-JOURNAL. The E-journal will now be printed.
Please see the next page for an example of the E-journal.
8
Press <STOP> once the E-journal has been printed.
9
The following message will appear on the screen: ‘EJOURNAL IS DELETED’.
PROTECTED ITEM
MERCHANT PASSWORD:
_____
MERCHANT MENU
REPORTS
FUNCTIONS
CONFIGURE
FINANCIAL
E-JOURNAL PRINTED
AGAIN? [STOP] / [OK]
E-JOURNAL
E-JOURNAL IS
DELETED
CID110A/08062013
42 / 56
CCV Holland B.V.
Westervoortsedijk 55
6827 AT Arnhem
E-JOURNAL
Date:
01/06/2012 10:09:20
TMS TERM-ID:
CSL001
=======================================
JOURNAL:
The date and time on which
you printed the E-journal and
the TMS Terminal ID of the
payment terminal.
Terminal: CT380071
Merchant: 423600707814
Period: 2166
Transaction: 00000002
MASTERCARD (A00002301)
Card: xxxxxxxxxxxx6015
Card Sequence Nr: 00
Valid thru: 30/04/14
The receipt of the sale
performed.
SALE
Date: 01/06/2012 10:05:15
Auth. code: 180813
Total:
EUR 0,01
YOU HAVE PAID
ACQUIRER ID
67300110
TRANSACTION TERMINAL TREATMENT RES. 0000
=======================================
JOURNAL
Terminal: CT380071
Merchant: 423600707814
Period: 2166
Transaction: 00000003
MASTERCARD (A00002301)
Card: xxxxxxxxxxxx6015
Card Sequence Nr: 00
Valid thru: 30/04/14
The receipt of the cancellation
performed.
CANCELLATION
Date: 01/06/2012 10:08:15
Auth. code: 180813
Total:
EUR 0,01
CANCELLATION
AUTHORISED
ACQUIRER ID
67300110
TRANSACTION TERMINAL TREATMENT RES. 0000
=======================================
END OF E-JOURNAL
CID110A/08062013
43 / 56
6.4
Change settings for reports
The E-journal feature is activated on your payment terminal by default. As a result, your payment
terminal will print one receipt after performing a transaction by default. The second receipt (the copy of
the receipt for your records) is temporarily stored in the memory of the payment terminal. After
performing a deactivation of the terminal, all the copies of the receipts will be printed automatically.
You can enable or disable the E-journal feature as desired. The following subsections provide an
extensive instruction on enabling or disabling the E-journal.
6.4.1
Enabling the E-journal
To enable the E-journal you should:
•
set the maximum number of transactions to be stored in the E-journal;
•
set the number of transactions after which you want to receive a warning that the E-journal is
almost full.
Perform the following actions to enable the E-journal:
Screen of the VX 520
SALE
01.06.12
Action
1
Press the purple function key below the symbol
open the menu.
to
OTHER TRX
MAIN MENU
DISPLAY INFO
MERCHANT MENU
SERVICE MENU
2
Select MERCHANT MENU.
3
Enter the merchant password (by default 99999) and confirm
with <OK>.
4
Select CONFIGURE.
5
Select TERMINAL.
6
Scroll to and select E-JOURNAL.
7
Select MAX TRX ENTRIES.
PROTECTED ITEM
MERCHANT PASSWORD:
_____
MERCHANT MENU
REPORTS
FUNCTIONS
CONFIGURE
CONFIGURE
TERMINAL
C-TAP
TERMINAL
COMMUNICATION
MERCHANT PASSWORD
E-JOURNAL
E-JOURNAL
MAX TRX ENTRIES
THRESHOLD ALM. FULL
CID110A/08062013
44 / 56
Screen of the VX 520
Action
E-JOURNAL
MAX TRX ENTRIES
0
(0)
8
Press the <CORR> key.
9
Enter the number of transactions you wish to store in the Ejournal and confirm with <OK>.
E-JOURNAL
MAX TRX ENTRIES
___
(0)
Please note: you can store maximum 500 transactions in the E-journal.
E-JOURNAL
MAX TRX ENTRIES
THRESHOLD ALM. FULL
10
Select THRESHOLD ALM. FULL.
11
Press the <CORR> key.
12
Enter the number of transactions after which you want to
receive a warning on the payment terminal that the E-journal
is almost full and confirm with <OK>.
13
If the E-journal is enabled, the following message will appear
on the screen: 'CHANGE E-JOURNAL SUCCESSFUL'.
E-JOURNAL
THRESHOLD ALM. FULL
0
(0)
E-JOURNAL
THRESHOLD ALM. FULL
___
(0)
E-JOURNAL
CHANGE E-JOURNAL
SUCCESSFUL
CID110A/08062013
45 / 56
6.4.2
Disabling the E-journal
To disable the E-journal, you should set the maximum number of transactions to be stored in the Ejournal to 0.Perform the following actions to disable the E-journal:
Screen of the VX 520
SALE
01.06.12
Action
1
Press the purple function key below the symbol
open the menu.
to
OTHER TRX
MAIN MENU
DISPLAY INFO
MERCHANT MENU
SERVICE MENU
2
Select MERCHANT MENU.
3
Enter the merchant password (by default 99999) and confirm
with <OK>.
4
Select CONFIGURE.
5
Select TERMINAL.
6
Scroll to and select E-JOURNAL.
7
Select MAX TRX ENTRIES.
8
Press the <CORR> key.
9
You can now enter the maximum number of transactions to
be stored in the E-journal. Enter the number 0 and confirm
with <OK> to disable the E-journal.
PROTECTED ITEM
MERCHANT PASSWORD:
_____
MERCHANT MENU
REPORTS
FUNCTIONS
CONFIGURE
CONFIGURE
TERMINAL
C-TAP
TERMINAL
COMMUNICATION
MERCHANT PASSWORD
E-JOURNAL
E-JOURNAL
MAX TRX ENTRIES
THRESHOLD ALM. FULL
E-JOURNAL
MAX TRX ENTRIES:
0
(0)
E-JOURNAL
MAX TRX ENTRIES:
___
(0)
If the E-journal is disabled, the following message will appear on the screen: 'CHANGE E-JOURNAL
SUCCESSFUL'. If the message: ‘E-JOURNAL NOT DELETED / DELETE OR PRINT FIRST’ appears,
you must first print the E-journal (see subsection 6.3.2) or delete it (see section 6.5).
CID110A/08062013
46 / 56
6.5
Deleting the E-journal
You can also delete the E-journal without printing it.
Perform the following actions to delete the E-journal:
Screen of the VX 520
SALE
01.06.12
Action
1
Press the purple function key below the symbol
open the menu.
to
OTHER TRX
MAIN MENU
DISPLAY INFO
MERCHANT MENU
SERVICE MENU
2
Select MERCHANT MENU.
3
Enter the merchant password (by default 99999) and confirm
with <OK>.
4
Select FUNCTIONS.
5
Select TERMINAL.
6
Scroll to and select DELETE E-JOURNAL.
7
Enter the merchant password (by default 99999) and confirm
with <OK>.
8
The E-journal has been deleted.
PROTECTED ITEM
MERCHANT PASSWORD:
_____
MERCHANT MENU
REPORTS
FUNCTIONS
CONFIGURE
FUNCTIONS
TERMINAL
C-TAP
TERMINAL
CONTACT TMS
RESTART TERMINAL
DELETE E-JOURNAL
PROTECTED ITEM
MERCHANT PASSWORD:
_____
E-JOURNAL
E-JOURNAL IS
DELETED
CID110A/08062013
47 / 56
7
OPTIONAL FEATURES
7.1
Overview of the optional features
On your payment terminal, you can use optional features. Some of these features can be activated via
the CCV Service Centre, while other features are only available if allowed by an acquirer.
Feature
Description
Availability
Dynamic Currency
Conversion
Dynamic Currency Conversion provides your foreign
customers with the ability to pay in their own
currency.
If allowed by the
acquirer
Transaction attribute
While performing a transaction you can add an
attribute to the transaction, for example, a number
or description. The attribute will appear on the copy
of the receipt.
Activation only via the
CCV Service Centre
Employees
The Employees feature provides insight into the
transactions your employees perform during a shift.
Activation only via the
CCV Service Centre
•
•
•
7.2
After the deactivation of the terminal, a report
is printed in which the totals of the
transactions performed are specified per
employee.
The name of the employee performing the
transaction appears on the copy of the receipt.
The employee can print a personal report of
the transactions he or she performed.
Instruction cards for optional features
You can find instruction cards for optional features on our website www.ccv.nl, Service, Manuals.
CID110A/08062013
48 / 56
8
MAINTENANCE AND FAILURES
8.1
Maintenance to the payment terminal
To extend the service life of the equipment, it is advisable to clean the payment terminal periodically.
This depends on the number of transactions you perform and the environment in which the terminal is
located.
For example, you may notice that the card readers have problems reading the payment cards. If this is
the case, use the special cleaning cards to clean the card readers.
A special cleaning kit is available for the cleaning of the
payment terminal. The kit contains:
•
antistatic and antibacterial cleaning pads;
•
a cleaning card for the chip card reader;
•
a cleaning card for magnetic stripe reader.
Chapter 9 describes how you can order the cleaning kit
and other supplies.
8.1.1
Cleaning of the payment terminal
To clean the payment terminal, please perform the following actions:
Wipe the casing, keyboard and screen of the terminal clean with a cleaning pad. Pay extra attention to
the keys. Like a keyboard or telephone, for example, the keys may contain a lot of bacteria after a
certain period of use.
CID110A/08062013
49 / 56
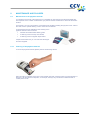
8.1.2
Cleaning of the chip card reader
To clean the chip card reader of the payment terminal, please perform the following actions:
1.
8.1.3
Insert the cleaning card into the chip card
reader of the payment terminal.
2.
Fix the grey-black part of the card with one
hand as shown in the picture. Then slide the
transparent slider back and forth a number of
times with your other hand.
Cleaning of the magnetic card reader
To clean the magnetic card reader of the payment terminal, please perform the following actions:
Swipe the cleaning card in a straight way and with a constant speed through the magnetic card reader
of the payment terminal. The cleaning card has two cleaning strips on both sides. For the best result,
swipe the card through the magnetic stripe reader twice without turning it over.
8.2
Periodic version check of the software
Your payment terminal periodically communicates with the CCV Terminal Management System for a
version check. This is done automatically during the night. The software version of your terminal is then
checked. If a new software version is available, your terminal will be updated to this new version. After a
successful version check, a receipt will be printed with the message 'CONFIGURATION SUCCESSFUL'.
Please note: make sure that the Ethernet connection and the plug of the external power are always
connected correctly. Should this not be the case, the version check cannot be performed.
CID110A/08062013
50 / 56
8.3
What to do in case of a failure?
This section describes which actions you can perform yourself in case of a failure of the payment
terminal.
Problems with reading payment cards:
•
As a test, try to perform a transaction for € 0.01 with another payment card. Preferably use a
card from another bank. If this transaction is successful, the payment card of the cardholder
may be defect. If this transaction is unsuccessful, there may be a problem with the card reader
of the payment terminal.
•
Reset the payment terminal by interrupting the power supply for 15 seconds.
In case of communication problems:
•
•
•
•
•
Reset the payment terminal by interrupting the power supply for 15 seconds.
Check whether the Ethernet cable is properly connected to the terminal and the modem or
router. Also check whether the connectors of the payment terminal and the Ethernet cable are
damaged.
Test the communication links of the payment terminals (see subsection 2.4.4).
Do you suspect that your terminal is not connected? Please contact your Internet service
provider to check your connection and your subscription.
Does the connection work properly and the aforementioned actions did not solve the failure?
Then please contact the CCV Service Centre for technical support.
Please note: make sure you have the TMS Terminal ID or the payment terminal code at hand. This will
enable our employees to help you faster. Read how you can find this information on the following page.
CID110A/08062013
51 / 56
8.3.1
Looking up the TMS Terminal ID and the payment terminal code
The TMS Terminal ID is the number under which your payment terminal is registered on the CCV
Terminal Management System. You can look up the TMS Terminal ID in your payment terminal yourself.
To look up the TMS Terminal ID, perform the following actions:
Screen of the VX 520
SALE
01.06.12
Action
1
Press the purple function key below the symbol
open the menu.
to
OTHER TRX
MAIN MENU
DISPLAY INFO
MERCHANT MENU
SERVICE MENU
2
Select DISPLAY INFO.
DISPLAY INFO
CUSTOMER SERVICE
TERMINAL
COMMUNICATION
3
Select TERMINAL.
TERMINAL
TMS TID:
CSL001
CONF TYPE:
V520NLSW
CONF VERS.:
09.24
SOFTW VERS.:
09.24
PINPAD VERS.:
0322
01/06/2012
10:09:20
4
Write down the TMS Terminal ID (in this example (CSL001).
If you cannot look up the TMS Terminal ID, you may also
refer to the payment terminal code of the payment terminal.
You can find the payment terminal code on the copies of
the transaction receipts.
Payment terminal code
(in this example 573201)
Journal
CCV Holland B.V.
Westervoortsedijk 55
6827AT Arnhem
Terminal: CT380071
Merchant: 423600707814
Period: 2166
Transaction: 00000002
MASTERCARD (A00002301)
Card: xxxxxxxxxxxx6015
Card Sequence Nr: 00
Valid thru: 30/04/14
SALE
Date: 01/06/2012 10:09
Auth. code: 425544
Total:
0,01 EUR
YOU HAVE PAID
CID110A/08062013
52 / 56
9
ACCESSORIES FOR THE PAYMENT TERMINAL
9.1
Ordering accessories
Would you like to order accessories for your payment terminal? You can do this in the following ways:
9.2
•
via the Internet:
www.ccv.nl, Web shop
•
by telephone:
+31 (0)88 228 9849
•
via the payment terminal (only printing paper rolls)
Ordering printing paper rolls via the payment terminal
Would you like to order printing paper rolls? This can also be done via the payment terminal. To order
printing paper rolls via your payment terminal, please perform the following actions:
Screen of the VX 520
SALE
01.06.12
Action
1
Press the purple function key below the symbol
open the menu.
2
Scroll to and select ORDER PAPER ROLLS.
3
Enter the merchant password (by default 99999) and confirm
with <OK>.
4
Use the purple function keys below the symbols
and
to adjust the number of rolls you want to order.
to
OTHER TRX
MAIN MENU
MERCHANT MENU
SERVICE MENU
ORDER PAPER ROLLS
PROTECTED ITEM
MERCHANT PASSWORD:
_____
ORDER PAPER ROLLS
QUANTITY:
25 ROLLS
PRESS OK TO CONFIRM
Please note: you can order printing paper rolls in packages of 25 units. 200 printing paper rolls is the
maximum per order!
ORDER PAPER ROLLS
QUANTITY:
50 ROLLS
5
Press <OK>to confirm your order. A receipt will be printed
with the confirmation of your order.
PRESS OK TO CONFIRM
By ordering printing paper rolls via your payment terminal, you authorise CCV to automatically charge
the amount of the order to the account number known to us. After placing the order, it will be delivered to
the location where the terminal is located. Check the receipt that is printed after placing the order
whether the address information matches the actual address.
CID110A/08062013
53 / 56
10
GLOSSARY
Term
Meaning
Registration number acquirer
The registration number of a payment card You need this number,
also called Merchant ID, to accept a payment card on your
payment terminal.
Acquirer
A payment service provider or a bank that receives and processes
transactions. This party also provides data for the acceptance of
transactions.
Acquirer parameter session
A communication session with the acquirer host to retrieve
acquirer parameters for the payment terminal. These parameters
determine the types of cards your terminal will accept and how the
terminal handles these types of cards.
Authorisation code
A unique code that you must enter during the performance of the
transaction types: cancellation, sale after reservation, sale referral,
extra reservation and cash advance after referral.
Dutch Payments Association
An association that organises the collective tasks in the national
payment system for its members. The members of the Payments
Association are providers of payment services in the Dutch
market: banks, payment service providers and electronic money
institutions. The Payments Association coordinates the common
tasks of the members in the area of infrastructure, standards and
joint product characteristics. These are focused on an optimised
effective, safe, reliable and efficient payment system.
CVC2 code
A three-digit code applied on the back or front of a payment card
for security purposes.
Dynamic IP address
An automatically assigned IP address that may change over time.
Ethernet connection
A connection used to connect devices within a network. Your
payment terminal is connected to the Internet connection via the
Ethernet connection.
EMV standard
An international standard for payments and cash advances with
payment cards.
E-journal
A financial report that contains copies of the receipts of all
transactions performed during a period.
Internet provider
An organisation that provides facilities to individuals and/or
companies with a computer or other device to connect to the
Internet.
Cardholder
The person who is charged money by you for a product and/or
service and who pays for this with a payment card.
Brand relation report
A report that shows what types of payment cards you can accept
with your payment terminal and to which transaction processor(s)
these cards are linked.
Merchant password
The password that protects the access to the merchant menu, and
that must be entered during the performance of certain operations.
Terminal Management System
System for managing and maintaining payment terminals.
TMS Terminal ID
A unique identification number for a payment terminal that serves
as a key to access the CCV Terminal Management System.
CID110A/08062013
54 / 56
Term
Meaning
Total report
A financial report showing the total amounts of all transactions that
were performed during a period, specified per transaction
processor, type of payment card and transaction type.
Transaction processor
The party to which the transactions are offered according to the
Common Terminal Acquirer Protocol. The transaction processor
then sends the transactions offered to the correct acquirer.
Static IP address
A set IP-address that will not change over time.
CID110A/08062013
55 / 56
11
CONTACT DETAILS
11.1
Telephone numbers CCV
CCV Service Centre (for failures and ordering supplies)
Ordering supplies via the Internet:
CCV Sales department
11.2
+31 (0)88 228 9849
www.ccv.nl, Web shop
+31 (0)88 228 9870
Opening hours CCV
CCV business hours:
Monday to Friday
8.30 AM – 5 PM
CCV Service Centre:
Monday to Friday
Saturday
Sunday
7 AM – 10 PM
8 AM – 6 PM
9 AM – 5.30 PM
Note 24-hour service only for urgent failures.
11.3
General address details CCV
CCV Holland B.V.
PO Box 9226
6800 KH Arnhem, the Netherlands
T
F
E
I
11.4
+31 (0)88 228 9911
+31 (0)88 228 9900
[email protected]
www.ccv.nl
Telephone numbers acquirers
European Merchant Services (EMS)
B+S Card Service
American Express
Bank Card Company (BCC)
China UnionPay
Citibank
ConCardis
Diners Club
JCB
OmniPay
PaySquare
YourGift Cards
CID110A/08062013
+31 (0)20 660 3120
+31 (0)20 427 8344
+31 (0)20 504 8333
+32 22 05 87 87
+31 (0)30 283 7333
+31 (0)20 651 4211
+31 (0)20 794 8630
+31 (0)20 654 5500
+31 (0)30 283 7333
+31 (0)30 283 7333
+31 (0)30 283 7333
+31 (0)10 240 9259
56 / 56