1
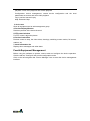
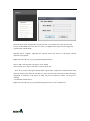
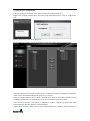
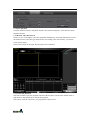
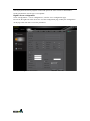
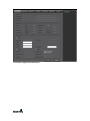
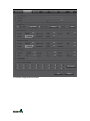
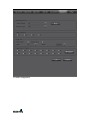
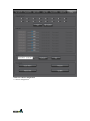
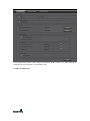
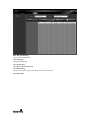
Client software user manual
the introduction
the introduction
system requirements
over Window 2,000
CPU:over Inter Pentium 4 2.4G
Memory:over 512M
Monitor : support 1024*768 and the higher resolution
Card : support directdraw to accelerate and opening.
1.3 engagement
In order to the simplify describe in this manual ,will describe as following .
client software called software
DVR DVS called equipment
Click to the left mouse button click
double click
Right click the right mouse button click
Second : installation and unloading
double click
Third: software running
3.1Running and login
3.11 Double-click The shortcut or the TLClient.exe star to running the software
First of all to use the software needs super user registration. Double-click , The dialog
box as following
Enter the user name, user password and reconfirmed password, Password with a
minimum of six.
and must and reconfirmed password. After successful Registration it will pop up dialog
windows
1.13 login
Choose the user name ,enter the password clink to enter the program. Or can choose
“automatically logged on,” so will not appear on the window next time.
3.2 introduction of the Software interface
introduction of the Software interface
1:system and the button bar
Interface can be locked, minimize the window to the taskbar, close program operation.
2:Tab bar
Contain the function of the different software models
preview :Real-time preview on the device
playback :Local video playback and remote playback
Configuration: device management, remote device configuration and the local
parameters set remote and local video playback
Log: Local and remote Inquiry
Map: Electronic Map
3 device tree
Show all equipment and to add management group
4 Preview Display Window
Real-time preview of the device channel
5 PTZ control window
For PTZ control, adjust the picture
6 Preview Control Bar
Preview control to stop, the client video, drawings, switching screen modes, full screen,
rotation, etc.
7 alarm information list
Displays short messages and other alerts
Fourth:Equipment Management
Before using the software to operate, need to add and configure the device operation.
Click the tab bar "Configure" tab to enter configuration mode
Click on the left navigation bar "Device Manager" item to enter the device management
interface.
Interface Description
1: 1 navigation bar
2: device tree
3: Packet group Control
4: packet tree
4.1 device tree configuration
When the initial run the software, the list defaults to an empty tree, right-click
any blank space can be a list of trees to add the region.
Fill in the name of the regional title bar and click OK you can add a tree to the list area, and
because of this added area as the first area, there is no higher in the region area, the higher the
regional name column blank.
Regional add is complete, right-click the regional nodes may choose to sub-region, add the
operation of equipment
Right-click the Add area, pop-up regional management menu.
Select "Add a sub-regional" sub-regions can be added.
Select "Delete area" will be removed in a selected state area.
Note: If you remove the region contains other regions under, equipment or channels, then delete
operation will not only delete the selected area, but will remove all of the regions under the region,
equipment or channels; if the region is under the preview channel or Video will be given a
warning.
4.11 Manually add the device
Right-click the Add area, pop-up regional management menu, select "Add Device."
Options
Specifications
Esee_ net
it can be linked via setting ID of Esee_ net
Traditional
only IP address of DVR can be available
Device address
IP of equipment or domain adress
Device port
Device name
port number
user-defined
Access number
according the fact
Name
registered name
Password
password of user
Area
area of user
4.1.2 Search the LAN-line equipment
In any regional / sub-regional node click, click the menu item in the search equipment, search the
same LAN-line equipment
Select a device, click on "Add Device"
When the device information in the pop-up box, modify the device name so that the device name
does not appear to repear.
Fill in the device to log the user name and password , and then clink to confirm the setting
Then continue to add other devices
4.2 Grouping tree configuration
If the group did not contain any node in the tree, then to be add the node first
Right at the grouping column shows the space group management menu, click on "Add Group"
item
Enter a group name, click OK to add group.
Group added successfully, you can access the list in the tree node to the next selected group
Select the channel list tree node, click the Device Configuration window, configure the button bar
"add" to select the channel added to the group tree is selected
Group, the channel name to "device name _ channel name" in the form of shows after the success
of adding a channel list tree automatically select the next channel of the device node.
Select the device list tree, click Device Configuration window, configure the button bar "add"
button under the selected equipment, add all channels.
Add to select the group. When a device successfully added all the channels, then select the next
window select list of a device tree node.
Configured using the device configuration window button bar "Move" and "Down" buttons can be
grouped under the channel to adjust the order of nodes.
Channels in the grouping tree node, click Device Configuration window, configure the button bar
of the "delete" button to select the channel to remove from the group. Remove the channel, the
group tree will automatically select the next group in the channel.
Select the group node group tree, click Device Configuration window, configure the button bar of
the "delete" button to display the warning message dialog window. Click "OK" to delete all the
channels under the selected group node.
Note: Adding a group can not repeat under the same channel, but you can also add a channel to a
different group under.
Fifth :Image Preview
Non-Robin Preview
5.1.1 Double-click the Start Preview
Click to play a player window panel, window frame is selected at this time will become light blue.
Double-click the device list or grouped under a channel, the channel will be broadcast in this
window.
5.1.2 Drag to preview
Drag the equipment list or group under a channel to a broadcast window, this time in this window
broadcast channel, while the player will become the selected window
5.1.3Close the preview
Right-click the playback window, the menu appears, click on "Stop Preview" or click the preview
control bar of the "stop" button.
5.2 Round Robin Preview
Please drag the device node or group node to broadcast window, and then begin round robin play ..
Will Enable Round Robin and Round Robin time to set the page settings on the client. or not .
5.3 Preview Control
Stop: Stop the currently selected window preview.
Video: Click the video button to start the currently selected client video playback window, click
again to stop recording
Drawings: Save the currently selected window screen shot
5.4 Sound control
Right click in the player window, pop-up player menu, select "open voice" to open the window of
the audio preview, again right click and choose "turn off the sound" to close the preview.
Note: The software can also open a window of the audio, if the next window to open the voice will
automatically turn off the audio on a window.
5.5 Other features
Double-click to enlarge: In the multi-screen mode, double-click the playback
window will enlarge the window, double-click again to return
Screen mode: multi-screen mode can be switched.
Full Screen: hidden part of the program, to maximize the player window panel.
In the current window mode shows the remaining window. A total of 64 Preview window shows
each page. Page number depends on the window screen mode
Sixth: PTZ control
6.1 Sixth: PTZ control
Control the direction of head rotation, speed, aperture, focus, focus. As well as lighting, wipers
and other auxiliary functions.
6.2 Locus
Setting and control PTZ locus
Pre-set locations
Set PTZ preset point
6.3 Cruise
Set point head cruise, cruise path.
6.4 Screen adjustment
Set the screen brightness, contrast, color, saturation.
Seventh :video and playback
7.1 Client local video
Client video is divided have two parts, namely and the client manually recording video and
program.
Manual control of the client video in the preview column, click on the video, then start recording.
Program video configuration page to set the client program recording time.
All clients and package size of the video path set by the client settings page.
7.2 remote playback
Click the Software tab bar's "Playback" button, select "Remote Playback", then enter the remote
playback interface.
7.2.1 Remote video file retrieval
The device tree on the right to select the equipment needed query, the search panel below to select
the channel search, select the type and start time of recording, click "File Search", you can file
search results appear.
In the search results on the right, flip and jump can be controlled.
7.2.2 remote file playback
Select the window to play the playback, and select the file in the search results, double-click or
right click on "File Playback" to start the file playback.
Select query, click the "intervals", you can playback video by time.
Note: according to time intervals for up to four channels, but when the start time of playback,
playback will start turning off all windows and then start playback.
7.2.3 remote file download
Select the file in the search results, click on the right of "File Download", you can start
downloading files, and download progress bar will appear below.
7.2.4 Playback Control
First select the window to control, and playback control bar displays the current release of the
progress, and rate.
May be drag on the currently selected playback, pause, stop, drawings, quiet, rate control
Click "Full Stop" to stop all the playback window.
7.3 local playback
Click the Software tab bar's "Playback" button, select the "local playback", you can enter the local
playback interface.
Search playback and remote playback control and operate the same can not be downloaded ..
locally playback file, the file type is not optional.
Eighth: server configuration
Click "Configuration" - "server configuration", enter the server configuration page.
First of all, the right side of the device tree to select configuration page, modify the configuration
on the page after click Save to save the parameters.
8.1 System configuration information
8.2-channel configuration information
8.3 Alarm Configuration Information
8.4 User Management Configuration
8.5 video deployment
8.6 Video detection configuration
8.7 Other configurations
Ninth: the Client Configuration
9.1 Local Configuration
Local configuration options can be configured as follows: Robin, capture, save path. Alarm client
configuration, log maintenance, and automatic login.
9.2 Video Configuration
Note: After saving the local video configuration parameters need to restart the client to take effect,
and the plan is the premise of the video stream must have a preview..
9.2.1 Video save path
Set the starting end drive, set the video save path, set the file package size, the largest single file
size limit.
9.2.1 Plan Video
Check "program video" to open the program video.
In the left side of the device tree, select the video channel to program, set the right time to the
video, click Save.
9.3 Alarm Linkage
Client option set alarm linkage.
Tenth: Log
10.1 The operation log.
Query client operation log.
10.2 Alarm log
Query client alarm log.
10.3 System Log
Check the client system log.
10.4 Remote Log
Query remote device logs, select the device tree in the left list.
Eleventh: map.