1
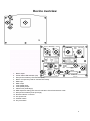
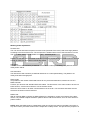
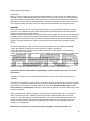
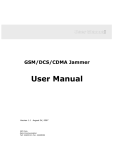
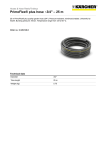
ITA3D 600
RGB ILDA laser with 3D effect
User manual
1
Safety precautions
WARNING: This unit may cause serious injury to eyesight when used incorrect. It therefore is strongly
advised to read this user manual carefully, to get familiar with the functions of this laser device.
WARNING: This unit must be operated by, or under the supervision of an adult. This device is not
suitable for children.
WARNING: Do not look directly into the beam coming out of the lens, from short distance or when a
solid beam is projected. This may cause serious injury to eyesight. Ayra is not responsible for any
injuries caused by incorrect use of this device.
WARNING: Do not project the beam of this unit on to reflective surfaces, as the shattering beam may
cause injury to eyesight.
Installation requirements:
- Always check the voltage settings on the unit and the power supply you want to connect the device
to. If the voltage requirements do not meet, do not connect the device as this may cause serious
damage.
- This device must be installed by a professional technician, in a standing or hanging position. Always
pay attention to the positioning of the unit, as the beams may project directly into your audience.
- It is strongly advised to NOT project the beams directly into your audience. Ayra strongly
recommends a minimum distance of 1.5 meters in height between the lowest projected laser beam
and your audience, for optimal safety. If there is no other option, keep a minimum distance of 5 meters
from the beam exit to the first beam that hits your audience.
- When installed in a standing position, a safety cable is recommended to secure the unit.
- When installed in a hanging position, this unit MUST be secured by using a safety cable, capable of
holding 10x the weight of this device.
- When installed in a hanging position, this unit must be mounted to a proper surface, e.g. a truss
system. When using a truss system, Ayra recommends the use of a proper hook or halfcoupler.
- Make sure there are no flammable objects in the direct environment of the device (such as
decorative objects). Keep a minimum distance of 1.5 meter.
- Do not block the beam-exit and fan
- Keep a minimum distance of 0.5 meter from any walls to provide sufficient cooling
- Make sure the beam-exit and fan are not blocked by any objects in the near environment
- This unit must be connected to a grounded power supply that meets the voltage requirements of the
device.
Maintenance and protection
- Keep the unit away from dusty environments, as this may have negative effect on the fan-cooling
system and laser optics. Ayra recommends using a flightcase for storage of this device. Clean the
optics and fan of the laser with a small, soft brush and vacuum cleaner when needed. Clean the
housing of the unit with a damp cloth. WARNING: Always disconnect the unit from the power supply
when cleaning the unit. Reconnect the unit only if any moist on the fixture disappeared completely.
- This laser device is a lighting effect, designed to support visual entertainment while playing music.
Continuous use is not recommended. Do not use the device longer than 3 hours subsequently, so the
unit can cool down. This will provide a longer lifespan for the diodes. Apply a cooling-down time of 25
minutes before re-activating the laser.
- Do not switch the power on and off too often, as this may cause serious damage to the unit.
2
- Avoid heavy shocks and collision during transport and use, as this might cause damage to the laser
diodes, electronic circuit, optics and housing.
- Keep the device away from moisture, rain, water or any liquids as this may cause a short circuit
and/or electric shocks. If any liquid enters the unit, power supply or housing of the unit, disconnect the
unit immediately and do not reconnect the power supply. Contact your local dealer or technician to
inspect the unit for any damage.
3
Box contents
Box contents
1x ITA3D 600 laser device
1x user manual
1x IEC to Schuko power cable
1x XLR – XLR DMX signal cable
Unit and accessory inspection
- Always use the supplied power cable to connect the unit to a power supply. If the cable appears
broken or has visible damage, do not use it. The supplied cable can be replaced with a regular IEC to
Schuko cable, with a minimum cable diameter of 0.75m².
- If the unit will not be used for a longer period of time, disconnect it from the power supply and store it
in a dust-free environment.
- Always check the unit for possible damage before use. If you suspect that something is wrong with
the unit, do not connect it to a power source! When you suspect that your unit is broken or damaged,
contact your local dealer or a certified technician to inspect the unit.
- When your device does not generate any laser beams, do not look directly into the lens. When the
laser suddenly produces a beam, it may cause severe eye damage, possibly resulting in permanent
visual loss.
4
Device overview
1.
2.
3.
4.
5.
6.
7.
8.
9.
10.
11.
12.
13.
14.
15.
Beam output
Power status LED-indicator (red)
Microphone sensitivity LED indicator (blue)
Built-in microphone (used for sound-active mode)
DMX input
DMX output
ILDA (DB25) input
ILDA (DB25) output
Pattern size (small-large)
DMX dipswitch setting (also used for activation of auto/sound active mode
Microphone sensitivity knob (low-high)
Remote interlock connector
IEC power inlet
ON/OFF switch
Key lock switch
5
Setting up the device
Setting up the device
- When the power supply is connected, the unit will first calibrate the stepping motors of the unit. It is
normal that this may cause any noise. When the calibration is done, the unit is ready to be used (in the
selected DMX, automatic or music controlled mode)
- It is possible that the unit may shut off the beam projection when no music or sound is detected. This
will avoid the projection of a solid, static beam, which may cause injury to eyesight.
- This unit uses an advanced scanset to create variable movements to the laser beam. This way,
figures and patterns can be made. The unit uses a high-speed 25 kpps scanset to create the moving
beams of the laser. It is normal that the laser beam and projection may appear ‘flickering’ when
projecting very large or very complex patterns.
- The projected beams of the unit may appear shivering when projecting very complex or very large
patterns on surfaces as a wall, ceiling or decorative cloth.
Selecting a working mode
This laser device has several working modes, which are automatic, music-controlled, ILDA and
DMX. To select the right operating mode for your situation, use the dipswitch panel on the rear of the
unit.
A DMX-dipswitch panel works with a binary character. It sends a 0 or 1 message to the electrical
circuit. To select a working mode, pay close attention to the information scheduled below. Every DMX
dipswitch stands for a certain value, which is on or off. The values are stated as below:
1–1
2–2
3–4
4–8
5 – 16
6 – 32
7 – 64
8 – 128
9 – 256
10 – mode switch (DMX ON/OFF)
To select the different working modes, pay close attention to the setting of DMX dipswitches below:
NOTE: value “X” = not used or not active for this mode
6
Working mode explanation:
Sound active:
The unit uses its internal microphone to sense music (the beat of the music) and will change patterns
according to the beat of the music. The microphone is situated at the front of the laser device. On the
rear of the laser, there is an adjustable microphone sensitivity knob.
Please note that the sound-activated mode will not function properly when the music source is not loud
enough or when only high-pitched sounds are played.
Auto-beam:
The laser device will activate a pre-defined lasershow on a solid speed setting. The patterns are
mainly beam-effects.
Auto-animation:
The laser device will activate a pre-defined lasershow on a solid speed setting. The patterns are
mainly animations and graphics.
Slave mode:
It is possible to link several ITA3D 600 fixtures for a synchronized lasershow, without the use of a
DMX controller.
Connect your devices with standard XLR-XLR cables. The first device in the chain needs to be set to a
basic function, such as sound-active or one of the auto shows.
Select the slave mode on all other connected device in the chain. You will notice that these devices
will mimic the actions of the first device.
DMX mode:
With an external DMX-controller (or DMX-software) it is possible to control every feature of the laser
device. It is possible to adjust the built-in patterns and to add several effects, such as zoom-effects or
pattern rotation.
NOTE: When the DMX-signal or master/slave signal is lost (due to a failure in the DMX-connection or
any other reason), the laser will shut off the output due to safety issues. This prevents the projection of
7
static images and/or patterns.
ILDA mode:
When you wish to control this laser using ILDA-lasersoftware, you need to connect a DB25 cable to
the laser. The laser automatically detects the ILDA-connection and will override any selected working
mode, thus switching automatically to ILDA mode. When an ILDA signal is detected, but there is no
data-transfer, the laser will shut off automatically, to prevent the projection of static beams. Also when
the connection during a lasershow is lost, the laser will shut off the beam output to prevent injury.
WARNING
When using this laser device, Ayra strongly recommends not using the laser for audience scanning
purposes*. Only a skilled technician and/or laser operator should operate this laser while audience
scanning is performed, for safety reasons.
Audience scanning should always be performed with a moving graphic (such as a tunnel or wave) and
with large graphics, to prevent that high-intensity beams are projected into the eyes of your audience
long enough to cause serious injury. Because the automatic modes of this laser use different types of
graphics, the laser should not be used for audience scanning purposes when operating in these
modes.
Only when using DMX or ILDA, it is safe to project laser patterns into your audience, but only:
- When the graphics are large (so the beam intensity is relatively unharmful)
- When the graphics are moving (such as rotating movement, so the graphic can never project
continuously on the same spot
- When you have a laser emergency power cut-off installed (use the interlock feature or a 230V power
switch)
- When a skilled technician or laser operator is controlling the laser
- When the audience scanning begins at a distance of at least 10 meters of the beam output
If one (or more) of the above stated situations or features is not applied, the laser device should not be
used for audience scanning purposes and the projection of the laser should never ‘touch’ your
audience. A minimum projection height of 1,5m above your audience should prevent this.
Ayra can not be held responsible for any damage or injuries caused by incorrect use of this
laser device.
*Audience scanning is a term which describes the effect of laser beams being projected into your
audience.
Theoretically it is possible to project a static, small beam with high intensity when using ILDA-software.
Therefore only skilled technicians and/or laser operators should work with this kind of laser to prevent
these situations. The maximum scanner speed is 25 kpps, but a setting of 20 kpps max. in your
laser software is recommended. Setting a too large scanner speed in your laser software may cause
permanent damage!
When creating figures, patterns or graphics, always check the realtime projection of your laser to
check if the laser scan set is capable of projecting the figures. Slight flickering while projecting
complex or very large patterns is virtually unharmful for the scan set when setting the correct scan
speed, but large amounts of flickering and unrecognizable patterns are a sign that the scan set is
unable to perform the task and drives its capabilities to the maximum, with possible permanent
damage as a consequence.
Warranty is void when the scan set of the laser is damaged, caused by improper use.
8
DMX operating mode
While in the DMX mode, it is possible to select the working mode of the laser. That way, you can either
choose to use your own programmed presets of your DMX controller, or to activate the music
activated/automatic working mode of the laser to have a fully-automatic lasershow. Depending on the
starting address you selected earlier, the laser responds to the following commands. In this example,
we use DMX starting address 1. When you use a different DMX-starting value, for example 29, the unit
will respond from channel 29, 30, 31.. and so on.
For more information about DMX, consult the manual of your DMX controller or software.
Channel
1
Function
Mode
2
Effect mode
3
Color
4
5
Pattern
selection
Movement Y
6
Movement X
7
Rolling X
8
Rolling Y
9
Rotation
10
Zoom (+/-)
11
12
13
Pattern size
Display dot
Drawing
Value
0-63
64-127
128-191
192-255
0-49
50-99
100-149
150-199
200-255
0-255
0-255
Description
Sound-active mode (disabling channel 2)
Automatic mode (disabling channel 2)
Manual mode, auto run function
Manual mode, sound-active mode
Multi-effect
Normal animation effect
Multi-pattern effect
3D dot effect
3D plane effect
Closed – White – Red – Yellow – Green – Blue – Purple –
Fixed color – Random single color – Random 7 colors –
Moving 7 colors – fixed color
128 built-in patterns
0-127
128-191
192-255
0-127
128-191
192-255
0-127
128-255
0-127
128-255
0-127
128-191
192-255
0-85
86-170
171-255
0-255
0-255
0-127
128-255
Manual Y positioning
Automatic down movement
Automatic up movement
Manual X positioning
Automatic right movement
Automatic left movement
Manual positioning
Auto rolling
Manual positioning
Auto rolling
Manual positioning
Automatic clockwise rotation
Automatic counter-clockwise rotation
Auto zoom (+)
Auto zoom (-)
Manual zoom (+/-)
0 is moderate, 1-255 is small-large
0 is display dot, 255 is optimal brightness
Auto drawing mode 1
Auto drawing mode 2
NOTE: While using ILDA, it is still possible to use DMX-channel 2 to control the effect wheel. It is also
possible to use the dipswitches on the rear of the unit.
9
Technical specifications
TYPE: ITA3D 600
Laser diodes
Type ITA3D 600:
- 100mW red laser (wavelength: 635nm)
- 100mW green laser (wavelength: 532nm)
- 400mW blue laser (wavelength: 450nm)
- mixed output: 500mW white max.
Tech specs:
- scanset: 25 kpps high-speed optical scanner with a maximum angle of +/- 30 degrees
- working modes: auto, sound-active, master/slave, DMX-512, ILDA
- graphics and effects: 128 beam show and animated graphic show patterns with 3D animation
- high-efficiency 3D optical grating system for unique 3D lighting effects
- hanging bracket, for use with a lighting stand or truss system
- built-in microphone with adjustable sensitivity
- pattern size adjustable (small-large)
- ILDA control with DB25 connectors
- DMX-control with 3-pin XLR connectors
- DMX-control: 12 channels
- Power supply: 100-250V AC, 50/60 Hz
- Power consumption: 50 Watt
- dimensions: 200 x 235 x 130 mm
- weight: 4.5 kg
Laser class and licensing
This laser has the capability to perform with a power of maximum 500mW theoretically. However, the
optics of the laser have a small influence on the beam output power, thus reducing the maximum
power slightly. In practice, this device falls under Class 3B.
Class 3B and Class 4 lasers are able to cause serious injury to your audience when used incorrectly. It
is therefore strongly recommended that only skilled laser operators and technicians install and operate
this device.
Class 3B and Class 4 lasers can be used for audience scanning in a safe way, but only when used by
a skilled laser operator or technician.
There are no official laser laws or licenses to operate or own a laser device. However, there is specific
guidance issued by the Health and Safety Executive in the form of a document called HS(G)95 The
Radiation Safety of Lasers Used for Display Purposes. HS(G)95 outlines a number of detailed points
to consider when using lasers for lightshow purposes. Class 3B and 4 laser products are required to
have several specific safety features as part of their design. These features are laid out in the British
Standard on Laser Product Safety BS/EN 60825-1 and are a requirement of the product meeting CE
approvals.
10