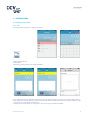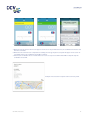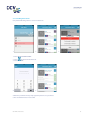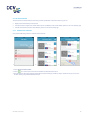
1
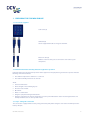
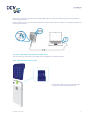
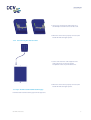
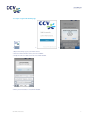
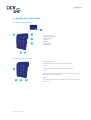
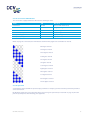
User manual CCV Mini (iOS) User Manual CCV Mini (iOS) TABLE OF CONTENTS 1. PREPARING THE CCV MINI FOR USE.......................................................................... 4 1.1. List of items supplied ............................................................................................................................. 4 1.2. Environmental factors that may affect the equipment’s operation ................................................. 4 1.3. Step 1 - Charge the card reader ............................................................................................................ 4 1.4. Step 2 - Connect the card reader to your mobile device .................................................................... 5 1.4.1. Connect without extension cable ..................................................................................................................................... 5 1.4.2. Connect using the extension cable .................................................................................................................................. 6 1.5. Step 3 - Download and install the CCV Pay app .................................................................................. 6 1.6. Step 4 - Log in to the CCV Pay app ........................................................................................................ 7 2. WORKING WITH THE CCV MINI .................................................................................. 8 2.1. Overview of the card reader .................................................................................................................. 8 2.2. The keys on the card reader .................................................................................................................. 8 2.3. Introducing payment cards to the card reader ................................................................................... 9 2.4. The card reader’s LED indicators ........................................................................................................ 10 2.5. The password ........................................................................................................................................ 10 3. TRANSACTIONS ........................................................................................................11 3.1. Performing transactions ...................................................................................................................... 11 3.1.1. Sale ............................................................................................................................................................................................11 3.2. Cancelling transactions ....................................................................................................................... 13 3.3. 3.3.1. 3.3.2. 3.3.3. 3.3.4. 3.3.5. The transaction list............................................................................................................................... 14 View the transaction list .....................................................................................................................................................14 Send the transaction list .....................................................................................................................................................15 Delete the transaction list ..................................................................................................................................................15 Send a transaction receipt to your email address .....................................................................................................16 Send a transaction receipt to a cardholder ..................................................................................................................16 4. INFORMATION AND SETTINGS ................................................................................18 4.1. View information.................................................................................................................................. 18 CID142F/26032015 2 User Manual CCV Mini (iOS) 4.2. 4.2.1. 4.2.2. 4.2.3. 4.2.4. 4.2.5. Change settings .................................................................................................................................... 19 Email address .........................................................................................................................................................................19 Password..................................................................................................................................................................................19 Keypad type ............................................................................................................................................................................20 Standard reference...............................................................................................................................................................21 Location display ....................................................................................................................................................................22 4.3. Restore factory settings ....................................................................................................................... 23 CID142F/26032015 3 User manual CCV Mini (iOS) 1. PREPARING THE CCV MINI FOR USE 1.1. List of items supplied Card reader (A) USB cable (B) Use the supplied USB cable to charge the CCV Mini. Extension cable (C) With the extension cable you can connect the card reader to your smartphone. 1.2. Environmental factors that may affect the equipment’s operation Environmental factors may affect the operation of the equipment. The equipment is guaranteed to operate under the following environmental factors: • • The ambient temperature is between 0 °C and 35 °C The relative humidity is between 5% and 95% Avoid: • • • • • • • Shocks and vibrations Direct sunlight or heat-emitting objects Excessive heat and dust Oil and dirt Water or condensation Using the equipment during thunderstorms Using the equipment near objects that produce excessive power fluctuations and/or electromagnetic fields. For example: theft detectors or conveyor belt motors. 1.3. Step 1 - Charge the card reader The card reader is equipped with a battery. Charge the battery fully before using the card reader. This will improve the battery’s lifespan. CID142F/26032015 4 User Manual CCV Mini (iOS) Connect the card reader to your PC with the supplied USB cable. The card reader is fully charged when the fourth LED indicator lights up purple. Using an adaptor, you can also connect the USB cable to a mains power socket. The adaptor is not supplied; you will need to purchase it separately. 1.4. Step 2 - Connect the card reader to your mobile device You can connect the card reader to your mobile device (smartphone or tablet) in two ways. 1.4.1. Connect without extension cable 1. Connect the audio plug on the card reader to the headphone socket on your mobile device. CID142F/26032015 5 User manual CCV Mini (iOS) 2. If necessary, reposition the audio plug. Use a small Phillips screwdriver to loosen the screw. 3. When the card reader is properly connected, the fourth LED indicator lights up blue. 1.4.2. Connect using the extension cable 1. Connect the extension cable supplied to the audio plug on the card reader and the headphone socket on your mobile device. 2. When the card reader is properly connected, the fourth LED indicator lights up blue. 1.5. Step 3 - Download and install the CCV Pay app Download and install the CCV Pay app from the App Store. CID142F/26032015 6 User Manual CCV Mini (iOS) 1.6. Step 4 - Log in to the CCV Pay app 1. 2. 3. 1. Open the CCV Pay app on your mobile device. 2. Enter the TMS Terminal ID twice, then select LOG IN. 3. Verify the name and address details and confirm with OK. 4. 4. Enter your email address and confirm with OK. CID142F/26032015 7 User manual CCV Mini (iOS) 2. WORKING WITH THE CCV MINI 2.1. Overview of the card reader 1. Chip card reader 2. Magnetic card reader 3. LED indicators 4. Keypad 5. USB port 6. Reset button 7. Audio plug 2.2. The keys on the card reader 1. Numeric keys (0-9) The cardholder uses these keys to enter the PIN code. 2. X key The cardholder uses this key to break off a transaction. 3. < key Press this key to activate the card reader. The cardholder uses this key to correct an entered PIN code. 4. O key The cardholder uses this key to confirm an entered PIN code and a transaction. CID142F/26032015 8 User manual CCV Mini (iOS) 2.3. Introducing payment cards to the card reader When carrying out a transaction, the cardholder can introduce the payment card in two ways. 1. Payment card with chip 2. Payment card with magnetic strip CID142F/26032015 9 User manual CCV Mini (iOS) 2.4. The card reader’s LED indicators The card reader is equipped with four LED indicators showing its status. Status LED LED colour Deactivated All LEDs None (no LEDs illuminated) Activated LED 4 Orange (flashing) Connected to mobile device LED 4 Blue (flashing) PIN code entry requested LED 1 Blue (flashing) Battery is charging LED 4 Purple (flashing) Battery is fully charged LED 4 Purple (constant) When carrying out a transaction, the LED indicators show how many figures the cardholder has entered. One figure entered Two figures entered Three figures entered Four figures entered Five figures entered Six figures entered Seven figures entered Eight figures entered Nine figures entered Ten figures entered Eleven figures entered Twelve figures entered 2.5. The password Several features in the CCV Mini are protected by a password. For example, you must enter the password if you want to cancel a transaction. By default the password is set to 99999. We advise you to change the password (see "Password" on page 19). This will prevent any third parties from misusing your equipment. CID142F/26032015 10 User manual CCV Mini (iOS) 3. TRANSACTIONS 3.1. Performing transactions 3.1.1. Sale Carry out the following actions to perform a payment. 1. 2. 3. 1. Open the CCV Pay app. 2. Select SALE. 3. Enter the payment amount and confirm with NEXT. 4. 5. 6. 4. The cardholder enters the payment card when the message 'Read card' appears on the screen of your mobile device. 5. The cardholder enters the PIN code on the card reader and confirms with the O key when the message 'Enter Pin + OK' appears on the screen of your mobile device. 6. If required, the cardholder places a signature in the CCV Pay app and confirms with OK. CID142F/26032015 11 User Manual CCV Mini (iOS) 7. 8. 9. 7. When the message ‘Please remove card' appears on the screen of your mobile device, the cardholder removes the card from the card reader. 8. When the transaction has been completed successfully, the message 'Payment accepted' will appear on the screen of your mobile device. The cardholder selects OK to continue. 9. If desired, the cardholder enters an email address to receive a receipt and confirms with SEND. To skip this step the cardholder selects SKIP. Example of a transaction receipt the client receives by email. CID142F/26032015 12 User manual CCV Mini (iOS) 3.2. Cancelling transactions Carry out the following actions to cancel a transaction. 1. 2. 3. 1. Select TRANSACTION HISTORY. 2. Select for the desired transaction. 3. Select RESERVAL. 4. 5. 4. Enter the password. This step only appears if you have set a password. 5. The cancellation has been successful. CID142F/26032015 13 User Manual CCV Mini (iOS) 3.3. The transaction list The transaction list shows all the transactions you have performed. In the transaction list you can: • • • display more information per transaction send transaction receipts to the email address of the cardholder or the email address you have set in the CCV Pay app send the transaction list to the email address you have set in the CCV Pay app 3.3.1. View the transaction list Carry out the following actions to view the transaction list. 1. 2. 3. 1. Select TRANSACTION HISTORY. 2. Select for a transaction to view more information about the transaction. 3. The information will now be displayed. If 'Enable location tracking' is enabled, a map is shown. Here you can see the location where you performed the transaction. CID142F/26032015 14 User manual CCV Mini (iOS) 3.3.2. Send the transaction list Carry out the following actions to send the transaction list to your email address. 1. 2. 3. 1. Select TRANSACTION HISTORY. 2. Select . 3. Confirm with YES to send the transaction list to your email address. 3.3.3. Delete the transaction list Carry out the following actions to delete the transaction list. 1. 2. 3. 1. Select SETTINGS. 2. Select CLEAR TRANSACTION HISTORY. 3. The transaction list has been deleted. CID142F/26032015 15 User Manual CCV Mini (iOS) 3.3.4. Send a transaction receipt to your email address Carry out the following actions to send a transaction receipt to your email address. 1. 2. 3. 1. Select TRANSACTION HISTORY. 2. Select for the desired transaction. 3. Select EMAIL RECEIPT TO MERCHANT. 3.3.5. Send a transaction receipt to a cardholder Carry out the following actions to send a transaction receipt to a cardholder. 1. 2. 3. 1. Select TRANSACTION HISTORY. 2. Select for the desired transaction. 3. Select EMAIL RECEIPT TO CUSTOMER. CID142F/26032015 16 User manual CCV Mini (iOS) 4. 4. Enter the client’s email address and confirm with YES. CID142F/26032015 17 User manual CCV Mini (iOS) 4. INFORMATION AND SETTINGS 4.1. View information Carry out the following actions to view information. 1. 2. 3A. 1. Select SETTINGS. 2. Select DISPLAY INFO. 3A. The system category shows: the version number of the CCV Pay app the TMS Terminal ID the CTAP Terminal ID 3B. 3C. 3B. The merchant category shows your name and address details. 3C. Scroll down. The device category shows: the connection status of the card reader the charge percentage of the battery the serial number of the card reader. CID142F/26032015 18 User manual CCV Mini (iOS) 4.2. Change settings 4.2.1. Email address Carry out the following actions to change your email address. 1. 2. 3. 1. Select SETTINGS. 2. Select EMAIL. 3. Enter the desired email address and confirm with DONE. 4.2.2. Password Carry out the following actions to set or change your password. 1. 2. 3. 1. Select SETTINGS. 2. Select ENABLE PASSWORD. By default the password is set to 99999. 3. Select CHANGE PASSWORD to change the default password. CID142F/26032015 19 User manual CCV Mini (iOS) 4. 5. 6. 4. Enter the current password (99999). 5. Enter a new five-digit password. 6. Enter the new password again. 4.2.3. Keypad type You can set how you enter transaction amounts in the CCV Pay app. For this, you have to specify the desired keypad type. You can choose from the following keypad types: • • Euro: enter transaction amounts in complete euros Eurocent: enter transactions in eurocents Carry out the following actions to change the keypad type. 1. 2. 3. 1. Select SETTINGS. 2. Select KEYBOARD TYPE. 3. Select the desired keypad type and confirm with OK. CID142F/26032015 20 User manual CCV Mini (iOS) 4.2.4. Standard reference If desired you can set a reference (for example the name of an employee). This reference will be shown on transaction receipts and is also visible for transactions in the transaction list. Carry out the following actions to set a reference. 1. 2. 3. 1. Select SETTINGS. 2. Select ENABLE REFERENCE. During a transaction you can now enter a reference (see A). Continue with the following steps if you always want to use the same reference. 3. Select DEFAULT REFERENCE. 4. 4. Enter the desired standard reference and confirm with DONE. During a transaction you now only need to confirm the standard reference (see B). CID142F/26032015 21 User manual CCV Mini (iOS) A. B. After entering and confirming the transaction amount, you After entering and confirming the transaction amount, you have the option of entering a reference. have the option of confirming the standard reference immediately. 4.2.5. Location display If you enable the location display feature, the CCV Pay app can collect and use details of your location. The locations at which the transactions were performed are then shown on transaction receipts and in the transaction list. Carry out the following actions to enable location display. 1. 2. 1. Select SETTINGS. 2. Select ENABLE LOCATION TRACKING. CID142F/26032015 22 User manual CCV Mini (iOS) 4.3. Restore factory settings Carry out the following actions to restore the factory settings. 1. 2. 3. 1. Select SETTINGS. 2. Select FACTORY RESET. 3. Confirm with YES. 4. 5. 4. Enter the password. This step only appears if you have set a password. 5. The factory settings have been restored. You must then log in again to the CCV Pay app (see "Step 4 - Log in to the CCV Pay app" on page 7). CID142F/26032015 23