1
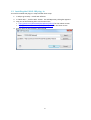
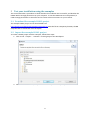
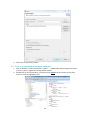
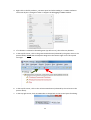
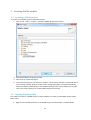
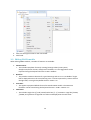
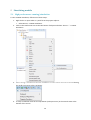
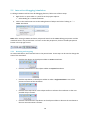
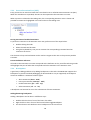
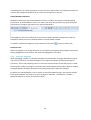
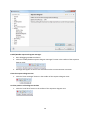
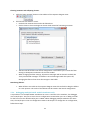
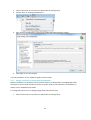
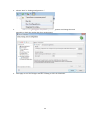
Embedded Systems Innovation by TNO
POOSL IDE
User Manual
Tool version 3.1.0
29-8-2014
1
POOSL IDE User Manual
1
Installation ...................................................................................................................................... 5
1.1
Minimal system requirements ................................................................................................ 5
1.2
Installing Eclipse ...................................................................................................................... 5
1.3
Installing the POOSL IDE plug- in............................................................................................. 6
1.4
Updating the POOSL IDE ......................................................................................................... 7
1.4.1
1.5
2
3
4
5
Updating the simulator ................................................................................................... 7
Installation problems .............................................................................................................. 8
Test your installation using the examples ...................................................................................... 9
2.1
Download the example POOSL project ................................................................................... 9
2.2
Import the example POOSL project ........................................................................................ 9
2.3
Test your installation using an example ............................................................................... 10
Creating POOSL models ................................................................................................................ 12
3.1
Creating a POOSL project ...................................................................................................... 12
3.2
Creating POOSL models ........................................................................................................ 12
3.3
Editing POOSL models ........................................................................................................... 13
POOSL IDE Shortcuts ..................................................................................................................... 14
4.1
Useful basic Eclipse shortcuts ............................................................................................... 14
4.2
Navigation ............................................................................................................................. 14
4.3
Editing ................................................................................................................................... 14
4.4
Fault detection and correction ............................................................................................. 14
Simulating models......................................................................................................................... 15
5.1
High performance running/simulation ................................................................................. 15
5.2
Interactive debugging/simulation......................................................................................... 16
5.2.1
Running and stepping ................................................................................................... 16
5.2.2
Inspecting processes and variables ............................................................................... 17
5.2.3
Process Execution Tree (PET) ........................................................................................ 18
5.2.4
Breakpoints ................................................................................................................... 18
5.2.5
Sequence diagrams ....................................................................................................... 19
5.2.6
Debugging multiple POOSL models simultaneously ..................................................... 21
2
5.2.7
Setting a seed for resolving non-determinism .............................................................. 22
6
Preferences ................................................................................................................................... 24
7
Export Functionality ...................................................................................................................... 25
7.1
8
Exporting a model to Rotalumis xml ..................................................................................... 25
FAQ ................................................................................................................................................ 26
8.1
Running or debugging a model gives validation errors but the IDE does not show them. .. 26
8.2
I see strange behavior when debugging multiple models simultaneously. .......................... 26
8.3
My quick fix is not working. .................................................................................................. 26
8.4
Internal null pointer exception when trying to run/debug a model .................................... 26
3
Introduction
This document explains the use and installation of the POOSL IDE, which is a plug-in for Eclipse. It
relies on the Xtext framework (http://www.eclipse.org/Xtext/) and the POOSL simulator (Rotalumis)
of the Eindhoven University of Technology (http://www.es.ele.tue.nl/poosl).
This manual describes all features that are needed to create and debug POOSL models. This
document does not cover an explanation of the POOSL syntax as supported by the POOSL IDE.
4
1
Installation
1.1 Minimal system requirements
The POOSL IDE requires:
•
•
•
•
Windows 7 32bit or 64bit (Windows XP is not supported)
Ubuntu 12.04 32bit or 64bit
JRE 1.7.0_55 or newer1
Eclipse Kepler or newer. The POOSL IDE has been tested with Eclipse Luna.
1.2 Installing Eclipse
If a correct version of Eclipse is already installed, skip this section. Otherwise, follow these steps to
install Eclipse:
1. Download and Install Java Runtime Environment (JRE), see
http://www.oracle.com/technetwork/java/javase/downloads
2. Download the Eclipse Luna Standard Package (version 4.4)
http://www.Eclipse.org/downloads/.
3. Unzip the Eclipse file at a location where you have permission to write files and directories.
Locate the “Eclipse.exe” file in directory “Eclipse”. Create a shortcut on the desktop or task
bar (In Windows, right click on the file -> Send to -> Desktop). When multiple JREs are
installed on your machine, specify the JRE to be used as follows: right-click on Eclipse
shortcut, select Properties, tab Shortcut; edit the “Target” field to specify the location of the
Java Virtual Machine. For instance:
C:\Eclipse\Luna\Eclipse.exe -vm "C:\Program Files\Java\jre8\bin\javaw.exe"
Note the use of “javaw” to avoid opening a additional window.
When opening Eclipse select a location for the workspace and click OK.
1
To determine which version of Java is installed, type the following at the command prompt: java -version
5
1.3 Installing the POOSL IDE plug- in
To install the POOSL IDE plug-in in Eclipse follow these steps:
1. In Eclipse go to Help -> Install new software
2. In “Work with: “, click the Add… button. The Add Repository dialog box appears:
3. Copy one of the following links to the location box:
• http://poosl.esi.nl/downloads/ide/updates/release/ for the release version
• http://poosl.esi.nl/downloads/ide/updates/latest/ for the latest version
4. Enter a name for the repository and click OK.
6
5. Select the POOSL IDE plug-in from the update site and uncheck the “Contact all update sites
during installation to find required software” checkbox.
6. Click “Next” twice and accept the license agreement, click “Finish” to start the installation.
Because the software is not signed by Eclipse it will give a security warning. Click OK on the
security warning to continue installation.
• Installing the POOSL IDE plugin will automatically install the simulator (Rotalumis).
7. When asked, restart Eclipse.
1.4 Updating the POOSL IDE
To update the POOSL IDE follow these steps:
1. In Eclipse select Help -> Check for Updates. If a newer version of the POOSL IDE or the
simulator (Rotalumis) are available, they will appear in the list of software to update.
2. Click Next to install the new updates.
1.4.1 Updating the simulator
It is possible to update the simulator (Rotalumis) independently from the POOSL IDE. To add the
update site to Eclipse follow these steps;
7
1. In Eclipse go to Help -> Install new software
2. In “Work with: “, click the Add… button. The Add Repository dialog box appears:
3. Copy one of the following links to the location box:
• http://www.es.ele.tue.nl/rotalumis/repository/release/ for the release version
• http://www.es.ele.tue.nl/rotalumis/repository/integration/ for the latest version
4. Enter a name for the repository and click OK.
5. Close the window and follow the steps in 1.4 to check for updates.
1.5 Installation problems
In case errors occur after installing the POOSL IDE when opening files or running or debugging
models, make sure that the correct versions of this software is installed in Eclipse and the computer.
•
•
Java JRE 1.7 (please update to the latest version of 1.7 or update to 1.8)
Xtext 2.6.x (can be installed from the Xtext update site:
http://download.eclipse.org/modeling/tmf/xtext/updates/composite/releases/ )
8
2
Test your installation using the examples
This section describes a procedure to check whether the installation was successful, and whether the
POOSL IDE has enough permissions on your computer. To use the POOSL IDE to its full potential, it
needs enough permissions to write files and to create socket connections on your machine.
2.1 Download the example POOSL project
The example POOSL project can be downloaded from
http://poosl.esi.nl/downloads/examples/examples.zip. Save the file in a temporary location; do not
unzip the files or extract files from the zip file.
2.2 Import the example POOSL project
To create a POOSL project with the examples, follow these steps:
1. Click on File -> Import… -> General -> Existing Projects into Workspace.
2. Click on Select archive file, and press Browse… to open the examples.zip file.
9
3. Click Finish to import the project.
2.3 Test your installation using an example
1. Click on Window -> Open Perspective -> Other… -> POOSL Edit, which changes the screen
layout in order to support the editing POOSL models.
2. Double-click on the file producer_consumer.poosl. Check that the contents of the file is
shown in a syntax-highlighted way.
10
3. Right-click on the file producer_consumer.poosl and select Debug as -> POOSL simulation.
The screen layout is changed in order to support the debugging of POOSL models.
4. If no element is selected in the Debug view (top-left corner), then select any element.
5. In the top-left corner, click on the green Resume button (indicated by the green arrow in the
picture below). Check that the Sequence Diagram in the bottom-right corner fills up with
messages.
6. In the top-left corner, click on the red Terminate button (indicated by the red arrow in the
picture above).
7. In the top-right corner, click on POOSL Edit to change back to the screen layout for editing.
11
3
Creating POOSL models
3.1 Creating a POOSL project
To create a new POOSL project, follow these steps:
1. Click on File -> New -> Project… and select POOSL project from the list.
2. Click Next and give the project a name.
3. Click Finish to create the project.
4. The created project has one directory “models”. This directory contains a new model file to
start creating a model. All basic classes such as String and Integer are imported implicitly.
Eclipse will switch automatically to the POOSL Edit perspective. This will allow you to right
click in the project explorer to create POOSL projects more easily.
3.2 Creating POOSL models
First make sure there is a POOSL project in the workspace. To create a new POOSL model, follow
these steps:
1. Right click the models directory in the POOSL project and select New -> POOSL Model.
12
2. Click next and type a name for the new model.
3. Click finish.
3.3 Editing POOSL models
When editing POOSL models, a number of features are available:
1. Content-assist:
• This includes templates for easily creating (amongst others) new system,
data/process/cluster classes, data/process methods, etc. The suggestions can be
inspected using the keyboard shortcut <CTRL>-<SPACE>.
2. Quick-fix:
• This provides common solutions for typical warnings and errors. It is available if a lightbulb is displayed next to the error/warning icon. It can be inspected by a mouse click on
the light bulb, or using the keyboard shortcut <CTRL>-<1>.
3. Formatter:
• This applies a proposed default format for textual POOSL models. The automatic
formatter can be started using the keyboard shortcut <CTRL>-<SHIFT>-<F>.
4. Comments:
• This includes single-line (//) and (nested) multi-line (/* */) comments. Tags like //TODO,
//FIXME, and //XXX are recognized as markers and displayed in the tasks view.
13
4
POOSL IDE Shortcuts
4.1 Useful basic Eclipse shortcuts
•
•
•
•
Switch between tabs:
• <CTRL>-<Page Up>
• <CTRL>-<Page Down>
Maximize current editor (tab):
• <CTRL>-<M>
• Double click on tab
Jump to position of last edit
• <CTRL>-<Q>
Save file
• <CTRL>-S
4.2 Navigation
•
•
•
•
Outline view:
• Window -> Show view -> Outline
• <CTRL>-O
opens a quick outline that is searchable (including wildcards)
Hyper-linking to referenced elements:
• <F3> while the cursor position is at a cross-reference
• <CTRL>-click on a cross-reference
Find references:
• <CTRL>-<SHIFT>-<G>
Label (with extra information):
• Point at a cross-reference
4.3 Editing
•
•
•
Content assist:
(including templates for system and data/process/cluster classes)
• <CTRL>-<SPACE>
Rename element:
(including any cross-references)
• <ALT>-<SHIFT>-R
Automatic formatting: (pretty printing)
• <CTRL>-<SHIFT>-F
4.4 Fault detection and correction
•
•
•
•
Validation:
Automatically upon changes and upon saving
Revalidate all files:
• Project -> Clean...
Validation results:
• error:
icon: cross in a red box
• warning:
icon: exclamation mark in a yellow triangle
Quick fix
(available if a light bulb is displayed next to the validation icon)
•
<CTRL>-<1>
14
5
Simulating models
5.1 High performance running/simulation
To Run a POOSL simulation, follow one of these steps:
1. Right click in an open editor or .poosl file in the project explorer.
• Select Run As -> POOSL Simulation.
2. Click on the small arrow next to the Run button of Eclipse and select “Run as…” -> POOSL
Simulation
3. After running a simulation it becomes available as a recent launch and can be launched using
the small arrow next to the run button.
4. To stop a simulation click the red stop button (red square icon) in the Console view at the
bottom of the screen.
15
5.2 Interactive debugging/simulation
To debug a POOSL model and use all debugging features, follow one of these steps:
1. Right click in an open editor or .poosl file in the project explorer.
• Select Debug As -> POOSL Simulation.
2. Click on the small arrow next to the Debug button of Eclipse and select “Debug as…” ->
POOSL Simulation
Note: After starting a POOSL simulation, Eclipse will switch to the POOSL debug perspective and the
model will start in the paused state. To return to the edit perspective, click on the Edit perspective
button in the top right corner.
5.2.1 Running and stepping
As mentioned before, the model will start in the paused state. These steps can be used to change the
state of the simulation:
•
Click the play button in the Eclipse toolbar to resume simulation.
•
Click the pause button in the Eclipse toolbar to suspend simulation.
•
Click the step button in the Eclipse toolbar to make a single transition in one of the
process instances of the simulation.
•
Click the time step button in the Eclipse toolbar to advance the simulation to the next
possible delay transition.
•
Click the communication step button in the Eclipse toolbar to advance the simulation to
the next communication transition.
16
•
•
It is also possible to make specific transitions within a process instance (See Process
Execution Tree in section 4.2.3).
Click the terminate button in the Eclipse toolbar to terminate the simulation.
5.2.2 Inspecting processes and variables
For demonstration purposes the following screenshots are based on the fisher.poosl example that
can be obtained through http://poosl.esi.nl/downloads/examples/examples.zip.
The Debug view shows all process instances as nodes of the model that you are debugging. The
names of the nodes correspond to the hierarchical path of the instance. Instances are colored based
on the execution state of that instance. Red means that the instance can do a step, blue means the
instance can perform a time step and black means the instance can’t make any steps.
To inspect the variables and state (Process Execution Tree (PET)) of an instance, click it in the debug
view. This will update the information in Execution Tree and Variables views.
Selecting a variable in the Variables view will inspect that variable. For native data classes (such as
String and Integer) this is the same as the value next to the name. Your own data classes can contain
variables. In this screenshot, the contents of “b” of type Array and “k” of type Integer are visible.
17
5.2.3 Process Execution Tree (PET)
Every process has its own local state that is visualized in its so-called Process Execution Tree (PET).
When the simulation is suspended, this PET can be inspected in the Execution Tree view.
When a process is selected in the Debug view, the corresponding Execution Tree is shown and
possible transitions are highlighted in the same colors as the Debug view.
Forcing execution of enabled transitions:
To perform a transition in the Execution Tree view, perform one of the steps below:
1. Double clicking the node
2. Select the node and hit enter
3. Using the keyboard keys 1-9 you can execute the corresponding transition based on
occurrence in the list.
The shortcut Ctrl+Up and Ctrl+Down can be used to navigate to the next or the previous possible
transition.
Process definition reference:
All nodes in the Execution Tree view correspond with a definition in the .poosl file. Selecting a node
will highlight that part of code that corresponds with the statement in the Execution Tree.
5.2.4 Breakpoints
A good way to debug problems is by adding breakpoints to the code. The POOSL IDE supports line
breakpoints in process methods (Debugging of data methods is not yet supported). A breakpoint
cannot be added on a statement of these types:
•
•
•
•
Abort statement (abort .. with)
Interrupt statement (interrupt .. with)
Parallel statement (par .. and .. rap)
Select statement (sel .. or .. les)
A breakpoint can however be set to the constituents of these statements.
Adding/Removing breakpoints
Adding a breakpoint can be done in 3 different ways:
1. Double click the ruler in front of the line in the editor.
2. Right click the ruler in front of the line and select Toggle Breakpoint.
3. Use the shortcut Ctrl+Shift+B to set a breakpoint on the current line.
18
If a breakpoint is set, a blue dot appears in front of the line. When there are multiple statements on
one line, the breakpoint will always be set to the first statement on that line.
Enable/Disable breakpoints
Breakpoints will be listed in the Breakpoints view that is visible in the bottom of the Edit/Debug
perspectives. (If the Breakpoints view is not visible, then reset the perspective by right clicking the
perspective in the upper right hand corner and selecting Reset).
The checkbox in front of a breakpoint can be used to enable or disable a breakpoint so that the
breakpoint remains set but can be deactivated or activated when needed.
To Enable or disable all breakpoints at the same time use button
in the top of the view.
Breakpoint hits
When a breakpoint is hit during simulation, the simulation will suspend. The breakpoint that was hit
will be highlighted in the Execution Tree view and highlighted in the editor.
5.2.5 Sequence diagrams
When debugging a model, it is possible to display all communication messages between processes
and cluster in the form of a sequence diagram. The Sequence Diagram view allows filtering out
processes / cluster and collapsing clusters so that only communication outside the cluster is visible.
Hovering over a lifeline, message or timestamp will provide additional information about it. Clicking
messages updates the Eclipse properties view with all information about the message.
By default, the message buffer is set to contain at maximum 1000 messages. This prevents Eclipse
heap space problems. The buffer size can be changed in “Window -> Preferences -> POOSL ->
Sequence Diagram” as shown in the picture below.
19
Enable/Disable sequence diagram messages
1. Start debugging a POOSL simulation.
2. Click the “Enable/disable sequence diagram messages” button in the toolbar of the sequence
diagram view.
3. Messages will appear as soon as the simulation makes a communication transition.
Clear the sequence diagram view
1. Click the “Clear messages” button in the toolbar of the sequence diagram view.
Lock the position of the diagram timeline
1. Click the “Scroll lock” button in the toolbar of the sequence diagram view.
20
Filtering instances and collapsing clusters
1. Click the “Open settings” button in the toolbar of the sequence diagram view.
2. All instances are shown in a tree.
• Uncheck the instances that need to be filtered out.
• Click a cluster to show messages on cluster level instead of containing instances.
•
•
The filter will be saved in the launch configuration. This enables you to reuse the filter
setting in subsequent simulations of the same model.
When changing the filter settings, all previous messages will be cleared. Uncheck the
“Only save filtered messages” checkbox to save all messages. With this option off,
changing the filter will not clear all messages in the buffer.
Reordering lifelines
•
When lifelines are visible in the sequence diagram view click and hold to drag the lifeline
to a new position. The order of the lifelines will be saved in the launch configuration.
5.2.6 Debugging multiple POOSL models simultaneously
It is possible to run multiple POOSL simulations at once. To connect to the simulator, the debugger
uses a TCP/IP port. This port is set in the run configuration created when you run or debug a model
for the first time. The default TCP/IP port is 10001. When debugging multiple models at the same
time, the TCP/IP port in the run configuration needs to be unique. To change the run configuration,
follow these steps:
21
1. Click on the arrow next to either the Eclipse Run or Debug button.
2. Choose “Run” or “Debug Configurations…”
3. From the Run configurations, choose your model and change the Port number.
4. Click Apply to save the changes.
It is now possible to run this model alongside another model.
5.2.7 Setting a seed for resolving non-determinism
With the simulator it is possible to set the seed to resolve non-determinism. The POOSL IDE offers
the option to set the seed manually or choose a random seed for the simulation. The default is to
always run the simulation with seed 1.
To change the seed of a run or debug configuration follow these steps:
1. Click on the arrow next to either the Eclipse Run or Debug button.
22
2. Choose “Run” or “Debug Configurations…”
3. From the Run or Debug configurations, choose your configuration and change the seed
manually or check the random box for a random seed.
4. Click Apply to save the changes and Run or Debug to start the simulation.
23
6
Preferences
It is possible in Eclipse to set preferences for the POOSL IDE.
1. Go to Window -> Preferences and select POOSL from the Tree on the left of the screen.
2. The options to set preferences for are:
a. Refactoring; Default Eclipse options about refactoring.
b. Simulator; Determine the logging level of the communication with the simulator. This
is only used for bug reporting. See http://poosl.esi.nl for more details.
c. Syntax Coloring; Change the font, size and color of comment sections, keywords etc.
24
7
Export Functionality
7.1 Exporting a model to Rotalumis xml
In case it is desired to export the POOSL model in the XML format that is use by the simulator
(Rotalumis), but one does not want to actually run a simulation through Eclipse, perform these steps:
1. In Eclipse right click on any .poosl file
2. Click “Generate Rotalumis XML” to save the POOSL model in XML format for Rotalumis.
25
8
FAQ
8.1 Running or debugging a model gives validation errors but the IDE does
not show them.
If the POOSL IDE reports no validation errors but running or debugging the model reports errors
there might be a problem with the line endings of the files. To solve this problem save the file with
windows line endings. This problem is often caused by Linux line endings.
8.2 I see strange behavior when debugging multiple models
simultaneously.
Debugging multiple models at the same time only works if the simulator port in both debug
configurations is set to a different port. To change the port of the debug configuration follow the
steps in 4.2.6.
This problem occurs when running multiple models on the same debug port under windows. Linux
does not allow binding of the same ports.
8.3 My quick fix is not working.
Executing a quick fix supplied by the IDE sometimes results in no changes to the model. This can be
caused by other errors that are still present in the model elements the quick fix modifies. Solve these
errors before trying the quick fix.
8.4 Internal null pointer exception when trying to run/debug a model
The following error may occur when you try to run or debug a model:
An internal error occurred during: "Launching …poosl". java.lang.NullPointerException
It usually indicates that your version of the Java Runtime Environment (JRE) is too old. Please check
the minimal system requirements in section 1.1.
26