1
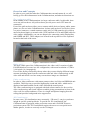
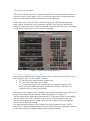
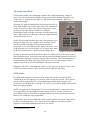
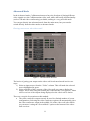
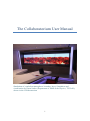
The Collaboratorium User Manual Simulation of a turbulent atmospheric boundary layer. Simulation and visualization by Harm Jonker (Department of Multi-Scale Physics, TU Delft), shown in the Collaboratorium 1 Table of Contents Introduction ............................................................................................................... 3 Collaboratorium support ............................................................................................ 3 Booking the Collaboratorium .................................................................................... 3 Overview and Concepts ............................................................................................. 4 Presentation Mode ..................................................................................................... 6 Video-Conferencing Mode ........................................................................................ 7 3D Projection Mode .................................................................................................10 SAGE mode .............................................................................................................10 Advanced Mode .......................................................................................................11 Network in the Collaboratorium ...............................................................................13 Multi-Touch .............................................................................................................14 Ending your session..................................................................................................14 2 Introduction This document is a guide for most of the functionality provided by the Collaboratorium. It covers topics such as giving presentations, doing videoconference, connecting to the local network, and more. The information in this guide represents a general overview, enough to get most users started. However, it does not provide a full description of what each and every button does specifically. If there are any questions left unanswered, please contact the support team. Collaboratorium support If you have a support question concerning your sessions in the Collaboratorium, you can contact the support team: Who: E-mail: Room: Paul Melis & Tijs de Kler [email protected] 1.03 (right next to the Collaboratorium) You can also call the general SURFsara phone number 020-800 1300 and ask for Paul or Tijs to contact you. Booking the Collaboratorium The Collaboratorium is available to any scientists or institution that linked to the NWO1 or KNAW2, or to commercial research in the areas defined by the “Topsectoren”3 policy of the government. There are currently no additional costs involved in booking the Collaboratorium. To see if the Collaboratorium is available at a certain time and date, you can look at our publicly viewable Collaboratorium calendar. This calendar is located on the SURFsara website under Systems → Collaboratorium → Agenda. Or using the URL https://www.surfsara.nl/systems/collaboratorium/agenda To book the Collaboratorium, you can simply send an email to [email protected], requesting the time slot you need, your name and affiliation, and the project it is for. 1 Nederlandse organisatie voor Wetenschappelijk onderzoek http://www.nw.nl Koninklijke Nederlandse Akademie van Wetenschappen http://www.knaw.nl 3 See http://www.rijksoverheid.nl/onderwerpen/ondernemersklimaat-en-innovatie/investeren-intopsectoren 2 3 Overview and Concepts In order to get a good idea what the Collaboratorium can and cannot do, we will briefly go over the infrastructure in the Collaboratorium, and what its functions are. The conference table In the middle of the Collaboratorium is a large conference table. In this table, there are seven pull-out boxes. All pull-out boxes provide power and a UTP network connection. Four of the pull-out boxes allow you to connect mobile devices (laptop, tablet, smartphone, etc) for use in the Collaboratorium. In these pull-out boxes (see below), there is a power connector, a sound connector (mini-jack), a USB connector (for wireless mouse/keyboard input), a network cable (UTP) and both a VGA and HDMI cable for video output. Additionally, you can use adapters for connecting (mini) DisplayPort, mini-HDMI and DVI. These adapters are located in the top drawer of the cupboard located at the back of the room. POWER HDMI VGA Audio Network USB Figure 1: Pull-out box overview Video-wall The most visible part of the Collaboratorium is the video-wall. It consists of eight Full-HD thin bezel screens in a 4x2 configuration, with a total resolution of 7,680 x 2,160 pixels (16.6 megapixels). Users of the facility can flexibly choose where they want to display different image streams (including input from the conference table and video conferencing) on the video wall and decide over how many screens these images are distributed. Video-conferencing In order to video-conference with remote partners, there is a Polycom HDX8000 unit available. This Polycom set provides high quality sound and video, which can be displayed and made audible on the video-wall and the sound system. The video-conferencing set is equipped with both a front camera, for face-to-face video-conferencing, and a back camera to enable giving presentations in front of the video-wall, for remote audiences. There is a single microphone hanging from the ceiling that provides background noise suppression. 3D Visualization In some cases, 3D visualization (more accurately, “3D stereo”) can give you better insight in specific spatial problems. To provide for 3D visualizations, the Collaboratorium is equipped with a projection screen and a Full-HD 3D stereo projection system. The 3D Visualization requires the users to wear special active shutter glasses, in order to correctly see the 3D images. 4 Figure 2: “Main menu” in the touch interface Intuitive interfaces The Collaboratorium has a very intuitive touch interface that can be accessed through either the touch screen located at the head of the conference table, or using the iPad located in the Collaboratorium. The main menu looks like the image above, and can be used to access the different modes of use that are available. 5 Presentation Mode The presentation mode is designed to quickly set you up for simple tasks such as giving a presentation. It puts one video input in a 2x2 configuration in the middle of the video-wall. In the main menu, select the Presentation option. This should bring up the Presentation interface as shown below. Figure 3: Presentation interface Selecting a video source If you are using a laptop, first make sure that it is correctly connected to either the VGA or the HDMI connector of one of the four table outlets. Next, in the touch interface select the Display input you want to use. This involves two steps, 1) select the number of the table input, 2) select a connection type, either VGA or HDMI. This should bring up your laptop screen on the middle 2x2 screens of the video wall. This might take a bit of time (up to 20 seconds), so please be patient. If you do not get a video output on the video wall, this might indicate that your laptop does not automatically send its desktop to its secondary output. Make sure that your laptop is correctly configured to send video output to the video output connected. Keyboard and sound There is a wireless keyboard/mouse set available (located at the top of the cupboard in the back of the room) that can be connected to your laptop. To do this, simply connect the USB connector in the table pull-out box to your laptop. It should automatically be connected when you select your Display input for Presentation. This mouse can also be used as a presenter tool, to cycle through your slides. If you want to use sound during your presentation, this should work automatically when using the HDMI input, as an HDMI connection can also transfer sound (if your laptop supports sending audio over HDMI). If you use the VGA connector as input, you have to connect the small mini-jack connector to the sound output of your laptop. 6 Video-Conferencing Mode The Video-conferencing mode is designed to quickly get you into a video-conference with one or more remote parties. We cover the basic usage here, for advanced usage, there is a manual located in the bottom drawer of the cupboard. In the main menu, select the Video-conferencing option. This should bring up the front Camera, bring up the video-conference interface (see figure 4), and start the middle 2x2 screens in video-conferencing mode. Please note that the video wall might need a few seconds to start up and come out of standby. Figure 4: Video-conferencing interface Selecting a video-wall screen setup There are three different video outputs that the video-conferencing can display on the wall, being VC Far, VC Near and VC Content: VC Far shows the image from the remote party VC Near shows the local camera image VC Content shows local video signal input (for example a laptop screen connected on the table) that can be shared/sent in a video-conference, for example to give a remote presentation. These three video outputs can be arranged in three different layouts on the video-wall, which can be selected on the left side of the control panel (see figure 4-1). The first layout is the default layout, and has the VC Far output visible on the middle 2x2 part of the video-wall, with the VC Near and VC Content output on the left. The second layout has the Far output visible on only a single screen, leaving more screens free for different content. The third layout has all three video outputs in the left column of screens, with VC near and VC content sharing the upper left screen. This leaves the right three columns of the video wall free for different applications in advanced mode. 7 Making or receiving a call For setting up a video conference, you either need to call, or be called to set up a connection. To make a call, use the arrow keys and “OK” button (see figure 4-2) to navigate to the “Place a Call” option (see figure 5). Figure 5: Video-conferencing displayed on the video-wall Here you need to fill in a number, an IP address or an email address registered on a gatekeeper and press the “Call” button (see figure 4-3). The specific number/address can be filled in using the numbers in the interface, or with an on-screen virtual keyboard that can be called up with the “Keyboard” button. If the other party can be reached, a dial tone can be heard, and a connection will be set up when the other party accepts. If the other party wants to call you, they have to call to IP address 145.100.39.4. If the sound of the video-conferencing is active, you will hear a dial tone when called, and a message is displayed on screen as well. Accepting the call can be done with the “Answer” button (see figure 4-3). Selecting a local camera and adjusting the c amera view The Collaboratorium is equipped with two cameras. The camera in front of the videowall can capture the participants seated at the table in a video-conference, and the camera in the back corner of the room can capture presentations given in front of the video-wall. At any moment, only one camera view can be used and transmitted. To adjust the camera, you can use the camera presets (see figure 2-5). Presets 1 through 4 use the front camera, directed at the table, and range from completely zoomed in to zoomed out to the whole table. Presets 5 through 8 use the rear camera, providing different perspectives on the video-wall. The camera, orientation and zoom can be further adjusted using the arrow and zoom in/out buttons (see figure 4-2), to create your optimal camera view. Sharing content The video-conferencing equipment used is also able to share video content in the video-conference, enabling the user to give a remote presentation, or to show specific content such as a graph or an image within the video-conference. To start sharing, you first have to select a content source in the control interface (see figure 2-4), which is either a laptop connected on one of the four pull-outs on the table, or one of the available workstations. If it works correctly, the content should 8 appear in the top left screen of the video wall. Next, you have to press the “Start Content” button to switch to sending the content instead of the camera signal. Pressing “Stop Content” will switch the signal back to the previous used camera view. Note: certain Mac devices connected through HDMI will flag their output image as being copy-protected. This prevents that content to be shared in a video-conference. Sound issues If the other party does not hear you, it might be that the microphone is inactive. You can see this in the bottom right of the interface (see figure 4-5). If the microphone is inactive, the button “Mic. Inactive” will be highlighted in red, as in the screenshot of figure 4. If you do not hear the other party, you might want to turn up the volume on your side, using the volume control in the bottom left (see figure 4). 9 3D Projection Mode 3D Projection mode is for displaying content with a depth component, using 3D stereo. It works by having two distinct images projected in alternate frequency, one for the left eye, and one for the right eye, and wearing special shutter glasses to separate the images. Selecting 3D mode will bring down the projection screen in front of the middle 2x2 screen of the video-wall, and switch on the 3D projector. Since the projector lamp has to warm up, this process takes about 3 minutes to complete. Switching off again will take some time to let the lamp cool down, and prevents the 3D being switched on again until the cool down period is over. In the 3D projection interface, there are a few properties you can play around with. For example, you can switch on/off the 3D, basically switching between mono and stereo projection, or you can close/open the shutter. However, most of the properties are correct as they are, so please leave them as they are, unless there is a good reason to change them. Figure 6: 3D Projection controls In order to start and run 3D applications, there is a dedicated 3D workstation located in the technical room. You can use the wireless mouse/keyboard located on the top of the cupboard in the back to interact with the 3D workstation. The 3D workstation is a Linux/windows dual boot. Note that you do need a user account to login. Contact support if you want to do 3D visualization and need an account. Displaying 3D data is something that requires some expertise on the user side, and as such we recommend only to use it when you know what you are doing. SAGE mode In SAGE mode the input of all the screens in the video-wall is switched to DVI. Connected to the DVI input are two servers, each serving four screens. These servers can be used for running SAGE, a virtual desktop environment developed by the Electronic Visualization lab in Chicago 4. In SAGE, you can show images, movies and share your laptop desktop. SAGE is completely touch supported: You can start applications, resize, move and close applications just by using the multi-touch overlay. As a result, SAGE is an environment where you can look at multiple different data streams and interact with them as you would use a big touch tablet. Using SAGE mode is something that requires some expertise on the user side, and as such we recommend only to use it when you know what you are doing. Contact support for a detailed explanation on how to use SAGE. 4 www.sagecommons.org 10 Advanced Mode In the Advanced mode, Collaboratorium users have the freedom of placing different video signals over the Collaboratorium video-wall, while still having all functionality (such as 3D and video-conferencing) available, making it a very powerful mode. You can get directly into advanced mode from the main menu, but you can also switch directly from the other modes to advanced mode. Placing sources on the video-wall Figure 7: The advanced interface The basics of getting your output on the video wall in advanced mode involve two steps: 1) Select an input source from the “Video” column. This will make the selected source highlighted in green. 2) Select on which of the 8 screens of the video wall you want to display the output. This is done using the bottom part of the interface (see figure 8), where a 4x2 overview of the outputs being displayed on the video-wall is shown. There are a couple of exceptions to this method: The video-conference output can only be used in a limited number of screen configurations. Selecting the video-conference option will automatically place the video-conference output in the middle 2x2 of the video-wall, after which you can move it using the “Screen Mode” option on the bottom of the videowall overview. 11 The 3D projection uses a projection screen that always drops in front of the middle 2x2 screen of the video-wall. In SAGFE mode all 8 video-wall screens are switched to their DVI inputs, to which the SAGE servers are always connected. The button “Individual SAGE PC’s” is a bit more powerful, and allows you to switch individual monitors to DVI. Figure 8: The overview of the 4x video-wall output In the video wall overview, you can do two more things: Removing an image/input, by pressing the red X on the top left. This puts the screen in standby, leaving it blank. Pressing the Fullscreen option of a display lets you scale an input up to a 2x2 configuration. You get the option of putting it on the Left, Middle or Right 2x2 screens. Finally, there are columns for Audio and USB. By selecting the box before a machine, you set audio/USB for that machine: In case of the audio, the audio output of that source will be audible on the Collaboratorium speakers. In case of USB, the input provided by the wireless keyboard and mouse will be connected to that machine. This will let you work with machines not physically located in the room, such as the Linux and Windows workstation, and the 3D projection workstation. Note: Video-conference and SAGE have no USB input option. The Linux PC has no sound output, due to technical limitations. Figure 9: The Audio and USB selection interface 12 Network in the Collaboratorium In order to have a working internet connection in the Collaboratorium, there are two options that will connect you to the network: Wired and wireless. Wired For a wired connection, you have to pull a UTP cable out of one of the four pullout boxes in the table, and connect this to your laptop. Make sure that your connection is set for DHCP, and you should have a network connection. One important note here is that the pullouts only support 1Gbit/s speed internet, so if you still have a 100Mbit/s network card, these cables will not work. Alternatively, you can connect a separate UTP cable to one of the boxes on the wings of the table, marked with a red dot in the figure to the right. These network patches are configured for 100Mbit/s network connections. Wireless The Collaboratorium has a dedicated wireless access point that provides a high bandwidth wireless connection to visitors to the Collaboratorium. In order to make sure only visitors of the Collaboratorium can access this network, the “Collaboratorium” wireless network is secured with a daily-changing guest password. This password can be found on the Collaboratorium intranet, located on collab.sara.nl, which is only accessible from inside the Collaboratorium network. In order to access this, you can either use a laptop already connected through the wired network, or you can use the iPad located in the Collaboratorium. If you are using the iPad, select the icon named “Collaboratorium” in the bottom startup bar, this should direct you to collab.sara.nl immediately. On the website, you can see the current password in the upper left corner, as visible in the figure to the right. If your connection settings are not automatically configured on connecting, you can try and set your connection settings manually, using the settings listed in the figure to the right. To summarize the wireless network settings: Network SSID: Security: Encryption: Verification: Collaboratorium WPA2-Enterprise AES PEAP 13 Multi-Touch The video-wall in the Collaboratorium is equipped with a touch overlay, consisting of a large one-piece glass plate with sets of infrared emitters and sensors attached to the edge. As a result, the entire surface of the video wall has a ‘multi-touch overlay’ allowing direct interaction with the displayed images and applications. The touch events generated by the multi-touch overlay are available for use in your own applications. Specifically, we have a Java application that can subscribe to the multi-touch events, and make them available for your own application by use of the open source touch protocol TUIO5, or alternatively as mouse click events. If you want to use the multi-touch capability of the Collaboratorium please contact the support team. Ending your session When you are done working in the Collaboratorium, don’t forget to power off the video wall by using the “System off” button in the upper left corner, thereby resetting the system and putting the monitors in off mode. Don’t forget to make sure that everything is left in good order: 5 Clean up empty coffee cups, etc. Close the pull-out boxes, after putting back the cables Put things like 3D glasses and adapters back into the cupboard Turn off the lights using the switch right next to the door Lock the door http://www.tuio.org/ 14