1
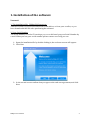
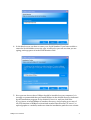
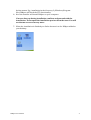
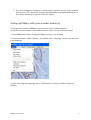
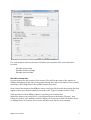
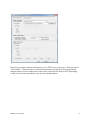
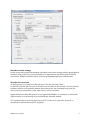
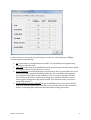
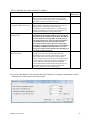
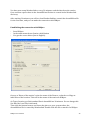
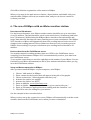
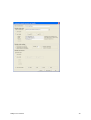
Bio Fruit Advies Marc Trapman Dorpsstraat 32 4111 KT Zoelmond RIMpro User Manual Version Feb. 2012 1-‐Installation of the software 2-‐Connecting RIMpro to a source of weather data Before you start: Measured weather data: your weather station Weather forecast data Setting up RIMpro with your weather station (s) Weather station data Weather station settings Weather forecast data 3-‐Using RIMpro Opening a station and getting results. When you correct your weather data Use of the forecast editor Forecast in the Growers version Forecast in the Advises version General menu structure and basic settings Parameters that should be adapted to year and site Apple Scab Biofix Codling Moth Biofix Fireblight 4-‐RIMpro-‐based apple scab management Relative and absolute infection risk Scab management 5-‐Use of RIMpro with a Davis Vantage Pro Weather station Collecting data Exporting data for RIMpro Setting up the automated export by Weatherlink Establishing the connection with RIMproUpdates 6-‐Use of RIMpro with an iMetos weather station RIMpro User Manual 1 1-‐Installation of the software You need: 1-‐ The installation file: RIMpro2012setup.exe This file is on the CD you received from Bio Fruit Advies, or from your reseller, or you have downloaded this file after purchasing the software. 2-‐ Your Serial Number The Serial Number is on the CD envelope you, or we did send you your Serial Number by e-‐mail. When you lost your serial number please contact us to help you out. 1-‐ Open the installation file by double clicking it, the welcome screen will appear. 2-‐ Click Next 3-‐ In the second screen confirm that you agree to the end user agreement, and click Next. RIMpro User Manual 2 4-‐ In the third screen you have to enter your Serial Number. If you have trouble to enter the Serial Number correctly, type it in Word so you can see what you are typing, and copy-‐paste it in the Serial Number field. 5-‐ Now you can choose where RIMpro should be installed on your computer. It is strongly recommended that you install RIMpro in the default directory indicated by the installation program. So by default let it as it is, and just click Next. If you choose to install RIMpro in another directory, and you plan to use any of the FTP functions of RIMpro to download weather data from an FTP server, or upload graphs to a website, make sure that the installation path does not contain RIMpro User Manual 3 broken names. E.g.: installation in the directory C:/Windows/Program files/RIMpro will block the FTP functionality. 6-‐ Now the installer will install RIMpro on your computer. If errors show up during installation, confirm, and proceed with the installation. Then repeat the installation process from the start. You will see that no errors occur any more. 7-‐ When the installation is finished you find a shortcut icon for RIMpro added to your desktop RIMpro User Manual 4 2-‐Connecting RIMpro to a source of weather data Before you start RIMpro needs measured weather data, and weather forecast data to calculate the status and expected development of the pest and disease populations in your crop. Measured weather data: your weather station RIMpro does not read data directly from your weather station, or from the internal databases created by your weather stations software. Most weather stations have software that facilitates an automatic export in a for RIMpro understandable file format. RIMpro needs the weather data to be in a txt of csv file format, with each new measurement in a new line. The files should be complete from beginning of season, and new measurements should be appended at the end of the file. As most weather stations have their own file format, RIMpro comes with a number of interfaces to interpret the files of the different types of weather stations. As an increasing number of modern weather stations is setup to send their data directly to an internet server, and also extension services tend to provide weather data to their customers over internet, RIMpro has four possibilities to retrieve data: RIMpro can read weather data from: -‐ a file on your local PC -‐ a file on your local network -‐ a file on a directory of an internet site -‐ a file on an password protected FTP server Weather forecast data When you are fruit grower, you can manually enter key parameters of weather forecast in the RIMpro Forecast Editor as will be explained later. When you are using the advisers’ version of RIMpro, you can set up RIMpro to automatically download the weather forecast from a weather forecast service where you made a contract with. So before you start setting up RIMpro: 1-‐ When you own a weather station, find out how to set it up to export automatically a file that can be read by RIMpro. For support on this contact the dealer where you purchased the weather station. 2-‐ Organize the export from weather data so that the files are complete from beginning of season. 3-‐ Note the type of weather station, and the file type RIMpro should read. 4-‐ Note the exact local file path, directory, or Internet address and, when necessary user name and password for the FTP access to your data file. RIMpro User Manual 5 5-‐ If you are an adviser, and made a contract with a weather service to get weather forecast over FTP, check that you have the right address and path information, a User name and the your password for this service. Setting up RIMpro with your weather station (s) To the growers version of RIMpro you can connect two weather stations. As adviser you can connect 110 weather stations. These can be of different types. 1-‐ Start RIMpro by double clicking the RIMpro icon on your desktop. 2-‐ In the main menu, under “Station”, you find the item “Language “ where you can select your language. 3-‐ After selecting your language, select “Add Station” to setup a weather station in RIMpro. RIMpro User Manual 6 For each weather station you have to fill this screen separate. The screen has three sections: Weather station data Weather station settings Weather forecast data Weather station data Provide a name for the location of the station. This will be the name of the station in RIMpro and appear in the title of the graphs. Mostly this will be the name of the orchard, the farm or the village where the weather station is located. Next choose the interface that RIMpro uses to read your file from the drop down list that appears when you click the small arrow next to the “Type of weather station” field. Then you have to show RIMpro where it can find your weather data. When the data are on you local PC, or local network press the button “Browse”, and follow the path to your weather data file. When you located your data file double click it so RIMpro notes its location. Your screen will then look like the next example. RIMpro User Manual 7 When your weather data are on Internet or on a FTP server, you have to click the option “Use webfile”. Then you have to enter the information you got from the organisation that provides you the weather data. Data can be retrieved over http or FTP, depending on the service that is provided to you. See the example below. RIMpro User Manual 8 Weather station settings In the next section some information is needed on the time settings and the geographical location of the station. For several models it is important to know the time of sunrise and sunset. RIMpro calculates these from the geographical position, and the time. Weather forecast data As Fruit grower, you only have the option to “Use the forecast editor”. As adviser you can add a source of weather forecast data to this station. You can provide weather data for each separate station, but as these are not extremely local, you can often refer several stations to the same source of forecast data. Again the forecast data file need to be recognized by RIMpro, so you have to choose the right interface to read exactly as you did with the weather station. You can have this forecast file local on your PC, in case you create this yourself, or download it with an external FTP program. RIMpro User Manual 9 But RIMpro can also retrieve the forecast data automatically over FTP or HTTP. You then have to choose the option Use WebFile and enter the information you got from your weather provider as in the example below. When you have filled in everything correctly, you can proceed by pressing either the key next station, or OK , when you have entered the details to all your stations. RIMpro User Manual 10 3-‐ Using RIMpro Opening a station and getting results In the RIMpro main menu, under “Station” you can choose “ Open Station”. A list then shows the stations you have created in RIMpro. Double click the station to open. RIMpro now downloads the weather data file for this station (in case the data have to be retrieved over Internet), checks for new data. Then RIMpro does the same for the weather forecast and the weather forecast file. New data are interpreted and added to the internal RIMpro database containing the interpretation of your weather data. Now you see in the main menu a new menu item “Choose a model for Your Station”. In this submenu you find a list with the Models your RIMpro version is supporting. When you choose a model from this list, RIMpro immediately calculates the actual situation for you. When you correct your weather data When there is a data gap in your file with weather data, RIMpro tries to fill this gab by interpolation during the reading of your raw data into the RIMpro internal database. RIMpro User Manual 11 When your data gab is more than 5 hours RIMpro does not fill this gab, and there will be a gap in the calculations. RIMpro only checks for new data in your data file and does not look back at the old data in your file that are already in the internal database. When you make corrections in the original data file of your weather station, you should force RIMpro to read all data again. You do this as follows: 1-‐ Open the station in RIMpro 2-‐ Choose the option “ Read data from ASCII file again” RIMpro now reads your weather data again from the beginning, and the next time you choose a model all calculations will be renewed using your corrected data. Weather forecast The use of the forecast editor In the main menu you find the menu item “Forecast Editor”. After selecting this menu you see the screen below. The lines in the screen show the following days. For every day you can type in the expected maximum and minimum temperature. From this, RIMpro will estimate the temperature in each hour of the following days using a sine function. You can indicate forecasted wetness periods by clicking in the hour fields in each line. If you click once, this hour will have leaf wetness, if you double click, in this hour it will be raining. The amount of rain in a day is not used. Forecast in the Growers version Under “Station” in the RIMpro main menu, you find the submenu “Startup parameters” that provides access to the following screen. RIMpro User Manual 12 You can set how RIMpro should behave at start-‐up, and how the weather forecast is handled. For the extrapolation of the simulations you have two options: 1-‐ Extrapolate with the existing weather data. In this model the scab calculations are extrapolated 24 hours, using the temperature development of the last day, and presuming the leafs stay wet for 24 hours. This is a worst-‐case extrapolation to see how a developing scab infection could develop. In the codling moth model an extrapolation of one week is made based on the average temperature development of the last days. 2-‐ Ask for weather forecast In this mode the information you enter in the forecast editor is used for both the Codling Moth and the Apple Scab model. Forecast in the Advisers version Under “Station” in the RIMpro main menu, you find the submenu “Forecast/ extrapolation” that provides access to the following screen. RIMpro User Manual 13 In this screen you can set the way forecasts are made for each model your RIMpro version supports individually. 1-‐ No means that no extrapolations are made. The calculations and graphs stop where you data file ends. 2-‐ 24h/14d means that an extrapolation based on previously measure data is made as explained above for the growers’ version. 3-‐ Forecast Editor means that the data you entered in the Forecast Editor are used. To give you some regional flexibility in this, the Forecast Editor distinguishes four regions: North, East, South, and West. You can enter a separate weather forecast for each of these regions, and assign your weather stations to one of these regions during the setup of the station. You can later revise your choice using “Edit Station”. 4-‐ Forecast data in local or Webfile means that RIMpro runs to the end of the file with your measured data, then switches to the weather forecast file. It looks in this for connecting data, and runs the extrapolation using these data. RIMpro User Manual 14 General menu structure and basic settings Each of the models has the following menu items: Update simulation. This forces the model to look for new weather data and append the calculations. In the Fire blight and Downy Mildew model this menu has a submenu to make a choice in how the calculations are made to compare the output. Graph In all models there are several graphs showing aspects related to management of the pest/disease in question. Depending on the model these are primary and secondary infections, inclusion of estimated residues of previous treatments, and weather data. Parameters The RIMpro models have an open structure. The end user can set most of the parameters that are ruling the calculations. Normal users are strongly advised NOT to change any of the parameter settings. Only experts that know what they are doing could adapt parameters according to their own experience or ideas. Some parameters however NEED TO BE SET to year and local conditions to obtain correct results. Parameters that should be adapted to year and site Apple scab Biofix For optimal performance the Biofix needs to be set so that first simulated discharge matches first observed ascospore discharge. Technically the Biofix is used to trim the maturation process so that the first cohorts of spores are in a position to be discharged at next rain event. Experts use several methods to set the Biofix for RIMpro. Early season observations are communicated between RIMpro users in Europe to optimize regional Biofix setting. The result of these observations and the advised Biofix for RIMpro are published each spring on the Bio Fruit Advies Website. RIMpro User Manual 15 Table 1: Methods for setting the Biofix in RIMpro Method Interpretation Green tip of main apple variety First morphologically mature ascospores under microscope First ascospores discharged in the laboratory First spores observed in spore traps in the field Order of preference When no other information is available, users can use green tip stage of their main apple variety as Biofix. Following a wet, mild winter users are advised to set the Biofix several days before this event. When looking at pseudothecia crushed on a microscope slide, finding 5-‐10% olive coloured spores in the asci indicates the morphological maturity of the pseudothecia. This leads however to a relative early setting of the Biofix as not always the first spores are actually released during the next rain event. In the weeks before bud burst, twice a week , Pseudothecio containing apple leaves are brought in form the field, and put in a perti dish. The dish is covered with a microscope slide. Then the leaves are wetted at 18-‐20°C. After two hours the slide is checked for the presence of ascospores under microscope. The first date spores are discharged from these leaves provides the most accurate Biofix for RIMpro. In RIMpro the Biofix date is set a few days prior to this event so that the first discharge in the model matches this date. Running spore traps in the field will indicate the first ascospore release in the field. As this method is depending on the occurrence of naturally occurring rain events, the actual moment of “ first ejectable spores” is between the last rain event that did not lead to spore ejection, and the first rain that brought out spores. Advisors using this method set the Biofix several days before the first observed ejection in the field trimming the system so that first simulated discharge meets first observed discharge. 3 3 1 2 You can set the Biofix for the scab model in the submenu “Ascospore maturation” under “ Parameters” in the menu of the Scab model. RIMpro User Manual 16 Codling Moth (Cydia pomonella) Biofix Users are strongly advised NOT TO USE a Biofix for the Codling Moth model. The Codling Mot model has the possibility to use “ first capture of moths in an pheromone trap “ as Biofix, but this option is only used in cases where the file of weather data does not go back early enough in the season. Fire Blight (Erwinia) Primary infections of Fire Blight occur during flowering. As RIMpro cannot calculate accurately when the flowering of the different varieties in your orchard starts and terminates, you have to enter these dates in the “ RIMpro-‐Erwinia” parameter menu of the Fire Blight program. 4-‐ RIMpro-‐based apple scab management Relative and absolute infection risk Relative infection risk During spring, during the period of ascospore discharge, the RIM values indicate the relative importance of the infection events. The graph shows you which rain events bring more, and which bring less risk for apple scab infection. RIMpro User Manual 17 Lowest graph: measured rain and leaf wetness hours Light blue in the lower graph indicates hours of leaf wetness. Dark blue are the hours where active rain is recorded by your weather station. Middele graph: Ascospore potential The dark brown field that is diminishing from left to right in the graph is the fraction of not yet mature ascospores. These spores are in the leafs that have fallen during last autumn, still lying on the on the orchard soil. During spring this potential decrease as more spores mature, and more leafs decay. The red field in the graph indicates the fraction of mature spores. These spores are ready to be discharged during the next rain period. Upper graph: The infection process The yellow peek shows the discharge of ascopsores during and following a rain event. These spores germinate on the leaf surface. When the leafs dry, these spores can survive some hours of dry conditions, but eventually dy. The white field shows the amount of spores that is still surviving on the leaf surface. The red line indicated the amount of spores that has finished the germination process and can continue the infection proses independent from leaf wetness. This amount of spores is an indication of the severity of the scab infection. This is the RIM value of the infection. The more spores are discharged, and the better the conditions for their germination, the more severe the infection will be, and the higher the RIM value. RIM values below 100 are considered light infection risk, values between 100 and 300 are considered moderate infection risk, and values over 300 are considered high infection risk. Rain events casing a RIM value over 300 occur only two to four times per year, and are the key moments in apple scab management. Absolute infection risk The absolute risk for apple scab infections to occur in your orchard is not only determined by the infection conditions as calculated by RIMpro, but also by other local factors as: -‐ Ascospore potential of the orchard ( PAD) -‐ Susceptibility of the apple varieties to apple scab -‐ Residual activity of preceding fungicide treatments Together these factors make the absolute infection risk, and determine the need for a fungicide treatment. Scab management Before the start of the growing season, growers and their adviser should establish the general risk for apple scab infections in the local orchard based on orchard history and the susceptibility of the apple variety. Unfortunately we tend to plant only highly apple scab susceptible apple varieties. Decisions in apple scab management should be based upon this general orchards risk. RIMpro User Manual 18 For technical and economical reasons apple scab management should be based as much as possible on the use of contact fungicides. The use of systemic fungicides always includes the risk for sub optimal control due to resistance developed or factors limiting the effective concentration in each leaf. Protective treatments should be made as close as possible to the rain event causing the infection. There will always be a reduction of the fungicide cover due to leaf expansion or rain wash before the fungicide can preform its action during the infection process. Stop-‐sprays with contact fungicides can be applied extremely effective during the “ germination window”. This is the time between the rain starts, and the infection (RIM value) occurs. In this way you place the full rate of your fungicide exactly at the time the fungicide performs its action on the germinating spores. By the use of Curative treatments, you allow the infection to occur, and then try to stop the further growth of the mycelium in the plant. As explained there is always a risk that this is not completely effective. Therefore you should not make systemic fungicides the key in your strategy, but use it al last fall-‐back. Table 1: General risk classes for apple orchards Ascospore potential Observed last autumn Scab susceptibility of the apple variety Low Discovery, Alkmene, Katja, Aroma Moderate Boskoop, Cox's, James grieve, Pinova, Greenstar + Vf- resistent; Topaz, Santana, Collina, Elstar at low growth Goldrush…. level High Jonagold, Golden, Gala, Braeburn, Fuji, Pink Lady, Summerred, McIntosh, Gloster, Delblush < 10 % infected shoots Low Low Moderate 10-30 % infected shoots Low Moderate High Moderate High Very High > 30% infected shoots RIMpro User Manual 19 Table 2: Guidelines for apple scab management during primary in the different risk classes: Risk General Strategy Low Moderate High Aim control at the infection peeks • Protective or stop-‐spray at full rate at events with RIM value exceeding 250-‐300 Keep all infection events covered • Apply sanitary measures • Cover before, or stop spray during each predicted infection • Always double treatment as stop-‐spray or curative when RIM value exceeds 250-‐300 Zwaar schema, pieken dubbel pakken • Apply sanitary measures • Cover before, or stop spray during each predicted infection • Always double treatment as stop-‐spray or curative when RIM value exceeds 150 Secondary infections As soon as you find any apple scab symptoms in an orchard, the conidia produced by these spots outnumber the risk for ascospore infections. From that moment onward you should only use the graph for secondary infections to make your decisions on apple scab management. During rain, conidia are splashed form the existing scab spots upon new leafs and fruits. Only freshly developed leafs are susceptible for scab infections, older leafs not. Infections on young leafs are green in the graph. Young fruits are as susceptible as young leafs, but get more resistant as the get older during the growing season. The fruit infections are red in the graph. To cause fruit infections in August much longer wetness period are necessary than in May. The difference is clearly visible in figure 2. RIMpro User Manual 20 Figure 2: Secondary infections op leafs and fruits in RIMpro. Thresholds On apple scab susceptible apple varieties scab can increase very fast during rainy periods. The level of increase is mainly depending on the weather during summer and hard to predict. Strong growing orchards keep producing fresh susceptible leafs long in summer facilitating the further increase of the epidemic. In production orchards in maritime climate of The Netherlands and Belgium we see a factor 100 increase between the number of infected leafs end of primary (May) and end of August. In these situations your thresholds should be low. On less susceptible apple varieties, and orchards that terminate their growth early, the increase of the epidemic is much slower and thresholds may be applied to decide on treatments during (parts of) the summer. For observations on apple scab all leafs of at least 200 shoots/ orchard block should be checked. Take one shoot/tree in random trees in the orchard. The outcome of your observations is only valid for the orchard you checked. Repeat the observations within four week (or two infection cycles) RIMpro User Manual 21 Table 3: Thresholds for scab management during summer Period Threshold in percent shoots with apple scab Low Moderate High Discovery, Alkmene, Katja, Boskoop, Cox's, James Jonagold, Golden, Gala, Aroma grieve, Pinova, Greenstar Braeburn, Fuji, Pink Lady, Summerred, McIntosh, + Vf- resistent; Topaz, Elstar at low growth Gloster, Delblush Santana, Collina, level Goldrush…. May 1% 0 0 June 1% 1% >0 % July 2% 2% >0 % August 7% 7% >0 % Table 4: General guidelines for apple scab management during summer Scab level Necessary treatments Below threshold • Only treat on fruit scab infections. • Preventive or stop-‐spray on leaf infections when estimated residue of previous treatment is less then 30% Preventive or stop-‐spray on fruit scab infections. Over threshold RIMpro User Manual • 22 5-‐ The use of RIMpro with a Davis Vantage Pro Weather station. Collecting data -‐ Use the Davis manuals and the support of your dealer to set up the weather station. -‐ As the sensors of the station, (particular the leaf wetness sensors) are susceptible to chemicals, we advise to setup your station between trees in a garden and not in the orchard. -‐ Your Davis station should be equipped with two leaf wetness sensors. -‐ Both sensors are placed horizontally and not in an angle as they are supplied by Davis. -‐ One sensor is placed outside the trees so gets wet with the first rain drops, and cools down during the night indicating dew periods. -‐ The other sensor is place in the shade inside tree being worst case in duration of the wetness period. -‐ The Davis Interface in the RIMpro software interprets leaf wet as long as one of the sensors is wet. -‐ The station should be set to store data in 30 minute interval, temperature in °C, and rain in mm. -‐ As long as the Console is connected to the PC, and Weatherlink is running, Weatherlink stores the data every 30 minutes in the Davis internal database. Exporting data for RIMpro RIMpro cannot read the weather data from the internal Davis database, but Weatherlink has several possibilities to export data for use by other programs. o It is possible to make a manual export of records (see Davis manual). When using this option make sure you select to export all record of the current year. The file that is produced in this way is read by the RIMpro “ Davis 30 min” txt interface. o It is possible to let Weatherlink export the data automatically in the same .txt file format every 30 minutes. That is what we normally use. The bottleneck in this is that this file is always only 7 days long so it does not contain data from beginning of year. That means that if you do not run RIMpro with a week interval, data are lost. Setting up the automated export by Weatherlink Weatherlink can automatically export the data of the last 7 days in a file that is always called downld08.txt. This file is the connection between RIMpro and Davis. For this you have to set up the Weatherlink as follows: 1-‐ Go to menu Weatherlink Main menu > Setup> Internet settings. Then you see the screen below. RIMpro User Manual 23 2-‐ In this screen click the button “Internet Connection Settings”, which brings you in the next screen called “Internet Connection Settings”. 3-‐ If you do not wish to send your weather data to an Internet site, only “Local transfer” has to be setup. -‐ On the left lower corner only mark “ Local Transfer Enabled”, and see that the box “Internet Transfer Enabled” is unmarked. -‐ In the lower right corner “Local Path” your Weatherlink directory is indicated as the place where Weatherlink will create the downld08.txt export file. Leave this as it is and close this screen by clicking “OK” RIMpro User Manual 24 You are now back in the screen called “ Internet Settings”. Click now the button “Configure” under the column “Profile1”. This brings you in the following screen called “Upload Profile 1” Choose in the upper left part at “Upload every” the setting 30 minutes. Mark in the upper right corner the option “Download Weather Station First” Then you click the button “ Select report files”. In the screen that opens next you only mark “ 1-‐Week Data Archive.” Then you close all screens by clicking OK several times. RIMpro User Manual 25 You have now setup Weatherlink to every 30 minutes read the data from the station first, and then export these in the downld08.txt file that is created in the Weatherlink directory. After waiting 30 minutes you will see that Weatherlink has created the downld08.txt file for the first time, and you can make the connection with RIMpro. Establishing the connection with RIMpro -‐ Start RIMpro. -‐ In the main menu choose Station >Add Station -‐ You get the screen below (but in English). On top, at “Name of the station” write the name of the Farmer, orchards or village as indication of the location. This will be the name of the station in RIMpro. As Type of station you find standard Davis downld08 txt 30 minutes. Do not change this. See that Use Local File is indicated. Then click the button browse and locate the place on your system where the downld08.txt file is created by Weatherlink. Double click this file to mark it for RIMpro. RIMpro User Manual 26 Click OK to finish the registration of the station in RIMpro. When you go now in the main menu to Station > Open Station, and double click your stations name, RIMpro will read you weather data, and you can choose a model to evaluate your data. 6-‐ The use of RIMpro with an iMetos weather station. Data interval 30 minutes For the best performance your iMetos weather station should be set up to store data every 30 minutes. The data should be saved on the whole hour ( 00 minutes) and halve hour (30 minutes). Within limits the RIMpro iMetos interface can read smaller and larger data intervals, but this will cause rounding errors in the calculations. The RIMpro 2012 interface to iMetos will dynamically detect the reading interval, and correct for changes in the reading interval. These routines are however only created to prevent RIMpro form crashing. For proper calculations your reading interval should be 30 minutes. Retrieve data from the FieldClimate server You weather station is sending weather data over GPRS to the FieldClimate server owned by Pessl Instruments. RIMpro 2012 can automatically retrieve your data from the FieldClimate server. To set up this connection you need the eight digit serial number of your iMetos. You can find this in your iMetos documentation, and in your stations information when you log in to the FieldClimate website. Setup an iMetos connection in RIMpro After you have installed RIMpro on your computer, start RIMpro. 1. Choose “add station” in RIMpro 2. Enter a name for the location that will appear in the title of the graphs. 3. Choose as interface “ iMetos dynamic interface(.csv)” . 4. Activate the option “use webfile” 5. Activate the option “use HTTP” 6. Enter as Address www.fieldclimate.com 7. Enter as Subdir “rimpro/the serial number of your station/the year “ 8. Enter as Filename an appropriate name ending with the extension “.csv” 9. Click OK to save the settings for your station. See the example in the screenshot below. When you have set up the connection correct, RIMpro will automatically read the actual weather data from the FieldClimate server when you start a simulation. RIMpro User Manual 27 ! RIMpro User Manual 28