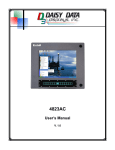
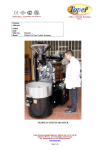
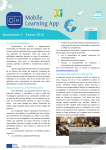
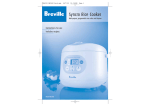
1
TOPER OPTICAL COFFEE ROASTER USER MANUAL PLEASE READ THIS MANUAL! Dear valued customer, Our product is manufactured with high quality and with the latest technology. In order to use this product for longer years, please read this manual carefully and save it for future. This user manual will help you for a fast installation of your machine. Before installation and operating your machine, read the manual. Save this user manual and store in easy accessible place. 2 TABLE OF CONTENTS IMPORTANT SAFEGUARDS .................................................................................................. 5 1. MACHINE DESCRIPTION AND SPECIFICATIONS ...................................................... 7 1.1. General Description .................................................................................................................................. 7 1.2. Parts Description ....................................................................................................................................... 8 1.3. Technical Specifications .......................................................................................................................... 8 2. CONDITIONS OF CARRIAGE ............................................................................................ 9 3. ELECTRICAL SAFETY ........................................................................................................ 9 3.1. Energy Saving .......................................................................................................................................... 10 4. INSTALLATION ................................................................................................................. 10 4.1. General Description ................................................................................................................................ 10 4.2. Power Connection ................................................................................................................................... 10 5. OPERATING INSTRUCTIONS ......................................................................................... 10 5.1. Points to Remember ................................................................................................................................ 10 5.1. Operating the Roaster ............................................................................................................................. 11 6. DIFFERENT COFFEE ROASTING LEVELS FROM ALL OVER THE WORLD .... 14 7. COOLING.............................................................................................................................. 15 8. ROASTING TIPS .................................................................................................................. 15 8.1. Figure of Roasting Steps ......................................................................................................................... 16 9. TROUBLESHOOTING INSTRUCTIONS ........................................................................ 17 10. SETTING THE ROASTING TIME - MODEL 1 ............................................................ 18 10.1. Parameter Access Menu ....................................................................................................................... 18 10.2. Setting Display Screen Contrast......................................................................................................... 21 10.3. Setting Temperature Value ................................................................................................................. 22 3 11. MAINTENANCE ................................................................................................................ 23 11.1. Removing and Cleaning of the Dust Room .............................................................................. 23 11.2. Removing and Cleaning the Roasting Chamber...................................................................... 24 11.3. Cleaning the Air Ventilation Grids of the Roaster .................................................................. 25 12. DISPOSAL OF THE MACHINE ...................................................................................... 26 13. SPARE PARTS .................................................................................................................... 26 13.1. Spare Parts List .......................................................................................................................... 27 14. WARRANTY CERTIFICATE .......................................................................................... 28 4 IMPORTANT SAFEGUARDS When using electrical appliances, basic safety precautions must always be followed, including the following: 1. Read all instructions, safeguards, and warnings before operating the machine. 2. Improper installation or modification of the machine can result with physical injuries or even death. Read this user manual carefully and use your machine in accordance with these instructions. Carry out the maintenance of the machine on time. 3. For your safety, this appliance is supplied with a grounded plug to protect against electrical shock. Do not attempt to modify the plug in any way. Electrical grounding must be in accordance with the local codes or universal code suitable with ANSI/NFPA. Use only grounded outlets. 4. To protect against electrical shock, do not immerse cord, plug, or power base in water. 5. Do not store any flammable things in the vicinity of the machine. Keep away at least 8cm (3inc.) away from the machine. 6. Do not touch hot surfaces. Use only handles or knobs. Allow the appliance to cool down completely before handling. Do not touch the glass chamber or metal parts of the chamber with bare hands during roasting. You may burn yourself. 7. Do not let children to operate the machine. Be careful when you use the machine around kids. 8. Unplug from outlet when not in use or before cleaning. 9. Do not operate with a damaged cord or plug or after the malfunctions or if the machine has been damaged in any manner. Return the machine to the manufacturer for examination or repair. 10. The use of accessory attachments is not recommended by Toper Co. It may result in fire, electrical shock, or personal injury. The appliance should be operated on a separate electrical outlet from other operating appliances due to wattage limitations. Certain models of the appliances may have a polarized plug. To reduce the risk of an electric shock, this plug is intended to fit into a polarized outlet one way. Do not attempt to modify the plug. 11. Do not use outdoors. 12. Do not let the cord hang over the edge of a counter or touch hot surfaces. 13. Do not place the machine on or near gas or electric burners. 14. Do not move the appliance while it contains hot coffee beans. 15. Do not unplug the appliance while it is operating. 16. Do not disassemble the appliance. 17. Do not leave the appliance unattended while in use. 18. To prevent breakage or burns, use only handles when unlocking the glass roasting chamber from the base unit. 19. The glass roasting pot is designed for use with this roaster only. Do not use with other machines. 20. Do not put roasting chamber on wet or cold surfaces. 5 21. 22. 23. 24. Do not place food, oil, or any other liquids in glass chamber. Do not use the roasting pot if it has a loose handle or if glass is cracked. Do not use with materials that will scratch. Always operate the machine in a well-ventilated area. Make sure the ventilation grid behind the machine is always clean. 25. Do not remove the main cover. The parts under this cover can be repaired by only authorized Toper technicians. 26. This appliance is supplied with a short power cord to reduce the risk of entanglement or tripping. Extension cords may be used. If an extension cord is used: The marked electrical rating of the extension cord should be at least as great as the electrical rating of the appliance. The longer cord should be arranged so that it will not drape over the counter or tabletop where it could be pulled on by children or tripped over unintentionally. 6 1. MACHINE DESCRIPTION AND SPECIFICATIONS 1.1. General Description Newest product of our company, Toper Optical Roaster has hot air roasting system. AIR VENTILATION GRID ROASTING CHAMBER DUST ROOM LOCK HANDLE ROASTING CHAMBER HANDLE GREEN COFFEE MEASURING CUP CHAMBER LOCK SYSTEM ROASTING CONTROL PANEL MANUAL COOLING BUTTON START BUTTON DIGITAL TEMPERATURE CONTROLLER STOP BUTTON Figure 1 7 1.2. Parts Description - DUST ROOM: Collects unwanted skin or chaff of the beans during roasting. - CHAMBER LOCK SYSTEM: It secures roasting chamber. - START BUTTON: It starts roasting process. - STOP BUTTON: Stops roasting process in case of emergency. - TEMPERATURE SETTING: It adjusts the roasting temperature. - GREEN COFFEE MEASURING CUP: It’s used to measure green been for roasting. - ROASTING CHAMBER: It’s a glass chamber where the beans are roasted. - ROASTING CONTROL PANEL: It adjusts roasting and cooling time. - DIGITAL TEMPERATURE CONTROLLER: It adjusts maximum roasting temperature during roasting. - MANUAL COOLING BUTTON - AIR VENTILATION GRID - LOCK HANDLE 1.3. Technical Specifications Machine Model Voltage Frequency Electrical Current Power Fan Speed Capacity (Per hour) Chamber Capacity Roasting Time Weight Dimensions Dimensions (With table) OPTICAL 001 220-240 Volt 50-60 Hz 14 A 3 kw 2100 rpm 1800 gr/ (light roast) 900 gr/ (dark roast) 150 gr green coffee 7 minutes (light roast) – 10 minutes (dark roast) 27 KGs 30 x 44 x 63 cm (W x L x H) 37 x 51 x 150 cm (W x L x H) Table 1 8 2. CONDITIONS OF CARRIAGE To prevent any damage, move the machine in accordance with the instructions on the package. Prevent the machine from outside impacts. Check your machine for damages after unpacking. If there is any damage on the machine, do not turn on the machine. Before first time operating, consult to service. Place the machine on a flat surface. Do not use the machine in wet and humid environment. Humidity is bad for the packed machine. Even though the machine is still in its package, humidity is not good for the machine. 3. ELECTRICAL SAFETY In order to use the machine efficiently and safely please be sure to have new and stable electrical wiring. Cable diameter used in the electrical wiring should be 2.5 mm for 220-240V. In case of fire, use only dry-type fire-extinguisher. In case of electrical malfunction; first turn off the main fuse and unplug the machine. Then call for service. Plug the machine in only grounded outlet. To reduce the risk of an electric shock, For your safety, this appliance is supplied with a grounded plug to protect against electrical shock. Use only grounded outlets. Do not attempt to modify the plug in any way. Electrical grounding must be in accordance with the local codes or universal code suitable with ANSI/NFPA. Use only grounded outlets. To protect against electrical shock, do not immerse cord, plug, or power base in water. Unplug from outlet when not in use or before cleaning. Do not operate with a damaged cord or plug or after the malfunctions or if the machine has been damaged in any manner. Return the machine to the manufacturer for examination or repair. The use of accessory attachments is not recommended by Toper Co. It may result in fire, electrical shock, or personal injury. The appliance should be operated on a separate electrical outlet from other operating appliances due to wattage limitations. Certain models of the appliances may have a polarized plug. Do not let the cord hang over the edge of a counter or touch hot surfaces. Do not unplug the appliance while it is operating. This appliance is supplied with a short power cord to reduce the risk of entanglement or tripping. 9 Extension cords may be used. If an extension cord is used, marked electrical rating of the extension cord should be at least as great as the electrical rating of the appliance. The longer cord should be arranged so that it will not drape over the counter or tabletop where it could be pulled on by children or tripped over unintentionally. 3.1. Energy Saving Start roasting after you fill the green coffee measuring cup fully. Turn off power switch after completing roasting. 4. INSTALLATION 4.1. General Description After unpacking, place the machine on a flat surface. Do not use the machine on slippery surfaces which can harm the user. Always operate this roaster in a well-ventilated area. Smoke is a natural by-product of the roasting process. 4.2. Power Connection This machine is suitable for 220-240V. The machine is ready to use. Read “3-ELECTRICAL SAFETY” section before operating the machine and take necessary precautions. 5. OPERATING INSTRUCTIONS 5.1. Points to Remember You can roast already roasted coffee beans in the roaster. Make sure the ventilation grid behind the machine is always clean. The machine gives hot air into environment so keep in mind that this will warm up indoor area. If the roasting pot is not properly locked, hot air will leak and may cause damage to the roaster. If this happens please push the cool button immediately. This will cool down the unit and prevent any further damage. Do not unplug the machine! In order to stop a roasting process, do not use POWER button. If the coffee beans seem to be being over roasted, push “COOLING” button, roasting process will end and 10 cooling process will start. If you turn off the machine at this point, you will also cancel the cooling so beans will stay hot. This may cause fire or smoke. Before getting the beans always let the roaster to complete cooling process. Clean the roaster after each use. Cleaning plays a very critical role in the efficiency of the roaster. Read “Maintenance” section. Be around the machine and do not leave the machine unattended while in use. Due to power blackout, blocked ventilation grid or improper use, the roaster may stop and this may burn the coffee beans inside. The moisture in the green beans may force the roaster. Consider green coffee storage conditions. Make sure that no foreign materials like metal, stone, plastic are in the roasting chamber. In order to get the same roasting results, make three roasts in sequence. On the forth roast you will get the same results. Your sample green coffee beans should be around 50-150 grams, same size and same type. In case of any malfunction, call for service. Do not try to repair the machine on your own. User interventions are stated at the end of user manual. 5.2. Operating the Roaster Measurement: Add one full measuring cup of green coffee into glass roasting chamber. This is 150grams depending on bean size and density. To ensure optimal roasting performance, do not add more than one cup of green beans. You may roast less. If the roasting result is uneven, reduce the roasting amount. 5.2.1. Removing the roasting chamber Half turn the handle clockwise (See Figure 2). 11 Figure 2 Remove the roasting chamber by pulling towards yourself. (See Figure 3.) Figure 3 Put the green beans into the roasting chamber. 12 5.2.2. Locking the roasting chamber Place the glass roasting chamber on the main unit. Reverse the chamber removing process to lock. WARNING: If the roasting pot is not properly locked, hot air will leak and may cause damage to the roaster. If this happens please push the cool button immediately. This will cool down the unit and prevent any further damage. Do not unplug the machine! To set roasting time use roasting adjustment board. Please read “SETTING THE ROASTING TIME-MODEL 1” section for roasting settings. 5.2.3. Starting Push START button of the roaster. START button will start roasting process and proceeds as below: The fan starts and the beans move in the air inside the chamber. Whirlpool of the beans is the sign of a proper roasting. The machine roasts automatically and increases the temperature to your desired set roasting temperature. During roasting, there will be changes in the color, size and weight of the beans. See Figure 4. - - - Color: As long as the bean temperature is increasing, the color of the beans will transform from green to yellow then yellow to brown. If you continue the roasting the color of the beans will go darker, and also the oil will come out of the beans. Note: Decaffeinated coffee beans will be already brown in the beginning of roasting as they are processed beans. Size: As long as the beans will be heated up, the size of the beans will enlarge. The beans enlarge nearly 30% during roasting. This enlarging process is called as “CRACK” which can be also noticed with a cracking sound. This happens for the first time in the 3rd minute and again in the 4th minute. Weight: There is humidity in the green coffee beans so they are heavier than roasted beans. During roasting, the humidity in the beans disappears. As the beans lose weight towards the end of roasting they move faster in the roasting chamber. After approximately four minutes, the roasting process finishes. The roaster automatically stops the heating and starts cooling process. In the cooling process, the fan cools the beans 13 nearly in 3 minutes. When the cooling process ends, the coffee beans cool down to a temperature that allows you to hold the beans with your bare hands. After completing the cooling process the fan stops and the roaster enters standby mode. The roaster waits in standby mode till you push START button to begin another roasting process. 6. DIFFERENT COFFEE ROASTING LEVELS FROM ALL OVER THE WORLD Below you can find a table for different coffee beans in different roasted color results from all around the world in different origins. Only color number #1 is raw coffee bean which is unroasted. All the other specified numbers are roasted coffee beans. You can see roasted coffee beans in those colors in many different countries. Also there can be different roasting preferences in the same country. The significant point is roasting as the way you or your customer prefer. Figure 4 14 7. COOLING After roasting process finishes, the roaster will enter cooling process for 3 minutes. While roasting, watch the progress in the roasting chamber to get your favorite roast. As soon as you reach your desired roasting level and color, press “COOLING” button so you do not over roast your beans. After the cooling process is completed, the roasting chamber can be unlocked and cooled beans can be removed safely. Clean dust room after each roast. See “Cleaning Instructions”. 8. ROASTING TIPS 1) We strongly recommend you to record your roasting process and these records will be your source of information. Keep a roasting journal with the following information: a) b) c) d) e) f) g) h) i) j) Roasting times and temperatures Times and temperatures for each three steps. Ambient Temperature Type of the green beans Humidity rate of the green beans Size of the green beans Temperature degree and time of 1st and 2nd cracks Amount of chaff Type of roast Cupping results 2) Roasted beans remain at peak flavor for about 2 weeks. Placing them into a vacuum container can extend this time. Refrigeration does not extend their life. 3) Ground coffee beans remain fresh for only two days. 4) Flavors may be safely added after roasting. Place the roasted beans into a mixing bowl to add flavorings. Never place liquids into the roasting pot! 15 8.1. Figure of Roasting Steps 4) After each 5 roast, clean dust room. To remove the dust room, pull it down. 1) Remove the roasting chamber by turning the handle clockwise. Add one full measuring cup of green coffee into glass roasting chamber. 2) Set your desired roasting temperature and time. Figure 5 3) Press green START button. 16 9. TROUBLESHOOTING INSTRUCTIONS 9.1. During roasting, if green beans do not seem to mix well, check for the following: a) Ensure that the roasting pot is locked into the base properly. b) Make sure that no foreign material is blocking the ventilation grids located on the back of the roaster. If this occurs, clear them out of the way. c) Make sure you are using no more than 1 full measuring cup of green beans (150grams). 9.2. On very rare occasions, a specific bean may present some roasting difficulties: This may occur because the bean is either much larger or smaller than normal, or because its natural density is much heavier than usual. To accommodate these natural bean variations, the roast may be adjusted by removing up to 50% of the beans. 9.3. Roasting too dark or too light: a) Reduce or increase roasting time. b) Set the roaster at higher temperature for darker roast, or lower temperature for lighter roast. 9.4. No power or no display: Make sure the plug is inserted properly in the power outlet. PROBLEM Roasting time is too long. Roasting time is too long. The bean colors are not homogenous. POSSIBLE REASONS POSSIBLE SOLUTIONS Ventilation grid may be blocked. The beans may be old or there might be humidity inside the beans. Clean the ventilation grid. It can be blend coffee or the beans may not be from single origin. Use same origin beans. The beans may be old or there might be humidity inside the beans. Use same type and size beans. Use beans which have less humid. Table 2 17 10. SETTINGS THE ROASTING TIME (MODEL 1) Figure 6 10.1. Parameter Access Menu You can reach parameter access menu pressing ESC when the power is on. When you are in the menu, use direction keys to go sections. If you change anything, press OK to save. Choose “Set Parameter” section to determine START, ROAST and COOL times. In total the roaster has one START time, four ROAST times and one COOL time. Press OK to enter, input your new value, and then press OK to save. To input new value for another time section, use direction keys to go that section. Repeat same steps. Press ESC to exit access menu. 18 To see elapsed time, press direction keys and proceed to ESC+Key page. When you enter this page, press and hold ESC. First press ▼ DOWN KEY, then press ▲ UP KEY to see times. When you start roasting with START button, predefined START, ROAST and COOL times will be shown on the screen in sequence (only during roasting). During roasting, do not cut off the power. Figure 7 StartScreen of the roaster 19 Figure 8 Recorded program in control menu Figure 9 To save your operation press ESC then choose “SET PARAMETER” section in the menu. 20 Figure 10 You can increase or decrease time with direction keys. 10.2. Setting Display Screen Contrast When the power is on, press ESC to enter the main setup menu. Choose “Stop” in the menu and press OK. Choose “Setup” and press OK. Choose “LCD” and press OK. Choose “Contrast” for setting display screen contrast level. Choose “Backlight” and press OK. To make screen backlight always active, choose “Always On” and press OK. Then press ESC button two times to go main menu. Choose “Start” and press OK. This will take you to StartScreen. WARNINIG: If you do not apply these steps to go StartScreen, your roaster will not operate and the roasting process will not begin. 21 10.3. Setting Temperature Set Value Figure 11 Figure 12 22 11. MAINTENANCE Before interfere with the roaster for maintenance and cleaning, turn off and unplug the machine. For cleaning you may use cloth moisturized with alcohol. Do not use unhealthy chemicals (like gasoline, diesel etc.). Do not wash outside surfaces of the roaster. Clean with a damp cloth and dry properly. Have your roaster serviced annually. General maintenance should be done only by authorized service. If you want to roast different kinds of coffee beans, you should clean the roasting chamber before each roast as aroma and oil from the previous roast can mix in the next roast. Use only original Toper spare parts. 11.1. Removing and Cleaning of the Dust Room Figure 13 Dust room is fixed to main body with magnetic force. Remove the dust room from the main body by pulling down. 23 11.2. Removing and Cleaning the Roasting Chamber Half turn the handle clockwise. Figure 14 Figure 15 Remove the roasting chamber by pulling towards yourself and then clean it. 24 11.3. Cleaning the Air Ventilation Grids of the Roaster Figure 16 Roaster Upper Ventilation Grids Figure 17 Dust Room Backside Ventilation Grids 25 Figure 18 Roaster Hot Air Exit Clean all ventilation grids shown above with a wire brush. Make sure ventilation grids are always clean. 12. DISPOSAL OF THE MACHINE This machine will serve you for long years as long as the machine is used and maintained in accordance with the instructions. As well as each machine, this roaster has an expected product life. When the machine completes its product life, consult your local recycling companies for disposal procedure. 13. SPARE PARTS You can supply spare parts for your machine from your dealer or service. Some spare parts can be replaced by owner. These parts will be sent to you with installation instructions. 26 13.1. Spare Parts List 1. Heating Element 3800W or 3000W. 2. Thermocouple (1 meter) 3. Digital Temperature Controller 4. Glass Roasting Chamber 5. Green Coffee Measuring Cup 6. Dust Room 7. Roasting Chamber Lock Handle 8. PLC Unit 9. Fan Motor 10. Buttons 27 TOPER KARAKUNDAKOĞLU DEĞ. MAK. SAN. VE TİC. LTD. ŞTİ. TERMS OF WARRANTY: 1. WARRANTY PERIOD IS TWO (2) YEARS BEGINNING FROM DATE OF INVOICE. 2. WARRANTY COVERS FAULTY MACHINE AND SPARE PARTS. 3. THE WARRANTY DOES NOT COVER DAMAGES DUE TO MISCARRIAGE, ELECTRICAL FLUCTUATIONS AND IMPROPER USE OF THE MACHINE AGAINST THE MANUFACTURER’S WRITTEN INSTRUCTIONS. 4. WARRANTY IS VOIDED IF REPAIRS ARE MADE SOMEONE BESIDE AN UNAUTHORIZED SERVICE. 5. ANY REPAIR WITHOUT KNOWLEDGE OF TOPER WILL AVOID THE WARRANTY. 6. PLACE OF REPAIR IS DECIDED BY MANUFATURER (TOPER). 7. THE COST OF REPAIR DURING WARRANTY PERIOD CANNOT EXCEED PRODUCT PRICE. 8. SPARE PARTS, MAINTENANCE AND SERVICE COSTS ARE COVERED BY WARRANTY. 9- SERVICE TIME IS ADDED IN WARRANTY PERIOD. MACHINE MODEL : OPTICAL ROASTER BUYER NAME AND ADDRESS : INVOICE NUMBERAND DATE : SERIAL NUMBER : 28 TOPER KARAKUNDAKOĞLU DEĞİRMEN SAN. VE TİC. LTD. ŞTİ 5912 SOKAK NO: 3 KARABAĞLAR İZMİR TÜRKİYE TEL : + 90.232.254 01 21 FAX: + 90.232.237 21 27 www.toper.com 29