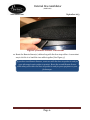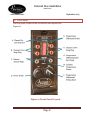
1
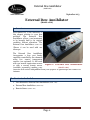
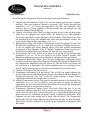
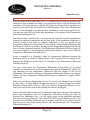
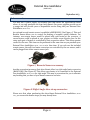
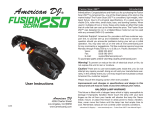
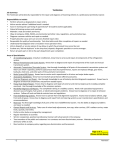
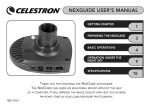
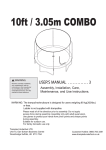
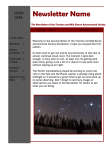
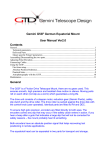
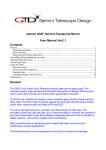
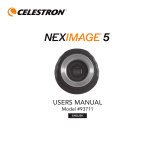
User’s Manual for the Astro-Smart External Dew Annihilator External Differential Dew Heater Module (Model: eDA) Copyright September 2013 User’s Manual for the Astro-Smart External Dew Annihilator (Model: eDA) Contents A. Overview................................................................................................................. 2 B. Contents Included.................................................................................................. 2 C. Specifications ......................................................................................................... 3 D. Design Features ..................................................................................................... 4 E. Basic Functionality ................................................................................................ 4 F. How to Use ............................................................................................................. 5 G. 1. Front Panel ...................................................................................................... 7 2. Operation ........................................................................................................ 9 Accessories ........................................................................................................... 10 Astro-Smart LLC P.O. Box 33753 Indialantic, FL 32903 Page 1 External Dew Annihilator (Model: eDA) astro-smart.com September 2013 External Dew Annihilator (Model: eDA) A. Overview Astro-Smart LLC is the innovator of this elegant solution to your dew problem. The External Dew Annihilator allows your investment to be brought back to its original condition without alteration. The External Dew Annihilator (Model: eDA) (Figure 1) can be used with any telescope. The External Dew Annihilator incorporates a four port heater capability controlled by two channels using two remote temperature sensors (one optional). It will work with one remote temperature sensor Figure 1: External Dew Annihilator or with a second remote sensor (Model: eDA) (available separately) making your corrector dew control independent from your eyepiece or guidescope dew control for instance. B. Contents Included 1. User Manual for External Dew Annihilator (Model: eDA). 2. External Dew Annihilator (Model: eDA) 3. Remote Sensor (Model: eDA) Providing the Astronomical Community with Premier Products, Services, and Training Page 2 External Dew Annihilator (Model: eDA) astro-smart.com September 2013 C. Specifications The External Dew Annihilator (Model: eDA) requires the following: 12 Volts at 3 amps minimum Note: This current drawn through the External Dew Annihilator (Model: eDA) is dependent on the resistance of each dew strap being used with the External Dew Annihilator (Model: eDA). The total current for all the dew straps must not exceed the power supply current rating, see red highlighted equation below: The total resistance of all the dew heater straps used with the External Dew Annihilator (Model: eDA) must follow this equation for SAFE operation: Current Rating of Power Supply Voltage output of Power Supply = 1 Rstrap 1 + 1 Rstrap 2 + 1 Rstrap 3 + 1 Rstrap 4 Astro-Smart LLC assumes no responsibility if this or any other warning is not heeded. Center: positive voltage, sleeve: ground [See Figure 2]. Positive (+) 12V Grounded Sleeve Figure 2 DC power plug Uses dew straps manufactured by other astronomical vendors (You must verify usability via the equation above). Providing the Astronomical Community with Premier Products, Services, and Training Page 3 External Dew Annihilator (Model: eDA) astro-smart.com September 2013 D. Design Features The Astro-Smart External Dew Annihilator (Model: features: eDA) has these innovative and unique Efficient and elegant use at your telescope. It is lightweight. Yet aids balancing when placed appropriately. High quality components and construction. Astro-Smart uses only the best quality components. It can keep optical surfaces free of moisture in many different circumstances. High quality design employs multi-layer circuit boards with conformal coatings. E. Basic Functionality The user simply adjusts the temperature differential based on local current ambient and dew temperature conditions. The External Dew Annihilator (Model: eDA) displays the above ambient temperature differential setting via a bar graph showing each degree Celsius temperature difference. The display is also calibrated for Fahrenheit degrees as well. Each External Dew Annihilator (Model: eDA) comes with one remote sensor. You simply co-locate the sensor head with your primary heater. Figure 3 displays the normal a closer view of the Temperature Scale. Figure 3 Temperature Scale of the Dew Annihilator (Model: iDA shown) Providing the Astronomical Community with Premier Products, Services, and Training Page 4 External Dew Annihilator (Model: eDA) astro-smart.com September 2013 F. How to Use 1. Setup 1. Ensure the Power Switch is in the OFF position [See 2. Figure 6, Page 7, item (D)]. 3. Ensure the Temperature Differential Setting Knob is rotated Counter-Clockwise. 4. Conveniently locate your External Dew Annihilator on your telescope or other suitable location. 5. Connect the Remote Sensor cable that was supplied with the External Dew Annihilator into the Remote Sensor Plug [See 6. Figure 6, Page 7, item (C)]. If you purchased the 2nd Remote Sensor you may install it at this time. 7. Connect any dew straps that you have [See 8. Figure 6, Page 7, item (B andthe F)].total resistance meets the specifications WARNINIG: Ensure provided in Section C on Page3. Astro-Smart is not responsible for failure to heed this warning. If you purchased the Right-Angle dew strap connector(s) you may choose to install them at this time along with the connection of your dew straps. 9. Install the Remote Sensor at each location under the dew strap with the flat face of the sensor facing the telescope, finder, or eyepiece piece [See Figure 4]. Providing the Astronomical Community with Premier Products, Services, and Training Page 5 External Dew Annihilator (Model: eDA) astro-smart.com September 2013 Figure 4 Remote Sensor Placement 10. Route the Remote Sensor(s) cables along with the dew strap cables. A convenient way to do this is to braid the two cables together [See Figure 5]. If you have two Remote Sensors, route one with the dew strap that is used for your telescope’s main surface to protect. Route the second Remote Sensor cable along with either the dew strap that is used for your eyepieces or your finderscope. Providing the Astronomical Community with Premier Products, Services, and Training Page 6 External Dew Annihilator (Model: eDA) astro-smart.com September 2013 Figure 5 Route Sensor cable with Dew Strap cable 11. Connect the power supply that is 12V 3amp (minimum) [See Section C, Page 3]. Providing the Astronomical Community with Premier Products, Services, and Training Page 7 External Dew Annihilator (Model: eDA) astro-smart.com September 2013 2. Front Panel The front panel contains all the controls the user requires [See Figure 6]. Figure 6 Front Panel Layout Providing the Astronomical Community with Premier Products, Services, and Training Page 8 External Dew Annihilator (Model: eDA) astro-smart.com September 2013 The following are descriptions of each of the major control panel features: A. Channel-ON LED Indicators: Each of the two dew heater channels has a separate indicator. When the respective Channel is powered (“ON”) by the External Dew Annihilator (Model: eDA) circuit the appropriate red LED will illuminate. This indicates power is being supplied to the dew straps that are plugged into the respective Channel Dew Strap Plug. B. Channel 1 Dew Strap Plug: These two plugs provide power to the two dew straps when they are plugged into them. When the Channel-1 On LED Indicator illuminates then there is power supplied to these Channel-1 Dew Strap Plugs. They are standard RCA plugs. Any standard dew strap from astronomical vendors will work with the External Dew Annihilator (Model: eDA). C. Remote Sensor Plugs: The Remote Temperature Sensors are plugged in here. The External Dew Annihilator (Model: eDA) comes with one Remote Temperature Sensor. It can be plugged into either Remote Sensor Plug and provide temperature information to both Channels. If the 2nd Remote Temperature Sensor Accessory is purchased and utilized then each Channel will have its own remote sensor. D. Power Switch: The Power Switch is the main on-off switch for the External Dew Annihilator (Model: eDA). In the ON position the Power Switch’s internal LED illuminates indicating power is being supplied to the External Dew Annihilator. E. Temperature Differential Scales: There are two Temperature Differential Scales provided on the front panel. The Temperature Differential Setting is indicated with the Temperature Differential LED Bar Graph (G). The left Scale is in Celsius and the right Scale is in Fahrenheit. The Celsius graduates from 0 to 10 degrees every degree. The Fahrenheit Scale is converted and rounded for each Celsius scale. F. Channel 2 Dew Strap Plug: See B. above. G. Temperature Differential LED Bar Graph: This 10 LED bar graph indicates the desired Temperature Differential Setting between the Ambient (H) and Remote (C) Temperature Sensors. Each LED in the bar graph indicates 1 degree Celsius temperature difference set between the two sensors. H. Ambient Temperature Sensor: This sensor is mounted internal to the External Dew Annihilator (Model: eDA) and is visible on the front panel. It senses the ambient temperature for use by the External Dew Annihilator to determine the temperature difference between it and the remote sensors. I. Temperature Differential Setting Knob: This knob allows the user to set the temperature difference that they wish to use for the activation of power to the dew straps. Turn the knob fully counter-clockwise for no temperature differential and fully clock-wise for maximum 10 degree Celsius temperature differential. Both Channels use the same setting that is made with this knob. The Temperature Differential LED Bar Graph indicates the setting the user has set with this knob. Each degree Celsius is indicted by an LED on the Temperature Differential LED Bar Graph. Providing the Astronomical Community with Premier Products, Services, and Training Page 9 External Dew Annihilator (Model: eDA) astro-smart.com September 2013 3. Operation Once the External Dew Annihilator (Model: eDA), Remote Sensor cable(s), and dew strap cables have been installed according to the procedures above, turn the External Dew Annihilator ON using the Power Switch (D). When the External Dew Annihilator is turned on you will see the Power Switch red LED illuminate. This is the indication that power is being supplied to the External Dew Annihilator circuit and is ready for use. You may see other LEDs lit at this time depending on the setting of the Temperature Differential Setting Knob (I). Check the weather conditions for your observing site. Note the temperature difference between the ambient temperature and the dew point. If the temperature difference is relatively small, on the order of 5 degrees Fahrenheit or less, you should set the Temperature Difference Setting Knob (I) such that the Temperature Differential LED Bar Graph (G) indicate a setting on the appropriate Temperature Differential Scale (E) that is at least 2 degrees Fahrenheit. The Temperature Differential LED Bar Graph (G) is a visual indicator of the temperature differential setting the user has set with the Temperature Differential Setting Knob (I). Power is supplied to a Channel(s) when the temperature difference between the Remote Sensor(s) (C) and the Ambient Sensor (H) is greater than the setting of the Temperature Difference Setting Knob (I) indicated by the Temperature Differential LED Bar Graph (G). You may notice when the Temperature Differential Setting Knob (I) is turned clockwise a small amount from the minimum setting that the Channel ON LED(s) (A) will illuminate but the Temperature Differential LED Bar Graph (G) will not be illuminated. This condition indicates a Temperature Differential Setting of 0.5 degrees Celsius. All other Temperature Differential Settings are indicated in 1 degree Celsius increments. When only one Remote Temperature Sensor (C) is used, both Channels are controlled by that sensor. A single Remote Temperature Sensor (C) can be plugged into either Channel’s Remote Sensor Plug (C). When two Remote Temperature Sensors (C) are used, then each sensor controls the Channel into which it is plugged. When a Channel’s Remote Sensor (C) temperature falls below the sum of the Ambient Sensor (H) temperature plus the Temperature Differential Setting (G), then the External Dew Annihilator (Model: eDA) will supply power to the applicable associated Channel’s Dew Strap Plugs (B). The Channel ON LED (A) will illuminate ON as the External Dew Annihilator heats the optical elements and OFF as the optical elements heat above the sum of the Ambient Sensor (H) temperature plus the Temperature Differential Setting (G). Providing the Astronomical Community with Premier Products, Services, and Training Page 10 External Dew Annihilator (Model: eDA) astro-smart.com September 2013 G. Accessories You may use a power supply you already have that meets the specifications listed above, or you may purchase one from Astro-Smart. Our power supplies provide 12v at 3.3amps and will provide years of dependable service along side your External Dew Annihilator (Model: eDA). An optional second remote sensor is available (2RSDDH-M)) [See Figure 7]. This 2nd Remote Sensor allows you to control the heating of separate optical elements. For instance, one remote sensor would be placed with your heater at the corrector. A second sensor could be placed at your eyepiece or finder scope objective lens. In this setup each pair of heaters is controlled by their respective sensor. This allows greater control for the user. This item can be purchased at the same time as you purchase your External Dew Annihilator (Model: eDA) or at a later time. If you only use the included remote sensor, then all four heater connectors are controlled by the one sensor; and it can be plugged into either remote sensor jack. Figure 7 Remote Sensor accessory Another convenient accessory that Astro-Smart offers is a right angle heater connector (RAHC-DM)) [See Figure 8]. This allows your heater to be connected to the External Dew Annihilator (Model: eDA) at a right angle. This may be convenient for you to alleviate any bending that you have of your heater connector and wire. Figure 8 Right Angle dew strap connector Please note that when purchasing the Astro-Smart External Dew Annihilator eDA), you can use the heater straps you may already have. Providing the Astronomical Community with Premier Products, Services, and Training Page 11 (Model: External Dew Annihilator (Model: eDA) astro-smart.com September 2013 Visit Astro-Smart for more astronomical products and services at www.astro-smart.com . Return Policy All items must be in new (mint) condition. Returned items cannot show evidence of use or wear, dirt, or blemishes of any kind. Merchandise must be returned in its original packaging and should include all supplied materials, instructions, warranty cards, original accessories, hardware, and any software provided. Astro-Smart LLC is not responsible for lost or damaged packages. Return shipping costs are the responsibility of the customer. A 20% restocking fee will apply to returnable items if they are returned within 15 days of shipment from us. Items must be in "as new" condition and unopened. We ask that you open and inspect your order upon receipt since no insurance or damage claims will be accepted more than three days after delivery. All Customers MUST call before returning products for warranty or repair to get an RMA# (Return Merchandise Authorization) or an SRO# (Service Repair Order) as well as return shipping instructions and return shipping address. Items being returned from the continental US must be sent 'PARCEL POST', unless directed by Astro-Smart LLC to do otherwise. Failure to do so will result in customs and administration charges being charged to the customer's account or the shipment being refused. Product is to be returned with delivery and insurance charges prepaid and these charges are not refundable. Limited Warranty Upon receipt of returned product, Astro-Smart LLC will assess the item/s to determine if they comply with the conditions of our warranty. Items that do comply will be fixed or replaced free of charge. Items that are deemed to be out of warranty or have had their warranty voided will, with the customer's knowledge, be fixed at our costs specified below or replaced with new product paid for at full retail value. Please note that items that have been returned for repair or assessment and are deemed to be in proper working order will have a $60.00 bench charge applied as well as return shipping costs. Repairable items that are out of warranty will be charged $70.00 per hour plus parts as well as return shipping costs. Our warranty does not cover damage due to misuse, accidental, incidental or intentional abuse, tampering or the wear and tear of normal use. Astro-Smart External Dew Annihilator (Model: eDA) Module: 90 days for parts and labor. Sensors: 90 days for parts and labor. In no event shall Astro-Smart LLC be liable for any claim for incidental or consequential damage arising out of or in connection, manufacture, delivery or use of any product offered on this website or by information received by US mail, E-mail, data files or fax. Astro-Smart LLC is not responsible for damage caused by the freight carrier, i.e.: UPS, FED EX, etc., to our product. Warranty coverage excludes normal wear and tear, or damage caused by improper installation, any modification, abuse, misuse, improper maintenance, and unauthorized repairs or modifications to the original product. Warranty does not cover those parts prone to failure under normal wear and tear. Any product repair request must be submitted and approved before shipment to Astro-Smart LLC. Shipper is responsible for proper packaging, shipping and insurance on approved repair items. Providing the Astronomical Community with Premier Products, Services, and Training Page 12