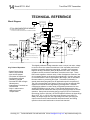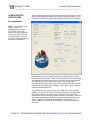
1
USB Programmable, DIN Form B
Connection Head Transmitter
Model ST131-0600 & ST131-0610
Two-Wire Transmitter, RTD Input
USER’S MANUAL
ACROMAG INCORPORATED
30765 South Wixom Road
P.O. BOX 437
Wixom, MI 48393-7037 U.S.A.
Tel: (248) 295-0880
Fax: (248) 624-9234
email: [email protected]
Copyright 2010, Acromag, Inc., Printed in the USA.
Data and specifications are subject to change without notice.
8500-895-B11A002
2
Model ST131-06x0
Two-Wire RTD Transmitter
___________________________________________________________________
TABLE OF
CONTENTS
Symbols on equipment:
!
Means “Refer to User’s
Manual (this manual) for
additional information”.
The information of this manual
may change without notice.
Acromag makes no warranty
of any kind with regard to this
material, including, but not
limited to, the implied
warranties of merchantability
and fitness for a particular
purpose. Further, Acromag
assumes no responsibility for
any errors that may appear in
this manual and makes no
commitment to update, or
keep current, the information
contained in this manual. No
part of this manual may be
copied or reproduced in any
form without the prior written
consent of Acromag, Inc.
For additional information,
please visit our web site at
www.acromag.com and
download our whitepaper
8500-904, Introduction to TwoWire Transmitters.
Windows® is a registered
trademark of Microsoft
Corporation.
IMPORTANT SAFETY CONSIDERATIONS
You must consider the possible negative effects of power, wiring,
component, sensor, or software failure in the design of any type of
control or monitoring system. This is very important where property
loss or human life is involved. It is important that you perform
satisfactory overall system design and it is agreed between you and
Acromag, that this is your responsibility.
GETTING STARTED
DESCRIPTION….…………………….………..………..
Key Features……………………………………….
Application.…………..…………………………….
Mechanical Dimensions..………………………..
ELECTRICAL CONNECTIONS.….……..……………..
Sensor Input Connections…..………………….
Output/Power Connections....………………….
Earth Ground Connections……………….…….
USB Connections.………………………………...
CONFIGURATION SOFTWARE…….…………………
Introduction…………....………………………….
TROUBLESHOOTING……...…………………………..
Diagnostics Table.………………………………..
3
3
3
4
5
5
6
7
8
9
9
11
11
TECHNICAL REFERENCE
BLOCK DIAGRAM…..……...…………………………..
CONFIGURATION STEP-BY-STEP…………………..
Calibration Connections..…………..…………..
Reconfiguration Parameters.…..……………….
Zero & Full-Scale Calibration……………..........
Over-Scale & Under-Scale Thresholds.……….
Break Detection…………………………………...
Read Status & Reset Unit.…………………..
Factory Settings…………………………………..
SPECIFICATIONS……………………...……………….
Model Numbers...……………….………………..
Input…………………………………………………
Output…………..………..……....…………………
USB Interface..…………………………………….
Approvals…..…………………………………..….
Enclosure and Physical………………………….
Environmental……………………………………..
Reliability Prediction……………………………..
Configuration Controls…………………………..
ACCESSORIES……………...…………………………..
Software Interface Package…………………….
Transmitter Mounting Kit………………………..
USB Isolator…..….………………………………..
USB A-B Cable, USB A-mini B Cable………….
DIN Rail Adapter Kit………………………………
Connection Heads………………………………..
14
17
17
18
22
26
27
27
28
28
28
29
30
32
32
32
33
34
34
34
34
34
34
35
35
35
_______________________________________________________________________________________
Acromag, Inc. Tel:248-295-0880 Fax:248-624-9234 Email:[email protected] http://www.acromag.com
Model ST131-06x0
Two-Wire RTD Transmitter
__________________________________________________________________
The ST131-06x0 is an ANSI/ISA Type II transmitter designed to interface
with a Platinum RTD (Resistance Temperature Detector) sensor, or
resistance input, and modulates a 4-20mA current signal for a two-wire
current loop. This unit is setup and calibrated using configuration software
and a USB connection to Windows-based PC’s (Windows XP and later
versions only). The unit provides RTD sensor excitation, linearization, leadwire compensation, and lead break or sensor burnout detection. It also
offers an adjustable input and output range with adjustable alarm levels.
DESCRIPTION
•
•
•
•
•
•
•
•
•
•
•
•
•
•
•
•
•
•
•
•
•
Key Features
Fully analog signal path (input signal is not digitized).
Converts sensor signal with a single differential measurement.
Digitally setup and calibrated w/ Windows software via USB.
Pt RTD or Linear Resistance input support.
Adjustable input range up to 900°C or 900Ω.
Adjustable input excitation, linearization, and output range.
Connects to two, three, or four wire sensors.
Lead-wire compensation (3-wire).
Up or down-scale lead-break/burnout detection
Adjustable output error/alarm levels outside of operating range.
Non-polarized two-wire current output.
Convenient two-wire loop power.
Provides a linearized or non-linearized output response.
Adjustable under-range and over-range levels. Namur compliant.
High measurement accuracy and linearity.
Wide ambient temperature operation.
Hardened For Harsh Environments.
Designed for DIN Form B sensor head mounting.
Optional DIN Rail Adapter for T-type & G-type rail.
CE Approved (Pending).
UL/cUL Class 1, Division 2 Approved Model (ST131-0610, Pending).
This transmitter is designed for mounting in DIN Form B connection/sensor
heads commonly used in thermowell applications for sensing temperature.
Optionally, a DIN-rail adapter may be purchased for mounting the unit to Ttype, or G-type DIN rail.
3
Application
Its non-isolated input is intended to mate with non-grounded, 100Ω, Pt RTD
temperature probes common to these thermowell applications. It provides
an output current linearized to the RTD sensor temperature. Optionally, it
can support simple resistance input and drive an output current linear to the
sensor resistance.
The output signal is transmitted via a two-wire, 4-20mA current loop. The
two-wire current signal can be transmitted over long distances with high
noise immunity. Sensor lead-break detection and the inherent live-zero
output offset offers convenient I/O fault detection, should an I/O wire break.
_______________________________________________________________________________________
Acromag, Inc. Tel:248-295-0880 Fax:248-624-9234 Email:[email protected] http://www.acromag.com
4
Model ST131-06x0
Two-Wire RTD Transmitter
___________________________________________________________________
Mechanical Dimensions
5
O 5.1
.203
48
O 6.
.255
Connection Head Mounting
5.28
.208
33.00
1.299
20.0°
16.50
.650
44.50
1.752
10.44
.411
23.40
.921
DIN Rail Mounting
12.96
.510
35mm T-Type DIN Rail
Dimensions in millimeters (inches)
Note that this transmitter conforms to the mechanical limits set forth in the
German standard DIN 43 729, for the Form B head style, and can be easily
mounted in DIN Form B connection and thermowell protection heads, similar
to the figure at upper left.
G-Type DIN Rail
The M4 mounting screws and relief springs used to attach the transmitter to
the connection head are ordered separately via Acromag Mounting Kit
ST130-MTG (see Accessories section).
The unit may be optionally mounted to 35mm T-type or G-type DIN rail using
the optional DIN mounting kit ST130-DIN as shown at left (see Accessories
section).
_______________________________________________________________________________________
Acromag, Inc. Tel:248-295-0880 Fax:248-624-9234 Email:[email protected] http://www.acromag.com
Model ST131-06x0
Two-Wire RTD Transmitter
__________________________________________________________________
Wire terminals can accommodate 14-28 AWG solid or stranded wire. Input
wiring may be shielded or unshielded twisted type. Ideally, output wires
should be twisted pair. Strip back wire insulation 3/8-inch on each lead and
wrap the bare wire in a clockwise direction around the terminal screw and
below the SEMS washer. Tighten the screw to secure the wire. Terminals
include wire loops for test clip attachment, or for redundant soldered wire
connection required for heavy shock and vibration applications. Since
common mode voltages can exist on signal wiring, adequate wire insulation
should be used and proper wiring practices followed. Output wires are
normally separated from input wiring for safety, as well as for low noise
pickup.
Sensor wires are passed up through the center of the transmitter and wire
directly to transmitter input terminals 1, 2, 3, and 4, as shown in the
connection drawings below. Observe proper polarity when making input
connections.
•
•
•
5
ELECTRICAL
CONNECTIONS
Sensor Input
Connections
Use Insulated or Non-Grounded Sensors Only - Input is non-isolated.
Do not ground any input leads.
Two-Wire Input Sensors Require Jumper - For a 2-wire sensor, you
must connect a short copper jumper wire between input terminals 3 and
4 at the transmitter. Alternately, if you want to compensate for sensor
lead wire resistance, do not include this jumper but add a third copper
lead from the sensor to terminal 4, as shown in the 3-wire connection
figure.
Four-Wire Input Sensors Use 3-Wire Lead Compensation.
MODEL ST131-0600 INPUT SENSOR WIRING
PLATINUM RTD OR RESISTANCE
4-WIRE
3-WIRE
SHIELDED CABLE
2-WIRE
INPUT
TERMINALS
1
2
T1
NC
T2
USB
IN+
IN
IN3 T3
4
DO NOT GROUND INPUT LEADS
OPT SHIELD GROUND
T4
+2
-3
1
OUT
6+
4
5
-
T6
T5
ADD JUMPER
(2-WIRE ONLY)
_______________________________________________________________________________________
Acromag, Inc. Tel:248-295-0880 Fax:248-624-9234 Email:[email protected] http://www.acromag.com
6
Model ST131-06x0
Two-Wire RTD Transmitter
___________________________________________________________________
ELECTRICAL
CONNECTIONS
Output/Power
Connections
This transmitter has an ANSI/ISA Type 2 output in which the power and
output signal share the same two leads, and the transmitter has a floating
connection with respect to earth ground. In these applications, output wires
normally pass through the output channel on top of the transmitter and are
drawn through the egress path of the connection head. Connect a DC
power supply and load in series in the two-wire loop as shown in the drawing
below.
•
•
•
•
•
•
Output connections are not polarized. The + and – designations are for
reference only with current normally input to Output+ and returned via
Output-.
Loop supply voltage should be from 9-32V DC with the minimum voltage
level set to supply over-range current to the load, plus 9V across the
transmitter, plus any transmission line drop.
Variations in power supply voltage between the minimum required and
32V maximum, has negligible effect on transmitter accuracy.
Variations in load resistance has negligible effect on output accuracy as
long as the loop supply voltage is set accordingly.
Note the placement of earth ground in the current loop. This is very
important when making connection to USB and will drive the need for
USB isolation (see below).
Always connect the output/power wires and apply loop power before
connecting the unit to USB.
MODEL ST131-0600 OUTPUT/POWER WIRING
T1
T2
NOTE: OUTPUT TERMINALS ARE NOT POLARIZED
PLUS & MINUS LABELS ARE FOR REFERENCE ONLY.
USB
IN
+2
-3
1
4
-
OUT+
5
T6
T3
T4
OUTPUT
TERMINALS
OUT
6+
T5
6
5
OUT-
THIS TRANSMITTER IS LOOP POWERED
4-20mA
I
+
+
-
I
-
I
+
R LOAD
DC SUPPLY
(9-32V)
EARTH
GROUND
The output of this transmitter has a floating connection relative to ground
which makes it flexible in the way it connects to various “Receiver” devices.
In most installations, the loop power supply will be local to either the
transmitter, or local to the remote receiver. Shielded twisted pair wiring is
often used to connect the longest distance between the field transmitter and
remote receiver. The receiver device is commonly the input channel of a
Programmable Logic Controller (PLC), a Digital Control System (DCS), or a
panel meter. Some receivers already provide excitation for the transmitter
and these are referred to as “sourcing” inputs. Other receivers that do not
provide excitation are referred to as “sinking” inputs, and these will require
that a separate power supply connect within the loop. Here are example
transmitter connection diagrams for “sourcing” and “sinking” receiver types:
_______________________________________________________________________________________
Acromag, Inc. Tel:248-295-0880 Fax:248-624-9234 Email:[email protected] http://www.acromag.com
Model ST131-06x0
Two-Wire RTD Transmitter
__________________________________________________________________
COMMON TWO-WIRE TRANSMITTER CONNECTIONS TO "SOURCING" AND "SINKING" INPUT RECEIVERS
I
+
6
Twisted Pair
DCS/PLC SOURCING
INPUT CARD
P
24VDC
TRX
5
+
-
+
I
24VDC POWER SUPPLY
+
I
+
6
Twisted Pair
I
+
RCV
Connecting the ST131 Two-Wire Transmitter to
a "SOURCING" Input Card of a Digital Control
System or Programmable Logic Controller (e.g.
24V DC Excitation is Provided by Card)
24VDC
DCS/PLC SINKING
INPUT CARD
TRX
5
+
-
RCV
Connecting the ST131 Two-Wire Transmitter to
a "SINKING" Input Card of a Digital Control
System or Programmable Logic Controller with
24V DC Excitation Provided by Separate Power
7
ELECTRICAL
CONNECTIONS
Output/Power
Connections
-
WARNING: For compliance to applicable safety and performance
standards, the use of twisted pair output wiring is recommended. Failure
to adhere to sound wiring and grounding practices as instructed may
compromise safety, performance, and possibly damage the unit.
TIP - Ripple & Noise: Power supply ripple at 60Hz/120Hz is normally
reduced at the load by the transmitter, but additional filtering at the load can
reduce the ripple further. For large 60Hz supply ripple, connect an external
1uF or larger capacitor directly across the load to reduce excessive ripple.
For sensitive applications with high-speed acquisition at the load, high
frequency noise may be reduced by placing a 0.1uF capacitor directly across
the load.
TIP - Inductive Loads: If the two-wire current loop includes a highly
inductive load (such as an I/P current-to-pressure transducer), this may
reduce output stability. In this case, place a 0.1uF capacitor directly across
the inductive load and this will typically cure the problem.
The unit housing is plastic and does not require an earth ground connection.
If the transmitter is mounted in a metal housing, a ground wire connection is
typically required and you should connect the metal enclosure’s ground
terminal (green screw) to earth ground using suitable wire per applicable
codes. See the Electrical Connections Drawing for Output/Power and note
the traditional position of earth ground for the two-wire output current loop.
The Type II transmitter output terminals have a floating connection relative to
earth ground. Earth ground is normally applied at the output loop power
minus terminal and in common with the loop load or loop receiver minus.
•
•
Earth Ground
Connections
Do not earth ground any input lead and use only insulated/non-grounded
RTD sensors. This transmitter does not isolate its input signal.
Respect the traditional position of earth ground in a two-wire current loop
and avoid inadvertent connections to earth ground at other points, which
would drive ground loops and negatively affect operation. This includes
a USB connection to the transmitter, which should be made via a USB
isolator, as most Personal Computers earth ground their USB ports and
this makes contact with both the signal and shield grounds.
_______________________________________________________________________________________
Acromag, Inc. Tel:248-295-0880 Fax:248-624-9234 Email:[email protected] http://www.acromag.com
8
Model ST131-06x0
Two-Wire RTD Transmitter
___________________________________________________________________
ELECTRICAL
CONNECTIONS
USB Connections
This transmitter is setup, configured, and calibrated via configuration
software that runs on a Windows-based PC that is connected to the unit via
USB (Windows XP or later version required). Refer to the drawing below to
connect your PC or laptop to the transmitter for the purpose of
reconfiguration and calibration using this software.
WARNING: The intent of mating USB with this transmitter is so that it can be
conveniently setup and calibrated in a safe area, then installed in its
connection head, which may be in a hazardous area. Do not attempt to
connect a PC or laptop to this unit while installed in a hazardous
environment, as USB energy levels could ignite explosive gases or particles
in the air.
•
•
•
USB Signal Isolation Required (See Below) - You may use Acromag
model USB-ISOLATOR to isolate your USB port, or you can optionally
use another USB signal isolator that supports USB Full Speed operation
(12Mbps).
Configuration Requires USB and Loop Power - This transmitter
draws power from both the current loop, and from USB during setup.
Connect Loop Power Before USB - Always connect the transmitter to
its loop power supply before connecting USB, or erratic operation may
result.
IMPORTANT: All USB logic signals to the transmitter are referenced to the
potential of its internal signal ground. This internal ground is held in
common with the USB ground and shield ground. The potential of the
transmitter’s current output pin (output minus) relative to earth ground will
vary according to the load current and load resistance (net IR drop). Without
isolation, this IR voltage drop would drive a potential difference between the
normally grounded current loop and the grounded USB connection at the
PC, causing a ground loop that would inhibit setup and calibration, and may
even damage the transmitter. This is why an isolated USB connection is
recommended. You could alternately avoid the use of an isolator if a battery
powered laptop was used to connect to the transmitter, and the laptop has
no other earth ground connection.
MINIPUCK TRANSMITTER USB CONNECTION DRAWING
TO HOST USB PORT
PERSONAL COMPUTER
RUNNING WINDOWS OS
HOST
USB
USB-A MALE
USB-ISOLATOR
1 METER CABLE
Acromag
USB-B MALE
LED
TRANSMITTER
ST131-0600
USB MiniB MALE
R
USB-A MALE
THE LEADER IN INDUSTRIAL I/O
MODEL : USB-ISOLATOR
POWER
DEVICE
CONNECT
HOST USB SERIAL
PORT CONNECTOR
AT BACK OF PC
PC
CONNECT
HOST PC RUNNING
ACROMAG
CONFIGURATION
SOFTWARE
RESET
CONNECTION
1 METER CABLE
_______________________________________________________________________________________
Acromag, Inc. Tel:248-295-0880 Fax:248-624-9234 Email:[email protected] http://www.acromag.com
Model ST131-06x0
Two-Wire RTD Transmitter
__________________________________________________________________
9
CONFIGURATION
SOFTWARE
Introduction
This transmitter can only be
configured and calibrated via
its Configuration Software and
a USB connection to your PC
or laptop. The configuration
software can be downloaded
free of charge from our web
site at www.acromag.com.
This software is also included
on a CDROM bundled with the
Configuration Kit ST13C-SIP
(see Accessories section).
For this model, look for
program ST131Config.exe.
The software is compatible
with XP or later versions of the
Windows operating system.
Device Connect
• Scan for connected transmitters and open communications with them.
• Display the model number (Product Name), Manufacturer, and Serial
Number of the connected transmitter.
This section is used to scan for connected transmitters, select a connected
transmitter, open communications with a transmitter, and close connections
with a transmitter. Device connection Status is also indicated here, along
with the connected transmitter’s ID info (Product Name/serial, Manufacturer,
& Serial Number).
Configuration / Calibration
• Set the Input Type, Platinum RTD or Resistance.
• Set the input wiring to Two-wire or Three/Four-wire sensor connections.
• Set the alpha coefficient of your particular RTD curve.
• Define your input temperature range or resistance range.
• Define your output current range.
• Read a unit’s current configuration.
• Calibrate your transmitter zero, gain, excitation, and linearization.
Use the controls of this section to select an input type, specify the input
wiring, specify the RTD “alpha” coefficient, specify input range zero & fullscale, and specify output zero & full-scale. You must calibrate any
changes you make in this section by clicking Start Calibration.
The configuration software
screen for this model is shown
at left. The configuration
screen is divided into six
sections as follows: Device
Connect, Configuration &
Calibration, Under/Over Scale
Thresholds, Sensor
Fault/Break Detection, Factory
Settings, Unit Status, and the
System Message Bar at the
bottom of the screen. A short
description of each of these
groups follows. For a detailed
explanation, see Configuration
Step-by-Step in the Technical
Reference section of this
manual.
HELP – You can press F1 for
Help on a selected or
highlighted field or control.
You can also click the [?]
button in the upper-right hand
corner of the screen and then
click to point to a field or
control to get a Help message
pertaining to the item you
pointed to.
_______________________________________________________________________________________
Acromag, Inc. Tel:248-295-0880 Fax:248-624-9234 Email:[email protected] http://www.acromag.com
10
Model ST131-06x0
Two-Wire RTD Transmitter
___________________________________________________________________
CONFIGURATION
SOFTWARE
Introduction
You can refer to the Technical
Reference section of this
manual for a more detailed
description of every control
described here.
The Configuration/Calibration section includes a type field where you are
prompted to enter measured current values for zero and full-scale after
starting calibration. You can also read the current transmitter configuration
with “Get Config”, or “Abort” calibration if necessary.
Under/Over Scale Thresholds
• Select the output under-scale and over-scale thresholds to define your
linear output operating range.
• Indirectly sets the upscale and downscale fault limits outside of your
linear operating range to 1mA above over-scale, and 0.4mA below the
under-scale threshold settings.
You can use the controls of this section to specify the under-scale and overscale threshold levels of the output, and the corresponding upscale &
downscale alarm limits. Once you have made your selections, you can click
the “Submit U/O Configuration” button to engage your settings.
Break Detection
• Select output Downscale or Upscale lead-break or sensor fault
detection.
Use these controls to select Upscale or Downscale lead break detection,
then click the “Submit Break Detection” button to write your selection to
transmitter memory. Note that a lead break or sensor burnout will send the
output to the upper or lower alarm level, as directed by this setting. The
alarm levels are outside the output operating range and are 1mA above the
over-scale threshold, or 0.4mA below the under-scale threshold.
Factory Settings
• Restore a transmitter to its original factory calibration.
• Restore a transmitter to its initial factory configuration.
You can click the “Restore Factory Settings” button if you ever miscalibrate a
transmitter in such a way that its operation appears erratic.
Unit Status
• Test the integrity of your USB connection to the transmitter.
• Read the Fault Status of your input signals wrt the input amplifier.
• Reset the transmitter (sets the transmitter to its power-up configuration).
Use the “Read Status” control to test communication with the unit and to
obtain diagnostic information relative to the input. Input Fault Status will be
returned on the “Fault Status:” line, and in the system message bar at the
bottom of the screen. Use the “Reset Unit” control to revert to the power-up
or stored configuration, or to clear a checksum error. Refer to Read Status
of the Configuration Step-by-Step section for more information.
Message Bar
• Displays the Fault Status of your transmitter input signal.
• Displays prompt instructions during calibration.
The system message bar at the bottom of the screen will display & repeat
prompt instructions as you step through calibration. It also displays
diagnostic messages after clicking “Read Status”.
_______________________________________________________________________________________
Acromag, Inc. Tel:248-295-0880 Fax:248-624-9234 Email:[email protected] http://www.acromag.com
Model ST131-06x0
Two-Wire RTD Transmitter
__________________________________________________________________
POSSIBLE CAUSE
POSSIBLE FIX
Software Fails to Scan Transmitter…
Bad USB Connection
Recheck USB Cable Connection
Loop power was enabled
You must enable the loop power supply
after connecting to USB.
before connecting to USB. With loop
power present, disconnect then reconnect
the USB cable to the transmitter.
USB has not enumerated the Use the reset button on the Acromag USB
device.
isolator to trigger renumeration of the
transmitter, or simply unplug/replug the
USB cable to the transmitter.
Communication or power
Close the current connection with the
was interrupted while USB
software, re-scan the transmitter, select
was connected and the
and re-open the transmitter for
configuration software was
communication (or simply exit the
running.
Configuration software and reboot it).
Output Erratic, Not operational, or at Wrong Value…
Missing USB isolation
If your two-wire output current loop is
grounded, then connecting USB to the
transmitter will drive a ground loop
between your current loop and earth
ground at the PC. Always use USB signal
isolation, or alternatively, you can connect
directly to a battery-powered laptop, which
does not earth ground its USB connection.
Otherwise…
Verify loop power and voltage level. Try
Closing the connection and re-opening it.
Output goes to Over-Range Value (ORV) or Under-Range Value (URV)…
This indicates that the input
Check your input signal with respect to
signal is out of range. If the
your calibrated range and reduce or
level is 1mA above the ORV
increase it as required to drive your output
or 0.4mA below URV, then
current within its linear operating range.
this would indicate a sensor
Also check the wiring of your input sensor.
fault or lead break.
Output goes 1mA above the selected Over-Range Value (ORV)…
This is the Upscale alarm
An Upscale alarm is normally driven by a
level and indicates the input
sensor fault, such as an open sensor or
signal exceeds the common
broken sensor lead with the transmitter
mode range of the input.
lead break detection set to upscale. It can
This can also occur if the
also be triggered by a very high sensor
third sensor wire is missing
resistance that looks like an open sensor
(3/4-wire RTD), a lead has
to the transmitter. Check your sensor
broken, the sensor has
resistance, sensor connections, and your
burned out or open, or the
connection to input terminal 4 to restore
jumper between terminals 3
input operation. You can also check your
& 4 of the transmitter is not
sensor connections by measuring a
installed (2-wire RTD).
voltage drop across your input resistance
approximately equal to ~0.5mA*
Sensor_Ohms? If connections are OK
and you measure a voltage drop across
the sensor, than your sensor value is likely
out of range, or the unit has been
miscalibrated.
11
TROUBLE-SHOOTING
Diagnostics Table
Before attempting repair or
replacement, be sure that all
installation and configuration
procedures have been
followed and that the unit is
wired properly. Verify that
power is applied to the loop
and that your loop power
supply voltage is sufficient to
supply over-scale current into
the load (MIN 0.020*Rload),
plus 9V at the unit terminals,
plus any line drop.
If your problem still exists after
checking your wiring and
reviewing this information, or if
other evidence points to
another problem with the unit,
an effective and convenient
fault diagnosis method is to
exchange the questionable
unit with a known good unit.
Acromag’s Application
Engineers can provide further
technical assistance if
required. Repair services are
also available from Acromag.
_______________________________________________________________________________________
Acromag, Inc. Tel:248-295-0880 Fax:248-624-9234 Email:[email protected] http://www.acromag.com
12
Model ST131-06x0
Two-Wire RTD Transmitter
___________________________________________________________________
TROUBLE-SHOOTING
Diagnostics Table
POSSIBLE CAUSE
POSSIBLE FIX
Output goes ~0.4mA below selected Under-Range Value (URV)…
This is the Down-scale alarm
A Downscale alarm level is normally
level and indicates the input
driven by a sensor fault, such as an open
signal exceeds the common
sensor or broken sensor lead with the
mode range of the input. This transmitter lead break detection set to
can also occur if the third
down-scale. It can also be triggered by a
sensor wire is missing (3/4very high sensor resistance that looks
wire RTD), a lead has broken, like an open sensor to the transmitter.
the sensor has burned out or
Check your sensor resistance, sensor
open, or the jumper between
connections, and your connection to
terminals 3 & 4 of the
input terminal 4 to restore input
transmitter is not installed (2operation. You can also check your
wire RTD).
sensor connections by measuring a
voltage drop across your input resistance
approximately equal to ~0.5mA*
Sensor_Ohms? If connections are OK
and you measure a voltage drop across
the sensor, than your sensor value is
likely out of range, or the unit has been
miscalibrated.
Output goes 0.4mA below the lowest possible Under-Range Value…
An output level 0.4mA below
This is a rare error that is not likely to
the lowest URV setting can be occur. If it is persistent, it may indicate a
indicative of a checksum error unit defect. You can reset the transmitter
encountered in a data
to clear this error, or simply cycle power
exchange with the internal
to the transmitter. If it continues to
EEPROM memory. This
occur, then you should try restoring
assumes that you have not
factory calibration. If the error still
configured an Under-Range
occurs, you should consult with the
Value to its lowest setting.
factory and arrange for the unit to be
returned for repair or replacement.
Cannot Communicate with Transmitter via USB…
Loop power ON to the unit?
Unit requires a loop power connection,
even when connected to USB. The loop
power supply should also be present
before connecting to USB.
A missing USB Isolator could
A ground loop is created between a
cause a ground loop when
normally grounded two-wire current loop
connecting to USB from a
and earth ground of the PC USB port.
Personal Computer.
Only connect to USB via a USB isolator,
like the Acromag USB-ISOLATOR.
Otherwise, use a battery powered laptop
to configure the transmitter.
Unit fails to operate or has an erratic output signal…
Is input grounded?
This non-isolated model is intended for
use with ungrounded RTD probes and a
grounded probe could inadvertently short
the input bias voltage causing erroneous
operation, in particular if the output loop
is already grounded.
_______________________________________________________________________________________
Acromag, Inc. Tel:248-295-0880 Fax:248-624-9234 Email:[email protected] http://www.acromag.com
Model ST131-06x0
Two-Wire RTD Transmitter
__________________________________________________________________
POSSIBLE CAUSE
POSSIBLE FIX
Unit drives a low current, but fails to drive current at/near/above 20mA…
Loop supply voltage is too low Check power supply voltage level. Make
to support full-scale or oversure it is at least 9V plus 0.020*Rload. If
range current into the loop
transmission distance is long, than it
load.
must have additional voltage to support
the IR drop in the wire. Ideally, the
voltage should have ample overhead to
drive the load at the maximum output
current, which is ~1mA above the OverRange Value that you set.
Cannot Calibrate Input Channel…
Is input wired properly?
Check input wires at terminals 2, 3, & 4.
Missing third input terminal
You must include a wire to terminal 4 of
connection.
the transmitter, either from the sensor
itself (3-wire sensor connection), or a
small jumper wire between terminals 3 &
4 at the transmitter (2-wire connection).
Cannot Calibrate Input Channel…
You may have damaged the
If you cannot get the output signal to vary
input PGA via a ground loop,
for a continuously variable input signal,
or incorrect wiring.
your input signal is within range, and you
have properly wired the input including
connections to input terminal 4, then your
input amplifier may have been damaged
and the unit will need to be replaced.
Does not Operate or calibrate properly with a 2-wire input connection…
Are you missing the jumper
Check input wiring and make sure that
required between input
terminals 3 & 4 are jumpered together for
terminals 3 and 4?
2-wire connections. Note that the thirdlead from the sensor, or the jumper
between input terminals 3 & 4 forms the
return path of the sensor excitation
current and must be present to operate
the unit.
Output shifts momentarily while using Read Status or Get Config…
Reading/Writing the
Memory is powered by the loop supply.
EEPROM memory
This is normal during reconfiguration via
momentarily consumes more
USB using the Configuration software
current and this is evident by
and reflects the increased current draw
a momentary glitch in output
during memory access. Note that the
current during reconfiguration. contents of memory is uploaded at
power-up and repeated access of
memory is not required during normal
operation, except for reconfiguration.
13
TROUBLE-SHOOTING
Diagnostics Table
Service & Repair Assistance
This unit contains solid-state
components and requires no
maintenance, except for
periodic cleaning and
transmitter configuration
parameter (zero and full-scale)
verification. The potted
Surface Mounted Technology
(SMT) board contained within
this enclosure is impossible to
repair, except for firmware. It
is highly recommended that a
non-functioning transmitter be
returned to Acromag for repair
or replacement. Acromag has
automated test equipment that
thoroughly checks and
calibrates the performance of
each transmitter, and restores
firmware. Please refer to
Acromag’s Service Policy and
Warranty Bulletins, or contact
Acromag for complete details
on how to obtain repair or
replacement.
_______________________________________________________________________________________
Acromag, Inc. Tel:248-295-0880 Fax:248-624-9234 Email:[email protected] http://www.acromag.com
14
Model ST131-06x0
Two-Wire RTD Transmitter
___________________________________________________________________
TECHNICAL REFERENCE
Block Diagram
Vs
USB PORT
USB CONVERTER
ST131-0600 SIMPLIFIED SCHEMATIC
EEPROM
CONTROL LOGIC
(FILTERING NOT SHOWN FOR CLARITY)
1. NON-ISOLATED TRANSMITTER INTENDED FOR UN-GROUNDED RTD PROBES.
IREF DAC
ILIN DAC
IREF1
493uA
IREF1=IREF2
(MATCHED)
2
+/-INPUT LEADS MUST BE
SAME LENGTH, SIZE, TYPE
FOR LEAD COMPENSATION.
I = Vo/6340
6.34K
MUX
492uA
+
2
2
LINEARIZER
3
x50 CURRENT AMP
Vo
PGA
1
Vs
-
+
DC
POWER
9 TO 32VDC
SCHOTTKY
BRIDGE
~
5 2W
1
492uA
MUX
6 2W
NC
Pt RTD
SUB-REGULATOR
GATE DRIVER
ZERO DAC
3
4
6
IREF2
493uA
1
OUTPUT
+
5 2W
REFERENCE
VOLTAGE
1.193V
+
4-20mA
~
EARTH
GROUND
R LOAD
I
_
RVI
4
5
6 2W
3
RZ-50C
79.6
RZ0C
96.8
R Z+50C
118
4
3-WIRE RTD CONNECTION
984uA
Rcm sets a +bias within common mode voltage range.
RLIN
Iout = 50*Vo/6340
RSET
IREF1,2 = 5*Vref/12100
+
986uA
Rz sets input range zero.
Rz forces diff input voltage near 0 at Tmin
12.1K
_
492uA
15.8K
INPUT
R CM
475
V CM '=0.467V
_
CMV of IR in each lead is rejected by amplifier.
Key Points of Operation
- Signal Path is Analog
- Unit is Loop Powered
- Input is Non-Isolated
- Conversion is Differential
- Configuration is Digital
- Calibration is Digital
- Converts RTD with a Single
Measurement
- Output/Power Terminals are
Not Polarized
- Only ± Leads must be
balanced for lead
compensation.
This digitally calibrated analog transmitter uses a unique, low noise, voltage
to current conversion scheme that delivers 12-bit equivalent performance,
but does not actually digitize the input signal. Instead it uses integrated
Digital-to-Analog Converters (DAC) to adjust the zero offset, control the
excitation currents, and drive linearization correction to the input. These
DAC’s work together to achieve nearly 12-bits of adjustment resolution, but
do not operate directly on the analog input signal itself. Likewise, there are
no microcontrollers in the I/O signal path of this design, and no embedded
firmware relative to processing the signal. Transmitter functionality is
actually hard-wired (integrated) into an application specific component IC.
The only microcontroller in this design is used to convert the external USB
signals to an internal SPI bus signal during reconfiguration. Windows
configuration software is used to write configuration parameters into nonvolatile EEPROM memory at setup. These stored parameters are autodownloaded into the transmitter ASIC at power-up and will define its normal
operation. Setup involves selecting the input type (Pt RTD or Resistance),
input wiring (2-wire or 3/4-wire), the Pt RTD alpha coefficient, the input range
zero (-50°C, 0°C, or +50°C), the input range full-scale (up to 900°C or
900Ω), the output range zero, the output range full-scale, specifying the
output over and under-scale thresholds and alarm detents, and setting
upscale or down-scale lead break or sensor fault detection.
_______________________________________________________________________________________
Acromag, Inc. Tel:248-295-0880 Fax:248-624-9234 Email:[email protected] http://www.acromag.com
Model ST131-06x0
Two-Wire RTD Transmitter
__________________________________________________________________
This transmitter uses a unique signal processing method that reduces error
by converting the 3 or 4-wire sensor with a single differential measurement,
including the lead-wire compensation. During operation, a small excitation
current is passed through the positive lead of the RTD element. A matching
excitation current is passed through a zero pedestal resistor Rz and into the
minus lead of the sensor element. These currents combine and return to the
unit via a third lead that is terminated with a common-mode resistance in the
unit (3-wire connection). The voltage drop produced in the series-connected
zero resistor of the minus lead has the effect of driving the differential input
voltage across the bulb and in parallel with the input amplifier near 0V, for
bulb temperatures near the minimum temperature for the RTD range (-50C,
0C, or +50C). The return current sinking through the common-mode
resistance drives a positive-biased, differential voltage signal proportional to
the RTD element resistance. The differential voltage measured by the
transmitter is corrected slightly to make it linear with temperature by
modulating the sensor excitation current with a value determined during
calibration, then converted to a proportional process current at its output.
Because the currents in each lead match, and if both the positive and
negative leads to the RTD are of the same length, type, and diameter, then
the IR drop in these lines will create small common-mode voltages that are
effectively rejected by the differential instrumentation amplifier
measurement. In this way, the measured signal is compensated for the
additional resistance of the ±lead wires without making a separate
measurement. Refer to the block diagram above to gain a better
understanding of how this transmitter works.
15
Block Diagram
Note that a third sensor wire is used to compensate the sensor for the
resistance of the lead wires, which can affect the accuracy of the RTD bulb
given its low initial resistance (100 ohms at 0°C typical), and its small change
in resistance per degree of temperature change. In this design, the third
lead wire is used as the return path for both the positive and negative sensor
lead currents. Then as long as both the positive and negative leads wires to
the bulb are of the same type and length, their individual contributions to the
differential signal cancel out (as equal IR drops in each lead), and the
precise voltage across the RTD element is measured directly proportional to
its sensed temperature. Without this third lead, the sensor excitation current
returns via the minus lead and combines with the minus lead current in the
small jumper placed between terminals 3 & 4 of the transmitter for a 2-wire
sensor connection. This unbalances the sensor measurement preventing
lead-wire compensation. The current returned via the third sensor lead is
shunted through a common-mode resistor, effectively biasing the input
signal above 0V and into the common mode input range of the amplifier.
The small resistance of this line adds a small common-mode voltage that
increases the bias and is essentially rejected by the amplifier. Note that if
the sensor is connected via two-wires, the lead-wire resistance is not
compensated for. For two-wire sensors, you additionally have to include a
small jump-wire between leads 3 & 4 which allows the combined excitation
currents to reach the common-mode shunt resistor and properly bias the
sensor. Note that any 2-wire sensor can be made to compensate for its
lead-wire resistance by simply adding a third lead to the sensor (in place of
the jumper), and for this unit, that third lead can be a different size and type
of material than the ±input leads to the sensor.
_______________________________________________________________________________________
Acromag, Inc. Tel:248-295-0880 Fax:248-624-9234 Email:[email protected] http://www.acromag.com
16
Model ST131-06x0
Two-Wire RTD Transmitter
___________________________________________________________________
Block Diagram
The zero point of the calibrated range is set via zero resistor Rz that is
connected in series in the minus input lead. From the factory, three
resistance values are installed in three separate minus lead paths, and are
at ohm values just below that of a 100Ω Pt RTD corresponding to
temperatures -50°C, 0°C, and +50°C. Note that for two-wire sensor
connections, only a 0°C input range zero may be selected. The voltage drop
produced in Rz drives the differential voltage measured across the sensor to
be near zero at Tmin of the RTD range, as the excitation current in each
lead is matched. The combined excitation current of each lead is then
shunted into a 475Ω common mode resistor Rcm, producing a positive bias
for the input sensor within the input common mode range of the differential
amplifier, as it ensures that the lowest common mode input voltage is
greater than the minimum range limit of the amplifier.
Note that the excitation currents are digitally adjustable via the Iref DAC.
From the factory, this current is set to a nominal value of 493uA via the
12.1K Rset resistor (480uA to 510uA range). It can be digitally adjusted to
other levels during calibration. The excitation current values are also
influenced by the linearity DAC. All RTD’s have a nonlinear response over
temperature that is approximated by a quadratic equation. The linearity DAC
uses positive feedback from the input signal to produce a system response
that is also nearly quadratic, but curving in the opposite direction, producing
a net response that is very linear. This DAC allows the nonlinearity error to
be calibrated out by modulating the excitation current with the input signal of
the RTD during calibration, and will produce a nearly 40:1 improvement in
linearity. The adjustment range of this linearity correction is set via the
15.8K Rlin resistor, which has been optimized for increased accuracy for the
most common spans that occur between -50°C and +500°C.
The PGA includes a zero DAC that allows the magnitude of the zero output
current to be precisely adjusted near 4mA. The output voltage of the PGA
voltage amplifier is converted to current through a 6.34K Rvi resistor at its
output, just prior to the current amplifier that drives the output loop. The
current gain of this output current amplifier is 50x. Note that the output loop
is bridge-coupled to the transmitter, making the transmitter output polarity
insensitive.
The USB port ground is common to the circuit ground. The USB port ground
of most PC’s is common to the USB cable shield and earth ground. The
output current loop is typically earth grounded at the loop supply minus
connection. For this reason, it is recommended that USB signals be isolated
when connected to a PC to prevent a ground loop from occurring between
the PC earth ground and the traditional current loop earth ground.
_______________________________________________________________________________________
Acromag, Inc. Tel:248-295-0880 Fax:248-624-9234 Email:[email protected] http://www.acromag.com
Model ST131-06x0
Two-Wire RTD Transmitter
__________________________________________________________________
17
This section of the manual will walk you through the reconfiguration process
step-by-step. But before you attempt to reconfigure or recalibrate this
transmitter, please make the following electrical connections:
CONFIGURATION
STEP-BY-STEP
Calibration Connections:
Calibration
Connections
1. Connect a precision resistance decade box or RTD calibrator to the
input, as required (refer to Electrical Connections section). Your
resistance source must be adjustable over the range desired for zero
and full-scale. A 3-wire or 4-wire sensor connection is recommended,
as this will compensate for sensor lead resistance (this unit will use 3wire lead compensation for 4-wire sensors). Be sure to either wire a
third lead to the remote sensor, or install a short copper jump-wire
between input terminals 3 & 4 of the transmitter, as this serves as the
return path for the excitation current and must be present for operation.
The input resistance source must be accurate beyond the unit
specifications (better than ±0.1%). A good rule of thumb is that your
source accuracy should be four times better than the rated accuracy you
are trying to achieve with the transmitter.
2. Wire an output current loop to the transmitter as shown in the Electrical
Connections section. You will need to measure the output current
accurately in order to calibrate the unit. You could connect a current
meter in series in this loop to read the loop current directly. Alternatively,
you could simply connect a voltmeter across a series connected
precision load resistor in the loop, then accurately read the output
current as a function of the voltage IR drop produced in this resistor
(recommended). In any case, be sure to power the loop with a voltage
that minimally must be greater than the 9V required by the transmitter,
plus the IR drop of the wiring and terminals, plus the IR drop in the load.
To compute the IR drop, be sure to use a current level that considers the
over-scale current and alarm limit by adding 1mA to the over-scale
threshold that you select (this could be as high as 30mA depending on
your selection of over-scale threshold).
The output load resistance and meter must be accurate beyond the unit
specifications (better than ±0.1%). A good rule of thumb is that your
load and meter accuracy should be four times better than the rated
accuracy you are trying to achieve with the transmitter.
Loop Power Supply: Make sure that your power supply voltage level is
at least 9V plus 0.020*load_resistance. Ideally, it should be great
enough to drive the over-range alarm current into your load (i.e. greater
than or equal to 9V+ 0.030*Rload, assuming the line drop is negligible
and the maximum possible over-range threshold is configured).
The non-volatile memory of the transmitter receives its power from the
loop supply, not USB. Therefore, apply power to the transmitter output
loop and always power the loop before connecting to USB.
3. Connect the transmitter to the PC using the USB isolator and cables
provided in Configuration Kit ST13C-SIP (refer to Electrical Connections
section). You may omit the isolator if you are using a battery powered
laptop to connect to the unit.
Now that you have wired the unit, applied power, and connected the unit
to USB, you can execute the Configuration Software program for your
model (ST131Config.exe) to begin reconfiguration. This software is only
compatible with XP or later versions of the Windows operating system.
_______________________________________________________________________________________
Acromag, Inc. Tel:248-295-0880 Fax:248-624-9234 Email:[email protected] http://www.acromag.com
18
Model ST131-06x0
Two-Wire RTD Transmitter
___________________________________________________________________
CONFIGURATION
STEP-BY-STEP
After executing the Acromag Configuration software for this model, a screen
similar to the following will appear if you have not already connected to your
transmitter via USB (note some fields are faded out under these conditions):
Reconfiguration
HELP – You can press F1 for
Help on a selected or
highlighted field or control.
You can also click the [?]
button in the upper-right hand
corner of the screen and click
to point to a field or control to
get a Help message pertaining
to the item you pointed to.
Note that without a device already connected via USB, the Device Status
field indicates “Disconnected”. After you connect USB, the first step to begin
reconfiguration is to select the device to connect to using the scroll window
of the Device Name field. Use the scroll bar to click on and select a
transmitter from this list in order to open it for reconfiguration (use the serial
number to discern a particular transmitter). Then click the “Open” button to
connect to the selected device.
If your transmitter was already connected via USB when you booted this
software, your screen will look more like the one below, where the software
has already initiated a connection to the transmitter for you (see Device
Connect area and note that Device Status indicates “Connected”). Note that
the software automatically opened the connection with the transmitter and
“Read Complete” is indicated in the message bar at the bottom of the
screen. Additionally, most fields and controls are not faded out and await
your input.
_______________________________________________________________________________________
Acromag, Inc. Tel:248-295-0880 Fax:248-624-9234 Email:[email protected] http://www.acromag.com
Model ST131-06x0
Two-Wire RTD Transmitter
__________________________________________________________________
19
CONFIGURATION &
CALIBRATION
Reconfiguration
HELP – You can press F1 for
Help on a selected or
highlighted field or control.
You can also click the [?]
button in the upper-right hand
corner of the screen and click
to point to a field or control to
get a Help message pertaining
to the item you pointed to.
If more than one transmitter is connected via USB through a USB hub, the
software automatically opens a connection with one of the transmitters and
“Read Complete” is indicated in the message bar at the bottom of the
screen. You can discern which transmitter is open by referring to the
product’s unique serial number indicated next to the Product Name. If your
intent was to open a different transmitter on the hub, then you will have to
“Close” the current connection and use the Device Name scroll bar to select
another transmitter (discern by serial number). Then click “Open” to open it
for communication.
If you break the USB connection to a transmitter, the software will
automatically close the connection for you. When you reconnect the USB
cable, you will have to click “Open” to reopen communication with the
transmitter. If you have more than one transmitter connected via a hub, then
you will have to use the Device Name scroll bar to first select a transmitter
(discern unit by serial number), and then click “Open” to open
communication with it.
Note that you must already have loop power connected to the transmitter
before you execute this software. If you do not, the software will prompt you
to make this connection when you execute the software program. If you
later interrupt loop power while already using the software and while
connected to USB, you may have to re-open communication with the unit.
_______________________________________________________________________________________
Acromag, Inc. Tel:248-295-0880 Fax:248-624-9234 Email:[email protected] http://www.acromag.com
20
Model ST131-06x0
Two-Wire RTD Transmitter
___________________________________________________________________
CONFIGURATION
STEP-BY-STEP
Reconfiguration
Open the Transmitter for Communication….
Once you have opened a transmitter for communication, the device status
will change from “Ready” to “Connected”, and the transmitter ID information
will be displayed in the Product Name, Manufacturer, and Serial Number
fields. At this point, the connected transmitter is ready for reconfiguration
and the appropriate configuration fields become active and await your input.
If you want to see how the connected unit is already configured before
changing its configuration, click the “Get Config” button of the Configuration
& Calibration controls to retrieve its current configuration information. Note
the message bar at the bottom of the screen and it should display a
message like “Read Complete! Normal Operation, inputs in range”
IMPORTANT: If you make any changes to the Configuration Parameters,
you will have to recalibrate the unit via the “Start Calibration” button in order
to actually write those changes to the transmitter.
Select the Input Type…
In the Calibration section of this screen, select an input type: Platinum RTD,
or Resistance.
•
•
If you select “Platinum RTD”, your output will be linear with respect to
sensor temperature, not resistance, and you will additionally have to use
the “Alpha Value” scroll window to select your particular RTD curve type
(alpha is only used by the software to recommend resistance values
during calibration).
If you select “Resistance”, your output current will be linear with respect
to sensor resistance, not temperature, and no special linearization will be
performed.
Select the Sensor Wiring…
This selection tells the unit which inputs to connect to its internal PGA, and
which inputs to connect its excitation sources to.
•
•
If you select “Two-Wire”, your input measurement will not be
compensated for the sensor lead resistance, and your input range zero
will be fixed at 0°C (Pt RTD). Note that in most thermowell applications,
the sensor leads are less than 2 feet long, and will have negligible
resistance, minimizing the importance of lead-wire compensation in
these applications.
If you select “Three-Wire”, your input measurement will be
compensated for its lead-wire resistance, as long as the ± input leads
are of the same length, size, and type. Additionally, you will be able to
select an input zero of -50°C, 0°C, or +50°C (input zero is a fixed
selection of 3 different values, while the full-scale is programmable to
any value in range). If you have a four-wire sensor, select “Three-Wire”.
A selection of “Two Wire” requires that you additionally wire input
terminals 3 & 4 together with a short copper jumper wire. A selection of
“Three Wire” requires that a third lead be wired to input terminal 4 and
the other end of this lead connects to the minus terminal at the sensor.
In both cases, this “third-wire” connection serves as the return path for
the excitation current and it must be present in either form in order to
make your measurement. If you have actually wired a four-wire sensor,
it will use 3-wire lead compensation.
_______________________________________________________________________________________
Acromag, Inc. Tel:248-295-0880 Fax:248-624-9234 Email:[email protected] http://www.acromag.com
Model ST131-06x0
Two-Wire RTD Transmitter
__________________________________________________________________
Select the Alpha Value…
(Pt RTD Only, for internal use only)
For the Pt RTD Input Type, you should specify the Alpha Value of your
particular RTD curve. The software only uses this information to compute
the input resistances required to calibrate your selected input range for
Platinum RTD Input Types, which it then returns in message prompts during
the calibration process.
21
CONFIGURATION
STEP-BY-STEP
Reconfiguration
If you are calibrating to a particular curve not indicated, you may select this
value arbitrarily and just substitute your own resistance values during
calibration that will correspond to your particular curve at the temperatures
noted.
Note: Alpha (α) is used to identify the RTD curve and its value is derived
by dividing the sensor resistance at 100°C (boiling point of water) minus the
sensor resistance at 0ºC (freezing point of water), by the sensor resistance
at 0°C, then by 100°C (α = [R100°C -R0°C] / R0°C/ 100°C). For Pt 100Ω, this is
38.5Ω/100.0Ω/100°C, or 0.00385Ω/Ω/°C, and represents the average
change in resistance per ºC.
1
Select the Input Range Zero and Input Range Full-Scale…
Next you need to select the input temperature range for the Pt RTD Input
Type, or your input resistance range for the Resistance Input Type.
For Platinum RTD types, use the scroll bar to select your Input Zero
temperature: -50°C, 0°C, or +50°C (Zero is a fixed value for Pt RTD).
For Resistance Input Type, you instead enter an Input Zero value in ohms
(0Ω typical, for a 0-500Ω range, or 100Ω typical for a 100-200Ω range). Note
that some zero values will not be acceptable and the software may prompt
you to make adjustments. Note that if you choose 0Ω as your input zero,
then your under-scale threshold selection below cannot be achieved, except
for the purpose of setting the downscale alarm limit, which is ~0.4mA below
your under-scale threshold setting.
Your selection of Input zero is the RTD temperature or input resistance that
will correspond to 0% of output. Note that some under-range is built-in later
via the Under-scale Threshold selection, which is set separately (see below).
Note that this selection indirectly determines the PGA minus lead connection
from the input multiplexer. Different paths are chosen which have different
pedestal resistors installed that happen to be set just below the
corresponding resistance of the platinum input sensor at its zero
temperature. An equivalent sensor input resistance actually drives the
differential signal measurement to 0V. For example, the Resistance Input
Type will use the 0°C pedestal resistor which is 98.8Ω.
Next, enter your Input Full-Scale temperature (Pt RTD Input), or full-scale
resistance (Resistance Input Type).
Your Input Full-Scale selection will correspond to 100% of output. For Pt
RTD, you can enter any value up to 900°C. For the Resistance input type,
you can enter any resistance value up to 900Ω. Note that the unit does
convert under-range and over-range values outside of the 0% and 100%
limits, and this is set by separately selecting the output Under/Over-scale
Thresholds.
_______________________________________________________________________________________
Acromag, Inc. Tel:248-295-0880 Fax:248-624-9234 Email:[email protected] http://www.acromag.com
22
Model ST131-06x0
Two-Wire RTD Transmitter
___________________________________________________________________
CONFIGURATION
STEP-BY-STEP
Reconfiguration
Not all combinations of Input Zero and Input Full-Scale will be possible. The
software may prompt you to make another selection. Also, if the input zero
and full-scale points are chosen too close together, performance will be
degraded. A minimum span of 50°C is recommended. Note that you will
have to be able to precisely drive the corresponding input range resistance
values for zero and full-scale in order to calibrate your input range later.
Select the Output Range Zero and Output Range Full-Scale…
In the Output Zero and Output Full-Scale fields, enter the output currents
that are to correspond to 0% and 100% of output respectively. This is
typically 4mA and 20mA, respectively, but you could optionally specify an
output zero from 3.5mA up to 6.0mA, or an output full-scale from 16mA up to
24mA. Note that the output range over-scale and under-scale thresholds
are specified separately and will determine the linear operating range of the
output including possible over/under-range outside of these approximate
limits.
If the output zero and full-scale points are chosen too close together,
performance will be degraded. Use input spans greater than 50°C.
The actual operating range limits of your input sensor will depend on the
linear output operating range defined by the output under-scale and overscale threshold limit settings (set separately below). Threshold limiting
allows you to define an under-scale threshold, typically between 2.1mA and
3.6mA, and an over-scale threshold between 21mA and 30mA. This
indirectly corresponds to a linear operating range outside of the input zero
and full-scale limits. It also indirectly defines the fault current levels which
will be ~0.4mA below the under-scale threshold for down-scale detection,
and ~1.0mA above the over-scale threshold for upscale detection. The
Min/Max range of adjustment has already been calibrated at the factory and
the Min/Max values indicated will vary between units. Note that the range of
adjustment for the threshold levels can vary as much as ±10% of span
between units for the same “digital” setting.
Zero & Full-Scale
Calibration
Calibrate your I/O Range Selection…
IMPORTANT: If you make any changes to the Configuration parameters,
you must re-calibrate your input. Any changes to the Input Type, Sensor
Wiring, Input Zero/Full-Scale, or Output Zero/Full-Scale, are not written to
the transmitter until you complete the calibration sequence that is initiated by
clicking the “Start Calibration” button.
You can use the “Get Config” Calibration control button to read the current
configuration of the unit if you like, perhaps to determine the active
configuration prior to recalibrating it. Note that it will over-write the
configuration parameter selections of this screen that you may have just
changed. It a good idea to always check the current configuration selections
to affirm your intentions before clicking “Start Calibration”.
After making your input type and I/O range selections, you can click the
“Start Calibration” button of the Calibration section to begin calibrating your
selections. Calibration is a simple two step process (Resistance Input), or
three step process (Pt RTD Input), that adjusts the I/O range zero, the PGA
gain and excitation, and linearization (Pt RTD only). If you make a mistake
and need to repeat a step, just click “Abort Calibration” to restart from the
beginning.
_______________________________________________________________________________________
Acromag, Inc. Tel:248-295-0880 Fax:248-624-9234 Email:[email protected] http://www.acromag.com
Model ST131-06x0
Two-Wire RTD Transmitter
__________________________________________________________________
Calibration is an interactive process in which the software prompts you to
apply input signals and then measure the corresponding output current.
First, it will prompt you to apply the zero input signal resistance, then
measure and record the corresponding zero output signal current. Second,
it does the same for the full-scale input resistance and the corresponding
full-scale output current signal (it makes adjustments to gain at this stage,
but with linearization turned off). Third for Pt RTD input types, it enables
linearization and prompts you to apply the full-scale input resistance signal
again and then measure and record the corresponding full-scale output
current (it uses this second full-scale measurement to adjust the magnitude
of its linearization correction for the sensor). There may still be
combinations of zero and full-scale that you will not be able to adjust and
calibrate the unit for. For example, this might occur for very tight input
spans, or odd endpoints. The Configuration Software will usually let you
know when you need to adjust your desired limits as you enter them.
23
CONFIGURATION
STEP-BY-STEP
Zero & Full-Scale
Calibration
CAUTION: RTD Input levels outside of the nominal input range of the unit
(-50° to +900°C, or 0-900Ω) will not be accepted for configuration of zero or
full-scale. Since not all input levels can be validated during field
programming, connecting or entering incorrect signals will produce an
undesired output response.
By default, the unit is factory calibrated to a 100Ω, Pt385 RTD type, using a
3-wire sensor connection, and a 0° to 200°C input span to drive a 4mA to
20mA output span. For our example below, we will instead use the 0 to
500°C portion of the Pt RTD type to drive a 4 to 20mA output range.
Transmitter Zero, Full-Scale, & Linearizer Calibration Procedure
1. After configuring your input type and I/O ranges, you can begin
calibrating the transmitter by clicking the “Start Calibration” button and
the following message will appear:
Your unit needs to calibrate its zero signal. The software used your
input type and alpha information to compute the equivalent RTD
resistance of the input zero value you specified, and returned that value
in this prompt. Click OK and this message is repeated in the system
message window at the bottom of the screen. You need to adjust your
input signal to the zero input value noted. Because this input is a Pt
100Ω sensor, and 0°C is our input zero, our input signal should be
precisely set to 100.00 ohms. Measure the corresponding output current
and type the measured current in milliamps into the Measured Current
Output field. Then click the “Go To Step 2” button.
2. After clicking “Go To Step 2”, the following message will be displayed:
_______________________________________________________________________________________
Acromag, Inc. Tel:248-295-0880 Fax:248-624-9234 Email:[email protected] http://www.acromag.com
24
Model ST131-06x0
Two-Wire RTD Transmitter
___________________________________________________________________
CONFIGURATION
STEP-BY-STEP
Zero & Full-Scale
Calibration
Now the unit needs to calibrate its gain to produce your full-scale
endpoint. The software used your input type and alpha information to
compute the equivalent RTD resistance of the input full-scale value you
specified, and returned that value in this prompt. Click OK and this
message is repeated in the system message window at the bottom of
the screen. You need to adjust your input signal to the full-scale input
value noted. Measure the corresponding output current accurately and
type the measured output current in milliamps into the Measured Current
Output field. Then click the “Go To Step 3” button (only Pt RTD inputs
rd
will require a 3 step).
Note that at this point, your output signal will not be an accurate fullscale output (RTD Input), as linearization is OFF and calibration has not
been completed. The second step only sets the gain of the PGA
amplifier to drive the full-scale output, but without RTD linearization
turned on.
If your Input Type is Resistance, your calibration is complete after this
step because no special linearization correction applies (your output is
already linear with resistance). You simply need to click the Complete
Calibration button to continue and your resistance transmitter should be
calibrated.
3. (Pt RTD Input only) After clicking “Go to Step 3”, the following message
will be displayed:
Step 3 reads just like Step 2, except the RTD linearization circuit has
been activated and your output signal shifts closer to your desired fullscale output level. Click OK and this message is repeated in the prompt
window at the bottom of the screen. The transmitter needs your output
reading with linearization enabled to adjust the RTD linearization
correction current for the sensor excitation. You don’t need to readjust
your input signal at this step, as it uses the same full-scale input from the
prior step 2.
Simply measure your output signal and input the new measurement
taken (note that it will be closer to the full-scale output than it was in step
2, as linearization is ON). Type the measured output current in
milliamps into the Measured Current Output field. Then click the
Complete Calibration button and the following message will appear (your
output may shift slightly to reflect an adjustment to linearization):
At this point, the transmitter is calibrated.
Click OK to continue. Check the
accuracy of a few other points. Note that
if your input type is Pt RTD, your output
will be linear with the input temperature,
not the input resistance.
_______________________________________________________________________________________
Acromag, Inc. Tel:248-295-0880 Fax:248-624-9234 Email:[email protected] http://www.acromag.com
Model ST131-06x0
Two-Wire RTD Transmitter
__________________________________________________________________
If your output appears imprecise, you may need to repeat calibration, but
being very careful to take accurate measurements and enter the
measured output currents correctly, and using milliamps as your units.
Make sure that you carefully drive the precise input signal resistances
necessary for calibration. If measuring voltage across the output load
resistance, make sure that you use the exact input resistance when
calculating the current measured. Also, make sure that you have an
adequate input span, as too-tight input spans will magnify error.
Refer to the following table when using a resistance substitution box to drive
the input zero and full-scale signals. This contains the resistance values for
the two most common Pt RTD alpha types. Optionally, you can determine
resistances using an online calculator based on a different reference
standard,. For example, try the calculators at
http://www.minco.com/tools/sensorcalc/ .
Platinum RTD Resistance Versus Temperature
Temperature in Ohms
TEMP
100Ω Platinum RTD
°C
Pt385 (α=0.00385)
Pt391 (α=0.00391)
- 200
18.52
17.26
- 150
39.72
38.79
- 100
60.26
59.64
- 50
80.31
80.00
- 40
84.27
84.03
- 30
88.22
88.04
- 20
92.16
92.04
- 10
96.09
96.02
0
100.00
100.00
+ 10
103.90
103.96
+ 20
107.79
107.91
+ 30
111.67
111.86
+ 40
115.54
115.78
+ 50
119.40
119.70
+ 100
138.51
139.11
+ 150
157.33
158.22
+ 200
175.86
177.04
+ 250
194.10
195.57
+ 300
212.05
213.81
+ 350
229.72
231.76
+ 400
247.09
249.41
+ 450
264.18
266.77
+ 500
280.98
283.84
+ 550
297.49
300.61
+ 600
313.71
317.09
+ 650
329.64
333.29
+ 700
345.28
349.18
+ 750
360.64
364.79
+ 800
375.70
380.10
+ 850
390.48
395.12
Note: Shaded values fall outside the supported zero range for the ST131.
25
CONFIGURATION
STEP-BY-STEP
Zero & Full-Scale
Calibration
Note: For Pt385 (Platinum),
alpha = 0.00385Ω/Ω/ºC using
the European curve reference,
ITS-90. For Pt391 (Platinum),
Alpha = 0.00391 Ω/Ω/ºC using
reference 11-100. Alpha (α) is
used to identify the particular
RTD curve. Alpha (α) is used
to identify the RTD curve and
its value is derived by dividing
the sensor resistance at 100ºC
(boiling point of water) minus
the sensor resistance at 0ºC
(freezing point of water), by
the sensor resistance at 0ºC,
then by 100ºC (α = [R100ºC R0ºC] / R0ºC/ 100ºC). For Pt
100Ω, this is 38.5Ω/100.0Ω/
100ºC, or 0.00385Ω/Ω/ºC.
The configuration software will
allow you to select the curve
required for your application
(i.e. your alpha value). It uses
this value to calculate the
corresponding input resistance
required during calibration,
which it returns to you in
calibration prompt messages.
_______________________________________________________________________________________
Acromag, Inc. Tel:248-295-0880 Fax:248-624-9234 Email:[email protected] http://www.acromag.com
26
Model ST131-06x0
Two-Wire RTD Transmitter
___________________________________________________________________
CONFIGURATION
STEP-BY-STEP
Over-Scale & UnderScale Thresholds
TIP – Namur Limits: For
Namur compliant output limits,
you generally need to produce
a linear output range from
3.8mA to 20.5mA, and have a
failure high limit greater than
or equal to 22.5mA, and a
failure low limit less than or
equal to 3.6mA.
TIP – Error Detection: Note
that a checksum error can be
distinguished at the output
signal from a lead break error
by selecting an under-scale
limit that is greater than the
minimum threshold setting.
This is because a checksum
error always sends the output
signal to a level that is 0.4mA
below the lowest threshold
setting until reset (~1.8mA). If
you select an under-scale
threshold value greater than
the minimum, then you ensure
that the downscale alarm level
limit (0.4mA below the
threshold) does not overlap
with the checksum error level
indication.
Select The Over/Under-Scale Thresholds & Alarm Levels…
This unit allows you to select over-scale and under-scale output range
thresholds which determine the linear operating range of your output. They
also indirectly define the upscale & downscale alarm/error limits. The
downscale detent will be set to a current level ~0.4mA below the under-scale
threshold. The upscale detent will be set approximately 1.0mA above the
over-scale threshold. In this way, a lead break or open sensor fault can be
easily discerned from simply an over-range or under-range input signal.
The range of adjustment for the under & over-scale thresholds is calibrated
at the factory and indicated via the “Min” and “Max” value fields adjacent to
the slide controls. Note that the threshold levels can vary as much as 10%
of span between units for the same digital setting, and this will be reflected
by differing values for Min and Max between units. The Min/Max limits of
adjustment are calibrated at the factory.
CAUTION: For a low resistance or shorted load, and a high loop supply
voltage, excessive over-range current does drive excessive power
dissipation in the output pass transistor of the transmitter and will cause the
unit to get warm. This could be troublesome at elevated ambient
temperatures and in hazardous environments, particularly for output currents
near 30mA.
•
•
Use the Under-Range Limit slide control to select an approximate
under-scale threshold. You have 8 levels of under-scale threshold
adjustment between Min & Max, typically between 2.1mA and 3.6mA.
Your selection will be indicated in the field just above the control.
Use the Over-Range Limit slide control to select an approximate overscale threshold. You have 16 levels of over-scale threshold adjustment
between Min & Max, typically between 21mA and 30mA. Your selection
will be indicated in the field just above the control.
After making your adjustments, click the “Submit O/U Configuration” button
to write your adjustments to non-volatile transmitter EEPROM memory.
The linear operating range of your output is now defined between the limits
you specified. Your under-scale and over-scale thresholds also indirectly
correspond to a linear operating reqion that usually extends outside of the
input zero and full-scale limits you specified. Additionally, the sensor
fault/break detent output levels are set outside the linear operating region so
that you can discern them from simply an over-range or under-range input
signal.
You should check your under-scale and over-scale threshold levels. For
example, you could disconnect an RTD lead to check your O/U alarm limits,
which should be ~0.4mA below the under-scale threshold for a downscale
break, or 1mA above your over-scale threshold for an upscale break.
_______________________________________________________________________________________
Acromag, Inc. Tel:248-295-0880 Fax:248-624-9234 Email:[email protected] http://www.acromag.com
Model ST131-06x0
Two-Wire RTD Transmitter
__________________________________________________________________
Select Upscale or Downscale Lead Break Detection…
Upon sensor burnout or a broken sensor lead, you can select “Downscale”
to send the output current to the under-scale alarm limit, which is ~0.4mA
less than the under-scale threshold. Otherwise, you can select “Upscale”
to send the output to the over-scale alarm limit, which is ~1mA above the
over-scale threshold. By using alarm levels outside of a defined linear
operating range, a lead break or open sensor can be easily discerned from
an over-range or under-range input signal by noting its current level.
(Optional) Read Status & Reset Unit…
You can use the “Read Status” button to display fault status information
relative to the input signal. The fault status error level will be indicated in the
“Fault Status:” message field, and any additional diagnostic information will
be displayed in the message window at the bottom of the screen. Possible
fault status levels and diagnostic messages are indicated below:
27
CONFIGURATION
STEP-BY-STEP
Break Detection
Read Status & Reset
Unit
FLT LEVEL FAULT INDICATION
0 or None
Normal Operation, No Faults
1*
IN- Exceeds Positive Limit
2*
IN- Exceeds Negative Limit
3
IN+ Exceeds Positive Limit
4
IN+ Exceeds Negative Limit
5
IN+ Exceeds Positive Limit & IN- Exceeds Positive Limit
6
IN+ Exceeds Positive Limit & IN- Exceeds Negative Limit
7
IN+ Exceeds Negative Limit & IN- Exceeds Positive Limit
8
IN+ Exceeds Negative Limit & IN- Exceeds Negative Limit
ELSE
“Error Reading Unit. Check Connections and try again.”
*Note: A two-wire sensor input cannot correctly register IN- errors, as this
always requires a third lead to the sensor. A break in IN- will return Fault
Level 3, the same as a break in IN+. If an IN- error is flagged with a two-wire
sensor, it is referring to the short jumper wire placed between terminals 3 &
4 of the unit, which supplants the third sensor lead for two-wire input
connections. Failure to install this jumper for 2-wire sensors will drive error
level 5 (see below).
Normally, after clicking “Read Status”, No Faults will be indicated and “Read
Complete! Normal Operation, inputs in range” will be displayed in the
message bar. For a 3-wire sensor, a break in the IN+ lead will return “Fault
Code:3 (Positive Input Exceeds Positive Limit)”. A break in the IN- lead will
return “Fault Code: 1 (Negative Input exceeds Positive Limit)”. A break in
the third lead that connects to terminal 4 will return “Fault Code: 5 (Positive
Input exceeds positive Limit and Negative Input exceeds Positive Limit)”.
For a 2-wire sensor, a break in the IN+ lead and/or IN- will return “Fault
Code:3 (Positive Input Exceeds Positive Limit). A missing jumper between
terminals 3 & 4 of the transmitter will return “Fault Code: 5 (Positive Input
exceeds positive Limit and Negative Input exceeds Positive Limit)”. The
following table summarizes the Fault Levels returned for a break or open in
each of the input leads.
LEAD BREAK
#1, M
#2, IN+
#3, IN#4, L
3-4 Jumper
2-WIRE FAULT
NA
3
3
NA
5
3-WIRE FAULT
NA
3
1
5
NA
4-WIRE FAULT
Not Flagged
3
1
5
NA
_______________________________________________________________________________________
Acromag, Inc. Tel:248-295-0880 Fax:248-624-9234 Email:[email protected] http://www.acromag.com
28
Model ST131-06x0
Two-Wire RTD Transmitter
___________________________________________________________________
CONFIGURATION
STEP-BY-STEP
You can use “Reset Unit” to reset the transmitter and cause it to revert to
its power-up or last saved configuration. This will also clear a very rare
checksum error, which can occur if the transmitter fails to read its
configuration from the EEPROM properly, or if the EEPROM contents have
been corrupted. A checksum error will also send the output current to
0.4mA below the lowest under-scale threshold setting, until reset via this
control, or by toggling loop power OFF/ON. A persistent checksum error
could indicate a defective transmitter.
Factory Settings
(Optional) Factory Settings…
You can use the “Restore Factory Settings” button to restore the
transmitter configuration to the original factory state (see Specifications
Reference Test Conditions), including the optional settings (over/under-scale
& and break detection). This control provides a potential recovery path
should the configuration ever become corrupted during recalibration,
perhaps due to miscalibration. For example, if during calibration you break
the USB connection before completing calibration, the EEPROM checksum
value could be corrupted and this would inhibit normal operation.
Alternately, this button can be used as a sanitation tool to restore the unit to
its initial configuration. Note that the “Reset Unit” control of Unit Status
sends the unit to its power-up or stored configuration, different from this
control which sends the unit to its initial factory configuration.
SPECIFICATIONS
Model ST131-0600
Signal Transmitter
RTD Input
Non-Isolated
Two-Wire Loop-Powered
CE Approved (Pending)
No SIL Approvals
Model ST131-0610
Adds UL/cUL Class 1, Division
2 approvals (Pending)
Add a “-C” model suffix to
specify Custom Calibration of
the transmitter.
Model Numbers:
ST13/Input-Isolation/Power/Approvals/SIL-Calibration
ST13 is the model Series. The prefix “ST” denotes the “Smart Transmitter”
family. The trailing “1” digit denotes an RTD input type. The “0” after the
hyphen denotes non-isolated, the “6” that follows denotes 2-wire loop
powered. The “0” or “1” following denotes CE Approvals Only, or CE and
UL/cUL Class 1, Division 2 Approvals. The last “0” digit refers to No SIL
Approvals. The optional “-C” model suffix specifies custom calibration.
ST131-0600
ST131-0600-C
ST131-0610
ST131-0610-C
RTD Input, Non-Isolated, CE Approved, No SIL Certification
Same as first but w/Customer Specified Calibration
Same as first but adds UL/cUL Class 1, Division 2 Approval
Same as third but w/Customer Specified Calibration
Note that ST131 models can be ordered with or without the factory
calibration “-C” option. Factory calibration requires selection of input type (Pt
RTD or Resistance), sensor wiring (2-wire or 3/4-wire), Input Zero Value
(-50°C, 0°C, or +50°C for Pt RTD, or Ohms for Resistance), Input Full-Scale
(up to 900°C or 900Ω), Output Zero Value (3.5 to 6mA), Output Full-Scale
Value (16-24mA), and Sensor Fault Detent (Upscale or Downscale).
Models without the “-C” suffix are calibrated by default for Pt100 RTD,
α=0.00385 Ω/Ω/°C, 3-wire, 0°C to 200°C input, 4 to 20mA output, upscale
fault detection.
Recalibration of any model will require use of an ST13C-SIP configuration kit
ordered separately (see Accessories).
Models can be mounted in DIN Form B connection heads using the ST130MTG mounting kit, or on DIN rail using the ST130-DIN kit. These kits are
purchased separately (see Accessories)
_______________________________________________________________________________________
Acromag, Inc. Tel:248-295-0880 Fax:248-624-9234 Email:[email protected] http://www.acromag.com
Model ST131-06x0
Two-Wire RTD Transmitter
__________________________________________________________________
Input Specifications
Input: Configurable for 100Ω Platinum RTD from -50°C to +900°C, or for
linear resistance from 0Ω to 900Ω. Unit provides sensor excitation,
linearization, lead-wire compensation (3-wire), and sensor fault/lead
break detection. Consult factory for 1000Ω Pt RTD support.
Input Zero Adjust: For Pt RTD w/ 3 or 4-wire connection, select
-50°C, 0°C, or +50°C. For Pt RTD w/2-wire Connection, input zero is
fixed at 0°C. For Resistance input, zero is user-specified in ohms, 0Ω or
100Ω typical. Some zero values in ohms will not be acceptable and the
software may prompt you to make adjustments.
Input Full-Scale Adjust: For Pt RTD, specify a full-scale temperature
up to 900°C. For Resistance input, specify a resistance up to 900Ω.
Minimum recommended span is 50°C (RTD), and 8Ω (Resistance).
Accuracy/Linearity: Accuracy is dependent on the calibration region as
shown in Table 1. Note that accuracy is generally better than ±0.1% of
the calibrated range for regions below 500°C. For Platinum RTD input
type, linearity and accuracy is optimum for calibrated spans within the
region of -50° to +500°C.
Table 1: RTD Ranges and Accuracy
1
°C or Ω
α
Input Type
Alpha
Spans in Range
1.385
-50°C up to 250°C
Pt385 100Ω
(IEC751 Amendment
-50°C up to 251-500°C
2:1995)
-50°C up to 501-900°C
1.3911
-50°C up to 250°C
Pt3911 100Ω
(Old JIS 1981)
-50°C up to 251-500°C
-50°C up to 501-900°C
2
2
Resistance (Linear)
1.000
0-900Ω
29
SPECIFICATIONS
3
Typical
Accuracy
< ±0.05%
< ±0.1%
< ±0.2%
< ±0.05%
< ±0.1%
< ±0.2%
< ±0.1%
Notes (Table 1):
1
Alpha (α) is used to identify the RTD curve and its value is derived by
dividing the sensor resistance at 100°C (boiling point of water) minus the
sensor resistance at 0ºC (freezing point of water), by the sensor
resistance at 0°C, then by 100°C (α = [R100°C -R0°C] / R0°C/ 100°C). For Pt
100Ω, this is 38.5Ω/100.0Ω/100°C, or 0.00385Ω/Ω/°C and represents
the average change in resistance per ºC.
2
The Zero of the range is a fixed choice of -50°, 0°C, or +50°C for 3-wire
RTD. The 2-wire RTD input uses a fixed zero of 0°C.
3
Rated accuracy applies for input spans greater than 50°C or 8Ω, and
with a 16mA output span.
Reference Test Conditions: 100Ω Pt RTD, α=0.00385 Ω/Ω/°C, 0°C to
200°C input, 4-20mA output, Upscale break detection, ambient
temperature = 25°C; power = 24V DC; R-Load = 250Ω.
Input Configuration: Three-wire w/ lead compensation, four-wire w/ 3wire lead compensation, or two-wire w/o lead compensation.
Input Gain: PGA gain is adjustable for 6.25, 12.5, 25, 50, 100, 200, and
400 mV/mV. PGA output voltage sinks current through 6.34KΩ and a
current gain of 50mA/mA is applied to that current at the output stage.
Linearization Range: Digitally adjustable correction, 8-bit value (256
steps), at 3.9nA/mV per step (set to zero for linear resistance input). The
maximum linearization coefficient is 0.99uA/mv (∆Iref/∆Vin). Additive to
excitation current to accomplish linearization of Pt RTD inputs.
_______________________________________________________________________________________
Acromag, Inc. Tel:248-295-0880 Fax:248-624-9234 Email:[email protected] http://www.acromag.com
30
Model ST131-06x0
Two-Wire RTD Transmitter
___________________________________________________________________
SPECIFICATIONS
Excitation Currents: Utilizes dual current sources, one for each ±
sensor lead, matched within ±0.2%. Set to 0.493mA typical, with less
than 10ppm/°C drift over temperature (zero code level for each is
between 0.480mA and 0.510mA). Digitally adjustable via Coarse and
Fine DAC’s with 256 steps of adjustment for each (7bits + sign bit).
Coarse adjustment is -195 to +195uA w/1.54uA/step. Fine adjustment is
-12.2 to +12.2uA with 96nA/step. Also adjusted via linearization feedback
for Pt RTD input types (see below).
Lead-Wire Compensation: For balanced ± sensor leads (same size,
length, & type) and only with 3 or 4-wire sensor connections.
Recommended maximum lead resistance is 25Ω per lead.
Lead Resistance Effect: Output shift less than ±0.01% per ohm of lead
resistance, with a max shift less than ±0.1% with up to 10Ω per ±lead.
Lead Break/Sensor Burnout Detection: Select output upscale or
downscale detection. Alarm output level is indirectly programmed via the
linear U/O threshold settings (see Output Fault Limits).
Input Filter Bandwidth: -3dB at 700Hz, typical, normal mode filter.
Input Response Time: Output completes transition within 500us, typ.
Input Bias Current: 50pA typical (PGA), ~doubling every +10°C.
Output Specifications
Output Range: 4 to 20mA DC nominal. An output zero from 3.5mA to
6mA, and an output full-scale from 16mA to 24mA may be optionally
configured. The linear operating range including over-range is also
digitally adjustable between the Under-scale & Over-scale limits selected.
Over-scale limit is adjustable from ~20.5 to 30mA typical, and the underscale limit is adjustable from ~2.1 to 3.6mA typical.
Output Zero Adjust: 4mA nominal, adjustable from 3.5mA to 6mA.
Sets value corresponding to 0% of output and is adjusted independent of
under-range threshold. Hardware uses digitally controlled (7bits + sign)
coarse & fine DAC’s with 256 steps of adjustment in each. Zero code
output level is ~4.116mA. Coarse adjustment is 0.029mA/step with a
typical coarse adjustment range from -3.77mA to +3.77mA at the output.
Fine adjustment is 0.0018mA/step for an adjustment range of -236uA to
+236uA at the output. Your effective adjustment range is additionally
limited via the configuration software.
Output Full-Scale Adjust: 20mA nominal, adjustable from 16-24mA.
Adjusted independent of under-range and over-range thresholds. Sets
value corresponding to 100% of output and adjusted independent of overrange threshold. Your effective adjustment range is additionally limited
via the configuration software.
Output Span: 4-20mA, nominal. Optionally an output zero from 3.5mA
to 6mA and a full-scale from 16mA to 24mA may be configured. Span
adjustment is determined by the combination of PGA gain and sensor
excitation with 3 methods of digital adjustment: PGA gain selection,
reference current coarse adjustment, and reference current fine
adjustment. The span expressed as Io/Vin from the PGA to the output
amplifier has an adjustment range from 49.3mA/V to 3150mA/V.
Additionally, the linear operating range of the output may be extended via
the under-scale and over-scale threshold settings set separately. Your
effective adjustment range is additionally limited via the configuration
software.
.
_______________________________________________________________________________________
Acromag, Inc. Tel:248-295-0880 Fax:248-624-9234 Email:[email protected] http://www.acromag.com
Model ST131-06x0
Two-Wire RTD Transmitter
__________________________________________________________________
Output Fault/Alarm Limits: Downscale fault level is ~0.4mA below the
selected under-scale threshold, typical. Upscale fault level is ~1.0mA
above the selected over-scale threshold, typical. The unit can be set for
limits that comply with NAMUR NE43 recommendations
Output Compliance: 8.6V Minimum (transmitter). Will drive 15V typical,
with a 24V supply and 20mA loop current.
Output Ripple: Less than ±0.1% of output span.
Output Limiting: Output current limit is programmable and limited to an
over-scale threshold value that you configure less than or equal to 30mA.
Output Power Supply: 9-32V DC SELV (Safety Extra Low Voltage),
30mA maximum. The supply voltage across the transmitter must not
exceed 36V, even with a shorted load. The supply voltage level must be
chosen to provide a minimum of full-scale current to the load (0.020*R
typical), plus 8.6V minimum to the transmitter terminals, plus any line
drop. Ideally, your supply should drive over-scale and alarm current
levels into the load (alarm level is 1mA above the over-scale threshold
selected). Reverse polarity protection is included, as output terminals are
bridge coupled and not polarized. The ± output polarity labels on the
enclosure are for reference only.
CAUTION: Do not exceed 36VDC peak to avoid damage to the unit.
Terminal voltage at or above 8.6V minimum must be maintained across
the unit during operation.
Output Resolution: Not Applicable. Input signal is not digitized. The
signal path is fully analog with digital controls for offset, excitation, and
linearity. The effective adjustment resolution is approximately 12-bits for
reference test conditions.
Output Response Time: For a step change in input signal, the output
reaches 98% of final value in less than 500us typical, with a 250Ω load.
Output Load Resistance Effect: Less than ±0.005% of output span
effect for ±100Ω change in load resistance.
Accuracy: Refer to Table 1 for relative accuracy referred to the input.
Accuracy will vary with calibrated input and output span. Rated accuracy
assumes 50°C minimum input span and 16mA output span. Accuracy
includes the effects of repeatability, terminal point conformity, and
linearization, but does not include sensor error.
Ambient Temperature Effect: Better than ±0.008% per °C of input span
or ±80ppm/°C, over the ambient temperature range for reference test
conditions. Includes the combined effects of zero and span drift over
temperature.
Power Supply Effect: Less than ±0.001% of output span effect per volt
DC change.
Load Resistance Range Equation: Rload (Max) = (Vsupply - 9V)/0.020A
for full-scale output current (assuming negligible line drop). This does not
account for over-scale or alarm current levels and you should adjust the
denominator in this expression for your particular alarm current level. At
24V DC, Rload = 0-750Ω typical for 20mA of loop current and no line drop.
Note: Additional filtering at the load is recommended for sensitive
applications with high-speed acquisition rates--high frequency noise may
be reduced by placing a 0.1uF capacitor directly across the load. For
excessive 60Hz supply ripple, a 1uF or larger bulk capacitor is
recommended at the load.
31
SPECIFICATIONS
_______________________________________________________________________________________
Acromag, Inc. Tel:248-295-0880 Fax:248-624-9234 Email:[email protected] http://www.acromag.com
32
Model ST131-06x0
Two-Wire RTD Transmitter
___________________________________________________________________
SPECIFICATIONS
IMPORTANT – USB Isolation
is recommended: The
transmitter digital ground is
connected in common to USB
power/signal ground and
shield ground, and will make
connection to earth ground
when directly connected to the
USB port of a Personal
Computer without the use of
an isolator. Failure to connect
without isolation would force a
potential difference between
earth ground at the PC and the
earth ground normally applied
in a properly grounded twowire current loop. This would
drive an inadvertent ground
loop that will interfere with
operation and could damage
the unit. For this reason, USB
isolation is strongly
recommended when
connecting to a PC.
Otherwise, in the absence of
USB isolation, a battery
powered laptop could be used
to connect to the unit, as the
laptop does not normally
connect to earth ground.
USB Interface
Includes a USB socket for temporary connection to a PC or laptop for the
purpose of setup and reconfiguration. During reconfiguration and
calibration, the transmitter receives power from both the USB port and
the output loop, and both power sources must be present to calibrate the
unit.
CAUTION: Do not attempt to connect USB in a hazardous environment.
Transmitter should be setup and configured in a safe environment only.
Data Rate: USB v1.1 full-speed only, at 12Mbps. Up to 32K commands
per second. USB 2.0 compatible. Consult factory for a low speed
(1.5Mbps) version if required.
Transient Protection: Unit includes transient voltage suppression on
USB power and data lines.
USB Connector: 5-pin, Mini USB B-type socket, Molex #5000751517.
PIN
DEFINITION
1
+5V Power (Includes Inrush Current Limiting)
2
Differential Data (+)
3
Differential Data (-)
4
NC – Not Connected
1
5
Power Ground (Connects to Signal Ground via ferrite bead)
1
SHLD Signal Ground (Connects directly to Signal Ground)
1
Note: Most Host Personal Computers (except battery powered laptops)
will connect earth ground to the USB shield and signal ground.
Inrush Current Limiting: Unit includes series inrush current limiting at
its USB power connection.
Cable Length/Connection Distance: 5.0 meters maximum.
Driver: No special drivers required. Transmitter uses the built-in USB
Human Interface Device (HID) drivers of the Windows Operating System
(Windows XP or later versions only).
Approvals (-xx00, Pending)
CE marked (EMC Directive 89/336/EEC, Pending). Pending: UL Listed
(UL3121-First Edition, UL1604), cUL Listed (Canada Standard C22.2,
No. 1010.1-92), Hazardous Locations: Class 1; Division 2; Groups A, B,
C, & D. Consult factory for availability of other approvals.
Enclosure & Physical
General purpose plastic enclosure intended to be mounted in DIN Form
B connection heads. Optionally, a DIN rail adapter is available for
mountable to 35mm “T-type” DIN rail, or G-Type DIN rail.
Dimensions: Diameter = 44.5mm (1.752 inches), Height = 23.4mm
(0.921 inches). Refer to Mechanical Dimensions drawing. Conforms to
DIN 43 729 Form B size requirements.
I/O Connectors: Barrier strip type, captive screw terminals; wire range:
AWG #14-28 solid or stranded.
Program Connector: USB Mini B-type, 5-pin.
Case Material: Self-extinguishing polycarbonate ABS plastic, UL94 V-0
rated base material, color blue. USB dust cap material is Santoprene,
251-70W232, color red.
Terminal Material: Captive 4-40 threaded steel screw and 0.040 inch
thick Phosphor-Bronze terminal material.
_______________________________________________________________________________________
Acromag, Inc. Tel:248-295-0880 Fax:248-624-9234 Email:[email protected] http://www.acromag.com
Model ST131-06x0
Two-Wire RTD Transmitter
__________________________________________________________________
Circuit Board: Military grade fire-retardant epoxy glass per IPC-4101/98
with humi-seal conformal coating.
DIN-Rail Mounting: The unit can be optionally mounted to 35x15mm, Ttype DIN rails using optional ST130-DIN DIN-rail mounting adapter kit.
Refer to the Mounting & Dimensions section for more details.
Shipping Weight: 0.5 pounds (0.22 Kg) packed.
33
SPECIFICATIONS
Environmental
These limits represent the minimum requirements of the applicable standard,
but this product has typically been tested to comply with higher standards in
some cases.
Operating Temperature: -40°C to +80°C (-40°F to +176°F).
Storage Temperature: -40°C to +85°C (-40°F to +185°F).
Relative Humidity: 5 to 95%, non-condensing.
Isolation: Input & output are not isolated from each other for this model.
Model is intended to interface with insulated/non-grounded sensors.
Installation Category: Suitable for installation in a Pollution Degree 2
environment with an Installation Category (Over-voltage Category) II
rating per IEC 1010-1 (1990).
Shock & Vibration Immunity: Unit rated to 5g Random Vibration, 5500Hz, in 3 axis at 2 hours/axis per IEC60068-2-64; Mechanical Shock to
50g, 3ms, with 3 half-sine shock pulses in each direction along 3 axis (18
shocks), and 30g, 11ms, with 3 half-sine shock pulses in each direction
along 3 axis (18 shocks), per IEC60068-2-27.
Radiated Field Immunity (RFI): Designed to comply with IEC1000-4-3
Level 3 (10V/M, 80 to 1000MHz AM & 900MHz keyed) and European
Norm EN50082-1.
Electromagnetic Interference Immunity (EMI): The transmitter output
has demonstrated resistance to inadvertent output shifts beyond ±0.25%
of span, under the influence of EMI from switching solenoids,
commutator motors, and drill motors.
Electromagnetic Compatibility (EMC)
Minimum Immunity Per European Norm EN61000-6-2:2005
Electrostatic Discharge (ESD) Immunity: 4KV direct contact and 8KV
air-discharge to the enclosure port per IEC61000-4-2.
Radiated Field Immunity (RFI): 3V/M required, 80 to 1000MHz, 3V/M
1.4-2.0GHz, 1V/M 2.0-2.7GHz, AM 80% 1KHz, per IEC610004-4.
Electrical Fast Transient Immunity (EFT): 0.5KV to output/power
w/coupling clamp and fast transients to AC side of AC/DC adapter.
Complies with IEC1000-4-4 Level 1 (0.5KV) and European Norm
EN50082-1. Test is applicable only to ports interfacing with cables
whose length may exceed 3M.
Surge Immunity: 0.5KV to output/power per IEC1000-4-5 Level 1
(0.5KV) and European Norm EN50082-1. Surge applied to AC side of
AC/DC adapter per standard. Not applicable to signal ports that interface
via cables whose total length is less than 3 meters.
Conducted RF Immunity (CRFI): 3Vrms, 150KHz to 80MHz, AM 80%
1KHz, per IEC61000-4-6.
Emissions per European Norm EN61000-6-4:2007
Radiated Frequency Emissions: 30 to 1000MHz per CISPR11. Meets
or exceeds European Norm EN50081-1 for Class B equipment.
_______________________________________________________________________________________
Acromag, Inc. Tel:248-295-0880 Fax:248-624-9234 Email:[email protected] http://www.acromag.com
34
Model ST131-06x0
Two-Wire RTD Transmitter
___________________________________________________________________
SPECIFICATIONS
Reliability Prediction
MTBF (Mean Time Between Failure): MTBF in hours using MIL-HDBK217F, FN2. Per MIL-HDBK-217, Ground Benign, Controlled, GBGC
Temperature
25ºC
40ºC
ST131-06X0
TBD hrs – Consult Factory
TBD hrs – Consult Factory
Configuration Controls (Software Configuration Only via USB)
This transmitter produces an analog output current proportional to a
sensor input based on the voltage measured across the sensor
resistance. No switches or potentiometers are used to make
adjustments to this transmitter. Its analog output level and behavior is
instead determined via register values stored in non-volatile EEPROM
memory in the transmitter. The contents of these registers are
automatically uploaded at power-up and will determine excitation,
amplifier gain, zero offset, linearization, and other options of the
embedded ASIC. The contents of these registers are programmed using
a temporary USB connection to a host computer or laptop running a
Windows-compatible configuration software program specific to the
transmitter model. This software provides the framework for digital
control of the contents of these registers. All register information is
stored in non-volatile EEPROM memory, except for Control Register 1,
the Fault Status Register, and the Checksum Register. All control
registers are read/write capable except for the Fault Status Register.
Refer to Configuration Step-by-Step of this manual for detailed
information on available software control of this model.
ACCESSORIES
Software Interface Package/Configuration Kit –
Order ST13C-SIP
•
•
•
•
USB Signal Isolator
USB A-B Cable 4001-112
USB A-mini B Cable 4001-113
Configuration Software CDROM 5039-312
This kit contains all the essential elements for configuring ST130 Smart
Transmitters. Isolation is recommended for USB port connections to these
transmitters and will block a potential ground loop between your PC and a
grounded current loop. A software CDROM is included that contains the
Windows software used to program the transmitter.
Transmitter Mounting Kit – Order ST130-MTG
•
•
M4 Mounting Screw 1010-456, 2pcs
Relief Spring 1011-358, 2pcs
This kit contains two M4 mounting screws and relief
springs for mounting this transmitter in DIN Form B
Connection Heads. The screws in this kit are of a
special design that is semi-captive to the ST130
enclosure. Order 1 kit per transmitter.
_______________________________________________________________________________________
Acromag, Inc. Tel:248-295-0880 Fax:248-624-9234 Email:[email protected] http://www.acromag.com
Model ST131-06x0
Two-Wire RTD Transmitter
__________________________________________________________________
USB Isolator – Order USB-ISOLATOR
•
•
•
35
ACCESSORIES
USB Signal Isolator
USB A-B Cable 4001-112
Instructions 8500-900
This kit contains a USB isolator and a 1M USB A-B cable for connection to a
PC. This isolator and cable are also included in ST131C-SIP (see above).
USB A-B Cable – Order 4001-112
•
USB A-B Cable 4001-112
This is a 1 meter, USB A-B replacement cable for
connection between your PC and the USB isolator. It is normally included
with the ST13C-SIP Software Interface Package and also with the isolator
model USB-ISOLATOR.
USB A-mini B Cable – Order 4001-113
•
USB A-mini B Cable 4001-113
This is a 1 meter, USB A-miniB replacement cable for
connection between the USB isolator and the ST130
transmitter. It is normally included in ST13C-SIP.
Series ST DIN Rail Adapter – Order ST130-DIN
•
•
•
DIN Rail Adapter 1027-187
M4 Mounting Screw 1010-456, 2pcs
Relief Spring 1011-358, 2pcs
This is a DIN rail bracket with mounting screws that
connect to the ST130 Smart Transmitter to allow it to be snapped onto
35mm T-type DIN rail, or G-type DIN Rail. The screws and springs of this kit
are identical to those provided in the Transmitter Mounting Kit ST130-MTG.
Aluminum Connection Head, Explosion Proof,
Screw Cap, NEMA 4 Rated – Order 4001-115.
This is an aluminum, silver-epoxy colored, explosion
proof, screw cap, connection head, with ½” NPT
egress, and ¾” NPT ingress. Enclosure material is
SS316, with SS304/SS302 chain/screws. Enclosure
material is alloy AL ADC12, with SS304/SS302
chain/screws. It is FM/FMC (Canada), Class I,
Division 1, Groups A, B, C, D, T6; Class II, III, Division 1, Groups E, F, G,
T6; NEMA 4 rated.
.
_______________________________________________________________________________________
Acromag, Inc. Tel:248-295-0880 Fax:248-624-9234 Email:[email protected] http://www.acromag.com
36
Model ST131-06x0
Two-Wire RTD Transmitter
___________________________________________________________________
ACCESSORIES
Stainless Steel Connection Head, Explosion
Proof, Screw Cap, NEMA 4X – Order 4001-116.
This connection head is a stainless steel, screwcap, explosion proof type, with ½” NPT egress and
¾” NPT ingress. Enclosure material is SS316, with
SS304/SS302 chain/screws. It is FM/FMC
(Canada), Class I, Division 1, Groups a, B, C, D, T6;
Class II, Division 1, Groups E, F, G, T6; Class III,
NEMA 4X rated.
Aluminum Connection Head, General Purpose,
Screw Cap, NEMA 4X & IP68 – Order 4001-117.
This connection head is an aluminum, screw-cap,
general purpose type, with ½” NPT egress and ¾”
NPT ingress. It is silver-epoxy painted and NEMA
4X and IP68 rated.
Cast Iron Connection Head, Screw Cap, NEMA
4X – Order 4001-119.
This connection head is a cast iron (black), screwcap, with ½” NPT egress and ¾” NPT ingress. It is
NEMA 4X rated.
_______________________________________________________________________________________
Acromag, Inc. Tel:248-295-0880 Fax:248-624-9234 Email:[email protected] http://www.acromag.com