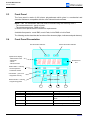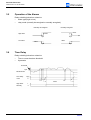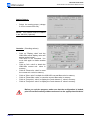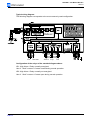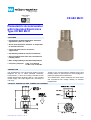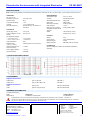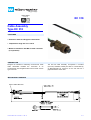
1
TITLE PAGE
User Manual
VIBRATION MONITOR
VibroSmart VMU100
MAVMU100/E
User Manual MAVMU100/E
Edition 6
REVISION RECORD SHEET
Edition
Date
Written by
of Issue /Modified by
PM
No.
Description
Signature
1
01.09.97
J. C. Monet
-
Original edition
---
2
03.02.98
A. Safavi
-
Page arrangement and sundry modifications
3
14.05.98
A. Safavi
-
Modification to the disassembly procedure
4
18.09.98
A. Safavi
-
Added RS232C and RS485 transmission
5
24.06.99
A. Safavi
-
New accelerometer data sheets.
Adjunction + new and modified appendices.
New VMU100 data sheet revision.
24/48 VAC removed.
Mounting adapter drawing removed (standard item
included with accelerometer)
6
07.02.05
R. Rice
-
Conversion to FrameMaker and general revisions.
Master copy stored at : Technical Publications Department
Technical content of original
issue approved by
Document released by
ii
Department
Name
Development
H.-P. Aeby
Product Management
F. Micco
Technical Publications
R. Arnaud
Date
Signature
User Manual MAVMU100/E
Edition 6
IMPORTANT NOTICE
All statements, technical information, and recommendations in this document which relate to the products supplied
by Vibro-Meter SA are based on information believed to be reliable, but unless otherwise expressly agreed in writing
with Vibro-Meter the accuracy or completeness of such data is not guaranteed. Before using this product, you must
evaluate it and determine if it is suitable for your intended application. Unless otherwise expressly agreed in writing
with Vibro-Meter, you assume all risks and liability associated with such use. Vibro-Meter takes no responsibility for
any statements related to the product which are not contained in a current English language Vibro-Meter
publication, nor for any statements contained in extracts, summaries, translations or any other documents not
authored and produced by Vibro-Meter.
COPYRIGHT
Copyright © Vibro-Meter SA, 2007
All rights reserved
Published and printed by Vibro-Meter SA in Fribourg, Switzerland
The names of actual companies and products mentioned
herein may be the trademarks of their respective owners.
The information contained in this document is subject to change without notice.
This information shall not be used, duplicated or disclosed, in whole or in part,
without the express written permission of Vibro-Meter.
THIS PAGE INTENTIONALLY LEFT BLANK
iv
User Manual MAVMU100/E
Edition 6
TABLE OF CONTENTS
TABLE OF CONTENTS
TITLE PAGE
i
REVISION RECORD SHEET
ii
COPYRIGHT
iii
TABLE OF CONTENTS
v
PREFACE
ix
About This Manual . . . . . . . . . . . . . . . . . . . . . . . . . . . . . . . . . . . . . . . . . . . . . . . . . . . . . . . .ix
Who Should Use This Manual? . . . . . . . . . . . . . . . . . . . . . . . . . . . . . . . . . . . . . . . . . . . . . .ix
Related Documentation . . . . . . . . . . . . . . . . . . . . . . . . . . . . . . . . . . . . . . . . . . . . . . . . . . . .ix
SAFETY
xi
Symbols and Styles Used in This Manual . . . . . . . . . . . . . . . . . . . . . . . . . . . . . . . . . . . . . .xi
Important Remarks on Safety . . . . . . . . . . . . . . . . . . . . . . . . . . . . . . . . . . . . . . . . . . . . . . . xii
Location of Safety Symbols . . . . . . . . . . . . . . . . . . . . . . . . . . . . . . . . . . . . . . . . . . . xii
Additional Remarks. . . . . . . . . . . . . . . . . . . . . . . . . . . . . . . . . . . . . . . . . . . . . . . . . . xii
General Handling Precautions . . . . . . . . . . . . . . . . . . . . . . . . . . . . . . . . . . . . . . . . . . . . . . xiii
Handling Precautions for Electrostatic Sensitive Devices . . . . . . . . . . . . . . . . . . . . . . . . . xiv
1 INTRODUCTION . . . . . . . . . . . . . . . . . . . . . . . . . . . . . . . . . . . . . . . . . . . . . . . . . . . . . . . 1-1
1.1
Version . . . . . . . . . . . . . . . . . . . . . . . . . . . . . . . . . . . . . . . . . . . . . . . . . . . . . . . . . . 1-1
1.2
Concept and Application Areas. . . . . . . . . . . . . . . . . . . . . . . . . . . . . . . . . . . . . . . . 1-1
2 SYSTEM DESCRIPTION . . . . . . . . . . . . . . . . . . . . . . . . . . . . . . . . . . . . . . . . . . . . . . . . . 2-1
2.1
Basic Version . . . . . . . . . . . . . . . . . . . . . . . . . . . . . . . . . . . . . . . . . . . . . . . . . . . . . 2-1
2.2
Optional Modules . . . . . . . . . . . . . . . . . . . . . . . . . . . . . . . . . . . . . . . . . . . . . . . . . . 2-1
2.3
Front Panel . . . . . . . . . . . . . . . . . . . . . . . . . . . . . . . . . . . . . . . . . . . . . . . . . . . . . . . 2-2
2.4
Front Panel Presentation . . . . . . . . . . . . . . . . . . . . . . . . . . . . . . . . . . . . . . . . . . . . 2-2
User Manual MAVMU100/E
Edition 6
v
TABLE OF CONTENTS
3 DETAILED FUNCTIONS . . . . . . . . . . . . . . . . . . . . . . . . . . . . . . . . . . . . . . . . . . . . . . . . . 3-1
3.1
Power Supply . . . . . . . . . . . . . . . . . . . . . . . . . . . . . . . . . . . . . . . . . . . . . . . . . . . . . 3-1
3.2
Display Functions . . . . . . . . . . . . . . . . . . . . . . . . . . . . . . . . . . . . . . . . . . . . . . . . . . 3-2
3.3
Self-check / OK Function. . . . . . . . . . . . . . . . . . . . . . . . . . . . . . . . . . . . . . . . . . . . . 3-2
3.4
Monitoring . . . . . . . . . . . . . . . . . . . . . . . . . . . . . . . . . . . . . . . . . . . . . . . . . . . . . . . . 3-4
3.5
Operation of the Alarms . . . . . . . . . . . . . . . . . . . . . . . . . . . . . . . . . . . . . . . . . . . . . 3-6
3.6
Time Delay . . . . . . . . . . . . . . . . . . . . . . . . . . . . . . . . . . . . . . . . . . . . . . . . . . . . . . . 3-6
3.7
Alarm Sequence . . . . . . . . . . . . . . . . . . . . . . . . . . . . . . . . . . . . . . . . . . . . . . . . . . . 3-7
3.8
Max/min Storage . . . . . . . . . . . . . . . . . . . . . . . . . . . . . . . . . . . . . . . . . . . . . . . . . . . 3-7
3.9
Analog Output (Optional). . . . . . . . . . . . . . . . . . . . . . . . . . . . . . . . . . . . . . . . . . . . . 3-7
3.10 RS232C or RS485 Transmission (Optional) . . . . . . . . . . . . . . . . . . . . . . . . . . . . . . 3-8
3.11 List of Commands . . . . . . . . . . . . . . . . . . . . . . . . . . . . . . . . . . . . . . . . . . . . . . . . . 3-11
3.11.1 Command descriptions . . . . . . . . . . . . . . . . . . . . . . . . . . . . . . . . . . . . . . . 3-11
3.11.2 Configuration Codes Description . . . . . . . . . . . . . . . . . . . . . . . . . . . . . . . 3-13
3.12 Configuration Software Description . . . . . . . . . . . . . . . . . . . . . . . . . . . . . . . . . . . . 3-14
4 ASSEMBLY AND WIRING DETAILS. . . . . . . . . . . . . . . . . . . . . . . . . . . . . . . . . . . . . . . . 4-1
4.1
Assembly. . . . . . . . . . . . . . . . . . . . . . . . . . . . . . . . . . . . . . . . . . . . . . . . . . . . . . . . . 4-1
4.2
Wiring . . . . . . . . . . . . . . . . . . . . . . . . . . . . . . . . . . . . . . . . . . . . . . . . . . . . . . . . . . . 4-2
5 OPERATING MODE (RUN) . . . . . . . . . . . . . . . . . . . . . . . . . . . . . . . . . . . . . . . . . . . . . . . 5-1
5.1
Monitoring . . . . . . . . . . . . . . . . . . . . . . . . . . . . . . . . . . . . . . . . . . . . . . . . . . . . . . . . 5-1
5.2
Readout Procedure . . . . . . . . . . . . . . . . . . . . . . . . . . . . . . . . . . . . . . . . . . . . . . . . . 5-1
5.3
Initialization of the Max/Min values . . . . . . . . . . . . . . . . . . . . . . . . . . . . . . . . . . . . . 5-2
5.4
Flow-charts for the Readout of Parameters . . . . . . . . . . . . . . . . . . . . . . . . . . . . . . 5-2
6 PROGRAMMING MODE (PROG) . . . . . . . . . . . . . . . . . . . . . . . . . . . . . . . . . . . . . . . . . . 6-1
vi
6.1
Programming Access . . . . . . . . . . . . . . . . . . . . . . . . . . . . . . . . . . . . . . . . . . . . . . . 6-1
6.2
Total Programming Mode . . . . . . . . . . . . . . . . . . . . . . . . . . . . . . . . . . . . . . . . . . . . 6-1
6.3
Programming the Alarm Thresholds . . . . . . . . . . . . . . . . . . . . . . . . . . . . . . . . . . . . 6-2
6.4
Programming Flow-Charts . . . . . . . . . . . . . . . . . . . . . . . . . . . . . . . . . . . . . . . . . . . 6-2
User Manual MAVMU100/E
Edition 6
TABLE OF CONTENTS
Appendices
A MECHANICAL DRAWINGS. . . . . . . . . . . . . . . . . . . . . . . . . . . . . . . . . . . . . . . . . . . . . . . A-1
B DATA SHEETS . . . . . . . . . . . . . . . . . . . . . . . . . . . . . . . . . . . . . . . . . . . . . . . . . . . . . . . . B-1
C GLOSSARY . . . . . . . . . . . . . . . . . . . . . . . . . . . . . . . . . . . . . . . . . . . . . . . . . . . . . . . . . . . C-1
PRODUCT DEFECT REPORT
DOCUMENT EVALUATION FORM
User Manual MAVMU100/E
Edition 6
vii
TABLE OF CONTENTS
THIS PAGE INTENTIONALLY LEFT BLANK
viii
User Manual MAVMU100/E
Edition 6
PREFACE
ABOUT THIS MANUAL
PREFACE
About This Manual
This manual provides information on vibration monitoring using Vibro-Meter’s VibroSmart
VMU100. It describes the installation and general use of this system.
Who Should Use This Manual?
This manual is written for operators of process monitoring/control systems using
Vibro-Meter’s accelerometers for absolute vibration measurement. These proximity systems
form the "front end" of the overall monitoring/control system, which usually also includes a
modular monitoring system (based on, for example, Vibro-Meter’s VMU100).
The operator is assumed to have the necessary technical training in electronics and
mechanical engineering (professional certificate/diploma, or equivalent) to enable him to
install the proximity system and operate the monitoring system and the controlled system.
Related Documentation
Table 1 lists the data sheet that concerns the VibroSmart VMU100 described in this manual.
Data sheets for associated equipment are listed in Table 2.
Document
VibroSmart VMU100
Doc. Ref.
Number
266-650
Table 1 : Related documentation (VibroSmart VMU100)
Document
Doc. Ref.
Number
Piezoelectric accelerometer with Integrated Electronics CE 680 M411
262-055
Cable Assembly EC 318
262-645
Table 2 : Related documentation (associated equipment)
User Manual MAVMU100/E
Edition 6
ix
PREFACE
RELATED DOCUMENTATION
THIS PAGE INTENTIONALLY LEFT BLANK
x
User Manual MAVMU100/E
Edition 6
SAFETY
SYMBOLS AND STYLES USED IN THIS MANUAL
SAFETY
Symbols and Styles Used in This Manual
The following symbols are used in this manual where appropriate :
The WARNING safety symbol
THIS INTRODUCES DIRECTIVES, PROCEDURES OR PRECAUTIONARY MEASURES WHICH
MUST BE EXECUTED OR FOLLOWED. FAILURE TO OBEY A WARNING CAN RESULT IN
INJURY TO THE OPERATOR OR THIRD PARTIES.
The CAUTION safety symbol
This draws the operator's attention to information, directives or procedures
which must be executed or followed. Failure to obey a caution can result in
damage to equipment.
The ELECTROSTATIC SENSITIVE DEVICE symbol
This indicates that the device or system being handled can be damaged by
electrostatic discharges.
Refer to Handling Precautions for Electrostatic Sensitive Devices on
page xiv for further information.
NOTE : This is an example of the NOTE paragraph style. This draws the operator’s attention
to complementary information or advice relating to the subject being treated.
User Manual MAVMU100/E
Edition 6
xi
SAFETY
IMPORTANT REMARKS ON SAFETY
Important Remarks on Safety
Read this manual carefully and observe the safety instructions before
using the equipment described.
Location of Safety Symbols
The following safety symbols are found on the pages specified below :
This symbol is found on the following page:
3-1
This symbol is found on the following pages:
xii, xiii, 2-1, 3-21, 4-1
This symbol is found on the following page:
xiv
Additional Remarks
Every effort has been made to include specific safety-related procedures in this manual using
the symbols described above. However, operating personnel are expected to follow all
generally accepted safety procedures.
Safety procedures should be communicated to all personnel who are liable to operate the
equipment described in this manual.
Vibro-Meter does not accept any liability for injury or material damage caused by failure to
obey any safety-related instructions or due to any modification, transformation or repair
carried out on the equipment without written permission from Vibro-Meter. Any modification,
transformation or repair carried out on the equipment without written permission from
Vibro-Meter will invalidate any warranty.
xii
User Manual MAVMU100/E
Edition 6
SAFETY
GENERAL HANDLING PRECAUTIONS
General Handling Precautions
Certain precautions should be taken when using the VibroSmart VMU100.
Read the following recommendations carefully before using the VibroSmart
VMU100.
•
•
•
Do not excessively bend the cables connecting transducers to the VMU100, or any
associated cables. Respect the minimum bending radius quoted in the appropriate data
sheet.
When storing and using the equipment, respect the environmental specifications
(temperature, humidity) quoted in the appropriate data sheet.
Refer also to Handling Precautions for Electrostatic Sensitive Devices on page xiv.
User Manual MAVMU100/E
Edition 6
xiii
SAFETY
HANDLING PRECAUTIONS FOR ELECTROSTATIC SENSITIVE DEVICES
Handling Precautions for Electrostatic Sensitive Devices
Certain devices used in electronic equipment can be damaged by electrostatic discharges
resulting from built-up static electricity. Because of this, special precautions must be taken to
minimize or eliminate the possibility of these electrostatic discharges occurring.
Read the following recommendations carefully before handling electronic
circuits, printed circuit boards or modules containing electronic
components.
•
•
•
•
•
xiv
Before handling electronic circuits, discharge the static electricity from your body by
touching and momentarily holding a grounded metal object (e.g. a pipe or cabinet).
Avoid the build-up of static electricity on your body by not wearing synthetic clothing
material, as these tend to generate and store static electric charges. Cotton or cotton
blend materials are preferred because they do not store static electric charges.
Do not handle electronic circuits unless it is absolutely necessary. Only hold modules by
their front panel handles.
Do not touch printed circuit boards, their connectors or their components with conductive
devices or with your hands.
Put the electronic circuit, printed circuit board or module containing electronic
components into an antistatic protective bag immediately after removing it from the
system rack.
User Manual MAVMU100/E
Edition 6
INTRODUCTION
VERSION
1
INTRODUCTION
1.1
Version
This user manual contains the general information relating to the vibration monitor
VibroSmart VMU100 designated by the following version numbers:
•
Equipment : Version M1
•
Software : Version VT1.98
1.2
Concept and Application Areas
The design of the VibroSmart VMU100 vibration monitor answers the following requirements:
•
•
•
•
•
•
•
•
Resistance to industrial environments
Simple programming
Easy wiring
Legibility of parameters
Outputs available for connection to other systems
Alarm and self-checking relays
Analog output
Serial digital output (various RS protocols)
The unit can be used in various application areas, for example:
•
•
•
•
•
Compressors
Pumps
Groups of hydraulic instruments
Electric and thermal motors
All rotary machines
and also:
•
•
•
•
Grinders
Conveyor belts and vibrating hoppers
Compacting process
Any machine generating vibrations
User Manual MAVMU100/E
Edition 6
1-1
INTRODUCTION
CONCEPT AND APPLICATION AREAS
THIS PAGE INTENTIONALLY LEFT BLANK
1-2
User Manual MAVMU100/E
Edition 6
SYSTEM DESCRIPTION
BASIC VERSION
2
SYSTEM DESCRIPTION
2.1
Basic Version
The basic version comprises :
•
The IP65 metal housing front panel in Lexan and accessories (stuffing glands, BNC
socket, screws, joints etc.)
•
The indicator board, integrated into the housing
This card cannot be disconnected.
In the event of deterioration or failure of the Indicator board, the complete
unit should be returned to Vibro-Meter for repair / replacement.
•
•
•
•
2.2
The mother board or base board comprising :
• The power supply block (115/230 VAC, other voltages possible as an option)
• The microcontroller, the Analog/Digital converter etc.
• The “Vibration” module for the constant current accelerometer, input in mV/g. This
module processes the vibration signals.
The three relay module one of which is a self-test relay (OK) and the other two alarm
relays (LD1 and LD2)
The removable connectors for connecting and disconnecting input cables
This User Manual
Optional Modules
The base board can take two optional modules :
•
“Analog output” module (Ordering code Y)
This module converts the value of the measurement, displayed by the digits, into an
analog signal 0-10 VDC or 4-20 mA (programmable selection) on the basis of the
measuring range (FSD)
•
RS standard serial digital module (Ordering code Z)
Two modules are available for RS serial digital connections :
• RS232C module
• RS485 module
User Manual MAVMU100/E
Edition 6
2-1
SYSTEM DESCRIPTION
FRONT PANEL
2.3
Front Panel
The front panel is made of 400 micron polycarbonate which gives it a mechanical and
chemical resistance compatible with the usual industrial environments.
NOTE : NB: The VibroSmart VMU100 must be ordered using the Ordering code V.
- The measurement unit : mm/s or inch/s
- The measurement type : RMS or Peak
so that the front panel suits the customer’s requirements.
Available front panels : mm/s RMS, mm/s Peak, inch/s RMS or inch/s Peak
The following section describes the functions of the elements (digits, indicators and push buttons).
2.4
Front Panel Presentation
First level alarm indicator
Second level alarm indicator
Alphanumeric display
- Measurement value
- Parameter
- Choice
- Numerical value
Measurement
unit
RUN indicator - lit during:
- Normal operation
- Parameter readout
OK indicator - goes out if:
- Equipment anomoly
PROG indicator - lit during:
- Programming phase
1
Description
3
4
Operation in PROG mode
Button 1
Read input or move to lower level
Lower level or lower value
Button 2
Same level
Same level or another digit or another
choice
Button 3
Higher level or reset
Higher level or exit without saving
Button 4
2-2
Operation in RUN mode
2
---
Exit after saving
User Manual MAVMU100/E
Edition 6
DETAILED FUNCTIONS
POWER SUPPLY
3
DETAILED FUNCTIONS
3.1
Power Supply
The VibroSmart VMU100 exists in different versions according to the supply voltage used.
•
“Standard AC supply”: 115/230 V - 50/60 Hz
Base configuration 230 VAC: Ordering Code X=1
Configuration option 115 VAC: Ordering Code X=2
•
“DC supply”: 20 to 30 VDC
One configuration only of 20 to 30 VDC: Ordering code X=5
Change of voltage by the user
The VibroSmart VMU100 is configured for the supply voltage requested on the order form,
using Ordering code X.
For the “basic” and “low voltage” alternating current versions the user can opt for the other
voltage of the supply block by repositioning the jumpers located on the mother board.
230 VAC
or 20 to 30 VDC
115 VAC
Spare jumper
Physical arrangement
The jumpers are located under the mother board, on the supply connector side. They are
accessible by taking off the lower cover, without removing the electronics from the housing.
IMPORTANT : THE EQUIPMENT MUST BE SWITCHED OFF BEFORE CHANGING THE
JUMPER SETTINGS.
230 VAC
or 20 to 30 VDC
115 VAC
View under the motherboard
User Manual MAVMU100/E
Edition 6
3-1
DETAILED FUNCTIONS
DISPLAY FUNCTIONS
3.2
Display Functions
The alphanumeric 5 digit display enables readout of:
•
The value of the vibration in the chosen measuring unit (mm/s RMS, mm/s Peak, inch/s
RMS or inch/s Peak)
•
The programming parameters which each include:
• An alphabetic identification text (Label)
• A numerical value or a selection option
When the voltage is switched on, all the segments are tested by simulating a clock with
turning hands. All of the parameters are described in Chapter 6 - Programming Mode
(PROG).
3.3
Self-check / OK Function
The purpose of this function is to identify the following defects which might occur with respect
to a vibration sensor or connecting cable :
•
At the level of the vibration sensor or the connection cable
• Break in the cable
• Short circuit
•
At the electronics level
• Loss of electrical supply
• Loss of supply voltages generated internally
• Failure of the Analog/Digital converter
In the event of a fault in the sensor, the line or the electronics:
1)
The OK indicator (Green) on the front panel, which is normally lit, goes out.
2)
The OK relay which is normally excited drops out and its available contacts, which are
closed during normal operation, become open.
3)
The alarms are inhibited in order to avoid setting off false “machine” alarms by the
incorrect interpretation of the measuring signal.
NOTE : If the external alarm processing device allows, this condition enables you to detect
the “machine” alarms and the “equipment” alarms for which the functional consequences are
different.
3-2
User Manual MAVMU100/E
Edition 6
DETAILED FUNCTIONS
SELF-CHECK / OK FUNCTION
Examples :
Depending on the structure of the supervision system.
A. Supervision system with specific processing of equipment
OK
Equipment fault
(NE)
LD1
Alarm
(NE)
LD2
Trip
(NDE)
LD1: Alarm level 1
LD2: Alarm level 2
Processing of alarms
Processing of equipment faults
B. Supervision system without specific processing of equipment
OK
Equipment fault
(NE)
LD1
Alarm
(NE)
LD2
Trip
(NDE)
LD1: Alarm level 1
LD2: Alarm level 2
Processing of alarms
The contact of the OK relay is connected in series with the contact of the LD1 alarm
programmed to be closed under normal operation.
(In principle the working contact of the normally energised relay is used.)
User Manual MAVMU100/E
Edition 6
3-3
DETAILED FUNCTIONS
MONITORING
3.4
Monitoring
The system allows two alarm levels to be monitored on the vibration signal.
Each of these alarms comprises the following programmable parameters :
NOTE : The text in brackets indicates the messages displayed on the VibroSmart VMU100,
followed by the possible responses.
•
Activity of the alarm (ACT = Yes/No)
If the alarm considered is used it should be declared active = Yes
If the alarm considered is not used it should be declared non active = No
•
Direction of the alarm (Hi-Lo = Hi/Lo)
The alarm can be:
• High = Hi (General case of supervision of rotating machines)
• Low = Lo (Case of supervision of vibrating machines, grinders etc.)
•
State of the relay under normal operation (NORM = ON/OFF)
In normal operation the relay can be:
• Normally energised (NE) = ON
• Normally de-energised (NDE) = OFF
The first level alarm LD1 is generally with the relay normally energised (failsafe, normally
energised relay).
The second level alarm LD2 can be with the relay normally de-energized if it controls the
tripping of the machine being monitored and if you want to avoid any accidental stoppage in
the case of :
•
Loss of power supply on the VibroSmart VMU100
•
Breaking of connection between the VibroSmart VMU100 and the supervised unit
•
Equipment defect (the OK light goes out)
•
Storing the alarm state (LATCH = No/Yes)
The alarm can be:
• Not stored (Not latched) = No
• Stored (latched) = Yes
See the alarm sequence in graphic form in 3.7 - Alarm Sequence.
•
Alarm not stored (Not latched) = No
•
Alarm activated : LD indicator blinking, relay oscillating on and off
•
Alarm deactivated : Indicator goes out and the relay returns to its normal position
•
Alarm stored (latched) = Yes
3-4
User Manual MAVMU100/E
Edition 6
DETAILED FUNCTIONS
MONITORING
RESET function
To clear the stored alarm, use the RESET function, by pressing the RESET button on the
front panel of the VibroSmart VMU100 or remotely through the logical input “external
RESET”.
(See Wiring Diagram on page 4-3.)
Sequence
Alarm activated: LD indicator blinking, relay oscillating on and off
•
Reset by the operator before the end of the alarm state:
• Alarm LD indicator continuously on, relay unchanged
• After the alarm state is cleared, the indicator goes out and the relay returns to its
normal position
•
Alarm state cleared before being reset by the operator :
• LD Indicator blinking and relay unchanged
• Indicator goes out and the relay returns to its normal position, when the Reset
function is selected by the operator
• Adjustment of the alarm level (LEVEL = Value to be adjusted)
Remarks on hysteresis
In the case of the VibroSmart VMU100, the hysteresis has been fixed at 5% of the
measurement value.
The hysteresis acts in such as way as to keep its displayed value at the alarm threshold
•
by going down again for a threshold at maximum
•
by going up again for a threshold at minimum
The level of the alarm is programmed according to the machine manufacturer’s data or from
the operator’s experience.
Taking into account the hysteresis of the alarm fixed at 5% of the measurement value, the
lowest values of the alarm thresholds (limited by the software) are :
•
10% FSD for a high threshold = Hi (Re-engagement at 5% FSD)
•
5% FSD for a low threshold = Lo (Re-engagement at 10% FSD)
•
Time delay of the alarm (DELAY = Value to be set)
The delay is the minimum time, in seconds, for which the alarm threshold should be exceeded
before setting off the alarm.
The delay enables known transitory states during which the vibration levels are higher than
in normal operation to pass without setting off the alarm (for example, when passing through
a critical speed during machine run-up). Refer to 3.6 - Time Delay for further information.
User Manual MAVMU100/E
Edition 6
3-5
DETAILED FUNCTIONS
OPERATION OF THE ALARMS
3.5
Operation of the Alarms
Relay switching behaviour related to:
•
alarm type (high or low)
•
relay mode (normally de-energized or normally energized)
Normally de-energized
Normally energized
Alarm
Alarm
High alarm
Hyst
Low alarm
Hyst
Alarm
Alarm
Hyst
3.6
Hyst
Time Delay
Relay switching behaviour related to:
•
Time to cross the alarm threshold
•
Hysteresis
Threshold
Hyst.
Measurement
Time delay
count
N(T)
0
t<T
High alarm
ND relay
3-6
1
0
T
t<T
T
Alarm
User Manual MAVMU100/E
Edition 6
DETAILED FUNCTIONS
ALARM SEQUENCE
3.7
Alarm Sequence
Relay switching behaviour and lighting of the LED as a function of the timing between the end of the
alarm and the Reset action.
Unlatched alarm
Latched alarm
Reset
End of alarm
before reset
Alarm
Alarm
LED
NE relay
LED
NE relay
Reset
Reset before
end of alarm
3.8
Alarm
LED
NE relay
Max/min Storage
VibroSmart VMU100 stores the Maximum and Minimum values reached by the vibration from
the moment these parameters are initialised.
This function records the extreme levels attained by the vibration being monitored over a
given period.
Examples :
•
Points exceeding the trip threshold which are ignored by the time delay
•
Vibration effectively achieved during the tripping of machines
3.9
Analog Output (Optional)
The analog output is generated by an optional module which can work either under the
0-10 VDC standard, or under the 4-20 mA standard.
The choice is programmable : (ANOUT = 0-10V / 4-20mA)
The analog output is refreshed at a rate of 16 times per second.
Ordering Code
This option must be defined with the Ordering code Y :
Y=0
No analog module
Y=1
Output 0-10 V (configurable)
Y=2
Output 4-20 mA (configurable)
User Manual MAVMU100/E
Edition 6
3-7
DETAILED FUNCTIONS
RS232C OR RS485 TRANSMISSION (OPTIONAL)
3.10
RS232C or RS485 Transmission (Optional)
Ordering code
This option must be defined by the "Z" code :
Z=0
None
Z=1
RS232C submodule
Z=2
RS485 submodule
The RS232C or RS485 output option consists of an additional card that is installed on the
VibroSmart VMU100 main board. The card incorporates a contact telephone socket with
output at the rear of the meter : RJ9-4 (RS232C) or RJ11-6 (RS485). In the case of the RS485
option, a double adapter is delivered in order to allow in and out links.
The serial output enables a communication line to be configured, allowing a master device to
request the transmission of data such as the display value, setpoint values and Max and Min
values from the VibroSmart VMU100, and also to perform operations such as displaying or
resetting the Max or Min memories and updating setpoint values.
The output option is totally software configurable as regards the transmission rate (4800,
9600 or 19200 baud) and the instrument’s address (from 01 to 99). The protocol used is
ISO 1745.
The RS232C option allows you to connect one VibroSmart VMU100 to a master device with
RS232C output.
The RS485 option allows up to 31 VibroSmart VMU100’s to be connected to a master device
with an RS485 output.
The operating mode is half-duplex. The serial channel only functions when the monitor is in
the run mode and it normally stays in data reception mode until reception of a message.
A valid data transmission may cause the immediate execution of a command (e.g. reset of
the Max and Min values in memory, modification of setpoint values) or the transmission of a
response from the monitor (e.g. display value, one of the setpoints’ values, Max and Min
values).
A disk containing the VIBRO_CONF program, for use under Windows 95, lets you control
the transmission and reception of data on a PC screen and the complete programming of one
or more VibroSmart VMU100 monitors connected to the computer’s RS232C/485 serial port
by means of the ISO 1745 protocol (PROT 2).
DESCRIPTION OF OPERATION
The communication mode used is the ISO mode = Protocol 2, which conforms to the ISO
1745 standard, and permits a more secure communication in noisy environments since the
data transfer is verified both at the transmission and the reception ends.
3-8
User Manual MAVMU100/E
Edition 6
DETAILED FUNCTIONS
RS232C OR RS485 TRANSMISSION (OPTIONAL)
ISO 1745 PROTOCOL
The transmission format is 1 Start bit, 7 Data bits, 1 Parity (Even) bit and 1 Stop bit.
Receiving messages
The message format, as sent from the master device, must contain the following sequence
of ASCII characters :
SOH
D
D
STX
C
C
X1...Xn
ETX
BCC
The bytes have the following meaning :
SOH
Start of header [ASCII 01]
D
Two bytes representing the instrument’s address (between 01 to 99).
Note : The broadcast address ‘00’ can be used to configure all of the
VMU100s with the same parameters and values.
STX
Start of text [ASCII 02]
C
Two command bytes; see 3.11 - List of Commands.
X1...Xn
For commands that are used to change a parameter, the command
bytes are followed by a group of n bytes, representing the parameter’s
new value, including the sign and decimal point.
ETX
End of text [ASCII 03]
BCC
Control byte, calculated as follows :
<BCC> Calculation
1)
Perform an Exclusive-OR with all bytes comprised between the <STX> (not included)
and the <ETX> (included).
2)
If the byte obtained (in ASCII format) is higher than 32, it can be taken as the <BCC>.
3)
If the result (in ASCII) is lower than 32, the <BCC> byte is obtained by adding 32.
Example messages
•
Request sent to the monitor with the address 35, to send the displayed value :
<SOH>35<STX>0D<ETX>w
•
Request sent to the monitor with the address 4, to change the LD1 set point to 19.3 :
<SOH>04<STX>M1+019.3<ETX>q
User Manual MAVMU100/E
Edition 6
3-9
DETAILED FUNCTIONS
RS232C OR RS485 TRANSMISSION (OPTIONAL)
Data transmission
The format of messages as sent from the instrument in response to a command from the
master device is the following :
1)
Example of commands that request the transmission of a value (data request type) :
SOH
D
D
STX
X1...Xn
ETX
BCC
SOH
Start of header [ASCII 01]
D
Two bytes representing the instrument’s address (between 01 to 99).
Note : The broadcast address ‘00’ can be used to configure all of the
VMU100s with the same parameters and values.
STX
Start of text [ASCII 02]
X1...Xn
A group of n bytes, representing the requested value, including the sign
and decimal point.
ETX
End of text [ASCII 03]
BCC
Control byte
Example of message
•
The monitor with the address 35 sends the display value = 4.5
<SOH>35<STX>+004.5<ETX>
2)
Example of commands that do not require the return of a value (command type or
changing parameters) :
The instrument sends a confirmation to the master device when it receives a message.
D
Dd
ACK
or
D
Dd
NAK
If the message has been correctly received and interpreted, the response will consist of two
address bytes and one “ACK” [ASCII 06] (acknowledged) byte.
If the received message has not been well interpreted or it has been detected with errors, the
response will be two address bytes and a “NAK” byte [ASCII 21] (Not Acknowledged).
NOTE : When the master device transmits a message to address 00, the command will be
received by all the instruments on the bus and there will not be any response.
3 - 10
User Manual MAVMU100/E
Edition 6
DETAILED FUNCTIONS
LIST OF COMMANDS
3.11
List of Commands
ISO 1745
Protocol
3.11.1
Command
0V
Transmit min. value in memory
0P
Transmit max. value in memory
0D
Transmit display value
L1
Transmit the setpoint value LD1
L2
Transmit the setpoint value LD2
TT
Transmit the terminal identification
NB
Transmit installed options
SC
Transmit the configuration
0v
Reset the min. value in memory
0p
Reset the max. value in memory
M1
Change the LD1 setpoint value
M2
Change the LD2 setpoint value
RC
Change the configuration
Type
Data Request
Commands / Orders
Changing Parameters
Command descriptions
Command 0V/0P: Min value / Max value transmission
The monitor sends the lowest/highest value in memory since power ON or since the last reset
of Min and Max values.
Command 0D: Current display value transmission
The monitor sends its current display value.
Command L1/L2: LD1/LD2 setpoint value transmission
The monitor sends the LD1/LD2 setpoint value configured in memory.
Command TT: Type of terminal transmission
The monitor sends the terminal type. The VibroSmart identification code is V5.
Command NB: Type of option transmission
The monitor send its installed options.
3RE: 05
User Manual MAVMU100/E
Edition 6
3RE+ANA: 45
3 - 11
DETAILED FUNCTIONS
LIST OF COMMANDS
Command SC: Configuration transmission
The monitor sends its configuration in memory. This configuration is coded in a string of 34
characters.
See Table 3-1 below.
Command 0v/0p: Reset the Min value / Max value
The order is sent to the monitor to reset the Min/Max value in memory.
Command M1/M2: Changing the LD1/LD2 setpoint value
A new LD1/LD2 value is sent to the monitor
Command RC: Changing the configuration
A new configuration is sent to the monitor. This configuration is coded in a string of 34
characters.
See Table 3-1 below.
3 - 12
User Manual MAVMU100/E
Edition 6
DETAILED FUNCTIONS
LIST OF COMMANDS
3.11.2
Configuration Codes Description
The 34 character string comprising the configuration is described below.
Byte
Description
Value
1
Number of decimal places
0, 1, 2
2
Resolution (RND)
0=1, 1=2, 2=5, 3=10
3
Full scale deflection (FSD) (mm/s / inch/s)
0=10.0/0.50, 1=20.0/1.00,
2=50.0/2.00, 3=100/5.00,
4=200/10.0, 5=500/20.0
4
Level detector 1 Activate (ACT)
0=OFF (No), 1=ON (Yes)
5
Level detector 2 Activate (ACT)
0=OFF (No), 1=ON (Yes)
6
Level detector 1 Mode (HI-LO)
0=HIGH (HI), 1=LOW (LO)
7
Level detector 2 Mode (HI-LO)
0=HIGH (HI), 1=LOW (LO)
8
Level detector 1 Normal (NORM)
0=ON, 1=OFF
9
Level detector 2 Normal (NORM)
0=ON, 1=OFF
10
Level detector 1 LATCH
0=OFF (No), 1=ON (Yes)
11
Level detector 2 LATCH
0=OFF (No), 1=ON (Yes)
12
Level detector 1 digit 4 (unit)
From 0 to 9
13
Level detector 1 digit 3 (decade)
From 0 to 9
14
Level detector 1 digit 2 (hundred)
From 0 to 9
15
Level detector 1 digit 1 (thousand)
From 0 to 9
16
Level detector 2 digit 4 (unit)
From 0 to 9
17
Level detector 2 digit 3 (decade)
From 0 to 9
18
Level detector 2 digit 2 (hundred)
From 0 to 9
19
Level detector 2 digit 1 (thousand)
From 0 to 9
20
Delay LD1 digit 2 (unit)
From 0 to 9
21
Delay LD1 digit 1 (decade)
From 0 to 9
22
Delay LD2 digit 2 (unit)
From 0 to 9
23
Delay LD2 digit 1 (decade)
From 0 to 9
24
Specific sensitivity (INPUT;SPEC)
0=Standard, 1=Specific
Table 3-1 : Configuration Coding (Part 1 of 2)
User Manual MAVMU100/E
Edition 6
3 - 13
DETAILED FUNCTIONS
CONFIGURATION SOFTWARE DESCRIPTION
Byte
Description
Value
25
Sensor Sensitivity digit 4 (unit)
From 0 to 9
26
Sensor Sensitivity digit 3 (decade)
From 0 to 9
27
Sensor Sensitivity digit 2 (hundred)
From 0 to 9
28
Sensor Sensitivity digit 1 (thousand)
From 0 to 9
29
Standard Sensitivity (INOUT;STD)
0=Standard, 1=Specific
30
Unit (UNIT)
0=mm/s, 1=Inch/s
31
Calibration (CAL;RMS/Peak)
0=RMS, 1=Peak
32
Filter (FILT) HP (Hz)
0=1, 1=2, 2=5, 3=10, 4=20,
5=40, 6=100, 7=200
33
Filter (FILT) LP (Hz)
0=40, 1=100, 2=200, 3=500,
4=1K, 5=2.5K, 6=5K, 7=10K
34
Analog output (ANOUT)
0=Voltage, 1=Current
Table 3-1 : Configuration Coding (Part 2 of 2)
3.12
Configuration Software Description
(Option with RS232C/RS485 transmission modules.)
Introduction
VIBRO_CONF is an easy-to-use program designed to help you manage the VibroSmart
VMU100. For this, you need the VibroSmart VMU100's RS232C/RS485 transmission module
(optional) installed inside the VMU100, an RS232C/RS485 converter (only with RS485
configuration) and a computer.
Installation
This section describes how to install VIBRO_CONF on a single machine running Windows 95.
The following is a list of hardware and software required when installing VIBRO_CONF.
•
486 DX 33 MHz having at least 12 MB of RAM with an RS serial port and 1.44” disk drive
•
VGA monitor
•
Microsoft Windows 95
To install VIBRO_CONF on a Windows 95 computer
3 - 14
1)
Insert the VIBRO_CONF disk in to your disk drive.
2)
Click Start>Run... then type a:\setup.exe and press ENTER.
3)
Follow the instructions that appear on the screen.
User Manual MAVMU100/E
Edition 6
DETAILED FUNCTIONS
CONFIGURATION SOFTWARE DESCRIPTION
Using the VIBRO_CONF configuration software
The VMU100 welcome window displays the software version. Each VibroSmart VMU100 is
delivered from the factory with a default or specific configuration as defined in the
configuration sheet (see Appendix B - Data Sheets).
Serial port : (interface type)
•
Select the type of interface that is
installed in the VMU100.
Serial port :
•
•
Select the serial port used on your
computer: from Com 1 to Com 4.
Select the VMU100's address:
from 01 to 99.
NOTE : Address 00 can only be used when the configuration is the same for all VMU100's
on the network. The address must be previously set from the front panel of each VMU100
monitor.
User Manual MAVMU100/E
Edition 6
3 - 15
DETAILED FUNCTIONS
CONFIGURATION SOFTWARE DESCRIPTION
•
Select the Baud rate:
9600 bps (recommended)
VMU100 welcome window
Comments :
Fill in the empty fields. This information
will be reported in the summary.
•
Click on the Connect button.
•
Click on the Receive button in order
to load the current VMU100's
configuration at this address.
3 - 16
User Manual MAVMU100/E
Edition 6
DETAILED FUNCTIONS
CONFIGURATION SOFTWARE DESCRIPTION
Summary :
This window shows the current VMU100
configuration. You can save and print
this configuration if all parameters are
correct. If you want to modify one or
more parameters, click on the
necessary windows to be modified as
defined below.
Example of a configuration summary screen:
VMU100 configuration - VIBRO_CONF
Date : 28/09/98
Plant
Location
Machine
VMU100's S/N
VMU100's Address
Comments
-
Time : 14:39:28
:
:
:
:
:
:
LM 251
HALL B05
Motor
A026
1
---
<<<<< CONFIGURATION >>>>>
Standard sensitivity sensor : 100 mV/g
Unit
: mm/s
Calibration
: RMS
Resolution
: 1
F.S.D.
: 20.0
High-Pass filter : 10 Hz
Low-Pass filter : 1 kHz
- Alarm 1
Level
Mode
Normally
Latch
Delay
- Alarm 2
Level
Mode
Normally
Latch
Delay
:
:
:
:
:
:
:
:
:
:
:
:
Active
12.0
High
Yes
Yes
1s
Active
16.0
High
No
Yes
1s
- No analogue output
-
Transmission type : RS232C
Baud rate
: 9600 Bits/s
Serial port
: Com 2
Protocol
: ISO1745
User Manual MAVMU100/E
Edition 6
3 - 17
DETAILED FUNCTIONS
CONFIGURATION SOFTWARE DESCRIPTION
Alarms :
•
•
•
Click-on the "Level detector 1" or
“Level detector 2" check box
window to activate it.
Level :
Enter the set point LD1 & LD2
values.
Select the delay, mode, relay action
and latch parameters for each level
detector.
Sensor :
•
•
•
3 - 18
Click on Standard or Specific
sensor sensitivity.
If standard, select standard
sensitivity in the list.
If specific, enter the sensitivity of the
actual sensor associated with the
VMU100.
User Manual MAVMU100/E
Edition 6
DETAILED FUNCTIONS
CONFIGURATION SOFTWARE DESCRIPTION
Display :
•
•
Select the calibration mode "RMS"
or "Peak".
Select the units "mm/s" or "Inch/s".
•
Select the F.S.D. available in the
list.
•
Select the rounding-up "resolution"
available in the list.
User Manual MAVMU100/E
Edition 6
3 - 19
DETAILED FUNCTIONS
CONFIGURATION SOFTWARE DESCRIPTION
Filters:
3 - 20
•
Select the high-pass filter available
on the list
•
Select the low-pass filter available
on the list
User Manual MAVMU100/E
Edition 6
DETAILED FUNCTIONS
CONFIGURATION SOFTWARE DESCRIPTION
Analog Output :
•
Select the analog output (voltage
0-10V or current 4-20 mA).
NOTE : This module must be installed
in the VMU100 (Optional).
Controls : (Checking actions)
•
•
•
•
•
•
•
Click on "Display value" and the
VMU100's actual display value will
appear at the bottom.
This value is not refreshed. You
must click again to obtain another
value.
Click on "min. value" to obtain the
VMU100's current min. value in
memory.
Click on "Reset min. value" to reset
the current min. value in memory.
Click on "Max. value" to obtain the VMU100's current Max value in memory.
Click on "Reset Max. value" to reset the current Max value in memory.
Click on "Set point 1 value" to display the "level detector 1" value in memory.
Click on "Set point 2 value" to display the "level detector 2" value in memory.
Before you quit the program, make sure that the configuration is loaded,
print it from the Summary window and save it to the appropriate disk drive.
User Manual MAVMU100/E
Edition 6
3 - 21
DETAILED FUNCTIONS
CONFIGURATION SOFTWARE DESCRIPTION
THIS PAGE INTENTIONALLY LEFT BLANK
3 - 22
User Manual MAVMU100/E
Edition 6
ASSEMBLY AND WIRING DETAILS
ASSEMBLY
4
ASSEMBLY AND WIRING DETAILS
4.1
Assembly
The housing of the VibroSmart VMU100 is fixed to the wall by 4 screws of 6 mm diameter.
We recommend that you position it :
•
Between 1.2 and 1.6 metres from the ground (accessibility).
•
Under cover, in an area not exposed to strong light (legibility).
The upper and lower covers are held in place by M5 non-removable screws, with an optimum
tightening torque of approximately 2 Nm to ensure IP65 housing protection.
The electronics supplied are fitted within the housing, with the options and standard or
customised (option) parameters.
To remove the electronics:
It is preferable that this operation is done by a Vibro-Meter technician.
If this is not done by an approved Vibro-Meter technician, the 12-month
warranty cover will be invalidated.
1)
Remove the lower cover.
2)
Disconnect the connectors and free the earth link wire.
3)
Remove the upper cover.
4)
Disconnect the indicator board link connector.
5)
Unscrew the fixing screws from the eccentric washers locking the mother board in place.
6)
Turn these washers to free the mother board.
7)
Remove the electronics unit by pulling it from the top.
To put the electronics unit back, reverse the above process, taking care that the eccentric
washers do not encroach on the bearing surface of the gasket.
User Manual MAVMU100/E
Edition 6
4-1
ASSEMBLY AND WIRING DETAILS
WIRING
4.2
Wiring
To obtain the optimum results the cables used for the connection of the VibroSmart VMU100
should withstand the environmental conditions of the application and meet the specifications
below:
•
Supply cable (3 conductors) - (a)
• Outside diameter: 6 to 11 mm
•
•
•
•
•
• Cross-section of the conductors 1 to 1.5 mm2
Accelerometer connection cable (2 conductors)
• Outside diameter: 6 to 11 mm
• Screening with copper strands, with a minimum covering of 60%
• Cross-section of the conductors 1 to 1.5 mm2
Analog output cable (2 conductors) - (b)
• Ditto accelerometer connection cable
RS digital output cable (2 or 4 conductors) (b)
• Ditto accelerometer connection cable
Output cable of the relay contacts (Number of conductors according to the case) - (a)
• Ditto the supply connection cable
Input cable of the Reset logic signal (2 conductors) - (b)
• Ditto accelerometer connection cable
NOTE : The connections marked by the same indices (a) or (b) can be combined in one and
the same cable without risk of disruption or cross talk.
Connections
All of the possible connections are shown below, connectors wired on a circuit except for the
RS connection cable.
4-2
User Manual MAVMU100/E
Edition 6
ASSEMBLY AND WIRING DETAILS
WIRING
Typical wiring diagram
The following diagram corresponds to the most commonly used configuration.
Live
Neutral
Alarm
Trip
OK
Configuration of the relays of the standard diagram above:
LD1: High Alarm - Relay normally energised
Use of “Work” contact = Contact closed during normal operation
LD2: High Alarm - Relay normally not energised
Use of “Work” contact = Contact open during normal operation
User Manual MAVMU100/E
Edition 6
4-3
ASSEMBLY AND WIRING DETAILS
WIRING
Detailed wiring diagrams, connector by connector
A – Mother Board
•
Power Supply (C1)
NOTE : In order to conform to the safety standard, the earth pin no. 2 of the supply connector
projects outward and establishes the earth connection before the other mains connections.
AC Power supply
DC Power supply
C1
P
N
•
C1
1
2
3
+Ual
-Ual
Terminal housing
earth
Terminal housing
earth
C2
Logic input (C2)
The VibroSmart VMU100
only has one logic input:
External reset of alarms.
1
2
3
Reset
Contact N/O
1
3
B - Vibration module (C3)
C3
2
Accelerometer input (mV/g)
3
Analog output “Filtered acceleration (mV/g)”**
Band pass: 1Hz - 10kHz (non filtered)
BNC
4
5
6
Analog output “Filtered acceleration (mV/g)”**
Band pass: 1Hz - programmed low pass filter
1
OK logic output (+5VDC)**
NOTE : **Output available but rarely used.
4-4
User Manual MAVMU100/E
Edition 6
ASSEMBLY AND WIRING DETAILS
WIRING
C - Analog output module
DC signal is proportional to the value displayed (0-10 VDC or 4-20mA)
C4
1
+
-
2
D - RS output card
RS232C C5
RS485 C5
1 (a)
2
3
4 (b)
RTS
TxD
RxD
GRND
1
2
NC
3 (a)
4
5 (b)
6
NC
NC
B
A
GRND
E - 3 relay output module (C6, C7, C8)
This card comprises:
•
One first level alarm indicator (LD1)
•
One second level alarm indicator (LD2)
•
One self-test relay (OK)
NOTE : The contacts are shown with “Power Off”.
The OK relay is energized during normal operation (NE).
The state of the LD1 and LD2 relays is user-defined (NE or NDE)
LD1
LD2
OK
C6
C7
C8
1
2
3
User Manual MAVMU100/E
Edition 6
4
5
6
7
8
4-5
ASSEMBLY AND WIRING DETAILS
WIRING
Wiring procedure
Taking into account the design of the terminal housing, the following procedure is advised :
1)
Prepare the
opposite.
cables
as
indicated
NOTE : It is advisable that the ingoing
cables are tagged for ease of maintenance
and identification. The stuffing gland inputs
could also be marked.
Stripping 8mm
Cutting 60mm
Penetration 8mm
2)
Remove the lower cover.
3)
Prepare the stuffing housings to
receive the cables, if necessary by
removing the internal sleeve.
4)
Thread the cables into the corresponding stuffing glands and place the cover about thirty
centimetres below the unit to disconnect the ends of the cables.
5)
Separate the connectors from their bases (Important!).
6)
Connect the wires to the connectors in accordance with the wiring
diagram. Introduce the bared end of the wire into its housing by
opening this using the lever supplied with the equipment (See
figure). When the lever is released the wire is firmly clamped.
NOTE : If you lose the lever, use a 2 mm screwdriver to push the spring tongue down.
7)
4-6
Plug the connectors into their respective bases.
User Manual MAVMU100/E
Edition 6
ASSEMBLY AND WIRING DETAILS
WIRING
8)
Refit the lower cover by sliding it along the cables.
9)
Tighten the 4 non-removable fixing screws in the cover.
Tightening torque = 2 Nm approx.
10) Ensure that the penetration of the cables into the cover is at
least 8mm (Markers advised in 1) above) and tighten the
stuffing glands.
11) Tighten the stuffing gland screws.
User Manual MAVMU100/E
Edition 6
4-7
ASSEMBLY AND WIRING DETAILS
WIRING
THIS PAGE INTENTIONALLY LEFT BLANK
4-8
User Manual MAVMU100/E
Edition 6
OPERATING MODE (RUN)
MONITORING
5
OPERATING MODE (RUN)
5.1
Monitoring
Operation under monitoring is the normal state of the VibroSmart VMU100 during which the
monitor oversees the vibration levels of the machine on the basis of the programmed
parameters (see 3.4 - Monitoring).
The unit becomes operational after the internal self-test has taken place at power on. This
takes several seconds to complete.
Max./min. storage
The extreme values of the vibration levels are stored by the VibroSmart VMU100 starting
from the time when these values are initialised.
The values can be viewed by using the readout procedure (see below).
5.2
Readout Procedure
The readout of the programmed parameters as well as the Max and Min values of the
measurement is accessible using the following procedure:
•
•
To enter the “Readout” mode from RUN mode press the DATA button
Choose the required readout, corresponding to alarms (ALARM), the Max/Min values
(M/m) or the readout of all parameters (ALL).
Then, wherever you are in the menu structure:
1)
Go to the lower hierarchical level with
2)
Enter the readout of each parameter from its “label” with
3)
Exit the readout via “Esc”, which returns you to the function label.
4)
Move to the next function in the same hierarchy by pressing
5)
Return to the higher hierarchical level by pressing “Esc” starting from the function label.
After a 20 second time-out since your last enquiry, you are returned to the measurement
display automatically.
User Manual MAVMU100/E
Edition 6
.
.
.
5-1
OPERATING MODE (RUN)
INITIALIZATION OF THE MAX/MIN VALUES
5.3
Initialization of the Max/Min values
The access procedure is the same as for the readout, but once having reached the Max or
Min value displayed:
•
•
Press DATA + to temporarily enter program mode
The text “INIT” is displayed
• If you decide not to reinitialise, press Esc
• If you decide to reinitialise, press ENTER
NOTE : Reinitialisation sets the Max value to 0000 and the Min value to 9999
•
5.4
To return to the higher hierarchical levels, press Esc as many times as is required.
Flow-charts for the Readout of Parameters
Parameter
Flow-chart
Max and min values
Initialization of Max and Min values
Alarm thresholds
SL1
Software version
Sensor sensitivity
Measuring unit (mm/s or inch/s)
Calibration (RMS or Peak)
SL2
Values of HP and LP filters
Analog output (0-10V or 4-20mA)**
Parameters of the serial digital output**
Address
Transmission speed
SL3
Protocol
Complete parameters of the alarms
Activity
High/Low
Latching of the alarm
SL4
Alarm threshold
Time delay
NOTE : ** indicates options
5-2
User Manual MAVMU100/E
Edition 6
User Manual MAVMU100/E
Edition 6
3p
2r
2
1
0
Esc
16.0 @
Esc
LD2
@ = Default value
12.0 @
- Label
- Readout
- Programming
2
2r
3p
Hierarchical levels
Esc
Esc
LD1
Esc
ALARM
RUN
Data
Esc
(and)
(PROG)
9999
9999
INIT
Esc
(and)
Data
1.4* / 9999 **
Enter
Esc
Enter
Esc
INIT
(PROG)
Data
18.2* / 0000 **
Esc
MIN
Figure 5-1: SL1 Readout flow-chart
Esc
Esc
MAX
Esc
M/m
VTxxx
Function
*Readouts before
initialization (example)
**Values after initialization
Initialization = ‘INIT’ + Enter
Initialization function
(Comparable to a
programming action)
Esc
VER
Esc
ALL
OPERATING MODE (RUN)
FLOW-CHARTS FOR THE READOUT OF PARAMETERS
5-3
5-4
3r
3
2r
2
1
0
Esc
3r
3
- Readout
- Label
mm/s @
Esc
UNIT
Function
Esc
M/m
@ = Default value
100 @
Esc
Hierarchical levels
Esc
INP
Function
Esc
ALARM
RUN
Data
Esc
Esc
Esc
Esc
20.0 @
Esc
FSD
Esc
DISP
Function
Esc
VER
Esc
Esc
10 Hz @
HP
Esc
FILT
Figure 5-2: SL2 Readout flow-chart
1@
Esc
RND
RMS @
CAL
Esc
ALL
Esc
Esc
Esc
1 kHz @
LP
Function
Esc
ALARM
Esc
Option
0-10V@
Esc
ANOUT
Esc
Function
Esc
RSOUT
OPERATING MODE (RUN)
FLOW-CHARTS FOR THE READOUT OF PARAMETERS
User Manual MAVMU100/E
Edition 6
User Manual MAVMU100/E
Edition 6
3r
3
2r
2
1
0
Esc
- Label
- Readout
3
3r
mm/s @
Esc
UNIT
@ = Default value
100 @
Esc
Function
Esc
M/m
Hierarchical levels
Esc
INP
Function
Esc
ALARM
RUN
Data
Esc
Esc
Esc
20 @
Esc
DISP
Function
Esc
VER
Esc
Function
01 @
Esc
ADRES
Esc
Esc
FILT
Figure 5-3: SL3 Readout flow-chart
RMS @
CAL
Esc
ALL
Esc
Esc
9600 @
Esc
BAUD
Function
Esc
ALARM
Esc
Esc
2@
Esc
PROT
0-10V @
Esc
ANOUT
Option
Esc
RSOUT
OPERATING MODE (RUN)
FLOW-CHARTS FOR THE READOUT OF PARAMETERS
5-5
5-6
4r
4
3
2r
2
1
0
Esc
Esc
Esc
Yes
Esc
ACT
Esc
LD1
100 @
INP
Function
Esc
ALARM
RUN
Data
Esc
Esc
Hi
Esc
HI-LO
Function
Esc
LD2
mm/s @
Esc
UNIT
Function
Esc
M/m
Esc
Esc
ON
Esc
NORM
Esc
20.0 @
Esc
DSP
Function
Esc
VER
Esc
Function
Yes
Esc
LATCH
Option
Esc
Esc
12 @
Esc
3r
3
Esc
1@
Esc
DELAY
- Readout
- Label
0-10V @
Esc
ANOUT
Hierarchical levels
Esc
ALARM
LEVEL
@ = Default value
Esc
Esc
FILT
Figure 5-4: SL4 Readout flow-chart
Esc
RMS @
CAL
Esc
ALL
Esc
Function
Esc
RSOUT
OPERATING MODE (RUN)
FLOW-CHARTS FOR THE READOUT OF PARAMETERS
User Manual MAVMU100/E
Edition 6
PROGRAMMING MODE (PROG)
PROGRAMMING ACCESS
6
PROGRAMMING MODE (PROG)
6.1
Programming Access
There are three programming access levels :
•
Total: All of the system parameters can be modified
•
Alarms: Only the alarm thresholds can be modified
•
None: No parameters can be modified (i.e. read-only access)
6.2
ACCESS
LEVEL
OFF
OFF
Total
ON
OFF
Alarms
OFF
ON
Alarms
ON
ON
None
ON
1 2
Vibration Card
SWITCH
2
Dip-Switches
SWITCH
1
Analog output module
The access level is defined by the position of two micro-switches located on the mother
board. The micro-switches can be reached by removing the top cover. Their position defines
the configurations listed below.
Total Programming Mode
Total programming can only be accessed if the configuration of the micro-switches is
“OFF_OFF”, the procedure is as follows:
To enter programming mode :
From RUN mode, press
and DATA at the same time.
The “PROG” indicator lights up and the “RUN” indicator goes out.
Select the programming access for all parameters (PROGT).
Then, and wherever you are in the hierarchy:
1)
Go to the lower hierarchical level with
2)
Enter the programming mode for each function starting with its “label” with
3)
Once you have entered the programming mode of the function
Changes of values are made by pressing
(Decreasing values).
Selections are made by pressing .
User Manual MAVMU100/E
Edition 6
.
.
6-1
PROGRAMMING MODE (PROG)
PROGRAMMING THE ALARM THRESHOLDS
6.3
4)
Exit the programming of values or selections by pressing:
“Esc” to keep the original values or selections
“ENTER” validating the figures or selections displayed
Esc and ENTER return you to the function label
5)
Go on to the next function at the same level or to the following row of figures with
6)
To return to the higher hierarchical level, press “Esc” from the function label. You are
automatically returned to the measurement display after a 20 second time-out since the
last key press.
.
Programming the Alarm Thresholds
The programming limited to alarm thresholds is accessible if the position of the
micro-switches is “ON-OFF” or “OFF-ON”.
The procedure is the same as that above but you need to select the programming limited to
alarm thresholds (PROGRA) instead.
NOTE : If access to the programming is total, PROGRA provides a shortcut to directly
access the adjustment of the alarm thresholds.
6.4
Programming Flow-Charts
The following pages give the procedures for programming the different parameters using
clear flow-charts. The table below lists the flow-charts corresponding to the parameters :
Parameter
Sensitivity of the standard or special sensor
Flow-chart
SP1
Measuring unit (mm/s or inch/s)
Calibration (RMS or Peak)
SP2
Analog output (0-10V or 4-20mA) **
Extent of measurement
Rounding up of display (resolution)
6-2
SP3
High Pass (HP) or Low Pass (LP) filters
SP4
Alarms parameters
SP5
RS output parameters **
SP6
Initialization of Max/Min values
SP7
User Manual MAVMU100/E
Edition 6
User Manual MAVMU100/E
Edition 6
4p
4
3
2
1
0
and
Esc Enter
25
Function
Esc
UNIT
- Label
- Programming
4
4p
Hierarchical levels
Esc Enter
10
Esc
STD
Esc
INPUT
Esc
Esc
Function
PROGA**
PROG T*
RUN
Data
Esc
SPEC
Adjust
Adjust
Esc Enter
8 8 8 .8
Function
Esc
FILT
Adjust
Esc Enter
8 8 8.8
Esc Enter
8 8 8 .8
Adjust
Function
Esc
ALARM
Hardware sensitivity range
9.5-19.9 mV/g
20-49.9 mV/g
50-105 mV/g
Selected automatically as a function of
the user-defined value.
Esc Enter
8 8 8 .8
Function
Esc
DISP
Full access
Limited access
Figure 6-1: SP1 Programming flow-chart
Esc Enter
100
Esc
Function
CAL
T* ‘Total’
A** ‘Alarms’
Function
Esc
ANOUT
Option
Function
Esc
RSOUT
PROGRAMMING MODE (PROG)
PROGRAMMING FLOW-CHARTS
6-3
6-4
3p
3
2
1
0
and
3p
3
- Programming
- Label
Hierarchical levels
Function
Esc
INPUT
Esc
Esc
Esc Enter
mm/s
Esc
UNIT
Function
PROGA**
PROGT*
RUN
Data
Esc Enter
Esc Enter
Peak
Function
Esc
DISP
Full access
Limited access
Function
Esc
FILT
Figure 6-2: SP2 Programming flow-chart
Esc Enter
Inc/s
Esc
RMS
CAL
T* ‘Total’
A** ‘Alarms’
Function
Esc
ALARM
Option
Esc Enter
0-10V
Esc
ANOUT
Esc Enter
4-20m
Function
Esc
RSOUT
PROGRAMMING MODE (PROG)
PROGRAMMING FLOW-CHARTS
User Manual MAVMU100/E
Edition 6
User Manual MAVMU100/E
Edition 6
3p
3
2
1
0
and
Function
Function
- Label
- Programming
3
3p
Hierarchical levels
Esc
UNIT
Esc
INPUT
Esc
Esc
Function
PROGA**
PROGT*
RUN
Data
Esc
Full access
Limited access
Esc Enter
Esc Enter
10*
Esc Enter
0.50
Esc Enter
10.0
Esc
FSD
Function
Esc
FILT
Esc Enter
1.00
Esc Enter
20.0
Function
Esc
ALARM
Figure 6-3: SP3 Programming flow-chart
5*
2*
Esc Enter
Esc Enter
Esc
RND
Esc
DISP
1*
Function
CAL
T* ‘Total’
A** ‘Alarms’
Esc Enter
2.00
Esc Enter
50.0
Option
5.00
Esc
Esc Enter
100
Function
Esc
ANOUT
Esc Enter
10.0
Esc Enter
200
Function
Esc
RSOUT
Esc Enter
20.0
Esc Enter
500
PROGRAMMING MODE (PROG)
PROGRAMMING FLOW-CHARTS
6-5
6-6
3p
3
2
1
0
and
Function
Function
- Label
- Programming
3
3p
Hierarchical levels
Esc
UNIT
Esc
INPUT
Esc
Esc
Function
PROGA**
PROGT*
RUN
Data
Esc
Esc Enter
2 Hz
Esc
Esc Enter
100Hz
Esc Enter
1kHz
Function
Esc
ALARM
40 Hz
Esc Enter
500Hz
Esc Enter
20 Hz
Esc Enter
Esc
FILT
200Hz
Esc Enter
10 Hz
Esc Enter
100Hz
Esc Enter
5 Hz
Esc Enter
40Hz
LP
Function
Esc
DISP
Full access
Limited access
Figure 6-4: SP4 Programming flow-chart
Esc Enter
1 Hz
HP
Esc
Function
CAL
T* ‘Total’
A** ‘Alarms’
Esc
Esc
Option
5kHz
Esc Enter
200Hz
Esc Enter
2.5kHz
Function
Esc
ANOUT
Esc Enter
10kHz
Function
Esc
RSOUT
PROGRAMMING MODE (PROG)
PROGRAMMING FLOW-CHARTS
User Manual MAVMU100/E
Edition 6
User Manual MAVMU100/E
Edition 6
4p
4
3
2
- Label
- Programming
3
3p
Hierarchical levels
Esc Enter
Yes
Esc
ACT
Esc
LD1
Esc
ALARM
Access by PROGT
Esc
Adjust
Adjust
Esc
8 8 88
Esc Enter
Lo
Adjust
Esc Enter
No
Esc
LATCH
Esc Enter
8 88 8
Adjust
Esc Enter
OFF
Esc Enter
8888
Esc Enter
ON
Esc
NORM
Figure 6-5: SP5 Programming flow-chart
Esc Enter
8 888
Hi
Esc Enter
Esc
HI-LO
No
Function
Esc
LD2
N.B. The OK relay is always:
- Active
- High and low
- Normally energized
- Not latched
- At defined levels
- With fixed hysteresis
- With fixed time delay
Esc Enter
Yes
Adjust
Esc Enter
8888
Esc
LEVEL
Adjust
Esc
8 88 8
Esc
DELAY
PROGRAMMING MODE (PROG)
PROGRAMMING FLOW-CHARTS
6-7
6-8
4p
4
3
2
1
0
and
Function
Function
- Label
- Programming
3
3p
Hierarchical levels
Esc
UNIT
Esc
INPUT
Esc
Esc
Function
PROGA**
PROGT*
RUN
Data
Function
Esc
Adjust
Esc
8 88 8
Function
Esc
DISP
Full access
Limited access
Esc Enter
1200
Esc
BAUD
Function
Esc
FILT
Esc Enter
Function
Esc
ALARM
2400
Figure 6-6: SP6 Programming flow-chart
32 possible addresses selected between 0 and 99
*Not yet available
**ISO 1745 protocol
Esc Enter
8888
Adjust
Esc
ADRES
CAL
T* ‘Total’
A** ‘Alarms’
Esc Enter
4800
Esc Enter
Esc Enter
19200
Esc Enter
9600
2**
Esc Enter
Option
Esc
RSOUT
1*
Esc
PROT
Function
Esc
ANOUT
PROGRAMMING MODE (PROG)
PROGRAMMING FLOW-CHARTS
User Manual MAVMU100/E
Edition 6
User Manual MAVMU100/E
Edition 6
2p
2
1
0
Function
Esc
- Label
- Programming
2
2p
Hierarchical levels
and
PROGT*
RUN
Data
Esc
LD1
Esc
PROGA**
Adjust
Esc Enter
8 8 8.8
Esc Enter
8 8 8.8
Adjust
Full access
Limited access
Adjust
Esc Enter
8 8 8.8
Figure 6-7: SP7 Programming flow-chart
Adjust
Esc Enter
8 8 8.8
T* ‘Total’
A** ‘Alarms’
Function
Esc
LD2
PROGRAMMING MODE (PROG)
PROGRAMMING FLOW-CHARTS
6-9
PROGRAMMING MODE (PROG)
PROGRAMMING FLOW-CHARTS
THIS PAGE INTENTIONALLY LEFT BLANK
6 - 10
User Manual MAVMU100/E
Edition 6
Appendices
User Manual MAVMU100/E
Edition 6
THIS PAGE INTENTIONALLY LEFT BLANK
User Manual MAVMU100/E
Edition 6
MECHANICAL DRAWINGS
A
MECHANICAL DRAWINGS
Designation
Drawing Number
Vibration Chain Diagram in Safe Area Configuration
P98-184A
Vibration Chain Diagram in Hazardous Area Configuration
P98-183A
User Manual MAVMU100/E
Edition 6
A-1
MECHANICAL DRAWINGS
THIS PAGE INTENTIONALLY LEFT BLANK
A-2
User Manual MAVMU100/E
Edition 6
User Manual MAVMU100/E
Edition 6
2984-8
OR
2984-2
CE680M411
Affectation:
Creation du plan
Commande:
Verif.
Modification
Modifications
CE680M411 adapter Modification
3
C3
2
2
C4
1
4
3
8
C8
7
6
5
C7
4
3
2
C6
1
2
ENTER
C5
1
ESC
RESET
mm/s
RMS
C1
1
PROG
R
2
DATA
LD2
C2
1
Date:
Dess.
FF
FF
Reset
Client:
Ind.
Date
AS
24.09.98
0
AS
24.06.99
1
Analog. O/P (Option)
RS I/O (Option)
2
3
4
CABLExxx transmission cable
or other type (see drwg P98_182A)
OK
RUN
PROG
LD1
VibroSmart
Figure A-1: Vibration Chain Diagram : Safe Area Configuration
100 mV/g
CE680 M411
Delivered with
CE 680M411
CABLExxx series cable assemblies
or other
(see drwg P98_182A)
SAFE AREA
Doc. associés
OK
LD2
LD1
Power supply
VibroSmart VMU 100
RS. Anal. output
Plan:
Aff.:
LD1, LD2, OK Relays
Power supply
VibroSmart VMU 100
MECHANICAL DRAWINGS
A-3
A-4
2984-8
OR
2984-2
5218A
Affectation:
Creation du plan
Commande:
Verif.
Modification
Modifications
Modification 5218A + CABLExxxEX
3
2
C3
2
C4
1
4
3
8
C8
7
6
5
C7
4
3
2
C6
1
2
ENTER
C5
1
ESC
RESET
mm/s
RMS
C1
1
PROG
R
2
DATA
LD2
C2
1
Date:
Dess.
FF
FF
Reset
Client:
Ind.
Date
24.09.98
0
AS
AS
24.06.99
1
Analog. O/P (Option)
RS I/O (Option)
2
3
1
2
3
4
4
Zener Barrier
Ref 9001/01-280-020-10
Zener barrier
Ref 9001/01-280-020-10
OK
RUN
PROG
LD1
VibroSmart
SAFE AREA
Figure A-2: Vibration Chain Diagram : Hazardous Area Configuration
100 mV/g
5218A
CABLExxxEX series cable
assemblies (see drwg p99-116A)
CABLExxxEX series cable assemblies
or other type (see drwg p99_116A)
Delivered with
CE 680M411
HAZARDOUS AREA
Doc. associés
OK
LD2
LD1
Power supply
VibroSmart VMU 100
RS. Anal. output
Plan:
Aff.:
LD1, LD2, OK Relays
Power supply
VibroSmart VMU 100
MECHANICAL DRAWINGS
User Manual MAVMU100/E
Edition 6
DATA SHEETS
B
DATA SHEETS
This appendix contains the following data sheets:
Data Sheet
Document No.
VMU100
VibroSmart Vibration Monitor
266-650 E
CE 680 M411
Piezoelectric Accelerometer with Integrated
Electronics
262-055 E
EC 318
Cable Assembly
262-645 E
User Manual MAVMU100/E
Edition 6
B-1
DATA SHEETS
THIS PAGE INTENTIONALLY LEFT BLANK
B-2
User Manual MAVMU100/E
Edition 6
A Meggitt company
vibro-meter
certified by
VMU 100
Vibration Monitor
VibroSmart ®
FEATURES
• Single-channel microprocessor-based monitor for
mV/g accelerometer (constant current supply)
• Designed for reliable operation in severe industrial
environments (IP 65 enclosure)
• 5-digit display and 5 LED indicators
• Built-in HP and LP filters with 24 dB/oct slope,
integrator and rectifier
• Field programmable functions or via RS link
- 3 sensor sensitivity ranges in mV/g
- 6 measuring ranges in mm/s or inch/s
- 8 individual HP and LP cut-off frequencies
- 2 level detectors : “ALARM” and “TRIP” levels
- 1 analog output available as option
- 1 digital RS output available as option (ISO 1745
and ModBus protocols)
• Self-check circuit (“OK System”) with relay output
• BNC output for analysis
• Various AC/DC power supply options
• Conforms to CE, ISO 10 816, NF E90.300 & VDI 2056
standards and recommendations
DESCRIPTION
The VibroSmart VMU 100 is a fully programmable vibration
monitor. It is designed for auxiliary rotating machines such
as pumps, fans, small hydro turbines, etc. It is housed in a
rugged IP 65 enclosure which protects the electronic
circuitry from the severe environments often found in the
petro-chemical and power generation industries or in other
industrial facilities.
It is a single channel monitor which fulfils any display,
monitoring and alarm requirements. This microprocessor
based monitor with 5-digit display, 5 LED indicators and
front panel setup buttons offers a perfect combination of
functions in a very small package.
The input processing module can match all accelerometers
using a constant current power supply, such as VibroMeter's CE 680 series. This configuration allows long
distances between the accelerometer and the monitor (up
to 500 meters).
The VibroSmart VMU 100 monitors, the vibration signal and
displays the RMS or peak value of the vibration velocity in
mm/s or inch/s.
©Vibro-Meter SA / 266-650 / 11.02 / E
All configurable parameters are stored in a non-volatile
memory and can be programmed with the front panel setup
buttons or via an RS link. When an alarm level is exceeded,
the corresponding LED will show the alarm status.
An optional analog output module converts the displayed
value into a current or voltage based DC signal (4-20 mA or
0-10 V).
In addition, an optional RS-232 or RS-485 digital data link
module allows the operator to request measured values (via
ModBus/RTU or ISO 1745) and change all the configurable
parameters from a remote computer.
A built-in self-check circuit (“OK System”) with front panel
LED indicator and a relay output provides continuous
monitoring of open or short-circuited transducer line,
dynamic overload/overflow, or lost power supply.
The front panel BNC output enables connection to a data
collector or spectrum analyser.
1/8
Vibration Monitor
VMU 100
SPECIFICATIONS
BASIC EQUIPMENT
Micro-processor mother board including display,
processing, power supply, vibration input module, A/
D converter and 3-relay output module.
Optionally, this basic equipment can accept an
analog output module and/or an RS digital output
module.
HARDWARE
Mother Board
Microprocessor type
Non-volatile static
RAM
: H8325, 8-bit at 20 MHz, with
32 kB RAM
: EEPROM, 10 000 store
cycles, 100 years data
retention
Processing, Display and Analog Module
Display
: 5 red alphanumeric
characters, 14 segments,
14 mm
Full scale (FSD)
: ± 9999 with decimal point
user programmable
Accuracy
: 0.5% of FSD
Temperature stability : 50 ppm/°C
Front panel buttons
: 4 set up buttons
Front panel indicators : Green LED “OK System”
• “ALARM” = LD1
Yellow LED, first level
• “TRIP” = LD2
Red LED, second level
A/D Converter
Type
Conversion rate
Resolution
Accuracy
Power Supply
AC voltage
DC voltage
Consumption
:
:
:
:
Dual slope integrating
16 conversions per second
±15 bit
0.05% of reading
: 115/230 V ±15%, 50/60 Hz
: 20 to 30 V ±5%
: 10 W max. with all options
and all relays ON
Relay Output Module
“OK System” relay
: Relay NE, 1 NO contact
“ALARM” relay (LD1) : Relay 1 NO and 1 NC
contacts
he NE or NDE relay status is
programmable
“TRIP” relay (LD2)
: Relay 1 NO and 1 NC
contacts
The NE or NDE relay status
is programmable
Relay type
: Fujitsu JS-12K.12V, 1 pole,
8A
©Vibro-Meter SA / 266-650 / 11.02 / E
SOFTWARE
Calibration Mode
Sensor sensitivity
: 9.5 to 105 mV/g, 3 ranges
with 0.1 mV/g step
resolution:
1) 9.5 to 19.9 mV/g
2) 20 to 49.9 mV/g
3) 50 to 105 mV/g
Full scale measuring : 10, 20, 50, 100, 200 or
range (FSD)
500 mm/s RMS or peak
or
0.5, 1, 2, 5, 10 or 20 inch/s
RMS or peak
Filter cut-off frequencies
• Low pass (LP)
: From 40 Hz to 10 kHz
40, 100, 200, 500 Hz,
1, 2.5, 5, 10 kHz
• High pass (HP)
: From 1 Hz to 200 Hz
1, 2, 5, 10, 20, 40, 100,
200 Hz
Level Detectors
Alarm level
Hysteresis
Time delay
Latch function
Output state
: User programmable, from 0
to 9999
: Fixed at 5% of FSD
: User programmable, from 1
to 99 seconds
: User programmable, “Latch”
or “Unlatch”
: Driver normally ON, relay
NE or normally OFF, relay
NDE
Input Characteristics
Input signal
: From 9.5 to 105 mV/g
(CE 680 transducer or
equivalent)
Circuit layout
: AC coupling, asymmetrical
Transducer supply
: 2 mA, 24 VDC
Transfer Characteristics
Dynamic range
: 100 g peak
Filters
: Active HP and LP filters, 4pole Tchebychev, 24 dB/
octave skirt slope, 0.1 dB
ripple
Cut-off frequencies
: At -3 dB (see above values)
Linearity error
: < 1%
Rectifier circuit
: True Root Mean Square
(RMS) value rectifier
2/8
Vibration Monitor
VMU 100
SPECIFICATIONS (Continued)
OUTPUT CHARACTERISTICS
Raw Signal BNC Output
Type
: Acceleration, unfiltered
Sensitivity
: According to the input signal
range
Input in mV/g
9.5 to 19.9
20 to 49.9
50 to 105
Gain
1
0.5
0.2
Dynamic range
: 2 V peak
Output impedance : 500 ohms
Raw Signal on Terminal
Type
: Acceleration, filtered
Sensitivity
: Same as on BNC output (see
above values)
Dynamic range
: 2 V peak
Output impedance : 500 ohms
OK System
Function
“OK” LED (green)
“OK” relay
: Continuous monitoring for
open transducer line, shortcircuited line, dynamic overlad/
overflow, or lost power supply.
: Light ON = normal state
: Light OFF = indicates fault
OPTIONS
(See Ordering Information)
PHYSICAL CHARACTERISTICS
Design standard
: Complies with all essential
specifications of CE,
ISO10 816, NF E90.300 and
VDI 2056 recommendations
Mechanical
: Aluminium enclosure, IP 65
protection, 4 PG 11 input/
output stuffing glands,
4 mounting holes for M6
screws
Electrical
: Removable terminals
connections
(for 1.5 mm2 wire)
Dimensions
• Height
: 226 mm
• Width
: 150 mm
• Depth
: 70 mm
Weight
: ~ 1.5 kg
ENVIRONMENTAL
(According to IEC 68.2 recommendations)
Operating
: 0°C to +60°C
temperature
Storage
: -25°C to +85°C
temperature
Humidity
: Max. 95% non-condensing
Vibration
: 10 to 55 Hz, 0.35 mm peak,
6 hours in each direction
Shock
: 15 g peak, 11 ms, half sine
pulse
Analog Output Module
DC voltage output : 0 to 10 V for FSD
or
impedance > 500 ohms
DC current output : 4 to 20 mA for FSD
impedance < 800 ohms
Resolution
: 12 bits
Accuracy
: 0.1% (±1 bit)
Time response
: 60 ms
RS Digital Output Module
Type
: RS 232 C or RS 485
Baud rate in bps
: Selectable from 1200 to 19 200
Bus interface
: 3 wires for RS 232 C
2 wires for RS 485
Address (RS-485) : Programmable from 00 to 99
Bus structure
: Slave which replies to
commands
Protocol
: ISO 1745, “start-stop” 7-bit
code ModBus/RTUTM
Network
: Up to 31 modules
configuration
Mode
: Asynchronous serial
transmission, half-duplex
©Vibro-Meter SA / 266-650 / 11.02 / E
3/8
Vibration Monitor
VMU 100
BLOCK DIAGRAM
BNC
LD 1
RMS
m m /s
RMS
A/D
RUN
Logic circuit
OK
LD2
Vibration card
DATA
RESET
OK
PROG
PROG
ESC
ENTER
CE 680
or
equivalent
Power
supply
Micro
Controler
Relay
module
RS
I/O
Analog
output
DESIGN AND DIMENSIONS
Bottom view
Mounting: 4 x M6 screws
©Vibro-Meter SA / 266-650 / 11.02 / E
4/8
Vibration Monitor
VMU 100
ORDERING INFORMATION
To order please specify :
Type
VMU 100
Designation
Vibration Monitor
Ordering Number
204-100-000-011 / X1 / X2 / X3 / X4 / X5
Programmable parameters (if X4 = 1):
PP1 / PP2 / ... / PP23
IMPORTANT : The parameters X1, X2, X3, X4 and X5 must be defined when ordering.
PP1 to PP23 concern programmable parameters which can be defined in the field by
programming the VibroSmart. If they are defined when ordering, the set-up will be done in the
factory prior to delivery.
CONFIGURATION PARAMETERS
X1 (1)
1
2*
5
Power Supply
115 VAC
230 VAC
20-30 VDC
X2
0*
1
X4
Factory setup of
programmable parameters
No
Yes
X5 (2) Programmation Rights
0*
1
1*
2
3
Analog Output Card
None
0 - 10 V or 4 - 20 mA
Total
Limited
Blocked
X3
0*
1
2
RS Output Card
None
RS 232
RS 485
* = Default setting
Notes :
(1)
The power supply can be changed from 115 VAC to 230 VAC by adjusting a jumper on the base card of the
VibroSmart.
(2)
The programmation rights can also be changed by adjusting a jumper on the base card of the VibroSmart.
©Vibro-Meter SA / 266-650 / 11.02 / E
5/8
Vibration Monitor
VMU 100
PROGRAMMABLE PARAMETERS
The following parameters can all be changed in the field by programming the VibroSmart. If they are defined when
ordering, the set-up will be done in the factory prior to delivery.
Programmable parameters
:
PP1 / PP2 / ... / PP23
PP1
1
2
3*
9
Input Sensitivity
10 mV/g
25 mV/g
100 mV/g
Other
PP2
1*
2
Unit
mm/s
inch/s
PP3
1*
2
Calibration
RMS
Peak
PP4
01
02
03*
04
05
06
07
51
52
53
54
55
56
57
Full Scale
5 mm/s
10 mm/s
20 mm/s
50 mm/s
100 mm/s
200 mm/s
500 mm/s
0.5 inch/s
1.0 inch/s
2.0 inch/s
5.0 inch/s
10.0 inch/s
20.0 inch/s
50.0 inch/s
PP5
1*
2
3
4
Rounding
1
2
5
10
PP6
1
2
3
4*
5
6
7
8
HP Filter
1 Hz
2 Hz
5 Hz
10 Hz
20 Hz
40 Hz
100 Hz
200 Hz
©Vibro-Meter SA / 266-650 / 11.02 / E
PP7
1
2
3
4
5*
6
7
8
LP Filter
40 Hz
100 Hz
200 Hz
500 Hz
1 kHz
2.5 kHz
5 kHz
10 kHz
* = Default setting
6/8
Vibration Monitor
VMU 100
PROGRAMMABLE PARAMETERS (Continued)
PP8
1*
2
LD1 Activity
Yes
No
PP14
1*
2
LD2 Activity
Yes
No
PP9
0
1*
2
LD1 Direction
Not applicable if PP8 = 02
High
Low
PP15
0
1*
2
LD2 Direction
Not applicable if PP14 = 02
High
Low
PP10
0
1*
2
LD1 Normal State
Not applicable if PP8 = 02
On
Off
PP16
0
1
2*
LD2 Normal State
Not applicable if PP14 = 02
On
Off
PP11
0
1*
2
LD1 Latch
Not applicable if PP8 = 02
Yes
No
PP17
0
1*
2
LD2 Latch
Not applicable if PP14 = 02
Yes
No
PP12
0
9*
LD1 Level
Not applicable if PP8 = 02
Specify value in writing
(* 60% of Full Scale)
PP18
0
9*
LD2 Level
Not applicable if PP14 = 02
Specify value in writing
(* 80% of Full Scale)
PP13
0
9*
LD1 Delay Time
Not applicable if PP8 = 02
Specify value in writing
(* 1 sec.)
PP19
0
9*
LD2 Delay Time
Not applicable if PP14 = 02
Specify value in writing
(* 1 sec.)
PP20
0
1*
2
Analog Output
Not applicable
0 - 10 VDC (if X2 = 1)
4 - 20 mA (if X2 = 1)
PP21
00
01*
--99
RS Address (0-99)
00 (if X3 = 1 or 2)
01 (if X3 = 1 or 2)
--99 (if X3 = 1 or 2)
PP22
0
1
2
3
4*
5
RS Baud Rate
Not applicable
1200 (if X3 = 1 or 2)
2400 (if X3 = 1 or 2)
4800 (if X3 = 1 or 2)
9600 (if X3 = 1 or 2)
19 200 (if X3 = 1 or 2)
PP23
0
1*
2
Protocol
Not applicable
ISO 1745 (if X3 = 1 or 2)
ModBus/RTU (if X3 = 1 or 2)
©Vibro-Meter SA / 266-650 / 11.02 / E
* = Default setting
7/8
Vibration Monitor
VMU 100
ORDERING EXAMPLE
VMU 100 Vibration Monitor
Programmable parameters
where PP12 = 12 mm/s (60% of FSD)
PP13 = 1 second
: 204-100-000-011 / 1 / 0 / 2 / 1 / 1
: 3 / 1 / 1 / 03 / 4 / 3 / 8 /
1/1/1/1/9/9/
1/1/2/1/9/9/
1 / 01 / 4 / 1
PP18 = 16 mm/s (80% of FSD)
PP19 = 1 second
ACCESSORIES
CE 680 series accelerometers
EC 318 cable assembly
EC 319 cable assembly
See data sheet 262-055
See data sheet 262-645
See data sheet 262-646
In this publication, a dot (.) is used as the decimal separator and thousands are separated by spaces. Example : 12 345.678 90
Although care has been taken to assure the accuracy of the data presented in this publication, we do not assume liability for errors or omissions.
We reserve the right to alter any part of this publication without prior notice.
Head Office
Vibro-Meter SA
Rte de Moncor 4, P.O. Box,
CH-1701 Fribourg, Switzerland
Phone :+41 26 407 11 11
Fax : +41 26 407 13 01
www.vibro-meter.com
©Vibro-Meter SA / 266-650 / 11.02 / E
Your Local Agent
Sales Offices
Sales offices in :
• Germany
• France
• USA
• Canada
• Singapore
• United Kingdom
• Russia
• Ukraine
Agents in over 30 countries
Vibro-Meter is a member of the
Meggitt Aerospace Systems Division
8/8
A Meggitt company
vibro-meter
certified by
CE 680 M411
Piezoelectric Accelerometer
with Integrated Electronics
Type CE 680 M411
FEATURES
• Designed for medium temperature industrial
applications (-55°C to +120°C)
• Shear mode operation, therefore no output due
to thermal transients
• 2-pole low-pass filter for resonance
suppression
• Hermetically sealed for harsh environments
• Ground isolated from case and connected to a
Faraday shield
• Bias voltage stability at elevated temperatures
• Frequency response
±10% 3 to 5000 Hz
±3 dB 0.5 to 10 000 Hz
DESCRIPTION
The CE 680 M411 is an all-purpose vibration sensor
designed for use in harsh industrial machinery
environments. It uses the industry standard 2-wire
voltage transmission technique with a 4 mA constant
current supply. The output signal has a sensitivity of
100 mV/g.
Thanks to the accelerometer's isolated ground and
Faraday shield, no ground loops or frame voltage are
present to disturb the measurement.
The CE 680 M411 shows extremely low noise levels
and exceptional bias voltage stability at elevated
temperatures.
PHYSICAL DIMENSIONS AND CONNECTING DIAGRAM
©Vibro-Meter SA / 262-055 / 11.02 / E
1/2
Piezoelectric Accelerometer with Integrated Electronics
CE 680 M411
SPECIFICATIONS
Note: Unless otherwise stated, all values listed are typical values, referenced at +24°C, 24 VDC supply, 4 mA constant current and 100 Hz
OPERATING
ENVIRONMENTAL
(at +23°C ±5°C)
Temperature range
Sensitivity (at 120 Hz)
: 100 mV/g ±10%
Humidity
: Hermetically sealed
Dynamic range
: 80 g
Simusoidal vibration limit
: 500 g peak
Transverse sensitivity
: < 5%
Shock limit
: 5000 g peak
Linearity
: < 1% up to full-scale
Base strain sensitivity
: 0.002 µg peak/µε
Resonant frequency
: Nominal 25 kHz, +15 dB max. at
resonance
ESD protection
: > 36 V
EMC (10 V/m, 150 kHz to
1000 MHz with 80% AM at
1000 Hz)
: 0.003 g peak to peak
Input supply current
: 2 to 10 mA
MTBF
Supply voltage for current
source
: 22 to 30 VDC
: 197 000 hours (+25°C)
35 000 hours (+125°C)
ELECTRICAL
: -55°C to +120°C
PHYSICAL
DC output bias voltage
Weight
• From -50 to +99°C
: 11 to 14 VDC
• From +100 to +120°C
: ≤ ±100 mV/°C
Output impedance
: 50 Ω
Residual noise
(+25°C or +120°C)
: 0.0005 g (from 2.5 Hz to 25 kHz)
Isolation between inner
case and housing
: ≥ 10 MΩ
Over-voltage protection
: > 40 VDC
Reversed polarity
: Protected
: 90 g
Case material
: 316 L stainless steel
Mounting torque
: 2.9 Nm
Mating connector
: MS3106F-10SL-4S or equiv.
CALIBRATION
Dynamic calibration at factory. No subsequent calibration
necessary.
TYPICAL RESPONSE CURVES
30
10
Deviation (dB)
Deviation (dB)
20
0
-10
-20
-30
0.1
1
10
100
1000
Frequency (Hz)
10 000
100 000
Temperature (°C)
ACCESSORIES
Supplied Accessories
Adaptor stud
Type 1/4-28 UNF
P/N 2984-2
Adaptor stud
Type 1/4-28 to M8 x 1.25
P/N 2984-8
Cable
Type EC 318
P/N 922-318-000-0XX
Cable
Type EC 319 (with boot)
P/N 922-319-000-0XX
Optional Accessories
ORDERING INFORMATION
To order please specify :
Type
Designation
Ordering Number
CE 680 M411
Piezoelectric Accelerometer
444-680-000-411
In this publication, a dot (.) is used as the decimal separator and thousands are separated by spaces. Example : 12 345.678 90
Although care has been taken to assure the accuracy of the data presented in this publication, we do not assume liability for errors or omissions.
We reserve the right to alter any part of this publication without prior notice.
Head Office
Vibro-Meter SA
Rte de Moncor 4, P.O. Box,
CH-1701 Fribourg, Switzerland
Phone :+41 26 407 11 11
Fax : +41 26 407 13 01
www.vibro-meter.com
©Vibro-Meter SA / 262-055 / 11.02 / E
Your Local Agent
Sales Offices
Sales offices in :
• Germany
• France
• USA
• Canada
• Singapore
• United Kingdom
• Russia
• Ukraine
Agents in over 30 countries
Vibro-Meter is a member of the
Meggitt Aerospace Systems Division
2/2
A Meggitt company
vibro-meter
certified by
EC 318
Cable Assembly
Type EC 318
FEATURES
• Extension cable for CE-type accelerometer
• Temperature range -54°C to +120°C
• Mates to transducer with MIL-C-5015 connector
(or equivalent)
DESCRIPTION
Designed for industrial or laboratory environments, these
cable assemblies facilitate the connection of an
accelerometer with integrated electronics and MIL-C-5015
type connector.
The EC 318 cable assembly incorporates a 22 AWG
(0.34 mm²) shielded, twisted pair cable. It is terminated by
an MS3106F10SL-4S connector at one end and has a
pigtail termination at the other.
MECHANICAL DIAGRAM
5/8-24 UNEF-2B thread
1
2
©Vibro-Meter SA / 262-645 / 11.02 / E
1/2
Cable Assembly
EC 318
SPECIFICATIONS
Physical Specifications of Cable
Cable type
Construction
: K 219
: According to IEC 228 specifications
Connector
Type
Construction
Finish
Insert material
Operating temperature
:
:
:
:
:
MS 3106F-10SL-4S
Alluminium alloy
Cadmium olive
Neoprene
Max. 125°C
Refer to drawing on page 1 and the data sheet K 219 (262-586) for full specifications.
ORDERING INFORMATION
To order please specify :
Type
EC 318
Designation
Cable Assembly
Ordering Number
922-318-000-011
922-318-000-021
922-318-000-031
922-318-000-041
922-318-000-051
922-318-000-001
Length 1 m
Length 3 m
Length 5 m
Length 8 m
Length 10 m
Length to be defined on order
In this publication, a dot (.) is used as the decimal separator and thousands are separated by spaces. Example : 12 345.678 90
Although care has been taken to assure the accuracy of the data presented in this publication, we do not assume liability for errors or omissions.
We reserve the right to alter any part of this publication without prior notice.
Head Office
Vibro-Meter SA
Rte de Moncor 4, P.O. Box,
CH-1701 Fribourg, Switzerland
Phone :+41 26 407 11 11
Fax : +41 26 407 13 01
www.vibro-meter.com
©Vibro-Meter SA / 262-645 / 11.02 / E
Your Local Agent
Sales Offices
Sales offices in :
• Germany
• France
• USA
• Canada
• Singapore
• United Kingdom
• Russia
• Ukraine
Agents in over 30 countries
Vibro-Meter is a member of the
Meggitt Aerospace Systems Division
2/2
GLOSSARY
C
GLOSSARY
This appendix contains an explanation of the terms displayed by the VibroSmart VMU100
and/or used in the present user manual :
Display
Term
ACT
Activity
Readout or programming of the activity of the alarm (Active or
inhibited)
Adjust
Adjust
Adjustment of each digit to obtain the required value
ADRES
Address
Readout or programming of the address of the VibroSmart in an
RS 485 network
ALARM
Alarm
Readout or programming of the alarm parameters
ALL
All
Access to all the programmed parameters
ANOUT
Analog Output
Readout or programming of the analog output
BAUD
Baud
Readout or programming of the transmission speed in RS
CAL
Calibration
Readout or programming of the peak or effective crest value
calibration
DATA
Data
Entry into the function of readout of the parameters and stored
values
DELAY
Delay
Readout or programming of the time delay of the alarm
DISP
Display
Access to the parameters of the display
ENTER
Enter
Validation of the parameter displayed and return to the higher
hierarchical level
ESC
Escape
Return to the higher hierarchical level keeping the original
parameter
FILT
Filter
Access to the filter parameters
FSD
Full Scale
Deflection
Readout or programming of the extent of measurement
HI-LO
High-Low
Readout or programming of the direction of alarm (High or low)
HP
High Pass (filter)
Readout or programming of the high cutoff frequency
Inc/s
Inch/s
Choice of unit inch/s
Init
Initialize
Initialization of the max and min values for a new period
INP
Input (Sensor)
Readout or programming of the sensitivity of the accelerometer
LATCH
Latch
Readout or programming of the latching of the alarm
LD1
Level Detector 1
Readout or programming of the 1st alarm
LD2
Level Detector 2
Readout or programming of the 2nd alarm
LEVEL
Level
Readout or programming of the level of the alarm
LP
Low Pass (Filter)
Readout or programming of the low cutoff frequency
M/m
Max/min
Access to the Max and min measurements for the period
User Manual MAVMU100/E
Edition 6
Comments
C-1
GLOSSARY
C-2
Display
Term
Comments
MAX
Maximum
Readout and reinitialization of the max values of measurement
for the period
MIN
Minimum
Readout and reinitialization of the min values of measurement
for the period
mm/s
mm/s
Selection of unit mm/s
No
No
Negative response to a selection (activity, storage etc)
NORM
Normally
Readout or programming of the state of the relay without alarm
OFF
Off (de-energized)
Relay normally de-energized - NDE
OK
OK
Inidicates the absence of any anomaly in the equipment
(VibroSmart VMU100, line and accelerometer)
ON
On (energized)
Relay normally energized (NE)
Peak
Peak
Calibration selection at peak value
PROG
Programming
Indicates the two keys enabling entry into programming mode
PROGA
Alarm Programming
Access to the programming limited to the alarms threshold
routine
PROGT
Total Programming
Access to the complete programming routine
PROT
Protocol
Readout or programming of the RS transmission protocol
RESET
Reset
Reset or clearance of a stored alarm
RMS
Root Mean Square
Selection of calibration in effective value
RND
Rounding-up
(resolution)
Readout or programming of the protocol for the rounding up
resolution of the display
RSOUT
RS Output
Readout or programming of the RS 232 or RS 485 serial output
RUN
Run
Operation under normal monitoring
SPEC
Special
Readout or programming of a non-standard accelerometer
sensitivity
STD
Standard
Readout or programming of a standard accelerometer
sensitivity
UNIT
Unit
Readout or programming of the measuring unit
VER
Version
Readout of the reference of the software version used
Yes
Yes
Positive response to a selection (activity, storage etc)
User Manual MAVMU100/E
Edition 6
PRODUCT DEFECT REPORT
PRODUCT DEFECT REPORT
If you have any problems with your Vibro-Meter product would you please contact your Vibro-Meter
agent. You may need to return a defective unit to Vibro-Meter. If you do, please photocopy then fill in
this form (in English) and attach it to the defective unit. Your completed Product Defect Report is
important because it can help us rapidly solve the problem.
NOTE : Always provide a filled-in photocopy of the Product Defect Report for each defective unit. The
report must accompany the unit at all times.
Contact Details: You or the designated Contact Person for your company.
Name
Job Title
Company
Email
Address
Country
Post Code
Telephone
Fax
Signature
Date
Product Details: Plug-in modules display Product Detail information on a sticker stuck on the unit.
Module type:
Serial number (S/N):
Part number (P/N):
Vibro-Meter order number:
Date of purchase:
Site where used:
Problems Observed:
(Please continue on back of sheet if necessary)
Is the problem (put an ⌧ where appropriate) :
Always evident ?
User Manual MAVMU100/E
Edition 6
Intermittent ?
Temperature dependent?
PRODUCT DEFECT REPORT
Please use this space for any additional information:
User Manual MAVMU100/E
Edition 6
DOCUMENT EVALUATION FORM
DOCUMENT EVALUATION FORM
Vibro-Meter welcomes your evaluation of this document. Your comments and suggestions help us
improve the quality of our documentation.
Document Title
Reference
VibroSmart VMU100 Vibration Monitor User Manual
MAVMU100/E
Edition 6
Date of Issue
01.03.2005
Circle Yes or No to answer the following questions:
• Is the document well organized?
Yes
No
• Is the information technically accurate?
Yes
No
• Would you like more technical detail?
Yes
No
• Are the instructions clear and complete?
Yes
No
• Are the descriptions easy to understand?
Yes
No
• Are the examples and diagrams/photos helpful?
Yes
No
• Are there enough examples and diagrams/photos?
Yes
No
• Is the style/wording easy to read?
Yes
No
• Is any information not included? (please list in “Comments” below)
Yes
No
Comments
(Please continue on back of sheet if necessary)
Contact Details: You or the designated Contact Person for your company:
Name
Job Title
Company
Email
Address
Signature
Date
Please mail, email or fax this document evaluation form to:
Technical Publications
Vibro-Meter S.A.
Route de Moncor 4
1701 Fribourg, Switzerland
web: www.vibro-meter.com , email: [email protected], Fax: +41 (0)26 407 15 55
User Manual MAVMU100/E
Edition 6
DOCUMENT EVALUATION FORM
Please use this space for any additional comments:
User Manual MAVMU100/E
Edition 6