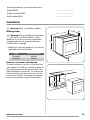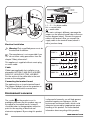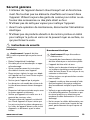
1
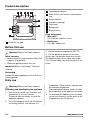
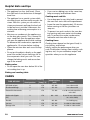
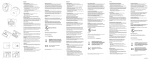
NL
EN
FR
Gebruiksaanwijzing
User manual
Notice d'utilisation
Oven
Oven
Four
ZOU10301
2
15
28
Inhoud
Veiligheidsinformatie _ _ _ _ _ _ _ _ _ _ _ _ _
Veiligheidsvoorschriften _ _ _ _ _ _ _ _ _ _ _
Beschrijving van het product _ _ _ _ _ _ _ _ _
Voor het eerste gebruik _ _ _ _ _ _ _ _ _ _ _
Dagelijks gebruik _ _ _ _ _ _ _ _ _ _ _ _ _ _ _
Extra functies _ _ _ _ _ _ _ _ _ _ _ _ _ _ _ _ _
2
3
5
5
6
7
Nuttige aanwijzingen en tips _ _ _ _ _ _ _ _ _ 7
Onderhoud en reiniging _ _ _ _ _ _ _ _ _ _ _ 10
Problemen oplossen _ _ _ _ _ _ _ _ _ _ _ _ 11
Montage _ _ _ _ _ _ _ _ _ _ _ _ _ _ _ _ _ _ _ 12
Milieubescherming _ _ _ _ _ _ _ _ _ _ _ _ _ 14
Wijzigingen voorbehouden.
Veiligheidsinformatie
Lees zorgvuldig de meegeleverde instructies voor installatie en gebruik van het apparaat. De fabrikant is niet verantwoordelijk voor letsel en schade veroorzaakt door een foutieve installatie. Bewaar de
instructies van het apparaat voor toekomstig gebruik.
Veiligheid van kinderen en kwetsbare mensen
Waarschuwing! Gevaar voor verstikking, letsel of permanente
invaliditeit.
• Dit apparaat kan worden gebruikt door kinderen van 8 jaar en ouder en door mensen met beperkte lichamelijke, zintuiglijke of verstandelijke vermogens of een gebrek aan ervaring en kennis, indien zij onder toezicht staan van een volwassene of van iemand
die verantwoordelijk is voor hun veiligheid.
• Laat kinderen niet met het apparaat spelen.
• Houd alle verpakkingsmaterialen uit de buurt van kinderen.
• Houd kinderen en huisdieren uit de buurt van het apparaat als het
in werking is of afkoelt. Het apparaat is heet.
• Als het apparaat is uitgerust met een kinderbeveiliging, raden wij
aan dit te activeren.
• Reiniging en onderhoud mag niet worden uitgevoerd door kinderen zonder toezicht.
Algemene veiligheid
• Van binnen wordt het apparaat heet als het in werking is. Raak de
verwarmingselementen in het apparaat niet aan. Gebruik altijd
2
www.zanussi.com
ovenhandschoenen om accessoires of kookgerei te plaatsen of
verwijderen.
• Gebruik geen stoomreiniger om het apparaat schoon te maken.
• Zet de stroomtoevoer uit alvorens onderhoud te plegen.
• Gebruik nooit agressieve reinigingsmiddelen of scherpe metalen
schrapers om de glazen deur schoon te maken, deze kunnen
krassen veroorzaken op het oppervlak, waardoor het glas zou kunnen breken.
Veiligheidsvoorschriften
Montage
Waarschuwing! Alleen een erkende
installatietechnicus mag het apparaat
installeren.
• Verwijder alle verpakkingsmaterialen.
• Installeer en gebruik geen beschadigd apparaat.
• Volg de installatie-instructies op die zijn meegeleverd met het apparaat.
• Wees voorzichtig met het verplaatsen van
het apparaat, het is zwaar. Draag altijd veiligheidshandschoenen.
• Trek het apparaat nooit aan de handgreep
van zijn plaats.
• De afmetingen van de keukenkast en de uitsparing moeten kloppen.
• Houd de minimumafstand naar andere apparaten en units in acht.
• Zorg ervoor dat het apparaat onder en naast
veilige installaties wordt geïnstalleerd.
• Delen van het apparaat staan onder stroom.
Sluit het apparaat met meubel om te voorkomen dat de gevaarlijke delen worden aangeraakt.
• De zijkanten van het apparaat moeten naast
apparaten of units staan van dezelfde hoogte.
Aansluiting op het elektriciteitsnet
www.zanussi.com
Waarschuwing! Gevaar voor brand en
elektrische schokken.
• Alle elektrische aansluitingen moeten door
een gediplomeerd elektromonteur worden
gemaakt.
• Dit apparaat moet worden aangesloten op
een geaard stopcontact.
• Controleer of de elektrische informatie op het
typeplaatje overeenkomt met de stroomvoorziening. Zo niet, neem dan contact op met
een elektromonteur.
• Gebruik altijd een correct geïnstalleerd,
schokbestendig stopcontact.
• Gebruik geen meerwegstekkers en verlengsnoeren.
• Zorg dat u de hoofdstekker en kabel niet beschadigt. Neem contact op met de serviceafdeling of een elektromonteur om een beschadigde hoofdkabel te vervangen.
• Laat de stroomkabel niet in aanraking komen
met de deur van het apparaat, met name niet
als deze heet is.
• De schokbescherming van delen onder
stroom en geïsoleerde delen moet op zo'n
manier worden bevestigd dat het niet zonder
gereedschap kan worden verplaatst.
• Steek de stekker pas in het stopcontact als
de installatie is voltooid. Zorg ervoor dat het
netsnoer na installatie bereikbaar is.
• Sluit de stroomstekker niet aan op een losse
stroomaansluiting.
3
• Trek niet aan het netsnoer om het apparaat
los te koppelen. Trek altijd aan de stekker.
• Gebruik alleen de juiste isolatie-apparaten:
stroomonderbrekers, zekeringen (schroefzekeringen moeten uit de houder worden verwijderd), aardlekschakelaars en contactgevers.
• De elektrische installatie moet een isolatieapparaat bevatten waardoor het apparaat volledig van het lichtnet afgesloten kan worden.
Het isolatieapparaat moet een contactopening hebben met een minimale breedte van 3
mm.
Gebruik
Waarschuwing! Gevaar op letsel,
brandwonden, elektrische schokken of een
explosie.
• Gebruik dit apparaat in een huishoudelijke
omgeving.
• De specificatie van het apparaat mag niet
worden veranderd.
• Zorg ervoor dat de ventilatieopeningen niet
geblokkeerd zijn.
• Laat het apparaat tijdens het gebruik niet onbeheerd achter.
• Schakel het apparaat telkens na gebruik uit.
• Wees voorzichtig met het openen van de
deur van het apparaat als het apparaat aan
staat. Er kan hete lucht ontsnappen.
• Bedien het apparaat niet met natte handen of
als het contact maakt met water.
• Oefen geen kracht uit op een geopende
deur.
• Het apparaat mag niet worden gebruikt als
werkblad of aanrecht.
• Houd de deur van het apparaat altijd dicht
als het apparaat in werking is.
• Open de deur van het apparaat voorzichtig.
Als u alcoholische toevoegingen gebruikt,
kan er alcohol-luchtmengsel ontstaan.
• Houd vonken of open vlammen uit de buurt
van het apparaat bij het openen van de deur.
• Plaats geen ontvlambare producten of items
die vochtig zijn door ontvlambare producten
in, bij of op het apparaat.
4
Waarschuwing! Risico op schade aan
het apparaat.
• Om schade of verkleuring van het email te
voorkomen:
– Zeg geen kookgerei of andere voorwerpen
direct op de bodem van het apparaat.
- Leg geen aluminiumfolie op de bodem van
het apparaat.
- Plaats geen water direct in het hete apparaat.
- Haal vochtige schotels en eten uit het apparaat als u klaar bent met koken.
- Wees voorzichtig bij het verwijderen of bevestigen van accessoires.
• Verkleuring van het email heeft geen ongewenst effect op de werking van het apparaat.
Dit is geen defect dat geldt voor het recht op
garantie.
• Gebruik een diepe braadpan voor vochtige
taarten. Fruitsappen kunnen permanente
vlekken maken.
Onderhoud en reiniging
Waarschuwing! Gevaar voor letsel,
brand en schade aan het apparaat.
• Schakel het apparaat uit en trek de stekker
uit het stopcontact voordat u onderhoudshandelingen verricht.
• Zorg ervoor dat het apparaat is afgekoeld. Er
bestaat een risico dat de glasplaten kunnen
breken.
• Vervang direct de glazen deurpanelen als deze beschadigd zijn. Neem contact op met de
service-afdeling.
• Wees voorzichtig bij het verwijderen van de
deur uit het apparaat. De deur is zwaar!
• Reinig het apparaat regelmatig om te voorkomen dat het materiaal van het oppervlak achteruitgaat.
• Resterend vet of voedsel in het apparaat kan
brand veroorzaken.
• Maak het apparaat schoon met een vochtige,
zachte doek. Gebruik alleen neutrale schoonmaakmiddelen. Gebruik geen schuurmiddelen, schuursponsjes, oplosmiddelen of metalen voorwerpen.
www.zanussi.com
• Raadpleeg als u een ovenspray gebruikt
eerst de aanwijzingen op de verpakking.
• Reinig niet het katalytisch emaille (indien van
toepassing) met een schoonmaakmiddel.
Binnenverlichting
• De gloeilampen of halogeenlampen in dit apparaat zijn uitsluitend bedoeld voor gebruik in
huishoudelijke apparaten. Gebruik deze niet
voor andere doeleinden.
Waarschuwing! Gevaar voor elektrische
schokken!
• Gebruik alleen lampjes met dezelfde specificaties.
Verwijdering
Waarschuwing! Gevaar voor letsel of
verstikking.
• Haal de stekker uit het stopcontact.
• Snijd het netsnoer van het apparaat af en
gooi dit weg.
• Verwijder de deurgreep om te voorkomen dat
kinderen en huisdieren opgesloten raken in
het apparaat.
• Voordat u het lampje vervangt, dient u de
stekker van het apparaat uit het stopcontact
te halen.
Beschrijving van het product
1
2
3
4
4
8
2 Temperatuurweergave
3 Knop voor de ovenfuncties en temperatuur
1
5
4 Stroomindicatielampje
5 Ventilatie-openingen
6
6 Ovenlampje
7 Typeplaatje
3
2
1
7
1 Toetsen voor de kookplaat
8 Rekstanden
Ovenaccessoires
• Bakrooster
Voor kookgerei, cake bakblikken en braadvormen.
• Bakplaat
Voor gebak en koekjes.
Voor het eerste gebruik
Waarschuwing! Zie de
veiligheidshoofdstukken .
Eerste reiniging
• Verwijder alle accessoires en verwijderbare
inschuifrails (indien van toepassing).
• Reinig het apparaat voor het eerste gebruik.
Belangrijk! Zie het hoofdstuk "Onderhoud en
reiniging".
www.zanussi.com
Voorverwarmen
Verwarm het apparaat voor om het resterende
vet weg te branden.
1. Stel de maximumtemperatuur in (250 °C).
2. Laat het apparaat een uur aan staan.
Accessoires kunnen heter worden dan normaal.
Het apparaat kan een vreemde geur en rook afgeven. Dit is normaal. Zorg dat er voldoende
luchtcirculatie is.
5
Dagelijks gebruik
Waarschuwing! Zie de
veiligheidshoofdstukken .
Het apparaat aan- en uitzetten
1. Zet de knop van de ovenfuncties en temperatuur op een ovenfunctie.
Het stroomindicatielampje gaat aan als het
apparaat in werking is.
2. Zet de knop op een temperatuur om de
functie Traditionele Bereiding in te stellen.
3.
Overige functies werken met de maximumtemperatuur.
Het temperatuurlampje gaat aan zolang de
temperatuur in het apparaat stijgt.
Draai om het apparaat uit te schakelen, de
knop voor de ovenfuncties en de knop voor
de temperatuur in de uit-stand.
Ovenfuncties
Ovenfunctie
50...250
Applicatie
Uit-stand
Het apparaat staat uit.
Binnenverlichting
Het ovenlampje activeren zonder een bereidingsfunctie.
Boven + onderwarmte
Bakken en braden op 1 ovenniveau. De bovenste en onderste verwarmingselementen worden gelijktijdig ingeschakeld.
Onderwarmte
Voor het bakken van taarten met een knapperige bodem. Alleen het
onderste verwarmingselement werkt.
Bovenverwarming
Voor het afbakken van gare gerechten. Alleen het bovenste verwarmingselement brandt.
Toetsen voor de kookplaat
U bedient de kookplaat die u met de oven
hebt geïnstalleerd met behulp van de
knoppen voor de kookplaat. Lees voor meer informatie over de kookplaat de gebruiksaanwijzing bij de kookplaat.
Belangrijk! U dient het hoofdstuk
'Veiligheidsinformatie' in de gebruiksaanwijzing
van de kookplaat te lezen.
0
1-9
6
2.
Let op! Draai de knop rechtsom om de
dubbele zone te activeren. Draai de knop
niet verder dan de stoppositie.
Functie
Uit-stand
Verwarmingsstanden
(1 = laagste verwarmingsstand;
9 = hoogste verwarmingsstand)
Draai de bedieningsknop in de gewenste
verwarmingsstand.
Zet de bedieningsknop op de uit stand om
het kookproces te beëindigen.
Gebruik van de dubbele zone (indien van
toepassing)
1.
2.
Verwarmingsstanden
Toets
1.
3.
Draai de knop rechtsom naar stand 9.
Draai de knop langzaam naar het symbool
tot u een klik hoort.
De twee kookzones zijn nu aan.
Raadpleeg 'Verwarmingsstanden' om de
nodige verwarmingsstanden in te stellen.
www.zanussi.com
Extra functies
Koelventilator
Als het apparaat in werking is, wordt de koelventilator automatisch ingeschakeld om de oppervlakken van het apparaat koel te houden. Na
het uitschakelen van het apparaat blijft de ventilatie door werken totdat de temperatuur in het
apparaat is afgekoeld.
hitting veroorzaken. Om dit te voorkomen is de
oven voorzien van een veiligheidsthermostaat
die de stroomtoevoer onderbreekt. Zodra de
temperatuur is gedaald, wordt de oven automatisch weer ingeschakeld.
Veiligheidsthermostaat
Een onjuiste bediening van het apparaat of defecte componenten kunnen gevaarlijke overver-
Nuttige aanwijzingen en tips
• Het apparaat heeft vier inzetniveaus. Tel de
inzetniveaus vanaf de bodem van het apparaat.
• Het apparaat heeft een speciaal systeem dat
de lucht circuleert en voor doorlopende recycling van stoom zorgt. Dankzij dit systeem
is het mogelijk om voedsel te bereiden in een
atmosfeer met stoom en worden de gerechten zacht van binnen en knapperig van buiten. Bovendien worden de bereidingstijd en
het energieverbruik tot een minimum beperkt.
• Vocht kan in het apparaat of op de glazen
deurpanelen condenseren. Dit is normaal. Ga
altijd iets terug staan van het apparaat als u
de deur van het apparaat tijdens de werking
opent. Om de condens te verminderen, dient
u het apparaat 10 minuten te laten voorverwarmen.
• Veeg na elk gebruik het vocht van het apparaat.
• Plaats geen voorwerpen direct op de bodem
van het apparaat en bedek de bodem tijdens
de bereiding niet met aluminiumfolie. Dit kan
de bakresultaten veranderen en de emaillelaag beschadigen.
• Als u twee bakplaten tegelijkertijd gebruikt,
dient u één niveau ertussen leeg te laten.
Voor de bereiding van vlees en vis
• Gebruik een diepe bak voor erg vet voedsel
om te oven te behoeden voor blijvende vetvlekken.
• Laat het vlees ongeveer 15 minuten rusten
voordat u het aansnijdt, zodat het vleessap er
niet uit stroomt.
• Om te veel rook tijdens het braden in de
oven te vermijden, kunt u een beetje water in
de lekbak gieten. Om rook te vermijden,
voegt u water toe wanneer het is opgedroogd.
Bereidingstijden
De bereidingsduur is afhankelijk van het soort
voedsel, de samenstelling en het volume.
Houd in eerste instantie het bereidingsproces
in de gaten. Zoek bij het gebruik van dit apparaat de beste instellingen (temperatuur, bereidingsduur, etc.) voor uw kookgerei, recepten en
hoeveelheden.
Voor de bereiding van gebak
• De ovendeur mag pas worden geopend als
driekwart van de baktijd is verstreken.
www.zanussi.com
7
Bak- en braadtabel
GEBAK
Boven + onderwarmte
Ovenniveau
Temp [°C]
Bereidingstijd
[min]
Notities
Schuimtaart
2
170
45-60
In een cakevorm
Zandtaartdeeg
2
170
20-30
In een cakevorm
Kwarktaart met karnemelk
1
170
70-80
In een cakevorm van 26 cm
op een bakrooster
Appelgebak (appeltaart)
2
170
80-100
In twee cakevormen van 20
cm op een bakrooster1)
Strudel
3
175
60-80
Op een bakplaat
Jamtaart
2
170
30-40
In een cakevorm van 26 cm
Cake, zacht
2
170
50-60
In een cakevorm van 26 cm
Kerstgebak/machtige
vruchtencake
2
160
90-120
In een cakevorm van 20
cm1)
Pruimentaart
1
175
50-60
In een broodvorm 1)
Cakejes
3
170
20-30
Op een bakplaat
Koekjes/deegreepjes
3
140
30-35
Op een bakplaat
Schuimgebakjes
3
120
80-100
Op een bakplaat
Broodjes
3
190
15-20
Op een bakplaat1)
Eclairs
3
190
25-35
Op een bakplaat
Taartjes
2
180
45-70
In een cakevorm van 20 cm
Vruchtencake
1
160
110-120
In een cakevorm van 24 cm
Victoria-taart met jamvulling
1
170
50-60
In een cakevorm van 20
cm1)
SOORT GERECHT
1) Verwarm de oven 10 minuten voor.
BROOD EN PIZZA
Boven + onderwarmte
Ovenniveau
Temp [°C]
Bereidingstijd
[min]
Wit brood
1
190
60-70
1 - 2 stuks, 500 gram per
stuk1)
Roggebrood
1
190
30-45
In een broodvorm
Pizza
1
230-250
10-20
Op een bakplaat of in een
braadpan1)
Scones
3
200
10-20
Op een bakplaat1)
SOORT GERECHT
Notities
1) Verwarm de oven 10 minuten voor.
8
www.zanussi.com
HARTIGE OVENGERECHTEN
Boven + onderwarmte
Ovenniveau
Temp [°C]
Bereidingstijd
[min]
Notities
Pastataart
2
200
40-50
In een vorm
Hartige groententaart
2
200
45-60
In een vorm
Quiches
1
180
50-60
In een vorm1)
Lasagne
2
180-190
25-40
In een vorm1)
Cannelloni
2
180-190
25-40
In een vorm1)
Bereidingstijd
[min]
Notities
SOORT GERECHT
1) Verwarm de oven 10 minuten voor.
VLEES
SOORT GERECHT
Boven + onderwarmte
Ovenniveau
Temp [°C]
Rundvlees
2
200
50-70
Op een bakrooster
Varkensvlees
2
180
90-120
Op een bakrooster
Kalfsvlees
2
190
90-120
Op een bakrooster
Engelse rosbief, rood
2
210
50-60
Op een bakrooster
Engelse rosbief, medium
2
210
60-70
Op een bakrooster
Engelse rosbief, gaar
2
210
70-75
Op een bakrooster
Schouderkarbonade
2
180
120-150
Met zwoerd
Varkensschenkel
2
180
100-120
Twee stukken
Lamsvlees
2
190
110-130
Bout
Kip
2
220
70-85
Hele
kalkoen
2
180
210-240
Hele
eend
2
175
120-150
Hele
gans
2
175
150-200
Heel
konijn
2
190
60-80
In stukken gesneden
haas
2
190
150-200
In stukken gesneden
fazant
2
190
90-120
Hele
VIS
Boven + onderwarmte
Ovenniveau
Temp [°C]
Bereidingstijd
[min]
Notities
Forel/zeebrasem
2
190
40-55
3-4 vissen
Tonijn/zalm
2
190
35-60
4-6 filets
SOORT GERECHT
www.zanussi.com
9
Informatie over acrylamides
Belangrijk! Volgens recente
wetenschappelijke informatie kan het intensief
bruinen van levensmiddelen (met name in
producten die zetmeel bevatten), een
gezondheidsrisico vormen tengevolge van
acrylamides. Om die reden adviseren wij
levensmiddelen zoveel mogelijk bij lage
temperaturen gaar te laten worden en de
gerechten niet te veel te bruinen.
Onderhoud en reiniging
Waarschuwing! Zie de
veiligheidshoofdstukken .
• Voor meer informatie over het schoonmaken
van de deurafdichting, raadpleegt u de algemene informatie over reiniging.
• Maak de voorkant van het apparaat schoon
met een zachte doek en een warm sopje.
• Gebruik voor metalen oppervlakken een universeel reinigingsmiddel.
• Reinig de binnenkant van de oven na elk gebruik. Vuil laat zich dan het makkelijkst verwijderen en kan niet aanbranden.
• Verwijder hardnekkig vuil met een speciale
ovenreiniger.
• Maak alle ovenaccessoires na gebruik
schoon en laat ze drogen. Gebruik een zachte doek met warm water en een schoonmaakmiddel.
• Accessoire met antiaanbaklaag mogen niet
worden schoongemaakt met een agressief
reinigingsmiddel, voorwerpen met scherpe
randen of een afwasautomaat. Hierdoor kan
de antiaanbaklaag onherstelbaar worden beschadigd.
Ovenlampje
Apparaten van roestvrij staal of aluminium:
Maak de ovendeur alleen met een natte spons
schoon. Droog maken met een zachte doek.
Gebruik nooit staalwol, zuren of bijtende producten, deze kunnen het ovenoppervlak beschadigen. Maak het bedieningspaneel van de
oven net zo voorzichtig schoon.
4.
De afdichting van de deur schoonmaken
• Voer regelmatig een controle van de deurafdichting uit. De afdichting van de deur bevindt zich rondom het frame aan de binnenkant van de oven. Gebruik het apparaat niet
als de afdichting van de deur is beschadigd.
Neem contact op met de service-afdeling.
10
Waarschuwing! Wees voorzichtig bij het
vervangen van het ovenlampje. Er bestaat
risico op elektrische schokken.
Voordat u het ovenlampje vervangt:
• Schakel de oven uit.
• Verwijder de zekeringen in de zekeringenkast, of schakel de stroomonderbreker uit.
Leg een doek op de bodem van de oven
om schade aan het ovenlampje en het afdekglaasje te voorkomen.
1.
2.
3.
Draai het afdekglas naar links en verwijder
het.
Reinig het afdekglas.
Vervang het ovenlampje door een geschikt
300 °C hittebestendig ovenlampje.
Gebruik hetzelfde ovenlamptype.
Plaats het afdekglas terug.
De ovendeur reinigen
De ovendeur beschikt over twee glazen panelen. U kunt de ovendeur en het interne glazen
paneel verwijderen om het schoon te maken.
De ovendeur kan dichtslaan als u het interne glaspaneel probeert te verwijderen als
de deur nog gemonteerd is.
Let op! Gebruik het apparaat nooit zonder
de glasplaten.
www.zanussi.com
1
1 Open de deur vol- 2 Til de hendels op
ledig en houd de
de twee scharnieren
twee deurscharnieren omhoog en draai ze.
vast.
2
7 Til de glasplaat
voorzichtig op (stap
1) en verwijder het
glazen paneel (stap
2).
Reinig de glasplaat met een sopje. Droog de
glasplaat voorzichtig af.
De deur en de glasplaten terugplaatsen
3 Sluit de ovendeur
in de eerste openingsstand (halfopen). Trek hem
daarna naar voren en
haal hem uit zijn zitting.
4 Leg de deur op
een zachte doek op
een stabiele ondergrond.
Als u het glazen paneel en de ovendeur heeft
schoongemaakt, plaatst u ze terug. Voer bovenstaande stappen uit in de omgekeerde volgorde.
De bedrukte zijde moet naar de binnenkant van
de deur gericht zijn. Zorg ervoor dat het oppervlak van de glasplaat op de bedrukte zijde na
de installatie niet ruw aanvoelt.
Zorg dat u het interne glazen paneel in de zittingen plaatst. Raadpleeg de illustratie.
90°
5 Maak het vergren- 6 Draai de twee bedelingssysteem open vestigingen 90° en
om het interne glazen verwijder ze uit hun
paneel te verwijderen. zittingen.
Problemen oplossen
Waarschuwing! Zie de
veiligheidshoofdstukken .
www.zanussi.com
11
Probleem
Mogelijke oorzaak
De kookzones functioneren niet.
Oplossing
Zie de gebruikshandleiding van de kookplaat.
Het apparaat werkt helemaal niet.
Het apparaat is niet ingeschakeld.
Schakel het apparaat in. Raadpleeg het hoofdstuk "Dagelijks gebruik".
Het apparaat werkt helemaal niet.
De zekering in de zekeringkast is
doorgebrand.
Controleer de zekering. Als de zekering meer dan een keer doorslaat, raadpleegt u een bevoegde
elektricien.
Het ovenlampje brandt niet.
Het ovenlampje is kapot.
Vervang het ovenlampje.
Stoom en condens slaan neer op
de gerechten en in de oven.
Het gerecht heeft te lang in de
oven gestaan.
Laat gerechten na het bereiden
niet langer dan 15-20 minuten in
de oven staan.
Als u het probleem niet zelf kunt verhelpen,
neemt u contact op met uw verkoper of de
klantenservice.
De contactgegevens van het servicecentrum
staan op het typeplaatje. Het typeplaatje be-
vindt zich voor aan de binnenkant van het apparaat.
Wij adviseren u om de gegevens hier te noteren:
Model (MOD.)
.........................................
Productnummer (PNC)
.........................................
Serienummer (S.N.)
.........................................
Montage
Waarschuwing! Zie de
veiligheidshoofdstukken .
Onderbouw
Waarschuwing! De installatie van het
apparaat mag uitsluitend worden
uitgevoerd door een gekwalificeerd en
deskundig persoon. Als u geen gekwalificeerd
of deskundig persoon inschakelt, vervalt de
garantie bij het ontstaan van schade.
• Voordat u het apparaat installeert, dient u het
te plaatsen in de geschikte kookplaat uit de
tabel.
12
Type
Maximaal vermogen
ZC6695X
6400 W
Type
Maximaal vermogen
ZC6675X
6000 W
Elektrische aansluiting op de kookplaat
De aansluiting van de kookplaat zit bovenop de
ovenbehuizing. De kookplaat heeft aansluitingen voor de kookzones en de massakabel. De
aansluitingen hebben stekkeraansluitingen. Om
de kookplaat op de oven aan te sluiten, steekt u
de stekkers in de juiste ovenaansluitingen. Het
ontwerp van de stekkers en de aansluitingen
voorkomt een verkeerde aansluiting.
www.zanussi.com
540
560
20
A
B
570
590
594
7
Elektrische installatie
Waarschuwing! De elektrische installatie
mag uitsluitend worden uitgevoerd door
een gekwalificeerd persoon.
600
min. 550
20
min. 560
De fabrikant is niet verantwoordelijk indien
u deze veiligheidsmaatregelen uit hoofdstuk 'Veiligheidsinformatie' niet opvolgt.
Dit apparaat wordt geleverd zonder stekker en
netsnoer.
Kabel
Kabeltypes die van toepassing zijn op de installatie of vervanging: H07 RN-F, H05 RN-F, H05
RRF, H05 VV-F, H05 V2V2-F (T90), H05 BBF.
Voor het deel van de kabel raadpleegt u het totale vermogen op het typeplaatje.
Klemmenplaat aansluiten
Het apparaat is uitgerust met een zespolige
klemmenplaat. De aansluitingen zijn ingesteld
op 400 V driefasig met een neutrale draad.
www.zanussi.com
13
1 = 45 mm
2 = 45 mm
3 = 60 mm
4 = 60 mm
= 70 mm
1
2
230V 3~
3
4
L 1 – 2 – 3 = fasekabels
N 4 = neutrale kabel
= massakabel
Als de elektriciteitsspanning anders is, stelt u
de aansluitingen op de klemmenplaat anders in
(zie het onderstaande bedradingsschema). Sluit
de massakabel op de klemmenplaat aan. Bevestig de op de klemmenplaat aangesloten voedingskabel met een vertakkingsklem.
230V 1~
400V 2N~
400V 3N~
1 2 3 4 5
L1
L2
L3 PE
1 2 3 4 5
L1
N
1 2 3 4 5
PE
L1 L2
N
1 2 3 4 5
PE
L1 L2 L3 N
PE
Milieubescherming
Het symbool op het product of op de
verpakking wijst erop dat dit product niet als
huishoudafval mag worden behandeld, maar
moet worden afgegeven bij een verzamelpunt
waar elektrische en elektronische apparatuur
wordt gerecycled. Als u ervoor zorgt dat dit
product op de juiste manier wordt verwijderd,
voorkomt u mogelijke negatieve gevolgen voor
mens en milieu die zich zouden kunnen
voordoen in geval van verkeerde
afvalverwerking. Voor gedetailleerdere
14
informatie over het recyclen van dit product,
kunt u contact opnemen met de gemeente, de
gemeentereiniging of de winkel waar u het
product hebt gekocht.
Verpakkingsmateriaal
Het verpakkingsmateriaal is milieuvriendelijk en geschikt voor hergebruik. Kunststofonderdelen worden aangeduid met internationale
afkortingen, zoals PE, PS, enz. Gooi het verpakkingsmateriaal weg in de daarvoor bestemde
containers van uw vuilnisophaaldienst.
www.zanussi.com
Contents
Safety information _ _ _ _ _ _ _ _ _ _ _ _ _ _
Safety instructions _ _ _ _ _ _ _ _ _ _ _ _ _
Product description _ _ _ _ _ _ _ _ _ _ _ _ _
Before first use _ _ _ _ _ _ _ _ _ _ _ _ _ _ _
Daily use _ _ _ _ _ _ _ _ _ _ _ _ _ _ _ _ _ _ _
Additional functions _ _ _ _ _ _ _ _ _ _ _ _ _
15
16
18
18
18
19
Helpful hints and tips _ _ _ _ _ _ _ _ _ _ _ _
Care and cleaning _ _ _ _ _ _ _ _ _ _ _ _ _
What to do if… _ _ _ _ _ _ _ _ _ _ _ _ _ _ _
Installation _ _ _ _ _ _ _ _ _ _ _ _ _ _ _ _ _ _
Environment concerns _ _ _ _ _ _ _ _ _ _ _
20
22
24
25
26
Subject to change without notice.
Safety information
Before the installation and use of the appliance, carefully read the
supplied instructions. The manufacturer is not responsible if an incorrect installation and use causes injuries and damages. Always
keep the instructions with the appliance for future reference.
Children and vulnerable people safety
Warning! Risk of suffocation, injury or permanent disability.
• This appliance can be used by children aged from 8 years and
above and persons with reduced physical, sensory or mental capabilities or lack of experience and knowledge if they are supervised by an adult or a person who is responsible for their safety.
• Do not let children play with the appliance.
• Keep all packaging away from children.
• Keep children and pets away from the appliance when it operates
or when it cools down. Accessible parts are hot.
• If the appliance has a child safety device, we recommend that you
activate it.
• Cleaning and user maintenance shall not be made by children
without supervision.
General Safety
• Internally the appliance becomes hot when in operation. Do not
touch the heating elements that are in the appliance. Always use
oven gloves to remove or put in accessories or ovenware.
• Do not use a steam cleaner to clean the appliance.
www.zanussi.com
15
• Before maintenance cut the power supply.
• Do not use harsh abrasive cleaners or sharp metal scrapers to
clean the glass door since they can scratch the surface, which
may result in shattering of the glass.
Safety instructions
Installation
Warning! Only a qualified person must
install this appliance.
• Remove all the packaging.
• Do not install or use a damaged appliance.
• Obey the installation instruction supplied
with the appliance.
• Always be careful when you move the appliance because it is heavy. Always wear safety
gloves.
• Do not pull the appliance by the handle.
• The kitchen cabinet and the recess must
have suitable dimensions.
• Keep the minimum distance from the other
appliances and units.
• Make sure that the appliance is installed below and adjacent safe structures.
• Parts of the appliance carry current. Close
the appliance with furniture to prevent touching the dangerous parts.
• The sides of the appliance must stay adjacent to appliances or to units with the same
height.
Electrical connection
Warning! Risk of fire and electrical shock.
• All electrical connections should be made by
a qualified electrician.
• The appliance must be earthed.
• Make sure that the electrical information on
the rating plate agrees with the power supply. If not, contact an electrician.
• Always use a correctly installed shockproof
socket.
16
• Do not use multi-plug adapters and extension cables.
• Make sure not to cause damage to the mains
plug and to the mains cable. Contact the
Service or an electrician to change a damaged mains cable.
• Do not let mains cables to come in touch
with the appliance door, specially when the
door is hot.
• The shock protection of live and insulated
parts must be fastened in such a way that it
cannot be removed without tools.
• Connect the mains plug to the mains socket
only at the end of the installation. Make sure
that there is access to the mains plug after
the installation.
• If the mains socket is loose, do not connect
the mains plug.
• Do not pull the mains cable to disconnect
the appliance. Always pull the mains plug.
• Use only correct isolation devices: line protecting cut-outs, fuses (screw type fuses removed from the holder), earth leakage trips
and contactors.
• The electrical installation must have an isolation device which lets you disconnect the appliance from the mains at all poles. The isolation device must have a contact opening
width of minimum 3 mm.
Use
Warning! Risk of injury, burns or electric
shock or explosion.
• Use this appliance in a household environment.
• Do not change the specification of this appliance.
www.zanussi.com
• Make sure that the ventilation openings are
not blocked.
• Do not let the appliance stay unattended
during operation.
• Deactivate the appliance after each use.
• Be careful, when you open the appliance
door while the appliance is in operation. Hot
air can release.
• Do not operate the appliance with wet hands
or when it has contact with water.
• Do not apply pressure on the open door.
• Do not use the appliance as a work surface
or as a storage surface.
• Always keep the appliance door closed when
the appliance is in operation.
• Open the appliance door carefully. The use
of ingredients with alcohol can cause a mixture of alcohol and air.
• Do not let sparks or open flames to come in
contact with the appliance when you open
the door.
• Do not put flammable products or items that
are wet with flammable products in, near or
on the appliance.
Warning! Risk of damage to the
appliance.
• To prevent damage or discoloration to the
enamel:
– Do not put ovenware or other objects in
the appliance directly on the bottom.
– Do not put aluminium foil directly on the
bottom of the appliance.
– do not put water directly into the hot appliance.
– do not keep moist dishes and food in the
appliance after you finish the cooking.
– be careful when you remove or install the
accessories.
• Discoloration of the enamel has no effect on
the performance of the appliance. It is not a
defect in the sense of the warranty law.
• Use a deep pan for moist cakes. Fruit juices
cause stains that can be permanent.
Warning! Risk of injury, fire or damage to
the appliance.
• Before maintenance, deactivate the appliance and disconnect the mains plug from the
mains socket.
• Make sure the appliance is cold. There is the
risk that the glass panels can break.
• Replace immediately the door glass panels
when they are damaged. Contact the Service.
• Be careful when you remove the door from
the appliance. The door is heavy!
• Clean regularly the appliance to prevent the
deterioration of the surface material.
• Remaining fat or food in the appliance can
cause fire.
• Clean the appliance with a moist soft cloth.
Only use neutral detergents. Do not use
abrasive products, abrasive cleaning pads,
solvents or metal objects.
• If you use an oven spray, obey the safety instructions on the packaging.
• Do not clean the catalytic enamel (if applicable) with any kind of detergent.
Internal light
• The type of light bulb or halogen lamp used
for this appliance, is only for household appliances. Do not use it for house lighting.
Warning! Risk of electrical shock.
• Before replacing the lamp, disconnect the
appliance from the power supply.
• Only use lamps with the same specifications.
Disposal
Warning! Risk of injury or suffocation.
• Disconnect the appliance from the mains
supply.
• Cut off the mains cable and discard it.
• Remove the door catch to prevent children
and pets to get closed in the appliance.
Care and Cleaning
www.zanussi.com
17
Product description
1
2
4
8
3
4
5
2 Temperature indicator
3 Knob for the oven functions and temperature
4 Power indicator
6
5 Ventilation openings
6 Oven lamp
1
3
2
1
7
1 Knobs for the hob
7 Rating plate
8 Shelf positions
Oven accessories
• Wire shelf
For cookware, cake tins, roasts.
• Baking tray
For cakes and biscuits.
Before first use
Warning! Refer to the Safety chapters.
Initial cleaning
• Remove all accessories and removable shelf
supports (if applicable).
• Clean the appliance before first use.
1. Set the maximum temperature (250 °C).
2. Let the appliance operate for one hour.
Accessories can become hotter than usually.
The appliance can emit an odour and smoke.
This is normal. Make sure that the airflow is sufficient.
Important! Refer to the chapter "Care and
cleaning".
Preheating
Preheat the empty appliance to burn off the remaining grease.
Daily use
Warning! Refer to the Safety chapters.
Activating and deactivating the appliance
1. Turn the knob for the oven functions and
temperature to an oven function.
The power indicator comes on while the
appliance operates.
2. To set the temperature for the Conventional Cooking function, turn the knob to a
18
3.
temperature. Other functions operate with
the maximum temperature.
The temperature indicator comes on while
the temperature in the appliance increases.
To deactivate the appliance, turn the knob
for the oven functions and the knob for the
temperature to the Off position.
www.zanussi.com
Oven functions
Oven function
50...250
Application
Off position
The appliance is off.
Light
To activate the oven lamp without a cooking function.
Conventional Cooking
To bake and roast on one oven level. The top and bottom heating
elements operate at the same time.
Bottom Heat
To bake cakes with crispy or crusty bottom. Only the bottom heating element operates.
Top Heat
To finish cooked dishes. Only the top heating element operates.
Knobs for the hob
With the knobs for the hob you operate
the hob that you installed with the oven.
For more information about the hob, refer to the
hob user manual.
Important! You must read the "Safety
information" chapter in the hob user manual.
Knob
1-9
Caution! To activate the double zone, turn
the knob clockwise. Do not turn it through
the stop position.
Function
Off position
Heat settings
(1 = lowest heat setting, 9 =
highest heat setting)
Turn the knob to a necessary heat setting.
To complete the cooking process, turn the
knob to the off position.
Using the double zone (if applicable)
1.
2.
Heat settings
0
1.
2.
3.
Turn the knob clockwise to position 9.
until
Turn the knob slowly to the symbol
you can hear a click.
The two cooking zones are on.
To set the necessary heat setting refer to
"Heat settings".
Additional functions
Cooling fan
When the appliance operates, the cooling fan
activates automatically to keep the surfaces of
the appliance cool. If you deactivate the appliance, the cooling fan continues to operate until
the temperature in the appliance cools down.
heating. To prevent this, the oven has a safety
thermostat which interrupts the power supply.
The oven activates again automatically when
the temperature drops.
Safety thermostat
Incorrect operation of the appliance or defective components can cause dangerous over-
www.zanussi.com
19
Helpful hints and tips
• The appliance has four shelf levels. Count
the shelf levels from the bottom of the appliance floor.
• The appliance has a special system which
circulates the air and constantly recycles the
steam. With this system you can cook in a
steamy environment and keep the food soft
inside and crusty outside. It decreases the
cooking time and energy consumption to a
minimum.
• Moisture can condense in the appliance or
on the door glass panels. This is normal. Always stand back from the appliance when
you open the appliance door while cooking.
To decrease the condensation, operate the
appliance for 10 minutes before cooking.
• Clean the moisture after each use of the appliance.
• Do not put the objects directly on the appliance floor and do not put aluminium foil on
the components when you cook. This can
change the baking results and cause damage to the enamel.
• If you use two baking trays at the same time,
keep one empty level between them.
Cooking meat and fish
• Use a deep pan for very fatty food to prevent
the oven from stains that can be permanent.
• Leave the meat for approximately 15 minutes
before carving so that the juice does not
seep out.
• To prevent too much smoke in the oven during roasting, add some water into the deep
pan. To prevent the smoke condensation,
add water each time after it dries up.
Cooking times
Cooking times depend on the type of food, its
consistency, and volume.
Initially, monitor the performance when you
cook. Find the best settings (heat setting, cooking time, etc.) for your cookware, recipes and
quantities when you use this appliance.
Baking cakes
• Do not open the oven door before 3/4 of the
set cooking time is up.
Baking and roasting table
CAKES
Conventional Cooking
Shelf position
Temp [°C]
Cooking time
[min]
Notes
Whisked recipes
2
170
45 - 60
In a cake mould
Shortbread dough
2
170
20 - 30
In a cake mould
Buttermilk cheesecake
1
170
70 - 80
In a 26 cm cake mould on a
wire shelf
Apple cake (Apple
pie)
2
170
80 - 100
In two 20 cm cake moulds
on a wire shelf1)
Strudel
3
175
60 - 80
In a baking tray
Jam-tart
2
170
30 - 40
In a 26 cm cake mould
Sponge cake
2
170
50 - 60
In a 26 cm cake mould
TYPE OF DISH
20
www.zanussi.com
Conventional Cooking
Shelf position
Temp [°C]
Cooking time
[min]
Notes
Christmas cake / Rich
fruit cake
2
160
90 - 120
In a 20 cm cake mould1)
Plum cake
1
175
50 - 60
In a bread tin 1)
Small cakes
3
170
20 - 30
In a baking tray
Biscuits / pastry strips
3
140
30 - 35
In a baking tray
Meringues
3
120
80 - 100
In a baking tray
Buns
3
190
15 - 20
In a baking tray1)
Eclairs
3
190
25 - 35
In a baking tray
Plate tarts
2
180
45 - 70
In a 20 cm cake mould
Rich fruit cake
1
160
110 - 120
In a 24 cm cake mould
Victoria sandwich
1
170
50 - 60
In a 20 cm cake mould1)
Notes
TYPE OF DISH
1) Preheat the oven for 10 minutes.
BREAD AND PIZZA
Conventional Cooking
Shelf position
Temp [°C]
Cooking time
[min]
White bread
1
190
60 - 70
1 - 2 pieces, 500 gr per
piece1)
Rye bread
1
190
30 - 45
In a bread tin
Pizza
1
230 - 250
10 - 20
In a baking tray or a deep
pan1)
Scones
3
200
10 - 20
In a baking tray1)
TYPE OF DISH
1) Preheat for 10 minutes.
FLANS
Conventional Cooking
Shelf position
Temp [°C]
Cooking time
[min]
Notes
Pasta flan
2
200
40 - 50
In a mould
Vegetable flan
2
200
45 - 60
In a mould
Quiches
1
180
50 - 60
In a mould1)
Lasagne
2
180 - 190
25 - 40
In a mould1)
Cannelloni
2
180 - 190
25 - 40
In a mould1)
TYPE OF DISH
1) Preheat for 10 minutes.
MEAT
www.zanussi.com
21
Conventional Cooking
Cooking time
[min]
Notes
200
50 - 70
On a wire shelf
180
90 - 120
On a wire shelf
2
190
90 - 120
On a wire shelf
2
210
50 - 60
On a wire shelf
English roast beef,
medium
2
210
60 - 70
On a wire shelf
English roast beef,
well done
2
210
70 - 75
On a wire shelf
Shoulder of pork
2
180
120 - 150
With rind
Shin of pork
2
180
100 - 120
Two pieces
Lamb
2
190
110 - 130
Leg
Chicken
2
220
70 - 85
Whole
Turkey
2
180
210 - 240
Whole
Duck
2
175
120 - 150
Whole
Goose
2
175
150 - 200
Whole
Rabbit
2
190
60 - 80
Cut in pieces
Hare
2
190
150 - 200
Cut in pieces
Pheasant
2
190
90 - 120
Whole
Notes
TYPE OF DISH
Shelf position
Temp [°C]
Beef
2
Pork
2
Veal
English roast beef,
rare
FISH
Conventional Cooking
Shelf position
Temp [°C]
Cooking time
[min]
Trout / Sea bream
2
190
40 - 55
3 - 4 fish
Tuna fish / Salmon
2
190
35 - 60
4 - 6 fillets
TYPE OF DISH
Information on acrylamides
Important! According to the newest scientific
knowledge, if you brown food (specially the one
which contains starch), acrylamides can pose a
health risk. Thus, we recommend that you cook
at the lowest temperatures and do not brown
food too much.
Care and cleaning
Warning! Refer to the Safety chapters.
• Clean the front of the appliance with a soft
cloth with warm water and a cleaning agent.
• To clean metal surfaces use a usual cleaning
agent.
22
• Clean the oven interior after each use. Then
you can remove dirt more easily and it does
not burn on.
• Clean stubborn dirt with a special oven
cleaner.
www.zanussi.com
• Clean all oven accessories after each use
and let them dry. Use a soft cloth with warm
water and a cleaning agent.
• If you have nonstick accessories, do not
clean them using aggressive agents, sharpedged objects or a dishwasher. It can destroy nonstick coating.
Stainless steel or aluminium appliances:
Clean the oven door with a wet sponge only.
Dry it with a soft cloth.
Do not use steel wool, acids or abrasive materials, as they can cause damage to the oven surface. Clean the oven control panel with the
same precautions.
Cleaning the door gasket
• Regularly do a check of the door gasket. The
door gasket is around the frame of the oven
cavity. Do not use the appliance if the door
gasket is damaged. Contact the Service
Centre.
• To clean the door gasket, refer to the general
information about cleaning.
Cleaning the oven door
The oven door has two glass panels. You can
remove the oven door and the internal glass
panel to clean it.
The oven door can close if you try to remove the internal glass panel before you
remove the oven door.
Caution! Do not use the appliance
without the glass panels.
1 Open the door
fully and hold the two
door hinges.
2 Lift and turn the
levers on the two
hinges.
Oven lamp
Warning! Be careful when you change
the oven lamp. There is a risk of electrical
shock.
Before you change the oven lamp:
• Deactivate the oven.
• Remove the fuses in the fuse box or deactivate the circuit breaker.
Put a cloth on the bottom of the oven to
prevent damage to the oven light and
glass cover.
1.
2.
3.
4.
3 Close the oven
4 Put the door on a
door to the first open- soft cloth on a stable
ing position (halfway). surface.
Then pull forward and
remove the door from
its seat.
Turn the glass cover counterclockwise to
remove it.
Clean the glass cover.
Replace the oven light bulb with an applicable 300 °C heat-resistant oven light
bulb.
Use the same oven lamp type.
Install the glass cover.
www.zanussi.com
23
Clean the glass panel with water and soap. Dry
the glass panel carefully.
90°
5 Release the locking system to remove
the internal glass
panel.
1
6 Turn the two fasteners by 90° and remove them from their
seats.
Installing the door and the glass panel
When the cleaning is completed, install the
glass panel and the oven door. Do the above
steps in the opposite sequence.
The screen-printing zone must face the inner
side of the door. Make sure that after the installation the surface of the glass panel frame on
the screen-printing zones is not rough when
you touch it.
Make sure that you install the internal glass
panel in the seats correctly. Refer to the illustration.
2
7 Carefully lift (step
1) and remove (step
2) the glass panel.
What to do if…
Warning! Refer to the Safety chapters.
Problem
Possible cause
The cooking zones do not operate.
Remedy
Refer to the user manual for the hob.
The appliance does not operate.
The appliance is not activated.
Activate the appliance. Refer to
the chapter "Daily use".
The appliance does not operate.
The fuse in the fuse box is released.
Do a check of the fuse. If the fuse
is released more than one time,
contact a qualified electrician.
The oven lamp does not operate.
The oven lamp is defective.
Replace the oven lamp.
Steam and condensation collect
on the food and in the oven.
You left the dish in the oven for
too long.
Do not keep the dishes in the
oven for more than 15 - 20 minutes after the cooking ends.
If you cannot find a solution to the problem
yourself, contact your dealer or the service centre.
24
The necessary data for the service centre is on
the rating plate. The rating plate is on the front
frame of the appliance cavity.
www.zanussi.com
We recommend that you write the data here:
Model (MOD.)
.........................................
Product number (PNC)
.........................................
Serial number (S.N.)
.........................................
Installation
Warning! Refer to the Safety chapters.
540
Building Under
Warning! Only a qualified and competent
person must do the installation of the
appliance. If you do not contact a qualified or
competent person, the guarantee becomes
invalid if there is damage.
560
20
570
590
• Before you install the appliance, fit it with the
applicable hob from the table.
Type
Maximum power
ZC6695X
6400 W
ZC6675X
6000 W
594
7
Electrical connection with the hob
The hob connection socket is at the top of the
oven cabinet. The hob has connection leads for
the cooking zones and the ground cable. The
leads have plug-in connectors. To connect the
hob to the oven, plug the connectors into the
correct oven sockets. The design of the plugs
and sockets prevents incorrect connections.
600
min. 550
20
min. 560
www.zanussi.com
25
1 = 45 mm
2 = 45 mm
3 = 60 mm
4 = 60 mm
A
= 70 mm
1
B
2
3
4
Electrical installation
L 1 – 2 – 3 = phase cables
N 4 = neutral cable
= earth cable
If the mains voltage is different, rearrange the
jumpers on the terminal board (refer to the connection diagram below). Connect the ground
cable to the terminal. After you connect the
supply cable to the terminal board, attach it
with a junction clamp.
Warning! Only a qualified person must do
the electrical installation.
230V 3~
The manufacturer is not responsible if you
do not follow safety precautions from the
chapter "Safety information".
This appliance is supplied without a main plug
or a main cable.
Cable
Cable types applicable for installation or replacement: H07 RN-F, H05 RN-F, H05 RRF,
H05 VV-F, H05 V2V2-F (T90), H05 BB-F.
For the section of the cable refer to the total
power on the rating plate.
230V 1~
400V 2N~
400V 3N~
1 2 3 4 5
L1
L2
L3 PE
1 2 3 4 5
L1
N
1 2 3 4 5
PE
L1 L2
N
1 2 3 4 5
PE
L1 L2 L3 N
PE
Connecting the terminal board
The appliance has a six-pole terminal board.
The jumpers (bridges) are set for operation on
a 400 V three-phase with a neutral wire.
Environment concerns
The symbol on the product or on its
packaging indicates that this product may not
be treated as household waste. Instead it
should be taken to the appropriate collection
point for the recycling of electrical and
electronic equipment. By ensuring this product
26
is disposed of correctly, you will help prevent
potential negative consequences for the
environment and human health, which could
otherwise be caused by inappropriate waste
handling of this product. For more detailed
information about recycling of this product,
www.zanussi.com
please contact your local council, your
household waste disposal service or the shop
where you purchased the product.
with international abbreviations such as PE, PS,
etc. Dispose of the packaging material in the
containers provided for this purpose at your local waste management facility.
Packaging material
The packaging material is environmentallyfriendly and recyclable. Plastic parts are marked
www.zanussi.com
27
Sommaire
Consignes de sécurité _ _ _ _ _ _ _ _ _ _ _
Instructions de sécurité _ _ _ _ _ _ _ _ _ _ _
Description de l'appareil _ _ _ _ _ _ _ _ _ _
Avant la première utilisation _ _ _ _ _ _ _ _ _
Utilisation quotidienne _ _ _ _ _ _ _ _ _ _ _
Fonctions supplémentaires _ _ _ _ _ _ _ _ _
28
29
31
31
32
33
Conseils utiles _ _ _ _ _ _ _ _ _ _ _ _ _ _ _ _
Entretien et nettoyage _ _ _ _ _ _ _ _ _ _ _
En cas d'anomalie de fonctionnement _ _ _
Installation _ _ _ _ _ _ _ _ _ _ _ _ _ _ _ _ _ _
En matière de protection de l'environnement
________________________
33
36
38
39
40
Sous réserve de modifications.
Consignes de sécurité
Avant d'installer et d'utiliser cet appareil, lisez soigneusement les
instructions fournies. Le fabricant ne peut être tenu pour responsable des dommages et blessures liés à une mauvaise installation ou
utilisation. Conservez toujours cette notice avec votre appareil pour
vous y référer ultérieurement.
Sécurité des enfants et des personnes vulnérables
Avertissement Risque d'asphyxie, de blessure ou d'invalidité
permanente.
• Cet appareil peut être utilisé par des enfants de plus de 8 ans,
ainsi que des personnes dont les capacités physiques, sensorielles et mentales sont réduites ou dont les connaissances et l'expérience sont insuffisantes, à condition d'être surveillés par une personne responsable de leur sécurité.
• Ne laissez pas les enfants jouer avec l'appareil.
• Ne laissez pas les emballages à la portée des enfants.
• Tenez les enfants et les animaux éloignés de l'appareil lorsqu'il est
en cours de fonctionnement ou lorsqu'il refroidit. Les parties accessibles sont chaudes.
• Si l'appareil est équipé d'un dispositif de sécurité enfants, nous
vous recommandons de l'activer.
• Les enfants ne doivent pas nettoyer ni entreprendre une opération
de maintenance sur l'appareil sans surveillance.
28
www.zanussi.com
Sécurité générale
• L'intérieur de l'appareil devient chaud lorsqu'il est en fonctionnement. Ne touchez pas les éléments chauffants se trouvant dans
l'appareil. Utilisez toujours des gants de cuisine pour retirer ou enfourner des accessoires ou des plats allant au four.
• N’utilisez pas de nettoyeur vapeur pour nettoyer l'appareil.
• Avant toute opération de maintenance, déconnectez l'alimentation
électrique.
• N'utilisez pas de produits abrasifs ni de racloirs pointus en métal
pour nettoyer la porte en verre car ils peuvent rayer sa surface, ce
qui peut briser le verre.
Instructions de sécurité
Installation
Avertissement L'appareil doit être
installé uniquement par un professionnel
qualifié.
• Retirez l'intégralité de l'emballage.
• N'installez pas et ne branchez pas un appareil endommagé.
• Suivez scrupuleusement les instructions
d'installation fournies avec l'appareil.
• Soyez toujours vigilants lorsque vous déplacez l'appareil car il est lourd. Portez toujours
des gants de sécurité.
• Ne tirez jamais l'appareil par la poignée.
• Les dimensions du meuble de cuisine et de
la niche d'encastrement doivent être appropriées.
• Respectez la distance minimale requise avec
les autres appareils et éléments.
• Vérifiez que l'appareil est installé sous et à
proximité de structures sûres.
• Certaines pièces de l'appareil sont électrifiées. Placez l'appareil se façon à éviter que
l'on puisse toucher les pièces dangereuses.
• Les côtés de l'appareil doivent rester à côté
d'appareils ou d'éléments ayant la même
hauteur.
www.zanussi.com
Branchement électrique
Avertissement Risque d'incendie ou
d'électrocution.
• L'ensemble des branchements électriques
doit être effectué par un technicien qualifié.
• L'appareil doit être relié à la terre.
• Vérifiez que les données électriques figurant
sur la plaque signalétique correspondent à
celles de votre réseau. Si ce n'est pas le cas,
contactez un électricien.
• Utilisez toujours une prise antichoc correctement installée.
• L'appareil ne doit pas être raccordé à l'aide
d'un prolongateur, d'une prise multiple ou
d'un raccordement multiple (risque d'incendie).
• Veillez à ne pas endommager la fiche secteur
ni le câble d'alimentation. Contactez un professionnel qualifié ou un électricien pour
remplacer le câble d'alimentation s'il est endommagé.
• Ne laissez pas les câbles d'alimentation secteur entrer en contact avec la porte de l'appareil, particulièrement lorsque la porte est
chaude.
29
• La protection contre les chocs des parties
sous tension et isolées doit être fixée de telle
manière qu'elle ne peut pas être enlevée
sans outils.
• Ne branchez la fiche d'alimentation à la prise
de courant qu'à la fin de l'installation. Assurez-vous que la prise de courant est accessible une fois l'appareil installé.
• Si la prise de courant est lâche, ne branchez
pas la fiche d'alimentation secteur.
• Ne tirez jamais sur le câble d'alimentation
pour débrancher l'appareil. Tirez toujours sur
la fiche.
• N'utilisez que des systèmes d'isolation appropriés : des coupe-circuits, des fusibles
(les fusibles à visser doivent être retirés du
support), un disjoncteur différentiel et des
contacteurs.
• L'installation électrique doit être équipée d'un
dispositif d'isolement à coupure omnipolaire.
Le dispositif d'isolement doit présenter une
distance d'ouverture des contacts d'au moins
3 mm.
Utilisation
Avertissement Risque de blessures, de
brûlures, d'électrocution ou d'explosion.
• Utilisez cet appareil dans un environnement
domestique.
• Ne modifiez pas les caractéristiques de cet
appareil.
• Assurez-vous que les orifices de ventilation
ne sont pas bouchés.
• Ne laissez jamais l'appareil sans surveillance
pendant son fonctionnement.
• Mettez à l'arrêt l'appareil après chaque utilisation.
• Soyez prudent lors de l'ouverture de la porte
de l'appareil lorsque celui-ci est en fonctionnement. De l'air brûlant peut s'en échapper.
• N'utilisez jamais cet appareil avec les mains
mouillées ou lorsqu'il est en contact avec de
l'eau.
• N'exercez jamais de pression sur la porte ouverte.
30
• N'utilisez jamais l'appareil comme plan de
travail ou comme plan de stockage.
• Maintenez toujours la porte de l'appareil fermée lorsque l'appareil est en fonctionnement.
• Ouvrez prudemment la porte de l'appareil. Si
vous utilisez des ingrédients contenant de
l'alcool, un mélange d'alcool et d'air facilement inflammable peut éventuellement se
former.
• Ne laissez pas des étincelles ou des flammes
nues entrer en contact avec l'appareil lorsque vous ouvrez la porte.
• Ne placez pas de produits inflammables ou
d'éléments imbibés de produits inflammables
à l'intérieur ou à proximité de l'appareil, ni sur
celui-ci.
Avertissement Risque
d'endommagement de l'appareil.
• Pour éviter tout endommagement ou décoloration de l'émail :
– Ne mettez pas de plats allant au four ou
d'autres objets dans l'appareil directement
sur le fond.
– Ne placez jamais de feuilles d'aluminium
directement sur le fond de l'appareil.
– Ne versez jamais d'eau directement dans
l'appareil lorsqu'il est chaud.
– Ne laissez jamais d'aliments ou de plats
humides à l'intérieur de l'appareil une fois la
cuisson terminée.
– Faites attention lorsque vous retirez ou remettez en place les accessoires.
• La décoloration de l'émail est sans effet sur
les performances de l'appareil. Il ne s'agit
pas d'un défaut dans l'acception de la garantie.
• Utilisez un plat à rôtir pour obtenir des gâteaux moelleux. Les jus de fruits causent des
taches qui peuvent être permanentes.
Entretien et nettoyage
Avertissement Risque de blessure
corporelle, d'incendie ou de dommage
matériel à l'appareil.
www.zanussi.com
• Avant toute opération d'entretien, mettez à
l'arrêt l'appareil et débranchez la fiche de la
prise secteur.
• Vérifiez que l'appareil est froid. Les panneaux
de verre risquent de se briser.
• Remplacez immédiatement les vitres de la
porte si elles sont endommagées. Contactez
le service de maintenance.
• Soyez prudent lorsque vous ôtez la porte de
l'appareil. Elle est lourde.
• Nettoyez régulièrement l'appareil afin de
maintenir le revêtement en bon état.
• Des graisses ou de la nourriture restant dans
l'appareil peuvent provoquer un incendie.
• Nettoyez l'appareil avec un chiffon doux humide. Utilisez uniquement des produits de lavage neutres. N'utilisez pas de produits abrasifs, de tampons à récurer, de solvants ou
d'objets métalliques.
• Si vous utilisez un spray pour four, suivez les
consignes de sécurité figurant sur l'emballage.
• N'utilisez aucun produit détergent pour nettoyer l'émail catalytique (le cas échéant).
Éclairage interne
• Les ampoules classiques ou halogènes utilisées dans cet appareil sont destinées uniquement à un usage avec des appareils ménagers. Ne l'utilisez pas pour éclairer votre
logement.
Avertissement Risque d'électrocution.
• Avant de changer l'ampoule, débranchez
l'appareil de la prise secteur.
• N'utilisez que des ampoules ayant les mêmes
spécifications.
Mise au rebut
Avertissement Risque de blessure ou
d'asphyxie.
• Débranchez l'appareil de l'alimentation électrique.
• Coupez le câble d'alimentation au ras de
l'appareil et mettez-le au rebut.
• Retirez le dispositif de verrouillage de la porte pour empêcher les enfants et les animaux
de s'enfermer dans l'appareil.
Description de l'appareil
1
2
3
4
4
8
3 Manette de sélection des fonctions du four
et de la température
4 Voyant de mise sous tension
1
5
5 Orifices d'aération
6 Éclairage du four
6
7 Plaque signalétique
8 Position des grilles
3
2
1
7
1 Manettes de la table de cuisson
2 Voyant du thermostat
Accessoires pour four
• Grille métallique
Permet de poser des plats (à rôti, à gratin) et
des moules à gâteau/pâtisserie.
• Plateau de cuisson
Pour la cuisson de gâteaux et de biscuits/gâteaux secs.
Avant la première utilisation
www.zanussi.com
31
Avertissement Reportez-vous aux
chapitres concernant la sécurité.
Premier nettoyage
• Retirez tous les accessoires et les supports
de grille amovibles (si présents).
• Nettoyez l'appareil avant de l'utiliser pour la
première fois.
Important Reportez-vous au chapitre
« Entretien et nettoyage ».
1. Sélectionnez la température maximale
(250 °C).
2. Laissez l'appareil en fonctionnement pendant une heure.
Les accessoires peuvent chauffer plus que
d'habitude. Une odeur et de la fumée peuvent
s'échapper de l'appareil. Ce phénomène est
normal. Vérifiez que la ventilation environnante
est suffisante.
Préchauffage
Préchauffez le four à vide afin de faire brûler les
résidus de graisse.
Utilisation quotidienne
Avertissement Reportez-vous aux
chapitres concernant la sécurité.
Activation et désactivation de l'appareil
1. Tournez la manette de sélection des fonctions du four et de la température sur la
fonction souhaitée.
Le voyant de mise sous tension s'allume
pendant le fonctionnement de l'appareil.
2.
3.
Lorsque vous utilisez la fonction Convection naturelle, réglez une température en
tournant le thermostat. Les autres fonctions
utilisent la température maximale.
L'indicateur de température s'allume lorsque la température du four augmente.
Pour éteindre l'appareil, tournez la manette
de sélection des fonctions du four et celle
du thermostat sur la position Arrêt.
Fonctions du four
Fonction du four
50...250
Utilisation
Position Arrêt
L'appareil est éteint.
Éclairage four
Pour allumer l'éclairage du four même si aucune fonction de cuisson n'est sélectionnée.
Convection naturelle
Pour cuire et rôtir sur un seul niveau du four. Les résistances supérieure et inférieure fonctionnent en même temps.
Sole
Pour la cuisson de gâteaux à fond croustillant. Seule la résistance
inférieure fonctionne.
Voûte
Pour terminer la cuisson des plats. Seule la résistance supérieure
fonctionne.
Manettes de la table de cuisson
Les manettes de la table de cuisson permettent de faire fonctionner la table de
cuisson que vous avez installée avec le four.
Pour plus d'informations sur la table de cuisson,
32
reportez-vous à la notice d'utilisation de la table
de cuisson.
Important Vous devez lire le chapitre
« Consignes de sécurité » du manuel
d'utilisation de la table de cuisson.
www.zanussi.com
Niveaux de cuisson
Sélecteur
0
1-9
1.
2.
Fonction
L'appareil est éteint
Niveaux de cuisson
(1 = niveau de puissance minimal ; 9 = niveau de puissance
maximal)
Tournez la manette sur le niveau de cuisson souhaité.
Pour terminer le processus de cuisson,
tournez la manette de commande sur la
position Arrêt.
Attention Pour activer la double zone,
tournez la manette vers la droite. Ne la
tournez pas jusqu'à la position Arrêt.
1.
2.
3.
Tournez la manette vers la droite jusqu'à la
position 9.
Tournez lentement la manette jusqu'au
et jusqu'à entendre un clic.
symbole
Les deux zones de cuisson sont activées.
Pour ajuster le niveau de puissance nécessaire, reportez-vous au chapitre « Niveaux
de cuisson ».
Utilisation de la double zone (si
disponible)
Fonctions supplémentaires
Ventilateur de refroidissement
Lorsque le four fonctionne, le ventilateur de refroidissement se met automatiquement en marche pour refroidir les surfaces de l'appareil.
Lorsque le four est mis à l'arrêt, le ventilateur de
refroidissement continue à fonctionner jusqu'à
ce que l'appareil refroidisse.
surchauffe dangereuse. Pour éviter cela, le four
dispose d'un thermostat de sécurité interrompant l'alimentation électrique. Le four se remet
automatiquement en fonctionnement lorsque la
température baisse.
Thermostat de sécurité
Un mauvais fonctionnement de l'appareil ou des
composants défectueux peuvent causer une
Conseils utiles
• Le four dispose de quatre niveaux de gradins. Comptez les niveaux de gradins à partir
du bas de l'appareil.
• L'appareil est doté d'un système spécial qui
permet à l'air de circuler et qui recycle perpétuellement la vapeur. Dans cet environnement, ce système permet de cuisiner des
plats tout en maintenant ceux-ci tendres à
l'intérieur et croquants à l'extérieur. Le temps
de cuisson et la consommation énergétique
sont donc réduits au minimum.
• De l'humidité peut se déposer dans l'enceinte du four ou sur les vitres de la porte. Ce
phénomène est normal. Veillez à reculer un
peu lorsque vous ouvrez la porte de l'appareil
en fonctionnement. Pour diminuer la condenwww.zanussi.com
sation, faites fonctionner l'appareil 10 minutes avant d'enfourner vos aliments.
• Essuyez la vapeur après chaque utilisation de
l'appareil.
• Ne placez jamais d'aluminium ou tout autre
ustensile, plat et accessoire directement en
contact avec la sole de votre four. Cela entraînerait une détérioration de l'émail et modifierait les résultats de cuisson.
Cuisson de gâteaux
• N'ouvrez la porte du four qu'aux 3/4 du
temps de cuisson.
• Si vous utilisez deux plateaux de cuisson en
même temps, laissez un niveau libre entre les
deux.
33
Cuisson de viande et de poisson
• Pour les aliments très gras, utilisez un plat à
rôtir pour éviter de salir le four de manière irréversible.
• Avant de couper la viande, laissez-la reposer
pendant environ 15 minutes afin d'éviter que
le jus ne s'écoule.
• Pour éviter qu'une trop grande quantité de
fumée ne se forme dans le four, ajoutez de
l'eau dans le plat à rôtir. Pour éviter que la fumée ne se condense, ajoutez à nouveau de
l'eau dans le plat à rôtir à chaque fois qu'il
n'en contient plus.
Temps de cuisson
Le temps de cuisson varie selon le type d'aliment, sa consistance et son volume.
Au départ, surveillez la cuisson lorsque vous
cuisinez. Ainsi, vous trouverez les meilleurs réglages (fonction, temps de cuisson, etc.) pour
vos ustensiles, vos recettes et les quantités
lorsque vous utiliserez l'appareil.
Tableau de rôtissage et de cuisson des gâteaux
GÂTEAUX
Cuisson traditionnelle
Position de la
grille
Temp. [°C]
Temps de cuisson [min]
Notes
Pâtes à gâteaux
2
170
45-60
Dans un moule à gâteau
Pâte sablée
2
170
20-30
Dans un moule à gâteau
Gâteau au fromage
1
170
70-80
Dans un moule à gâteau de
26 cm sur une grille métallique
Tarte aux pommes
2
170
80-100
Dans deux moules à gâteau
de 20 cm sur une grille métallique1)
Strudel
3
175
60-80
Sur un plateau multi-usages
Tarte à la confiture
2
170
30-40
Dans un moule à gâteau de
26 cm
Génoise
2
170
50-60
Dans un moule à gâteau de
26 cm
Gâteau de Noël/gâteau riche aux fruits
2
160
90-120
Dans un moule à gâteau de
20 cm1)
Gâteau aux prunes
1
175
50-60
Dans un moule à pain 1)
Petits gâteaux
3
170
20-30
Sur un plateau multi-usages
Biscuits/bandes de
pâte
3
140
30-35
Sur un plateau multi-usages
Meringues
3
120
80-100
Sur un plateau multi-usages
Petits pains
3
190
15-20
Sur un plateau multi-usages1)
Éclairs
3
190
25-35
Sur un plateau multi-usages
Tartelettes
2
180
45-70
Dans un moule à gâteau de
20 cm
TYPE DE PLAT
34
www.zanussi.com
Cuisson traditionnelle
TYPE DE PLAT
Position de la
grille
Temp. [°C]
Temps de cuisson [min]
Gâteau riche aux fruits
1
160
110-120
Dans un moule à gâteau de
24 cm
Gâteau à étages
1
170
50-60
Dans un moule à gâteau de
20 cm1)
Notes
1) Préchauffez le four pendant 10 minutes.
PAIN ET PIZZA
Cuisson traditionnelle
Position de la
grille
Temp. [°C]
Temps de cuisson [min]
Pain blanc
1
190
60-70
1 - 2 pièces, 500 g par pièce1)
Pain de seigle
1
190
30-45
Dans un moule à pain
Pizza
1
230-250
10-20
Sur un plateau de cuisson
ou un plat à rôtir1)
Scones
3
200
10-20
Sur un plateau multi-usages1)
TYPE DE PLAT
Notes
1) Préchauffez pendant 10 minutes.
PRÉPARATIONS À BASE D'ŒUFS
Cuisson traditionnelle
Position de la
grille
Temp. [°C]
Temps de cuisson [min]
Notes
Gratin de pâtes
2
200
40-50
Dans un moule
Gratin aux légumes
2
200
45-60
Dans un moule
Quiches
1
180
50-60
Dans un moule1)
Lasagnes
2
180-190
25-40
Dans un moule1)
Cannelloni
2
180-190
25-40
Dans un moule1)
Temps de cuisson [min]
Notes
TYPE DE PLAT
1) Préchauffez pendant 10 minutes.
VIANDE
Cuisson traditionnelle
TYPE DE PLAT
Position de la
grille
Temp. [°C]
Bœuf
2
200
50-70
Sur une grille métallique
Porc
2
180
90-120
Sur une grille métallique
www.zanussi.com
35
Cuisson traditionnelle
Position de la
grille
Temp. [°C]
Temps de cuisson [min]
Notes
Veau
2
190
90-120
Sur une grille métallique
Rôti de bœuf, saignant
2
210
50-60
Sur une grille métallique
Rôti de bœuf, cuit à
point
2
210
60-70
Sur une grille métallique
Rôti de bœuf, bien
cuit
2
210
70-75
Sur une grille métallique
Épaule de porc
2
180
120-150
Avec couenne
Jarret de porc
2
180
100-120
Deux pièces
Agneau
2
190
110-130
Gigot
Poulet
2
220
70-85
Entier
Dinde
2
180
210-240
Entière
Canard
2
175
120-150
Entier
Oie
2
175
150-200
Entière
Lapin
2
190
60-80
En morceaux
Lièvre
2
190
150-200
En morceaux
Faisan
2
190
90-120
Entier
TYPE DE PLAT
POISSON
Cuisson traditionnelle
Position de la
grille
Temp. [°C]
Temps de cuisson [min]
Notes
Truite/daurade
2
190
40-55
3-4 poissons
Thon/saumon
2
190
35-60
4-6 filets
TYPE DE PLAT
Informations sur l'acrylamide
Important Selon les connaissances
scientifiques les plus récentes, faire brunir les
aliments de manière intensive, en particulier les
produits contenant de l'amidon, peut nuire à la
santé à cause de l'acrylamide. C'est pourquoi
nous vous recommandons de faire cuire les
aliments à basse température et de ne pas trop
les faire brunir.
Entretien et nettoyage
Avertissement Reportez-vous aux
chapitres concernant la sécurité.
• Nettoyez la façade du four à l'aide d'une
éponge humide additionnée d'eau savonneuse.
36
• Utilisez les produits spécifiques vendus dans
le commerce pour l'entretien des surfaces en
métal.
• Nettoyez l'intérieur du four après chaque utilisation. Les salissures s'éliminent alors plus
facilement et ne risquent pas de brûler.
www.zanussi.com
• En cas de salissures importantes, nettoyez à
l'aide d'un nettoyant pour four.
• Après chaque utilisation, lavez tous les accessoires pour four et séchez-les. Utilisez un
chiffon doux additionné d'eau savonneuse
tiède.
• Si vous avez des accessoires anti-adhérents,
ne les nettoyez pas avec des produits agressifs, des objets pointus ni au lave-vaisselle.
Vous risqueriez de détruire le revêtement anti-adhérent.
Appareils en acier inoxydable ou en
aluminium :
Nettoyez la porte uniquement avec une éponge
humidifiée. Séchez-la avec un chiffon doux.
N'utilisez jamais de produits abrasifs ou corrosifs, d'éponges métalliques ou de substances
acides susceptibles d'endommager le revêtement du four. Nettoyez le bandeau de commande du four en observant ces mêmes recommandations.
Nettoyez le joint d'étanchéité de la porte
• Vérifiez régulièrement le joint d'étanchéité de
la porte. Le joint d'étanchéité de la porte est
posé sur l'encadrement de la cavité du four.
N'utilisez pas l'appareil si le joint d'étanchéité
de la porte est endommagé. Contactez le
service après-vente.
• Pour le nettoyage du joint d'étanchéité de la
porte, consultez les informations générales
concernant le nettoyage.
2.
3.
4.
Nettoyez le diffuseur en verre.
Remplacez l'ampoule du four par une ampoule résistant à une température de
300 °C.
Utilisez le même type d'ampoule pour four.
Remettez en place le diffuseur en verre.
Nettoyage de la porte du four
La porte du four est dotée de deux panneaux
en verre. Vous pouvez retirer la porte du four
ainsi que le panneau en verre intérieur afin de le
nettoyer.
Si vous tentez d'extraire le panneau en verre intérieur sans avoir au préalable retiré la
porte du four, celle-ci peut se refermer brusquement.
Attention N'utilisez pas l'appareil sans les
panneaux de verre.
1 Ouvrez complètement la porte et saisissez les 2 charnières de porte.
2 Soulevez et faites
tourner les leviers sur
les 2 charnières.
Éclairage du four
Avertissement Soyez prudent lorsque
vous changez l'éclairage du four. Il existe
un risque d'électrocution.
Avant de remplacer l'éclairage du four :
• Éteignez le four.
• Retirez les fusibles de la boîte à fusibles ou
coupez le disjoncteur.
Placez un chiffon sur la sole du four afin
de protéger l'éclairage du four et le diffuseur en verre.
1.
Tournez le diffuseur en verre vers la gauche pour le retirer.
www.zanussi.com
3 Fermez la porte
4 Déposez la porte
du four à la première sur une surface staposition d'ouverture
ble recouverte d'un
(mi-parcours). Tirez la tissu doux.
porte vers l'avant et
retirez-la de son logement.
37
Lavez le panneau en verre avec un chiffon humidifié d'eau savonneuse. Séchez soigneusement le panneau en verre.
90°
5 Débloquez le système de verrouillage
afin de retirer le panneau en verre intérieur.
1
6 Faites pivoter les
deux fixations de 90°
et retirez-les de leur
logement.
Réinstallation de la porte et du panneau
en verre
Une fois le nettoyage terminé, replacez le panneau en verre et la porte du four. Répétez les
étapes ci-dessus dans l'ordre inverse.
La zone imprimée doit faire face à l'intérieur de
la porte. Après l'installation, vérifiez que la surface du panneau en verre où se trouve la zone
imprimée est lisse au toucher (le relief doit être
de l'autre côté).
Veillez à installer correctement le panneau en
verre intérieur dans son logement. Reportezvous à l'illustration.
2
7 Soulevez avec
précaution (étape 1),
puis sortez (étape 2)
le panneau en verre.
En cas d'anomalie de fonctionnement
Avertissement Reportez-vous aux
chapitres concernant la sécurité.
Problème
Les zones de cuisson ne fonctionnent pas.
Cause probable
Solution
Consultez la notice d'utilisation de la table de cuisson.
L'appareil ne fonctionne pas du
tout.
L'appareil est à l'arrêt.
Allumez l'appareil. Consultez le
chapitre « Utilisation quotidienne ».
L'appareil ne fonctionne pas du
tout.
Le fusible dans la boîte à fusibles
a disjoncté.
Vérifiez le fusible. Si le fusible disjoncte de manière répétée, faites
appel à un électricien qualifié.
L'éclairage du four ne fonctionne
pas.
L'éclairage du four est défectueux.
Remplacez l'éclairage du four.
De la vapeur et de la condensation
se déposent sur les aliments et
dans le four.
Le plat est resté trop longtemps
dans le four.
Une fois la cuisson terminée, ne
laissez pas les plats dans le four
plus de 15 à 20 minutes.
38
www.zanussi.com
Si vous ne trouvez pas de solution au problème, veuillez contacter votre revendeur ou le
service après-vente.
Les informations à fournir au service après-vente figurent sur la plaque signalétique. La plaque
signalétique se trouve sur le cadre avant de la
cavité de l'appareil.
Nous vous recommandons de noter ces informations ici :
Modèle (MOD.)
.........................................
Numéro du produit (PNC)
.........................................
Numéro de série (S.N.)
.........................................
Installation
Avertissement Reportez-vous aux
chapitres concernant la sécurité.
540
560
Installation sous un plan de travail
Avertissement L'installation de l'appareil
doit être effectuée par un professionnel
qualifié. Si vous ne contactez pas un
professionnel qualifié, les éventuels dommages
causés ne seront pas couverts par la garantie.
570
590
• Avant d'installer l'appareil, adaptez-y la table
de cuisson correspondante indiquée dans le
tableau.
Type
Puissance maximale
ZC6695X
6400 W
ZC6675X
6000 W
Branchement électrique de la table de
cuisson
La fiche de raccordement de la table de cuisson se trouve au sommet de l'armoire du four.
La table de cuisson possède des câbles de
raccordement pour les zones de cuisson et le
câble de masse. Les câbles disposent de connecteurs de branchement. Pour relier la table
de cuisson au four, branchez les connecteurs
dans les bonnes prises. La conception des prises et des fiches vous évitent de vous tromper
dans les branchements.
www.zanussi.com
20
594
7
600
min. 550
20
min. 560
39
1 = 45 mm
2 = 45 mm
3 = 60 mm
4 = 60 mm
A
= 70 mm
1
B
2
3
4
Installation électrique
Avertissement Le branchement
électrique doit être confié à un électricien
qualifié.
Le fabricant ne pourra être tenu pour responsable si vous ne respectez pas les précautions de sécurité du chapitre « Consignes
de sécurité ».
L'appareil est fourni sans câble d'alimentation,
ni fiche électrique.
Câble
Types de câbles compatibles pour l'installation
ou le remplacement : H07 RN-F, H05 RN-F,
H05 RRF, H05 VV-F, H05 V2V2-F (T90), H05
BB-F.
Pour la section du câble, consultez la puissance totale sur la plaque signalétique.
L 1 – 2 – 3 = câbles de phase
N 4 = câble neutre
= câble de masse
Si la tension secteur est différente, réarrangez
les cavaliers sur le bornier (reportez-vous au
diagramme de branchement ci-dessous). Reliez
le câble de masse au bornier. Après avoir connecté le câble d'alimentation au bornier, attachez-le avec une pince de raccordement.
230V 3~
230V 1~
400V 2N~
400V 3N~
1 2 3 4 5
L1
L2
L3 PE
1 2 3 4 5
L1
N
1 2 3 4 5
PE
L1 L2
N
1 2 3 4 5
PE
L1 L2 L3 N
PE
Raccordement du bornier
L'appareil dispose d'un bornier à six pôles. Les
cavaliers (ponts) sont installés pour fonctionner
sur un courant triphasé de 400 V avec un fil
neutre.
En matière de protection de l'environnement
Le symbole sur le produit ou son emballage
indique que ce produit ne peut être traité
40
comme déchet ménager. Il doit être remis au
point de collecte dédié à cet effet (collecte et
www.zanussi.com
recyclage du matériel électrique et
électronique).
En procédant à la mise au rebut de l'appareil
dans les règles de l’art, nous préservons
l'environnement et notre sécurité, s’assurant
ainsi que les déchets seront traités dans des
conditions optimum.
Pour obtenir plus de détails sur le recyclage de
ce produit, veuillez prendre contact avec les
www.zanussi.com
services de votre commune ou le magasin où
vous avez effectué l'achat.
Matériau d'emballage
Les matériaux d'emballage sont conçus
dans le respect de l'environnement et sont recyclables. Les pièces en plastique sont marquées d'abréviations internationales telles que
PE, PS, etc. Jetez les emballages dans les conteneurs de la commune prévus à cet effet.
41
42
www.zanussi.com
www.zanussi.com
43
397262201-D-362012
www.zanussi.com/shop