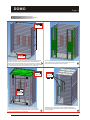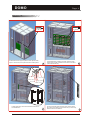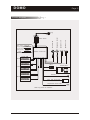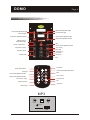
1
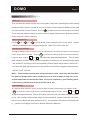
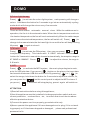
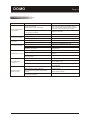
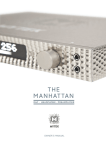
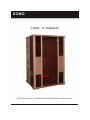
DOMO
User's manual
Dimension(mm): 1300x1000x2000 Wood material: Red Cedar
DOMO
Prologue
1
Safety need attention
1
Installation prepared
1
Power parameter
1
Installation tools
2
Parts list
2
Assembly instruction
3
Circuit diagram
5
Control panel & MP3 description
6
Operating instruction
7
Troubleshooting
9
Cabin use & maintain
10
DOMO
Page 1
Prologue
Thank you for you selecting our company infrared sauna products. This manual applies to IR21133
Product. In order to you can use it safely and effectively, please read this manual and please note
the following matters before use:
1) Select this series of products, we will provide you with high quality guarantee service. In order
to ensure your interest,please read the instructions carefully. If need any other service, please
contact us or the product distributors.
2) We will not be in charge of the damage caused by your incorrect installation not according to the
manual of the procedures to operate,
3) In order to make the series of products to achieve best use effect, we suggest you use the
company's original accessories
Safety need attention
1, the product of electrical installation debugging, must by qualified electrician professional or
dealers assigned professional personnel.
2, the product of the power supply facilities connecting must comply with the national safety
standards,the power supply voltage and frequency should be consistent with this product
( page 1 electrical parameters),Must be installed in leakage protection switch and over current
protection, overload fuse, etc, to ensure that circuit device above effective protection device.
3, During installation and use, it is strictly prohibited to cut its connection wires. Don't apart the
main controller and control panel, otherwise, the result of product fault or leakage, electric
shock accidents and so on, the company shall not be liable for all responsibility.
4, Regarding the product storage, don't put the cart before the horse, oblique, in debris piled up.
gentle handling. Prevent stress, strong vibration, and collisions.
5, when not in use product,please keep the surrounding environment ventilated, dry, and power off.
6, Laypeople do not operate installation, if discover the power cord with damaged or product quality
problem, please ask professional personnel to fix.
7, Before each use, please attempt to experiment leakage protector.
8, Connecting wire privately is prohibited.
9, children must be companied with parents to use products.
Installation prepared
1) Before installation , please confirm your installation place is ready to power supply and installed
leakage circuit breaker.
2) The products using integrated assemble technologies, the parts are already assembled and tested
before leaving the factory . Before the backout product packaging, Please check product type,
specification and configuration and whether you ordered that product.
3) After unpacking, please check carefully product fittings is complete,if it is in transportation is injured.
If you have any question, Please contact us or the product distributors.
4) The ground or build by laying bricks or stones will inherit a room body and the full weight of the user,
please confirm your installation place is enough strength.
Power parameter
Power
Voltage
Heater power/Q`ty
Freguency
Total heater power
300W
40 0 W
Rated power
Current
5pcs
1pcs
1900W
8.3A
Heater
Stove
Infrared sauna benefits
detoxifi cation,beatiful skin,
weight loss,flexibility,
cardiovascular health,pain relief,
stress relief/relaxation
DOMO
Page 2
Pencil
Straight screwdriver
Tape measure
Cross screwdriver
Cutter
Aiguille
Spirit level
Dower drill screwdriver
Power drill
Double ladder
Parts list
1
Top panel
1
2
Side panel
2
3
Front panel
2
4
Glass door
1
5
Front Guardrail
2
1
12
2
11
6
Metal Handle
1
7
Bench surface panel
1
3
4
5
6
8
9
1
Floor panel
7
1
8
1 0 Back Guardrail
1
1 1 Side wall glass
2
1 2 Back panel
1
9
10
DOMO
Page 3
Assembly instructions
8 -Φ4* 4 0
2 -Φ4* 4 5
Place floor panel on the floor and check that it is lying flat.
Lift back panel and one of side panels, assemble back
panel to the side panel with 4pcs 4*40 screws; Proceed 1
in the same way for the second side panel, then assemble
the side panels to floor panel with 2 pcs 4*45 screws.
7-Φ4* 40
Place one of side wall glasses and front panel in the
slot of floor panel; Proceed in the same way for the
second side wall glass and front panel.
4-Φ4* 40
Nut
Nut
2
Cap
Cap
8-Φ4* 40
Assemble top panel from above to the back panel,
side panels and front panel with 7pcs 4*40 screws,
then assemble two front panels to the top panel and
floor panel with 8pcs 4*40 screws
3
Assemble front guardrail to front radiator with 2pcs
4*40 screws. Proceed in the same way for the second
front guardrail
4
DOMO
Page 4
Assembly instructions
8-Φ4* 60
4-Φ4* 50
Assemble bench support panel to side panels with
4pcs 4*40 screws, then place bench surface panel.
5
Assemble back guardrail to back radiators with
8pcs 4*60 screws. (Distance from bench surface
panel about 20mm)
6
Hinge surface
Hex screw
Rubber fitting
Hinge bottom
Glass door
Rubber fitting
Install glass door and metal handle as shown in
the illustration
7
Fill two side wall glasses gaps with rubber strips.
Plug all connectors to the control box (on the roof),
then finish the installation.
8
DOMO
Page 5
Circuit diagram
Plug
AC230V/50HZ
1900W
8.3A
Current Rating
Safety Grade
Model
I
HJ705M
Speaker 8Ω5W
Input Voltage
Power Rating
Fan DC12V/5W
ON/OFF
Speaker 8Ω5W
Main switch
Temperature Control
Power
90°C
Electric control box
AC230V/400W
Calves
AC230V/300W
MP3
Front
AC230V/300W
Control panel
NC
AC230V/300W
Antenna
Back
AC230V/300W
Color light AC12V/8W
Temperature sensor(roof)
Note:only provide for reference
DOMO
Page 6
Control panel & MP3 description
Back power adjustment light
Fan automatic light
Front power adjustment light
Fan hand light
Calves power adjustment light
Front power adjustment button
Back power adjustment button
Signals receiver
Power switch light
Mp3
Power switch button
Calves power adjustment button
Temperature setting
Time setting
Color light
Frequency down
Frequency up
Fan switch
Volume down
Volume up
FM
Fan switch
Power switch button
Calves power adjustment button
Color light
Front
Back
MP3
Calves
Front power adjustment button
Back power adjustment button
Temperature setting
MP3
Time setting
FM
Frequency up
FM
Frequency down
Volume up
Volume down
MP3
D own
Play
Up
Switch
SD/ MMC
USB
DOMO
Page 7
Operating instruction
1)Start-up
Turn on the main switch on the roof of the cabin, the power switch light on the display
begins to blink. Now it is possible for you to switch on the infrared radiators, the read
ing light and the music function. Press (
) to switch on the control panel, the back
/front infrared radiators begin to work and their power adjustment lights are automa
tically set to the 100% intensity.
2)Power adjustment
Press(
) or (
) or (
) to adjust the power intensity of the front /back / calves
radiators separately by changing the gears: 100%-75%-50%-25%-0% .
3)Temperature settings
The upper display refers to control of the set temperature and also indicates the actual tempe
rature inside the infra cabin. Press(
begins to blink. Press(
) or (
) to enter the setting system, the number display
) to adjust the desired temperature. This is done
with 1degree interval. When the air temperature reaches to the desired temperature
, the radiators will stop to work automatically;When the air temperature reaches 2℃
less than the desired temperature, the radiators will switch on again automatically.
(default is 40 celsius)
Note: The maximum achievable air temperature in the cabin may be less than
the desired temperature, this may be due to one of a number of reasons, such
as the temperature outside the cabin, incorrect ventilation, poor sealing work,
or the wrong radiators for the size of the room, etc.
4)Time settings
The lower display refers to control of the set time and also indicates the countdown. Press
(
) to enter the setting system, the number display begins to blink. Press(
) or (
)
to adjust the desired time. This is done with 1minuter interval. After the desired time
is set, the number indicated will begin to count down (6-minuter intervals,10 times
per minuter). When the time reachs to '00,0' , the radiators will swich off automatical
ly. (the set time range is 5mins to 99mins, default is 99mins)
DOMO
Page 8
5)Colour light therapy
Press(
) to activate the colour light system, each press ing will change a
colour. Hold down the button for 3 seconds to go into an automatically cycling
mode which will change the colour every five seconds.
6)Ventilation Fan
There are three states: automatic、manual、close. While the radiators are in
operation, the fan is in the automatic state; When the air temperature reachs to
the desired temperature,the fan will work automatically;When the cabin tempe
rature lowers the desired temperature, the fan will switch off; Press(
) to
change to the manual state,the fan hand light is on and the fan will keep running
till press(
) again to close it.
7)FM radio
Press(
) to activate the FM system, then you can press (
) or(
)
to adjust the frequency. This is done with 0.1-MHZ intervals. Hold down the
button for 3 seconds to search the channel automatically, its reception range is
87.5MHZ to 108MHZ. Press(
) or(
)to adjust the volume, its range is
0-8 levels.
8) MP3
Press(
) to activate the MP3 system, the music player begins to work,
prior for USB slot data. If you press (
) button on the player, the input data
can be switch between USB slot and SD slot. By pressing (
) or (
)to
select the songs, hold down the button for 3 seconds to adjust the volume; Or,
you can press the (
you press (
) on the control panel to adjust the MP3 volume. If
) , the music will stop playing, press it again will switch on.
ATTENTION:
1)Read all instructions before using this appliance;
2)Use this appliance must be installed in leakage protection switch and over
current protection, overload fuse, etc, to ensure that circuit device above
effective protection device.
3)Connect the power cord to a properly grounded outlet only.
4)Never operate this appliance if it has a damaged cord or plug, if it is not work
ing properly or if it has been dropped or damaged,
personnel to fix.
please ask professional
DOMO
Page 9
Troubleshooting
Symptom
Control panel does
not operate
Possible causes
Possible solutions
Power is turned off
No electrical power to the cabin
Turn on or reset the circuit breaker. If this
does not solve the problem,have a qualified
electrician check the electrical service.
The fuse, depening on the electric
control box, has blown
Replace a new fuse
Control panle is defective
Replace a new control panel
Control panel no
message on display
Improper wiring to control panel is defective Consult with a qualified electrician
Control panel is defective
Replace a new control panel
Colour light does
not work
No electrical power to the light
Consult with a qualified electrician
Colour light has burned out
No electrical power to the fan
Replace a new light
Consult with a qualified electrician
Fan is defective
Replace a new fan
Obstacle is in the fan
Clean the fan
No electrical power to the radiators
Consult with a qualified electrician
The display appears “Err”
Inspect the connections of the temperature
sensor
The fuse, depening on the electric control
box, has blown
No electrical power to the radio
Replace a new fuse
Fan does not work
Radiators do not work
FM radio does
not work
Remote control
does not work
Consult with a qualified electrician
frequency or volume not correct
Press TUN to serch channels, press
VOL to adjust voice
No signal or weak signal
Put receiving antenna to different angles,
reset channels
Out of signal transmission angle or
Not trained to receiving window
Trained to receiving window when use
remote control
Strong electromagnetism interference
nearby
Don't use remote control , operates by
control panel instead
Low battery capacity
Replace a new battery
DOMO
Cabin use
&
Page 10
maintain
1, Infrared cabin should be installed in ventilated place,and avoid
direct sunshine.
2. Avoid infrared cabin hit with other objects
3. Before touch the room,please keep your hands clean,no moisture
and sweat,Lest wood surface black or become dirty.
4, The room inside metal,such as chrome accessories do not blow
row, prevent metal corrosion
5, During control panel of touch screens use,please use 30-100
grams of pressure,please do not stress and use other items knock
touch scrren surface.
6, If long time not use this product,please regularly start control system
and
heating
system,For
Infrared
cabin
maintain room body dry processing,lest room body wood
moldy.
7 , If wood surface appear mildew point or black spots,please use 800#
emery cloth grind black site.
8 , If stain steel parts or chromed plastic surface of scratch appear rust
corrosion ,please use alcohol swab it.
9 , Please tighten the screws of the bench support panels once every
three months,avoid the loose or dropping off.
Installation tools