1
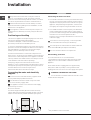
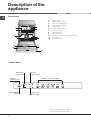
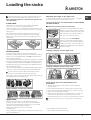
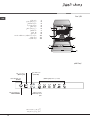
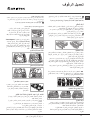
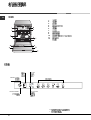
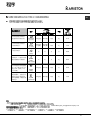
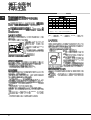
Operating instructions DISHWASHER EN AR Contents Installation, 2-3 English, 1 ZH 25 13 ،عربي Positioning and levelling Connecting the water and electricity supplies Advice regarding the first wash cycle Technical data Description of the appliance, 4 Overall view Control panel Loading the racks, 5 Lower rack Cutlery basket Upper rack Start-up and use, 6 Starting the dishwasher Measuring out the detergent Wash options LFT 216 Wash cycles, 7 Table of wash cycles Rinse aid and refined salt, 8 Measuring out the rinse aid Measuring out the refined salt Care and maintenance, 9 Shutting off the water and electricity supplies Cleaning the dishwasher Preventing unpleasant odours Cleaning the sprayer arms Cleaning the water inlet filter Cleaning the filters Leaving the machine unused for extended periods Precautions and advice, 10 General safety Disposal Saving energy and respecting the environment Troubleshooting, 11 Assistance, 12 Before calling for Assistance Installation EN Keep this instruction manual in a safe place for future reference. If the appliance is sold, given away or moved, please ensure the manual is kept with the machine, so that the new owner may benefit from the advice contained within it. Please read this instruction manual carefully: it contains important information regarding the safe installation, use and maintenance of the appliance. If the appliance must be moved at any time, keep it in an upright position; if absolutely necessary, it may be tilted onto its back. Positioning and levelling 1. Remove the appliance from all packaging and check that it has not been damaged during transportation. If it has been damaged, contact the retailer and do not proceed any further with the installation process. 2. Check the dishwasher by placing it so that its sides or back panel are in contact with the adjacent cabinets or even with the wall. This appliance can also be recessed under a single worktop* (see the Assembly instruction sheet). 3. Position the dishwasher on a level and sturdy floor. If the floor is uneven, the front feet of the appliance may be adjusted until it reaches a horizontal position. If the appliance is levelled correctly, it will be more stable and much less likely to move or cause vibrations and noise while it is operating. 4. Adjust the height of the rear foot from the front of the appliance* on the central lower part of the dishwasher, turning a hexagonal spanner (red color) with an opening of 8 mm in a clockwise direction to increase the height or in an anticlockwise direction to decrease the height. Connecting the water and electricity supplies Connection to the water and electricity supplies should only be performed by a qualified technician. Connecting the water inlet hose To a suitable cold water connection point: before attaching the hose, run the water until it is perfectly clear so that any impurities that may be present in the water do not clog the appliance; after performing this operation, screw the inlet hose tightly onto a tap with a ¾ gas threaded connection. To a suitable hot water connection point: your dishwasher may be supplied with hot water from the mains supply (if you have a central heating system with radiators) provided that it does not exceed a temperature of 60°C. Screw the hose to the tap as described for connection to a cold water supply. If the inlet hose is not long enough, contact a specialist store or an authorised technician (see Assistance). The water pressure must be within the values indicated in the Technical data table (see adjacent information). The hose should not be bent or compressed. Anti-flooding protection To ensure floods do not occur, the dishwasher: - is provided with a special system which blocks the water supply in the event of anomalies or leaks from inside the appliance. Some models are also equipped with the supplementary safety device New Acqua Stop*, which guarantees antiflooding protection even in the event of a supply hose rupture. WARNING: HAZARDOUS VOLTAGE! Under no circumstance should the water inlet hose be cut as it contains live electrical parts. The dishwasher should not stand on top of the water hoses or the electricity supply cable. The appliance must be connected to the water supply network using new hoses. Do not use old hoses. The water inlet (A) and outlet (B) hoses and the electricity supply cable may be positioned towards the right or the left in order to achieve the best possible installation (see figure). * Only available in selected models. 2 Connecting the water outlet hose Connect the outlet hose (without bending it) to a drain duct with a minimum diameter of 4 cm. Alternatively, rest it over a sink or tub; the free end of the hose should not remain immersed in water. A The special plastic elbow* makes it easier to find the best layout: fix the elbow to the wall securely in order to prevent the outlet hose from moving and spilling the dirty water. The part of the hose marked with the letter A should be between 40 and 100 cm above the ground (see Anti-condensation strip* EN After installing the dishwasher, open the door and stick the adhesive transparent strip under the wooden shelf in order to protect it from any condensation which may form. Advice regarding the first wash cycle After the appliance has been installed, immediately before running the first wash cycle, completely fill the salt dispenser with water and add only then approximately 1 kg of salt (see chapter entitled Rinse aid and refined salt). The water may overflow: this is normal and is not a cause for concern. Select the water hardness value (see chapter entitled Rinse aid and refined salt). - After the salt has been poured into the machine, the LOW SALT indicator light* switches off. If the salt container is not filled, the water softener and the heating element may be damaged as a result. figure). We advise against the use of hose extensions. Electrical connection Before inserting the plug into the electrical socket, make sure that: The socket is earthed and complies with current regulations. The socket can withstand the maximum load of the appliance, which is indicated on the data plate located on the inside of the door (see chapter entitled Description of the appliance). The power supply voltage falls within the values indicated on the data plate on the inside of the door. The socket is compatible with the plug of the appliance. If this is not the case, ask an authorised technician to replace the plug (see Assistance); do not use extension cables or multiple sockets. Once the appliance has been installed, the power supply cable and the electrical socket should be easily accessible. The cable should not be bent or compressed. If the power supply cable is damaged, it must be replaced by the manufacturer or its Technical Assistance Service in order to prevent all potential hazards. (See Assistance) The Company shall not be held responsible for any incidents that occur if these regulations are not observed. Technical data Dimensions width 59.5 cm height 82 cm depth 57 cm Capacity 12 standard place-settings Water supply pressure 0,05 ÷ 1MPa (0.5 ÷ 10 bar) 4.3 psi – 145 psi Power supply voltage See appliance data plate Total absorbed power See appliance data plate Fuse See appliance data plate This dishwasher conforms to the following European Community Directives: -2006/95/CE dated 16/01/2007 (Low Voltage) and subsequent modifications -89/336/EEC dated 03/05/89 (Electromagnetic Compatibility) and subsequent modifications -97/17/EC (Labelling) -2002/96/ CE (Waste Electrical and Electronic Equipment WEEE) * Only available in selected models. 3 Description of the appliance EN Overall view 1. 2. 3. 4. 5. 6. 7. 8. 9. 10. 11. 12. Upper rack Upper sprayer arm Tip-up compartments Rack height adjuster Lower rack Lower sprayer arm Cutlery basket Washing filter Salt dispenser Detergent and rinse aid dispensers Data plate Control Panel*** Control panel Select wash cycle button Low salt indicator light* ON/OFF indicator light ON/OFF/RESET button Wash cycle indicator lights Low rinse aid indicator light * ***Only in completely built-in models. * Only available in selected models. 4 Loading the racks Before loading the racks, remove all food residues from the crockery and empty liquids from glasses and cups. After loading the appliance, check that the sprayer arms can rotate freely. Lower rack The lower rack can hold pans, lids, plates, salad bowls, cutlery, etc. as seen in the Loading examples. Plates and large covers should be placed at the sides of the rack, ensuring that they do not block the rotation of the upper sprayer arm. Some dishwasher models are fitted with tip-up sections *, which can be used in a vertical position when arranging plates or in a horizontal position when arranging pans and salad bowls. Cutlery basket The type of cutlery basket may vary according to the dishwasher model: it may be modular, non-modular or a sliding version. The non-modular basket must only be positioned at the front of the lower rack. The modular basket may be separated into two parts, a solution which is recommended when performing a half load wash (only in models offering this option), is available in a sliding version (positioned at any point on the lower rack by sliding it between the fixed or tip-up inserts. - Both versions are fitted with a collapsible sliding system which means the cutlery can be arranged in the best possible way. Adjusting the height of the upper rack EN In order to make it easier to arrange the crockery, the upper rack may be moved to a higher or lower level. The height of the upper rack should ideally be adjusted WHEN THE RACK IS EMPTY. Never lift or lower the rack on one side only. Open the left and right guide rail stops and pull out the rack; position it higher or lower as required, slide it along the guide rails until the front wheels are in place and close the stops (see figure). If the rack is fitted with Dual Space handles* (see figure), pull out the upper rack until it reaches its stop point, grip the handles at the sides of the rack and move it upwards or downwards, then slowly let it fall back into place. Loading examples for the upper rack Loading examples for the lower rack Knives and other utensils with sharp edges must be placed in the cutlery basket with the points facing downwards, or they must be positioned horizontally in the tipup compartments on the upper rack. Items which should not be washed in the dishwasher Cutlery basket positioning examples Upper rack Load this rack with delicate and lightweight crockery: glasses, tea and coffee cups, saucers, small salad bowls, saucepans and small saucepans which are not too soiled, using the Loading examples as a guide. Mugs and cups: place these on the tip-up compartments**. Long sharp knives and serving utensils: place these on the tip-up compartments**. Wooden items, objects with wooden or horn handles or glued-on parts. Items made from aluminium, copper, brass, pewter or tin. Items made from plastic material which is not heat-resistant. Antique or hand-painted porcelain. Antique silver. Silver which is not antique may, however, be washed in the dishwasher using a delicate wash cycle, provided that it does not come into contact with other metals. We recommend the use of crockery which is dishwasher safe. * Only available in selected models. ** The number and position may vary. 5 Start-up and use EN Starting the dishwasher Measuring out the detergent 1. Turn the water tap on. 2. Open the door and press the ON/OFF button: you will hear a short beep and the ON/OFF and wash cycle indicator lights switch on for a few seconds. 3. Measure out the detergent (see below). 4. Load the racks (see chapter entitled Loading the racks). 5. Select the wash cycle in accordance with the type of crockery and its soil level (see Table of wash cycles), by pressing the P button; the indicator light corresponding to the selected wash cycle will switch on. 7. Start the wash cycle by shutting the door: after a few seconds have passed, a long beep signals the start of the wash cycle. 8. Two short beeps and one long one indicate the end of the wash cycle and the indicator light corresponding to the wash cycle flashes slowly. Open the door, switch off the appliance by pressing the ON/OFF button, shut off the water tap and unplug the appliance from the electricity socket. 9. Wait for a few minutes before removing the crockery, in order to avoid burns. Unload the racks, beginning with the lower level. A good wash result also depends on the correct amount of detergent being used; exceeding the stated amount does not result in a more effective wash and increases environmental pollution. The order in which the different wash programmes are displayed will change according to the frequency with which each cycle is used. Modifying a wash cycle in progress If a mistake was made during the wash cycle selection process it is possible to change the cycle, provided that it has only just begun: open the door, taking care to avoid the escaping steam, and press and hold the ON/OFF button; the machine will switch off with a long beep. Switch the machine back on using the ON/OFF button and select the new wash cycle using the P button; start the cycle by closing the door. Only use detergent which has been specifically designed for dishwashers. DO NOT USE washing up liquid. Using excessive detergent may result in foam residue remaining in the machine after the cycle has ended. The use of tablets is only recommended for models which offer the MULTI-FUNCTIONAL TABLETS option. To achieve the best results from each washing and drying cycle, powder detergent, rinse aid liquid and salt should be used. Compartment A: Washing detergent Compartment B: Pre-wash detergent 1. Open cover C by pressing button D. 2. Pour in the detergent after consulting the Table of wash cycles: For powder detergent use compartments A and B. C For detergent in tablet form: when the cycle requires 1 tablet, place it in compartment A and close the cover; when it requires 2, place the second tablet at the bottom of the appliance. 3. Remove detergent residues from the edges of the compartment and close the cover until it clicks. D A B Adding extra crockery Without switching off the machine, open the door, taking care to avoid the escaping steam, and place the crockery inside the dishwasher. Close the door: the cycle starts from the point at which it was interrupted. Accidental interruptions If the door is opened during the wash cycle, or if there is a power cut, the cycle stops. It starts again from the point at which it was interrupted once the door has been shut or the electricity supply is restored. * Only available in selected models. 6 Wash cycles If the crockery is only lightly soiled or if it has been rinsed with water before being placed in the dishwasher, reduce the amount of detergent used accordingly. EN The number and type of wash cycles and options may vary depending on the dishwasher model. Wash cycle selection instructions Extremely soiled dishes and pans (not to be used for delicate items). Normally soiled pans and dishes. Standard daily wash cycle. Preliminary wash cycle for dishes while the load is awaiting completion with the dishes from the next meal. Rinse and drying cycle for dishes that are seldom used and are only dusty. Economic and fast wash to be used for lightly soiled dishes. (Run cycle immediately after use) (2 plates + 2 glasses + 4 pieces of cutlery + 1 saucepan + 1 small frying pan). Economic and fast wash for delicate items which are sensitive to high temperatures. (Run cycle immediately after use) (12 glasses + delicate plates). Detergent (A) = compartment A (B) = compartment B Wash cycle Drying Wash cycle duration (tolerance ±10%) Hrs. Min. Powder Liquid Tablets 30 g (A) 30 ml (A) 1 (A) Yes 2:15’ 25 g (A) 5 g (B) 25 ml (A) 5 ml (B) 1 (A) Yes 1:45’ No No No No 0:08’ No No No Yes 0:36’ 25 g (A) 25 g (A) 1 (A) No 0:35’ 30 g (A) 30 g (A) 1 (A) Yes 1:30’ Intensive Normal Soak Special Guest Rapid Crystal Notes: Optimum performance levels when using the ""Rapid wash" cycle can be achieved by observing the maximum amounts of crockery specified. To make it easier to measure out the detergent, it is worth remembering that: 1 tablespoon = 15 grams of powder = approximately 15 ml of liquid - 1 teaspoon = 5 grams of powder = approximately 5 ml of liquid * The Eco wash cycle adheres to the regulation EN-50242. Although it has a longer duration than other wash cycles it uses less energy and is les harmful to the environment. Note for Test Laboratories: for information relating to comparative EN testing conditions, please send an email to the following address: [email protected] 7 Rinse aid and refined salt EN Only use products specifically designed Do not use table salt washing up liquid. Follow the instructions which have been for dishwashers. or industrial salt, or given on the packaging. If using a multi-functional product it is not necessary to add rinse aid; however, we recommend that you add salt, especially if you live in an area where the water is hard or very hard. Follow the instructions given on the packaging. If you do not add salt or rinse aid, the LOW SALT* and LOW RINSE AID* indicator lights remain lit. Measuring out the rinse aid Rinse aid makes it easier for the crockery to dry, as water runs off surfaces more readily and therefore does not leave streaks or marks. The rinse aid dispenser should be filled: When the LOW RINSE AID* indicator light on the control panel is illuminated; 1. Open the dispenser by turning the lid (G) in an anticlockwise direction. 2. Pour in the rinse aid, making sure it does not overflow from the dispenser. If this happens, clean the spill immediately with a dry cloth. F 3. Screw the lid back on. G NEVER pour the rinse aid directly into the appliance tub. Adjusting the amount of rinse aid If you are not completely satisfied with the drying results, you may adjust the quantity of rinse aid used. Use a screwdriver to turn the dosage adjuster (F) to one of the 6 pre-set positions (the default position is set to 4): If there are streaks on the crockery, set the adjustment device to a lower number (1-3). If drops of water remain on the crockery or if there are limescale marks present after the cycle has finished, set the adjuster to a higher number (4-6). Setting the water hardness Every dishwasher is equipped with a water softener which, by using refined salt designed especially for this type of appliance, supplies water without limescale which is then used to wash the crockery. This dishwasher offers a setting which helps to reduce pollution and optimises washing performance in accordance with the water hardness level in your area. This information can be obtained from the organisation which supplies your household with water.- Open the door and switch on the machine by pressing the ON/OFF button. - Press the P button and hold for approximately 5 seconds; two short beeps will sound and the indicator light corresponding to the set degree of hardness will flash slowly on the control panel (the water softening system is set to number 3). - Press the P button repeatedly until the desired hardness 8 level has been reached (1-2-3-4-5* see Water hardness table). E.g. hardness 1 (indicator light 1 flashing) hardness 2 (indicator light 1 illuminated, indicator light 2 flashing). hardness 3 (indicator lights 1 and 2 illuminated, indicator light 3 flashing and so on). - To exit the function, wait approximately 30 seconds or switch off the machine using the ON/OFF button. Even if using multi-functional tablets, the salt dispenser should still be filled. Water Hardness Table °dH 0 6 6 11 12 17 17 34 34 50 °fH 0 11 21 31 61 10 20 30 60 90 mmol/l 0 1 1.1 2 2.1 3 3.1 6 6.1 9 level 1 2 3 4 5* For values between 0°f and 10°f, we do not recommend the use of salt. * this setting may cause a slight increase in the duration of the cycle. (°dH = hardness measured in German degrees - °f = hardness measured in French degrees - mmol/l = millimoles per litre) Measuring out the refined salt In order to achieve the best possible results using a wash cycle, make sure that the dispenser is never empty. Refined salt removes limescale from the water, thus avoiding the formation of deposits on crockery. The salt dispenser is located in the lower part of the dishwasher (see Description) and should be filled: When the green float* cannot be seen by simply looking at the cap of the salt dispenser. When the LOW SALT* indicator light on the control panel is illuminated; 1. Remove the lower rack and unscrew the container cap (anticlockwise). 2. The first time you do this: fill the water tank right up to its edge. 3. Position the funnel* (see figure) and fill the salt container right up to its edge (this should hold approximately 1 kg); it is not unusual for a little water to leak out. 4. Remove the funnel* and wipe any salt residue away from the opening; rinse the cap under running water and then screw it on, the head facing downwards so as to let the water flow out of the four cracks which are arranged in a star shape on the lower part of the cap. (Salt cap with green float*) It is advisable to perform this procedure every time you add salt to the container. Make sure the cap is screwed on tightly, so that no detergent can get into the container during the wash cycle (this could damage the water softener beyond repair). When necessary, measure out the salt before a wash cycle so that any saline solution which has leaked out of the salt dispenser is removed. * Only available in selected models. Care and maintenance Shutting off the water and electricity supplies Turn off the water tap after every wash cycle to avoid leaks. Always unplug the appliance when cleaning it and when performing maintenance work. Cleaning the dishwasher The external surfaces of the machine and the control panel may be cleaned using a non-abrasive cloth which has been dampened with water. Do not use solvents or abrasive products. Any marks on the inside of the appliance may be removed using a cloth dampened with water and a little vinegar. Preventing unpleasant odours Always keep the door of the appliance ajar in order to avoid moisture from forming and being trapped inside the machine. Clean the seals around the door and detergent dispensers regularly using a damp sponge. This will avoid food becoming trapped in the seals, which is the main cause behind the formation of unpleasant odours. Clean the water inlet filter at the tap outlet regularly. EN - Turn off the water tap. - Unscrew the end of the water inlet hose, remove the filter and clean it carefully under running water. - Replace the filter and screw the water hose back into position. Cleaning the filters The filter assembly consists of three filters which remove food residues from the washing water and then recirculate the water. They should be cleaned if you wish to achieve the best results in every wash. Clean the filters regularly. The dishwasher should not be used without filters, or if the filter is loose. After several washes, check the filter assembly and if necessary clean it thoroughly under running water, using a non-metallic brush and following the instructions below: 1. Turn the cylindrical filter C in an anti-clockwise direction and pull it out (fig. 1). 2. Remove the cup filter B by exerting a slight pressure on the side flaps (fig. 2). 3. Slide out the stainless steel plate filter A (fig. 3). 4. Inspect the trap and remove any food residue. NEVER REMOVE the wash cycle pump (black detail) (fig. 4). Cleaning the sprayer arms Food residue may become encrusted onto the sprayer arms and block the holes used to spray the water. It is therefore recommended that the arms are checked from time to time and cleaned with a small non-metallic brush. The two sprayer arms may both be removed. 2 1 To remove the upper sprayer arm, rotate the locking ring in an anti-clockwise direction. The upper sprayer arm should be replaced with the holes facing upwards. The lower sprayer arm can be removed by pressing on the side tabs and pulling it upwards. B C C A 3 4 After cleaning the filters, replace the filter assembly and fix it in position correctly; this is essential for maintaining the efficient operation of the dishwasher. Leaving the machine unused for extended periods Cleaning the water inlet filter* If the water hoses are new or have not been used for an extended period of time, let the water run to make sure it is clear and free of impurities before performing the necessary connections. If this precaution is not taken, the water inlet could become blocked and damage the dishwasher. Disconnect the appliance from the electricity supply and shut off the water tap. Leave the door of the appliance ajar. When you return, run a wash cycle when the dishwasher is empty. * Only available in selected models. 9 Precautions and advice EN This appliance was designed and manufactured in compliance with current international safety standards. The following information has been provided for safety reasons and should therefore be read carefully. General safety The appliance was designed for domestic use inside the home and is not intended for commercial or industrial use. The appliance must be used by adults only, to wash domestic crockery in accordance with the instructions in this manual. The appliance must not be installed outdoors, even in covered areas. It is extremely dangerous to leave the machine exposed to rain and storms. Do not touch the appliance when barefoot. When unplugging the appliance always pull the plug from the mains socket, do not pull on the cable. The water supply tap must be shut off and the plug should be removed from the electrical socket before cleaning the appliance or carrying out any maintenance work. If the appliance breaks down, do not under any circumstances touch the internal parts in an attempt to perform the repair work yourself. Never touch the heating element. Do not lean or sit on the open door of the appliance: this may cause the appliance to overturn. The door should not be left open as it may create a dangerous obstacle. Keep detergent and rinse aid out of reach of children. The packaging material should not be used as a toy. Disposal Disposal of packaging materials: observe local legislation so that the packaging may be reused. The European Directive 2002/96/EC relating to Waste Electrical and Electronic Equipment (WEEE) states that household appliances should not be disposed of using the normal solid urban waste cycle. Exhausted appliances should be collected separately in order to optimise the cost of re-using and recycling the materials inside the machine, while preventing potential damage to the atmosphere and to public health. The crossed-out dustbin is marked on all products to remind the owner of their obligations regarding separated waste collection. Saving energy and respecting the environment Saving water and energy Only begin a wash cycle when the dishwasher is full. While waiting for the dishwasher to be filled, prevent unpleasant odours using the Soak cycle (see Wash cycles). Select a wash cycle which is suited to the type of crockery and to the soil level of the crockery using the Table of wash cycles: - For dishes with a normal soil level, use the Eco wash cycle, which guarantees low energy and water consumption levels. - If the load is smaller than usual activate the Half load option* (see Start-up and use). If your electricity supply contract gives details of electricity saving time bands, run wash cycles during the periods when a lower tariff is applied. The Delayed start* button (see Start-up and use) helps you organise the wash cycles accordingly. Phosphate-free and chlorine-free detergents containing enzymes We strongly recommend that you use detergents that do not contain phosphates or chlorine, as these products are harmful to the environment. Enzymes provide a particularly effective action at temperatures around 50°C, and as a result detergents containing enzymes can be used in conjunction with low-temperature wash cycles in order to achieve the same results as a normal 65°C wash cycle. To avoid wasting detergent, use the product in appropriate quantities based on the manufacturers recommendations, the hardness of the water and the soil level and quantity of crockery to be washed. Even if they are biodegradable, detergents contain substances which may alter the balance of nature. For further information relating to the correct disposal of household appliances, owners may contact the relevant public authority or the local appliance dealer. * Only available in selected models. 10 Troubleshooting Whenever the appliance fails to work, check for a solution from the following list before calling for Assistance. Malfunction: The dishwasher does not start. No water drains out from the dishwasher. The dishw asher makes excessive noise. The dishes and glasses are covered in a w hite film or limescale deposits. The dishes and glasses are streaked or have a bluish tinge. The crockery has not been dried properly. The dishes are not clean. No water enters the dishwasher/Shut off tap alarm. (several short beeps are emitted) (the 2 (Normal) and 3 (Soak) WASH CYCLES indicator lights flash). Water loading solenoid valve malfunction alarm (the 2 (Normal) WASH CYCLE indicator lights flash). Water inlet hose alarm/Water inlet filter blocked. (the 1 (Intensive), the 2 (Normal) and the 3 (Soak) WASH CYCLES indicator lights flash). EN Possible causes / Solutions: • The pl ug has not b een i nserted i nto t he el ectrical socket pr operly, or ther e is no power i n t he house. • The dis hwasher door has not been shut properl y. • A delayed start has been programmed (see St art-up and us e). • The dis hwasher cycle has not yet fi nished. • The water outl et hose is bent (see I nstall ation). • The dr ai n duct is blocked. • The filter is clogged up wit h food r esidues. • The dis hes are r at tling against eac h ot her or against t he s prayer arms. • An exc essive amou nt of foam has been produced: the det ergent has not been meas ured out cor rectly or it is not suit abl e f or use i n dishwashers (see Start -up and use). • The level of t he r efined sal t is low or the dos age setti ng is not suited to t he har dness of t he wat er (see Rins e ai d and salt). • The lid on the salt dispens er is not clos ed pr operly. • The rins e ai d has b een used up or t he dosage is too l ow. • The crockery is made from non-stick materi al. • The rins e ai d dosage is too high. • The rins e ai d has b een used up or t he dosage is too l ow (see Ri nse aid and salt). • The rins e ai d dis penser set ting is not high enough. • A was h cycle witho ut a dryi ng programme has been sel ected. • The racks are over l oaded ( see Loadi ng the racks). • The crockery has n ot been arranged well. • The spr ayer arms cannot move freel y. • The wash cycl e is too gentl e (see Wash cycles). • An exc essive amou nt of foam has been produced: the det ergent has not been meas ured out cor rectly or it is not suit abl e f or use i n dishwashers (see Start -up and use). • The lid on the rins e ai d compartment has not been s hut correctly. • The filter is dirt y or blocked (see Car e and maint enance). • The refi ned salt l e vel is low (see Ri nse ai d and salt). • There is no wat er i n t he mains suppl y. • The water i nlet h ose is bent (see Inst allati on). • Tur n on the t ap an d t he appliance will start aft er a f ew minutes. • The appliance l ock has been activated bec aus e no acti on was taken when t he beeps so unded. Switch off the machi ne, using t he ON/OFF butt on, t urn on the tap and switch the machi ne back on after 20 seconds by pr essin g the same butt on. Re- programme the machi ne and rest art the was h cycle. • Switch off the mac hi ne by pressing the ON/OFF butt on and switch it back on aft er a min ute. If t he al arm continues, tur n off the wat er tap to reduc e the risk of floodi ng, r emove the plug from the el ectrical socket and call As sistance. • Switch off the appl iance by pressing the ON/OFF butt on. Shut off the wat er tap to el imi nat e t he risk of flooding and remove the plug from the el ectrical socket. Make sur e the wat er inl et fi lter has not become bl ocked by vari ous impurities. (see “C ar e and mai ntenance” chapter). 11 Assistance EN Before contacting Assistance: Check whether the problem can be resolved using the Troubleshooting guide (see Troubleshooting). Restart the programme to check whether the problem has ceased to exist. If the problem persists, contact the Authorised Technical Assistance Service. Never use the services of unauthorised technicians. Please have the following information to hand: The type of malfunction. The appliance model (Mod.). The serial number (S/N). This information can be found on the appliance data plate (see Description of the appliance). 12 تعليمات التشغيل AR عربي13 ، ماكينة غسل األطباق المحتويات التركيب14-15 ، اختيار الموضع واالرتفاع وصل إمدادات الكهرباء والماء نصيحة متعلقة بدورة الغسل األولى البيانات التقنية وصف الجهاز16 ، نظرة عامة لوحة التحكم تحميل الرفوف17 ، الرف السفلي سلة السكاكين الرف العلوي التشغيل واالستخدام18 ، تشغيل ماكينة غسل األطباق قياس مواد التنظيف خيارات الغسل LFT 216 دورات الغسل19 ، جدول دورات الغسل ملح التكرير ومادة الشطف المساعدة20 ، قياس مادة الشطف المساعدة قياس ملح التكرير العناية والصيانة21 ، قطع إمدادات الماء والكهرباء تنظيف ماكينة غسل األطباق منع الروائح الكريهة تنظيف أذرع ّ الرشاش فحص فلتر خرطوم إدخال الماء تنظيف الفالتر ترك الماكينة من دون استخدام لفترات طويلة وسائل حذر ونصائح22 ، الوقاية العامة التخلص توفير الطاقة واحترام البيئة استكشاف المشاكل وحلها23 ، المساعدة24 ، قبل استدعاء المساعدة التركيب احتفظ بدليل التعليمات هذا في مكان آمن لمراجعته في المستقبل .إذا تم بيع الجهاز ،إعطاؤه أو نقله ،الرجاء تأكد من أن دليل التعليمات قد أرفق بالماكينة بحيث يتمكن مالكوها الجدد من االستفادة من النصائح الموجودة فيه. الرجاء اقرأ دليل التعليمات هذا بعناية :إنه يحتوي على معلومات هامة فيما يتعلق بالعمل اآلمن ،التركيب وصيانة الجهاز. توجب نقل الجهاز في أي وقت ،احتفظ به بشكل عامودي؛ إذا كان إذا ّ األمر ضروريا جدا ،يمكن إمالته على الجهة الخلفية منه. اختيار الموضع واالرتفاع .1أخرج الجهاز من جميع مواد التعبئة الخاصة به وتأكد من أنه لم يلحق به األذى خالل عملية الشحن. ّ بالموزع وال تنفذ أية عملية تركيب إضافية. إذا لحق به ضرر ،اتصل .2افحص ماكينة غسل األطباق بوضعها بحيث تالمس جوانبها أو اللوحة الخلفية ،الخزائن المجاورة أو حتى الحائط .يمكن تركيب هذا الجهاز أيضا تحت ّ مسطح عمل منفرد* (أنظر نشرة معلومات التجميع). ّ .3 ركب ماكينة غسل األطباق على مسطح مستو وأرضية صلبة .إذا كانت األرضية غير مستوية ،يمكن معايرة أرجل الجهاز حتى يصل إلى وضعية أفقية تامة .إذا تم تحديد مستوى الجهاز بشكل صحيح ،فسيكون أكثر ثباتا ويقل احتمال اهتزازه ولن يسبب على ما يبدو االرتجاج والضجيج خالل عمله. .*4اضبط ارتفاع الرجل الخلفية من مقدمة الجهاز* في الجزء السفلي المركزي من ماكينة غسل األطباق ,مديرا مفتاح ربط سداسي الشكل (اللون األحمر) ذي فتحة 8ملم باتجاه عقارب الساعة لزيادة االرتفاع أو عكس اتجاه عقارب الساعة لتقليل االرتفاع. وصل إمدادات الكهرباء والماء على وصل إمدادات الماء والكهرباء أن يتم فقط من قبل تقني مؤهل. ال يجب أن تقف ماكينة غسل األطباق على خراطيم المياه أو على كبل تزويد الكهرباء. يجب أن يكون الجهاز موصوال بشبكة تزويد المياه باستخدام خراطيم جديدة. ال تستخدم الخراطيم القديمة. وصل خرطوم إدخال الماء • بالنقطة المالئمة لتوصيل المياه الباردة :قبل وصل الخرطوم ،قم بتشغيل الماء حتى يصبح نقيا تماما بحيث ال تسد الجهاز أية أوساخ موجودة في الماء؛ بعد إنجاز هذه العملية ،قم بشد خرطوم اإلدخال لولبيا بلسان ¾ إلدخال الغاز. • بالنقطة المالئمة للمياه الساخنة :يمكن تزويد ماكينة غسل األطباق لديك بالماء الساخن من شبكة المياه الرئيسية (إذا كان لديك شبكة تدفئة مركزية مزودة بشبكة أنابيب تدفئة) بحيث ال تتعدى درجة الحرارة 60 درجة مئوية. قم بشد الخرطوم باللسان لولبيا كما تم الوصف في توصيل تزويد الماء البارد. إذا لم يكن طول خرطوم اإلدخال كافيا ،اتصل بمستودع خاص أو بتقني مؤهل(أنظر المساعدة). على ضغط الماء في الحنفية أن يكون في نطاق القيم المشار إليها في جدول البيانات التقنية (أنظر المعلومات المجاورة). على الخرطوم أال يكون معوجا أو مضغوطا. الحماية من الفيضان لتحاشي حدوث الفيضان ،على ماكينة غسل األطباق أن: تكون مزودة بنظام خاص يقطع تزويد الماء في حال حدوث انحرافات أوتسربات من داخل الجهاز. بعض الطرازات مزودة أيضا بجهاز األمان اإلضافي New Acqua ،*Stopالذي يضمن الحماية من الفيضان حتى في حال تمزق خرطوم اإلدخال. تحذير :فولطية خطرة! يجب عدم قطع خرطوم الماء بأي حال من األحوال ألنه يحتوي على عناصر كهربائية حية. يمكن وضع خراطيم إدخال ( )Aوإخراج ( )Bالماء وكبل تزويد الكهرباء باتجاه اليمين أو اليسار بهدف الحصول على أفضل تركيب ممكن (أنظر الرسم ) * متوفر في طرازات مختارة فقط. 14 AR AR وصل خرطوم إخراج الماء قم بوصل خرطوم اإلخراج (من دون ثنيه) إلى قنات التسريب بواسطة قطر من 4سم على األقل .أو عوضا عن ذلك ،ضعه فوق مغسلة أو جرن؛ يجب على الطرف الحر من الخرطوم أال ينغمس في الماء. المرفق البالستيكي الخاص * يجعل الحصول على الشكل األفضل أمرا أسهل :قم بتثبيت المرفق بالحائط بأمان بهدف ضمان عدم تحرك الخرطوم وسكب الماء المتسخ. يجب على جزء الخرطوم المشار إليه بالحرف Aأن يكون ما بين 40و 100سم فوق األرض (أنظر الرسم). A شريط مقاومة التكثيف* بعد تركيب ماكينة غسل األطباق ،افتح الباب والصق الشريط الشفاف الالصق تحت الرف الخشبي بهدف حمايته من أي تكثيف يمكن أن يتكوّن. نصيحة متعلقة بدورة الغسل األولى بعد أن تم تركيب الجهاز ،وقبل تشغيل دورة الغسيل األولى مباشرة ،قم بملئ جرن الملح بأكمله بالماء وأضف بعد ذلك فقط حوالي 1كغم من الملح(أنظر الفصل بعنوان مادة الشطف المساعدة وملح التكرير) .يمكن للماء أن ينسكب :هذا أمر طبيعي وال يجب االهتمام به .اختر قيمة قساوة الماء (أنظر الفصل بعنوان مادة الشطف المساعدة وملح التكرير) - .بعد سكب الملح في الماكينة ،سينطفئ مؤشر . * LOW SALT يتلفا. إذا لم تتم تعبئة حاوية الملح ،يمكن لمخفف الماء وعنصر التسخين أن نحن ال نوصي باستخدام اإلطاالت للخرطوم. التوصيالت الكهربائية قبل توصيل الجهاز بمقبس شبكة الكهرباء الرئيسية ،تأكد من أن: البيانات التقنية مؤرض ويذعن لكل القوانين الواجب تطبيقها. • المقبس ّ • المقبس يصمد أمام الطاقة القصوى في الجهاز ،المشار إليها في لوحة البيانات الموجودة في الجهة الداخلية من الباب (أنظر الفصل بعنوان وصف الجهاز). • الجهد الكهربائي في نطاق يتراوح بين القيم المشار إليها في لوحة البيانات الموجودة في الجهة الداخلية من الباب. • أن المقبس متوافق مع قابس الجهاز .إذا لم يكن المقبس متوافقا مع فني مؤهل أن يقوم بتغييره (أنظر المساعدة); ال القابس ،اطلب من ّ تستخدم كبالت اإلطالة أو المقابس المتعددة. األبعاد بعد أن تم تركيب الجهاز ،يجب أن يكون كبل تزويد الطاقة والمقبس الكهربائي قابلين للوصول السهل. السعة 12إعداد مكان اعتيادي ضغط تزويد الماء 10 ÷ 0.5( 1MPa ÷ 0.05بار) psi 145 – psi 4.3 فولطية تزويد الطاقة انظر لوحة البيانات في الجهاز الطاقة اإلجمالية المستهلكة انظر لوحة البيانات في الجهاز المصهر انظر لوحة البيانات في الجهاز يذعن هذا الجهاز إلرشادات السوق األوروبية المشتركة التالية: 2006/95/EECمن تاريخ 16/01/2007(الفولطية المنخفضة) والتعديالت الالحقة 89/336/EECمن تاريخ 03/05/89(التوافق اإللكترومغناطيسي) والتعديالت الالحقة ( 97/17/ECالالصقة) 2002/96/ CEالتخصل من األجهزةواإللكترونية ()WEEE على الكبل أال يكون معوجا أو مضغوطا. إذا حدث تلف في كبل تزويد الطاقة ،يجب تبديله من قبل المصنع أو مركز المساعدة التقنية التابع له بهدف تحاشي أية مخاطر يُحتمل حدوثها. (أنظر المساعدة) لن تتحمل الشركة أية مسؤولية في حال لم يتم احترام هذه التعليمات. * 15 العرض 59,5سم االرتفاع 82سم العمق 57سم متوفر في طرازات مختارة فقط. وصف الجهاز نظرة عامة AR .1 .2 .3 .4 .5 .6 .7 .8 .9 .10 .11 .12 الرف العلوي ذراع الرشاش العلوي حجرات قابلة للطي ضابط ارتفاع الرف الرف السفلي ذراع الرشاش السفلي سلة السكاكين فلتر الغسل حاوية الملح حجرات مواد التنظيف ومادة الشطف المساعدة لوحة البيانات لوحة التحكم*** لوحة التحكم مؤشر انخفاض الملح (*)Low Salt زر اختيار دورة الغسل ()Wash cycle مؤشر تشغيل/إيقاف تشغيل ()On/Off مؤشرات دورة الغسل ()Wash cycle انخفاض مادة الشطف المساعدة (Low Rinse )aid زر تشغيل/إيقاف/إعادة تهيئة ON/OFF/RESET ***في الطرازات المبنية تماما فقط. * متوفر في طرازات مختارة فقط. تحميل الرفوف AR قبل تحميل الرفوف ،أزل كل فضالت الطعام عن األواني وقم بتفريغ السوائل من الكؤوس والفناجين. بعد تحميل الجهاز ،تفقد إذا كان بإمكان أذرع الرشاش الدوران بحرية. معايرة ارتفاع الرف العلوي بهدف جعل ترتيب األواني أسهل ،يمكن تحريك الرف العلوي إلى مستوى مرتفع أو منخفض. (في الطرازات التي تقدم دورة الطفل ،يجب موضعة الرف العلوي في موضعه السفلي عند تحميل الجهاز). يمكن معايرة الرف العلوي بشكل أمثل عندما يكون الرف فارغا. الرف السفلي يمكن للرف السفلي أن يحمل األواني ،األغطية ،الصحون ،أطباق السلطات، السكاكين ،وما إلى ذلك .كما يظهر في أمثلة التحميل. يجب وضع الصحون واألغطية الكبيرة على جوانب الرف ،لضمان عدم إعاقة دوران ذراع الرشاش العلوي. بعض طرازات ماكينة غسل األطباق مزودة بأجزاء يمكن طيها* ,التي يمكن استخدامها في وضع عمودي عند ترتيب الصحون أو في وضع أفقي عند ترتيب األواني وأطباق السلطة. سلة السكاكين يمكن أن يتيغير نوع سلة السكاكين وفقا لطراز ماكينة غسل األطباق :يمكن أن تكون تركيبية ،غير تركيبية أو إصدار منزلق .على السلة غير التركيبية أنتوضع في مقدمة الرف السفلي. يمكن فصل السلة التركيبية إلى جزئين ،وهو الحل الموصى به عند إنجاز غسل بنصف حمل (فقط في الطرازات التي تتيح هذا الخيار) ،متوفرة في اإلصدار المنزلق (موضوعة في أية نقطة على الرف السفلي بواسطة زلقها بين المداخل الثابتة أو الممكن طيها). كال اإلصدارين مزود بنظام زلق قابل للطي وهذا يعني أنه يمكن ترتيباألواني بأفضل طريقة ممكنة. ال تقم برفع أو خفض الرف من جهة واحدة أبدا. افتح كوابح مساري التوجيه األيمن واأليسر، واسحب الرف إلى الخارج؛ قم برفعه أو خفضه كما هو مطلوب ،أدخله على امتداد مسارات التوجيه حتى يتم موضعة العجالت األمامية واقفل الكوابح(أنظر الرسم). أمثلة تحميل للرف العلوي إذا كان الرف مزودا بمقابض ""Dual Space (المسافة المزدوجة) * (أنظر الرسم) ،قم بسحب الرف العلوي إلى الخارج حتى يصل إلى نقطة توقفه ،امسك بالمقابض على جانبي الرف واسحبه إلى األعلى أو إلى األسفل ،ثم دعه يسقط ببطء في مكانه. أمثلة تحميل للرف السفلي السكاكين وسائر األدوات ذات األطراف الحادة يجب وضعها في سلة السكاكين بحيث تكون رؤوسها متجهة إلى األسفل ،أو يجب وضعها أفقيا في الحجرات القابلة للطي على الرف العلوي. الحجرات الصغيرة القابلة للطي* لماكينات غسل األطباق المزودة بدورة قصيرة، هناك حجرات مزودة قابلة للطي مالئمة لغسل الزجاجات ،الحلقات والحلمات( .أنظر نشرة المعلومات) أمثلة ألوضاع سلة السكاكين العناصر التي ال يجب غسلها في ماكينة غسل األطباق • الرف العلوي قم بتحميل هذا الرف باألواني الحساسة وخفيفة الوزن :الكؤوس ،فناجين القهوة والشاي ،أطباق السلطة الصغيرة ،الجاطات والجاطات الصغيرة غير المتسخة كثيرا ،باستخدام أمثلة التحميل كدليل. • األباريق والفناجين :ضع هذه في الحجرات القابلة للطي**. • السكاكين الطويلة الحادة وأدوات التقديم :ضع هذه في الحجرات القابلة للطي**. • • • • العناصر الخشبية ،العناصر التي تحتوي على مقابض خشبية أو قرنية أو عناصر ملصقة عليها. العناصر المصنوعة من األلومنيوم ،النحاس ،النحاس األصفر ،البيوتر أو القصدير. العناصر المصنوعة من مادة بالستيكية غير مقاومة للحرارة. األثريات أو الخزف الصيني المطلي يدويا. ُ الفضة األثرية (أنتيكا) .على أية حال ،يمكن للفضة غير األثرية أن تغسل في ماكينة غسل األطباق باستخدام دورة غسل ناعمة ،شريطة أال يالمس المعادن االخرى. * متوفر في طرازات مختارة فقط. ** الرقم و/أو الوضع يمكن أن يتغير. بدء التشغيل واالستخدام تشغيل ماكينة غسل األطباق .1افتح حنفية الماء. .2افتح الباب واضغط على زر تشغيل/إيقاف تشغيل :سوف تسمع صوت صفير قصير وسيضيء مؤشر التشغيل/إيقاف التشغيل ومؤشر دورة الغسل لبضع ثوان. .3 .3قم بقياس مادة التنظيف (أنظر أدناه). .4قم بتحميل الرفوف (أنظر الفصل المعنون بعنوان تحميل الرفوف). .5اختر دورة الغسل بما يتوافق مع نوع األواني ومستوى اتساخها (أنظر جدول دورات الغسل) ،بواسطة الضغط على زر P؛ سيضيء المؤشر المالئم لدورة الغسل. .7ابدأ دورة الغسل بواسطة إغالق الباب :بعد مرور بضع ثوان ،سيُسمع صفير طويل يشير إلى بدء دورة الغسل. .8صفيران قصيران وواحد طويل ستشير إلى انتهاء دورة الغسل وسيومض ببطئ المؤشر المالئم لدورة الغسل .افتح الباب ،قم بإطفاء الجهاز بواسطة الضغط على زر تشغيل/إيقاف تشغيل ،اقفل حنفية الماء واسحب الجهاز من المقبس الكهربائي. .9انتظر بضع دقائق قبل إخراج األواني ،لتحاشي الحروق .قم بتفريغ الرفوف ،ابدأ بالمستوى األسفل. سيتغير الترتيب الذي يتم فيه عرض دورات الغسل المختلفة وفقا لتكرار استخدام كل دورة. تعديل دورة الغسل قيد التشغيل إذا حدث خطأ خالل عملية اختيار دورة الغسل ،من الممكن تغيير الدورة شريطة أن تكون ما زالت في بدايتها :افتح الباب ،واحذر كي تتحاشى البخار المتصاعد ،واضغط على زر تشغيل/إيقاف تشغيل؛ سيتم إيقاف تشغيل الماكينة وسيُسمع صفير طويل .أعد تشغيل الماكينة باستخدام زر تشغيل/إيقاف التشغيل واختر دورة الغسل الجديدة باستخدام زر P؛ ابدأ دورة الغسل بواسطة إقفال الباب. قياس مواد التنظيف AR تعتمد نتائج الغسل الجيدة أيضا على كمية مواد التنظيف الصحيحة التي يتم استخدامها؛ تعدي كمية المواد المحددة ال ينتج عنه غسل أكثر جودة وهو يزيد من تلويث البيئة. استخدم مواد التنظيف المصنعة خصيصا لماكنات غسل األطباق فقط. ال تستخدم مواد الغسل السائلة. يكون فائض رغوة يمكن الستخدام مواد التنظيف الزائدة أن ّ يبقى في الماكينة بعد انتهاء دورة الغسل. يوصى باستخدام األقراص فقط للطرازات المزودة بخيار وظيفة األقراص المتعددة. للتوصل إلى أفضل النتائج من كل دورة غسل وتجفيف ،يجب استخدام مواد التنظيف المسحوقة ،مادة الشطف المساعدة والملح. الحجرة :Aمواد التنظيف للغسل الحجرة :Bمواد التنظيف المعدة لما قبل الغسل .1افتح الغطاء Cبواسطة الضغط على الزر .D .2اسكب مواد التنظيف بعد مراجعة جدول دورات الغسل: لمواد التنظيف المسحوقة استخدم الحجرتين A و .B • ألقراص التنظيف :عندما تحتاج دورة الغسيل إلى قرص واحد ،ضعه في الحجرة Aواغلق الغطاء؛ عندما تحتاج إلى قرصين ،ضع القرص الثاني على أرضية الجهاز. .3أزل بقايا مواد التنظيف من أطراف الحجرة واغلق الغطاء حتى يُسمع طرقة خفيفة. إضافة أواني إضافية من دون أيقاف تشغيل الماكينة ،افتح الباب ،تحاشى البخار المتصاعد ،وضع األواني داخل ماكينة غسل األطباق .أقفل الباب :ستبدأ دورة الغسل من النقطة التي تم اعتراضها. إذا كانت األواني متسخة قليال فقط ،أو إذا تم شطبها بالماء قبل إدخالها إلى ماكينة غسل األطباق ،قم بتقليل كمية مواد التنظيف المستخدمة وفقا لذلك. تعطيالت عرضية في حال ُفتح الباب خالل دورة الغسل ،أو إذا انقطع التيار الكهربائي، فستتوقف الدورة .سوف تتابع من النقطة التي تعطلت فيها عند اقفال الباب أو عند عودة الطاقة الكهربائية. * متوفر في طرازات مختارة فقط. دورات الغسيل AR للخيارات المتوفرة ،الرجاء راجع جدول الخيارات في صفحة بدء التشغيل واالستخدام. تعليمات اختيار دورة الغسل دورة الغسل أطباق متسخة جدا وطناجر (يجب عدم استخدامها مع العناصر الحساسة). مكثف الطناجر واألطباق المتسخة بشكل اعتيادي .دورة غسل يومية اعتيادية. عادي دورة غسل تمهيدية لألطباق بينما يكون الحمل بانتظار تعبئة األطباق من الوجبة التالية. نقع دورة شطف وتجفيف لألطباق التي تستخدم على فترات متباعدة وتعلوها الغبار فقط. ضيف خاص دورة غسل اقتصادية وسريعة تُستخدم لألطباق المتسخة قليال( .قم بتشغيل الدورة بعد االستخدام مباشرة ) ( 2أطباق 2 +أكواب 4 +قطع من أدوات المائدة 1 +قدر 1 + مقالة صغيرة). دورة غسل اقتصادية وسريعة للعانصر الحساسة لدرجات الحرارة العالية( .قم بتشغيل الدورة بعد االستخدام مباشرة) ( 12كوب + األطباق الحساسة). مواد التنظيف = ) (Aالحجرة A = )(Bالحجرة B سريع كريستال التجفيف مدة دورة الغسل (التفاوت )±10% ساعات دقائق ’2:15 مسحوق سائل أقراص 30غم)(A 30ملليتر )(A )A( 1 نعم 25غم )(A 5غم)(B 25ملليتر )(A 5ملليتر)(B )A( 1 نعم ’1:45 ال ال ال ال ’0:08 ال ال ال نعم ’0:32 25غم )(A 30غم)(A 25غم )(A 30ملليتر )(A )A( 1 )A( 1 ال نعم ’0:35 ’1:30 مالحظات: يمكن الوصول إلى مستويات األداء األمثل عند استخدام دورة "الغسل السريع "Rapid washلدى التقيد بالحد األقصى من األواني المحددة. لجعل قياس كمية مواد التنظيف أسهل ،يجدر أن تتذكر أن: 1ملعقة صغيرة = 15غرام من المسحوق = حوالي 15ملليتر من السائل 1 -ملعقة صغيرة = 5غرام من المسحوق= حوالي 5ملليتر من السائل * دورة الغسل االقتصادية تتقيد بمواصفات .EN-50242على الرغم من أن مدتها أطول من مدة دورات الغسل األخرى ،إال أنها تستخدم طاقة أقل وتحدث أقل ضررا للبيئة. مالحظة لمختبرات الفحوص :للمعلومات المتعلقة بشروط اختبارات المالءمة ، ENالرجاء إرسال بريد إلكتروني إلى العنوان التاليASSISTENZA_EN_LVS@ : indesitcompany.com ملح التكرير ومادة الشطف المساعدة استخدم المنتجات المصنعة خصيصا لماكنات غسل األطباق فقط .ال تستخدم الملح على شكل أقراص أو الملح الصناعي ،أو سائل الغسل .اتبع التعليمات الموجودة على العبوة. إذا تم استخدام منتج متعدد االستخدامات ،ليس من الضروري إضافة مادة الشطف المساعدة؛ على أية حال ،نحن ننصح بأن تضيف الملح، وخاصة إذا كنت تعيش في منطقة المياه فيها قاسية أو قاسية جدا .اتبع التعليمات الموجودة على العبوة. إذا لم تضف الملح أو مادة الشطف المساعدة ،ستبقى مؤشرات انخفاض الملح* وانخفاض مادة الشطف المساعدة * مضاءة. قياس مادة الشطف المساعدة تجعل مادة الشطف المساعدة تجفيف األواني أسهل ،ألن الماء يتبخر عن األسطح بسهولة ولذلك فهو ال يترك خطوطا أو عالمات. يجب تعبئة درج مادة الشطف المساعدة: • عندما يضيء مؤشر انخفاض مادة الشطف المساعدة * على لوحة التحكم؛ .1افتح الدرج بواسطة إدارة الغطاء ( )Gبعكس عقارب الساعة. .2اسكب مادة الشطف المساعدة وتأكد من أنها ال تفيض عن الدرج .إذا حدث ذلك ،نظف ما انسكب بواسطة خرقة جافة. F .3أعد تركيب الغطاء في مكانه. ال تسكب مادة الشطف المساعدة أبدا في G قعر الجهاز مباشرة. ضبط كمية مادة الشطف المساعدة إذا لم تكن راضيا تماما عن نتائج التجفيف ،يمكنك ضبط كمية مادة الشطف المساعدة المستخدمة .استخدم مفك إلدارة ضابط الكمية ( )Fلواحد من األوضاع الـ 6المهيئة مسبقا (الوضع االفتراضي معد لـ :)4 • إذا وجدت أية خطوط على األواني ،قم بإعداد نظام الضبط إلى رقم منخفض أكثر (.)1-3 • إذا بقيت قطرات من الماء على األواني أو إذا بقيت بقع كلسية بعد انتهاء الدورة ،قم بإعداد الضابط إلى رقم أعلى (.)4-6 إعداد قساوة الماء كل ماكينة غسل أطباق مزودة بمخفف للماء حيث أنه ،باستخدام ملح التكرير المصمم لهذا النوع من الجهاز ،يوفر ماء خاليا من الترسبات الكلسية الذي يتم استخدامه بعد ذلك لغسل األواني. تقدم ماكينة غسل األطباق هذه إعداد يساعد على خفض التلوث ويوفر المستوى األمثل من إنجاز الغسل بما يتالءم مع مستوى قساوة الماء في منطقتك .يمكن الحصول على هذه المعلومات من المؤسسات التي تزود منزلك بالماء - .افتح الباب وقم بتشغيل الماكينة بالضغط على زر تشغيل/ إيقاف تشغيل. اضغط الزر Pوأبقه مضغوطا لخمس ثوان؛ سيصدر صفيران قصيرانوسيومض ببطء المؤشر المالئم لدرجة القساوة على لوحة التحكم (نظام تخفيف الماء معد افتراضيا إلى الرقم .)3 -اضغط الزر Pبشكل متكرر حتى التوصل إلى مستوى قساوة الماء لمرغوب به ( *5-4-3-2-1انظر جدول قساوة الماء). مثال القساوة رقم ( 1يومض المؤشر رقم )1 القساوة رقم ( 2يضيء المؤشر رقم ،1يومض المؤشر رقم .)2 القساوة رقم ( 3يضيئان المؤشران 1و 2ويومض المؤشر رقم ،3وهل ّم جرا). للخروج من هذه الوظيفة ،انتظر حوالي 30ثانية أو قم بإيقاف تشغيلالماكينة باستخدام زر تشغيل/إيقاف تشغيل. حتى عند استخدام األقراص متعددة االستخدامات ،يجب أن يبقى درج الملح مليئا. المستوى 1 2 3 4 *5 جدول قساوة الماء mmol/l 0 10 0 1 11 20 1.1 2 21 30 2.1 3 31 60 3.1 6 61 90 6.1 9 ofH o o odH 6 11 17 34 50 0 6 12 17 34 للقيم ما بين 0 fوحتى f, 10نحن ال ننصح باستخدام الملح. *يمكن لهذا اإلعداد أن يزيد قليال من مدة دورة الغسل. ( = dH°القساوة مقاسة بدرجات ألمانية = f° -القساوة مقاسة بدرجات فرنسية = mmol/l -مليمول لكل لتر) قياس ملح التكرير بهدف الحصول على أفضل النتائج الممكنة من استخدام دورة الغسل ،تأكد من أن الدرج ليس فارغا أبدا .ملح التكرير يزيل الترسبات الكلسية من الماء ،وهذا يمنع تكون البقع على األواني. درج الملح موجود في الجزء السفلي من ماكينة غسل األطباق (أنظر الوصف) ويجب تعبئته: • عندما ال يكون باإلمكان رؤية الطفاف االخضر* بالنظر على غطاء درج الملح. • عندما يضيء مؤشر انخفاض الملح * على لوحة التحكم؛ .1فك الرف السفلي وحرر غطاء الحاوية (بعكس اتجاه عقارب الساعة). .2في المرة األولى التي تفعل ذلك فيها :امأل حاوية الماء حتى طرفها العلوي. .3قم بموضعة القمع (أنظر الرسم) * وامأل حاوية الملح حتى طرفها العلوي (يجب على الحاوية أن تحتوي على ما يعادل 1كغم)؛ إنه من الطبيعي أن ينسكب بعض الماء إلى الخارج. .4أزل القمع * وامسح أية بقايا للملح عن الفتحة؛ اشطف الغطاء تحت ماء متدفق ثم أعد تثبيته ،بحيث يكون رأس الغطاء باتجاه األسفل ،ليدع الماء يتدفق إلى الخارج من الشقوق األربعة المرتبة على شكل نجمة في الجهة السفلية من الغطاء( .غطاء الملح بالطفاف األخضر*) ينصح بإنجاز هذه العملية في كل مرة تقوم فيها بإضافة الملح إلى الحاوية. تأكد من أنه قد تم تثبيت الغطاء بقوة ،بحيث ال يمكن لمواد التنظيف أن تدخل إلى الحاوية خالل دورة الغسل (يمكن لذلك أن يلحق الضرر بمخفف الماء حيث ال يمكن إصالحه). عند الضرورة ،قم بقياس الملح قبل دورة الغسل بحيث تتم إزالة أية مياه ملحية انسكبت من درج الملح. * متوفر في طرازات مختارة فقط. AR العناية والصيانة AR قطع إمدادات الماء والكهرباء • قم بإقفال حنفية الماء بعد كل دورة غسل لتحاشي التسربات. • افصل الجهاز عن الكهرباء دائما عند تنظيفه أو أثناء أي عمل صيانة. تنظيف ماكينة غسل األطباق يمكن تنظيف األسطح الخارجية في الماكينة ولوحة التحكم باستخدام خرقة غير كاشطة مبللة بالماء .ال تستخدم المنتجات المذيبة أو الكاشطة. • يمكن إزالة أي بقع داخل الجهاز باستخدام خرقة مبللة بالماء والقليل من الخل. نظف فلتر إدخال الماء الموجود على مخرج الحنفية بشكل منتظم. أقفل حنفية الماء. فك نهائية خرطوم إدخال الماء بشكل لولبي ،أزل الفلتر ونظفه بعناية تحت الماءالجاري. -أعد الفلتر وأعد تركيب خرطوم الماء في موضعه. تنظيف الفالتر مجموعة الفالتر مكونة من ثالثة فالتر التي تزيل األطعمة المتبقية من ماء الغسل ثم تعيد تدوير الماء .يجب تنظيفها إذا أردت الحصول على أفضل النتائج في كل غسلة. نظف الفالتر بانتظام. يجب عدم استخدام ماكينة غسل األطباق من دون فالتر ،أو إذا كان الفلتر محررا. منع الروائح الكريهة • أبق باب الجهاز مفتوحا قليال بهدف تحاشي تكوّن الرطوبة وبقائها داخل الماكينة. • نظف مطاط اإلحكام حول الباب وحجرات مواد التنظيف بشكل منتظم باستخدام إسفنجة رطبة .هذا سيمنع التصاق األطعمة على مطاط اإلحكام ،وهو السبب الرئيسي لتكون الروائح الكريهة. تنظيف أذرع ّ الرشاش • بعد عدة دورات غسل ،افحص مجموعة الفالتر ونظفها إذا اقتضت الضرورة بشكل تام تحت ماء جاري ،باستخدام فرشاة غير معدنية واتبع التعليمات أدناه: .1أدر الفلتر األسطواني Cبعكس اتجاه عقارب الساعة واسحبه إلى الخارج ( الرسم .)1 .2أزل الفلتر المخروطي Bبتنفيذ قوة خفيفة على األلسنة الجانبية ( الرسم .)2 .3اسحب الفلتر المسطح المعدني المقاوم للصدأ ( Aالرسم .)3 .4افحص اللسان وأزل أية بقايا طعام .ال تزل أبدا مضخة دورة الماء (العنصر األسود) (الرسم .)4 يمكن لبقايا الطعام أن تغطي أذرع الرشاش وأن تسد الثقوب المستخدمة لرش الماء .لذلك يوصى بفحص األذرع بين الحين واآلخر وتنظيفها بواسطة فرشاة صغيرة غير معدنية. يمكن تفكيك كال ذراعي الرشاش. B C لتفكيك ذراع الرشاش العلوي ،أدر حلقة اإلقفال بعكس اتجاه عقارب الساعة. يجب إرجاع ذراع الرشاش العلوي بحيث تكون الثقوب باتجاه األعلى. 2 1 C A يمكن إزالة ذراع الرشاش السفلي بواسطة الضغط على األلسنة الجانبية وسحبه إلى األعلى. 3 4 بعد تنظيف الفالتر ،أعد مجموعة الفالتر وثبتها بالوضع الصحيح؛ هذا األمر ضروري لألداء الناجع لماكينة غسل األطباق. تنظيف فلتر إدخال الماء* إذا كانت خراطيم الماء جديدة أو أنه لم يتم استخدامها لفترة طويلة من الوقت ،دع الماء يجري فيها للتأكد من أنها نظيفة وخالية من األوساخ، قبل إنجاز التوصيالت الضرورية .إذا لم يتم توخي وسيلة الحذر هذه ،فمن الممكن لمدخل الماء أن ينسد وأن يتلف ماكينة غسل األطباق. ترك الماكينة من دون استخدام لفترات طويلة • قم بقطع الجهاز عن التزويد الكهربائي وأقفل حنفية الماء. • اترك باب الجهاز مفتوحا جزئيا. • عند عودتك الستخدام الجهاز ،قم بتشغيل دورة غسل بينما تكون ماكينة غسل األطباق فارغة. * 21 متوفر في طرازات مختارة فقط. وسائل حذر ،نصائح تم تصميم هذا الجهاز وتصنيعه طبقا لمواصفات األمان العالمية سارية المفعول .يتم تزويد التحذيرات التالية ألسباب وقائية ولذلك يجب قراءتها بعناية. • أختر دورة غسل مالئمة لنوع األواني باستخدام جدول دورات الغسل: -لألطباق ذات مستوى االتساخ العادي ،استخدم دورة الغسل االقتصادية ،التي تضمن استخدام مستويات منخفضة من استهالك الطاقة والماء. -إذا كان الحمل أقل من الحمل االعتيادي ،استخدم خيار نصف الحمل* (أنظر بدء التشغيل واالستخدام). • إذا كان تعاقد التزويد الكهربائي لديك يوفر تفاصيل عن أوقات توفير الطاقة ،قم بتشغيل دورات الغسل خالل األوقات التي يكون فيها استهالك الطاقة أقل .زر البدء المؤجل * (أنظر بدء التشغيل واالستخدام) يساعدك على تنظيم دورات الغسل وفقا لذلك. • • مواد التنظيف الخالية من الفوسفات والكلورين تحتوي على إنزيمات الوقاية العامة • • • • • • • • • • تم تصميم الجهاز لالستعمال البيتي داخل المنزل وهو غير مع ّد لالستعمال التجاري أو الصناعي. يجب استخدام الجهازمن قبل البالغين فقط ،لغسل األواني وفقا للتعليمات المدرجة في هذا الدليل. يجب عدم تركيب الجهاز خارج المنزل ،حتى وإن كان ذلك في مناطق مغطاة .من الخطر جدا إبقاء الجهاز عرضة للشتاء والعواصف. ال تلمس الجهاز وأنت حافي القدمين. عند فصل الجهاز عن الكهرباء ،اسحب دائما القابس من مقبس الشبكة الرئيسية ،ال تسحب الكبل. يجب إقفال حنفية تزويد الماء ويجب إزالة القابس من المقبس الكهربائي قبل تنظيف الجهاز أو تنفيذ أي عمل صيانة له. إذا تعطل الجهاز ،ال تلمس بأي حال من األحوال ،األجهزة الداخلية في محاولة لتصليحها بنفسك. ال تلمس عنصر التسخين أبدا. ال تتكئ وال تجلس على باب الجهاز المفتوح .يمكن لذلك أن يسبب انقالب الجهاز. يجب عدم إبقاء الباب مفتوحا ألنه يمكن أن يسبب عقبة خطرة. أبعد مواد التنظيف ومادة الشطف المساعدة عن متناول يد األوالد. يجب عدم استخدام مواد التعبئة كألعاب لألوالد. • نحن نوصي بشدة باستخدام مواد التنظيف التي ال تحتوي على الفوسفات أو الكلورين ،ألنها منتجات تلحق الضرر بالبيئة. • توفر اإلنزيمات أداء ناجعا بشكل خاص بدرجات حرارة تعادل 50 درجة مئوية ،ونتيجة لذلك يمكن لمواد التنظيف التي تحتوي على اإلنزيمات أن تستخدم مع دورات الغسل بدرجات حرارة منخفضة بهدف التوصل إلى نفس نتيجة دورة الغسل العادية بدرجة حرارة 64درجة مئوية. • لتحاشي تبذير مواد التنظيف ،استخدم المنتج المالئم للكميات استنادا إلى توصيات المصنع ،قساوة الماء ومستوى األوساخ وكمية األواني التي يجب غسلها .حتى ولو كانت قابلة لالستنفاذ الحيوي ،فإن مواد التنظيف تحتوي على مكونات يمكن أن تغير التوازن الطبيعي. التخلص • التخلص من مواد التعبئة :تقيّد بالقوانين المحلية حيث يمكن لمواد التعبئة أن يعاد تصنيعها. • تنص التوجيهات األوروبية 2002/96/ECالمتعلقة باألجهزة الكهربائية واإللكترونية التالفة ( )WEEEعلى أنه يجب عدم التخلص من األجهزة البيتية عن طريق دورة النفايات البلدية الصلبة .يتوجب جمع األجهزة التالفة على انفراد بهدف تقليل كلفة إعادة استخدام المعادن الموجودة داخل الجهاز وتصنيعها ،بينما يتم تحاشي األضرار الممكنة للغالف الجوي والصحة العامة .صندوق القمامة المشار إليه بعالمة ‘إكس‘ على كافة المنتجات هو لتذكير المالك بوجوب الجمع المنفرد للقمامة. لمزيد من المعلومات المتعلقة بالتخلص الصحيح من األجهزة البيتية التالفة ،يمكن للمالكين االتصال بالخدمات العامة المزودة أو بتاجرهم المحلي. توفير الطاقة واحترام البيئة توفير الماء والطاقة • ابدأ دورة غسل عندما تكون ماكينة غسل األطباق ممتلئة .أثناء اتنظار ماكينة غسل األطباق حتى تمتلئ ،تحاشى الروائح الكريهة باستخدام دورة النقع (أنظر دورات الغسل). * متوفر في طرازات مختارة فقط. 22 AR استكشاف المشاكل وحلها AR إذا لم يعمل الجهاز ،وقبل استدعائك للمساعدة ابحث عن حل في القائمة التالية. العطل: ماكينة غسل األطباق ال تبدأ بالعمل. ال يتم تصريف الماء من ماكينة غسل األطباق ماكينة غسل األطباق تصدر الكثير من ا لضجيج . األطباق والكؤوس مغطاة بطبقة بيضاء رقيقة أو طبقة كلسية. األسباب المحتملة /الحلول: • لم يتم إدخال القابس في المقبس الكهربائي ،أو لم يتم إدخاله بما فيه الكفاية ليحدث تماسا كهربائيا ،أو أن الطاقة الكهربائية مقطوعة في البيت. • لم يتم إغالق باب ماكينة غسل األطباق بشكل تام. • تم إعداد بدء مؤجل (انظر بدء التشغيل واالستخدام). • • • • لم تنته دورة ماكينة غسل األطباق بعد. خرطوم التصريف ملتو (أنظر "التركيب"). أنبوب التصريف مسدود. الفالتر مسدودة ببقايا الطعام • األطباق تتصادم ببعضها البعض أو باذرع الرشاش. • تم إنتاج كمية رغوة مفرطة :لم يتم قياس مواد التنظيف بشكل صحيح أو أنها ال تالئم االستخدام في ماكينات غسل األطباق (أنظر بدء التشغيل واالستخدام) • • • • مستوى ملح التنقية منخفض أو أن إعداد الكمية ال يالئم قساوة الماء (أنظر مادة الشطف المساعدة والملح). لم يتم إغالق غطاء حجرة الملح بشكل صحيح. نفذت مادة الشطف المساعدة أو أن الكمية منخفضة جدا. األواني مصنوعة من مواد غير الصقة. يوجد على األطباق والكؤوس خطوط أو بقع زرقاء. • مادة الشطف المساعدة أكثر مما يجب. لم يتم تجفيف األواني بشكل تام. • نفذت مادة الشطف المساعدة أو أن الكمية منخفضة جدا (أنظر مادة الشطف المساعدة والملح). • إعداد حجرة مادة الشطف المساعدة غير مرتفع بما فيه الكفاية. • تم اختيار دورة غسل من دون برنامج تجفيف. األطباق غير نظيفة. • • • • • • • • تم تحميل الرفوف أكثر مما يجب (أنظر تحميل الرفوف). لم يتم ترتيب األواني بشكل جيد. ال يمكن ألذرع الرشاش أن تتحرك بحرية. دورة الغسل ناعمة أكثر مما يجب (أنظر دورات الغسيل). تم إنتاج كمية رغوة مفرطة :لم يتم قياس مواد التنظيف بشكل صحيح أو أنها ال تالئم االستخدام في ماكينات غسل األطباق (أنظر بدء التشغيل واالستخدام) لم يتم إغالق غطاء حجرة مادة الشطف المساعدة بشكل صحيح. الفلتر متسخ أو مسدود (أنظر العناية والصيانة). مستوى ملح التنقية منخفض (أنظر مادة الشطف المساعدة والملح). ال يدخل ماء إلى ماكينة غسل األطباق/إنذار حنفية مقفلة (تصدر عدة إشارات صوتية قصيرة) • يوجد انقطاع في تزويد الماء في البيت. • خرطوم التصريف ملتو (أنظر "التركيب"). • قم بفتح الحنفية وسيبدأ الجهاز بعد بضع دقائق. (تومض مؤشرات دورات الغسل ( 2عادي) و ( 3نقع). • تم تنشيط إقفال الجهاز ألنه لم يتم إجراء أية عملية خالل إسماع الصفير .قم بإيقاف تشغيل الماكينة باستخدام زر التشغيل/إيقاف التشغيل ،افتح الحنفية وأعد تشغيل الماكينة بعد 02 ثانية بواسطة الضغط على نفس الزر .أعد برمجة الماكينة وكرر دورة الغسل. جرس إنذار خلل في عمل الصمام اللولبي إلدخال الماء. (يومض مؤشر دورة الغسل ( 2عادي). • قم بإطفاء الماكينة بواسطة الضغط على زر بدء/إيقاف التشغيل ثم أعد تشغيلها بعد دقيقة. إذا استمر جرس اإلنذار ،أقفل حنفية الماء لتقليل خطر الفيضان ،أزل القابس من المقبس الكهربائي ،واتصل بالمساعدة. جرس إنذار خرطوم إدخال الماء/فلتر إدخال الماء مسدود (تومض مؤشرات دورات الغسل ( 1مكثّف) و ( 2عادي) و ( 3نقع). • قم بإطفاء الجهاز بواسطة الضغط على زر بدء/إيقاف التشغيل .أقفل حنفية الماء لتحاشي خطر الفيضان ،أزل القابس من المقبس الكهربائي. تأكد من أن فلتر إدخال الماء غير مسدود بأوساخ مختلفة (أنظر فصل "العناية والصيانة"). المساعدة قبل االتصال بالمساعدة: AR • افحص فيما إذا كان باإلمكان حل المشكلة باستخدام دليل استكشاف المشاكل وحلها (أنظر استكشاف المشاكل وحلها). • أعد تشغيل البرنامج للفحص فيما إذا تم حل المشكلة. • إذا بقيت المشكلة ،اتصل بخدمة المساعدة التقنية. ال تطلب مساعدة فنّي غير مؤهل أبدا. الرجاء خذ بعين االعتبار المعلومات التالية: • نوع الخلل. • طراز الجهاز (.).Mod • الرقم التسلسلي (.)S/N يمكن العثور على هذه المعلومات في لوحة بيانات الجهاز(أنظر وصف الجهاز). ZH , 26-27 , 25 , 28 , 29 30 LFT 216 , 31 , 32 , 33 , 34 , 35 , 36 ZH 1. 2. * 3. 4 *. 8mm (A) (B) * 26 ZH 4 cm 1 A 40 100 cm 技术 数据 长 59.5 cm 规格 高 82 cm 深 57 cm 容量 水源 压力 12 套 标准餐具 0.05~1MPa (0.5~10 bar) 4.3 psi – 145 psi 电压 参阅特性标牌 吸收 总功率 参阅特性标牌 保险 丝 参阅特性标牌 本机符合以下 欧盟标准: - 2007年 1月 16日颁 布的 2006/95/CE (低电压) 标准 及后续修订标 准 -1989年5月 3日 颁布的 89/336/EEC (电磁兼容性) 标准及后续修 订标准 -97/17/EC (贴标签) 标准 -2002/96/CE标 准 27 ZH 1. 2. 3. 4. 5. 6. 7. 8. 9. 10. 11. 12. Low salt * ON/OFF ON-OFF/RESET Low rinse aid * *** * 28 *** ZH Baby Baby Baby 29 ZH 1. 2. 3. 4. 5. ON/OFF P MULTI-FUNCTIONAL TABLETS 6. 7. ON/OFF 8. D A ON/OFF ON/OFF C 3. * 30 B 1. 2. • • D C A B 1 2 A ZH 程序选择指示 程序 洗涤粉 非常肮脏的餐具和锅具 (质地纤细者不能使用) 正常肮脏的餐具和锅具。 日常标准程序。 洗涤剂 (A) = 容器 A (B) = 容器 B 洗涤液 洗涤块 干燥 程序时间 (误差 ±10%) 小时:分钟 Intensive (强力洗) 30 g (A) 30 ml (A) 1 (A) 是 2:15’ Normal (正常洗) 25 g (A) 5 g (B) 25 ml (A) 5 ml (B) 1 (A) 是 1:45’ Soak (浸泡) 否 否 否 否 0:08’ 否 否 否 是 0:32’ 25 g (A) 25 ml (A) 1 (A) 否 0:35’ 30 g (A) 30 ml (A) 1 (A) 是 1:30’ 等待在下一餐完成餐具放 入的初步洗涤。 用得较少、只是有灰尘的 餐具的漂洗和干燥循环。 Special guest (特殊宴客洗) 用于不太脏的餐具在使用 后立即进行经济快速的洗 涤。 (2 只碟 +2 个杯 +4 副刀叉+1 个深锅 + 1 个 小平底锅) Rapid (快洗) 用于质地纤细、对高温较 敏感的餐具,在使用后立 即进行经济快速的洗涤。 (12 高脚酒杯 + 质地纤细 的碟子)。 Crystal (水晶杯洗) Rapid ( ) * Eco ( ) EN-50242 EN 1 15 15 [email protected] 1 5 5 31 水质硬度表 ZH °dH 0 6 6 11 12 17 17 34 34 50 * Low salt * Low rinse aid 10 20 30 60 90 1 2 3 4 5* * 通过这一设定,洗涤时间可能稍微延长。 °fH mmol/l Low rinse aid * 1. F 0 11 21 31 61 级别 mmol/l 0 1 1.1 2 2.1 3 3.1 6 6.1 9 0°f 至 10°f 建议不要使用再生盐。 °dH • °fH (G) • • 2. * Low salt * 1. G 3. 2. 3. * 1 kg (F) 6 • • P 4. 4 1-3 4-6 * ON/OFF 5 3 P 1-2-3-4-5* 1 2 3 1 1 1 2 3 30 32 ON/OFF * ZH 1 2 3 4 C A B 3 1 2 B C C 1 2 A 3 4 33 ZH Eco * * 50 65 (RAEE) 34 2002/96/CE ZH 故障: 可能原因/排除方法: 洗碗机不能启动。 • 电插头未在电源插座中插好,或者家中无电。 • 洗碗机门未关好。 • 设定了启动延迟(参阅《启动和使用》)。 洗碗机不能排水。 • • • • 洗碗机发出噪声。 • 餐具互相碰撞或与喷臂碰撞。 • 泡沫过多:洗涤剂用量不当或不适合在洗碗机使用。 (参阅《启动和使用》)。 餐具和杯子上有水垢沉淀或白锈。 • • • • 餐具和杯子上有条纹或蓝色深浅渐 变。 • 催干光亮剂用量过多。 • 催干光亮剂的调节不适当。 餐具不很干。 • 选择了无干燥功能的程序。 • 催干光亮剂用完或用量不足(参阅《催干光亮剂和再生盐》)。 • 催干光亮剂的调节不适当。 餐具不干净。 • • • • • 程序仍未结束。 排水管曲折(参阅《安装》)。 洗手盆的排水口堵塞。 过滤器被残余食物堵塞。 缺再生盐或其调节不适合水质硬度(参阅《催干光亮剂和再生盐》)。 再生盐容器盖未关好。 催干光亮剂用完或用量不足。 餐具以不粘材料制成。 碗篮放入过多餐具(参阅《放入餐具》)。 餐具没有放好。 喷臂不能自由旋转。 洗涤程序过于柔和(参阅《程序》)。 泡沫过多:洗涤剂用量不当或不适合在洗碗机使用。 (参阅《启动和使 用》)。 • 催干光亮剂容器盖未正确关好。 • 过滤器肮脏或堵塞(参阅《保养和护理》)。 • 缺再生盐 (参阅《催干光亮剂和再生盐》)。 洗碗机不进水/水龙头关闭警告 (可听到短促的“哔”声) • 水管无水。 • 进水管曲折(参阅《安装》)。 • 打开水龙头,本机将在数分钟后启动。 (第 2 和第 3 程序 – Normal (正常洗)和 • 由于在发出“哔”声时没有进行处理,本机停止。按ON/OFF (开/关)键 Soak (浸泡) – 指示灯闪烁)。 关机,打开水龙头并在20秒后按同一按键重新开机。重新设定程序并启动 机器。 进水电磁阀故障警告 (第 2 程序 – Normal (正常洗)– 指示 灯闪烁)。 • 通过ON/OFF (开/关)键关机,一分钟后再重新启动。如果警告仍响,则 关闭水龙头,以免浸水,拔出电源插头并致电联络售后服务中心。 进水管/进水过滤器堵塞警告 (Intensive (强力洗)、Normal (正常 洗)、Soak (浸泡)程序指示灯闪烁) • 按ON/OFF (开/关)键关机。关闭水龙头,以免浸水,拔出电源插头。 检查进水过滤器是否被脏物堵塞。 (参阅《保养和护理》一章) 35 195071182.00 07/2008- Xerox Business Services ZH • • • • • • 36 (Mod.) (S/N)